Beginner’s and Returner’s Guide
Last Updated:June 15, 2025|Changelog
Are you about to take your first steps into the world of Arkesia? Or perhaps you have decided to return to the game after a break. No matter the case, if you feel overwhelmed by the amount of content and systems you’re being thrown into, this article is here to provide you with step-by-step instructions and guide you toward the appropriate sources, helping you overcome challenges and reach the juicy endgame!
Choosing your Class
Choosing the correct class and build to fit your personal playstyle is very important, and can make your journey truly memorable. Before you make such an important choice, think first about your preferences, the amount of free time you have available to spend in the game, and your skill level. Picking a class based on these factors is bound to lead to satisfaction!
For example, if your available playtime is limited, it would be unwise to pick a build that requires a high amount of time and resource investment to make it work properly. Without proper min-maxing, some builds might negatively impact your overall raid experience and that of your party members.
Now take a look at the Class Overview article and pay close attention to the Pros & Cons of each build. Once you have made your choice, either use the links in that article or go to the Build Guides category to learn more about your class and build.
Leveling
If you want to level your first character or an alt without the help of any boost or skip events, use the following articles listed below as guidance. If you want to jump into the endgame with accelerated progress, then skip ahead to the next section of this article.
Powerpass, Express & Events
In Lost Ark, you will be introduced to numerous events that either provide you with a ticket to boost a character closer to the endgame, or accelerate your progress by rewarding you with additional materials. Take a look at the different sections below for more details!
Powerpass
The Powerpass is a ticket which you can assign to a character of your choice to take give it a significant head-start towards the endgame. Here's how you can use it on your character:
- Pick a server and log in.
- You will automatically receive a Powerpass.
- Create a character and apply the Powerpass you just received, following the steps below.
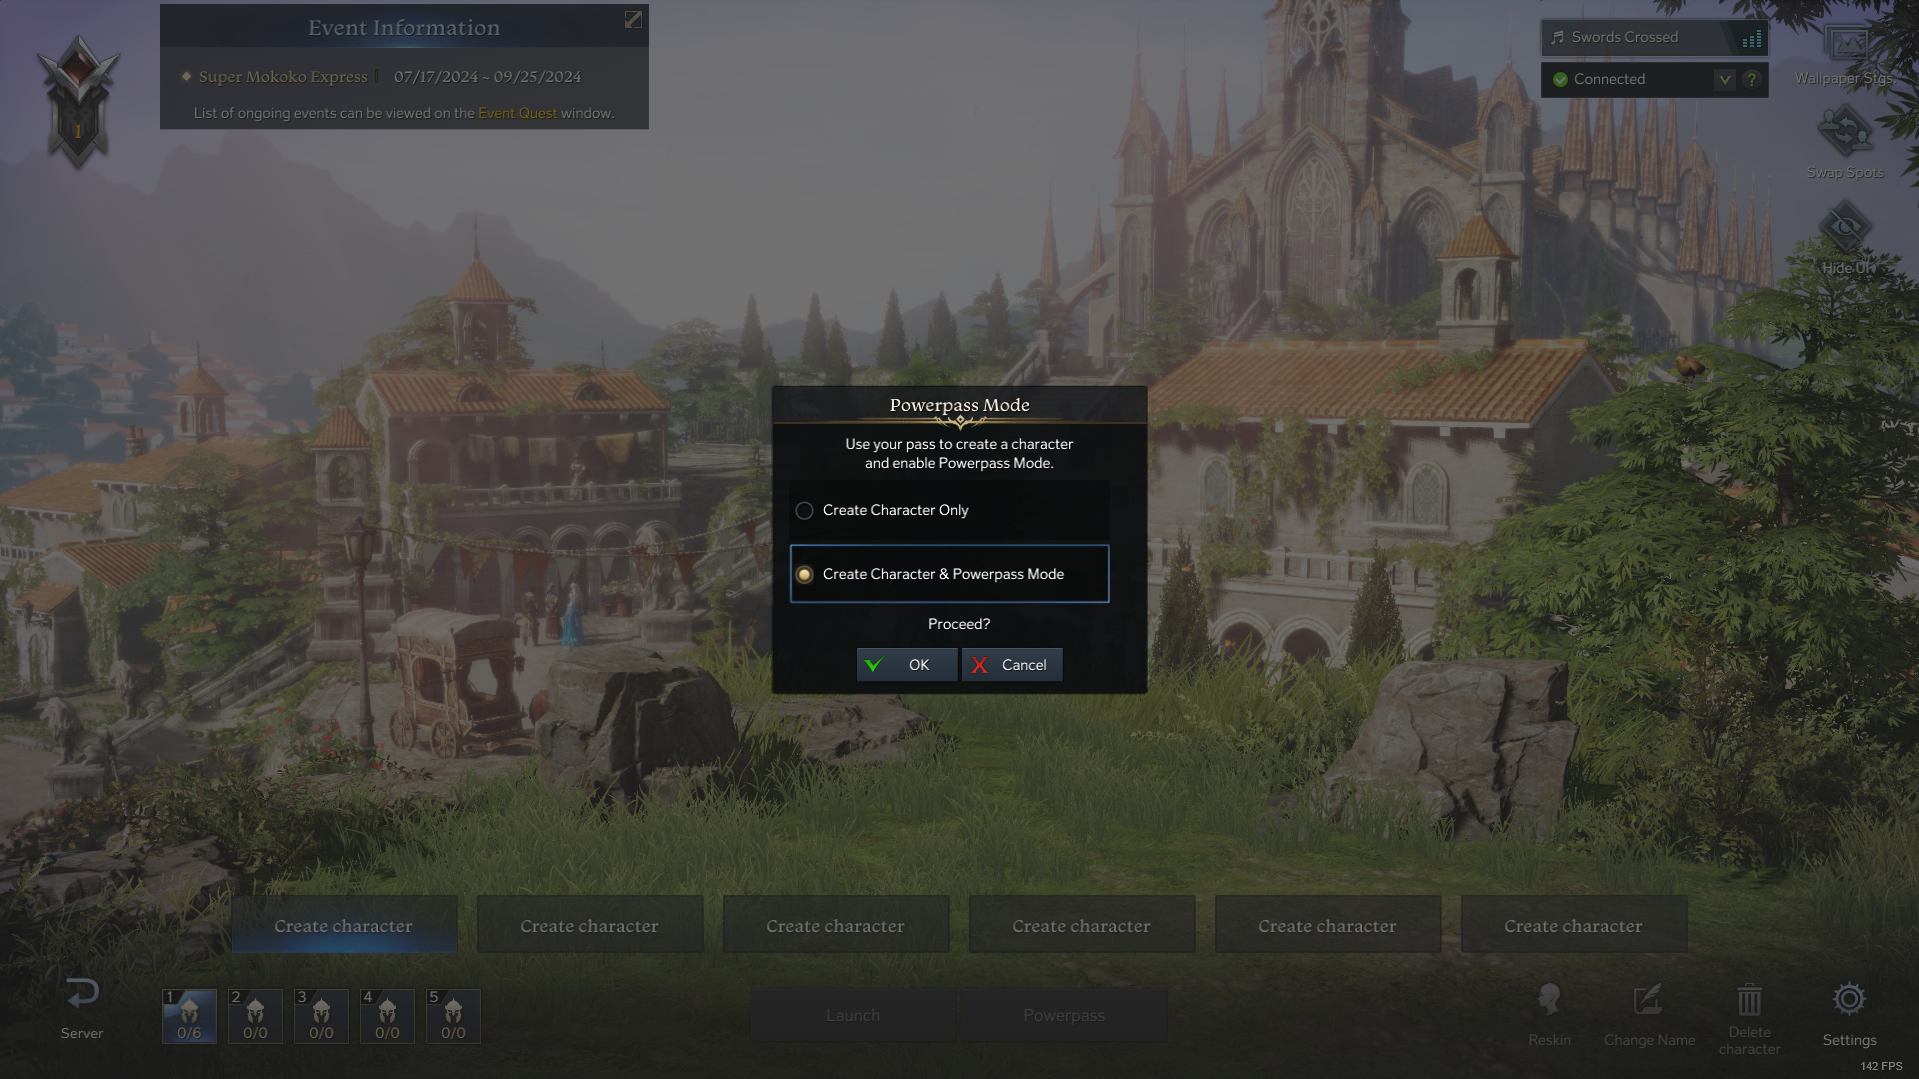
- You will be moved to Trixion. Walk up to the NPC called Beatrice, select a class and exit Trixion.
- Complete or skip the prologue.
- Complete or skip the Adventurer's Path.
- You will be teleported to a city. Open the Gear Selection Chest in your inventory and equip all the gear you acquire from it (it doesn't matter which set you select, you can freely change it later). This should boost your item level to 1540!
- Go back to the Character Selection screen and log in again in order for the server to recognize your item level as 1540 (important for the next step).
Express & Other Events
The Event Quest window can have multiple different ongoing events at the same time, so make sure to check out each tab if there's more than one. Aside from the Express Events, which are meant for one character only, there might be others providing you with free materials for completing specific goals. Here are all the currently available events and what rewards you should expect from participating.
November 27th - January 15th
Can be assigned to a single character between 1540 - 1640 item level
Express is a progression event which won't give you any instant item level boost, but it significantly reduces the amount of materials and Gold required when honing your gear, up to a certain point. Additionally, it provides materials upon reaching certain item level milestones, helping accelerate your progress even further.
Here's a breakdown of the honing benefits you can expect and the segments they apply to:
Honing Chance Increase
- 1540 to 1620 - Double Rates
- 1540 to 1620 - Double Artisan Energy
Gold Discount
- 1540 to 1580 - No Gold Required
- 1585 to 1620 - 40%
Honing Materials Discount
- 1540 to 1580 - 70%
- 1585 to 1620 - 40%
Honor Shard Discount
- 1540 to 1580 - 70%
- 1585 to 1620 - 40%
Additionally, the you can choose between two Battle Styles (one for each Class Engraving) and click on Auto Apply to get basic Engravings, Gems, and a Skill Build automatically assigned. However, we still recommend that you manually adjust these things based on the Build Guides, since some of the builds provided are not always optimal.

Always active
Can be claimed daily, once per roster
This event rewards you with various items for every 15 minutes that you are logged in, up to 1 hour and 30 minutes. You can access it via the ![]() Daily Playtime Rewards icon on the top left bar.
Daily Playtime Rewards icon on the top left bar.
Always active
Can be claimed daily, once per roster
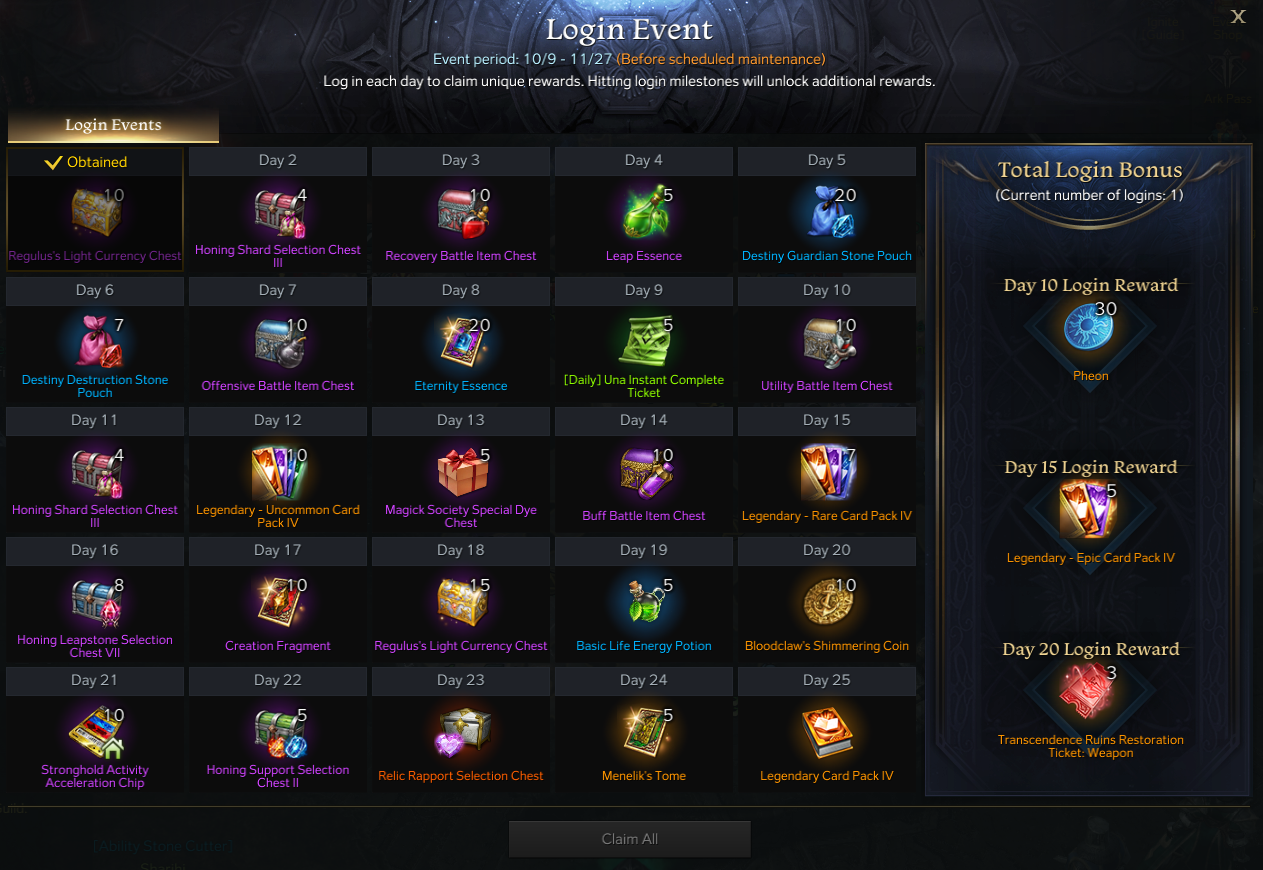
This system rewards you with various items to help with your progression or generally ease your activities simply by logging in and claiming them. There is an iteration of this system running at all times, and generally there will be a few extra days available for you to catch up if you haven't logged in every day. It can be accessed via the ![]() Login Event icon on the top left bar.
Login Event icon on the top left bar.
Always active
Depends on the current events
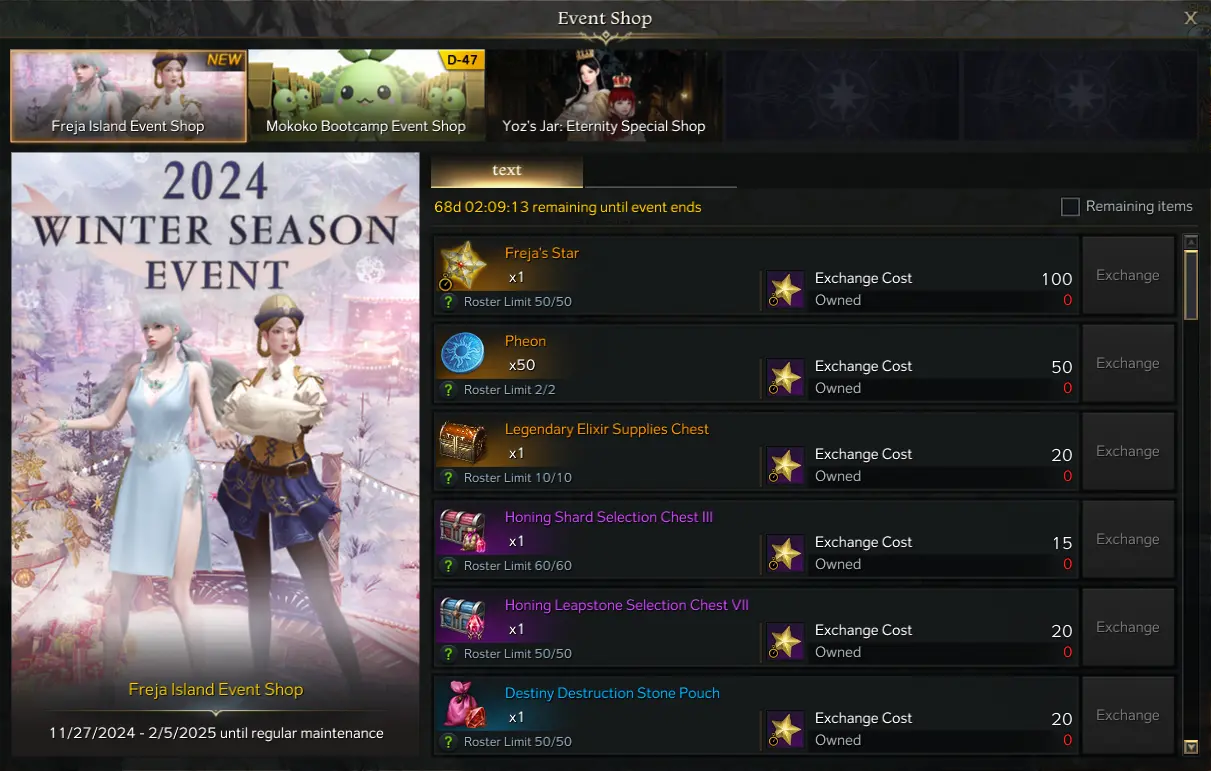
Normally, there will be an event running, accompanied by a shop. You can access it by clicking on the ![]() Event Shop icon left of your minimap. You can exchange special Event Currencies for Honing Materials, Cards, Silver and other valuable items.
Event Shop icon left of your minimap. You can exchange special Event Currencies for Honing Materials, Cards, Silver and other valuable items.
Occasionally active
Can be claimed once per roster
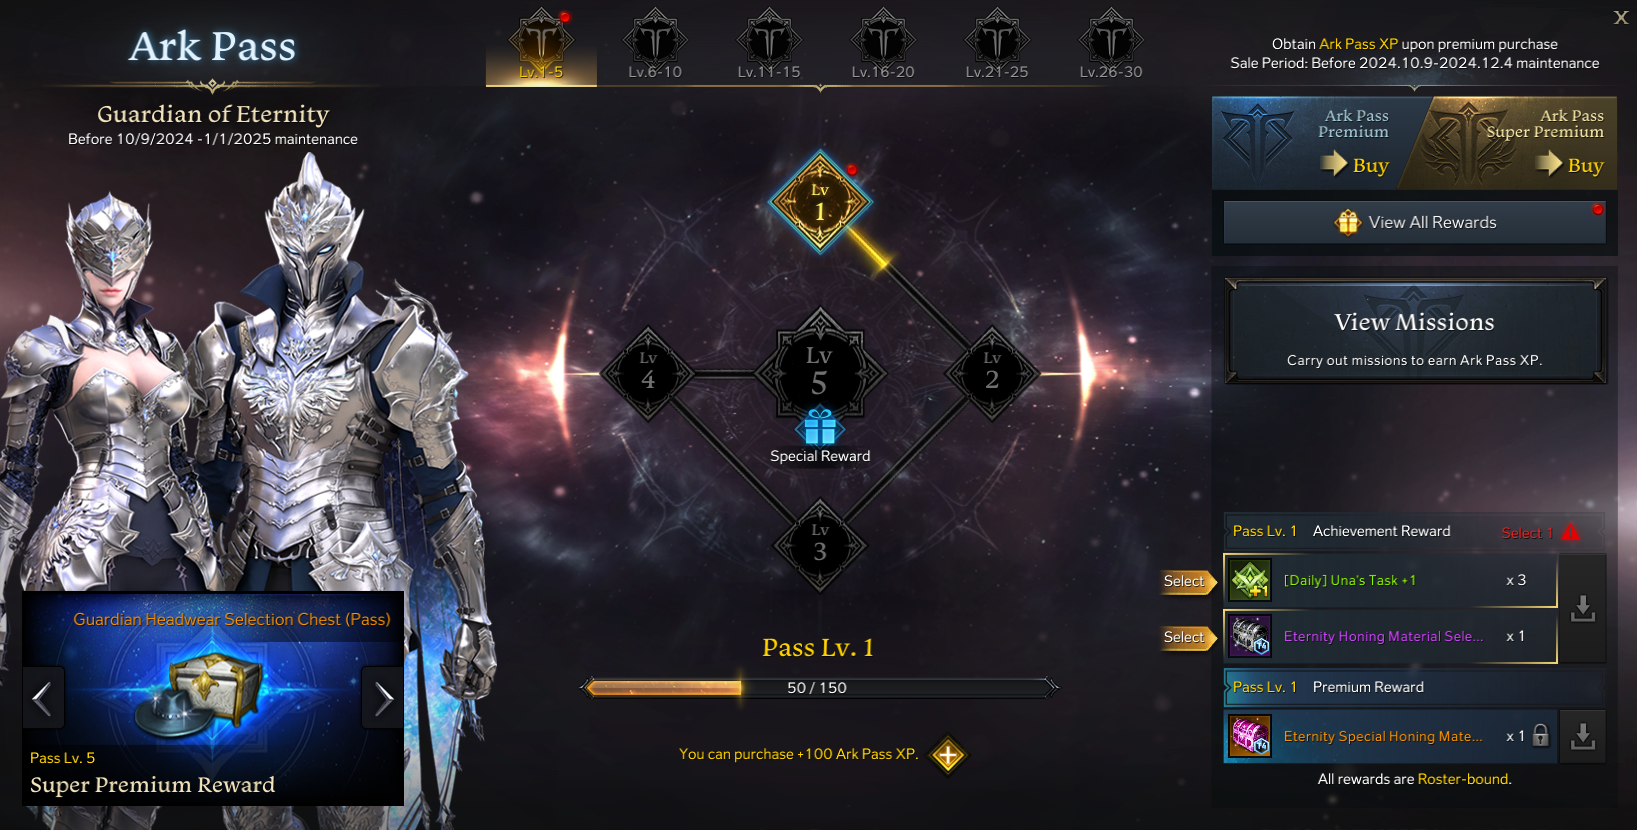
Periodically, an ![]() Ark Pass will become active. This event features a variety of missions that give you points when completed, working towards unlocking up to 30 Levels of rewards.
Ark Pass will become active. This event features a variety of missions that give you points when completed, working towards unlocking up to 30 Levels of rewards.
Each level has a Free Track and a Premium Track, which can be unlocked for the entire Ark Pass for 1,500 ![]() Royal Crystals. Additionally, there is a Super Premium Track which can be unlocked for an additional 1,500
Royal Crystals. Additionally, there is a Super Premium Track which can be unlocked for an additional 1,500 ![]() Royal Crystals, but typically this only includes cosmetic items.
Royal Crystals, but typically this only includes cosmetic items.
Always available
Not an actual event
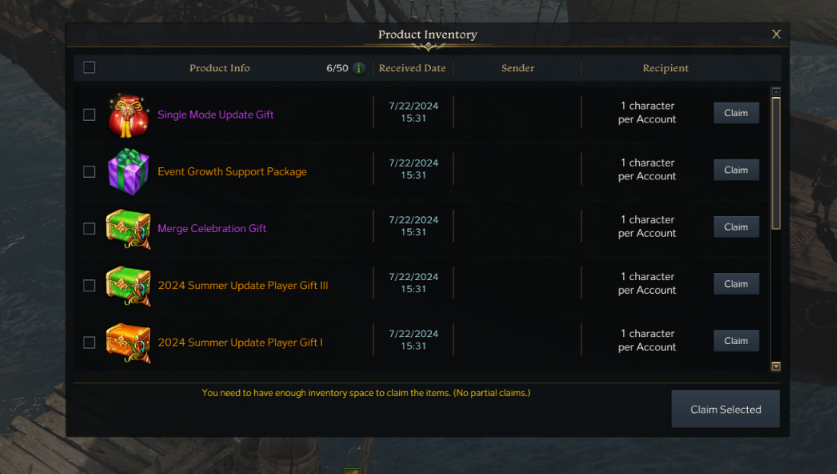
The ![]() Product Inventory, found in the top left bar on your screen, is where you can claim any item you purchase in the Lost Ark Shop (F4). Occasionally, any gift that you receive as part of events or celebrations can also be redeemed here, so make sure to check periodically or keep up with official news.
Product Inventory, found in the top left bar on your screen, is where you can claim any item you purchase in the Lost Ark Shop (F4). Occasionally, any gift that you receive as part of events or celebrations can also be redeemed here, so make sure to check periodically or keep up with official news.
Growth & Guide Quests
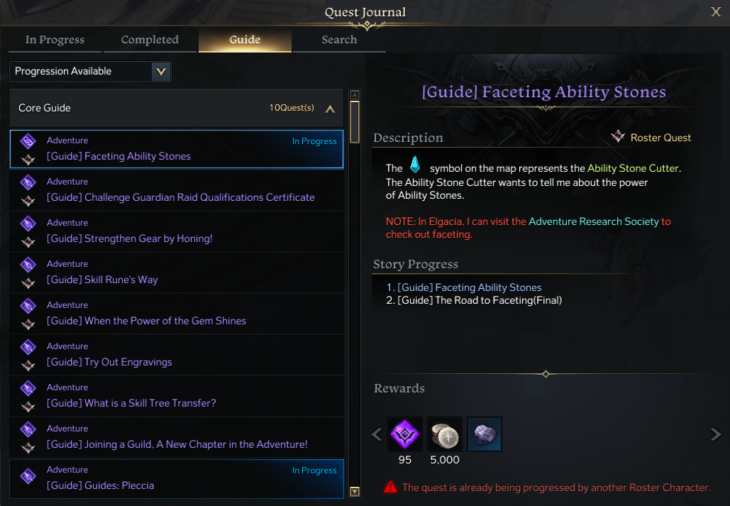
Opening up your Quest Journal (J), you will find several ![]() Guide Quests in the Guide tab at the top. They aren't hard to complete or long, with most of them only requiring you to speak to an NPC. Their purpose is to introduce you to various systems that the game offers, and explain how you will interact with them. It's highly recommended that you go through them whenever one becomes available if you are unfamiliar with the game.
Guide Quests in the Guide tab at the top. They aren't hard to complete or long, with most of them only requiring you to speak to an NPC. Their purpose is to introduce you to various systems that the game offers, and explain how you will interact with them. It's highly recommended that you go through them whenever one becomes available if you are unfamiliar with the game.
One very important Guide Quest that you should complete immediately is ![]() [Guide] What Is Gear Set Conversion, as it allows you to freely swap between Gear Sets, an integral part of your character's build.
[Guide] What Is Gear Set Conversion, as it allows you to freely swap between Gear Sets, an integral part of your character's build.
Inventory Management
Due to the vast amount of events available to help you start off, and the large quantity of items you receive from content, your inventory will quickly fill up with a variety of items. In order to help you quickly navigate through it all, here are a few things to consider:
In order to help keep your inventory usable and free of clutter, here is a list of items you should use without giving it much thought, whenever you encounter them:
- Reskin Tickets and Powerpasses
- Mounts and Pets
- Phoenix Plumes
- Ancient Gold Coin, Ancient Platinum Coin, and Regulus's Light Currency Chest
- Runes (of any type or rarity)
- Card XP (of any rarity)
- Combat XP Potions
- Honor Shard Pouch (L) and Honor Shard Pouch (M) (only if they are Bound to Character)
- Pheons
- Dye Chests
- Weekly Stronghold Activity Reward Chests, Stronghold Crew Applications (and other Stronghold related items)
Tip: If you hold Alt, then Right Click consumable items, you can use multiple at the same time!
At the same time, there are some items you will want to keep in your ![]() Storage for later, until you really need them:
Storage for later, until you really need them:
- Epic Rapport Chest (of any rarity)
- Legendary Card Pack Selection Chest
- Engraving Recipe Pouch
- Sailing Coin Selection Chest
- Event Gems (only those you are not using)
Lost Ark has multiple inventories available for you to store your goods, and while it's up to you where you choose to store most of your valuables, some of them are specially made to hold certain materials and items.
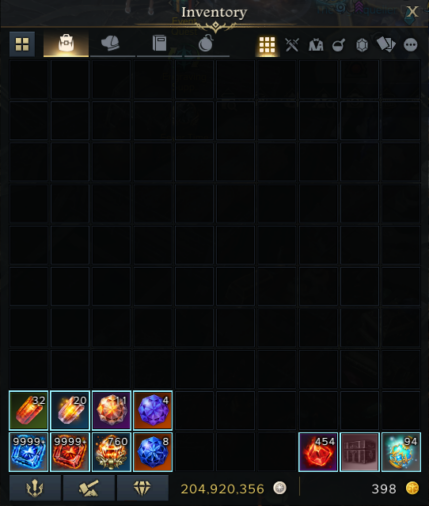
Inventory
This is your regular inventory where most new items will go as soon as you pick them up. Can be opened by pressing I.
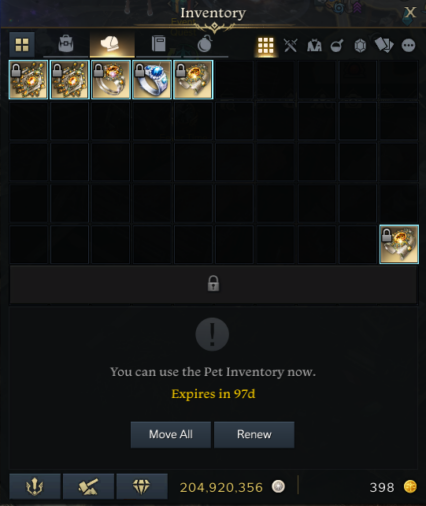
Pet Inventory
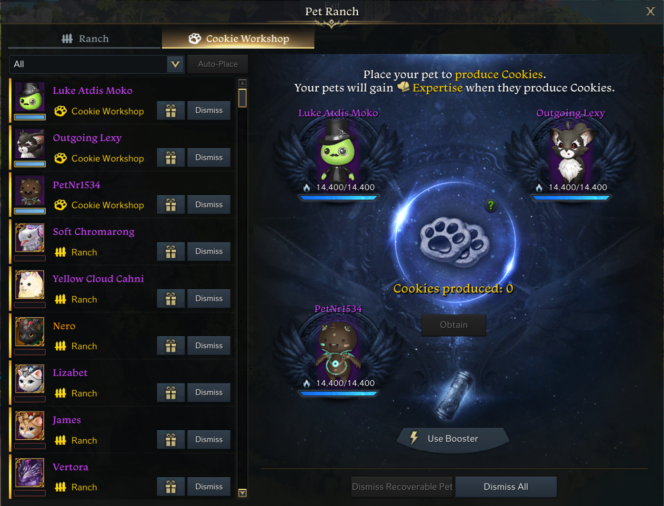
This inventory becomes available while a Crystalline Aura is in effect. Can be opened by pressing I, then navigating to the second tab. Normally, it has 4 rows, but a 5th one can be obtained via Legendary Pets. Check out our Pet Ranch guide for more information on this.
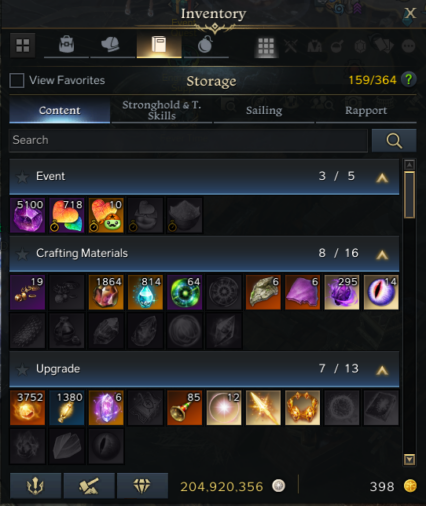
Storage
This is a special inventory that holds all progression related materials, event currencies, dyes, stronghold items, sailing items, and rapport items. You do not need to move things here manually, they will automatically be registered to this tab. Can be opened by pressing I, then navigating to the third tab.
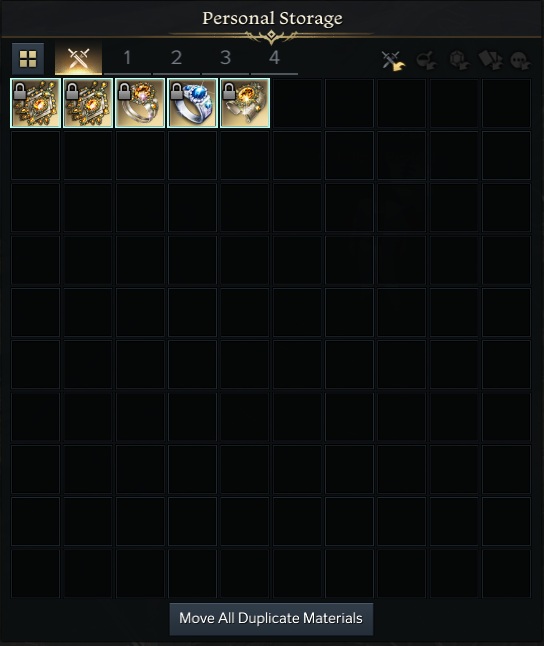
Remote Storage
This is a vault type inventory where you can store items for long-term use. It is made up of 5 tabs for each character - one that only holds gear, and four that can hold any item, and 2 tabs for the entire roster, where only tradeable or roster-bound items can be stored. Initially, most of it will be locked, and can be unlocked by using  Blue Crystals or Stronghold Research. Can be opened by visiting the
 ![]() Storage Keep NPC, or via Pet Functions (Alt + P), if a Crystalline Aura is in effect.
Storage Keep NPC, or via Pet Functions (Alt + P), if a Crystalline Aura is in effect.
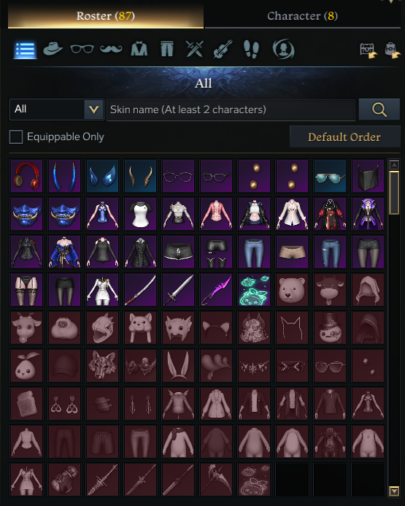
Skins Storage
This is a special inventory that only holds skins. It can be opened by visiting the ![]() Storage Keep NPC, or via Pet Functions (Alt + P), if a Crystalline Aura is in effect.
Storage Keep NPC, or via Pet Functions (Alt + P), if a Crystalline Aura is in effect.
Auto-Dismantle is an extremely important feature in Lost Ark. Almost all encounters you go through (Raids, Chaos Dungeons, Guardians, etc) will drop a large amount of Accessories, and manually filtering through them takes far too long.
This feature automatically dismantles all items that meet the criteria you set, allowing you to only filter through potentially valuable items. You can access this window at the bottom of your inventory, and here are some recommended settings to start with:

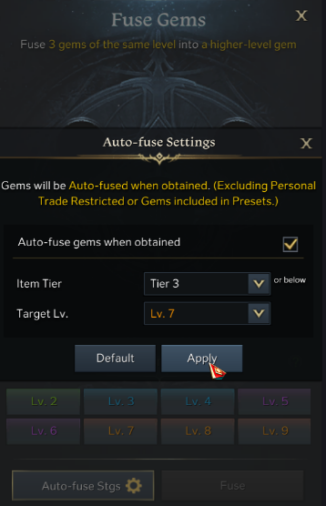
Gems are a key component of character builds, making them a very desired item. You will be given Event Gems so you won't need to interact with this system early on, but the gems you obtain from Chaos Dungeons and other activities can become very valuable.
However, the drops you receive will feature low level gems, and it takes a rather large amount of them to fuse a high level one. It is recommended to set up the following Auto-fuse settings at the bottom of your inventory to help automatically reduce clutter as you go through content.
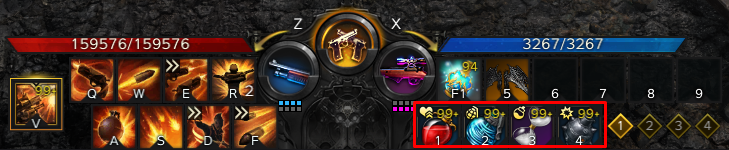
Battle Items
Battle Items play a key role in Lost Ark's raids. HP Potions serve as the primary way of healing, while other consumables like Whirlwind Grenades and Destruction Bombs can greatly help with solving raid mechanics. These items can only be equipped onto dedicated slots on your hotbar, and cannot be used without first equipping them.
You will be periodically provided with Collective Battle Item Chests via gifts or events. Sometimes they will contain all four of the following chests, and sometimes you will be required to choose between them:
- Recovery Battle Item Chests
- Offensive Battle Item Chests
- Utility Battle Item Chests
- Buff Battle Item Chests
Each of these chests can be opened to obtain specific Battle Items, depending on your current needs. Make sure not to open too many of them at once.
For starters, you should open some HP Potions, Whirlwind Grenades, and Destruction Bombs. These will be great for most raid encounters, especially early on. For more specific Battle Item usage for each encounter, you can refer to the Solo Raids Guide Collection.
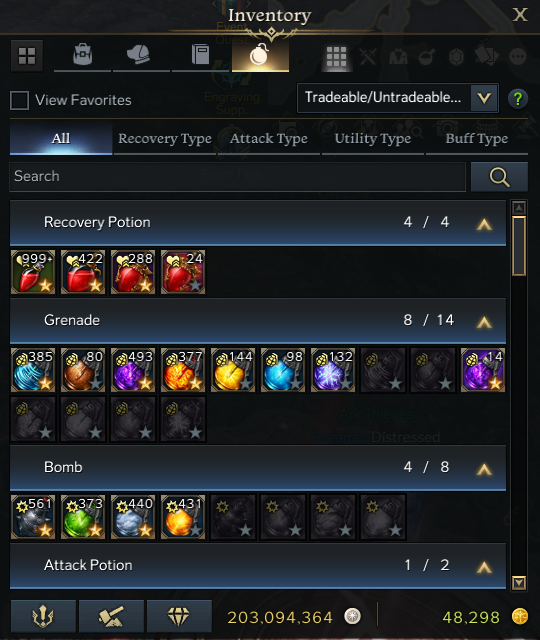
Battle Item Storage
Your Battle Items are stored inside a special storage, found via the 4th tab at the top of your inventory. For ease of use, it's recommended to toggle the "Tradeable/Untradeable Merge" option at the top right. To help declutter this inventory even further, you can click on the star icon on each item you want to add to favorites, then tick the "View Favorites" checkbox at the top left. This will make it much easier to filter through Battle Items when you need to change them.
In order to equip Battle Items, you can simply drag and drop from the inventory onto your slots.
Character Builds
Although the ![]() Mokoko Express event instantly sets you up with a build for your chosen class, it is often not the exact setup that you should be using. In order to fix that, it's recommended to go through a Build Guide for your class and follow it to change the incorrect parts that the Express event provided.
Mokoko Express event instantly sets you up with a build for your chosen class, it is often not the exact setup that you should be using. In order to fix that, it's recommended to go through a Build Guide for your class and follow it to change the incorrect parts that the Express event provided.
This can also help you get a better understanding of your character, if you wish to know more, but for now, here are the main parts that go into a character's build:
Engravings are a great source of power. This is a system you should try to understand as quickly as possible while moving into the endgame.
The Skill Tree System modifies and enhances each of your skills, hence it is a major contributor to your overall strength. Learn how to use it and set up a proper Skill Tree filter by checking out the guide linked below!
Skill Tree Effects are also commonly called Tripods!
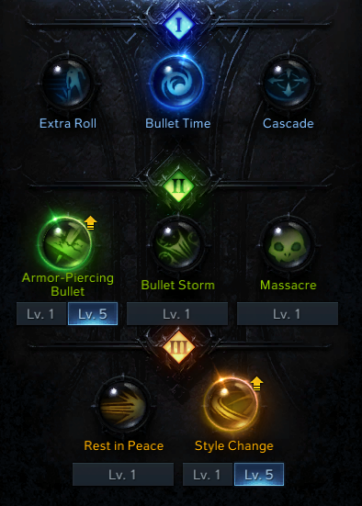
You get Skill Points each time your character levels up, allowing you to raise the level of your skills, increasing their damage and granting you access to Skill Tree effects. You can unlock additional Skill Points by acquiring Skill Point Potions, which can be obtained by completing various challenges throughout the game. Once you are done with your dailies and weeklies, you should focus on completing content which unlocks Skill Point Potions.
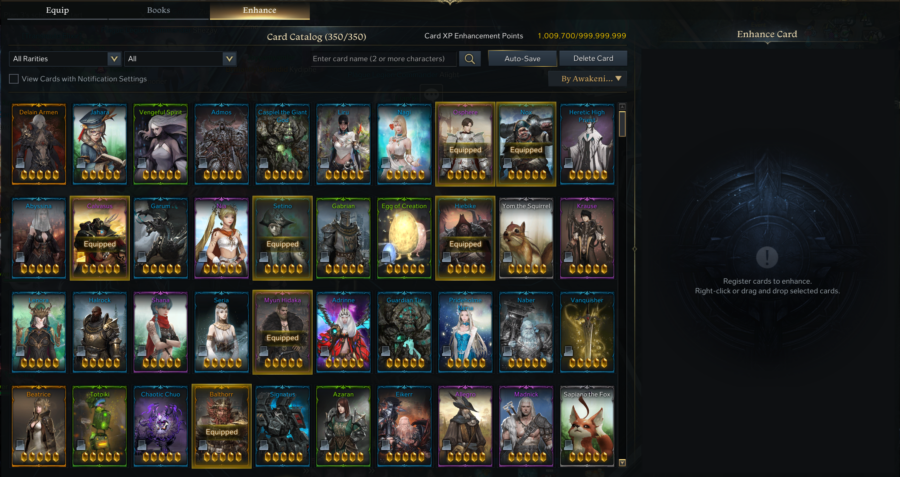
Cards are collectibles that become increasingly important as you progress further into the endgame. You should never lose track of the most crucial card sets for your class build. Whenever you have time, you should explore the various sources for cards that the game has to offer and try to participate. With each card set that you complete, all of your characters become stronger!
Runes work in tandem with your skills. Some class builds heavily rely on specific Runes to perform well. Similar to cards and Skill Point Potions, you should try to unlock additional or higher quality Runes for your skills.

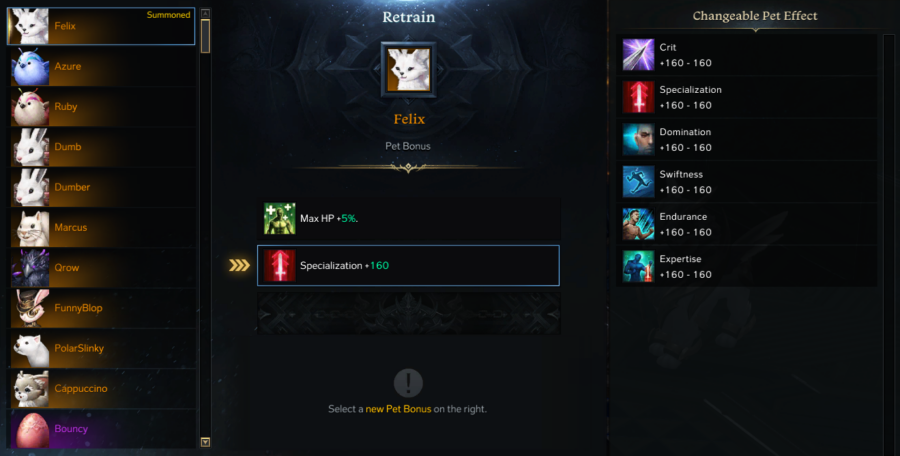
In addition to various menus and features, your pet also provides you with additional Combat Stats. Make sure to visit the ![]() Pet Management NPC in any major city to change your pet's stat bonus to the correct one for your build. Typically, this will be aligned with the stat that your build uses in the highest amount.
Pet Management NPC in any major city to change your pet's stat bonus to the correct one for your build. Typically, this will be aligned with the stat that your build uses in the highest amount.
Each gear piece has a feature called Quality, which can influence different aspects:
- For Armors, it provides you with Vigor, increasing your Max HP
- For Weapons, it provides you with Additional Damage, increasing your DPS
- For Accessories, it affects the amount of Combat Stats they provide
While for Accessories, quality is randomized upon acquisition and cannot be changed, for Armors and Weapons, you can increase your quality by using Chaos Stones and Gold at the ![]() Quality Upgrade NPC.
Quality Upgrade NPC.
Another way to increase your gear's quality, without spending Chaos Stones and Gold, is to use Processed Chaos Stones (Armor) and Processed Chaos Stones (Weapon). These can be obtained from events, and the ![]() Mokoko Express should provide you with a good amount to start with.
Mokoko Express should provide you with a good amount to start with.
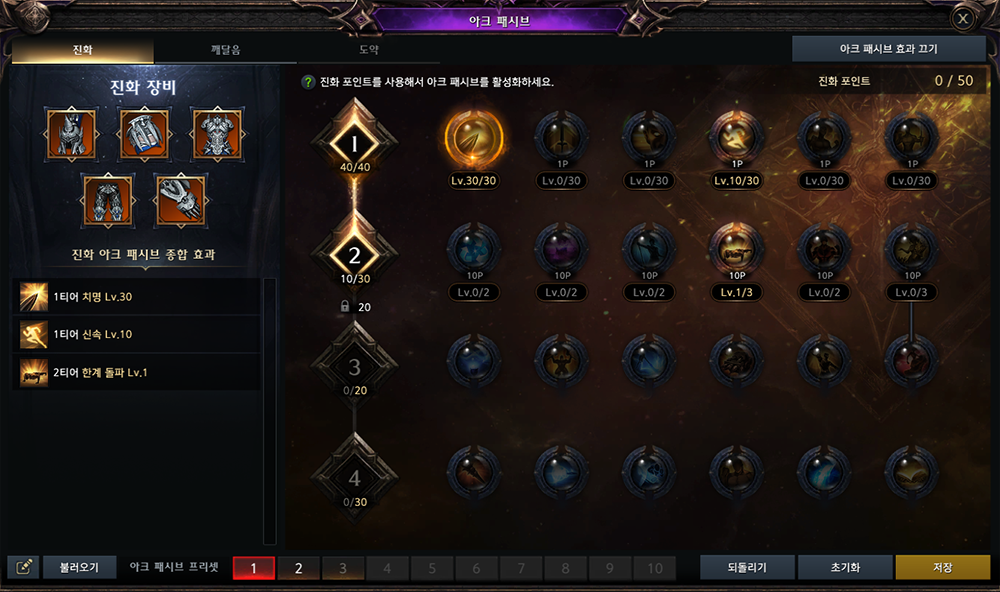
This is the foundation of your build, and you should understand how it works in order to understand your class. Check out the Ark Passive guide to learn about how your character's build changes with this system.
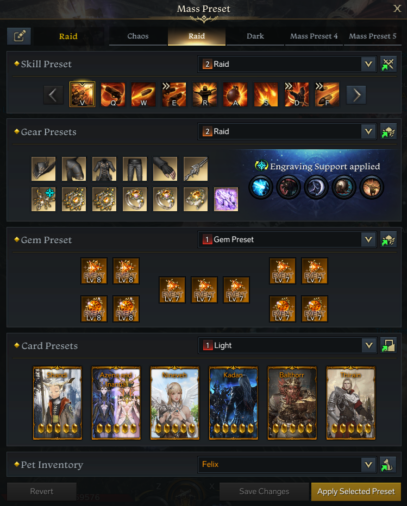
Mass Presets
Mass Presets (Alt + E) are an incredibly helpful feature that allows you to create up to 5 different builds and assign them to be equipped automatically when you enter certain content, essentially solving the need for you to worry about your build being correct. Each preset is made up of the following parts:
- Skill Preset (K)
- Gear Preset (P)
- Gem Preset (P)
- Card Preset (Alt + C)
- Pet (Alt + P)
Make sure to set up the separate tabs for each of these individual pieces first, and then simply select them in the Mass Presets (Alt + E) window and save the changes you made to it.
You can quickly swap between presets manually by using Ctrl + A/S/D/F/G!
In order to apply a preset to certain content, head to the entry window for that content and look for a dropdown next to the ![]() Gear Preset icon, then select the preset you want to use for it.
Gear Preset icon, then select the preset you want to use for it.
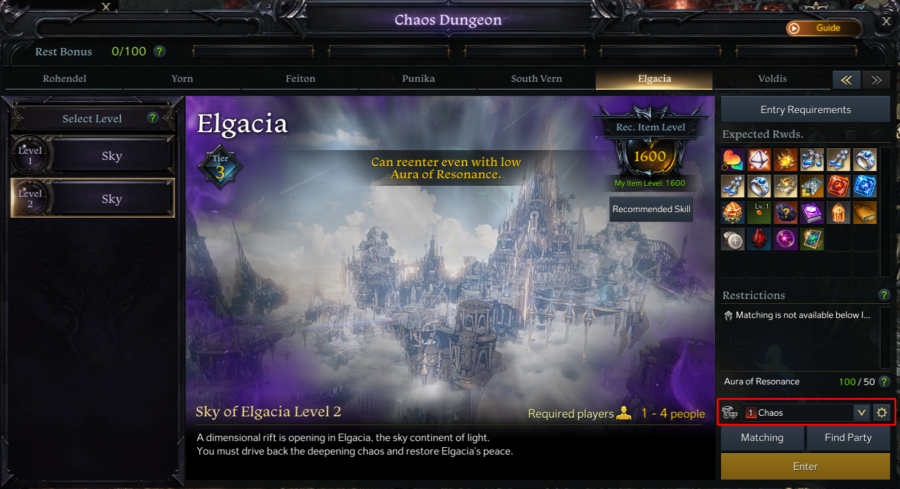
Make sure that you check a Build Guide for your class and set up a dedicated Chaos Dungeon build. This will significantly improve your experience in this content!
Upgrading Your Gear (Honing)
Gear Progression (or Vertical Progression) is the main way of unlocking access to new content and empowering your characters. To avoid wasting your precious time or upgrade materials, make sure to check out the guides below.
Gear Progression Guide
While you should first familiarize yourself with the Gear Progression Guide, it only offers an overview of how your gear evolves from the beginning right up until endgame, and does not give in-depth explanations about the systems you'll be interacting with along the way. Here are some of the most important aspects you should learn about regarding how to acquire gear and how to enhance it using the materials provided by the ![]() Mokoko Express:
Mokoko Express:
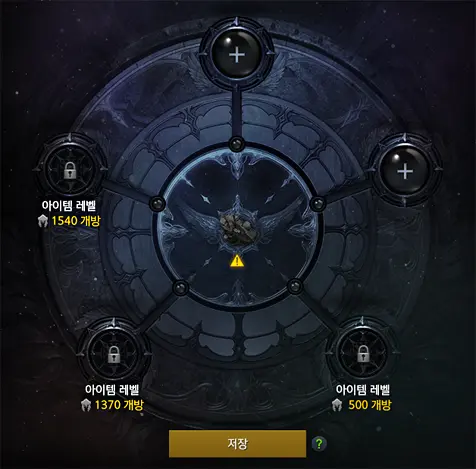
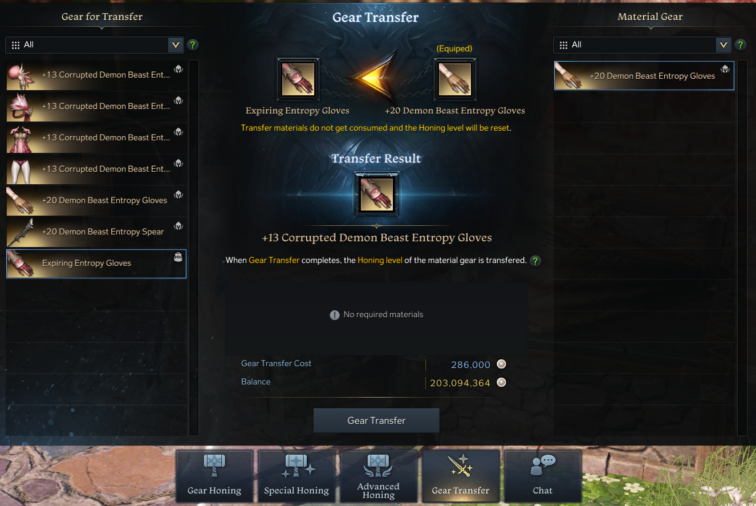
After reaching Item Level 1580, the ![]() Mokoko Express will provide you with an Akkan Ancient Gear Selection Chest. After opening it, you will acquire a new gear set that requires you to interact with Gear Transfering in order to continue your progression. To do that, head to the
Mokoko Express will provide you with an Akkan Ancient Gear Selection Chest. After opening it, you will acquire a new gear set that requires you to interact with Gear Transfering in order to continue your progression. To do that, head to the ![]() Gear Honing NPC and click on the Gear Transfer tab. From there, you can simply select a new gear piece as the target (left) and an old gear piece as the material (right), and transfer over the quality and item level.
Gear Honing NPC and click on the Gear Transfer tab. From there, you can simply select a new gear piece as the target (left) and an old gear piece as the material (right), and transfer over the quality and item level.
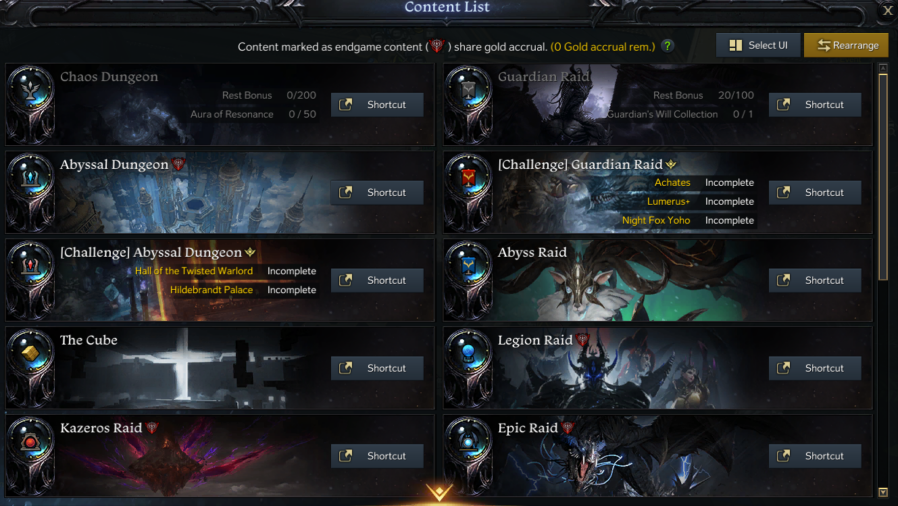
Raids & Other Content
Solo Raids
You are now ready for battle! Introduced in Summer 2024, a solo version of earlier raids is available, stretching from Valtan up to Ivory Tower. If you're a new player, this can help you learn the game at your own pace, and if you're a returner, this allows you to jump right back into the fray, without having to deal with Party Finder.
Now that you're up to speed on how to build your character, you can choose to experience these raids however you want, and we wish you good luck on your journey if you prefer to discover things on your own! However, if you find yourself wanting a helping hand, make sure to check out our Solo Raids Guide Collection! Alternatively, you can keep on reading this guide to find out more about other types of content that Lost Ark has to offer, or come back to it later.
Dailies and Weeklies
Dailies and Weeklies are your main sources to obtain Honing Materials, Gold, and Silver. Check out the list below and learn more about each daily and weekly activity.
Dailies
For additional one-time rewards, check out the Tower Guide.
Horizontal Progression
If you want to kick back and relax after doing all the important dailies, weeklies, and other vertical progression content, you should give the activities below a try. By completing these you will not only learn more about the lore of the world of Arkesia, but you can also unlock new costumes, mounts, furniture for your stronghold, and other rewards!
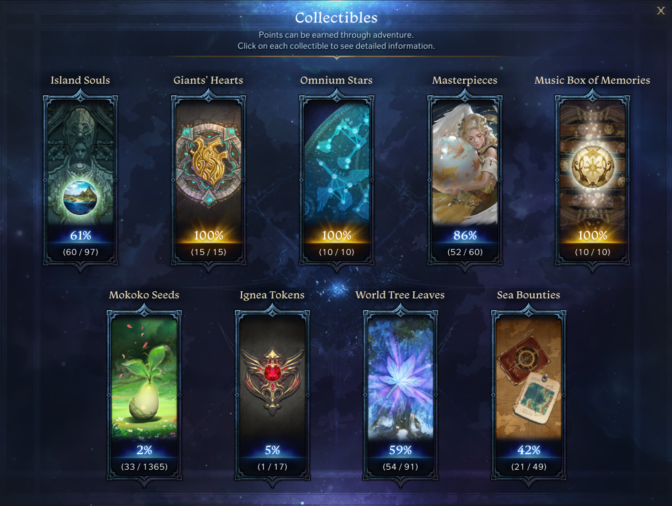
Collectibles
Some collectibles are easy to get but others might require more than a few weeks to complete. If you don't have enough time to complete your collections, you should at least try to unlock the things which are closely tied to your vertical progression! If you would rather skip through most of these collectibles and gain the essential rewards tied to them, you can read about the ![]() Arkesia Tour at the end of this section.
Arkesia Tour at the end of this section.
Adventure Tome
Most of the major areas and continents have their own dedicated Aventure Tome. By completing tasks in those areas, you can unlock Music Sheets, Collectibles, Runes, Skill Point Potions, and more.
Rapport
This is the true end content! Improve your relationship with NPCs by interacting with them on a daily basis. By maximizing your affinity with some specific NPCs, you might even unlock some "alone time" with them!
Arkesia Tour
The ![]() Arkesia Tour (or Horizontal Express) helps players quickly and easily unlock important collectibles, such as Runes or Skill Point Potions, through completing a series of special tasks listed in the event window.
Arkesia Tour (or Horizontal Express) helps players quickly and easily unlock important collectibles, such as Runes or Skill Point Potions, through completing a series of special tasks listed in the event window.
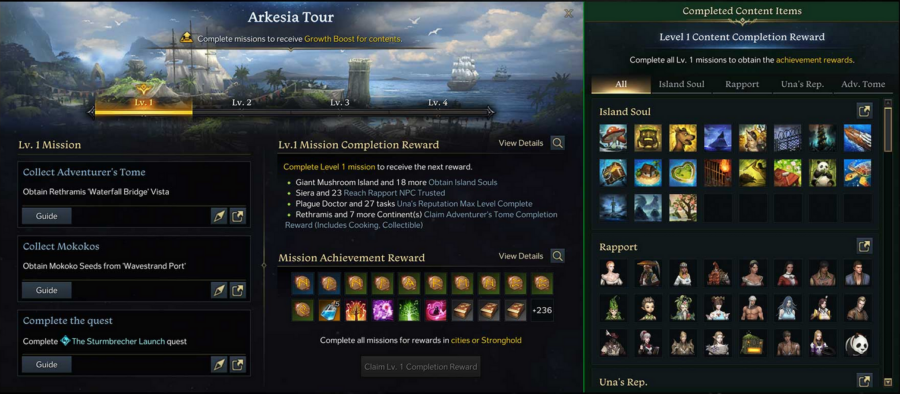
Here are all the activities you must finish for each stage of the Arkesia Tour.
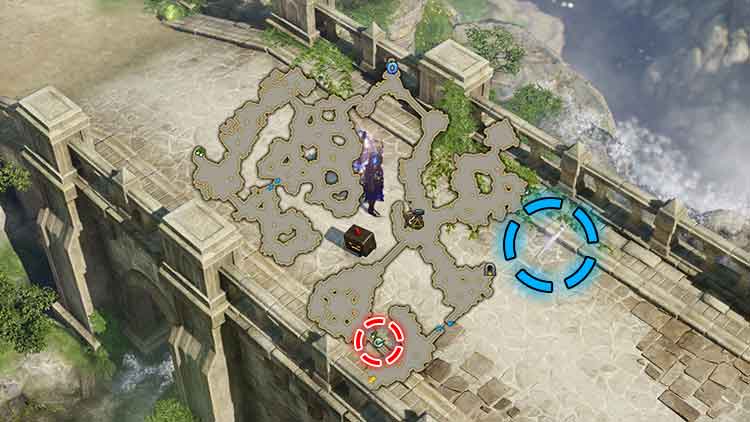
Step 1. Collect the fourth ![]() Vista for the Rethramis Adventure Tome.
Vista for the Rethramis Adventure Tome.
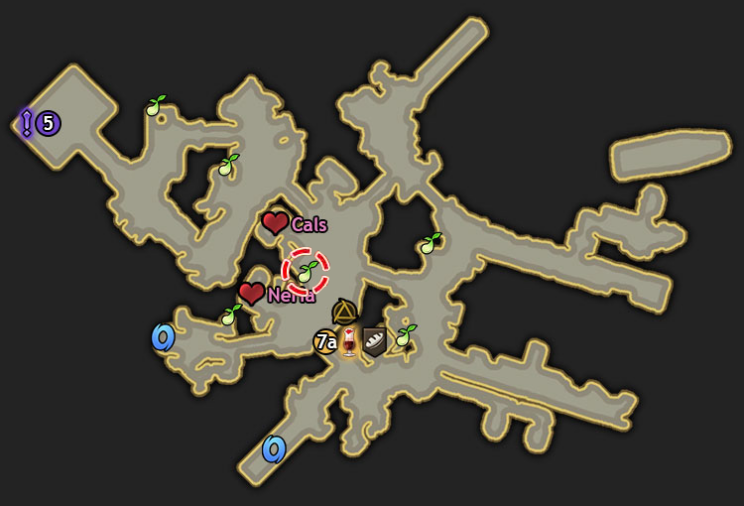
Step 2. Collect the following  Mokoko Seed.
Step 3. Finish the main story of North Vern, ending with ![]() Ealyn's Gift.
Ealyn's Gift.
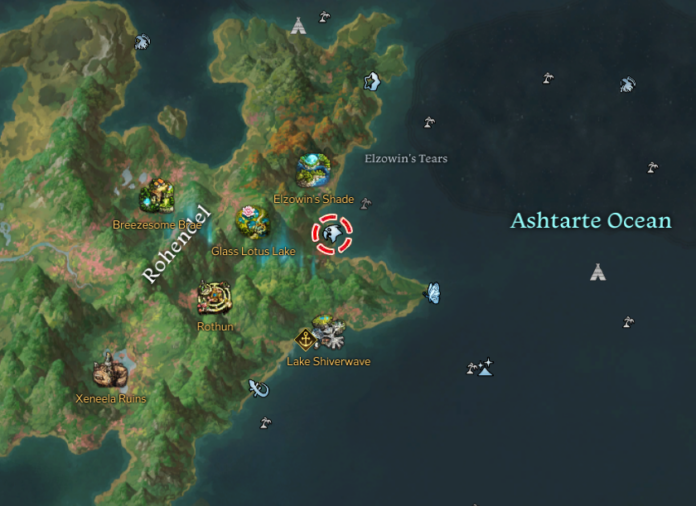
Step 1. Craft Jelly Chew at the Cook in Rothun after collecting all 3 ingredients in Lake Shiverware.
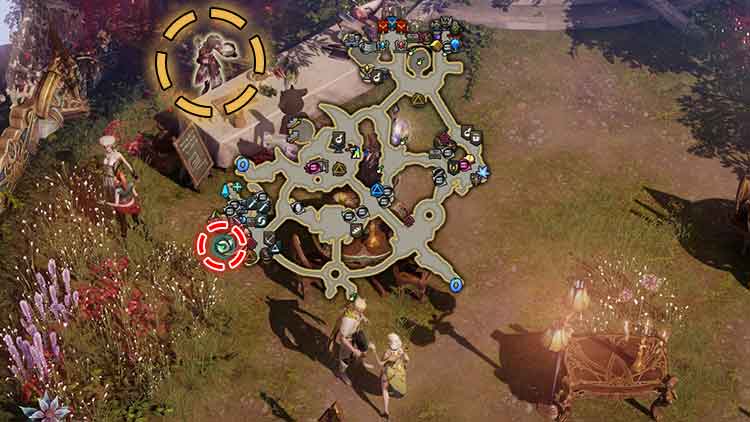
Step 2. Finish the ![]() The Wind at Your Back quest on Lopang Island.
The Wind at Your Back quest on Lopang Island.
Step 3. Finish the main story of Rohendel, ending with ![]() Ratik.
Ratik.
Step 1. Collect the "5-Colored Parrot" Sea Bounty, granted to you in a previous stage.
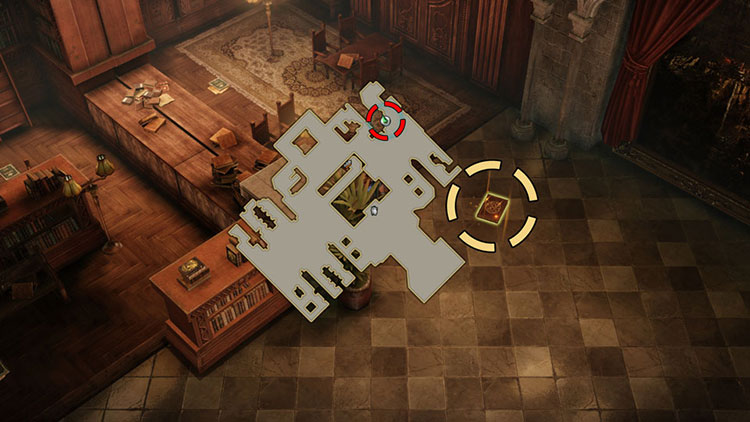
Step 2. Finish the ![]() Artist in Residence quest on Sunflower Island.
Artist in Residence quest on Sunflower Island.
Step 3. Finish the main story of Feiton, ending with ![]() Will.
Will.
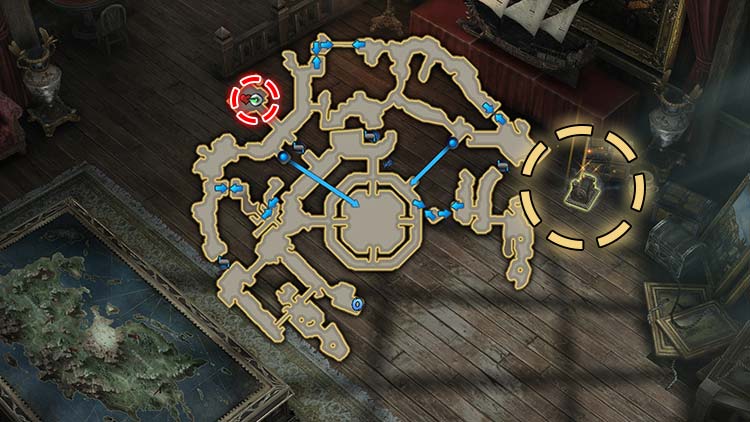
Step 1. Finish the ![]() Heart of a Giant quest on Wisdom Isle.
Heart of a Giant quest on Wisdom Isle.
Step 2. Finish the ![]() Unforgettable quest on Hypnos's Eyes.
Unforgettable quest on Hypnos's Eyes.
Step 3. Finish the main story of Punika, ending with ![]() Festival Adventure.
Festival Adventure.
- Any of the listed requirements count towards unlocking rewards, no matter when you complete them.
- Expect this event to take between 1 - 3 hours to complete (
 Main Story Questlines not included), depending on your knowledge of the game or previously completed content. This effectively means that new players will take longer than veterans or returners.
 - The event window can be viewed through the Arkesia Tour icon located left of your minimap.
- Before you can claim rewards for a stage, you must complete and claim the previous stage.
- Rewards cannot be claimed unless you're in a main city or your stronghold.
- Rewards will be sent directly to your inventory. If there aren't enough slots, they will be sent via mail.
- The following Skill Point Potions won't be unlocked by completing the Arkesia Tour:
- 12th Giant Heart
- 80% Adventure Tome: Punika
- Wisdom Isle Una Reputation (14 Days)
- Fortunespire
- Ignea Tokens
For more details on unlocking the remaining Skill Points, check out the Skill Point Collection Guide.
Tips, Tricks & Tools
There are quite a few interactions and tricks in Lost Ark which are left unexplained. Knowing about some of these can make your everyday life in Arkesia so much easier! We've also prepared some tools to greatly improve your ability to learn and plan ahead.
Bonus Information
In this section we will cover additional bonus topics that do not necessarily fit into the other categories but are still important and somewhat frequently talked about.
Currencies
As you keep progressing with your gear enhancements and unlocking essential collectibles, you will often be required to spend specific currencies, such as Gold, Silver, Pirate Coins, or High Seas Coins. Check out the guides below to learn more about them!
Alts
"You need to make alts in Lost Ark to progress at an adequate pace, otherwise you will fall behind!" - you might have heard this sentence more than once from content creators or by just hanging around in the community. This statement is not entirely wrong, since creating alts and doing daily & weekly content on them to funnel the materials indeed helps you progress faster. However, before making the decision to create alts, you should be aware of the following things.
Creating alts and pushing (honing) them to relevant item level thresholds requires resources, which you could have otherwise used towards progressing on your main. However, if you play these characters diligently, you will naturally acquire most of the honing resources you need in the form of bound materials.
Once new endgame content releases, you usually have to upgrade your alts to a higher item level to still make use of the resources they generate. You can think of this as a constantly moving goalpost. If you lack the time to play your alts, you should either restrict the amount of alts you have or avoid them entirely!
As a bottom line, this game allows you to have more than one character, and with enough dedication and effort they can all be close to each other in terms of strength and progression. You should ask yourself how much free time you have at your disposal after doing all the necessary content on your main. If you find that you have enough time to regularly do daily & weekly content on more than one character, check out the following guide!
Stronghold & Crafting
Your stronghold is more than a cozy home for you, your friends and the members of the community. It is a place where you can craft items required for honing, unlock research to aid your progression, train your alts and pets to make them stronger, and more! Learn everything you need to know about your stronghold by checking out the guides below!
Guild
Being part of an active guild comes with a lot of benefits. You get access to the guild vendor, where you can purchase additional honing materials. It will also be easier to find people to play with and form static groups!
Credits
Written by Raeinor & Civo