Gear Honing System
Last Updated:March 6, 2024|Changelog
Introduction
Upgrading or transferring gear in Lost Ark cannot result in the item breaking or downgrading! It is however the only way to progress your character to higher endgame content in Lost Ark. Let's go more into detail about how to upgrade Gear using the Honing System and what to look out for when doing so to avoid potential mistakes.
Gear Honing Steps
1. Visit the Gear Honing NPC
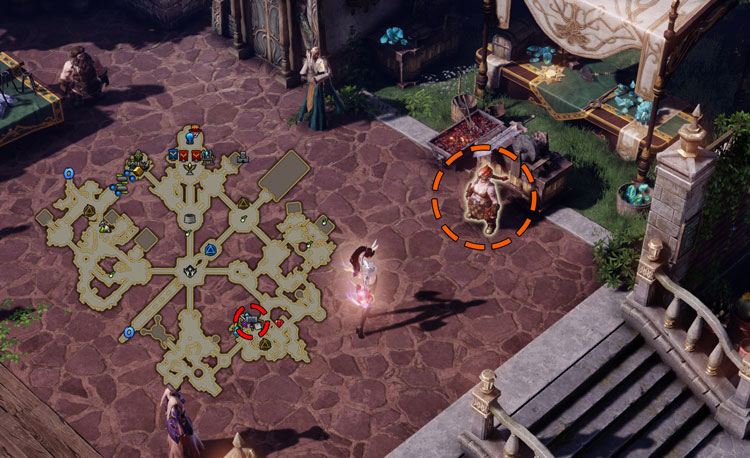
Upgrading your gear can be done by visiting the Gear Honing NPC, displayed as a hammer icon on the minimap and found in any major city in the game.
2. Fill your Gear XP
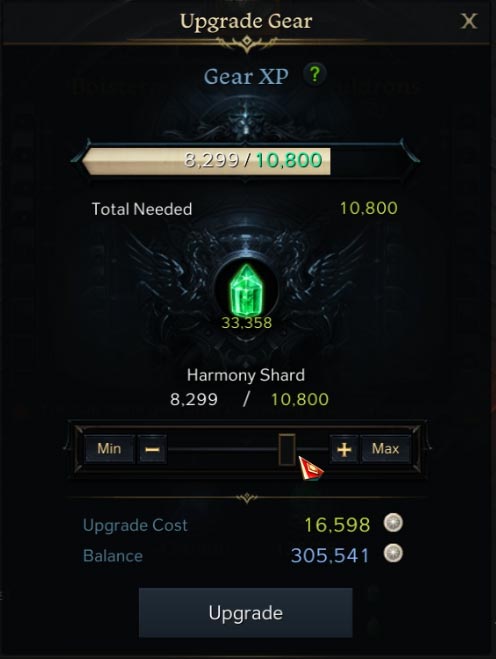
To initiate the upgrading process select an item of your choice and fill the XP Gauge of that item. This is done by paying a cost of Silver and Harmony Shards. Once filled, you can proceed to upgrading. The experience bar needs to be filled only once per enhancement level.
3. Upgrade Priority
All items have a 100% upgrade chance until a certain point depending on the Tier you're in, and start to reduce in success rate past this point. Different gear slots have higher damage and defensive bonuses compared to others. Prioritize items in this order if your goal is the highest damage or defensive benefits for your character, but ultimately they can be upgraded equally, especially when upgrading early game gear.
Damage Dealers
- Weapon
- Gloves
- Shoulders
- Helm
- Pants
- Chest
Supports
- Chest
- Pants
- Helm
- Shoulders
- Gloves
- Weapon
4. Upgrade your Item
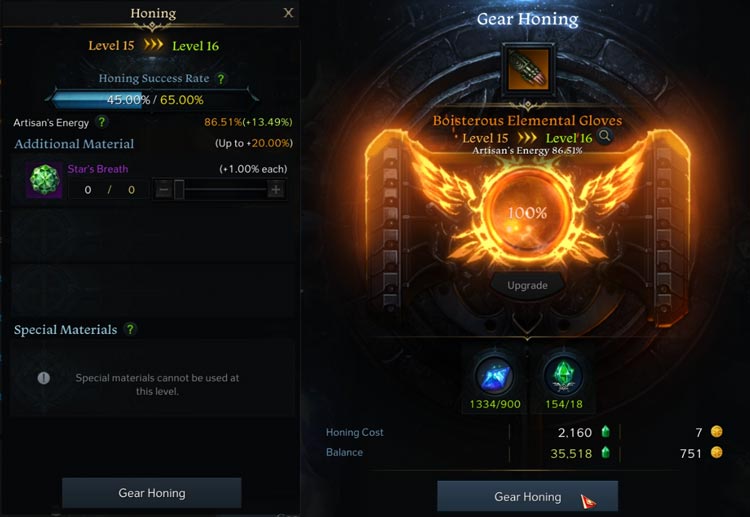
When upgrading, every attempt costs you a set amount of materials and Gold. This cost depends on the level of your item and doesn't change until successfully upgraded.
Before upgrading you have the option to increase the odds of success by using Solar Protection, Solar Blessing and Solar Grace. These items can be found through various activities like Field Bosses, Cube and many more. Save these materials for upgrading your weapon, since it's your highest cost and value gear slot.
If you succeed, your item becomes 1 level higher, your accumulated Artisan's Energy gets restored to 0%, and you have to refill the XP Gauge once more to upgrade further.
If you fail, you are given a higher success rate for all subsequent upgrade attempts (up to a maximum limit). In addition, you start receiving Artisan's Energy.
Artisan's Energy

Think of this as a pity system. Each failed upgrade attempt grants you a percentage of Artisan's Energy, in our example this is displayed as +13.49%. This number increases for all subsequent upgrade attempts (up to a maximum limit) until it reaches 100%, at which point your next upgrade is guaranteed to succeed.
Things to note here:
- Artisan's Energy has no influence on your success rate prior to reaching 100%.
- The use of additional materials like Solar Protection increase the amount of Artisan's Energy gained for failed attempts.
- Higher item stages reward less Artisan's Energy per failed attempt than lower ones.
- A successful upgrade resets your Artisan's Energy back to 0%.
Fusion Materials
In Tier 3, upgrades past +5 require a new ingredient: Oreha Fusion Material. This material can only be created in your Stronghold when reaching item level 1250. Research one of three recipe types depending on which Life Skill path you've chosen to pursue: Hunting, Excavation or Fishing. Once researched, this can be crafted in the Workshop "Special" tab.
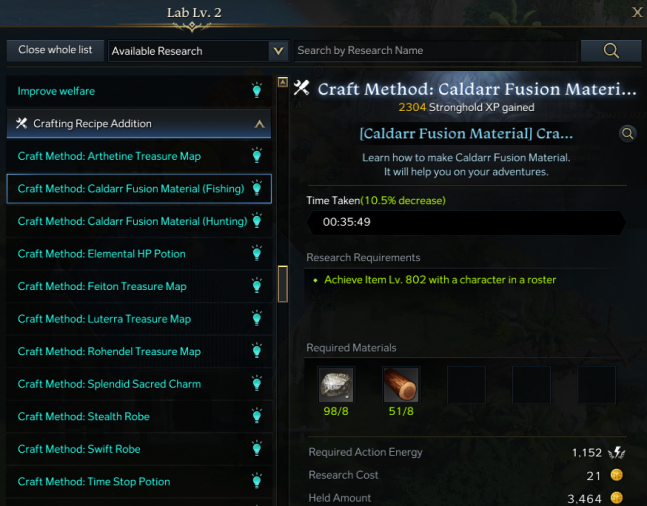
Fusion Research Requirements
- Oreha Fusion Material
- Reach item level 1250.
- Go to your Stronghold by using the Song of Hearth and Home (F2)
- Press Ctrl+1 and choose the Lab tab
- Under Crafting Recipe Addition, search for "Crafting Recipe: Oreha Fusion Material" (Life skill type)
- Superior Oreha Fusion Material
- Reach item level 1475.
- Under Crafting Recipe Addition, search for "Crafting Recipe: Superior Oreha Fusion Material" (Life skill type)
- Prime Oreha Fusion Material
- Reach item level 1580.
- Under Crafting Recipe Addition, search for "Crafting Recipe: Prime Oreha Fusion Material" (Life skill type)
Gear Transfer
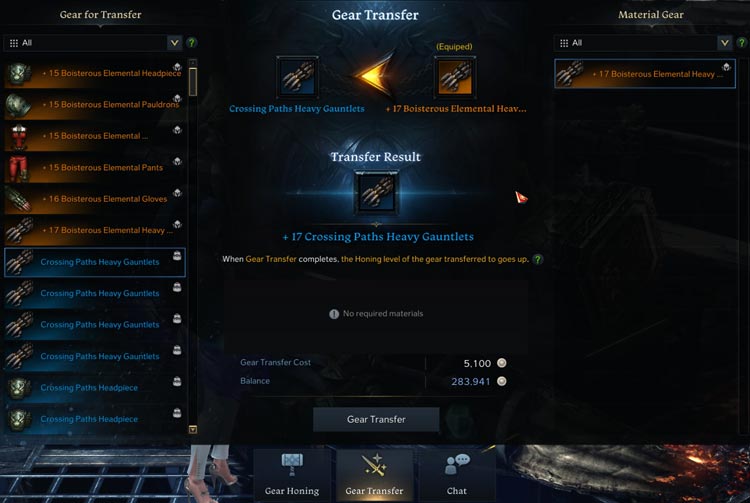
Items you find or craft that are more powerful than your current gear don't have to be upgraded from scratch. Using the Gear Transfer Tab at the Honing NPC, choose the item you want to transfer onto, select the current item you're wearing from the Material Gear listing and click Gear Transfer. This process retains all upgrade levels you've obtained so far without the chance of breaking or deleveling the item. Gear transfer only costs Silver.

Gear Transfer can also be used to transfer higher quality grade weapons & armors over your existing ones for more defensive or offensive stat bonuses.
Cost & Success Rate
For an in-depth list of your character's gear cost and crafting success rates, as well as optimal material usage, visit our Upgrade Calculator Tool.
Summary
Find the Gear Honing NPC in any major city in the game, choose the item you wish to upgrade and pray to the RNG gods that you are successful. Gear transfer can also be performed at the same NPC. Remember that:
- Solar Protection can be used to further increase the success rate of your item.
- Failed attempts give you a higher success rate for all subsequent upgrade attempts (up to a maximum limit).
- Accumulating 100% Artisan's Energy on an item guarantees the next upgrade is successful.
- Transferring gear preserves your upgrade level without having a chance to break or delevel the item.
- Item Level 1100(+15 average) is required to progress into Tier 3.
Credits
Written by Choilicious
Reviewed by Facefoot