Solo Raids Guide Collection
Introduction
Welcome to the Solo Raids Guide Collection. On this page, you can check out the Cheat Sheets and the Main Patterns of every available Solo Raids on the Western servers.
Disclaimer: The guides below only list the Main Patterns of each gate. Majority of the normal patterns are identical to the Normal Mode. If you want to learn more about those patterns, click on the links in each tab.
Rewards
Solo Raids give a reduced amount of gold compared to the traditional difficulties of a raid. However it is still quite a lot of gold to help you on your journey! The gold obtained from Solo Raids is bound gold, that means it is untradable and used primarily for character progression.
| Raid | Gate 1 | Gate 2 | Gate 3 | Gate 4 | Total Gold |
| Valtan | 240 | 360 | 600 | ||
| Vykas | 280 | 520 | 800 | ||
| Kakul-Saydon | 320 | 480 | 800 | 1600 | |
| Brelshaza | 800 | 800 | 800 | 1280 | 3680 |
| Kayangel | 640 | 960 | 1280 | 2880 | |
| Akkan | 800 | 1440 | 2080 | 4320 | |
| Ivory Tower | 1200 | 1600 | 2400 | 5200 | |
| Thaemine | 2300 | 2700 | 3800 | 8800 | |
| Echidna | 4800 | 8000 | 12800 |
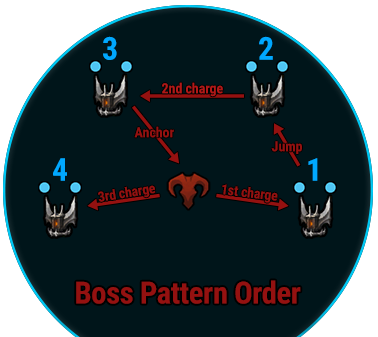
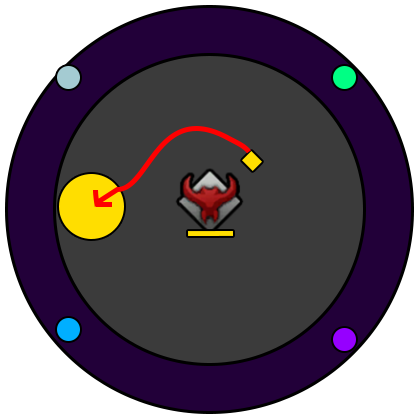
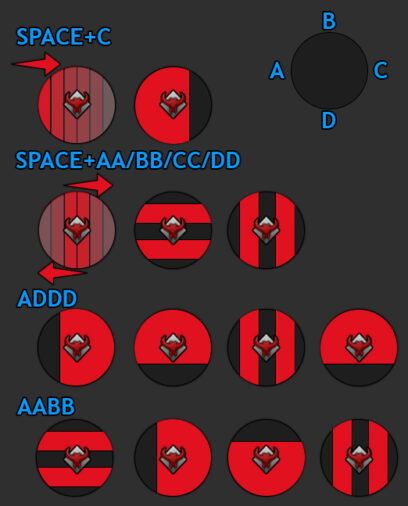
Valtan
x30 & x15
Orb Phase

Optional: Use Sidereal: Wei.
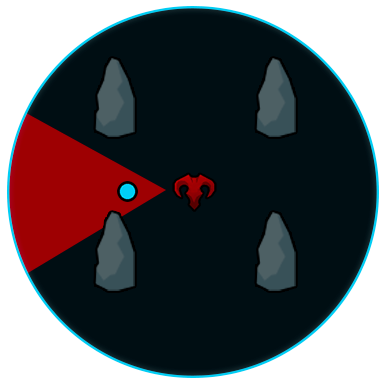
x160
Armor Break Phase
Make Valtan charge into a Wall.
Use Destruction Bomb and Weak Point skills to break his armor.
x130
Wipe Pattern

Use Sidereal: Balthorr.
or
Pick up Blue Orb and dodge pizza pattern.
x110
Pillar Hug
Pillar protects the player from Yellow Zone damage.
Dodge Red Zone at the last second to hide behind a Pillar in the Yellow Zone or use Time Stop Potion in Yellow Zone.
x85
Stage Break

Left or right side of the arena gets highlighted with a red telegraph. Move to the opposite side.
x65
Counter
Counter 3 seconds after his turning animation stops. Learn the timing.
x35
Stage Break
The other half of the arena breaks. Move to the opposite side.
x17-15
Ghost Transition
Force Valtan strike a certain spot.
Use Sidereal: Balthorr on that spot.
or
Follow video on walking method.
x40
Ghost Phase
Counter the ghost clones to reduce the armor stacks and gain Sidereal meter.
Use Sidereal: Thirain after removing all armor stacks.
Check out the G1 Guide for additional information!
Battle Items:
- HP Potion of your choice
- Panacea
- Sacred Charm or Atropine Potion
- Dark Grenade or Whirlwind Grenade
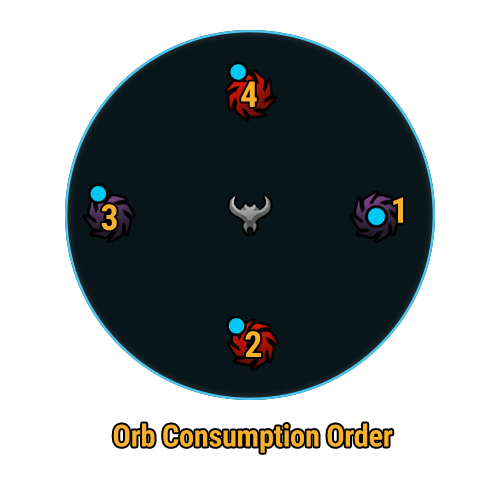
What To Do
- Collect colored orbs in alternating order.
- Stagger after collecting all 4 orbs.
Check out the G2 Guide for additional information!
Battle Items:
- HP Potion of your choice
- Time Stop Potion
- Flame Grenade
- Corrosive Bomb or Destruction Bomb
What to do
- Lead Valtan to charge at a pillar with blue orbs.
- After the crash, use a Destruction Bomb (Bound).
- Collect Blue Orb for x130 mechanic.
What To Do
- Dodge pizza pattern.
- Make sure you have a blue orb before this phase or use Balthorr if you don't.
What To Do
- If you are the player targeted by the red zone, make sure to not point it towards a pillar. Place it right between 2 pillars and “wiggle” around until it stops tracing you. Once that is the case, either try to get fast behind a pillar in the yellow zone or simply move away from the red zone and use Time Stop Potion.
What To Do
- Dodge stage break and hug pillars.
- Aim target at 2 pillars and dodge accordingly.
What To Do
- Counter Valtan when he's about to charge.
What To Do
- Dodge stage break and hug pillars.
- Aim target at 2 pillars and dodge accordingly.
What To Do
- Move to the left.
- Dodge first strike and go back to the same place.
- Either use Sidereal: Balthorr to ignore the follow-up patterns, or run the path as shown in the footage.
What To Do
- Focus during this phase more on dodging attacks and countering the clones. Dealing a decent amount of damage is more than enough to kill Valtan with the help of Sidereal: Thirian.
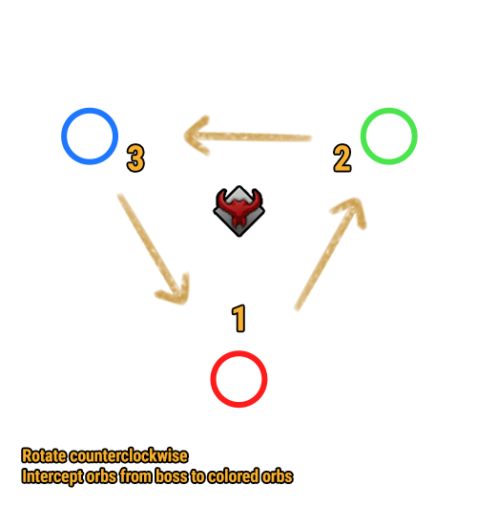
Vykas
x120
Clone Rotation
Pick up Purple Orb
Red: Open Wings ⇾ Half ⇾ Closed
Purple: Closed ⇾ Half ⇾ Open Wings
x65
Clone Absorption
Block Black Pulses
Avoid Red Pulses
x170
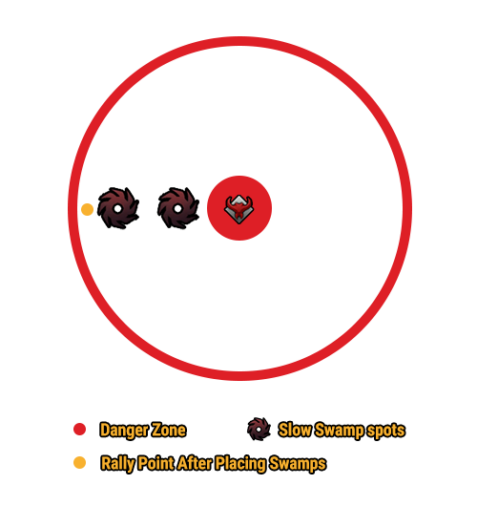
Swamp
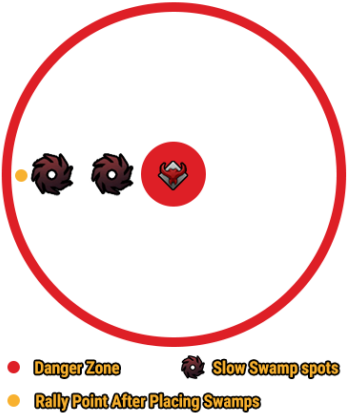
Drop speed puddle outside.
Go to rally point.
x135
Key Input
Use north yellow orb. Reduce Seduction Gauge to 0. Key input after.
Air Raid pattern occurs after. Dodge as group.
x120
Throne
Place Seduction Puddles and stand on it to get your Seduction Gauge to 100%.
x102
Stagger Check
Destroy Monster Spawn
Stagger
x75
Swamp
Drop speed puddle outside.
Go to rally point.
x55
Tentacles
Red orbs increase Seduction Gauge.
Tentacles can only be destroyed if you have over 70% Meter.
x2
Last Struggle
~x10 HP, consume a yellow orb to get Seduction Gauge to 0.
x2 HP, Avoid Medusa, then find real Vykas. Shockwave reduces Meter. Get behind Vykas and Stagger her. Use Sidereal: Wei. Dodge Air Raid.
Check out the G1 Guide for additional information!
Battle Items:
- HP Potion of your choice
- Time Stop Potion
- Flame Grenade
- Swiftness Robe
What To Do
- Pick up purple orb.
- Follow wing pattern.
- Red: Open Wings ⇾ Half ⇾ Closed
- Purple: Closed ⇾ Half ⇾ Open Wings
What To Do
- Block Orbs going into Vykas.
- The clone will pulse red or black pattern.
- Block black pulses
- Avoid red pulses
Check out the G2 Guide for additional information!
Battle Items:
- HP Potion of your choice
- Time Stop Potion
- Whirlwind Grenade
- Sleep Bomb
What To Do
- Drop speed puddle outside.
- Go to rally point.
What To Do
- Cleanse seduction gauge at north orb.
- Input keys.
What To Do
- Place puddle and stand on it to get 100% gauge.
What To Do
- Kill monster spawn.
- Stagger Vykas.
What To Do
- Keep Seduction Gauge above the 70% mark, but avoid reaching 100% Seduction Gauge.
- Destroyed the tentacles.
What To Do
- At around x5 HP, use a yellow orb at the edge of the map to reduce your Seduction Gauge to 0.
- Deal damage to Vykas to trigger the Last Struggle pattern.
- Go to center and find the real Vykas. (Check Mini Map)
- Follow center clone's shockwave towards the real vykas and go behind her.
- Use Sidereal: Wei and deal Stagger Damage to deplete her Stagger Bar.
Kakul-Saydon
x130
Break

Stagger where there is no purple shield.
x110
Heart
Find the odd one. If 3 hearts, face non-heart.
Find the odd one. If 1 heart, face heart.
x85
Simon Says
Saydon Facing You
Match Emote
Saydon's Back Turned
Use Different Emote
x65
Break 2
Stagger where there is no purple shield.
x45
Roulette

Match suit/symbol above head with space. 3 rounds. Suit/symbol changes every round. Get out after 3rd round.
x25
Heart 2
Ping hearts. If 3 hearts, face non-heart.
Ping hearts. If 1 hearts, face heart.
x125
Saydon Appears
Saydon appears. Dodge Explosions/Circus Balls thrown by Kakul.
x110
Curtain

Check the color of the symbol above your head.
Go into the matching safe spot.
x95
Flip
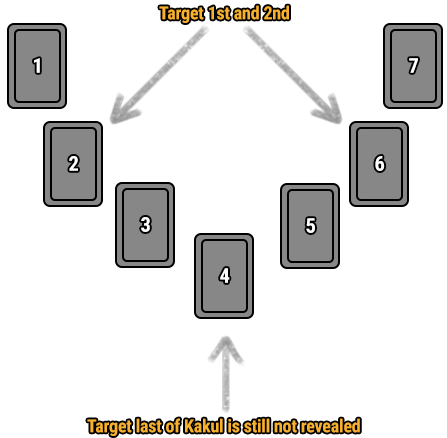
Must find Kakul within 3 hits.
Target 2nd or 6th card for first two targets. Order doesn't matter.
If you can't locate Kakul after first 2, he must be under the 4th position.
x75
Maze
Kill 3 enemies with the matching symbol.
Wait until 1:30 and go into the matching portal.
x55
Pizza
Watch the rotation by looking at the stars. 3 rotations.
Use Innana if you are struggling here.
x30
Flip
Must find Kakul within 3 hits.
Target 2nd or 6th card for first two targets. Order doesn't matter.
If you can't locate Kakul after first 2, he must be under the 4th position.
x155
1st Mario
Prepare your Madness Meter by standing close to the white circus balls or the fire turret.
Once the portal opens, fully transform and go inside to complete the Minigame.

1st Iron Maiden
Dodge the Saws moving vertically and reach the opposite side to Stagger Kakul-Saydon.
x90
Showtime!
Dodge the initial explosions and bullet spray.
Aim the Yellow cones to the two bombs to destroy them.
Dodge the Crosshair following you.
2nd Iron Maiden
Dodge the Hooks and reach the opposite side to Stagger Kakul-Saydon.
x55
3rd Mario
Prepare your Madness Meter by standing close to the white circus balls or the fire turret.
Once the portal opens, fully transform and go inside to complete the Minigame.
Check out the G1 Guide for additional information!
Battle Items:
- HP Potion of your choice
- Whirlwind Grenade
- Swiftness Robe
- Atropine Potion
What To Do
- Use Stagger skills where there is no purple shield.
What To Do
- Go near the clones that spawned in the four diagonals.
- Three of them will either emote a gun with their fingers, or a heart with their hands.
- Look at the odd one.
What To Do
- When Saydon does an emote facing you, you must match that emote by using the correct skill emote.
- When Saydon does an emote facing away, you must use any skill emote that does not match.
What To Do
- Match your suit/symbol with the correct background to the correct spot on the roulette after each spin.
- After the 3rd roulette, get out as the roulette will explode.
What to Do
- After the dice lands, a suit/symbol with a certain color is shown above the dice.
- Floating cards will move towards you, you need to make them collide with the correct NPC (match the symbols).
Check out the G2 Guide for additional information!
Battle Items:
- HP Potion of your choice
- Dark Grenade
- Swiftness Robe
- Time Stop Potion or Atropine Potion
What to do
- Dodge the Circus Balls / Explosions created by Kakul until he lands again.
- Saydon will periodically perform attacks for the rest of the fight that can knock you off the map. Pay attention to yellow telegraphs.
What To Do
- Go inside the safe spot that matches the color of the Clown Icon you have on top of your head.
What To Do
- Stand on one of the cards and bait Saydon to smash it with his Hammer.
- Tip: Saydon's Hammer Smash can reveal up to 3 cards at the same time
- Find the card in which Kakul is hiding under, and bait Saydon to smash it.
What To Do
- Smash the pedestal in the middle of the room
- Check your suit under your feets. It can be ♦️, ♣️ or ❤️.
- Smash 3 enemies with the same suit as you.
- Avoid getting hit by the horizontal/vertical Clowns, as this will reset your stacks and you will need to smash another 3 enemies.
- When the timer reaches 1:30, exit portals with the corresponding suits will spawn. Go into yours.
What To Do
- Pay attention to the direction in which the stars around Kakul spin. It can be clockwise or counter-clockwise. They will spin 3 times and you need to memorize it.
- Rotate around the boss in the correct directions. Each rotation starts and ends at 12 clock position (North).
- Tip: you can use Innana to have an easier time during this mech.
Check out the G3 Guide for additional information!
Battle Items:
- HP Potion of your choice
- Sacred Charm
- Time Stop Potion or Atropine Potion
- Whirlwind Grenade or Dark Grenade
What To Do
- Use the circus balls or the fire turrets to gain Madness meter until it's almost full.
- When the portal opens in the middle of the arena, fill your Madness meter fully to get transformed and go into the portal.
- A clown symbol will appear over your head, indicating you which color you're assigned. Knowing this color, smash the 3 matching balls inside the minigame and then go out the portal at the very end.

What To Do
- You need to get to the other side of the arena and stagger Kakul-Saydon.
- Dodge the saws moving from vertically as they do high amounts of damage.
What To Do
- Dodge the yellow telegraphs, bombs and Kakul-Saydon's bullet spray.
- Aim the yellow cones correctly at the two big bombs that spawn around the boss, to destroy them.
- Dodge the crosshair following you until it disappears.
What To Do
- You need to get to the other side of the arena and stagger Kakul-Saydon.
- Dodge the hooks as they can grab and drag you around for a long time.
What To Do
- Use the circus balls or the fire turrets to gain Madness meter until it's almost full.
- When the portal opens in the middle of the arena, fill your Madness meter fully to get transformed and go into the portal.
- A clown symbol will appear over your head, indicating you which color you're assigned. Knowing this color, smash the 3 matching balls inside the minigame and then go out the portal at the very end.

Brelshaza
x85
Safe zones
Go to any of the safe zones. NPCs will cover the remaining ones.
x45
3 Counters

Use Azena once mobs appear on Minimap.
Counter boss 3 times
x145
Meteors+Typing+Stagger

Meteors spawn in these locations.
Step on one to start a typing test
Finish it and stagger the boss!
x100
Medusa+Stagger
Stagger the boss!
Look away from the Medusa Eyes spawned around her.
x43~
Shapes
(Star, Square & Diamond)
Look away from the Medusa Eyes spawned around her.
Break the pair of shapes that spawn around the boss to gain a buff.
If the shape above your head is a Diamond, stay away from the NPC.
If the shape above your head is a Square, go near the NPC.
x0
Red & Blue Spears

Red or Blue areas will spawn, stand on one and wait to consume it.
Step on the spots that spawn later to "clear" them.
x170/x120/x60

x170/x120/x60

x170/x120/x60
Enter the dome to survive the Laser beam.
Go outside to stagger the boss, grab the pyramid-looking buff, and go back inside the dome.
Repeat it one more time.
Stagger the cube.
Complete the typing test.
Dodge the laser afterwards.
Destroy the sphere on the border of the arena.
Go near the boss and catch the small yellow orb to create a safe spot.
Stagger the boss.
x95/x20
Stagger 1&2
You have a limited time to stagger the boss.
Use Sidereal: Innana for cleansing Damage Stacks
Use Sidereal: Wei for immediate high stagger
x212, x28
Dream World 1
Dodge the small projectiles launched by Brelshaza.
Safe vertical/horizontal lines will be created across 3 tiles. Go into them. Repeat 3 times.
Once outside the Dream world, dodge the small projectiles again and move into the same safe zones as before, after each explosion.
Note: your controls will be inverted during the 1st and 3rd safe zones inside the second Dream World mech.
x188
Golden Meteor 1

Place the Golden meteor at the any of the corners of the map and run away, as the nearest 3 tiles will disappear.
After around 3 minutes another Golden meteor will spawn and you will need to repeat the process.
x113
Black Hole

Find one tile with a small orb floating in the middle.
Catch two yellow balls coming from outside (dodge red ones).
Go inside the small orb in the middle of the tile when it starts to shiver.
Counter/Stagger the small clone that spawns around the outer tiles and pick up the buff. Repeat it twice.
x25
Final Nightmare
Avoid 3/6/9/12 o'clock positions as they will break.
Finish the fight!
Check out the G1 Guide for additional information!
Battle Items:
- HP Potion of your choice
- Panacea or Atropine Potion
- Whirlwind Grenade, Frost Grenade or Flash Grenade
- Destruction Bomb or Sleep Bomb
What To Do
- Go to any of the safe spots in the cardinal directions. NPCs will cover the remaining ones.
- Wait until the Boss slams the ground with his hammer, then you're safe to move.
What To Do
- Suggestion: Use Sidereal: Azena to kill the summoned Elite Monsters in the four diagonals.
- Follow the boss as he moves around, and Counter him when he turns blue. Repeat this 3 times.
Check out the G2 Guide for additional information!
Battle Items:
- HP Potion of your choice
- Swiftness Robe
- Whirlwind Grenade or Dark Grenade
- Time Stop Potion or Atropine Potion
What To Do
- Once the boss teleports to the center, go into one of the Meteors to trigger a Typing test.
- Complete it and stagger the boss.
What To Do
- Stagger the boss while looking away from the Medusa eyes around her.
What To Do
- Wait for the shapes to spawn and break only one pair of them.
- Look for the symbol above your head.
- If your symbol is a Diamond, stay away from the NPC.
- If your symbol is a Square, stay near the NPC.
What To Do
- Go into any of the spots and wait a bit to consume that color.
- Go into the spots that appear afterwards with your matching color, wait until they are cleared.
What To Do
- Periodically the boss will teleport to the center and darken your screen a bit. Near her, a floating symbol will appear showing either a Star or a Pentagon.
- Two floating orbs with either forms will appear around her. You need to "lure" the matching symbol by going close to it (but not touching it!). Make it collide with the boss.
- If you did the previous step correctly, yellow zones will spawn in her diagonals. Go into one to gain a shield to survive the pulses afterward.
Check out the G3 Guide for additional information!
Battle Items:
- HP Potion of your choice
- Swiftness Robe
- Whirlwind Grenade or Dark Grenade
- Time Stop Potion or Atropine Potion
What to do
- Go into the safe zone in front of the boss to survive the laser beam and avoid a wipe.
- When you're free to move, stagger the boss and grab the pyramid-looking buff then get back inside the safe zone.
- Repeat it one more time to finish the mech.
What to do
- Stagger one of the cubes that spawn around the arena.
- Complete the typing test afterwards.
- Dodge the front/back laser the boss will use.
What to do
- Destroy the yellow sphere to obtain a shield.
- Move close to the boss and catch the small yellow orb spawned from the destroyed sphere.
- Stagger the boss.
What to do
- You will have limited time to stagger the boss while dodging normal attacks.
- You can use Innana to create a long-lasting safe zone, allowing you to stagger ignoring most attacks.
- Alternatively, use Wei to deal massive stagger damage quickly.
Check out the G4 Guide for additional information!
Battle Items:
- HP Potion of your choice
- Whirlwind Grenade or Dark Grenade
- Time Stop Potion or Atropine Potion
What to do
- Go behind the boss and dodge the incoming projectiles.
- Stay inside the safe tiles. Move when they change, and remember the safe zones.
- Once outside dodge the incoming projectiles again and then move to the safe zones you previously discovered after each explosion.
- Important: The second time this mech happens, your controls will be inverted for the 1st and 3rd explosions.
What to do
- Move to one of the corners of the map and wait until the meteor starts falling.
- Move away as the tiles near the explosion will disappear.
What to do
- Boss will disappear and a cinematic will start. You need to move to the central tile and dodge the Pizza-shaped explosions twice.
- Wait until Brelshaza lifts her hand, then move outside the inner circle as Brelshaza will open a Black Hole.
- Find a tile with a small black orb on top (and avoid it for a little bit). You need to collect 2 yellow meteors to gain a buff.
- Suggested: Use Sidereal:Shandi to have an easier time dodging the small meteors falling into the black hole.
- When the small black hole starts shivering, move inside of it to get transported to the other dimension.
- Small Brelshaza clones spawn on top of some tiles. Move on top of them to check where the Real clones will spawn.
- Counter or Stagger the clones and then collect the small orb they drop to gain a buff to survive the following explosion.
- You need to do this correctly at least once.
What to do
- Periodically you will receive a blue aura which, after the timer runs out, drops a blue meteor. Place these meteors in the outer tiles avoiding to break them (by placing them repeatedly in the same tile).
What to do
- Ocasionally (previous to Dream World mech) Brelshaza will spawn several tornados which move from one side of the map to the other. You will receive a buff that you need to keep until the end of the mech by dodging the tornados.
- If you managed to maintain the buff, you will be transported to a new dimension with a small blackhole in one of the corners of the central tile. Destroy it.
- Failing to do so will spawn a big blackhole which hinders your movement and last for a while. It can be dangerous if you receive a Yellow/Blue meteor during this period.
Kayangel
During Raid
Puddles
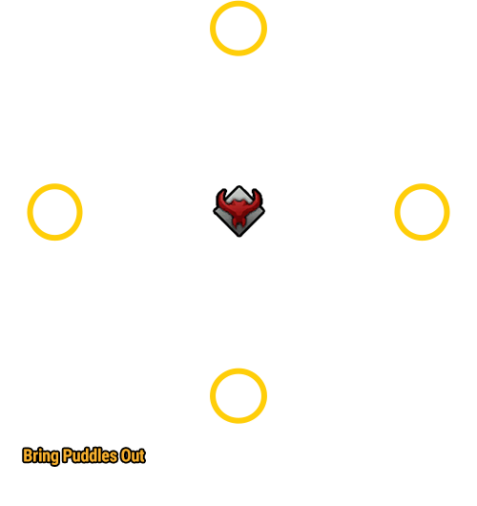
Bring puddles out
x55
Dodge Minigame
Dodge Lightning
Watch for spear toss
During Raid
Elemental Weakness
If Red destroy Blue
If Blue destroy Green
If Green destroy Red
x62
Rotating Elements
Block Orbs
Destroy Strong Element
x42
Counter/Stagger
Counter
Stagger
x20
Rings
Destroy Orbs that Beats the Ring
Red Ring = Blue Square
Green Ring = Red Triangle
Blue Ring = Green Circle
x180
Explosions/Egg Break
Dodge 3 explosions
Aim Laser at egg
Activate egg for buff
x135
Light Delivery
Take final laser
Don't stack rings
x100
White Orbs/Sunlight
Watch sunlight safespots
Collect 5 white orbs
Safespots
x60
Pillars/Clones
Stagger pillar with runes.
Final Phase
Kill Fast use Dark Grenade
Ping Sunlight Safe Spots
Spacebar after "Intense Gaze" goes away
Check out the G1 Guide for additional information!
Battle Items:
- HP Potion of your choice
- Dark Grenade
- Sacred Charm
- Time Stop Potion or Atropine Potion
What To Do
- Dodge AoEs.
- SpaceBar spear as he throws it towards you.
Check out the G2 Guide for additional information!
Battle Items:
- HP Potion of your choice
- Panacea
- Atropine Potion
- Whirlwind Grenade or Dark Grenade
Description
- During raid, colored (elemental) shapes will spawn.
- Depending on the color, you will need to break the color that beats that color.
- You can thnk of it has Blue = Water, Red = Fire, Green = Grass.
- Red < Blue < Green < Red...
What To Do
- Depending on the mechanic, you will need to destroy the element that is strong against the element shown on the boss/mechanic.

What To Do
- Collect orbs from reaching elements.
- After the boss stops launching orbs, check for the element shown underneath the boss.
- Destroy the element that is strong against it.
- If Blue destroy Green
- Red destroy Blue
- Green destroy Red
What To Do
- Counter a soldier.
- Stagger the boss.
What To Do
- Pay attention to ring colors:
- Green Ring = destroy Red
- Blue Ring = destroy Green
- Red Ring = destroy Blue
Telegraph
- SpaceBar prompt will appear.
What To Do
- Try to keep SpaceBar meter just before finishing.
- Finish the bar when the boss emits a black explosion.
Check out the G3 Guide for additional information!
Battle Items:
- HP Potion of your choice
- Time Stop Potion or Atropine Potion
- Flame Grenade or Dark Grenade
What To Do
- Dodge 3 explosions.
- Go close to one of the eggs at the edge of the map and wait for the boss to spawn at you.
- Turn the boss slightly to make the glass shield touch the egg.
- Move away when you hear a glass breaking noise to dodge the laser.
- Aim the laser at an egg in case the glass shield isn't able to touch an egg.
- Break the egg, while standing close to it, to be granted a damage buff for 2 min.
- You will need to constantly lure the boss to hit eggs to refresh this buff.
What To Do
- Guide final laser to boss. Watch out for teammates puddle.
- Use auto attacks to help guide the laser.
What To Do
- Get 5 white orbs.
- Go to safe spots in the shadow after 5 white orbs.
- You don't need white orb shield until final mech (after 2 sunlights).
- If you cannot make it to the safe spot, you can use Time Stop Potion.
What To Do
- Stagger pillar with runes.
What To Do
- Kill boss quickly to avoid stacking debuff.
- White glowing rune in the center indicate the next sunlight safe spot location.
- Boss will pull you in as the sunlight safe spots happen.
- To avoid the pull mechanic, when you receive the purple debuff text "Intense Gaze", wait until the text/debuff goes away, then immediately press a movement skill (spacebar) to nullify the pull. You can also use Time Stop Potion instead.
Akkan
During Raid
Armor Buff
Similar to Valtan Armor
Removed by doing mechs up to x112
During Raid
General Debuffs
Hit by Spear = 3.5% HP DoT
Hit by Green Circle = 30%+ DMG taken
During Raid
Green/Black Tumor Debuffs
Touching Players Opposite Color = Debuff
Debuff = Healing Reduced/DoT
Having 2 Tumors = Dead
During Raid
Drowning
After 90x HP
Fill Up Bar
Clip Yellow Bar On The Top of Blue
x140
8 Tumor Orbs/Spear
Destroy either Green or Black orb
Stay in place until other orbs explode
Touch the Spear after Boss Lands
x128
Cleanse Yellow
Use Sidereal: Wei to stagger the boss
x112
Orb Grab
Destroy the orb if it matches your color, get grabbed by the boss
Stagger boss if the orb isn't your color
Destroy Same Color Small Orbs
Time Attack

Thirain After Cutscene
Get Boss to x90 HP
Evacuation

At the Crossroad check Debri/Dust Fall
Go to the path without Debri
Wait until Water Rises to Last Stairs
x75
Stop Mobs
Kill Big Mob on Map
Kill Smaller Mobs to Not Get Stunned
When Grey Smoke = Take Spear
x50
Inanna Stagger

Boss Jumps to Center
Inanna when Boss Stands Up
Stagger & DPS
x20
Shield/Bells
Kill Bugs Quickly
Destroy Shield after Bells
Move out of Green Fog at 6-7 Stacks
Move Back in After Plague Cleansed
Final Fight
Kill Fast
Dodge
x175
Tentacles
Avoid standing in the center.
Destroy Tentacles.
x160
Ghost

Avoid green ghosts and puddles at the edge of the arena.
Pick up the skull and move clockwise.
Throw the skull to the yellow marked locations at 5, 7, 11 and 1 o'clock positions to cleanse your ms debuff.
Optional: Use Camouflage Robe method.
x140
Red Hole
Avoid standing in the center and dodge red explosions.
After 3rd explosion, dodge Akkan's 1 hit attack.
x110
Hide
Stay in the shadow behind Akkan.
Pay attention to the skulls to see Akkan's turning direction.
If the Lantern glows, Akkan will use the laser attack.
x85
Red Hole
Avoid standing in the center and dodge red explosions.
At the start, dodge Akkan's 1 hit attack.
Optional: Use Sidereal: Thirain towards the front of the boss.
x55
Ghost
Same as x160 Ghost.
x30
Red Hole
Avoid standing in the center and dodge red explosions.
After 3rd explosion, dodge Akkan's 1 hit attack.
x0
Destruction
Use Destruction Bomb and Weak Point skills on Akkan.
Counter Clones and use Sidereal: Thirain.
x200
X Stagger
Player - Intercept the orange laser, stagger the boss, avoid red attacks.
x165
Line Delivery & Stagger
Player - intercept purple laser and deliver it to Akkan.
x140
Star or Hexagon
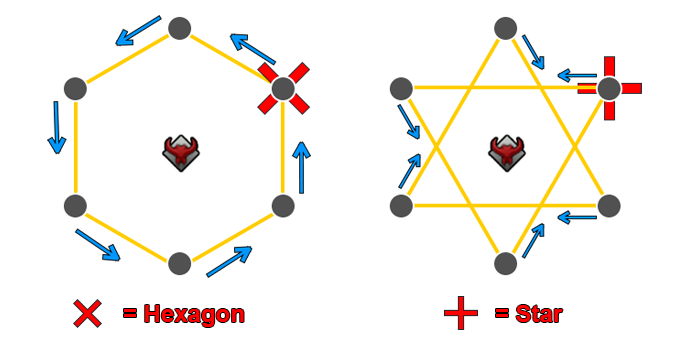
Turn the statues to form either a Hexagon or a Star
x139-30
Random Gimmics

Stand Left or Right of Akkans back
Then far backside
Lastly go inside
x139-30
Random Gimmics

Green Curse: Place and dodge 3 explosions spawning beneath you
Blue Curse: Stay close to Akkan
Red Curse: Move away from Akkan
x30
Arena Break
Outside arena breaks.
Use Sidereal: Wei at x15 HP to skip x0 HP mechanic
x0
Destruction
Akkan goes into a cocoon
Use Sidereal: Inanna for safety. Complete Akkan's Destruction check.
Check out the G1 Guide for additional information!
Battle Items:
- HP Potion of your choice
- Sacred Charm
- Panacea
- Atropine Potion
- (Purify)
Telegraph
- Boss jumps to center and summons 4 green orbs and 4 black orbs.
- Shortly after, the boss will drop spears that will be safe zones.
What To Do
- Break either a Black or Green orb to get your Tumor Debuff.
- Stay still and wait until the other orbs explode.
- Spears will be summoned shortly after.
- Touch the spear when the boss jumps back down. (safezones).
- The spears does % HP damage, so be careful if you touch it early.
Telegraph
- Boss will emit a green explosion with a stagger bar.
- During this period, you will get a green debuff that will turn into a yellow debuff.
- Yellow debuff = Less Stagger
- When the yellow debuff is cleansed, it will turn red.
- Red debuff = More Stagger.
What To Do
- Option1: Use Sidereal: Wei to complete the stagger.
- Option2: Wait for the green debuff to turn yellow.
- Use a Panacea potion to cleanse yourself.
- Stagger the boss with red debuff.

Green Debuff
"Wait"
Yellow Debuff
"Cleanse"

Red Debuff
"Stagger"
Telegraph
- Boss will jump to the center of the map.
What To Do
- A green or black orb will spawn around the boss.
- If the orb is the same color as your chosen orb at the start, → destroy it and get grabbed by the boss.
- If it's not your color, ignore it and stagger the boss afterward.
- Small Orbs will spawn around the map. Destroy Orbs that match your color with Auto Attacks.
- Destroying 3 incorrect orbs will kill you.
- Every Orb that touches the Boss will grant him more HP for the next phase.
Telegraph
- Boss cutscene will bring you to another arena.
- A 1 min timer will appear in the top left.
What To Do
- You will need to bring the Boss down to 90x HP before the timer runs out.
- Stick close to the boss, as raid patterns can be hidden with the water.
Telegraph
- The area will flood and a cutscene appears after 90x HP.
What To Do
- Go to the correct path when reaching the crossroads.
- The incorrect path will be marked with debris/dust dropping on top of the stairs.
- When you finally reach the top, before using the G Key to interact, wait till the water covers the last remaining stairs to avoid bad patterns from the boss.
- Jumping too early will cause bad boss patterns.
Telegraph
- Boss will summon 2 spears, a large mob, and several small mobs.
What To Do
- Kill the large mob.
- Eliminate the remaining small blobs, getting hit by 4 or more will petrify you, so be careful.
- When the black fog comes out from the boss, touch the spear for the safe zone.
Telegraph
- Boss will jump to center and create a stagger bar.
What To Do
- When the boss stands up, use Innana.
- This will prompt a special interaction and will make this a free DPS phase.
- Not using Innana will make doing the stagger much harder. As you will need to avoid his patterns while staggering (there is a counter at the end as well if you do not Innana).
Telegraph
- Boss will turn into a cacoon and emit a green puddle.
- Standing inside the green puddle will give you debuff stacks.
- At 10x stacks, you will die.
What To Do
- You will need to bring down his shield to make the next phase easier.
- Killing 3 small bugs will grant you an addtional shield damage buff.
- Dodge small circles that spawn.
- When the bell rings, the boss will get a shield that you will need to break.
- Get into the green puddle and DPS the boss.
- When you have around 7x stacks, step out and wait for the debuff to cleanse.
- repeat the process.
Telegraph
- Boss will queue the final cutscene for the last fight.
- No more main mechanics, but pay attention to the patterns to avoid death.
New Patterns
- Green Aura: The aura around the boss lowers movement speed & stagger.
- Imprison: A player will be imprisoned and after freeing them, others around will be imprisoned as well.
- Counter Attack: The boss flies up and spawns circles. When he lands he can be Countered.
Check out the G2 Guide for additional information!
Battle Items:
- HP Potion of your choice
- Time Stop Potion or Atropine Potion
- Sacred Charm (or Camouflage Robe)
- Corrosive Bomb or Destruction Bomb
Telegraph
- Occurs at or near x175 bars and randomly below x85 bars.
- Akkan teleports to the center and summons a poison aura around him.
- Green ground explosions occur at random spots.
- Tentacles spawn at random locations.
What To Do
- Avoid staying too close to the center.
- Destroy the tentacles spawning around the boss.
Telegraph
- Occurs at x160 and x55 bars.
- Akkan teleports to the center and summons a poison aura around him.
- A skull shaped object spawns at a random location.
- One red and two green ghosts spawn. One additional green ghost spawns on Hard Mode.
- Periodically, random players get a disease aura, which summons a puddle after a few seconds.
- Counterable Akkan clones appear randomly at the edge of the map on 3x+1 spots. (Only Hard Mode)
What To Do
- To survive the mechanic, you need to prevent the red ghost from reaching the skull for a certain duration.
If the red ghost touches the skull, it is a raid wipe. If the green ghost touches a player, the player is forced to walk towards Akkan's green aura in the center and receives massive damage. - Pick up the skull, move to the 5 o'clock position and throw it inside the yellow marked circle on the ground.
- Once the skull and the player are at the correct position, wait for the red ghost to walk a few steps towards the skull before picking it up and start running clockwise.
- Optional Camouflage Robe strategy: Activate Camouflage Robe shortly before picking up the skull and go clockwise. As long as the player is invisible, the red ghost will stop the chase. Once visible, wait for the red ghost to get closer before throwing the skull to yellow marker to cleanse yourself. Pick up the skull and proceed clockwise repeating the same actions.
- The skull carrier gets a stacking slow debuff, which is why that player needs to throw the skull to the locations at 5, 7, 11 and 1 o'clock by pressing “Q”.
- The puddles left behind by the disease aura deal damage and increase Disease Meter of players standing on top of it. Furthermore, these puddles reappear in the exact same location once the mechanic repeats at x55 bars. So make sure to place the puddles at the edge of the map, while avoiding the green ghosts patrolling that area.
Telegraph
- Occurs at or near x140, x85 and x30 bars.
- Akkan summons a red hole in the center.
- In certain intervals, a ring shaped explosion occurs either close to the red hole or at the edge of the map.
What To Do
- While fighting Akkan, avoid touching the red hole or standing in the ring shaped explosions, since these increase your Disease Meter heavily.
- After the 3rd explosion, Akkan disappears and teleports to a random player to perform a 1-hit frontal attack. Dodge it by moving away or behind Akkan.
- Optional: The raid lead can use Sidereal: Innana between x160 and x140 bars.
- This mechanic at x85 bars is slightly different. The 1-hit attack occurs right at the start of the mechanic. So group up at 6 O'clock and wait for Akkan to reappear before moving/dodging away. After that, the raid lead can use Sidereal: Thirain in front of the boss to trigger a special sidereal interaction, which deals high damage and provides the players with a big window to deal uninterrupted damage.
Telegraph
- Occurs at or near x110 bars and afterward in specific intervals.
- Akkan teleports to the center, draws a circle around him.
- A big shadow appears at the back of the boss.
What To Do
- The goal is to stay always in the moving shadow of Akkan. Getting exposed to Akkan increases the damage the player takes.
- There is one skull on each side of the boss. A glowing skull indicates in which direction the boss is about to turn. From the player's point of view, if the right skull glows, the boss will turn left. If the left skull glows, then Akkan will turn right. So pay attention to the skulls and follow the shadow closely to survive this mechanic.
- This pattern can be split into 3 rounds. Each round consists of 3 individual “turning moves” except for the 3rd segment, which is always a 180° rotation to one side and slowly rotating back to the default position.
- Tips: The first time the turning direction changes during the first 2 rounds, the boss always rotates 180°. So this means there are only a limited amount of patterns which can occur during the first 2 rounds. [90°⇾90°⇾180°] or [90°⇾180°⇾90°]
- The boss can also perform a rotating laser attack. Akkan's red lantern glowing is the indicator for this pattern. Make sure to rotate clockwise or counterclockwise with the shadow to avoid getting hit by the laser.
Telegraph
- Occurs once boss reaches 0 hp.
- Akkan teleports to the center and summons a ring shaped poison fog covering the outside of the battle area.
- A crosshair appears on the boss, indicating that “destruction” is possible.
- Counterable Akkan clones appear randomly at the edge of the map.
What To Do
- To succeed this mechanic and the raid, you have to deal a certain amount of Weak Point damage within a short duration. If you fail to do so, Akkan does a map wide 1-hit attack and heals back multiple bars. You can survive this by using Time Stop Potion, but in most cases, you won't have enough time to get Akkan back to 0 bars, before the boss enrages.
- Once the crosshair on the boss appears, use Destruction Bomb and skills with Weak Point damage on cooldown.
- Use Sidereal: Thirain as soon as it is available to assist with the destruction.
- Counter the clones on the outer edge of the arena.
- Successful counters increase the Sidereal Meter by 50% and reset your skill cooldowns, which is why it is important to not miss.
- During this entire mechanic, the following patterns can occur, which you need to avoid while leading Weak Point damage to the boss and countering the clones.
- Cone-shaped shockwave: Follows a player briefly before shooting a shockwave, which 1 shots most players.
- Cross lasers: Avoid standing in the cross shaped area.
- Ground Explosions: These have different shapes, move to unaffected safe spots to avoid getting hit.
- Tentacles: Dodge tentacle's attacks and destroy it.
Check out the G3 Guide for additional information!
Battle Items:
- HP Potion of your choice
- Sacred Charm or Sacred Bomb
- Dark Grenade or Destruction Bomb
- Atropine Potion or Time Stop Potion
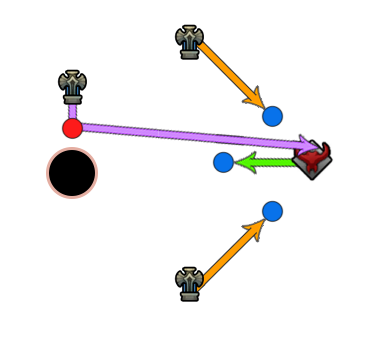
Player - Intercept orange lasers, stagger Akkan
Telegraph
- Occurs at or near x200 bars.
- Akkan teleports to the center and summons a poison aura around him.
- Four towers spawn that shoot an orange laser at Akkan forming an X shape.
- A stagger bar appears below the boss.
Description
- Find the location that is not being blocked by NPC's.
- Stand in front of the laser to break the link between the tower and Akkan.
- If all four links are severed, Akkan can be inflicted with stagger damage.
- The stagger bar will not decrease if you're not blocking the laser.
- You will gain a slowly stacking debuff that increases the damage they take from the laser.
- If the damage you receive becomes too large move out until the debuff stacks run out, then go back.
- Dangerous attacks marked with red telegraphs will periodically spawn and try to interrupt the process.
- Anyone hit by them will instantly die, so it is important to avoid them first and then proceed with the stagger.
NPC's - block orange lasers from reaching Akkan and green from reaching 9 o'clock.
Player - intercepts purple laser and deliver it to Akkan.
Telegraph
- Occurs at or near x165 bars.
- Akkan teleports to the 3 o'clock position on the arena.
- Additional towers are created at the 12, 6 and 9 o'clock positions.
Description
- To complete the mechanic, you must stagger the boss, but to be able to do that you must carry the purple laser towards Akkan from the far left.
- Rub your character against the laser at the 9 o'clock position to pick it up, then proceed to drag it across the arena towards Akkan at 3 o'clock.
- While dragging the purple laser, you will gain a movement speed reduction debuff that stacks to 3. If it reaches 3 stacks, your character will get dragged back to the starting position.
- An NPC will be standing in the center of the arena, blocking the green laser. Carry the purple laser to him and attach it to the NPC.
- Once the purple laser is attached to the NPC, wait until your debuff times out. Then re-take the laser from the NPC and finish dragging it over to Akkan and attach it to him.
- Then stagger Akkan and you're done.
Telegraph
- Occurs at or near x140 bars.
- Akkan teleports to the center, draws a large green area around him.
- Six towers spawn on the arena at 11, 12, 1, 5, 6 and 7 o'clock positions.
Description
- Your goal is to recognize which of the two shapes you must create, either Star or Hexagon. Then turn them in the right direction to create the required shape.
- The shape can either be a Star or Hexagon.
- Go to the towers that are facing the wrong way and interact with them by pressing "G" to turn them clockwise.
- Once all lasers are targeted to the correct direction and the shape is formed, the mechanic gets resolved.
- Be very careful not to stand in the path of the black lasers for too long, as they inflict large amounts of damage very quickly. On the contrary, white lasers do minimal damage.
- If you take too long to assemble the required shape, the raid will die to a periodical aoe explosion that Akkan is performing during the mechanic.
Three Shape Safespots
Telegraph
- Akkan teleports to the center of the arena.
- Flashes a large green pentagram on the ground.
Description
- Avoid the first attack by moving to either the 5 or 7 o'clock position when facing his backside.
- Then go directly behind him but stay at a large distance.
- And for the final safe spot, move inside, but avoid his small green aoe zone.
Four Curses
Telegraph
- Akkan places a green pentagram below him.
- Assigns players from the raid with a random curse.
- Finishes with casting a laser towards a non-cursed player.
Description
- Blue Curse
Stay close to Akkan, your character will run outwards, if it runs out of the marked area you die.
- Black Curse
Stay close to Akkan and make sure not to get knocked outside the zone by his attacks.
- Red Curse
Move away from Akkan, you will get pulled in. If you touch Akkan during this pull you'll die.
- Green Curse
Move away from the boss. Periodically, green explosions will occur under your feet. Wait for them to appear, then move to a safe spot and repeat this process 3 times. The explosions leave poisonous areas behind for a short period of time.
Skulls
Telegraph
- Akkan teleports to the center of the arena.
- Places a green pentagram below him.
- Green & White skulls move across the arena and from Akkan itself.
Description
- Move to the outer edges of the arena.
- Focus on dodging the green colored skulls, as they do not alter their trajectory.
- White skulls coming from Akkan aggro onto players and fear you if hit, but they do not reach the outer edges of the map.
Slimes & Tentacles
Description
- Akkan summons multiple tentacles on the arena, accompanied by a slime.
- Focus on killing the slime first. On its death, it creates a blue telegraphed explosion. Do not stand in it!
Plague Wave
Description
- Akkan suddenly dissapears and reappears at the edge of the map either at 3/6/9 or 12 o'clock.
- Quickly move to the opposite side of him to avoid this attack.
- Group up with your teammates as a horde of monsters will approach you.
- After this attack, Akkan will teleport to one player and perform an Execution attack.
Telegraph
- Occurs at or near x30 bars.
- Akkan teleports to the center and slams the ground in front of him repeatedly.
- He breaks the outer edge of the arena and despawns all disease puddles.
- A pack of monsters ambush and try to prevent you from dodging.
Description
Arena Break
- Your ideal safe spot during this entire mechanic is the back side of Akkan at all times.
- He can perform a frontal, side and a rotating laser during this phase, getting hit by them will knock you off the ledge.
- If your Sidereal gauge is ready, use Wei at x15 HP or lower, this will initiate a special sidereal attack that immediately completes the fight and brings Akkan to x0 HP skipping the final mechanic.
Destruction
- If you deplete his HP to x0 naturally, you must complete a destruction check similarly to gate 2 of Akkan.
- During this destruction Akkan will explode areas on the ground, always repeating the same pattern: Center, Middle, Sides. Use your Paralysis or Push immune skills to not get knocked off the ledge.
- Utilize Sidereal: Inanna to prevent random deaths from falling off.
Ivory Tower
x85
Catch/Stagger
Catch Green Seeds
Avoid Purple Seeds
Stagger
x45
Orbs/Fire
Destroy Golden Powder with Plants
Attack Purple Orbs till x15
Wait till Blue DR 0 Seconds
Use Flame Grenade
Before Raid
Traps
PICK UP BATTLE ITEM
To understand this sequence, please read the detailed explanations below first!
PreMechs
Normal Damage
Trap @ raid start
Stagger Check x3 (fail)
Counter/Stagger
Trap
Stagger x2
Trap
Destruction
(Repeat after x95 mech)
PreMechs
High Damage
Trap @ raid start
Stagger Check x2
Trap
Destruction
(Repeat after x95 mech)
x95
Clone
Go to the Clone
Counter it
x30
Marathon/Stagger

Go to Center
Go Opposite of Boss
Wait for Flame Breath
Run to Boss
Stagger
Final Phase
Traps at Start
Stagger Check x2
Trap
Destruction
During Raid
Stage Destruction
Avoid getting pushed into Red tiles
Purple & Normal Tiles are safe
Recover tiles by staggering boss and guiding red orb to broken tiles
x160 (Part 1)
Pizza
Move to 3 O'clock Position
Dodge first two slices and mirror explosion
Guide the 3rd slice towards the mirror
Move clockwise & repeat 2 more times
x160 (Part 2)
Stagger

Stagger Boss
Stagger at least the 2 bottom mirrors
using (Whirlwind Grenade) & skills
x110
Mirror Counter

Counter the real Mirrors
Real Mirror: Boss Stabbed & Red Thorn
Fake Mirror: Boss fake stabbed & Purple Thorn
Use Stagger skills on Boss in between counters
x60 (Part 1)
Sword Destruction

Use Destruction Bomb on the Mirror at 6 O'clock
Stagger Boss
Use Weak Point skills on the sword
x60 (Part 2)
Guardian Fight
Grab timing: Move after 2nd circle to the front of the boss
Kill Guardian
Stagger Boss Whirlwind Grenade
x40
Rage Phase
Mirrors spawn at 3x
Method 1: Focus boss and ignore mirrors
Method 2: Stagger mirror at 6 and fight at the bottom side
Check out the G1 Guide for additional information!
Battle Items:
- HP Potion of your choice
- Flame Grenade or Dark Grenade
- Sacred Charm or Sacred Bomb
- Atropine Potion
Description
- After x85 boss will spawn plants on the outskirts of the map that grab players.
What To Do
- Avoid yellow AoEs or destroy them.
What To Do
- Catch green seeds and avoid purple seeds.
- Green seeds will increase your stagger, while purple decreases your green stacks.
- Stagger boss after getting seeds. Avoid AoE attacks.
What To Do
- Boss will reflect damage for 45 seconds, do not attack until it is over. (Blue debuff icon under boss)
- Player will be targeted and attacked by the outside plants.
- Lead the plant attacks onto the golden powder to destroy them.
- Not destroying golden powders will sleep player if nearby.
- Attack purple orbs until 15 stacks.
- Wait until 45 seconds DR (Blue debuff icon under boss) is gone, then use Flame Grenade or any fire skill on the boss.
- If you do not pass in time, the boss will become more dangerous for the rest of the fight.
Check out the G2 Guide for additional information!
Battle Items:
- HP Potion of your choice
- Traps
- Destruction Bomb (Bound)
- Atropine Potion or Marching Flag
Description
- Pick up traps before starting the battle and move it to your combat item slot.
- The best time to throw the traps is either at the start of the raid or after a successful stagger check.
- NOTE: It's important to toss the trap right after the stagger happens.
- Tossing it early will cause the trap to be destroyed from his red AoE roar.
- Tossing it late will cause him to do a backflip, avoiding the trap.
- NOTE: It's important to toss the trap right after the stagger happens.
- Boss will generally perform a counter/stagger pattern ~9:30, 8:30, 7:00, 5:30. So you can save your traps then.
Description
- Over time, the boss will gain "Armor Parts" that stack up to 5 different icons.
- If the boss reaches 5 armor, the raid will wipe.
- After Destruction, Boss will be immune to Traps for ~40 seconds.
- It will take 2 traps to get to his Destruction phase where you can break off his Armor.
- Use Destruction Bomb (Bound) and skills with Weak Point affix to succeed the destruction check.
- Generally you want to destroy the Armor when the boss is around 3-4 stacks.


Description
- Around ~155x, blood orbs will spawn around the boss.
- Picking up these blood orbs will grant massive buffs for 15 sec (CDR, Regen, Speed).
- Getting hit during this buff will cause you to bleed to 10% HP and drop red orbs.
- Do not pot before your HP reaches 10% or you will keep bleeding till 10%.
- Pick up orbs after reaching 10% or use HP pots.
- Not picking up orbs will heal the boss when it touches. They will also blow up periodically if not taken.

Description
- After landing a trap, the boss will periodically perform stagger checks.
- Each stagger check will get harder.
- Generally, by the 3rd stagger, you will fail it, and a scripted event will happen:
- He will do a fire AoE around him, avoid it.
- Boss will also perform a Counter Pattern every ~1.5min into the fight, that's when the party will usually throw another trap.
- NOTE: if your damage is high (Boss HP ~110HP after 2nd stagger) throw a trap to go right into Destruction Phase. You can even do it after the first stagger if stronger.


Example
What To Do
- Go to the clone.
- Go to its front and use a counter skill.
What To Do
- Go to center.
- After he lands, move to the opposite side to avoid the AoE.
- Wait to avoid fire breath.
- Move towards boss, while dodging red orbs.
- After the Stagger check, dodge the AoEs around him while moving towards the center
What To Do
- Move to center and throw a trap on top of you as soon as it gets unlocked.
- Dodge away as soon as the boss moves/jumps towards you.
- If you fail to trap the boss, repeat step 1 & 2 once the boss moves goes to the edge of the arena.
- Throw another trap right after the 2nd Stagger check to get into the Destruction phase.
- From here on, the boss will do more damage and your goal will be to kill it.
Check out the G3 Guide for additional information!
Battle Items:
- HP Potion of your choice
- Destruction Bomb
- Dark Grenade or Whirlwind Grenade
- Time Stop Potion, Atropine Potion or Stimulant
What To Do
- Certain patterns of the boss can destroy the outer part (tiles) of the octagon shaped arena.
- Broken tiles have red effects on them. If you get pushed on those tiles, you will die.
- Some patterns allow you to recover broken tiles, which then turn purple. Purple and normal tiles are safe, you won't die if you get pushed on top of these tiles.
- To recover destroyed tiles, do as followed:
- Deplete the normal Stagger bar of the boss first.
- Succeed the Destruction check.
- Guide the big red orb, which spawns at the boss and follows the closest player towards a broken tile.
What To Do
- Once the pattern starts, go to the 3 O'clock position to the right of the boss.
- Dodge the first 2 slices and the mirror attack first before guiding the 3rd slice towards the mirror on that position.
- The slices are easier to dodge and readjust, the closer you are to the boss.
- Don't panic because of the yellow explosions caused by the mirror. It always explodes first before the 3rd slice locks on a position. So you can safely dodge that explosion first and should still have a second left to readjust the 3rd slice.
- Rotate clockwise towards the next mirror and repeat step 2. Upon completion, rotate one final time clockwise towards the next mirror to repeat step 2.
What To Do
- Stagger the boss first.
- Stagger at least the two bottom mirrors by using Whirlwind Grenade and stagger skills.
What To Do
- To succeed this mechanic, you need to Stagger the boss.
- The required Stagger is high, but by countering the correct mirrors, you get a Stagger buff to assist you.
- Countering the wrong mirrors or missing the Counter timing increases the Stagger difficulty and deals high damage.
- Counter Mirrors which the sword pierces.
- Ignore mirrors which aren't pierced by the boss' sword.
- Upon successfully countering the correct mirror, your counter skill will reset.
- Attack the boss after each counter, to reduce his stagger bar!
- Tips
- Boss always stabs 2 mirrors and pretend to stab 2. (4 in total)
- In case you forgot, the color of the thorn helps to differentiate between the correct and wrong mirror to counter. Red thorn indicates the correct mirror and purple one only comes out of the wrong one.
What To Do
- Use Destruction Bomb on the Mirror at 6 O'clock position, to destroy it.
- Stagger boss and use Whirlwind Grenade if needed.
- Use skills with Weak Point affix on the sword to destroy it.
What To Do
- Move to the front of the boss after the 2nd circle spawns below you, to get grabbed.
- Ignore the 3rd circle, since the boss will grab you before it explodes.
- Kill the Guardian.
- Stagger the boss.
What To Do
- Method 1: Ignore the mirrors and focus on dealing damage to the boss. Since 4 tiles will be destroyed because of the mirrors, you need to play carefully to avoid getting pushed into those.
- Method 2: Destroy the Mirror at 6 = O'Clock and try to fight the boss at the bottom part of the arena. This gives you more space to fight, but you have to sacrifice some damage during the transition to stagger the mirror.
What To Do
- Try to use a Counter skill as soon as he flashes blue.
- Failing this counter leads to destruction of all tiles hit by the cones.
Thaemine
x145
Tentacle Destruction

Run to the edge of the arena
Throw Destruction Bomb on tentacles
Stagger the boss
x145-100
Three Craters
Successful Counter/Stagger marks you
Stand in the crater once marked
Same crater must be targeted x2
x100 or x2 Crater
Destroy & Grab
Sidereal:Balthor if craters not destroyed
Locate the red tentacle
Throw Destruction Bomb
Get grabbed by the yellow telegraph
x55
Tentacle Destruction 2
Same as x145
x38
Eye Safe Zone
Boss hands transform into claws
Eyes on the map look towards a location
Boss dashes twice, then safe spot appears
Or use Sidereal: Balthor and break the shield.
x135
Counter
Counter the Orb
Boss counter can be Red or Blue Flash.
Countering Red Flash = Wipe
Move to the safe spot closer to the bottom side.
Hidden Azena
After Wings + Shockwave attack.
Use Sidereal:Azena shortly after it.
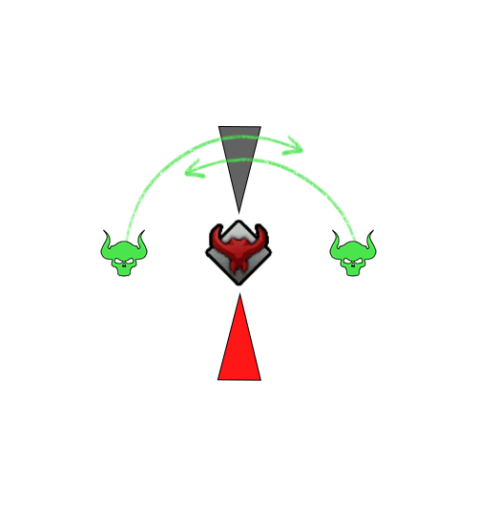
x72
Black or Blue Stagger

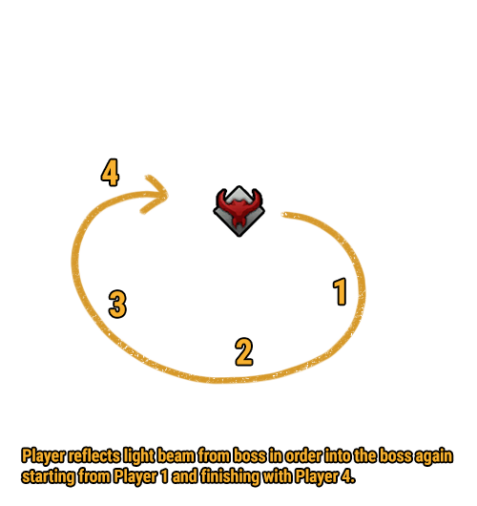
Identify the swirl color around the Boss, Black or Blue.
Attack the opposite color orbs towards the boss.
Use Hyper Awakening once available.
x18 HP
3 Monster Waves
Wave 1: Defeat 8 weak monsters
Wave 2: Defeat 4 elite monsters
Wave 3: Defeat 2 boss monsters
Do not counterattack, and dodge.
Use Sidereal: Thirain to hit both dragons.
x300
Sword Fight 1
Check which hand Thaemine is raising.
Go to the same side.
x275
Albion
Observe the patterns.
Then walk to the shown safe spots.
x255
Sword Fight 2
Dodge Red pizza while dealing damage to the sword.
x225
Safe Spot
Spacebar to avoid the darkness wave
Move to a safe spot
x210
Shield
& Clash
Perform 1st Clash.
Use Sidereal:Inanna versus red telegraphs.
Perform 2nd Clash.
Remove 40 HP shield of Thaemine.
x210-x90
Stage Break
& Clash
Every 45 seconds, Thaemine tries to break the stage in half.
Perform 3rd Clash.
Then let the stage break.
Perform 4th Clash or use Sidereal:Nineveh.
Use Sidereal:Nineveh for the 5th Clash if you didn't skip the 4th.
x90-x55
Fog
Black Fog starts to spread from the outer edges, reducing the playing field.
Get Thaemine to x55 as fast as possible.
x55
Safe Spot
Movement is inverted!
Complete the typing minigame.
Kill your clone.
Use Sidereal:Wei after this mechanic.
x55-x0
Fog + Clash
Fog spreads from the center to outer edges!
It expands: 20, 70 and 120 seconds from the start
5th Clash at x43
Check out the G1 Guide for additional information!
Battle Items:
- HP Potion of your choice
- Destruction Bomb
- Dark Grenade
- Atropine Potion or Stimulant
Organs
Blood Orb
Organ Stacks
- Upon Staggering or Countering the boss, it will spit out Organs onto the ground.
- These can be destroyed, spawning a Blood Orb in its place that can be collected, giving you an Organ Stack (max 10).
- If the Organs aren't killed or the Blood Orbs aren't picked up, they will return to the boss slowly.
- Letting this happen gives the boss 20% damage reduction for 10 seconds.
Cleansed Organism

Each stack provides:
- +10% damage
- +4% stagger
- max 10 stacks
Additionally, you gain: +1 Weak Point and +10% damage versus staggered foes.
- Organ stacks you've accumulated can be utilized during the fight and the Eye Safe Zone (x38 HP) mechanic.
- If you have at least 1 Organ stack and are under the effect of Sidereal: Balthor, stacks get transformed into a 30-second damage buff (Cleansed Organism) and the boss enters Frenzy & Endorphin state.
Bleed
Excessive Bleeding

- Getting hit by most of the boss attacks will inflict an uncleansable Bleed debuff to you for 30 seconds (max 20 stacks).
- When reaching 20 stacks, your character will become stunned for 10 seconds, Excessive Bleeding.
- This will cause the boss to perform a special attack.
Eyes

Eye Gauge

- In the second phase of the fight, you will see Eyes spread out on the floor.
- These move towards you players.
- You can walk over them, this will detonate the area beneath shortly after.
- Your character will be brought to 1 HP if caught within this explosion.
- If you remain next to an eye for too long, you will begin to build up Gauge below your feet.
- At 100% Gauge, your character will get rooted, and the Eye will accelerate towards you.
Frenzy

The Boss Movement and Attack speed is increased by 250%.
Endorphin

Players receive Status, Push & Bleed Immunity and have increased Movement Speed.
- If everyone has at least 1 Organ stack and is under the effect of Sidereal: Balthorr effect, then Frenzy & Endorphin is triggered.
- The boss converts x15 HP into a shield, which must be broken within 25 seconds (Frenzy).
- Utilize Dark Grenade and Atropine Potion
- You get an insanely large shield during this mechanic that can ignore all attacks.
- Endorphin - While this buff is active, players hit by the boss receive debuff stacks.
- If her shield is destroyed, the buffs/debuffs get removed and the mechanic ends.
- If not destroyed in time, the debuffs stacks accumulated during Endorphin slowly decay and deal massive amounts of damage that is impossible to survive.
Telegraph
- Occurs at or near x145 bars.
- The Boss teleports to the center of the arena and spawns blue telegraphed lines in all directions.
- A stagger bar appears below her feet.
Description
- Run to the outside of the map while avoiding the blue telegraphs.
- Getting hit by the attack will stun you.
- The Boss gains 36 stacks (tentacle connections)
- Throw Destruction Bombs and use long range skills on the tentacles to eliminate at least 6.
- When the connection is severed, yellow telegraphs will spawn and pull anyone caught within them to the boss, making them unable to move, avoid them!
- The remaining stack amount decides the difficulty of the stagger required to break her.
- Run to the boss and stagger it quickly.
- When successful, she will bombard the arena with falling rocks for a few seconds, simply avoid them.
- Getting hit will stun your character.
Telegraph
- Occurs after Tentacle Destruction.
- Three crater locations are spawned on the arena.
Description
- Successfully countering or staggering the boss will mark you with a Red Spike shape.
- You need to stand in one of the three craters in the ground and bait the boss attack onto it.
- The chosen crater gets 1 stack towards the mechanic and needs to be targeted a second time the same way whenever possible.
- Doing so will initiate the Destroy & Grab Main Mechanic, even if the boss HP hasn't reached 100 lines.
- If you fail to stack 2 explosions into the same crater or your group's damage is too high to have the opportunity to do so, you must use Sidereal: Balthor for the x100 HP mechanic to not wipe.
Telegraph
- Occurs at x100 bars or when 2 Crater Stacks have been reached.
- The Boss teleports to the center of the arena, exploding the 3 craters locations on the ground.
Description
Hidden Balthorr Method
- Utilize this method if you failed to stack the same crater twice, or you pushed the boss to x100 too quickly.
- After the crater areas have exploded, a text pop-up of Wei appears, the raid leader should use Sideral: Balthorr here.
- This will cause the mechanic to proceed normally, check the Regular Method for more info.
- If your Sidereal gauge is not ready, this will result in a wipe, make sure not to push x100 before that.
Regular Method
- Don't stand near the crater areas (especially the large one), as they will expand and explode when the mechanic begins.
- A tentacle marked with a red orb will appear.
- Run next to it and throw a Destruction Bomb on it, this will break the red orb and spawn a yellow telegraph that pulls you up to the boss.
- You must be caught within the yellow telegraph.
- If you got pulled up to the boss, you will survive her wipe attack and complete the mechanic.
Telegraph
- Occurs at or near x38 bars.
- The hands on the boss transform into claws.
- All eyes on the floor stop moving and point towards a location.
Description
Regular Method
- The boss starts performing multiple dashes.
- Look at the eyes and go to the spot they are pointing at.
- This general location will be the safe zone after the dashes.
- Before the 3rd dash, the eyes disappear, and a safe zone appears.
- Quickly go inside it and dodge the final dash of the boss with either space bar or a push immune skill.
Balthor Method
- Use Sidereal: Balthor to trigger the special Frenzy & Endorphin Raid mechanic, if you have collected Organ Stacks from killing blobs on the ground until this point.
- This will let you ignore the Eye Safe Zone and just tank the pattern.
- Deplete the shield of the boss within 25 seconds to complete this mechanic.
- Utilize Atropine Potion, Dark Grenade (and your Hyper Awakening) to make it in time.
Check out the G2 Guide for additional information!
Battle Items:
- HP Potion of your choice
- Sacred Charm
- Dark Grenade
- Panacea (Bound)
Weakness

- Lasts 20 seconds
- Cannot be cleansed
- Damage received is increased
- max 5 stacks
- Getting hit with various attacks that have a blue telegraph will inflict 1 Weakness stack to you.
- If you get electrocuted while having Weakness stacks, your character creates an explosion around you that does massive damage based on your stack amount.
- Getting electrocuted without Weakness stacks just stuns you with no side effects.
- Getting electrocuted without
- Play safe if you've got many stacks and wait out their duration.
Darkness
- 4 second debuff timer
- This is an ongoing mechanic during the final Phase.
- If you are affected by this debuff, you must run to either 12 or 6 o'clock before the timer runs out.
- When the timer expires, a puddle is created beneath them.
- Place it at the edge of the map and return to the fight.
- Make sure to not overlap the puddles with each other!
Telegraph
- Occurs at or near x135 bars.
- A cutscene is shown and the side of the arena breaks off.
Description
- Go to the bottom side of the bridge and counter the orb flying towards you.
- After you counter the orb, go to the boss and wait for him to glow blue before countering him.
- Move the safe spot at the bottom between the 2 yellow telegraphs.
Telegraph
- Briefly after you enter the new arena, the Boss raises his wings and emits a shockwave from his sides.
- Use Sidereal:Azena shortly after it to freeze and deal high damage to him.
Telegraph
- Occurs at or near x72 bars.
- Thirain's text popup appears on the screen, and the Boss teleports to the center of the arena.
- A stagger check is required.
Description
- Pay attention to the color that is swirling around the boss (Black or Blue), as this indicates which orb needs to be used.
- Attack the opposite color orb, while facing the boss with your character.
- Make sure not change your direction too quickly, otherwise the orb may take an incorrect path.
- The same color orb can be attacked to push away from the boss for more space.
- This will fling the orb at the boss and inflict large amounts of stagger damage.
- Manually complete the remaining stagger damage needed if some orbs were missed.
- Failing to stagger in time is a raid wipe.
- Use Hyper Awakening once available.
Telegraph
- Occurs at or near x18 bars.
- The Boss disappears, and the arena is surrounded in black and blue fog.
Description
Three waves of monsters will spawn that need to be killed within a time limit of around 1minute.
Wave1: 8 weak monsters
- Stay in the center, wait for the monsters to approach and group up, then blow them up.
Wave2: 4 elite monsters
- The monsters do lightning strikes that can trigger your Weakness stacks, so be careful.
- Use Dark Grenade to kill them quicker.
- Utilize skills with crowd control effects.
Wave3: 2 boss monsters
- At 3 and 9 o'clock, dragons will spawn.
- Stay at the center.
- One of them will perform a counterattack, do not counter it!
- This dragon will charge towards you. Dodge towards top or bottom side.
- Go behind this dragon and use Sidereal: Thirain towards both dragons.
- This kills one of the two dragons and leaves the remaining one with low HP.
- Finish off the dragon to complete the mechanic.
Check out the G3 Guide for additional information!
Battle Items:
- HP Potion of your choice
- Panacea (Bound)
- Dark Grenade
- Time Stop Potion or Atropine Potion/Stimulant
(Inverted Controls)
Thaemine's Identity
This is a special gauge that can be seen in the top left of your screen when fighting Thaemine.
- This gauge is divided into 5 different parts.
- Automatically builds up during the fight.
- Every 40 seconds 1 part is filled (30 seconds "The First")
- If a part is filled, the boss proceeds to do a special AoE attack.
- Normal or Enhanced (check below).
- If the gauge is fully filled, the boss does 2 special AoE attacks with impaired vision.
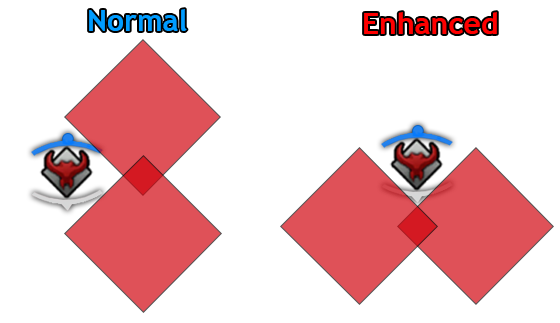
Normal vs. Enhanced
The type of attack Thaemine performs is based on his current HP. It is crucial to let your team know what kind of special attacks to expect, so people can dodge them correctly.
- x300 - x255 → Normal AoE
- x255 - 1st Arena Break → Enhanced AoE
- 1st Arena Break - x90 → Normal AoE
- x90 - 0x → Enhanced AoE
Cube
- Normal - Vertical sword, strikes left.
- Enhanced - Sword above right shoulder, strikes in front.
Circle
- Normal - Horizontal sword, stay in between the red.
- Enhanced - Stand behind, front or on the sides.

Pizza
- Normal - Flies in the air and puts sword behind his head. Stay in the safe spot for 2 explosions.
- Enhanced - Stay in the initial safe spot, then move to where the explosions happened.
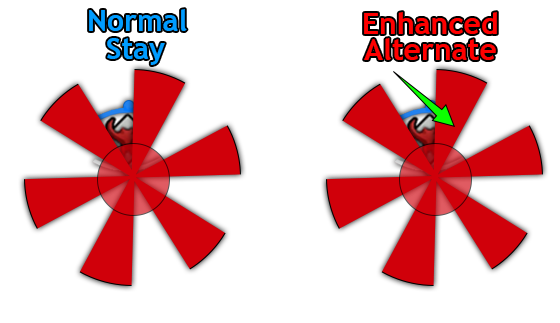
Special Attack
- When the Identity meter is full, Thaemine performs 2 random special patterns back-to-back.
- All players are affected by Darkness, you must know the safe spots based on the animations to survive.
- Darkness cannot be cleansed.
Mortal Wound

Getting hit by many of Thaemine attacks inflicts this debuff, each stack applies:
- +20% incoming damage
- Lasts 2 minutes
- Cannot be cleansed
Darkness

Getting hit by certain attacks from Thaemine inflicts you with Darkness.
- You lose the ability to see boss telegraphs for its duration.
- Some major raid mechanics inflict an uncleansable version of this debuff so watch out.
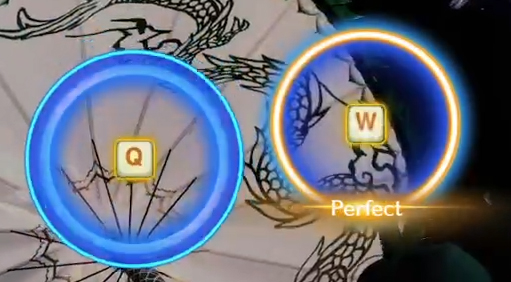
Clash is a new mechanic in Lost Ark that requires the player to press "G" and enter a timed minigame. These occur at specific moments in the raid after Thaemine emits a very bright flash of light.
- A total of 5 Clashes are available in gate 3.
- 6 if you include Hidden Nineveh as one.
- Perfect - greatly increase the damage you deal through Clash.
- Good - normal damage.
- Bad - stops the Clash and inflicts damage to you.
- Perfect Clash increases your ATK Power by +10% for 25 seconds per stack.
Dark Aura

Dark Mark
Dark Aura
- Thaemine raises his hand holding a blue energy orb, then explodes it.
- Then he teleports, slams in front of him and shoots a blue beam.
- He spins either 180 or 270 degrees counter-clockwise and strikes the ground twice.
- Roughly every 60 seconds, he does this pattern if he's not interrupted by main mechanics.
- He marks and inflicts you with a Dark Mark debuff for 6 seconds.
- You have a small blue sword above your heads. You must place it on the outskirts of the stage and return to the fight.
- Don't overlap these, as they create advanced puddles that do continuous damage and inflict darkness if you step on them.
- Right before the Dark Mark disappears, all existing Shadow Clones will shoot red telegraphed blades towards a random person that inflict Mortal Wound and do a lot of damage.
Blue Sword(Dark Mark)
Shadow Clone
Telegraph
- Occurs at the start of the fight.
- The Boss sits on his throne in the very back of the arena.
- He raises either his left or right hand.
Description
- Go to the same side that Thaemine indicated with his raised arm (from your perspective).
- Wait on the outskirts until he throws his energy ball and it explodes.
- Proceed to stagger the sword and inflict as much damage as possible.
- Damage you've inflicted will persist for the 2nd Sword Fight later.
Telegraph
- Occurs at or near x275 HP bars.
- Thaemine teleports to the center of the arena.
- Starts walking downwards while surrounded by a red tornado.
- Floats into the air and emits a darkness wave.
Description
- Try to space bar the darkness wave if possible, otherwise cleanse or use purify.
- Players affected by the darkness debuff won't see the ground pattern.
- Thaemine shows a series of red telegraphed attacks on the ground,
- Remember the safe spots and walk to all of them to be safe.
Telegraph
- Occurs at or near x255 HP bars.
- Thaemine surrounds himself in a blue shield and creates a donut shape attack below him.
Description
- Thaemine's sword spawns in the center.
- A Red pizza attack is visible, and tracks your movement.
- The Red telegraph explodes at the very end of this pattern.
- After this, the player with the aggro should run to 9 o'clock, as the sword will charge after him.
- This is to create space between the boss and the sword.
- Deplete the HP of the sword to x0 to finish this phase.
- If you struggle during this phase, check the Sword Pattern section in the normal guide.
- All Identity attacks become enhanced when below x255 HP. This lasts until the first stage break happens.
Telegraph
- Occurs at or near x225 HP bars.
- Thaemine teleports to the center of the arena, kneels down, and emits a darkness wave.
- The field gets flooded with red telegraphs.
Description
- Use your spacebar to avoid the darkness wave.
- You won't be able to see safe spots if you get hit with the debuff.
- Choose a safe spot anywhere on the bottom side.
- Cutscene happens and the mechanic ends.
Telegraph
- Occurs at or near x210 HP bars.
- A cutscene happens.
- Thaemine reappears while on his horse with a massive shield of x40 HP.
Description
- Thaemine rides in a "U" shape across the arena (avoid his front), returns to the center, and emits a bright flash (Clash).
- Press "G" in the white glowing spot to initiate the clash.
- Perform 3 sets of 1 key press each.
- Use Sidereal:Inanna here so that the red ground attacks don't interrupt you while dealing damage to the boss.
- Skippable: After a few seconds, Thaemine will teleport to the center and flash again (2nd Clash), if you didn't break his shield yet.
- The spot is once again slightly in front of where the flash happened.
- Perform a set of 1 key → 2 keys → 2 keys in succession.
- If the shield is depleted in time, the mechanic ends.
- If you fail, it's a raid wipe.
Telegraph
- Occurs between x210 - 90 HP bars.
- Every 45 seconds, Thaemine teleports to one edge of the arena.
- Shows a yellow telegraph splitting the stage in half.
Description
- Clash 3: Take the clash near the center of the map in front of the boss.
- Perform 2 sets of 1 key press each.
- Break: After 45 seconds, Thaemine will try to break the stage again.
- Since you can't Clash on two stage breaks in a row, you must let him break the stage this time.
- Do not stand near the part where the arena gets split in half.
- All Identity attacks become their normal version once the stage is broken, this lasts until x90 HP.
- Clash 4: Take the clash near the center of the broken arena in front of the boss.
- Perform 2 sets of 1 key press each.
- If your DPS is high enough to reach x90 HP quickly, then Hidden Nineveh can be used in front of Thaemine to skip Clash 4.
- Break: After another 45 seconds, Thaemine will try to break the stage again.
- If you didn't use Hidden Nineveh to skip Clash 4 then use her by standing in front of the boss here.
Telegraph
- Occurs at or near x90 HP bars.
- The fight happens on a new stage.
- All Identity attacks are the enhanced version until the end of the fight.
- Black Fog starts to spread from the outer edges, reducing the playing field.
Description
- During this phase, it is advised to stack the Shadow Clones on the same spot to reduce the attacking area of them, as the playing field gets smaller.
- DPS the boss until x55 HP and avoid all the regular attacks.
Telegraph
- Occurs at or near x55 HP bars.
- Thaemine teleports to the center of the arena.
- The field gets flooded with red telegraphs.
Description
- A typing mechanic must be completed while the red telegraphs appear.
- Solve the typing test and move to a safe spot (not red).
- Movement controls are inverted.
- If you succeed, you are teleported to a separate room, where you must kill a clone (Inverted movement is still active here).
- After killing your clone, you are brought back out where you can DPS the boss with a 50% damage reduction.
- Dodge a pizza pattern, and the mechanic is complete.
- After this mechanic, use Sidereal:Wei as soon as you can to skip to the final mechanic.
Telegraph
- Occurs at or near x55 HP bars.
- Black Fog starts to spread from the center to the outer edges, reducing the playing field.
- The Fog expands 3 times: 20, 70 and 120 seconds from the start.
- The playfield will shrink to just the edges of the map eventually.
Description
- Once you reach x43 HP, the 5th Clash happens, ready yourself to press "G" in the correct spot.
- This spot is behind the boss.
- Perform a set of 1 key → 2 keys → 3 keys in succession.
- Bring Thaemine to x0 HP and you've completed the raid.
- Thaemine dashes backwards, kneels down and slowly thrusts his sword forwards.
- Then releases a long range frontal attack that grabs anyone in its path.
- Dodge to the sides as soon as you see him dashing backwards.
- Thaemine slashes forward twice.
- Teleports his sword to his back and tries to grab you.
- Then slams the left side of him.
- Avoid being directly behind him during the grab and never be on his left.
- Thaemine jumps multiple times in a sequence of Dash → Slash → Dash → Slash → Dash → Targeted Swords.
- During the final attacks, you must kite it in one direction.
Echidna
x180 HP
First Encounter
Avoid Flame Breath, Stun and Grab
Kill the Elite Mobs next to the Boss
Use Ally Skill: Azena on Boss after his shield breaks
x162 HP
Run Phase
Reach Boss before time runs out
Stagger Boss
Use Ally Skill: Azena whenever it is available
x135 HP
Clone Split

Safe spot on odd colored line
2nd odd colored line points to Counter location
x110 HP
Invasion
Use Ally Skill: Avele next to Boss
Wait for mobs to close in and use Follow-up Ally Skill
Kill remaining mobs before they explode
x90 HP
Mini Boss
Use Whirlwind Grenade (Bound) and stagger Mini Boss
x50 HP
Final Phase
Use Ally Skill: Azena or Avele once ready
Avoid standing in the red fog area at the edge of the arena.
Charm Meter
25% & 75% Meter
Place it on Blue, Connecting or
Neighboring tiles
Don't place on Corrupted tiles
50% & 100% Meter
Create path Mirror ⇾ Boss by standing between them
x210 HP
Mirror Counter
Counter odd direction looking, blue glowing portrait
Use Ally Skill: Azena
x137 HP
Huge Echidna
Use Ally Skill: Thar as soon as you can close to Echidna.
Dodge horizontal lasers & 3 Boss Lasers
Succeed counter
Move to 6 O'clock for Clash
Use skills to stagger Echidna.
Basement Meter
50% Meter
Use Ally Skill: Ephernia
or Flame Grenade at highlighted Wall
100% Meter
Don't look at Echidna
Hit and kill snakes before they reach Echidna.
Use Flame Grenade if necessary.
x120 HP
Basement Clash
Occurs at x120, x100 and x80 HP
Go to the highlighted spot and succeed the clash.
x50 HP
Mirror Stagger
Follow while looking at the Mirror's back & Stagger
Check out the G1 Guide for additional information!
Battle Items:
- HP Potion of your choice
- Whirlwind Grenade
- Atropine Potion or Stimulant
Telegraph
- Mobs spawn between the players and the Boss. Some mobs can stun the players. (Blue Telegraph)
- The Shadow of a big dragon flies over the battlefield, followed by a flame breath attack.
- Periodically, small dragons fly over the battlefield and try to grab players. (Yellow Telegraph)
- An elite mob connected with a line to the boss prevent him from taking any damage.
Description
- Run to the elite mob, and try to kill it as soon as possible.
- While doing so, dodge the stuns and grabs of the normal mobs. And avoid standing in the flame breath path.
- After killing the elite mob, use Ally Skill: Azena on the Boss after his shield gets taken down by Avele.
Telegraph
- Boss teleports away.
- A timer appears on the top left of your screen.
Description
- Use the jump interaction on the right side of the battlefield to move towards the new area.
- Kill mobs on the way and avoid getting hit by AoEs.
- Upon reaching the big dragon, stay close to it, while dodging its attacks and kill it.
- After reaching the boss, deplete his stagger bar.
- Whenever you have at least 3 segments on the Ally Skill Bar, use Ally Skill: Azena on the boss.
Telegraph
- Boss teleports to the center and disappears.
- Two waves of lines appear. Each wave has one line, which has a different color than the rest.
- At the end of each wave, a clone runs through the field on each of the lines, followed by a big AoE attack.
- After the second wave, boss appears at a specific spot and requests a counter.
Description
- To avoid taking damage from the AoE at the end of first wave, stay on the odd colored line, which creates a safe spot after getting hit by the running clone.
- During the 2nd wave, pay attention to the flow direction of the odd colored line, since it points towards the location where the boss will appear for the counter.
- Once you stand on the line, move towards the flow direction until you reach the edge of the circle.
- Wait for the clones to run past the lines and prepare to counter the boss.
Telegraph
- Armen speaks and his dialogue is displayed at the bottom of your screen.
- Mobs spawn outside the Battlefield and rush towards the players.
- After a short duration, surviving mobs on the field explode and hit players in a big area.
Description
- As soon as you see Armen's dialogue, use Ally Skill: Avele while standing close to the boss.
- Wait for the mobs to move closer to the Boss and use the Follow-up Ally Skill.
- Make sure to cast it within 20 seconds after using Ally Skill: Avele.
- If mobs survived the Ally Skills, focus and kill those fast, before they explode.
Telegraph
- A Cutscene plays.
- You are teleported to the mini boss.
Description
- Use Whirlwind Grenade (Bound) and stagger skills on the Mini Boss to succeed the stagger check.
- Bring the mini boss' hp to x50 to trigger the final phase.
Telegraph
- Cutscene gets played.
- A red fog surrounds and shrinks the battlefield.
Description
- Touching the red fog deals damage to the player.
- Bring down Boss' HP to x0 to clear this gate.
- Use Ally Skill: Azena or Avele whenever it is ready.
Check out the G2 Guide for additional information!
Battle Items:
- HP Potion of your choice
- Flame Grenade
- Atropine Potion or Stimulant
Charm

Certain mechanics and patterns apply on hit a charm debuff stack to players, which lasts for 30 seconds and is displayed above their head.
Upon reaching 3 stacks, the player gets charmed briefly and gets a Atk. Power reduction debuff.
The entire Battlefield consists of multiple hexagon shaped tiles. They can be either in clean or corrupted state. Some patterns and interactions can change the state of each tile from clean to corrupted or vice versa.
Clean

Corrupted

Corrupted tiles get activated during certain patterns and will start to glow red.
Touching those tiles will increase your charm stacks.
If a tile fully gets surrounded by other corrupted tiles, a gigantic flower will bloom on it. Once this happens, the affected and the surrounding tiles will give charm stacks to players stepping on it.
The Charm Meter displayed on the top left of your screen fills up over time. Additionally, every time a player get charmed, it gets a slight progress boost.
Once the Charm Meter reaches certain thresholds, the following forced patterns will occur.
Tile Flip
Telegraph
- This pattern occurs once the Charm Meter fills up to 25% or 75%.
- You get a ring below their feet, which slowly fills up. Once full, the tile the player stands on will be corrupted.
- At the same time, you will be marked with a crosshair above your head and will be shortly after traced by a big line attack.
Description
- Don't step on the red glowing corrupted tiles to avoid getting charmed.
- Ignore the line tracing you, and focus first on placing the corrupted tile on a spot based on the following conditions:
- It needs to be a clean tile.
- It is either a tile which is on the connecting path between the 2 blue highlighted tiles, or on a blue highlighted tile, as long as it is clean.
- Avoid overlapping it on a corrupted tile.
- After corrupting a tile, calmly move until the line stops tracking you, and stay away from it.
At any given time, there are two randomly selected blue highlighted tiles at the edge of the battlefield. You need to be aware of the position of those two tiles for this pattern.
Cleansing Mirror
Telegraph
- This pattern occurs once the Charm Meter fills up to 50% or 100%.
- The camera zooms out, and you view the battefield through a mirror.
- The Boss teleports to one of the blue highlighted tiles. A mirror spawns on the other blue highlighted tile.
- You get a big pink circle around you.
- After a short delay, you will be imprisoned. The mirror shoots a laser, which bounces from you to Echidna.
Description
- The goal is to create a path from the mirror to the boss and force the laser to hit the boss.
- Stand on a tile between the boss and the mirror.
- If done correctly, it turns all corrupted tiles the laser passed through into clean ones. So the ideal path the you create consists of as many corrupted tiles as possible.
- The following criteria should be paid attention to, to avoid mistakes:
- Avoid forcing the laser through a clean tile, since it flips it into a corrupted one.
- The laser bounces to the boss as long as she is close to you. But if she is too far away, it won't bounce at all, which leads to failing this mech.
- After successfully completing this mechanic, 2 other tiles at the edge of the battlefield will be randomly selected as blue highlighted tiles. Scout for these for future tile flips.
If you fail to complete this mechanics for the second time, it leads to a raid wipe.
Telegraph
- This pattern re-occurs periodically after the first occurrence.
- Boss sits on a swing and gets lifted above the ground.
- A NPC dialogue window appears, and all corrupted tiles glow red until this pattern gets resolved.
- The players' vision is limited by a pink fog.
- Flowers start to bloom on random tiles closer to the boss, which give charm stacks to nearby players.
- Blue telegraphs appear below player's feet. After a short delay, a flytrap spawns on that spot and grabs players standing on it and deals 240% of their Max HP as damage.
Description
- As soon as you see Echidna sitting on the swing, run towards the farthest edge of her.
- Once you see the blue telegraph below your feet, move to the next clean tile. Repeat this process until no more blue telegraph appears below you.
Telegraph
- This pattern occurs once per encounter, mostly around the 5 minutes mark.
- Echidna teleports to a nearby edge tile, sits on a swing and gets lifted above the ground.
- A big red telegraph expands from her position, followed up by an explosion.
- The players' vision is limited by a pink cloud, and all corrupted tiles glow red until this pattern gets resolved.
- Pink butterflies fly around the map.
- A chain connects you with Echidna, which periodically applies a stacking debuff.
Description
- As soon as you see Echidna teleporting to an edge tile and sitting on the swing, move close to her and wait for the explosion to occur.
- As soon as you get connected to Echidna by a chain, you have to start running to be at least 6 tiles away from her to break the chain.
- If you are too slow, you will get charmed.
- While creating distance, avoid getting hit by the butterflies, otherwise you will fall asleep for 10 seconds.
Telegraph
- A cutscene happens.
- Waves of seven mirrors in a line slowly approach the players, while leaving a trail of pink puddles behind.
- One mirror glows blue.
Description
- The goal is to survive the waves by countering the correct mirror with echidna's portrait, which looks at a different direction than the other 6 mirrors, and glows blue.
- The damaging pink puddle trails left behind by a line disappear as soon you counter the correct mirror.
- After successfully resolving this mechanic, the boss gets staggered. Focus on dealing damage and use Ally Skill: Azena.
Telegraph
- After a short cutscene, you will be teleported to a different area.
- A gigantic Echidna appears at the top side of the area.
- Two waves of mirrors appear on each side, which shoots lasers. The laser stuns the player on hit.
- Echidna shoots 3 times a laser to a side, with shorts intervals between each shot.
- The boss raises her right hand and requests a counter.
- After a while, Echidna blows a kiss, sends out flying hearts and initiates a clash opportunity.
Description
- To resolve this pattern, you need to deplete the hidden stagger bar of Echidna.
- The laser between the mirrors turns off for a few seconds so that you can pass through.
- Dodge the lasers shot by Echidna to avoid getting a charm stack.
- Use Ally Skill: Thar as soon as it is available by standing close to echidna.
- Succeed the counter, which gives you a stagger buff. Upon success, Echidna will collapse and give a short window of opportunity to deal damage & stagger.
- As soon as she blows a kiss, move to 6 O'clock (back side of the battlefield). As soon as the blue circle appears, press “G” and succeed the clash.
- After the clash, keep using your skills to do stagger damage until you move to the next phase.
After resolving the x137 HP Huge Echidna Mechanic, you will be teleported to the basement, which leads to the following changes:
- Max Ally Skill Segments are increased by 1. (5⇾6)
- The battlefield gets surrounded by walls. If Echidna's abilities hit and force players to collide with the walls, the Charm Meter gets a progress boost.
Big Snakes
Telegraph
- This pattern occurs once the Charm Meter fills up to 50%.
- Ren speaks, and her dialogue is displayed at the bottom of your screen.
- The boss opens her arms and looks towards the sky, while being surrounded by a pink aura.
- Multiple red telegraphs expand from the walls, followed by giant snakes after a short delay.
Description
- Common Method: Once you see Ren's dialogue, use Ally Skill: Ephernia to burn all walls and skip the rest of this mechanic.
- Uncommon Method
- Locate at the closest wall, which displays a red outline upon hover.
- Use Flame Grenade on that wall to delay its red telegraph.
- Wait for the other wall's snakes to pass through. Afterward, move away from the burning wall's telegraph.
Small Snakes
Telegraph
- This pattern occurs once the Charm Meter fills up to 100%.
- Boss disappears into the ground and summons multiple clones performing a cone-shaped attack.
- Echidna reappears in the center and gets stationary. She occasionally targets you with a cone attack.
- Small snakes spawn at the edge of the battle and move towards the boss.
- Towards the end of the pattern, clone's of Echidna spawn and attempt to stun you.
Description
- Dodge the clone's attack.
- From the moment Echidna reappears in the center, you should avoid looking directly at her until this pattern is over. Otherwise, you will obtain charm stacks.
- If you get targeted by Echidna's cone attacks, try to move away from that area as soon as it locks and an expanding blue telegraph appears. This attack charms on hit.
- Pay attention to the mini-map, which highlights snakes with a red dot.
- Prevent the snakes from reaching the boss to avoid a raid wipe.
- Snakes die after they got hit a certain amount of time. Flame Grenade are effective against this type of snakes.
- Dodge the clone's attacks by moving away from their front.
Telegraph
- Occurs at x120, x100 and x80 HP.
- Echidna floats back, disappears and reappears close to the wall at 11 O'clock.
- A blue clash circle appears on her left side, followed by a white snake lunging towards that spot.
Description
- The goal of this pattern is to prevent the stage destruction and complete the snake clash. Killing both snakes gives a permanent 30% Damage Increase buff.
- Moves close to the first blue clash circle, press “G” to take the clash. Succeed it.
- At x80 HP, the 3rd clash occurs, upon success it gives the permanent 30% Damage Increase buff.
Telegraph
- Echidna disappears and summons a big mirror in the center, surrounded by small mirrors at x3 and x3+1 positions.
- A stagger bar appears below the big mirror and will keep repeating the steps below.
- The big mirror turns slowly, either clockwise or counterclockwise, and performs an attack which imprisons players looking at it on hit.
- Shortly after, the small mirrors at it's back will use the same attack and imprison player's looking at those.
Description
- Simply follow the back of the big mirror while looking at it, and keep attacking it until you deplete the stagger bar.
Credits
Written by Perciculum
Video Footage from Raeinor