Thaemine Gate 1 Guide
The first gate of Thaemine requires good reaction speed and team coordination to overcome. While the fight is rather simple overall, it still demands your attention to not mess up.
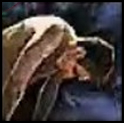
Enemy Information
| Normal Mode | Hard Mode | Monster Type | Weakness | Tauntable |
| 1610 Item Level | 1620 Item Level | Demon | None | Yes |
- HP Potion of your choice
- Destruction Bomb
- Dark Grenade
- Atropine Potion or Stimulant
Raid Rewards
| Gold | Material | Box Material | Box Cost | Auction Material | First Clear | |
| Normal | ||||||
| Gate 1 | 2700 |  3 3 2 2 | 3 2 | 1500 | 1,000,000 x20 x8 x20 | |
| Gate 2 | 3300 | 4 3 | 4 3 | 1800 | ||
| Gate 3 | 5000 | 6 4 | 6 4 | 2500 | 5 | |
| Hard | ||||||
| Gate 1 | 4400 | 6 6 | 6 6 | 2000 | 1,000,000 x20 x8 x20 | |
| Gate 2 | 5500 | 8 9 | 8 9 | 2400 | ||
| Gate 3 | 8900 | 12 12 | 12 12 | 2800 | 10 | |
| Gate 4 | 9800 | 12 12 | 12 12 | 3600 | 10 | |
This guide assumes that you are familiar with the recommended Raid Build for your class.
Learn about the Thaemine Gates: 2 / 3 / 4
Main Mechanics Overview
Once you have read through the detailed description of the main patterns, use the “cheat sheet” during the raid, or check out our condensed Cheat Sheet Collection for all Legion Raids on one page.
x145
Tentacle Destruction
Run to the edge of the arena
Throw Destruction Bomb on tentacles
Stagger the boss
x145-100
Three Craters
Successful Counter/Stagger marks players
Marked player stands in the crater
Same crater must be targeted x2
x100 or x2 Crater
Destroy & Grab
Sidereal:Balthor if craters not destroyed
All Players - x3+1 on the outer edge
Locate the red tentacle
Both partners throw Destruction Bomb
Get grabbed by the yellow telegraph
x55
Tentacle Destruction 2
Normal Mode: Same as x145
Hard Mode: Don't kill the Raspberry!
Stagger the boss
x38
Eye Safe Zone
Boss hands transform into claws
Eyes on the map look towards a location
Boss dashes twice, then safe spot appears
x35 HP
(Hard Mode)
Eye Black Hole

Spread out around the edge of the map
Look at the minimap, and avoid the boss
When the eye disappears, look for a counterattack
x145
Tentacle Destruction

Run to the edge of the arena
Throw Destruction Bomb on tentacles
Stagger the boss
x145-100
Three Craters
Successful Counter/Stagger marks you
Stand in the crater once marked
Same crater must be targeted x2
x100 or x2 Crater
Destroy & Grab
Sidereal:Balthor if craters not destroyed
Locate the red tentacle
Throw Destruction Bomb
Get grabbed by the yellow telegraph
x55
Tentacle Destruction 2
Same as x145
x38
Eye Safe Zone
Boss hands transform into claws
Eyes on the map look towards a location
Boss dashes twice, then safe spot appears
Or use Sidereal: Balthor and break the shield.
Sidereal
 Wei
Wei
- Generally used as first sidereal for the extra stagger and damage he provides.
 Thirain
- Ideally used if the boss is affected by Armor Stacks so they can be depleted quicker.
 Balthorr
- Used for the x100 HP mechanic if a crater was not targeted by x2 Red Spikes.
- Used to activate Frenzy & Endorphin mode.
Raid Mechanics
Raid mechanics cover the passive mechanics that are persistent through the entire raid.
Organs
Blood Orb
Organ Stacks

- Upon Staggering or Countering the boss, it will spit out Organs onto the ground.
- These can be destroyed, spawning a Blood Orb in its place that can be collected, giving you an Organ Stack (max 10).
- If the Organs aren't killed or the Blood Orbs aren't picked up, they will return to the boss slowly.
- Letting this happen gives the boss 20% damage reduction for 10 seconds.
- Support players should collect at least 1 Organ Stack, while DPS players as many as possible.
Cleansed Organism

Each stack provides:
- +10% damage
- +4% stagger
- max 10 stacks
Additionally, you gain: +1 Weak Point and +10% damage versus staggered foes.
- Organ stacks you've accumulated can be utilized during the fight and the Eye Safe Zone (x38 HP) mechanic.
- If everyone has at least 1 Organ stack and is under the effect of Sidereal: Balthor, stacks get transformed into a 30-second damage buff (Cleansed Organism) and the boss enters Frenzy & Endorphin state.
Ghosts
Red Moon

- When your HP drops too low (around 25%), Ghost creatures will appear and follow you (only visible to you).
- You must kill them or escape their radius indicator and detach the link between them before the Red Moon above your head fills up.
- If you fail to do so, your character will get mind controlled.
- Mind controlled players cannot be cleansed.
Bleed
Excessive Bleeding

- Getting hit by most of the boss attacks will inflict an uncleansable Bleed debuff to you for 30 seconds (max 10 stacks).
- When reaching 10 stacks, your character will become stunned for 10 seconds, Excessive Bleeding.
- This will cause the boss to perform a special attack aimed at this player.
- She will do a series of alternating AoE attacks, during which you can stagger the boss.
- Be mindful that all attacks inflict Bleed during this, so it's easy to reach 10 stacks yourself.
- You can choose to ignore the stagger, as she will perform a counter-attack right after it.
- She will spin clockwise 180° for the counter-attack.
- Successfully staggering or countering her will end this special attack.
- If failed, she will do it again.
Eyes

Eye Gauge

- In the second phase of the fight, you will see Eyes spread out on the floor.
- These move towards the nearest players.
- You can walk over them, this will detonate the area beneath shortly after.
- Your character will be brought to 1 HP if caught within this explosion.
- If you remain next to an eye for too long, you will begin to build up Gauge below your feet.
- At 100% Gauge, your character will get rooted, and the Eye will accelerate towards you.
Frenzy

The Boss Movement and Attack speed is increased by 250%.
Endorphin

Players receive Status, Push & Bleed Immunity and have increased Movement Speed.
- If everyone has at least 1 Organ stack and is under the effect of Sidereal: Balthorr effect, then Frenzy & Endorphin is triggered.
- The boss converts x15 HP into a shield, which must be broken within 25 seconds (Frenzy).
- Utilize Dark Grenade and Atropine Potion as a DPS or Stimulant as a SUP to provide maximum buffs.
- Players get an insanely large shield during this mechanic that can ignore all attacks.
- Endorphin - While this buff is active, players hit by the boss receive debuff stacks.
- If her shield is destroyed, the buffs/debuffs get removed and the mechanic ends.
- If not destroyed in time, the debuffs stacks accumulated during Endorphin slowly decay and deal massive amounts of damage that is impossible to survive.
- Whenever the boss gets naturally staggered, she gains 3 shield stacks.
- You're able to remove them by inflicting Weak Point damage.
- Sidereal: Thirain removes roughly 1.5 shields by himself.
- Her natural stagger bar disappears while she has these active.
Weakened
- Successful counterattacks or completed natural staggers grants a stack of Weaken to the boss.
- Stacks infinitely and with each stack her knockdown duration increases.
Main Mechanics
Main mechanics occur at certain HP intervals.
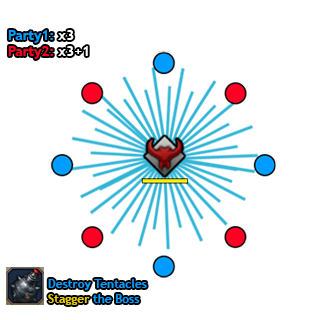
Telegraph
- Occurs at or near x145 bars.
- The Boss teleports to the center of the arena and spawns blue telegraphed lines in all directions.
- A stagger bar appears below her feet.
Description
Players spread out to these positions:
Party1: x3
Party2: x3+1
- Run to the outside of the map while avoiding the blue telegraphs.
- Getting hit by the attack will stun you.
- The Boss gains 36 stacks (tentacle connections)
- Throw Destruction Bombs or use long range skills on the tentacles to eliminate the connections.
- When the connection is severed, yellow telegraphs will spawn and pull anyone caught within them to the boss, making them unable to move, avoid them!
- The remaining stack amount decides the difficulty of the stagger required to break her.
- Run to the boss and stagger it quickly.
- When successful, she will bombard the arena with falling rocks for a few seconds, simply avoid them.
- Getting hit will stun your character.
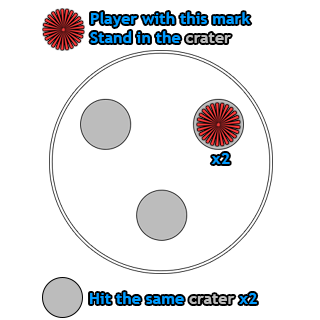
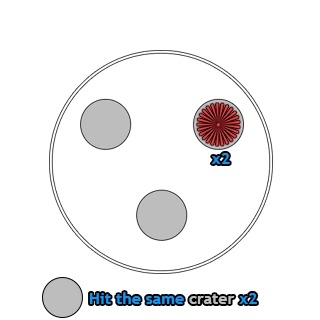
Telegraph
- Occurs after Tentacle Destruction.
- Three crater locations are spawned on the arena.
Description
- Successfully countering or staggering the boss will mark one player with a Red Spike shape.
- This player needs to stand in one of the three craters in the ground and bait the boss attack onto him.
- The chosen crater gets 1 stack towards the mechanic and needs to be targeted a second time the same way whenever possible.
- Doing so will initiate the Destroy & Grab Main Mechanic, even if the boss HP hasn't reached 100 lines.
- If you fail to stack 2 explosions into the same crater or your group's damage is too high to have the opportunity to do so, you must use Sidereal: Balthor for the x100 HP mechanic to not wipe.
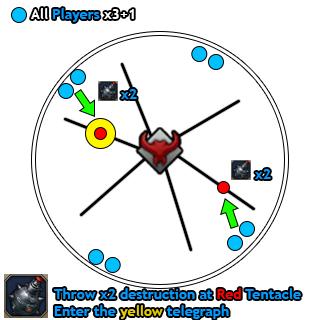
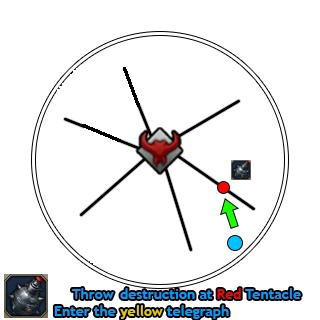
Telegraph
- Occurs at x100 bars or when 2 Crater Stacks have been reached.
- The Boss teleports to the center of the arena, exploding the 3 craters locations on the ground.
Description
Hidden Balthorr Method
- Utilize this method if you failed to stack the same crater twice, or you pushed the boss to x100 too quickly.
- After the crater areas have exploded, a text pop-up of Wei appears, the raid leader should use Sideral: Balthorr here.
- This will cause the mechanic to proceed normally, check the Regular Method for more info.
- If your Sidereal gauge is not ready, this will result in a wipe, make sure not to push x100 before that.
Regular Method
- Group up in pairs between party 1&2 and run to the outer edge of the arena at x3+1 positions.
- Can also be treated as "free for all" 2 nearest players to the red orbs enter it.
- Don't stand near the crater areas (especially the large one), as they will expand and explode when the mechanic begins.
- Blue telegraphed attacks in a star shape will periodically appear, these will imprison you if hit by them.
- Two tentacles marked with a red orb will appear, followed by another three after it (2 in Hard Mode).
- Run next to them with your partner and throw a Destruction Bomb on them, this will break the red orb and spawn a yellow telegraph that pulls you up to the boss.
- Maximum two people per red orb.
- Both players must be caught within the yellow telegraph.
- Everyone pulled up to the boss will survive her wipe attack and complete the mechanic.
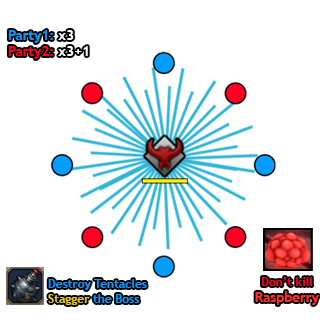
Telegraph
- Occurs at or near x55 bars.
- The Boss teleports to the center of the arena and spawns blue telegraphed lines in all directions.
- A stagger bar appears below her feet.
Description
Normal Mode
Players spread out to these positions:
Party1: x3
Party2: x3+1
- Run to the outside of the map while avoiding the blue telegraphs.
- Getting hit by the attack will stun you.
- The Boss gains 36 stacks (tentacle connections)
- Throw Destruction Bombs or use long range skills on the tentacles to eliminate the connections.
- When the connection is severed, yellow telegraphs will spawn and pull anyone caught within them to the boss, making them unable to move, avoid them!
- The remaining stack amount (connections) decides the difficulty of the stagger required to break her.
- Run to the boss and stagger it quickly.
- When successful, she will transition to the next phase.
Hard Mode Differences
Three different types of orbs are attached to some of the tentacles:
- Black & Black+Spikes
Periodically creates blue telegraphed attacks that stun you for 5 seconds if hit.
- Red (Raspberry)
- When destroyed, a debuff is applied to all players for 15 seconds:
- -95% damage and -100% stagger and destruction
- Players are killed if both red orbs are destroyed.
- It is highly recommended to not break these and warn your teammates with pings of their locations.
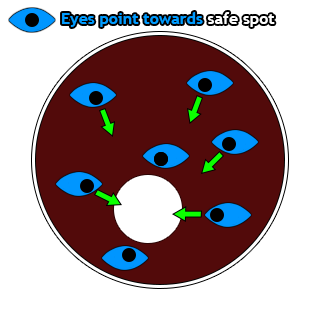
Telegraph
- Occurs at or near x38 bars.
- The hands on the boss transform into claws.
- All eyes on the floor stop moving and point towards a location.
Description
Regular Method
- The boss starts performing multiple dashes.
- Look at the eyes and go to the spot they are pointing at.
- This general location will be the safe zone after the dashes.
- Before the 3rd dash, the eyes disappear, and a safe zone appears.
- Quickly go inside it and dodge the final dash of the boss with either space bar or a push immune skill.
Balthor Method
- Use Sidereal: Balthor to trigger the special Frenzy & Endorphin Raid mechanic, if everyone has collected Organ Stacks from killing blobs on the ground until this point.
- This will let you ignore the Eye Safe Zone and just tank the pattern.
- Deplete the shield of the boss within 25 seconds to complete this mechanic.
- Utilize Atropine Potion and Dark Grenade to make it in time.
Telegraph
- Occurs at or near x35 bars.
- The boss initiates a cutscene that displays a Large Eye in the center of the map.
Description
- Spread out around the arena in x3 & x3+1 formation.
- The eye in the center of the map will pull you towards it.
- Giant Hands will spawn on the outer edges of the map trying to attack you.
- The boss will perform the Dash-Grab-Dash attack multiple times during this time.
- Look at the mini-map to locate the boss and avoid the Giant Hand attacks at the same time.
- When the Large Eye vanishes, you can move inwards and look for a counter opportunity on the boss to save all grabbed players.
- If countered, the mechanic ends, but the Giant Hands remain till the end of the fight.
Counter Patterns
Telegraph
- The boss performs 3 narrow cone attacks.
- Then she spawns 2 blue overlapping circles below her feet.
Description
- Quickly move out of the way while positioning yourself in front of her.
- Go for the counter the moment the telegraphs disappear.
- If you're hit by the blue attack, the boss grabs you.
- A counterattack may come out after only 2 cone attacks have happened, pay attention.
Telegraph

- The boss starts gaining Adrenaline stacks that are visible below her HP bar with each attack she does.
Description
- When the stack number reaches x3, the next attack will be a counter!
- If you fail to counter, she will proceed to gain extra stacks and ask for more counters.
- Each stack she gains increases her attack speed by 25%
Telegraph
- The head of the boss turns into a large alien shape.
- This pattern can appear when the enrage timer hits below 8 minutes remaining.
Description
- The boss does a Forward Dash → Backwards Dash → Grab attack.
- This attack is performed a total of 3 times
- If nobody gets grabbed by the 3rd Dash + Grab, she quickly turns, followed by a backdash & Counter.
- If someone does get grabbed, she repeats the attack.
Telegraph
- A single blue circle below the boss appears.
- The floor darkens and expands across the entire arena.
Description
- A couple of players should stand near the edge where the initial blue circle appeared.
- The remaining players need to hide in their shadow (Similar to Akkan Gate2 Lantern).
- After the mechanic is resolved, she can be countered at the location she jumps to.
Notable Patterns
Telegraph
- Three narrow cones followed by 2 red circles.
Description
- Identical to the counterattack version, but has 2 red circles instead of blue ones.
- Watch out for spike explosions on the ground after the red circles.
- These spikes are lethal and can one-shot almost anyone.
Telegraph
- The boss can transform her body into a special form.
- Large Swords, Spears or Gauntlets can be seen on her hands.
Description
Spear
- Disappears and creates quickly moving tornadoes across the arena that spawn red AoE's beneath you if hit by them.
Swords
- She jumps to the edge of the map and performs a series of long range line attacks that can be easily dodged.
Gauntlets
- The boss slams down her arms and creates large telegraphed areas with safety spots.
- Move around and doge these.
Telegraph
- The boss wraps her tail around her body and stands still.
- Your screen will darken.
Description
- Stop attacking.
- If successful, dodge a followup attack that shoots lines in a clockwise formation.
- When failed, she performs a deadly 360° retaliate attack.
- Ask for damage reduction or shields if possible.
Telegraph
- The boss crouches and shows yellow telegraphs emerging from her back.
Description
- Avoid the yellow telegraphs.
- If you're hit, the boss grabs you and create explosions around her.
Telegraph
- The boss spins forward surrounded by a red whirlwind.
- Jumps up in the air and spreads tentacles onto the ground.
Description
- Don't move!
- The boss freezes your character in place if you move and grabs you after it.
- Dodge the followup attacks.
Telegraph
- The outside of the arena slowly becomes red and moves towards the center.
Description
- One random player is chosen who is targeted by a red AoE circle beneath him (only visible to him).
- Place this AoE away from your teammates and return to the fight.
Telegraph
- A random player is marked with black rings around his character.
Mark

Aggro

Description
- When all the black rings turn red, your mark transforms into two red eyes.
- As a result, you have the boss aggro for the duration of the eyes.
- Before the marker transforms, other players can stand in front of it to intercept it and become the aggro target.
Solo Mode Main Mechanics
Organs
Blood Orb
Organ Stacks
- Upon Staggering or Countering the boss, it will spit out Organs onto the ground.
- These can be destroyed, spawning a Blood Orb in its place that can be collected, giving you an Organ Stack (max 10).
- If the Organs aren't killed or the Blood Orbs aren't picked up, they will return to the boss slowly.
- Letting this happen gives the boss 20% damage reduction for 10 seconds.
Cleansed Organism
Each stack provides:
- +10% damage
- +4% stagger
- max 10 stacks
Additionally, you gain: +1 Weak Point and +10% damage versus staggered foes.
- Organ stacks you've accumulated can be utilized during the fight and the Eye Safe Zone (x38 HP) mechanic.
- If you have at least 1 Organ stack and are under the effect of Sidereal: Balthor, stacks get transformed into a 30-second damage buff (Cleansed Organism) and the boss enters Frenzy & Endorphin state.
Bleed
Excessive Bleeding
- Getting hit by most of the boss attacks will inflict an uncleansable Bleed debuff to you for 30 seconds (max 20 stacks).
- When reaching 20 stacks, your character will become stunned for 10 seconds, Excessive Bleeding.
- This will cause the boss to perform a special attack.
Eyes
Eye Gauge
- In the second phase of the fight, you will see Eyes spread out on the floor.
- These move towards you players.
- You can walk over them, this will detonate the area beneath shortly after.
- Your character will be brought to 1 HP if caught within this explosion.
- If you remain next to an eye for too long, you will begin to build up Gauge below your feet.
- At 100% Gauge, your character will get rooted, and the Eye will accelerate towards you.
Frenzy
The Boss Movement and Attack speed is increased by 250%.
Endorphin
Players receive Status, Push & Bleed Immunity and have increased Movement Speed.
- If everyone has at least 1 Organ stack and is under the effect of Sidereal: Balthorr effect, then Frenzy & Endorphin is triggered.
- The boss converts x15 HP into a shield, which must be broken within 25 seconds (Frenzy).
- Utilize Dark Grenade and Atropine Potion
- You get an insanely large shield during this mechanic that can ignore all attacks.
- Endorphin - While this buff is active, players hit by the boss receive debuff stacks.
- If her shield is destroyed, the buffs/debuffs get removed and the mechanic ends.
- If not destroyed in time, the debuffs stacks accumulated during Endorphin slowly decay and deal massive amounts of damage that is impossible to survive.
Telegraph
- Occurs at or near x145 bars.
- The Boss teleports to the center of the arena and spawns blue telegraphed lines in all directions.
- A stagger bar appears below her feet.
Description
- Run to the outside of the map while avoiding the blue telegraphs.
- Getting hit by the attack will stun you.
- The Boss gains 36 stacks (tentacle connections)
- Throw Destruction Bombs and use long range skills on the tentacles to eliminate at least 6.
- When the connection is severed, yellow telegraphs will spawn and pull anyone caught within them to the boss, making them unable to move, avoid them!
- The remaining stack amount decides the difficulty of the stagger required to break her.
- Run to the boss and stagger it quickly.
- When successful, she will bombard the arena with falling rocks for a few seconds, simply avoid them.
- Getting hit will stun your character.
Telegraph
- Occurs after Tentacle Destruction.
- Three crater locations are spawned on the arena.
Description
- Successfully countering or staggering the boss will mark you with a Red Spike shape.
- You need to stand in one of the three craters in the ground and bait the boss attack onto it.
- The chosen crater gets 1 stack towards the mechanic and needs to be targeted a second time the same way whenever possible.
- Doing so will initiate the Destroy & Grab Main Mechanic, even if the boss HP hasn't reached 100 lines.
- If you fail to stack 2 explosions into the same crater or your group's damage is too high to have the opportunity to do so, you must use Sidereal: Balthor for the x100 HP mechanic to not wipe.
Telegraph
- Occurs at x100 bars or when 2 Crater Stacks have been reached.
- The Boss teleports to the center of the arena, exploding the 3 craters locations on the ground.
Description
Hidden Balthorr Method
- Utilize this method if you failed to stack the same crater twice, or you pushed the boss to x100 too quickly.
- After the crater areas have exploded, a text pop-up of Wei appears, the raid leader should use Sideral: Balthorr here.
- This will cause the mechanic to proceed normally, check the Regular Method for more info.
- If your Sidereal gauge is not ready, this will result in a wipe, make sure not to push x100 before that.
Regular Method
- Don't stand near the crater areas (especially the large one), as they will expand and explode when the mechanic begins.
- A tentacle marked with a red orb will appear.
- Run next to it and throw a Destruction Bomb on it, this will break the red orb and spawn a yellow telegraph that pulls you up to the boss.
- You must be caught within the yellow telegraph.
- If you got pulled up to the boss, you will survive her wipe attack and complete the mechanic.
Telegraph
- Occurs at or near x38 bars.
- The hands on the boss transform into claws.
- All eyes on the floor stop moving and point towards a location.
Description
Regular Method
- The boss starts performing multiple dashes.
- Look at the eyes and go to the spot they are pointing at.
- This general location will be the safe zone after the dashes.
- Before the 3rd dash, the eyes disappear, and a safe zone appears.
- Quickly go inside it and dodge the final dash of the boss with either space bar or a push immune skill.
Balthor Method
- Use Sidereal: Balthor to trigger the special Frenzy & Endorphin Raid mechanic, if you have collected Organ Stacks from killing blobs on the ground until this point.
- This will let you ignore the Eye Safe Zone and just tank the pattern.
- Deplete the shield of the boss within 25 seconds to complete this mechanic.
- Utilize Atropine Potion, Dark Grenade (and your Hyper Awakening) to make it in time.
Credits
Written by Choilicious
Video Footage by Saintone