Akkan Gate 1 Legion Raid Guide
In this gate, you will need to manage several debuff stacks that will cause death. Keep yourself clean and dodge important boss mechanics.
Enemy Information
| Normal Mode | Hard Mode | Monster Type | Weakness |
| 1580 Item Level | 1600 Item Level | Undead | None |
Battle Items:
- HP Potion of your choice
- Sacred Charm
- Panacea
- Atropine Potion
- (Purify)
Rewards
| Gold | Material | Box Material | Box Cost | Auction Material | First Clear | |
| Normal | ||||||
| Gate 1 | 1000 | 3 | 3 | 450 | 20 | |
| Gate 2 | 1800 | 3 | 3 | 550 | ||
| Gate 3 | 2600 | 5 | 5 | 750 | 5 | |
| Total | 5400 | |||||
| Hard | ||||||
| Gate 1 | 1500 | 7 | 7 | 600 | 20 | |
| Gate 2 | 2500 | 7 | 7 | 700 | ||
| Gate 3 | 3500 | 8 | 8 | 950 | 10 | |
| Total | 7500 | |||||
Learn about the Akkan Gates: 2 / 3
Cheat Sheets
During Raid
Armor Buff
Similar to Valtan Armor
Removed by doing mechs up to x112
During Raid
General Debuffs
Hit by Spear = 3.5% HP DoT
Hit by Green Circle = 30%+ DMG taken
During Raid
Green/Black Tumor Debuffs
Touching Players Opposite Color = Debuff
Debuff = Healing Reduced/DoT
Having 2 Tumors = Dead
During Raid
Drowning
After 90x HP
Fill Up Bar
Clip Yellow Bar On The Top of Blue
x140
8 Tumor Orbs/Spear
Clock Positions
Destroy Orb
Touch Spear after Boss Lands
Don't be too close to Opposite Color
x128
Cleanse Yellow
Green Debuff = Wait till Yellow
Yellow Debuff = Cleanse
Red Debuff = Stagger Boss
x112
Orb Grab
Destroy Orb That Match Color
Take Boss Grab
Stagger
Destroy Same Color Small Orbs
Time Attack

Thirain After Cutscene
Get Boss to x90 HP
Evacuation

Avoid Touching Players For Stacks
First Player Look for Debri/Dust Fall
Ping Correct Path
Wait until Water Rises to Last Stairs
x75
Stop Mobs
Kill Big Mob on Map
Kill Smaller Mobs to Not Get Stunned
When Grey Smoke = Take Spear
x50
Inanna Stagger

Boss Jumps to Center
Inanna when Boss Stands Up
Stagger & DPS
x20
Shield/Bells
Kill Bugs Quickly
Destroy Shield after Bells
Move out of Green Fog at 6-7 Stacks
Move Back in After Plague Cleansed
Final Fight
Kill Fast
Dodge
During Raid
Armor Buff
Similar to Valtan Armor
Removed by doing mechs up to x112
During Raid
General Debuffs
Hit by Spear = 3.5% HP DoT
Hit by Green Circle = 30%+ DMG taken
During Raid
Green/Black Tumor Debuffs
Touching Players Opposite Color = Debuff
Debuff = Healing Reduced/DoT
Having 2 Tumors = Dead
During Raid
Drowning
After 90x HP
Fill Up Bar
Clip Yellow Bar On The Top of Blue
x140
8 Tumor Orbs/Spear
Destroy either Green or Black orb
Stay in place until other orbs explode
Touch the Spear after Boss Lands
x128
Cleanse Yellow
Use Sidereal: Wei to stagger the boss
x112
Orb Grab
Destroy the orb if it matches your color, get grabbed by the boss
Stagger boss if the orb isn't your color
Destroy Same Color Small Orbs
Time Attack
Thirain After Cutscene
Get Boss to x90 HP
Evacuation
At the Crossroad check Debri/Dust Fall
Go to the path without Debri
Wait until Water Rises to Last Stairs
x75
Stop Mobs
Kill Big Mob on Map
Kill Smaller Mobs to Not Get Stunned
When Grey Smoke = Take Spear
x50
Inanna Stagger
Boss Jumps to Center
Inanna when Boss Stands Up
Stagger & DPS
x20
Shield/Bells
Kill Bugs Quickly
Destroy Shield after Bells
Move out of Green Fog at 6-7 Stacks
Move Back in After Plague Cleansed
Final Fight
Kill Fast
Dodge
Raid Mechanics
Raid mechanics cover the passive mechanics that are persistent through the entire raid.
The Tumor Debuff appears after the first mechanic. Players will either be black or green turmor. If a player with opposite colors touch, they will get a stack.
Stack effects:
- Healing Reduction 50%
- Bleed Damage at 10 stacks
What To Do
- Try to not to touch each other when possible.
- Use Panacea, Sacred Charm, and Purify.
After Evacuation Phase, you can get knocked off the arena. When knocked off, you will be in a Drowning state.
What To Do
- Spam Spacebar minigame to increase blue bar.
- When it's purple, clip the yellow bar at the top of the blue bar you filled.
- This will get increasingly harder the more times you Drown.
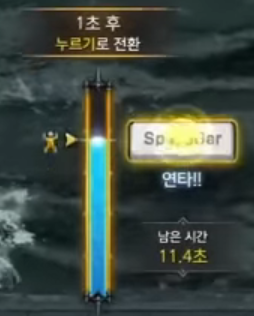
Drowning Bar

Purple Bar Clip

Drown Debuff
Main Mechanics
Telegraph
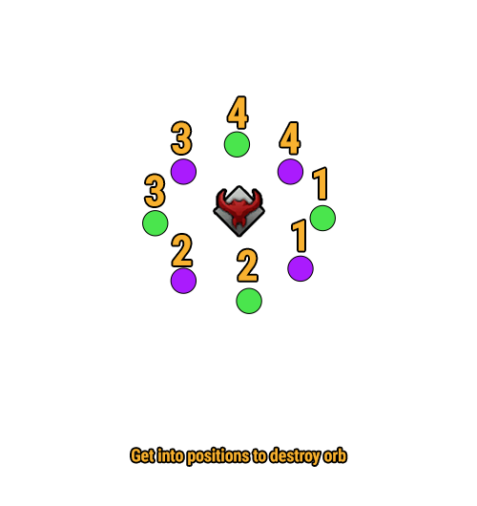
- Boss jumps to center and summons 4 green orbs and 4 black orbs.
- Shortly after, the boss will drop spears that will be safe zones.
What To Do
- Get into clock positions (x3, x3+1)
- Break Orb to get your Tumor Debuff.
- Spears will be summoned shortly after.
- Touch the spear when the boss jumps back down. (safezones).
- The spears does % HP damage, so be careful if you touch it early.
Telegraph
- Boss will emit a green explosion with a stagger bar.
- During this period, you will get a green debuff that will turn into a yellow debuff.
- Yellow debuff = Less Stagger
- When the yellow debuff is cleansed it will turn red.
- Red debuff = More Stagger.
What To Do
- Wait for the green debuff to turn yellow.
- Stick together and cleanse yellow debuff.
- Stagger with red debuff.

Green Debuff
"Wait"
Yellow Debuff
"Cleanse"

Red Debuff
"Stagger"
Telegraph
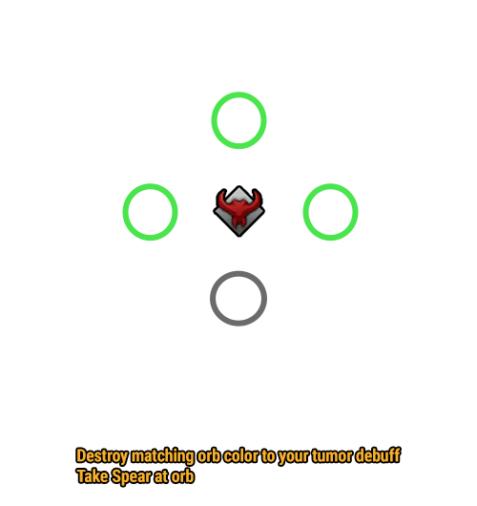
- Boss will jump and spawn a green or black orb.
What To Do
- Break the Orb with the correct tumor debuff. (Black orb only gets killed by Black Tumor person).
- The boss will grab at the location of the orb. Make sure that person being grabbed is the same color as the orb.
- Stagger the boss.
- Small Orbs will spawn around the map. Destroy Orbs that match your color with Auto Attacks.
- Destroying 3 incorrect orbs will kill you.
- Every Orb that touches the Boss will grant him more HP for the next phase.
Hard Mode: 4 orbs will spawn with 1 being a different color. The different orb will be the grab spot.
Telegraph
- Boss cutscene will bring you to another arena.
- A 1 min timer will appear in the top left.
What To Do
- You will need to bring the Boss down to 90x HP before the timer runs out.
- After the cutscene, use Thirain.
- Innana can work too to help the fight/cleanse.
- Stick close to the boss, as raid patterns can be hidden with the water.
Telegraph
- The area will flood and a cutscene appears after 90x HP.
What To Do
- Avoid touching Tumor debuffs when running through the map.
- First player who reaches the crossroad will need to point out the correct path.
- The incorrect path will be marked with debris/dust dropping on top of the stairs.
- In normal mode, there will be a barricade in the wrong path you can destroy instead of a dead end.
- When you finally reach the top, before using the G Key interact, wait till the water covers the last remaining stairs to avoid bad patterns from the boss.
- Jumping too early will cause bad boss patterns.
Hard Mode: wrong path = death.
Telegraph
- Boss will summon 2 spears, a large mob, and several small mobs.
What To Do
- Kill the large mob.
- Help with killing small mobs as well, they will stun you after a while.
- When a black fog comes out from the boss, touch the spear for the safe zone.
Hard Mode: 2 large mobs will need to be killed.
Telegraph
- Boss will jump to center and create a stagger bar.
What To Do
- When the boss stands up use Innana.
- This will prompt a special interaction and will make this a free DPS phase.
- Not using Innana will make doing the stagger much harder. As you will need to avoid his patterns while staggering (there is a counter at the end as well if you do not Innana).
Telegraph
- Boss will turn into a cacoon and emit a green puddle.
- Standing inside the green puddle will give you debuff stacks.
- At 10x stacks, you will likely die.
What To Do
- You will need to bring down his shield to make the next phase easier.
- Killing 3 small bugs will grant you an addtional shield damage buff.
- Dodge small and large circles that spawn. (large circles hurt)
- When the bell rings, the boss will get a shield that you will need to break.
- Get into the green puddle and DPS the boss.
- When you have around 7x stacks, step out and wait for the debuff to cleanse.
- repeat the process.
Telegraph
- Boss will queue the final cutscene for the last fight.
- No more main mechanics, but pay attention to the patterns to avoid death.
New Patterns
- Green Aura: The aura around the boss lowers movement speed & stagger.
- Imprison: A player will be imprisoned and after freeing them, others around will be imprisoned as well.
- Counter Attack: The boss flies up and spawns circles. When he lands he can be Countered.
Notable Patterns
Telegraph
- Boss will charge forward with his spears to grab.
- If he does not grab he will swing backwards and slams.
Telegraph
- Boss will step back and spear.
- If grabbed, he will laser the player.
- No grab = hits behind him.
Telegraph
- Boss pokes forward after a long yellow telegraph.
- If grabbed = boss throws player + 270 degree slash.
- No Grab = slash backwards
Telegraph
- Boss jumps to a spot.
- If he hits a player he will throw that player and AoE around him.
- If not, he will Jump again and AoE.
Telegraph
- Boss spawns a yellow telegraph around him.
- He will grab and hold onto the player for a while. Stay inside.
Telegraph
- Boss thrashes around him several times.
- He will then do a final slam that can be countered.
- If players are hit too much by the thrash you won't be able to counter.
Telegraph
- Boss jumps 3-4 times and then slams the front.
- Counter before the slam.
Telegraph
- Boss swings up and blows player away if hit.
- If not, swings the back.
Telegraph
- Tentacle spawns in the front of the boss.
- If grabbed, players will the tossed and an AoE will spawn around him.
Telegraph
- Boss will spin in several directions and finish with an AoE.
- Stick close.
Solo Mode Main Mechanics
What To Do
- Break either a Black or Green orb to get your Tumor Debuff.
- Stay still and wait until the other orbs explode.
- Spears will be summoned shortly after.
- Touch the spear when the boss jumps back down. (safezones).
- The spears does % HP damage, so be careful if you touch it early.
What To Do
- Option1: Use Sidereal: Wei to complete the stagger.
- Option2: Wait for the green debuff to turn yellow.
- Use a Panacea potion to cleanse yourself.
- Stagger the boss with red debuff.
Green Debuff
"Wait"
Yellow Debuff
"Cleanse"
Red Debuff
"Stagger"
What To Do
- A green or black orb will spawn around the boss.
- If the orb is the same color as your chosen orb at the start, → destroy it and get grabbed by the boss.
- If it's not your color, ignore it and stagger the boss afterward.
- Small Orbs will spawn around the map. Destroy Orbs that match your color with Auto Attacks.
- Destroying 3 incorrect orbs will kill you.
- Every Orb that touches the Boss will grant him more HP for the next phase.
What To Do
- You will need to bring the Boss down to 90x HP before the timer runs out.
- Stick close to the boss, as raid patterns can be hidden with the water.
What To Do
- Go to the correct path when reaching the crossroads.
- The incorrect path will be marked with debris/dust dropping on top of the stairs.
- When you finally reach the top, before using the G Key to interact, wait till the water covers the last remaining stairs to avoid bad patterns from the boss.
- Jumping too early will cause bad boss patterns.
What To Do
- Kill the large mob.
- Eliminate the remaining small blobs, getting hit by 4 or more will petrify you, so be careful.
- When the black fog comes out from the boss, touch the spear for the safe zone.
What To Do
- When the boss stands up, use Innana.
- This will prompt a special interaction and will make this a free DPS phase.
- Not using Innana will make doing the stagger much harder. As you will need to avoid his patterns while staggering (there is a counter at the end as well if you do not Innana).
What To Do
- You will need to bring down his shield to make the next phase easier.
- Killing 3 small bugs will grant you an additional shield damage buff.
- Dodge small circles that spawn.
- When the bell rings, the boss will get a shield that you will need to break.
- Get into the green puddle and DPS the boss.
- When you have around 7x stacks (at x10 stacks you die), step out and wait for the debuff to cleanse.
- repeat the process.
New Patterns
- Green Aura: The aura around the boss lowers movement speed & stagger.
- Counter Attack: The boss flies up and spawns circles. When he lands he can be Countered.
Cedits
Written by Starlast