Kakul-Saydon Gate 3 Legion Raid Guide
Gate 3 focuses on your ability to resolve mechanics over DPS. While this was true for Vykas and Valtan as well, Gate 3 of Kakul-Saydon requires it to a higher degree. Managing your Madness Meter here is crucial and knowing when to fill it is required to fulfill all the mechanics.
Enemy Information
| Normal Mode | Monster Type | Weakness |
| 1475 Item Level | Demon | None |
Battle Items:
- HP Potion of your choice
- Dark Grenade
- Swiftness Robe
- Time Stop Potion or Atropine Potion
Raid Rewards
| Gold | Material | Box Material | Box Cost | Auction Material | |
| Normal | |||||
| Gate 1 | 400 | 1 | 1 | 200 | |
| Gate 2 | 600 | 2 | 2 | 335 | |
| Gate 3 | 1000 | 2 | 2 | 470 | 5 |
This guide assumes that you are familiar with the recommended Raid Build for your class.
Also check Kakul-Saydon Gate 1 and Kakul-Saydon Gate 2 guides.
Cheat Sheets
x155
1st Mario
1st Iron Maiden
1st and 2nd mario person should've prepped their meter by now.
15 seconds until you can enter Mario.
Shortly afterward, curtain call mechanic will begin. Vertical saws.

x120-30
2nd Mario
2nd Iron Maiden
2nd Mario person should have had their meter prepped from before.
Curtain call mechanic with hooks.
x90
Showtime!
Group to bot to dodge initial bullet shower.
Saydon targets someone with a cone shortly after.
Saydon will do a bullet rotation 180 degrees, then 90 degrees in the other direction.
Person who got targetted by the cone initially, stand in front of the bomb.
Same person goes to the 2nd bomb that always appears on the opposite side.
Group together or separate and run clockwise to resolve the remaining mechanic.
x80
3rd Mario
3rd Iron Maiden
3rd Mario person can prep meter by getting hit from Showtime! or stalling at x85 for towers.
Curtain call mechanic with hooks and saws.
x55
4th Mario
4th Iron Maiden
4th Mario person preps meter.
Curtain call mechanic with hooks and saws. Must pull both levers before breaking.

x0
Bingo
Final phase.
x155
1st Mario
Prepare your Madness Meter by standing close to the white circus balls or the fire turret.
Once the portal opens, fully transform and go inside to complete the Minigame.
1st Iron Maiden
Dodge the Saws moving vertically and reach the opposite side to Stagger Kakul-Saydon.
x90
Showtime!
Dodge the initial explosions and bullet spray.
Aim the Yellow cones to the two bombs to destroy them.
Dodge the Crosshair following you.
2nd Iron Maiden
Dodge the Hooks and reach the opposite side to Stagger Kakul-Saydon.
x55
3rd Mario
Prepare your Madness Meter by standing close to the white circus balls or the fire turret.
Once the portal opens, fully transform and go inside to complete the Minigame.
Raid Mechanics
Raid mechanics cover the passive mechanics that are persistent through the entire raid.
The Madness Meter is a bar shown under each player's character. It fills up when hit by Kakul-Saydon's attacks.
Depending on which percentage your bar is, certain events occur.
0% = Nothing.
50% = Upon hitting 50%, a cross laser will shoot out from you. These can hit teammates and fill up their meter. Any pattern that hits you while you have over 50% meter will cause the cross laser to shoot out.
At 100% = You get turned into the clown's puppet. The boss gains an armor buff, reducing damage taken by 3% per stack. You gain access to 3 skills, Q, W, and E, detailed below.
When you get turned into a puppet, Saydon will receive an armor buff. Q no longer removes the debuff on Saydon. During Gate 3 when you want to intentionally turn into a puppet, you use it on the flame tower summon.
W
- Greatly reduces Madness Meter for party members within the area around the user.
- Party members not within the area have their Madness Meter slightly increased.
E
- Throws a gift box on the ground. Whoever takes it has their Madness Meter reduced.
Telegraph
- Saydon does a little dance ending with him holding up his cane.
Description
- Two madness balls/towers are summoned. Madness Meter increases when you step on the circle when it turns red.
- Use these towers wisely as they help you to prep your meter for the Mario Mechanics.
- The towers have their own meter under them. Kill them before their meter runs out or they explode.
- You usually want the Ranged DPS kill these.
- If melee are using them to prep, you can time the kill right as you fill up 50% of your meter.
Rehearsal Mode
- Be aware that because there are no flame tower spawns in Rehearsal when Mario begins, you must make sure these balls/towers are kept alive as they are your only source of Madness Meter.
Description
- Sacred Bomb is the preferred item to remove cc on party members. This is especially useful during the Bingo phase and timing the Mario Entry correctly. It can mean the difference between a raid clear and wipe.
- Alternatively, if you find that you have no use for another utility item, consider using Sacred Charm as well. Also, if you have a burn debuff on you, it may just remove that instead of a stun.
- Both items do not remove the fear applied from Gaze. Gaze applies a different type of debuff, called Gleaming Fear, which is not considered as regular CC.
Main Mechanics
Telegraph
- Occurs at or near x155, x130, x80, and x55 HP.
- Cane in air, pentagram pattern on ground. See Mario Entry video clip below.
Description
- A flame tower will be summoned somewhere on the map.
- 15 seconds after the mechanic officially starts, a portal appears in the middle of the map.
- To enter, you must become a puppet. Do not touch it unless you're a puppet, otherwise you die.
- Each person in your party can only enter the portal once. This mechanic occurs 4 times over the course of the fight, so each member must participate. Ideally, you should've assigned the order before the raid was started.
- Random saws and/or hooks will appear all over the map.
What To Do
- Ideally you want to prep your meter before the mechanic even starts. Do this by stepping on the madness balls/towers that peridiocally get summoned. Usually you want to get your meter to 50% before triggering the mechanic. See the below video clip for an example.
- Whoever is assigned to the 1st, 2nd, 3rd, and 4th mechanic should always remember to prep their meter before the mechanic occurs and tell their team to stall for tower summons if needed. You want to be especially careful about this for the x80 Mario Mechanic if you used Innana during x90 Showtime. Alternatively, the 3rd Mario Mechanic player can intentionally get hit by patterns during Showtime to increase their meter.
- Once the mechanic starts, locate the flame tower that spawns on the map. Getting hit by the flames increases your Madness Meter. This should help fill the other 50% of your meter that you already prepped beforehand.
Rehearsal Mode: Be aware that because there are no flame tower spawns in Rehearsal when Mario begins, you must make sure these towers are kept alive as they are your only source of Madness Meter.
- Once you turn into a puppet, use Q to throw a bomb on the flame tower to remove its armor buff. Your teammates must kill it shortly after.
- Since the portal does not open until 15 seconds after the mechanic begins, you don't need to immediately go into the middle. Spend your time dodging patterns and hooks. Once the portal spawns, you can space into it. Beware, you only have a limited amount of time to enter the portal before it disappears and you fail the mechanic.
- Sometimes if the Madness Balls/Towers are summoned right before or during the mechanic, you can use them to fill your Madness Meter if they overlap. This gives you more leeway as you don't have to rely on just the flame tower.
Telegraph
- Occurs shortly after a person enters the portal.
Description
- This phase occurs after each mario mechanic entry for the 3 members that did not go into the portal.
- One person is imprisoned in an Iron Maiden.
- Saydon appears on the opposite side of the map with a Stagger Meter.
- Hooks and/or saws appear on the map.
- The 1st Iron Maiden has only saws, 2nd only hooks, and 3rd both saws and hooks.
- The 4th Iron Maiden has an extra mechanic in the form of two levers, one up top, the other bottom.
What To Do
- You must run to the other side and deal enough Stagger to break the boss. While running to the other side, you must also dodge the hooks and saws that spawn.
- The 4th Iron Maiden requires two levers to be pulled. Once you enter the area, you must succeed in a typing test. Afterwards, you should remember to pull the lever. If both levers are not pulled, your Stagger damage will be extremely reduced.
- If one person is dead during the 4th Iron Maiden, one person can pull both levers and then use Sidereal: Wei.
- Beware if you have high ping. The hitboxes for the saws might not be as they seem under high ping!
Description
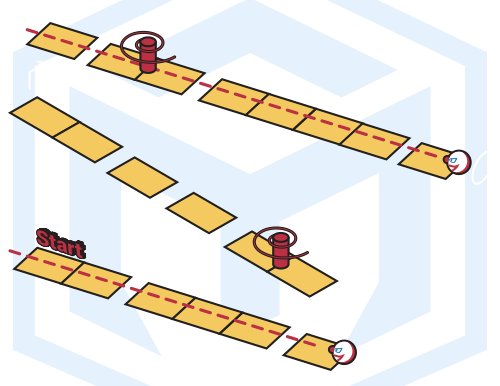
- The person entering the portal must complete 1 of 4 Mario Stages.
- The 1st Mario Stage is the easiest, followed by the 2nd.
- The 3rd Mario Stage involves patience and correct timing, thus in my opinion is the most difficult stage.
- The 4th Mario Stage requires decent spatial awareness, in my opinion not that much harder than the 2nd.
What To Do
- One of your three party members will have a color above their heads. They will also have the debuff/curse of the color on their status bars which you can see yourself. You must destroy only 3 balls of the same color in the stage.
- After destroying the 3 balls, you must reach the exit. Failure to destroy the 3 required balls means the party member with the curse outside gets a massive debuff. Failure to reach the exit in time means you die.
Be aware that bullets can appear on different "floors" based on required color to kill. So can their positions, either low or high.
Tips
- Be patient and anticipate bullets before jumping to the next ledge.
- Jumping to the next ledge gives you an i-frame.
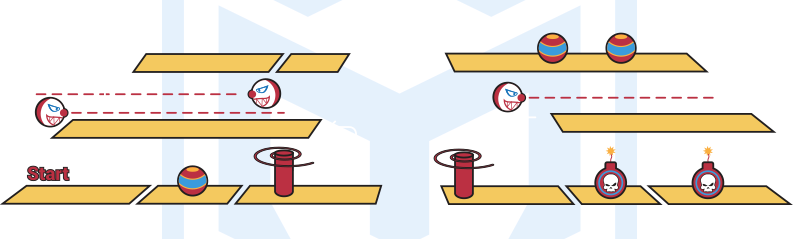
Be aware that bullets can appear on different "floors" based on required color to kill. So can their positions, either low or high.
Tips
- Upon jumping onto the 2nd platform after dodging the flame tower, take a couple of seconds to look at the background of the map.
- Look for the colored balls you must destroy and plot a path in your head to get to them all and to reach the exit efficiently.
Telegraph
- Occurs at x90 HP.
Description
- Two players will have targets above their head. They are targets of 2 puddles which apply a slow debuff. These players should run alongside the outer edge of the circle.
- Shortly into the mechanic, Saydon will target a player with a cone. In the video, you can see that the berserker gets targeted.
- After the cone, Saydon will do donut attacks on the outer arena. He will then put his arms on both sides and start firing bullets. These bullets increase Madness Meter and deal damage to you.
- He has a set rotation for firing the bullets so you can memorize the pattern and where to move. He will go clockwise or counterclockwise close to 360 degrees and complete a full circle or more. Afterwards, he will rotate around 180 degrees in the opposite direction to complete almost half a circle. You will have to react to whether he moves clockwise or counterclockwise initially.
- After the bullet rotation, he will spawn two bombs. Saydon will target the same player he initially targeted for the first cone, with another cone. Aim this cone in the direction of the bomb to destroy the bomb.
- The 2nd bomb will be on the opposite side of the first bomb. The same player gets targeted with a third cone.
What To Do
- Gather at the 6 o'clock position. Wait a while until Saydon starts turning to avoid initial bullet damage. Then split as you dodge the rest of the incoming patterns.
- Players with the target above their head should run alongside the outer edge after dodging the initial donut.
- After a player gets targeted with a cone, move towards the front of the boss. It's easier to tell who gets the targetted cone if you all split.
- Prepare to move in a certain direction to dodge the bullet rotation. Refer to the set rotation pattern above in description #4. Use Innana if you don't want to bother with the rotation to ignore bullet damage.
- Whoever the boss targeted with the 1st cone, that player must move in front of the bomb that will spawn shortly after the bullet rotation. This player must also then move to the opposite side in a timely manner for the 2nd bomb. If you are unsure about who got the initial cone, it is best to play safe and have whoever is unsure stand in front of the bombs. Take care to also dodge the donut patterns that occur during this.
- After the bomb portion of the mechanic is resolved, you have two choices. Either group together if you all have similar movement speed or everyone goes into their own corner of the map. You must then run around clockwise or counterclockwise to dodge the random patterns on the ground. If you all decide to stick together, consider using Marching Flag to speed your entire team. Consider Swiftness Robe if you run by yourself.
Bingo Mechanics
The Bingo phase occurs after Saydon reaches x0 HP. Saydon uses some of the same patterns reminescent of Gate 1 in this phase.
Use the Bingo-Tool to assist you during this Phase! It will give you 3 options to place every bomb turn, #1 being the best square. After a bomb is placed, it will give you an additional 3 options.
Use the Bingo-Tool to assist you during this Phase if you so desire!
Description
- Every 3rd bomb, Saydon will TP to the top to start channeling. To break this channel, you need to complete a Bingo, in other words, get a full row of skulls.
- DAMAGE UPTIME IS RARELY AN ISSUE HERE. Focus on successfully completing the mechanic. Each time you successfully break Saydon's channel, you will deal x13 HP bars of damage.
- Every 30-40 seconds, a bomb appears above a players head. After 5 seconds, the bomb icon above their head disappears. A bomb will fall shortly after on the specific square the player stands on.
- Bombs will flip the board panels to skulls which increase Madness Meter. The flipped boards are in a "+" pattern with the center being the square the bomb lands on.
- If you get 5 in a row, either horizontally, vertically, or diagonally, you become invincible for a short duration.
What To Do
- Every 3rd bomb, Saydon will teleport to the top. You must achieve a bingo with this 3rd bomb, i.e. 5 in a row, to survive.
- Alternatively, if you mess up the Bingo, you can use Innana to survive the damage. You go into this phase with full meter so you always have an emergency button.
Use the Bingo-Tool to assist you during this Phase if you so desire!
Description
- DPS is usually not an issue during Bingo Phase. If your team is on point with DPS and not overleveling the content, you usually clear with 4 Bingos. In other words, 12 bomb rounds.
- Planning ahead is crucial. Whoever is making the decision about where bombs go, should take some time to look at their board layout. They can take a small break from DPSing the boss.
- Always plan ahead at least 2-3 placements. Make sure you know in advance which row will be your Bingo row and communicate it to your team. Give your team multiple places to put their bomb. Be aware that hammer patterns may affect your plans so it's wise to be able to improvise on the spot or have other options.
- Depending on how you plan, your bomb placements can be done in any order with only every 3rd bomb having to result in a Bingo.
- Because bombs flip the board in a "+" pattern, you can prevent two flips by placing bombs at the corners, effectively saving you space on the entire board. This holds true when placing them in corners next to red Bingo rows.
- Once you get past 6 bomb turns, planning becomes much much easier. I would personally advise that your team emphasize flipping skulls rather than planning for Bingo past 6 bombs. With experience, noticing Bingo comes easily past 6 bombs, but creating space and room for the rest of the fight is more important.
Note: I recommend that if you are struggling with creating space, that you use Innana to prevent damage for the 3rd Bingo (9th Bomb Round). Use the 7th, 8th, and 9th bomb rounds for flipping skulls and creating more space for your team. If your team is on point on DPS, you will finish by the 4th Bingo (12th bomb).
Use the Bingo-Tool to assist you during this Phase if you so desire!
Description
- If your team is consistently struggling with creating space, there is an easy bomb placement rotation to do as featured below. It consists of 6 bomb placements. This effectively results in a net total of 0 skulls created.
- Each bomb placement does not need to be placed in order. You can start this rotation in any corner. The 1st and 2nd bomb placement can be interchangeable and order does not matter. Same with the 4th and 5th. The 3rd and 6th bomb placement are set in stone though.
Description
- Two hammers appear with red indicators on which row/column they will hit.
- They one shot. Make sure to use Sacred Charm if someone is cced in their path.
Telegraph
- Teleports to another position.
What To Do
- After a short duration, he gazes at someone. Make sure to look away or you will get feared.
Counter Patterns
Telegraph
- Backsteps in slow motion.
Description
- Failure to counter means Saydon dashes forward and farts backward from landing location.
Telegraph
- Ball appears and Saydon jumps on it in slow motion.
Description
- Failure to counter means Saydon follows a targetted player for a short duration before jumping off of it.
Notable Patterns
Telegraph
- Pimp cane in air. Similar to Mario Mechanic motion, but no pentagram.
- Easy to differentiate since players have a red pentagram symbol underneath them.
- Also, if it's not the HP for Mario Mechanic, then it's going to be reversal.
Description
- After 15 seconds, your HP gets flipped.
What To Do
- Get damaged from the 2D children book flame popouts on the outer arena.
- Be aware, there are places where the 2D flames overlap. You may take more damage than you wanted if you run past those overlapped places.
Telegraph
- Giant low quality JPEG on the floor of the map.
Description
- Turning into a puppet during non mechanic times, gives Saydon a buff.
- During Curse, Saydon damages everyone for each stack on himself.
Telegraph
- Eats a ball (red or yellow) and then moves backward.
Description
- After Saydon moves backward, he will create a damage area in the form of a X/cross pattern.
- He then jumps into the air and lands at another location.
- At this new location, a donut/ring damaging pattern extends outward from in front of Saydon.
- Red Ball = X cross | Yellow Ball = + Cross
Telegraph
- If Saydon leans with eyes above his right knee, the laser will go clockwise.
- If Saydon leans with eyes above his left knee, the laser will go counterclockwise.
- Alternatively, if he starts leaning in one direction, he laser will turn towards the opposite direction. This alternate telegraph is helpful when his back is facing towards your PoV.
Telegraph
- Spins and teleports to the middle.
Description
- Horizontal and vertical lines. Safe spot is usually at the ordinal direction (corners) for the first 3 lines.
- Good chance to Nineveh.
Description
- Vomit increases Madness Meter.
- I wanted to name this the Free pattern because of how free the DPS is here.
- If it's the clone version, only one will take damage. Find the real one for the Free DPS.
- Clones will have 0 HP. Real one has a HP bar.
Telegraph
- Teleports away like he does during showtime.
- Starts clapping like he does in Simon Says.
Description
- This would be the freest DPS window if he didn't also spawn random hooks or saws during this pattern.
- If Saydon teleports near the outer arena, it's very dangerous to DPS here as a melee on high ping. It's your choice to risk it.
- Saydon's clapping because he's baiting you to clap his ass with free DPS so that you can die to hooks and saws.
Solo Mode Main mechanics
Most of the attacks the boss does are exactly the same as in Normal mode. There's only a couple exceptions in the main mechanics.
What To Do
- Use the circus balls or the fire turrets to gain Madness meter until it's almost full.
- When the portal opens in the middle of the arena, fill your Madness meter fully to get transformed and go into the portal.
- A clown symbol will appear over your head, indicating you which color you're assigned. Knowing this color, smash the 3 matching balls inside the minigame and then go out the portal at the very end.

What To Do
- You need to get to the other side of the arena and stagger Kakul-Saydon.
- Dodge the saws moving from vertically as they do high amounts of damage.
What To Do
- Dodge the yellow telegraphs, bombs and Kakul-Saydon's bullet spray.
- Aim the yellow cones correctly at the two big bombs that spawn around the boss, to destroy them.
- Dodge the crosshair following you until it disappears.
What To Do
- You need to get to the other side of the arena and stagger Kakul-Saydon.
- Dodge the hooks as they can grab and drag you around for a long time.
What To Do
- Use the circus balls or the fire turrets to gain Madness meter until it's almost full.
- When the portal opens in the middle of the arena, fill your Madness meter fully to get transformed and go into the portal.
- A clown symbol will appear over your head, indicating you which color you're assigned. Knowing this color, smash the 3 matching balls inside the minigame and then go out the portal at the very end.

Credits
Written by Yaen
Reviewed by Starlast
Updated by Sekwah