Kakul-Saydon Gate 2 Legion Raid Guide
Gate 2 focuses on an encounter with Kakul who is Saydon's sidekick. Throughout the fight, Saydon will be in the background assisting Kakul with patterns. Saydon's patterns have the ability to knock you off the board just like in Valtan. Also while not intended, you can cheese one of Saydon's patterns by using screenshare.
Enemy Information
| Normal Mode | Monster Type | Weakness |
| 1475 Item Level | Demon | None |
Battle Items:
- HP Potion of your choice
- Dark Grenade
- Swiftness Robe
- Time Stop Potion or Atropine Potion
Raid Rewards
| Gold | Material | Box Material | Box Cost | Auction Material | |
| Normal | |||||
| Gate 1 | 400 | 1 | 1 | 200 | |
| Gate 2 | 600 | 2 | 2 | 335 | |
| Gate 3 | 1000 | 2 | 2 | 470 | 5 |
This guide assumes that you are familiar with the recommended Raid Build for your class.
Also check Kakul-Saydon Gate 1 and Kakul-Saydon Gate 3 guides.
Cheat Sheets
Once you have read through the detailed description of the main patterns, use the “cheat sheet” during the raid, or check out our condensed Cheat Sheet Collection for all Legion Raids on one page.
x125
Saydon Appears
Saydon appears. Dodge Explosions/Circus Balls thrown by Kakul.
x110
Curtain
Party Splits
Red Dome = 2 Players
Blue Dome = 1 Player Only
x95
Flip
Must find Kakul within 3 hits.
Target 2nd or 6th card for first two targets. Order doesn't matter.
If you can't locate Kakul after first 2, he must be under the 4th position.
x75
Maze
Use discord screen share to cheese. Screen sharer hits the box at the beginning.
Alternatively, tell or type where each player should go by rows and columns.
x55
Pizza
Watch the rotation by looking at the stars. 3 rotations.
Use Innana if your team is struggling here.
x30
Flip
Must find Kakul within 3 hits.
Target 2nd or 6th card for first two targets. Order doesn't matter.
If you can't locate Kakul after first 2, he must be under the 4th position.
x125
Saydon Appears
Saydon appears. Dodge Explosions/Circus Balls thrown by Kakul.
x110
Curtain

Check the color of the symbol above your head.
Go into the matching safe spot.
x95
Flip
Must find Kakul within 3 hits.
Target 2nd or 6th card for first two targets. Order doesn't matter.
If you can't locate Kakul after first 2, he must be under the 4th position.
x75
Maze
Kill 3 enemies with the matching symbol.
Wait until 1:30 and go into the matching portal.
x55
Pizza
Watch the rotation by looking at the stars. 3 rotations.
Use Innana if you are struggling here.
x30
Flip
Must find Kakul within 3 hits.
Target 2nd or 6th card for first two targets. Order doesn't matter.
If you can't locate Kakul after first 2, he must be under the 4th position.
Raid Mechanics
Raid mechanics cover the passive mechanics that are persistent through the entire raid.
The Madness Meter is a bar shown under each player's character. It fills up when hit by Kakul-Saydon's attacks.
Depending on which percentage your bar is, certain events occur.
0% = Nothing.
50% = Upon hitting 50%, a cross laser will shoot our from you. These can hit teammates and fill up their meter. Any pattern that hits you while you have over 50% meter will cause the cross laser to shoot out.
At 100% = You get turned into the clown's puppet. The boss gains an armor buff, reducing damage taken by 3% per stack. You gain access to 3 skills, Q, W, and E, detailed below.
When you get turned into a puppet, Saydon will receive an armor buff. Using Q in Gate 2 will debuff the target. During Gate 3 when you want to intentionally turn into a puppet, you use it on the flame tower summon.
W
- Reduces Madness Meter for party members within the area around the user.
- Party members not within the area have their Madness Meter slightly increased.
E
- Throws a gift box on the ground. Whoever takes it has their Madness Meter reduced.
Description
- Similar to Valtan's arena, any skill used by the Giant Saydon in the "dealer" position of the blackjack table has the potential to knock you off the map.
Main Mechanics
Description
- Kakul ropes up and disappears. Kakul will proceed with either of the two Rain Variants.
- Rain Variant 1: 2 balls drops on players. Kakul appears back where he disappeared.
- Rain Variant 2: Kakul goes to one side, ropes up to the other side. Balls drop as he goes to other side.
- Saydon appears in the "dealer" position of the playing board.
- Be careful of patterns used by Saydon. They have the potential to knock you off the map. Refer below for those patterns.
Telegraph
- Occurs at or near 110 bars of health.
- Vanishes and appears in the middle of the Blackjack table.
Description
- Saydon uses the Gaze pattern after Kakul appears in the middle. Make sure to face away from the Gaze.
- 4 red and/or blue circles appear on the table, 2 on each side.
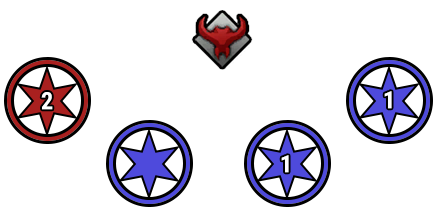
What To Do
- Assign party members 1 and 2 to the left side, 3 and 4 to the right side.
- If the two circles on one side are blue, one player stands on each blue circle.
- If one of the two circles on one side is red, both players on that side must stand in that red circle.
Telegraph
- Occurs at or near 95 and 30 bars of health.
- Starts poking a voodoo doll with pins. Kakul disappears.
Description
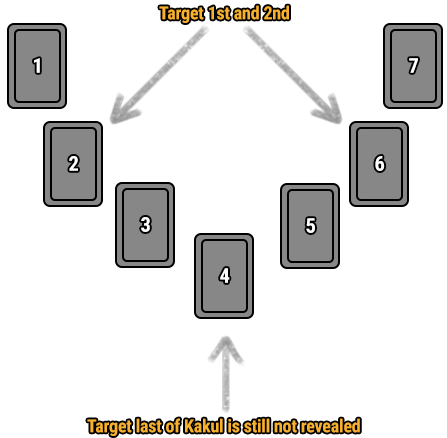
- 7 playing cards appear on the table. Kakul is hiding under one of these cards.
- A player will have a target over their head. Saydon will use their hammer on whoever has the target over their head.
- When the hammer hits the board, the card underneath the hammer will flip along with the card to the left and right of it. From that you will determine whether Kakul is hiding under one of the 3 flipped cards.
- The goal is to have Saydon hit the card Kakul is hiding under. You have 3 chances to find Kakul before a team wipe.
What To Do (Card # read left to right)
- Narrow down all possibilities by first standing on Card #2 or #6. If Kakul is under of the side cards, simply target that card next.
- If Kakul is not under the first 3, target the other Card # from above, either #2 or #6.
- If Kakul still has not been found from the 6 flipped cards above, then the only position remaining is #4. Use your last chance on #4 to complete this mechanic.
Telegraph
- Occurs at or near 75 bars of health. Cutscene starts.
Description
- Players teleport into a maze. Puppet appears in the middle.
- Player who destroys the puppet will be the "eyes" and will be able to see the whole map.
- The other 3 players will gain a suit/symbol with different colors above their heads.
- These players must kill 3 puppet soldiers on the map of the same suit/symbol. After a short duration, a suit/symbol will then appear on a position in the map. All 3 players must reach these positions to complete the mechanic.
What To Do
- Easy Way: Use discord. The "eyes" player will screen share. The other 3 players will immediately know where to find their suit/symbol.
- Intended Way: The "eyes" player will tell each player where to go by indicating how many rows/columns to move up, down, left, or right.
Telegraph
- Occurs at or near 55 bars of health. Vanishes and appears in the middle of the map.
Description
- 2 stars appear next to Kakul, one on each side.
- These stars will rotate clockwise (right) or counterclockwise (left). They rotate briefly before disappearing and a new set of stars rotate. 3 sets of stars rotate.
- Each rotation tells you which direction you should move for the following pizza mechanic.
- 3 full rotation of pizzas occur, 1 star rotation per pizza rotation.
What To Do
- Move left or right depending on the star rotation.
- On the last rotation, complete the pizza partially before moving out of the AoE.
- Use Innana if your party members consistently get hit by the pizza.
Saydon Patterns
Patterns used by Saydon in the dealer position of the blackjack table have the potential to knock you off the map like in Valtan.
Telegraph
- Red flashes of light.
Description
- Fears if you face him. Look away to avoid.
Telegraph
- Eyes flash red briefly. Puts hands on table. Swipes clockwise.
Description
- If grabbed, starts hitting you with their hammer.
Telegraph
- Eyes flash red briefly. Yellow line indicator.
Description
- Possible to get knocked off map.
Telegraph
- Eyes flash red briefly. Yellow indicator.
Description
- Possible to get knocked off map.
Telegraph
- Flips hat over. Birds appear.
Telegraph
- Yellow circle indicator.
Description
- Possible to get knocked off map.
Counter Patterns
Telegraph
- Throws hammer to the side. Does a handstand. Transitions onto all four limbs on the ground like in the movie "The Exorcist". Turns blue then moves forward.
- Very long telegraph for this one. Fairly easy to predict.
Description
- Failure to counter means it will move forward and target a player. Kakul applies fear if he hits a player.
- Kakul will do another dash if he hits no one the first time.
Telegraph
- Depends on fast player reaction.
Description
- Failure to counter means Kakul does a spin forward.
Notable Patterns
Excluding Towers, Kakul has patterns revolving around its four weapons.
Telegraph
- Kakul vanishes. Towers appear.
- White AoE Tower has head upright in a normal position. Red AoE Towers have clown head bending backward.
Description
- Tower with white circle reduces Madness Meter.
- Towers with red circles deal damage and increase your Madness Meter.
What To Do
- Go to the bottom edge of the board with the furthest possible distance from two towers. This is the safe spot.
- Alternatively, go to the tower with the white circle. You might not have enough time depending on it's spawn position.
Telegraph
- Throws weapon away.
- Kakul jumps backward on a circus ball before flying upward.
Description
- Kakul swings back and forth. Circus balls drop 2x on players.
- Kakul reappears at the location he vanished from.
- Good time to use Nineveh if you can time it right.
Telegraph
- Throws weapon away.
- Kakul vanishes. Reappears on one side. Flies away on a rope.
Description
- Circus balls appears starting from the side he ropes away from.
- Kakul reappears on the opposite side of the board.
- Good time to use Nineveh if you can time it right.
Description
- First ball creates AoE on ground, then throws 3 more at a player.
Description
- Vanishes then appears at another location. Charges laser.
- Good time to Nineveh only if you do it early enough, otherwise there is a chance you miss.
Description
- Targets player. Launches a grenade. Follow ups with triple grenades in a cone.
Description
- Targets player. Launches a grenade. Follow ups with targeted grenades.
Telegraph
- Plays trumpet pointed up.
Description
- Yellow ring indicator starts far away from the boss. Safe spot always near boss.
Telegraph
- Plays trumpet pointed up.
Description
- Yellow ring indicator starts far away from the boss. Safe spot always near boss.
Description
- Hammer smash backward. AoE's appear in a line going out. Then smash forward. Same AoE's in a line.
Solo Mode Main Mechanics
Most of the attacks the boss does are exactly the same as in Normal mode. There's only a couple exceptions in the main mechanics.
What to do
- Dodge the Circus Balls / Explosions created by Kakul until he lands again.
- Saydon will periodically perform attacks for the rest of the fight that can knock you off the map. Pay attention to yellow telegraphs.
What To Do
- Go inside the safe spot that matches the color of the Clown Icon you have on top of your head.
What To Do
- Stand on one of the cards and bait Saydon to smash it with his Hammer.
- Tip: Saydon's Hammer Smash can reveal up to 3 cards at the same time
- Find the card in which Kakul is hiding under, and bait Saydon to smash it.
What To Do
- Smash the pedestal in the middle of the room
- Check your suit under your feets. It can be ♦️, ♣️ or ❤️.
- Smash 3 enemies with the same suit as you.
- Avoid getting hit by the horizontal/vertical Clowns, as this will reset your stacks and you will need to smash another 3 enemies.
- When the timer reaches 1:30, exit portals with the corresponding suits will spawn. Go into yours.
What To Do
- Pay attention to the direction in which the stars around Kakul spin. It can be clockwise or counter-clockwise. They will spin 3 times and you need to memorize it.
- Rotate around the boss in the correct directions. Each rotation starts and ends at 12 clock position (North).
- Tip: you can use Innana to have an easier time during this mech.
Credits
Written by Yaen
Reviewed by Starlast
Updated by Sekwah