“One Page” Cheat Sheet Collection
Introduction
Welcome to the collection of Legion Raid Cheat Sheets. On this page, you can check out the Cheat Sheets of every available Raids on the Western servers. Make sure to read the in depth guides here, before you use the Cheat Sheets below for the boss encounters.
Cheat Sheets
| Gold | Material | Box Material | Box Cost | Auction Material | |
| Normal | |||||
| Gate 1 | 300 | 1 | 1 | 180 | |
| Gate 2 | 450 | 2 | 2 | 225 | |
| Hard | |||||
| Gate 1 | 400 | 3 | 3 | 255 | |
| Gate 2 | 700 | 3 | 3 | 380 | 5 |
Check out the G1 Guide for additional information!
| Normal Mode | Hard Mode | Monster Type | Weakness |
| 1415 Item Level | 1445 Item Level | Demon | None |
Battle Items:
- HP Potion of your choice
- Panacea
- Sacred Charm or Atropine Potion
- Dark Grenade or Whirlwind Grenade
x40 Invader
Blue Wolf
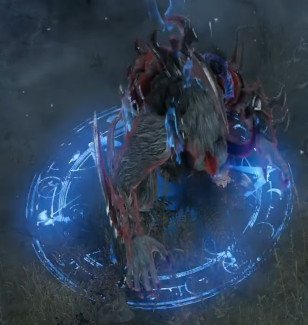

Separate both wolves!
Players with the Golden Orb Buff focus Blue Wolf.
Players without the Buff focus Red Wolf.
x30 & x15
Orb Phase
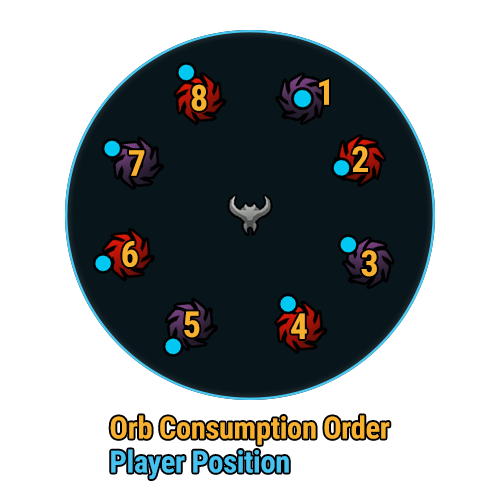

Optional: Use Sidereal: Wei.
x25 Invader
Red Wolf
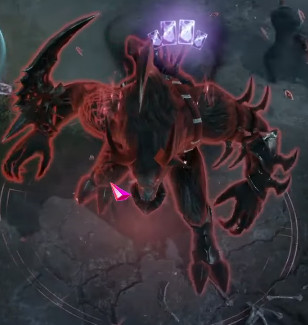

Separate both wolves!
Players with the Golden Orb Buff focus Red Wolf.
Players without the Buff focus Blue Wolf.
Check out the G2 Guide for additional information!
| Normal Mode | Hard Mode | Monster Type | Weakness |
| 1415 Item Level | 1445 Item Level | Demon | None |
Battle Items:
- HP Potion of your choice
- Time Stop Potion
- Flame Grenade
- Corrosive Bomb or Destruction Bomb
x160 Armor Break Phase
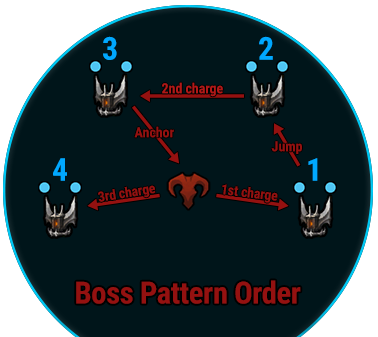
Make Valtan charge into a Wall.
Use Corrosive Bomb and Destruction Bomb to break his armor.
x65 Counter
Counter 3 seconds after his turning animation stops. Learn the timing.
x130 Wipe Pattern

Use Sidereal: Balthorr.
x35 Stage Break
The other half of the arena breaks. Move to the opposite side.
x110 Pillar Hug
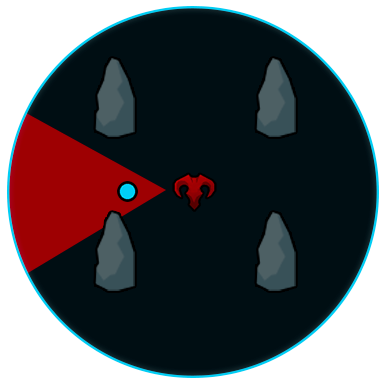
Pillar protects the player from Yellow Zone damage.
Dodge Red Zone at the last second to hide behind a Pillar in the Yellow Zone or use Time Stop Potion in Yellow Zone.
x17-15 Ghost Transition

Group up to force Valtan strike a certain spot.
Use Sidereal: Balthorr on that spot .
x85 Stage Break
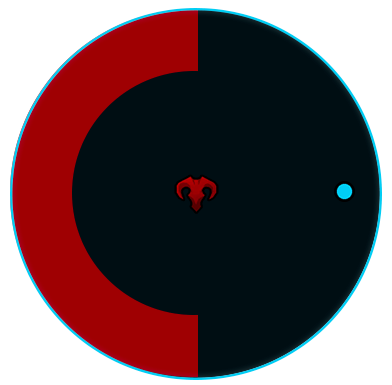
Left or right side of the arena gets highlighted with a red telegraph. Move to the opposite side.
x40 Ghost Phase
Counter the ghost clones to reduce the armor stacks and gain Sidereal meter.
Use Sidereal: Thirain after removing all armor stacks.
| Gold | Material | Box Material | Box Cost | Auction Material | |
| Normal | |||||
| Gate 1 | 350 | 1 | 1 | 175 | |
| Gate 2 | 650 | 2 | 2 | 290 | |
| Hard | |||||
| Gate 1 | 500 | 3 | 3 | 280 | |
| Gate 2 | 1000 | 3 | 3 | 435 | 5 |
Check out the G1 Guide for additional information!
| Normal Mode | Hard Mode | Monster Type | Weakness |
| 1430 Item Level | 1460 Item Level | Demon | None |
Battle Items:
- HP Potion of your choice
- Time Stop Potion
- Flame Grenade
- Swiftness Robe
x120
Clone Rotation
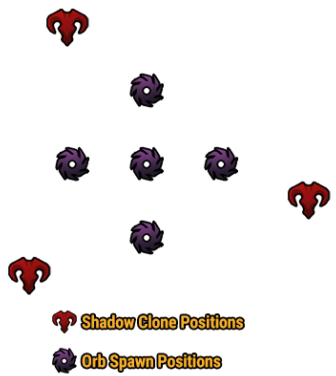
5 Players take orbs in center.
3 Players scout for number of wings (0, 1, 2)
Move from clone to clone in the correct order
3 Purple: 0 → 1 → 2
3 Red: 2 → 1 → 0
x65
Clone Absorption
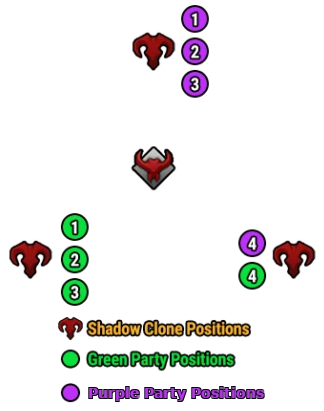
Assign positions. Example in picture by party order.
5 shockwaves at clones, red or black. Memorize the black shockwaves.
Clone shoots 5 orbs towards the boss. Block the black orbs as indicated by the shockwave order.
Flex position is Player 3.
Sidereal

Use Sidereal: Nineveh once it is ready.
Check out the G2 Guide for additional information!
| Normal Mode | Hard Mode | Monster Type | Weakness |
| 1430 Item Level | 1460 Item Level | Demon | None |
Battle Items:
- HP Potion of your choice
- Time Stop Potion
- Whirlwind Grenade
- Sleep Bomb
x170 Swamp
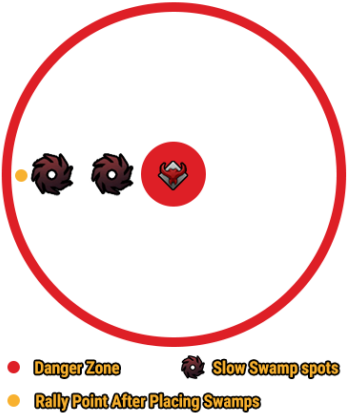
Place brown swamp in marked area.
Place speed swamp away from the marked area.
Group up at the marked spot after swamps placed.
x102 Stagger Check
Method 1: Use west yellow orb. Stagger Vykas. Time Stop Potion after.
Method 2: Raid lead uses Sidereal: Wei to hit the boss and the top slime. Everyone else, kills the bottom slime.
x150 Sword & Clones
Players with >70% Meter: Ping location of the swords.
Players with <70% Meter: Ping overlap with a clone.
x75 Swamp
Safe spot highlighted in white on Human side. Human team tells Demon team safe spot.
x135 Key Input
Use north yellow orb. Reduce Seduction Gauge to 0. Key input after. Use Sidereal: Nineveh after key input.
If team fails 1-3 inputs, use support shield.
Air Raid pattern occurs after. Dodge as group.
x55 Tentacles
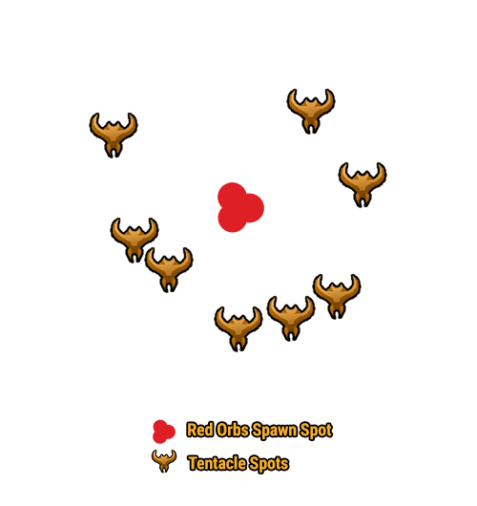
Red orbs increase Seduction Gauge.
Tentacles can only be destroyed if you have over 70% Meter.
x120 Throne
Stack Seduction Puddles together. Get your Seduction Gauge to 100%.
x2 Last Struggle
~x10 HP, group up and consume the last yellow orb to get Seduction Gauge to 0.
x2 HP, Avoid Medusa, then find real Vykas. Shockwave reduces Meter. Get behind Vykas and Stagger her. Use Sidereal: Wei. Dodge Air Raid.
| Gold | Material | Box Material | Box Cost | Auction Material | |
| Normal | |||||
| Gate 1 | 400 | 1 | 1 | 200 | |
| Gate 2 | 600 | 2 | 2 | 335 | |
| Gate 3 | 1000 | 2 | 2 | 470 | 5 |
Check out the G1 Guide for additional information!
| Normal Mode | Monster Type | Weakness |
| 1475 Item Level | Demon | None |
Battle Items:
- HP Potion of your choice
- Whirlwind Grenade
- Swiftness Robe
- Atropine Potion
x130 Break
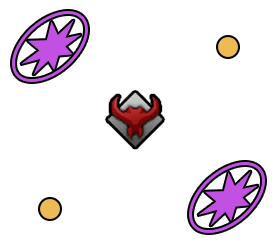
Stagger where there is no purple shield.
x65 Break

Stagger where there is no purple shield.
x110 Heart
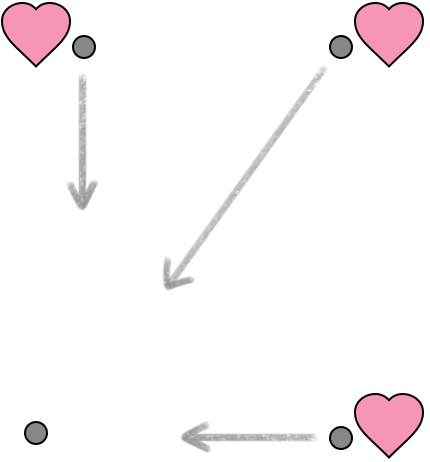
Ping hearts. If 3 hearts, face non-heart.
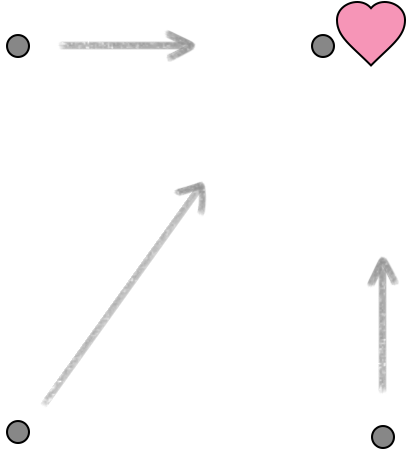
Ping hearts. If 1 heart, face heart.
x45 Roulette
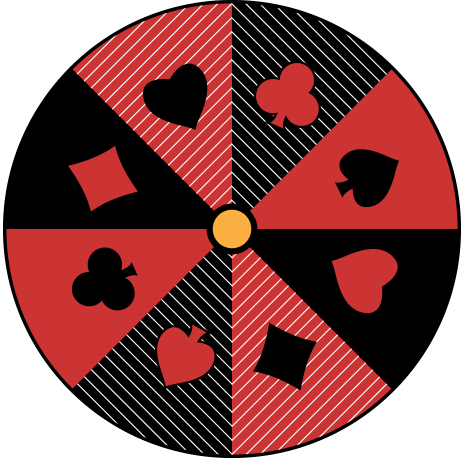
Match suit/symbol above head with space. 3 rounds. Suit/symbol changes every round. Get out after 3rd round.
x85 Simon Says
Saydon Facing You:
Match Emote
Saydon's Back Turned:
Use Different Emote
x25 Heart

Ping hearts. If 3 hearts, face non-heart.

Ping hearts. If 1 heart, face heart.
Check out the G2 Guide for additional information!
| Normal Mode | Monster Type | Weakness |
| 1475 Item Level | Demon | None |
Battle Items:
- HP Potion of your choice
- Dark Grenade
- Swiftness Robe
- Time Stop Potion or Atropine Potion
x125 Saydon Appears
Saydon appears. Kakul will rope into the air.
x75 Maze
Use discord screen share to cheese. Screen sharer hits the box at the beginning.
Alternatively, tell or type where each player should go by rows and columns.
x110 Curtain
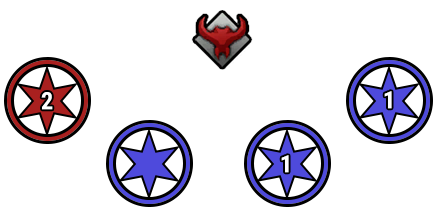
Party Splits
Red Dome = 2 Players
Blue Dome = 1 Player Only
x55 Pizza
Watch the rotation by looking at the stars. 3 rotations.
Use Innana if your team is struggling here.
x95 Flip
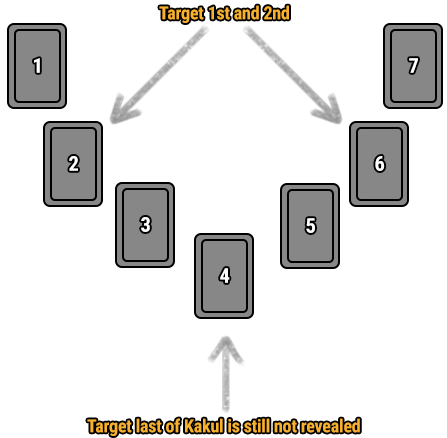
Must find Kakul within 3 hits.
Target 2nd or 6th card for first two targets. Order doesn't matter.
If you can't locate Kakul after first 2, he must be under the 4th position.
x30 Flip

Must find Kakul within 3 hits.
Target 2nd or 6th card for first two targets. Order doesn't matter.
If you can't locate Kakul after first 2, he must be under the 4th position.
Check out the G3 Guide for additional information!
| Normal Mode | Monster Type | Weakness |
| 1475 Item Level | Demon | None |
Battle Items:
- HP Potion of your choice
- Sacred Charm
- Time Stop Potion or Atropine Potion
- Whirlwind Grenade or Dark Grenade
x155 1st Mario & 1st Curtain Call
1st and 2nd Mario person should've prepped their meter by now.
15 seconds until you can enter Mario.
Shortly afterward, curtain call mechanic will begin. Vertical saws.

x80 3rd Mario & 3rd Curtain Call
3rd Mario person can prep meter by getting hit from Showtime! or stalling at x85 for towers.
Curtain call mechanic with hooks and saws.

x130 2nd Mario & 2nd Curtain Call
2nd Mario person should have had their meter prepped from before.
Curtain call mechanic with hooks.
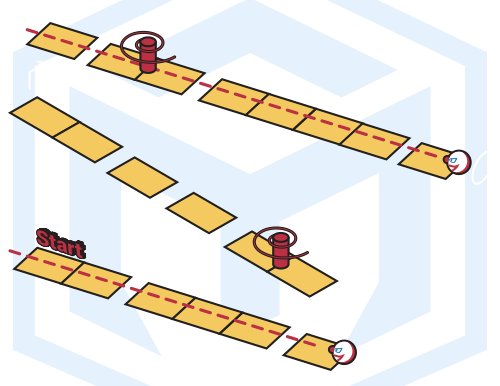
x55 4th Mario & 4th Curtain Call
4th Mario person preps meter.
Curtain call mechanic with hooks and saws. Must pull both levers before Stagger.
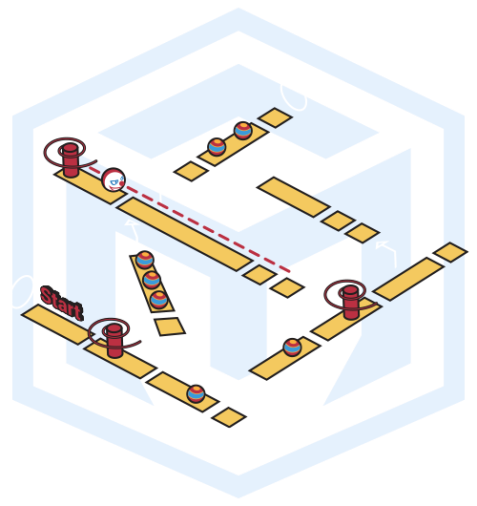
x90 Showtime
Group to bot to dodge initial bullet shower.
Saydon targets someone with a cone shortly after.
Saydon will do a bullet rotation 180 degrees, then 90 degrees in the other direction.
Person who got targeted by the cone initially, stand in front of the bomb.
Same person goes to the 2nd bomb that always appears on the opposite side.
Group together or separate and run clockwise to resolve the remaining mechanic.
x0 Bingo
Final phase. Use the Bingo-Tool.
| Gold | Material | Box Material | Box Cost | Auction Material | First Clear | |
| Normal | ||||||
| Gate 1 | 1000 | 4 | 4 | 250 | 30 | |
| Gate 2 | 1000 | 4 | 4 | 300 | ||
| Gate 3 | 1000 | 5 | 5 | 400 | 5 | |
| Gate 4 | 1600 | 7 | 7 | 600 | 15 | |
| Hard | ||||||
| Gate 1 | 1200 | 6 | 6 | 400 | 30 | |
| Gate 2 | 1200 | 6 | 6 | 400 | ||
| Gate 3 | 1200 | 7 | 7 | 500 | 5 | |
| Gate 4 | 2000 | 10 | 10 | 800 | 30 | |
Check out the G1 Guide for additional information!
Battle Items:
- HP Potion of your choice
- Panacea or Atropine Potion
- Whirlwind Grenade, Frost Grenade or Flash Grenade
- Destruction Bomb or Sleep Bomb
Phase1 Statues & Dogs
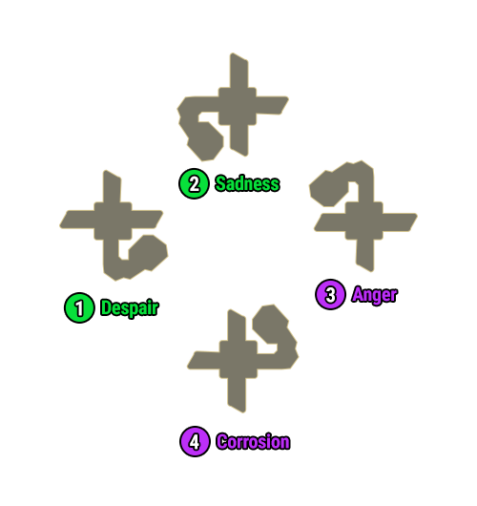
Despair:
Stagger Check Statue
Sadness:
Kite the Orb spawned by the Statue
Anger:
Counter Statue once it flashes blue
Corrosion:
Use CC to interrupt Statue's Blind Debuff
x85 Safe zones
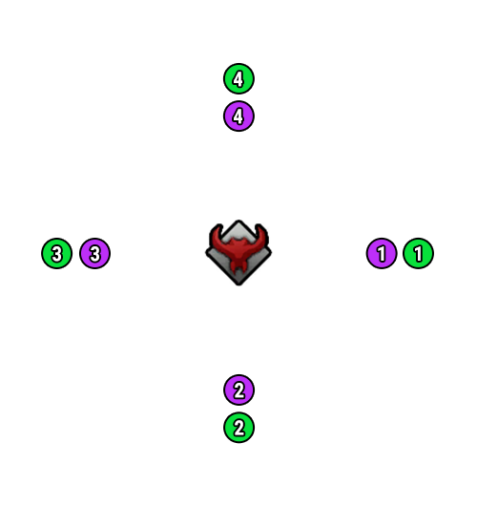
Go to your assigned position
Occupy the safe zones as soon as they spawn.
Phase 2 Hammer & Bow Split
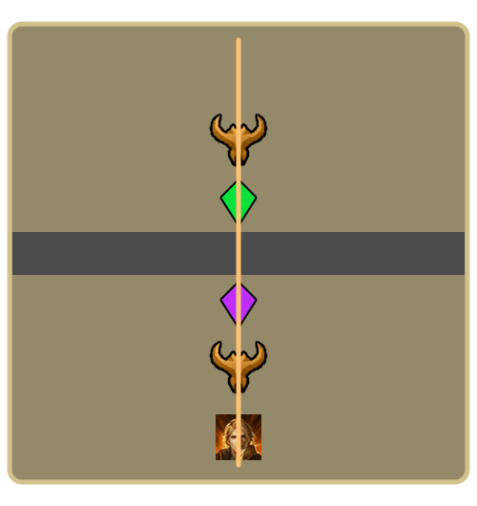

Use Thirain once both Bosses are aligned.
Try to kill both bosses at the same time.
x45 6 Counters
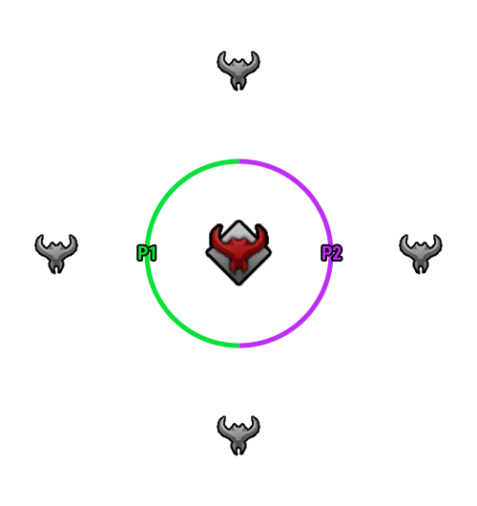

Use Azena once mobs appear on Minimap.
Counter 6 times
Check out the G2 Guide for additional information!
Battle Items:
- HP Potion of your choice
- Swiftness Robe
- Whirlwind Grenade or Dark Grenade
- Time Stop Potion or Atropine Potion
x145
Meteors+Typing+Stagger
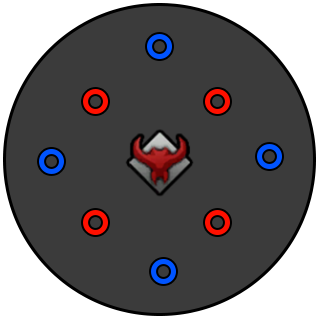
Party1: x3 positions
Party2: x3+1 positions
Meteors spawn in these locations.
Step on them to start a typing test
Finish it and stagger the boss!
x100
Medusa+Stagger
Stagger the boss!
Play around one of 2 Medusa versions:
Cat's eye = Look away
Round eye = Look inside
x43~
Shapes
(Star, Square & Diamond)
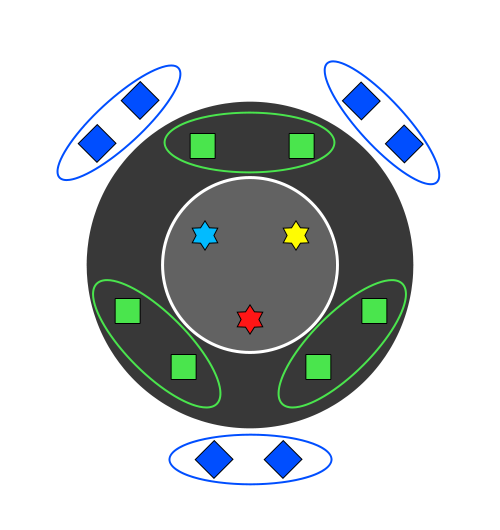
Check the glow on boss Red/Blue/Yellow
Avoid looking into medusa
Assign pre battle each player one of the positions & shapes below to destroy during this Mechanic.
1x Red/Yellow Stars
1x Blue/Yellow Stars
2 Squares around: 12 O'Clock ; 5 O'Clock ; 7 O'Clock
2 Diamonds around: 1 O'Clock ; 6 O'Clock ; 11 O'Clock
After destroying shapes:
Square markers group together with Star+Square player
Diamond markers stay away from Star+Diamond player and everyone else
x0
Red & Blue Spears

Party1: x3 positions
Party2: x3+1 positions
Red & Blue areas will spawn, stand on them with the correct color to consume them.
Consume 6 marks to complete the raid!
Check out the G3 Guide for additional information!
Battle Items:
- HP Potion of your choice
- Swiftness Robe
- Whirlwind Grenade or Dark Grenade
- Time Stop Potion or Atropine Potion
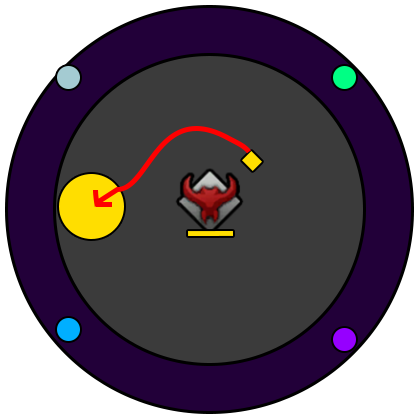
x170/x120
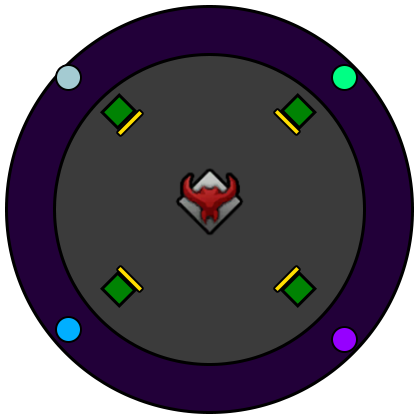
x170/x120

x170/x120
Lowest stagger enters the dome
All players stagger the boss
Collect objects after stagger & enter the dome with them
1, 2 & 2 objects will appear after each stagger.
Party1
Player1&2: Green Side
Player3&4: White Side
Party2
Player1&2: Blue Side
Player3&4: Purple Side
Stagger the cube, Complete typing test and breakout your teammate
Party1: Green side
Party2: Blue Side
Destroyer: Kill Orb
Catcher: Catch orb near the boss
Stagger: Step inside the Yellow dome and stagger the boss
Catcher & Destroyer: Block projectiles
x95
Stagger 1
You have a limited time to stagger the boss.
Use Sidereal: Innana for cleansing Damage Stacks
Use Sidereal: Wei for immediate high stagger
x60
Red/Blue/Yellow
Check images above
x20
Stagger 2
You have a limited time to stagger the boss.
Use Sidereal: Innana for cleansing Damage Stacks
Use Sidereal: Wei for immediate high stagger
Check out the G4 Guide for additional information!
Battle Items:
- HP Potion of your choice
- Whirlwind Grenade or Dark Grenade
- Time Stop Potion or Atropine Potion
x212
Dream World 1
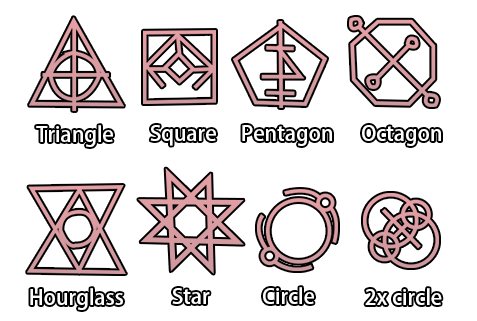
Check your shape, remember it
Projectile Safe spot on the 1 o'clock line
Inputs: Reverse → Normal → Reverse
Run to 3 safe areas, remember the order.
Type in chat: Shape & order
For Example: Star 7,11,0
x188
Golden Meteor 1
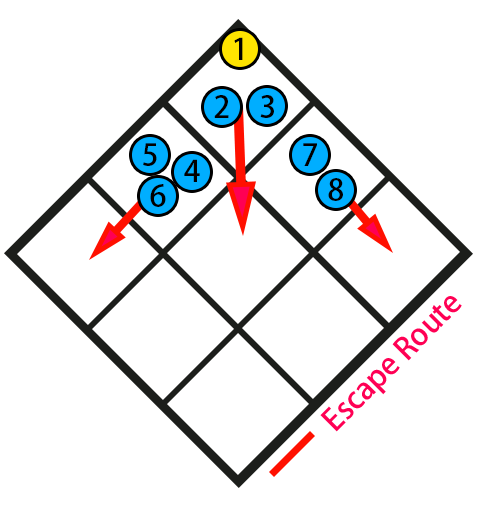
Pay attention to the order Blue meteors appearing in and go to those tiles.
Gold - 12 o'clock
Blue 2,3 - 12 o'clock
Blue 4,5,6 - 11 o'clock
Blue 7,8 - 1 o'clock
When your meteor is placed, escape!
Damage Push!
Reclear Party: High nonstop damage on the boss while placing blue meteors without breaking tiles.
Learning Party: Refer to the Golden Meteor Setup to know how to proceed with your blue and gold meteor placement.
3 Minute Interval
Golden Meteor
Golden meteor spawns, place it in the most damaged corners of the arena: 6 or 12 o'clock.
x113
Black Hole
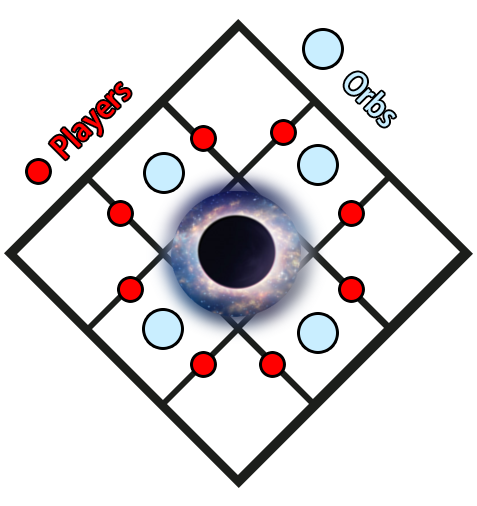
Party1 - x3
Party2 - x3+1
Don't stand in the middle of the tiles!
Stand on the lines!
Avoid red orbs floating to the center
Collect 1-2 yellow orbs
Outside Team - Enter orb when it expands
Outside Team - Check illusions & ping location
Inside Team - Counter/Stagger at ping location, consume the orb left behind.
Damage Push!
Reclear Party: High nonstop damage on the boss while placing blue meteors without breaking tiles.
Learning Party: Refer to the Golden Meteor Setup to know how to proceed with your blue and gold meteor placement.
x28
Dream World 2

Check your shape, remember it
Projectile Safe spot on the 1 o'clock line
Inputs: Random
Sidereal Innana to cleanse inputs!
Run to 3 safe areas, remember the order.
Type in chat: Shape & order
For Example: Star 7,11,0
x25
Final Nightmare
Avoid 3/6/9/12 o'clock positions as they will break.
Finish the fight!
Check out the G4 Guide for additional information!
Battle Items:
- HP Potion of your choice
- Whirlwind Grenade or Dark Grenade
- Time Stop Potion or Atropine Potion
Disclaimer! This only goes over new or altered main mechanics in Hard Mode and does not explain the entire mechanic. Check the Normal Mode Cheat Sheet for the remainder of the main mechanics.
x188
Golden Meteor 1
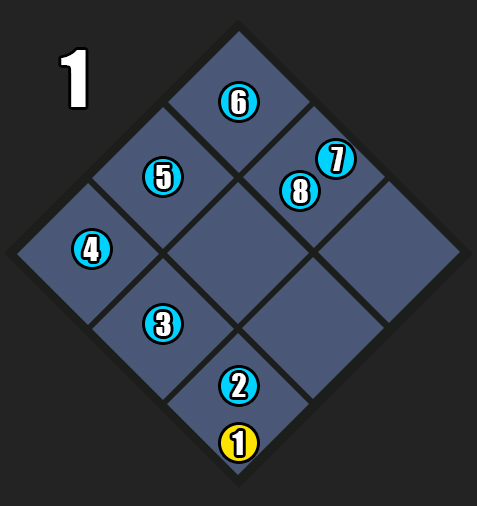
Pay attention to the order Blue meteors appearing in and go to those tiles.
Gold - 6 o'clock
Blue - Start 6 o'clock and run clockwise
How to proceed? (Learning and average DPS Party)
From now on, every 60 seconds, Blue meteors will spawn on random players. Starting with 2 followed by a pattern that will alternate between 3 and 4 endlessly.
The strategy is to prepare yourself for the Golden meteor ahead of time at locations 12 & 6 o'clock. Meaning that majority of Blue meteors will always be placed on tiles: 11,12,1 or 5,6,7 depending on the current 3 destroyed tile locations.
There are countless variations of where they can be placed based on the current situation and availability. This is just an example of how you could proceed:
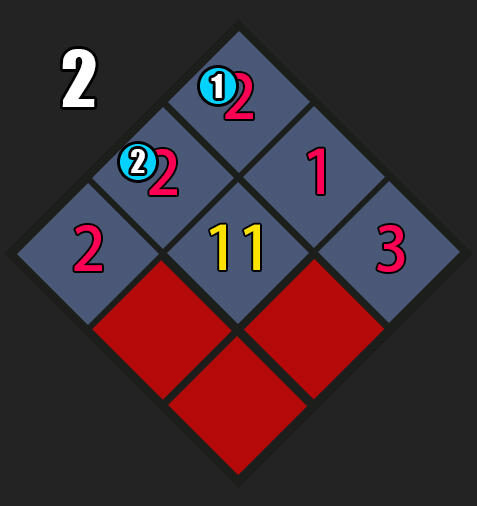
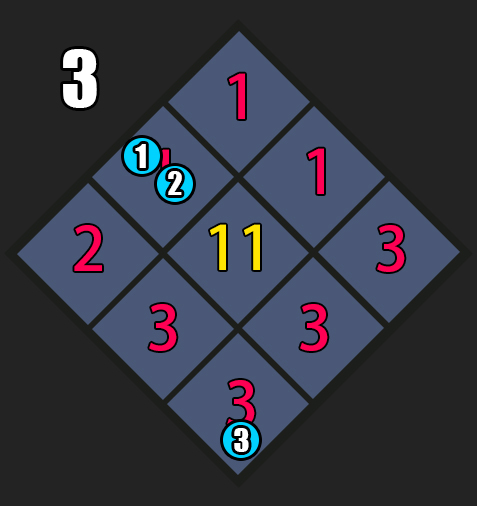
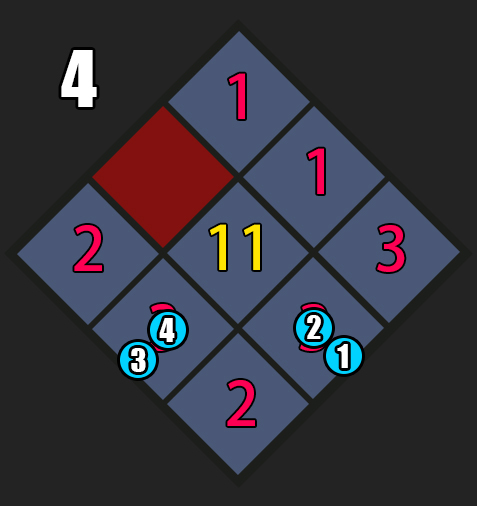
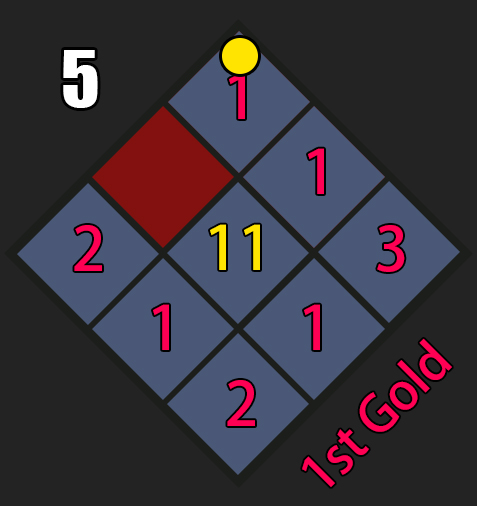
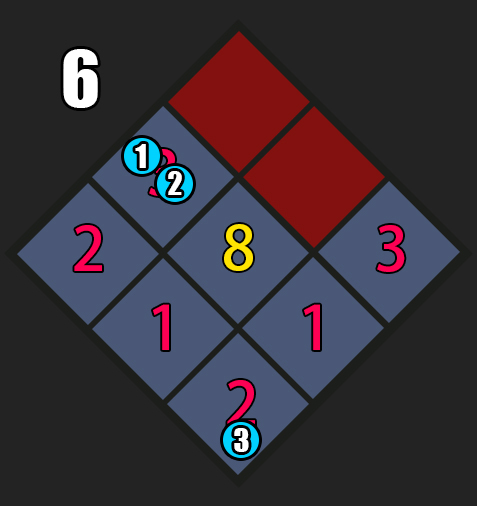
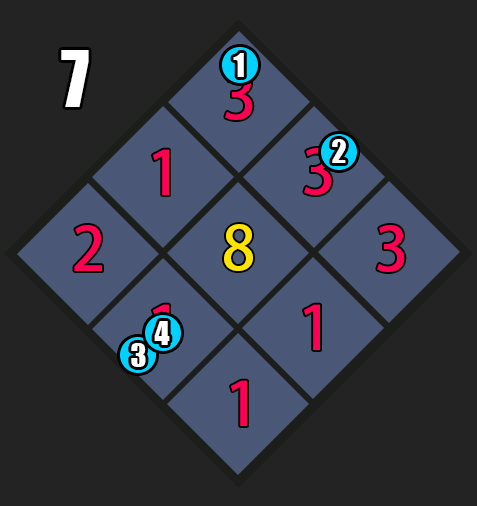
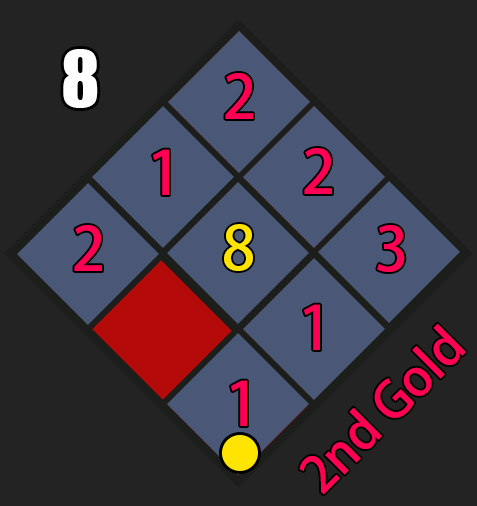
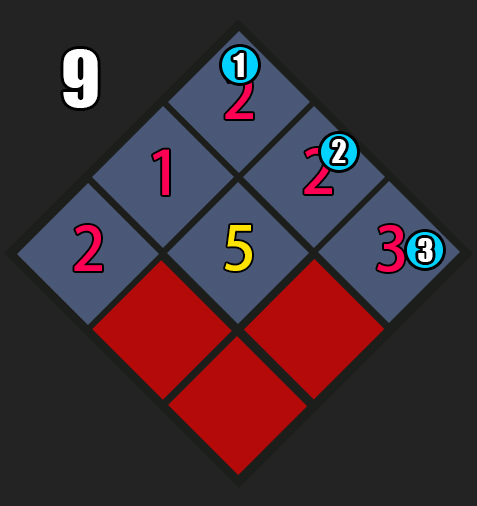
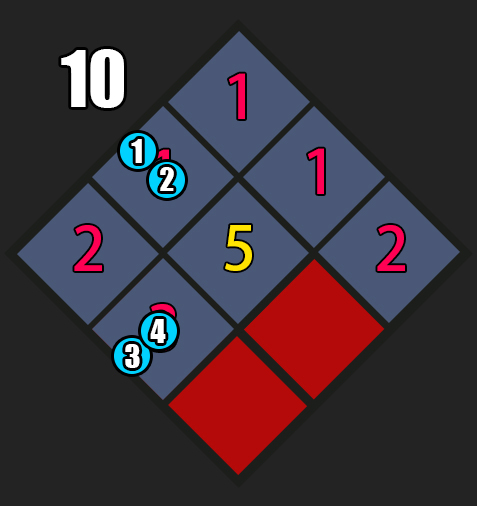
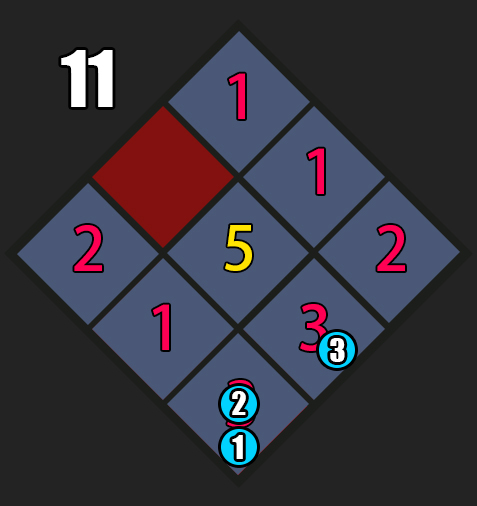
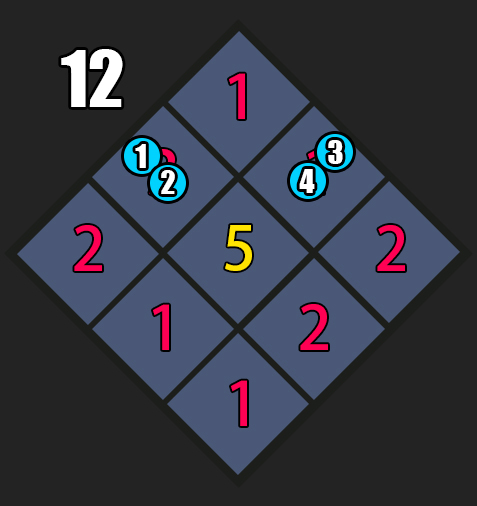
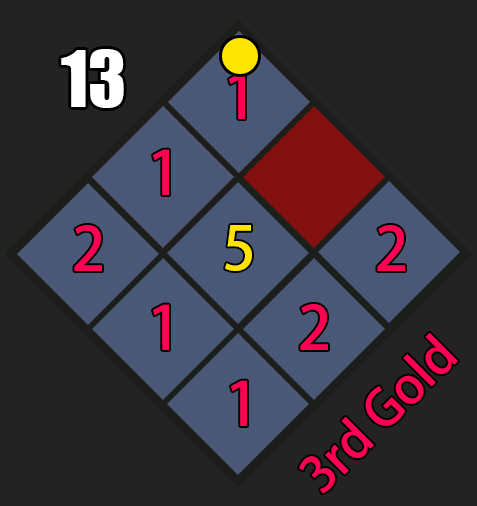
High Damage Reclear Party Strategy
- Complete Starting Golden meteor setup.
- Place consecutive blue meteors how you would normally, but try to not break any tiles.
- Full damage on the boss until x113 HP.
- Utilize Dark Grenades if dps is lacking.
- Use Sidereal: Shandi and complete the Black Hole gimmick.
- If you used Sidereal: Azena at the start of the fight and Shandi wasn't up in time for the Black Hole gimmick, then save your sidereal at the start so Shandi can be available for it.
- Once completed, full damage until the end of the fight.
- Use Sidereal: Azena if you're confident, otherwise keep it for Innana so it can be used at x28 HP Dream World mechanic.
| Gold | Material | Box Material | Box Cost | Auction Material | |
| Normal | |||||
| Gate 1 | 800 | - | - | 300 | |
| Gate 2 | 1200 | 1 | 1 | 400 | |
| Gate 3 | 1600 | 2 | 2 | 500 | 3 |
| Hard | |||||
| Gate 1 | 1000 | 1 | 1 | 350 | |
| Gate 2 | 1600 | 1 | 1 | 500 | |
| Gate 3 | 2200 | 3 | 3 | 700 | 5 |
Check out the G1 Guide for additional information!
| Normal Mode | Hard Mode | Monster Type | Weakness |
| 1540 Item Level | 1580 Item Level | Human | Dark |
Battle Items:
- HP Potion of your choice
- Dark Grenade
- Sacred Charm
- Time Stop Potion or Atropine Potion
During Raid Puddles
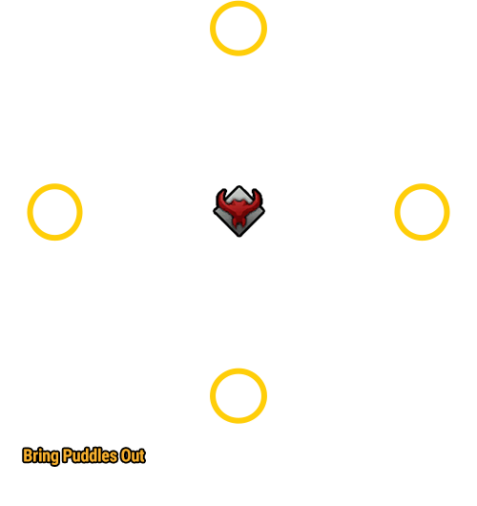
Bring puddles out
Before x55 gives atk buff
x55 Dodge Minigame
Dodge Lightning
Watch for spear toss
Cleanse if someone is stunned
Check out the G2 Guide for additional information!
| Normal Mode | Hard Mode | Monster Type | Weakness |
| 1540 Item Level | 1580 Item Level | Human | Dark |
Battle Items:
- HP Potion of your choice
- Panacea
- Atropine Potion
- Whirlwind Grenade or Dark Grenade
During Raid
Elemental Weakness
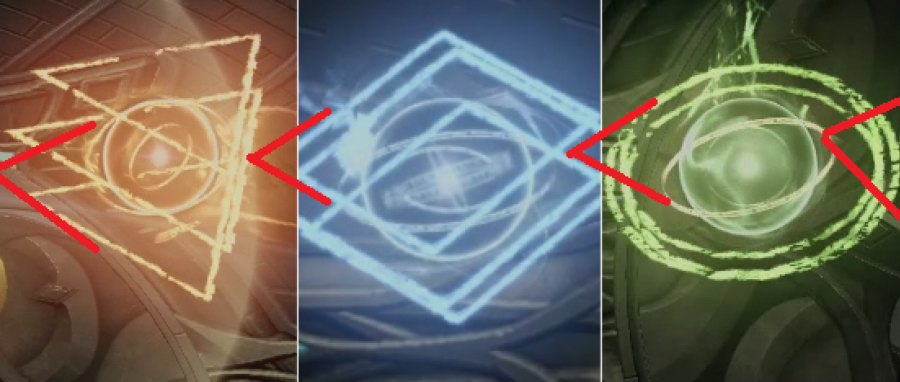
If Red destroy Blue
If Blue destroy Green
If Green destroy Red
x62
Rotating Elements
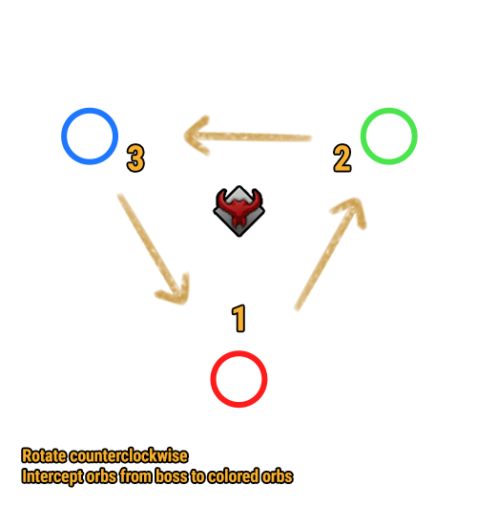
Cleanse Party
Go to your assigned position.
Rotate CounterClockwise
Destroy Strong Element
x42
Counter/Stagger
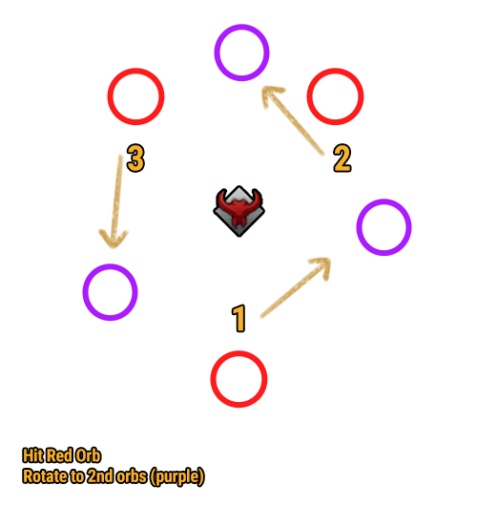
Go to your assigned position
Counter all mobs
Stagger
x20
Rings
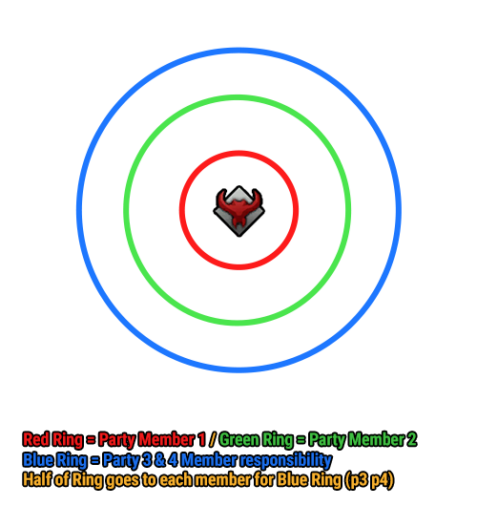
Destroy Orbs that Beats the Ring
Red Ring = Blue Square
Green Ring = Red Triangle
Blue Ring = Green Circle
Check out the G3 Guide for additional information!
| Normal Mode | Hard Mode | Monster Type | Weakness |
| 1540 Item Level | 1580 Item Level | Human | Dark |
Battle Items:
- HP Potion of your choice
- Time Stop Potion or Atropine Potion
- Flame Grenade or Dark Grenade
During Raid Mirror
Boss will target player with mirror
Hit around mirror
Don't touch mirror
x180 Explosions/Egg Break
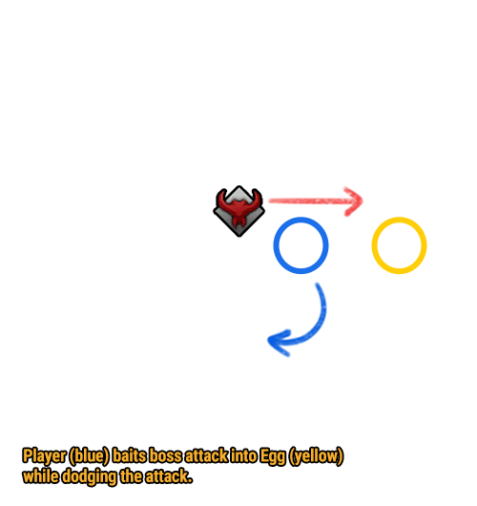
Dodge 3 explosions
Aim Laser at egg
Activate egg for buff
x135 Light Delivery
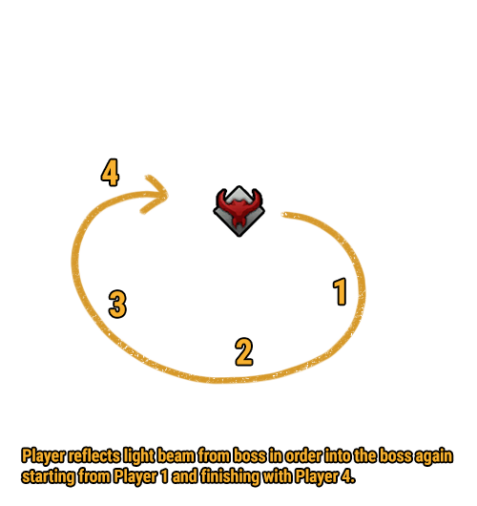
P1 take intial laser
P2, P3, then P4
Don't stack rings
x100 White Orbs/Sunlight
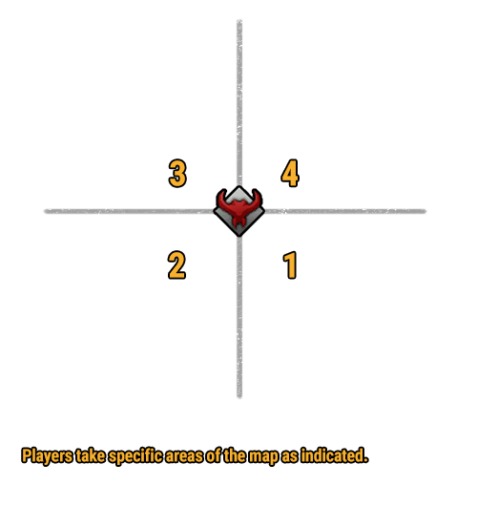
Clock Position 3x+1
Watch sunlight safespots
Collect 5 white orbs
Safespots
x60 Pillars/Clones
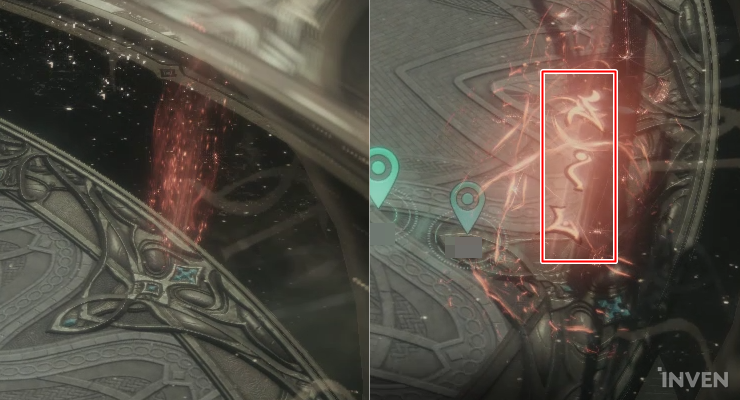
Ping Red Rune Pillars
Stagger Pinged Clone
Final Phase
Kill Fast use Dark Grenade
Ping Sunlight Safe Spots
| Gold | Material | Box Material | Box Cost | Auction Material | First Clear | |
| Normal | ||||||
| Gate 1 | 1000 | 3 | 3 | 450 | 20 | |
| Gate 2 | 1800 | 3 | 3 | 550 | ||
| Gate 3 | 2600 | 5 | 5 | 750 | 5 | |
| Total | 5400 | |||||
| Hard | ||||||
| Gate 1 | 1500 | 7 | 7 | 600 | 20 | |
| Gate 2 | 2500 | 7 | 7 | 700 | ||
| Gate 3 | 3500 | 8 | 8 | 950 | 10 | |
| Total | 7500 | |||||
Check out the G1 Guide for additional information!
| Normal Mode | Hard Mode | Monster Type | Weakness |
| 1580 Item Level | 1600 Item Level | Undead | None |
Battle Items:
- HP Potion of your choice
- Sacred Charm
- Panacea
- Atropine Potion
- (Purify)
During Raid
Armor Buff
Similar to Valtan Armor
Removed by doing mechs up to x112
During Raid
General Debuffs
Hit by Spear = 3.5% HP DoT
Hit by Green Circle = 30%+ DMG taken
During Raid
Green/Black Tumor Debuffs
Touching Players Opposite Color = Debuff
Debuff = Healing Reduced/DoT
Having 2 Tumors = Dead
During Raid
Drowning
After 90x HP
Fill Up Bar
Clip Yellow Bar On The Top of Blue
x140
8 Tumor Orbs/Spear
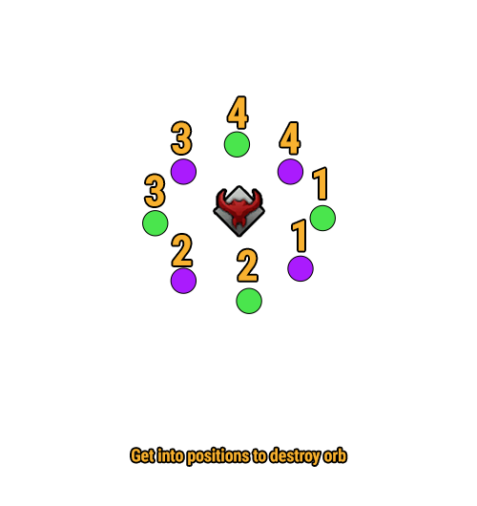
Clock Positions
Destroy Orb
Touch Spear after Boss Lands
Don't be too close to Opposite Color
x128
Cleanse/Stagger
Green Debuff = Wait till Yellow
Yellow Debuff = Cleanse
Red Debuff = Stagger Boss
x112
Orbs/Grab/Stagger
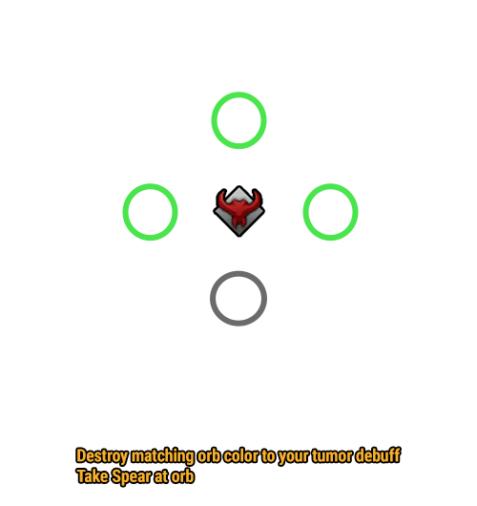
Destroy Orb That Match Color
Take Boss Grab
Stagger
Destroy Same Color Small Orbs
Time Attack

Thirain After Cutscene
Get Boss to x90 HP
Evacuation

Avoid Touching Players For Stacks
First Player Look for Debri/Dust Fall
Ping Correct Path
Wait till Water Rises to Last Stairs
x75
Stop Mobs
Kill Big Mob on Map
Kill Smaller Mobs to Not Get Stunned
When Grey Smoke = Take Spear
x50
Inanna Stagger

Boss Jumps to Center
Inanna when Boss Stands Up
Stagger & DPS
x20
Shield/Bells
Kill Bugs Quickly
Destroy Shield after Bells
Move out of Green Fog at 6-7 Stacks
Move Back in After Plague Cleansed
Final Fight
Kill Fast
Dodge
Check out the G2 Guide for additional information!
| Normal Mode | Hard Mode | Monster Type | Weakness |
| 1580 Item Level | 1600 Item Level | Undead | None |
Battle Items:
- HP Potion of your choice
- Time Stop Potion or Atropine Potion
- Sacred Charm (or Camouflage Robe)
- Corrosive Bomb or Destruction Bomb
x175
Tentacles
Avoid standing in the center.
Destroy Tentacles.
x160
Ghost
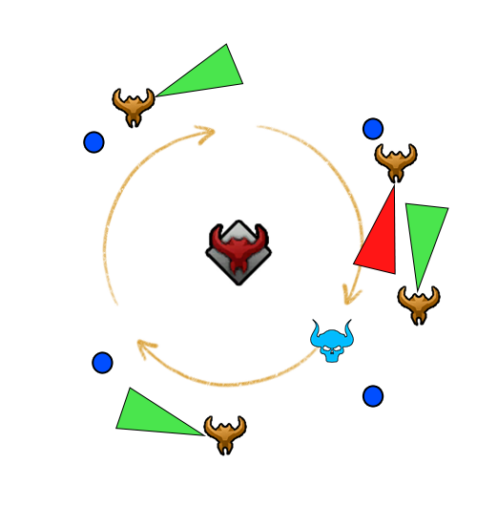
Avoid green ghosts and place puddles at the edge of the arena.
Pick up skull and run away from ghost clockwise.
Pass skull to the next player before the red ghost touches you.
Optional: Use Camouflage Robe method.
Hard Mode: Counter Clones.
x140
Red Hole
Avoid standing in the center and dodge red explosions.
After 3rd explosion, dodge Akkan's 1 hit attack.
x110
Hide
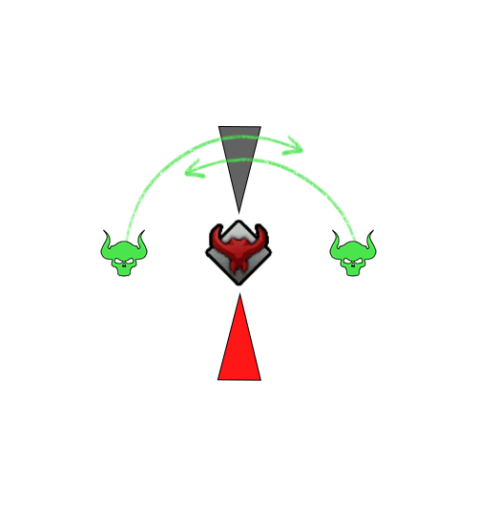
Stay in the shadow behind Akkan.
Pay attention to the skulls to see Akkan's turning direction.
If the Lantern glows, Akkan will use the laser attack.
x85
Red Hole
Avoid standing in the center and dodge red explosions.
At the start, dodge Akkan's 1 hit attack.
Optional: Use Sidereal: Thirain towards the front of the boss.
x55
Ghost
Similar to x160 Ghost.
x30
Red Hole
Avoid standing in the center and dodge red explosions.
After 3rd explosion, dodge Akkan's 1 hit attack.
x0
Destruction
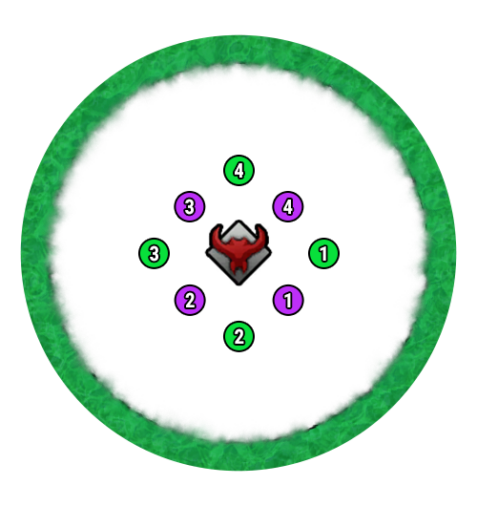
Go to assigned positions.
Use Corrosive Bomb, Destruction Bomb and Weak Point skills on Akkan.
Counter Clones and use Sidereal: Thirain.
Check out the G3 Guide for additional information!
| Normal Mode | Hard Mode | Monster Type | Weakness |
| 1580 Item Level | 1600 Item Level | Demon Undead (Extra Stage) | None |
Battle Items:
- HP Potion of your choice
- Sacred Charm or Sacred Bomb
- Dark Grenade or Destruction Bomb
- Atropine Potion or Time Stop Potion
x200
X Stagger
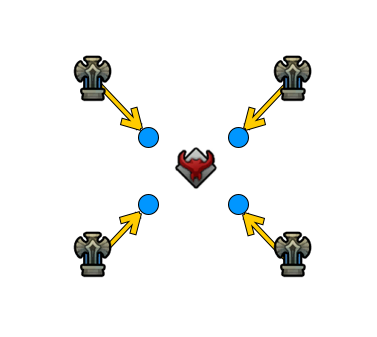
Players - Intercept orange lasers, stagger the boss, avoid red attacks.
x165
Line Delivery & Stagger
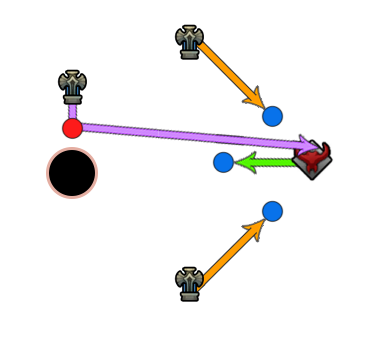
Players - block orange lasers from reaching Akkan and green from reaching 9 o'clock.
Players - intercept purple laser and deliver it to Akkan.
x140
Star or Hexagon
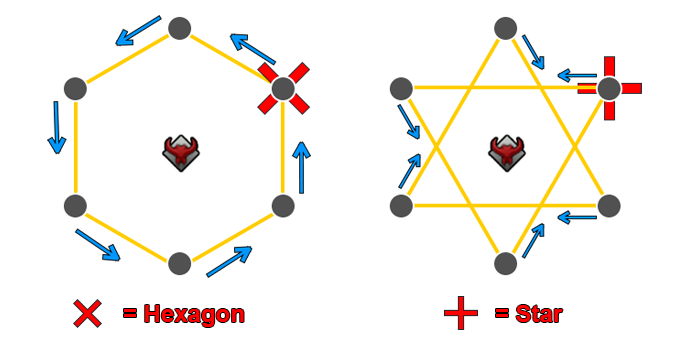
Check 11 & 1 o'clock positions:
Lasers facing diagonal = Hexagon
Lasers facing straight = Star
x139-30
Random Gimmics
Plague Wave

- Stand Left or Right of Akkans back
- Then far backside
- Lastly go inside
x139-30
Random Gimmics
Curses

Green : Walk together, place 3 explosions
Blue : 2 marked players stack together
Black : 3 marked players stack together (Hard Mode Only)
Red : 2 marked players separate each other
x30
Arena Break
Outside arena breaks.
Use Sidereal: Wei at x15 HP to skip x0 HP mechanic
x0
Destruction
Akkan goes into a cocoon
Use Sidereal: Inanna for safety. Complete Akkan's Destruction check.
| Gold | Material | Box Material | Box Cost | Auction Material | |
| Normal | |||||
| Gate 1 | 1500 | 2x | 2x | 500 | |
| Gate 2 | 2000 | 2x | 2x | 550 | |
| Gate 3 | 3000 | 4x 1x | 4x 1x | 900 | 1x |
| Total | 6500 | ||||
| Hard | |||||
| Gate 1 | 3000 | 4x | 4x | 750 | |
| Gate 2 | 4000 | 4x | 4x | 900 | |
| Gate 3 | 6000 | 8x 2x | 8x 2x | 1,350 | 2x |
| Total | 13000 | ||||
Check out the G1 Guide for additional information!
| Normal Mode | Hard Mode | Monster Type | Weakness |
| 1600 Item Level | 1610 Item Level | Plant | Fire |
Battle Items:
- HP Potion of your choice
- Flame Grenade or Dark Grenade
- Sacred Charm or Sacred Bomb
- Atropine Potion
x85
Catch/Stagger
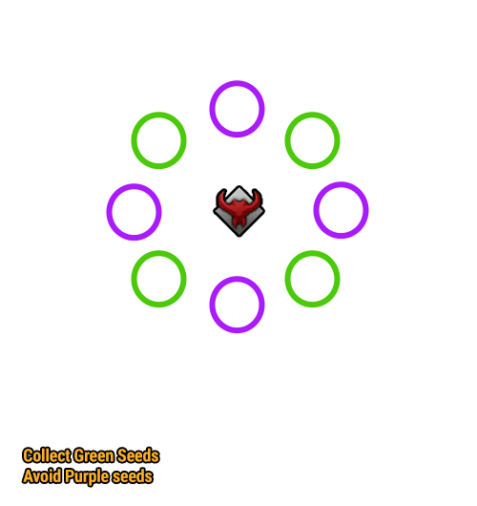
Catch Green Seeds
Avoid Purple Seeds
Stagger
x45
Orbs/Fire
Lead plant to destroy golden dust
Attack Purple Orbs till x15
Wait till Blue DR 0 Seconds
Use Flame Grenade
Check out the G2 Guide for additional information!
| Normal Mode | Hard Mode | Monster Type | Weakness |
| 1600 Item Level | 1610 Item Level | Beast | None |
Battle Items:
- HP Potion of your choice
- Traps
- Destruction Bomb (Bound)
- Atropine Potion or Marching Flag
Before Raid
Traps
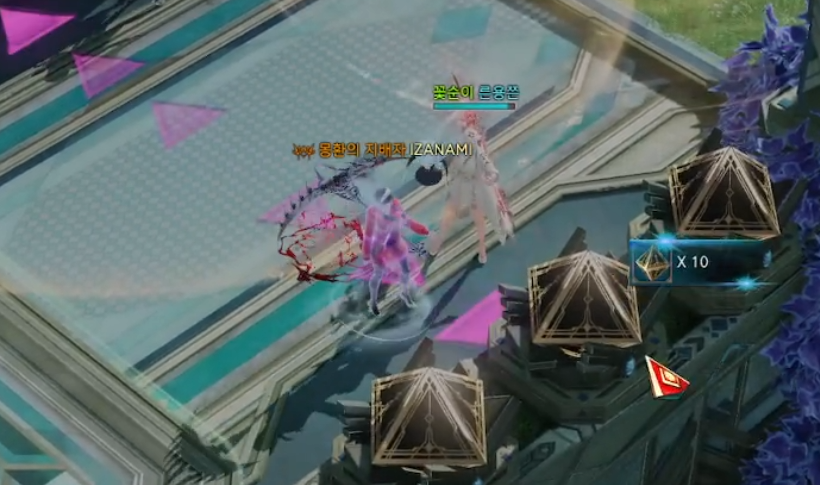
PICK UP BATTLE ITEM
To understand this sequence, please read the detailed explanations first!
PreMechs
Standard Party
Trap @ raid start
Stagger Check x3 (fail)
Counter/Stagger
Trap
Stagger x2
Trap
Destruction
PreMechs
Strong Party

Trap @ raid start
Stagger x2
Trap
Destruction
x95
Clones
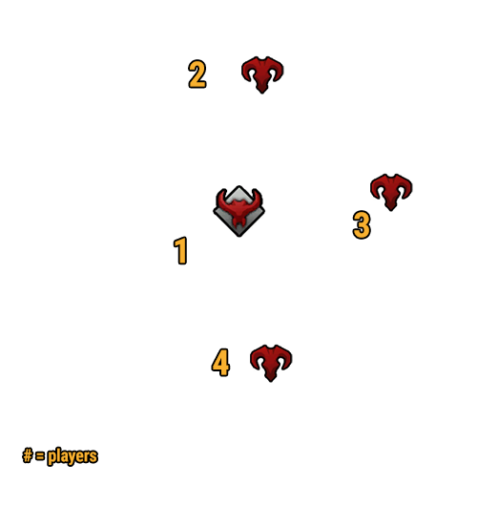
Support Center
3x+1 Clock Positions and Adjust
Counters/Kill
x30
Marathon/Stagger
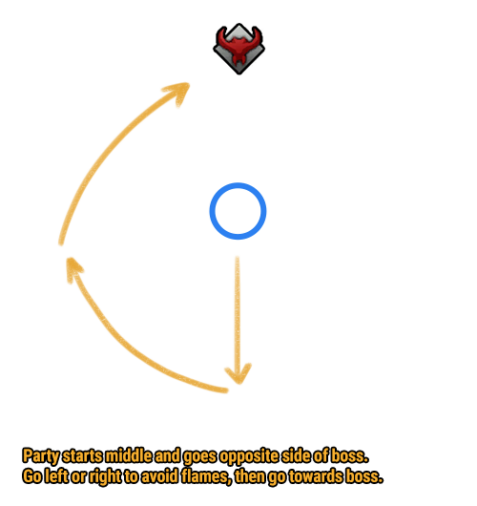
Gather Center
Go Opposite of Boss
Wait for Flame Breath
Run to Boss/Stagger
Final Phase
Traps at Start
Destruction
Kill
Check out the G3 Guide for additional information!
| Normal Mode | Hard Mode | Monster Type | Weakness |
| 1600 Item Level | 1610 Item Level | Ancient | None |
Battle Items:
- HP Potion of your choice
- Destruction Bomb
- Dark Grenade or Whirlwind Grenade
- Time Stop Potion, Atropine Potion or Stimulant
During Raid
Stage Destruction

Avoid getting pushed into Red tiles
Purple & Normal Tiles are safe
Recover tiles by staggering boss and guiding red orb to broken tiles
x160 (Part 1)
Pizza

Move to 3x Positions
Dodge first two slices and mirror explosion
Guide the 3rd slice towards the mirror
Move clockwise & repeat 2 more times
x160 (Part 2)
Stagger
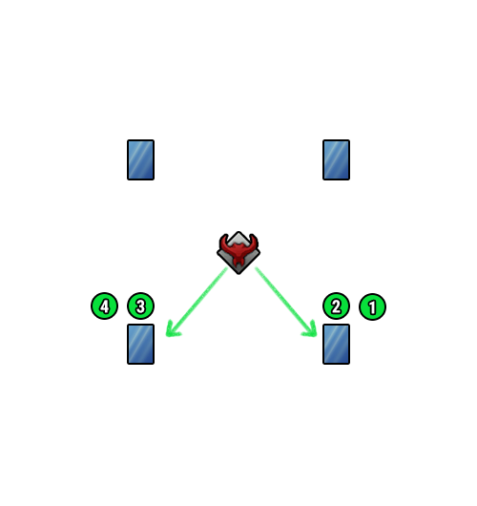
Stagger Boss
Split into group of 2 and stagger bottom mirrors (Whirlwind Grenade)
x110
Mirror Counter
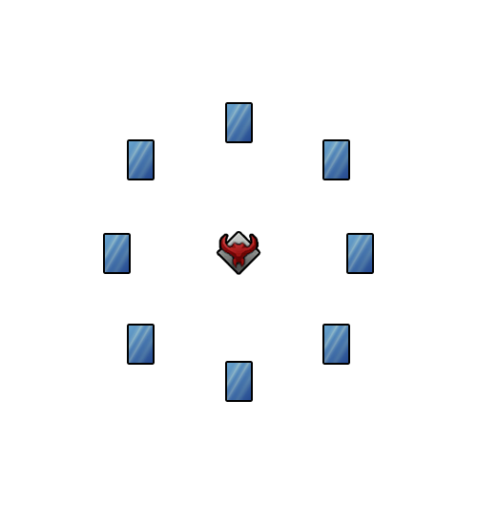
Method: “11223344”
Counter the real Mirrors
Real Mirror: Boss Stabbed & Red Thorn
Fake Mirror: Boss fake stabbed & Purple Thorn
Use Stagger skills on Boss in between counters
x60 (Part 1)
Sword Destruction
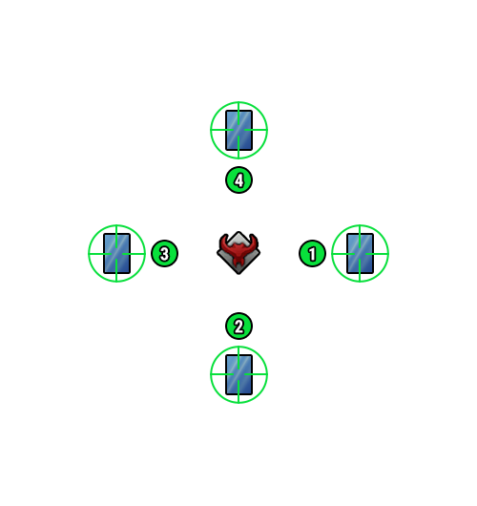
Move to 3x Positions and use Destruction Bomb
Stagger Boss
Use Weak Point skills on the sword
x60 (Part 2)
Guardian Fight
(Lowest) DD should get tethered
Tethered player dictates throw direction ⇾ Mirror
Grab order: (highest) DD ⇾ Sup ⇾ DD
Grab timing: Move after 2nd circle to the front of the boss
Kill Guardian ⇾ Low Stagger Player gets grabbed ⇾ Stagger Boss Whirlwind Grenade
x40
Rage Phase
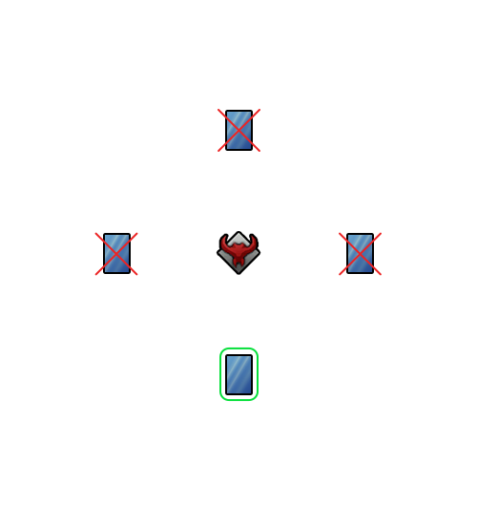
Mirrors spawn at 3x
Method 1: Focus boss and ignore mirrors
Method 2: Stagger mirror at 6 and fight at the bottom side
Pink Debuff 3 stacks ⇾ Use shield or DR skills
| Gold | Material | Box Material | Box Cost | Auction Material | First Clear | |
| Normal | ||||||
| Gate 1 | 2700 |  3 3 2 2 |  3 3 2 2 | 1500 | 1,000,000 x20 x20x8 x20 | |
| Gate 2 | 3300 |  4 4 3 3 |  4 4 3 3 | 1800 | ||
| Gate 3 | 5000 |  6 6 4 4 |  6 6 4 4 | 2500 |  5 5 | |
| Hard | ||||||
| Gate 1 | 4400 |  6 6 6 6 |  6 6 6 6 | 2000 | 1,000,000 x20 x20x8 x20 | |
| Gate 2 | 5500 |  8 8 9 9 |  8 8 9 9 | 2400 | ||
| Gate 3 | 8900 |  12 12 12 12 |  12 12 12 12 | 2800 |  10 10 | |
| Gate 4 | 9800 |  12 12 12 12 |  12 12 12 12 | 3600 |  10 10 | |
Check out the G1 Guide for additional information!
| Normal Mode | Hard Mode | Monster Type | Weakness | Tauntable |
| 1610 Item Level | 1620 Item Level | Demon | None | Yes |
- HP Potion of your choice
- Destruction Bomb
- Dark Grenade
- Atropine Potion or Stimulant
x145
Tentacle Destruction
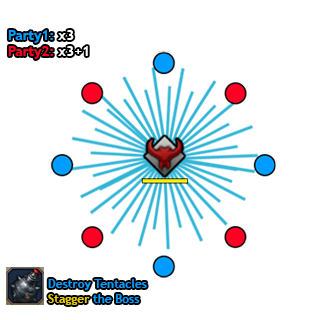
Run to the edge of the arena
Throw Destruction Bomb on tentacles
Stagger the boss
x145-100
Three Craters
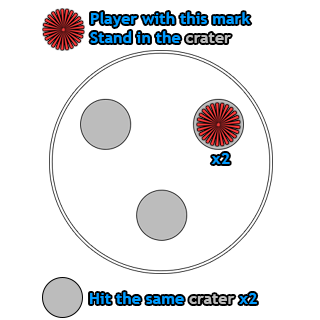
Successful Counter/Stagger marks players
Marked player stands in the crater
Same crater must be targeted x2
x100 or x2 Crater
Destroy & Grab
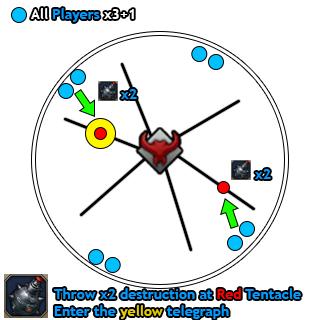
Sidereal:Balthor if craters not destroyed
All Players - x3+1 on the outer edge
Locate the red tentacle
Both partners throw Destruction Bomb
Get grabbed by the yellow telegraph
x55
Tentacle Destruction 2
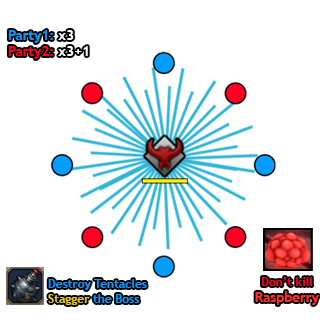
Normal Mode: Same as x145
Hard Mode: Don't kill the Raspberry!
Stagger the boss
x38
Eye Safe Zone
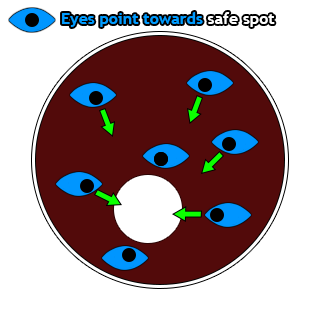
Boss hands transform into claws
Eyes on the map look towards a location
Boss dashes twice, then safe spot appears
x35 HP
(Hard Mode)
Eye Black Hole

Spread out around the edge of the map
Look at the minimap, and avoid the boss
When the eye disappears, look for a counterattack
Check out the G2 Guide for additional information!
| Normal Mode | Hard Mode | Monster Type | Weakness | Tauntable |
| 1610 Item Level | 1620 Item Level | Demon | None | Only phase 1 |
- HP Potion of your choice
- Splendid Sacred Charm or regular Sacred Charm
- Dark Grenade
- Time Stop Potion
x153 (Hard Mode)
Arena Break
Top or Bottom side of the arena breaks off.
x135
8 Counters & Run Phase
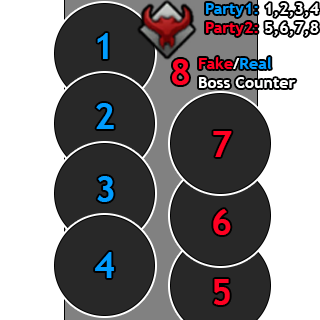
Counter in order:
Party1: Player1,2,3,4 then Party2: Player5,6,7,8
Boss counter can be Red or Blue Flash.
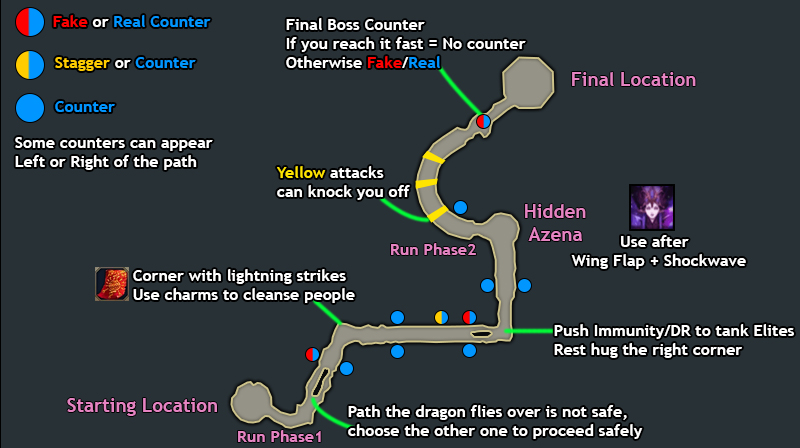
Countering Red Flash = Wipe
30 seconds after arrival
Hidden Azena & Run Phase 2
After Wings + Shockwave attack.
Use Sidereal:Azena shortly after it.
x72
Black or Blue Stagger
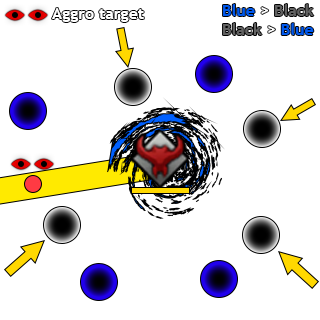
Identify the swirl color around the Boss, Black or Blue.
Attack the opposite color orbs towards the boss.
Aggro target dodges laser.
x18 HP
3 Monster Waves
Wave 1: Defeat 8 weak monsters
Wave 2: Defeat 4 elite monsters
Wave 3: Defeat 2 boss monsters
Do not counterattack, and dodge.
Use Sidereal: Thirain to hit both dragons.
Check out the G3 Guide for additional information!
| Normal Mode | Hard Mode | Monster Type | Weakness | Tauntable |
| 1610 Item Level | 1620 Item Level | Demon | None | No |
- HP Potion of your choice
- Sacred Charm
- Dark Grenade
- Time Stop Potion or Atropine Potion/Stimulant
x300
Sword Fight 1
Check which hand Thaemine is raising.
Go to the same side.
x275
Albion
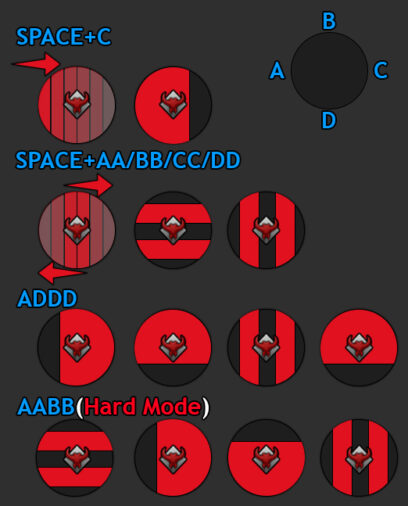
Observe the patterns.
Then walk to the shown safe spots.
x255
Sword Fight 2
Dodge Blue/Red pizza
Bait the sword to 9 o'clock and kill it.
x225
Safe Spot
Player with the puddle goes top.
Remaining players go bottom.
x210
Shield
& Clash
Assign 5 different players responsible for the Clash.
Perform 1st Clash.
Use Sidereal:Inanna versus red telegraphs.
Perform 2nd Clash.
DPS burst the 40 HP shield of Thaemine.
x210-x90
Stage Break
& Clash
Every 45 seconds, Thaemine tries to break the stage in half.
Perform 3rd Clash.
Then let the stage break.
Perform 4th Clash or use Sidereal:Nineveh.
Use Sidereal:Nineveh for the 5th Clash if you didn't skip the 4th.
x90-x55
Fog
Black Fog starts to spread from the outer edges, reducing the playing field.
Get Thaemine to x55 as fast as possible.
x55
Safe Spot
Movement is inverted!
Complete the typing minigame.
Hard Mode: Typing is from right to left and inverted.
Player with the puddle goes top.
Remaining players go bottom.
x55-x0
Fog + Clash
Fog spreads from the center to outer edges!
It expands: 20, 70 and 120 seconds from the start
5th Clash at x43
Use Sidereal:Wei versus Ghosts if overwhelmed.
Check out the G4 Guide for additional information!
| Normal Mode | Hard Mode | Monster Type | Weakness | Tauntable |
| 1610 Item Level | 1620 Item Level | Demon | None | No |
- HP Potion of your choice
- Sacred Charm/Splendid Sacred Charm
- Dark Grenade
- Time Stop Potion(The First) or Atropine Potion/Stimulant(Hard Mode)
x315
Red Marks
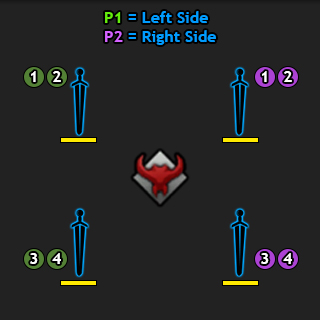
Place Red Markers.
Dodge and move to your location.
Stagger the statue.
Aim at least x2 tethers at each statue.
x280
Co-op Counter + Prokel
Group behind the boss.
Dodge cone attack, move to the bottom left.
Perform Co-op Counter (3 people).
2 DPS enter blue orb, kill Clone → Stagger Sword.
Remaining players, 11 o'clock → Spacebar Blue Wall, Stagger Thaemine.
x175
Tethers + Clash
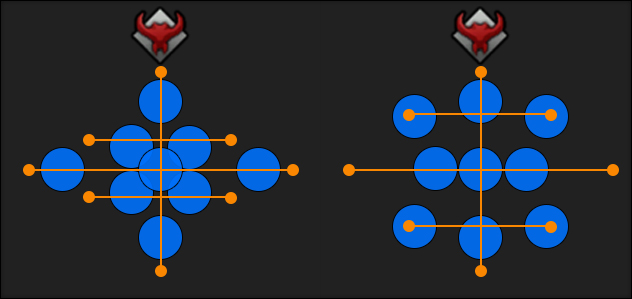
Eliminate blue circles with tethers.
Gather x1 yellow orb → run bottom.
Complete Maze.
Clash1 + Sideral:Shandi → Clash2
x87
6 Counters
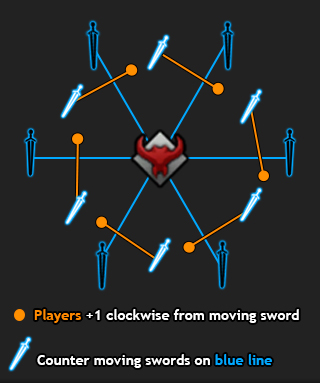
Party1: 9 o'clock
Party2: 3 o'clock
Spacebar when blue puddles appear → stagger Thaemine.
Tethered Players +1 clockwise → Counter on blue line.
x63
Puddle Walk + Crit
Party1: 9 o'clock
Party2: 3 o'clock
Run to 12 o'clock when you see blue puddles.
Run back after blue explosion.
Use Splendid Sacred Charms after 3rd explosion.
G4-2
Pace
6m20sec~ - First Domain Expansion
5m~ - Full Identity + Offense Kadan
x210 HP - Stagger Check
3-2m - Second Domain Expansion.
2m-1m - Full Identity + Offense Kadan
G4-3 - Transition to Gate 4-3
G4-2 x210
Stagger Check
Avoid blue/red overlapping telegraphs.
Dodge a series of 4 red attack variations.
Stagger the boss.
G4-3
Hidden Kadan
Approximately 1minute into G4-3.
Watch for Thaemine raising his sword and teleporting to the center.
Use Sidereal: Defense Kadan
| Gold | Material | Bonus Loot | Bonus Loot Cost | Auction | First Clear | |
| Normal | ||||||
| Gate 1 | 6000 | 3x | 3x | 2,200 | 10x | |
| Gate 2 | 10000 | 6x | 6x | 3,400 | 5x | |
| Total | 16000 | |||||
| Hard | ||||||
| Gate 1 | 7000 | 3x | 3x | 2,800 | ||
| Gate 2 | 12500 | 6x | 6x | 4,100 | 5x | |
| Total | 19500 | |||||
Check out the Gate 1 Guide for additional information!
| Normal Mode | Hard Mode | Monster Type | Weakness | Tauntable |
| 1620 Item Level | 1630 Item Level | Human | Fire | Yes |
- HP Potion of your choice
- Sacred Charm
- Highest stagger party: Whirlwind Grenade
Other Party: Dark Grenade - Atropine Potion or Stimulant
x180 HP
First Encounter
Avoid Flame Breath, Stun and Grab
Kill both Elite Mobs next to the Boss
Use Ally Skill: Azena on Boss after his shield breaks
x162 HP
Run Phase
Reach Boss before time runs out
Stagger Boss
Use Ally Skill: Azena whenever it is available
x135 HP
Clone Split
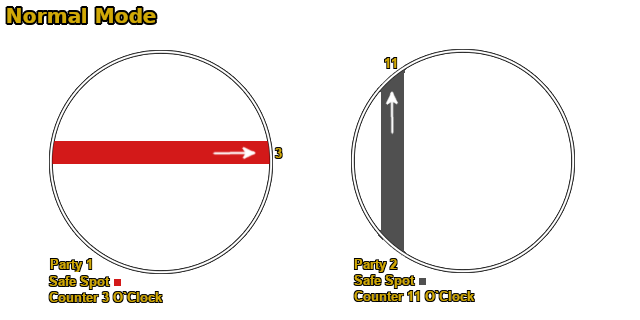
Safe spot on odd colored line
4th odd colored line points to Counter location
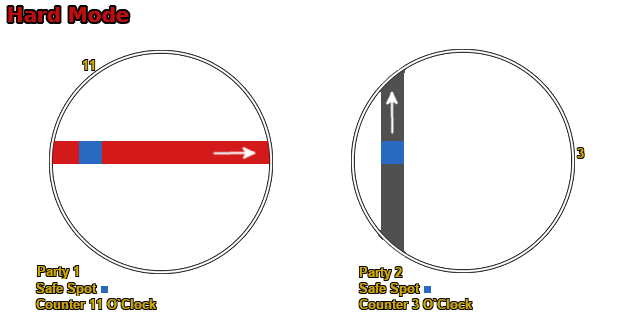
Safe spot on overlap of odd colored lines
4th odd colored line points to Counter location of the other party
x110 HP
Invasion
Use Ally Skill: Avele next to Boss
Wait for mobs to close in and use Follow-up Ally Skill
Kill remaining mobs before they explode
x90 HP
Mini Boss
Highest stagger party moves to Mini Boss
Use Whirlwind Grenade (Bound) and stagger Mini Boss
x90 - x50 HP
Safe Zone
Mini Boss Party writes safe spot in chat
Center or Outside Vertical ⇾ I or V
Center or Outside Horizontal ⇾ - or H
Clockwise Spin:
Center Vertical or Horizontal
Counterclockwise Spin:
Outside Vertical or Horizontal
x50 HP
(Either Boss)
Smoke and
Stagger
Mini Boss Party:
Kill all Mobs to reveal smoke color
Write color in chat
Stagger Mini Boss and escape
Main Boss Party:
5 stacks required to reveal censer
Pass tether before 10 stacks
Destroy censer called out by other party
Use Ally Skill: Avele & Follow-up to remove Boss' shield
x55 HP
Final Phase
Use Ally Skill: Azena or Avele once ready
Hard Mode: Interact with censer and rotate debuff before it stacks to 100
Check out the Gate 2 Guide for additional information!
| Normal Mode | Hard Mode | Monster Type | Weakness | Tauntable |
| 1620 Item Level | 1630 Item Level | Demon | None | No |
- HP Potion of your choice
- Sleep Bomb
- DPS: Dark Grenade
Support: Flame Grenade - Atropine Potion or Stimulant
Charm Meter
25% & 75% Meter
Place it on Blue, Connecting or
Neighboring tiles
Don't place on Corrupted tiles
50% & 100% Meter
Create path Mirror ⇾ Boss
Ideally Corrupted tiles
Don't overlap
x210 HP
Mirror Counter
Counter odd direction looking portrait
Dodge horizontal lasers
Use Ally Skill: Azena
x137 HP
Huge Echidna
Dodge horizontal lasers & 3 Boss Lasers
Succeed 3-man coop counter (Thar)
Move to 6 O'clock for Clash
Use Ally Skill: Thar
Basement Meter
50% Meter
Use Ally Skill: Ephernia
or Flame Grenade at Wall
100% Meter
x3 and x3+1
Don't look at Echidna
Hit normal and CC shielded snakes
x120 HP
Basement Clash
Common Method
Clash1: x61 HP Ally Skill: Thar & P1
Clash2: P2
Clash3: P3
Uncommon (low dmg) Method
Clash1: x79 HP Ally Skill: Thar & P1
Clash2: P2 & P3 + Ally Skill: Azena
x50 HP
Mirror Stagger
Normal
Follow and look at the Mirror's back & Stagger
Hard
Locate Red Glow
Right ⇾ CW | Left ⇾ CCW
Rotate ⇾ Position swap
Stagger
x0 HP
Final Struggle
2 Patterns ⇾ Grab at 6 O'clock
Write glow position in order
Real → Fake → Real
Fake → Real → Real
Ally Skill: Azena
| Gold | Material | Bonus Loot | Bonus Loot Cost | Auction | First Clear | |
| Normal | ||||||
| Gate 1 | 7000 | 10x  Behemoth's Scale Behemoth's Scale10x Magical Spring Water | 10x  Behemoth's Scale Behemoth's Scale10x Magical Spring Water | 2,600 | 100x  Behemoth's Scale Behemoth's Scale | |
| Gate 2 | 11000 | 20x  Behemoth's Scale Behemoth's Scale18x Magical Spring Water | 20x  Behemoth's Scale Behemoth's Scale18x Magical Spring Water | 3,900 | 20x  Behemoth's Scale Behemoth's Scale | |
Check out the Gate 1 Guide for additional information!
| Normal Mode | Monster Type | Weakness | Tauntable |
| 1620 Item Level | Ancient | None | No |
- HP Potion of your choice
- Nacrasena Party: Destruction Bomb (Bound)
- Party 1-3: Dark Grenade
Party 4: Flame Grenade - Atropine Potion or Stimulant
x460 HP
4 Guardians
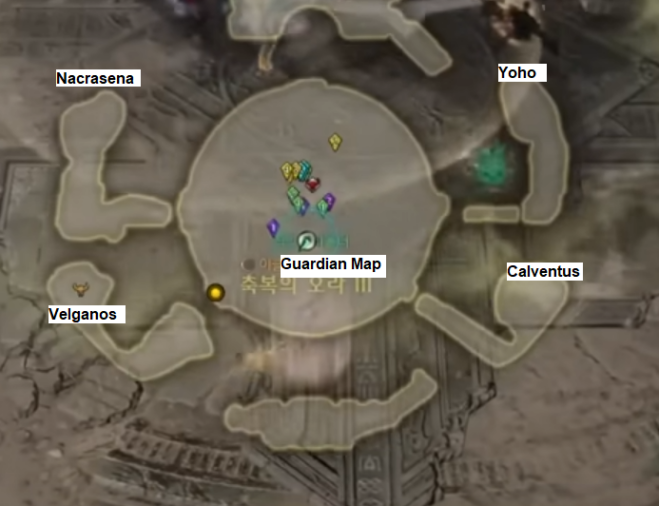
9 o clock: Nacrasena (will always spawn first)
3 o clock: Yoho
5 o clock: Calventus
7 o clock: Velganos
Periodically
Twisters
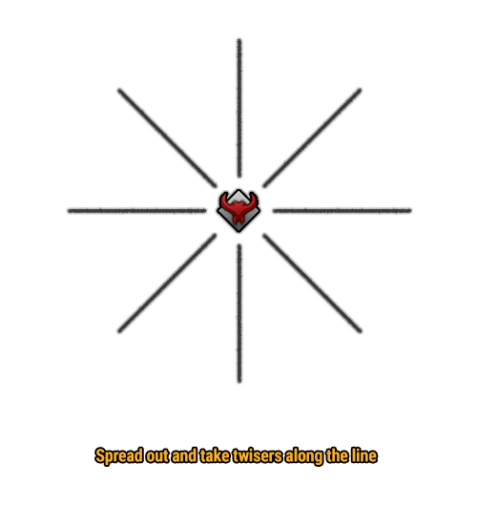
Spread out on the twister lines
Take twisters outside
Wait 2 seconds before taking another
x190 HP
Group Counter/Stagger
Boss will charge across the map twice
Co-Op counter on 2nd charge (opposite direction of his initial charge)
Check out the Gate 2 Guide for additional information!
| Normal Mode | Monster Type | Weakness | Tauntable |
| 1620 Item Level | Ancient | None | No |
- HP Potion of your choice
- Dark Grenade
- Atropine Potion or Stimulant
Periodically
Enhanced Twister
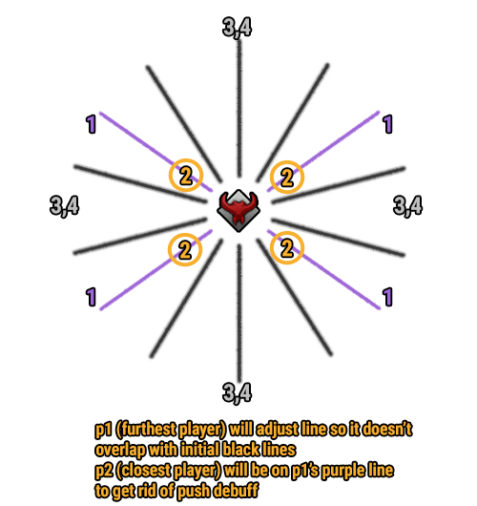
Party Positions
x3 Party Number (Not Player Number)
Player Positions
Assign roles before starting combat!
P1: Adjust Purple Line
P2: Stay near boss on Purple Line
P3/P4: Take fixed twisters
x190 HP
Crystals
Stagger by hitting crystals
2 "breaks" = stop hitting
Final Phase
Watch out for counter/new attacks
| Gold | Material | Bonus Loot | Bonus Loot Cost | Auction | First Clear | |
| Normal | ||||||
| Gate 1 | 7,500 | 4x | 4x | 3,200 | 20x | |
| Gate 2 | 16,500 | 6x | 6x | 5,300 | 5x | |
| Total | 24,000 | 10x | 10x | 8,500 | ||
| Hard | ||||||
| Gate 1 | 10,000 | 8x | 8x | 4,100 | ||
| Gate 2 | 20,000 | 12x | 12x | 6,600 | 10x | |
| Total | 30,000 | 20x | 20x | 10,700 | ||
Check out the Gate 1 Guide for additional information!
| Normal Mode | Hard Mode | Monster Type | Weakness | Tauntable |
| 1660 Item Level | 1680 Item Level | Demon | None | No |
- HP Potion of your choice
- Splendid Sacred Charm
- Dark Grenade
- Atropine Potion or Stimulant
x195 HP
Aegir Appears + Banishment
Dodge Boulder Shadow
Avoid Akkan's Scythe Slash
x170 HP
Ghost Phase

P1: 9 o'clock
P2: 3 o'clock
Call positions for symbols post stagger
x143 HP
Flame Breath/Pillars
Dodge rocks and hide behind pillars
x115 HP
Shield Break + Valtan Counters

Earthquake (inside or outside)
Valtan Counter Pattern
Earthquake (opposite)
Repeat
Use Ally Skill: Wei or Thar + Follow-Up
x85 HP
Aegir Attack
Dodge red telegraphs
x60 HP
Aegir's Arm + Guard
Dodge Aegir attacks
Guard after break
Use Ally Skill: Thar for stagger, or Wei after stagger
x30 HP
Final Stagger
Stagger Akkan/dodge attacks
Use Ally Skill: Thar
Check out the Gate 2 Guide for additional information!
| Normal Mode | Hard Mode | Monster Type | Weakness | Tauntable |
| 1660 Item Level | 1680 Item Level | Ancient | None | No |
- HP Potion of your choice
- Sacred Charm
- Dark Grenade
- Atropine Potion or Stimulant
x260 HP
1st Heart
Normal
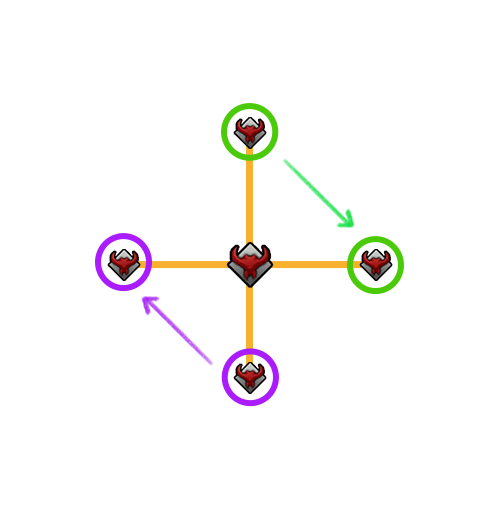
- Party 1: 12 ⇾ 3
Party 2: 6 ⇾ 9 - Destroy Stones, dodge Laser and attack Heart
- Guard
Hard
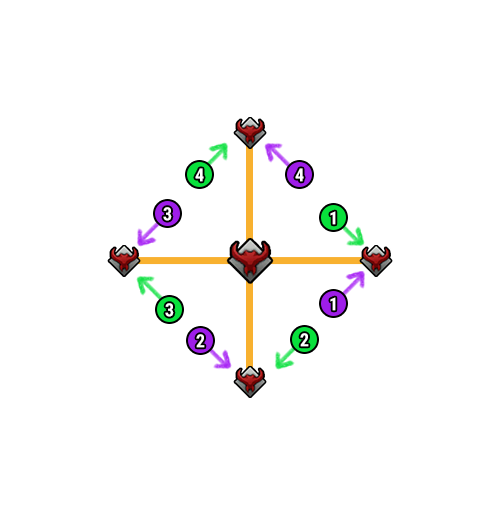
- Positions: x3 (One at each side)
- Destroy Stones
- Counter
- Auto Attack
- Stagger
- Guard
- Dodge Laser and attack Heart
- Guard
x260 HP
Armor Break
- P1 Top | P2 Bottom
- Left Corners to Dodge Feet
- Right Corner for Target Puddle (Hard Mode)
- Damage, Stagger, or Counter Spears
- Damage boss
- After 3rd spear wave, use Ally Skill: Avele
x250 HP
Distorted Space
Debuff stacks to 7 (5 HM) ⇾ 1 HP
Teleports to x3 ⇾ Coop Counter
Teleports to x3+1 ⇾ Stagger
Wall: Use Ally Skill: Avele
x165 HP
2nd Heart
Remove Aegir's Shield ⇾ Destroy Heart
Guard to reduce Cooldown
Use Ally Skill: Ealyn after 2nd Guard
Use Follow-Up skill to destroy Heart
x165 HP
Armor Break
- P1 Top | P2 Bottom
- Left Corners to Dodge Feet
- Right Corner for Target Puddle (Hard Mode)
- Damage, Stagger, or Counter Spears
- Damage boss
- After 3rd spear wave, use Ally Skill: Avele
x153 HP
Distorted Space
Debuff stacks to 7 (5 HM) ⇾ 1 HP
Teleports to x3 ⇾ Coop Counter
Teleports to x3+1 ⇾ Stagger
Wall: Use Ally Skill: Avele + Follow-Up
x95 HP
Stage Break
Use Ally Skill: Ealyn when Thirain speaks
You can fall to death
Use Ally Skill based on preference when ready
x0 HP
Final Struggle
Hard Mode only
Every 50 seconds:
Guard ⇾ Coop Counter ⇾ Laser
Use Ally Skill based on preference when ready
| Gold | Material | Bonus Loot | Bonus Loot Cost | Auction | First Clear | |
| Normal | ||||||
| Gate 1 | 9,000 | 4x | 4x | 3,800 | 20x 3x 3x 10x 20x 10x 20x | |
| Gate 2 | 18,500 | 6x 4x 4x | 6x | 5,600 | 5x | |
| Total | 27,500 | 10x 4x 4x | 10x | 9,400 | ||
| Hard | ||||||
| Gate 1 | 11,000 | 8x | 8x | 4,500 | ||
| Gate 2 | 23,000 | 12x 6x 6x | 12x | 7,200 | 10x | |
| Total | 34,000 | 20x 6x 6x | 20x | 11,700 | ||
Check out the Gate 1 Guide for additional information!
| Normal Mode | Hard Mode | Monster Type | Weakness | Tauntable |
| 1670 Item Level | 1690 Item Level | Ancient | Lightning | No |
- HP Potion of your choice
- Dark Grenade / Whirlwind Grenade (Normal Mode)
- Destruction Bomb or Corrosive Bomb
- Atropine Potion or Stimulant
- For re-clear runs:
- DPS replace Destruction Bomb with Flame Magic Scroll.
- Supports replace Stimulant with Flame Magic Scroll.
x300-240 HP
Armor Destruction
Apply Corrosive Bomb and use Destruction Bombs.
x240 HP
Ice Wall
Move to center, break ice, bait laser.
Stand in the safe spot.
Cast and re-cast Sidereal:Ephernia.
Co-op Counter.
Post x240 HP
Laser Dodge

Move to 11 o'clock.
Go up after 2nd red line explosion.
Then move back.
x180 HP
Perfect Guard
and
Time Attack
Group up at the front.
Wait for Perfect Guard.
Stay at the front until boomerangs finish.
Remove the shield in 60 seconds.
Cast and re-cast Sidereal:Ephernia.
Party1: User Hyper Awakenings.
x120 HP
Chase and Stagger
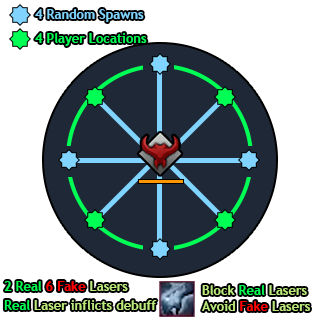
Chase the boss, wait for everyone.
Break barrier, move in.
Stagger the boss.
Cast and re-cast Sidereal:Ephernia.
[Hard Mode] block the 2 real lasers.
[Hard Mode] stagger the boss again.
x60 HP
Perfect Guard
and
Time Attack
Group up at the front.
Wait for Perfect Guard.
Stay at the front until boomerangs finish.
Remove the shield in 60 seconds.
Cast and re-cast Sidereal:Ephernia.
Party2: User Hyper Awakenings.
Check out the Gate 2 Guide for additional information!
| Normal Mode | Hard Mode | Monster Type | Weakness | Tauntable |
| 1670 Item Level | 1690 Item Level | Demon | Lightning(Phase2) | No |
- HP Potion of your choice
- Dark Grenade / Whirlwind Grenade
- Sacred Charm
- Atropine Potion or Stimulant
x335 HP
Colors
Stagger
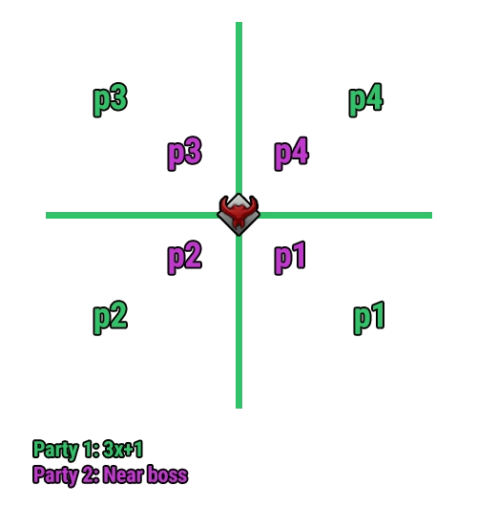
Stagger Clones & Boss.
[Hard Mode]
Party 1: 3x + 1 & Call/Step on Colors.
Party 2: Call out colors & Stagger.
Phase 2
After x335
Ice Field Outer Map.
Use Sidereal: Azena + Follow Up for DPS
Use Sidereal: Ninaveh for Crystal Break
P2 Full Meter
Crystal Break
Succeed Typing Test
Marked players drop Crystal at 6 o'clock
Optional: Sidereal: Ninaveh
x145 HP
Clockwise Orbs
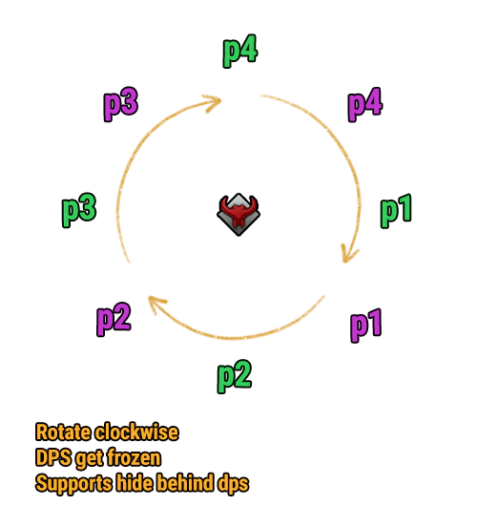
3x or 3x + 1 Positions.
Clockwise Rotation.
Destroy Orbs.
~ 33 Seconds on Debuff, DPS get Frozen.
Supports hide behind Frozen DPS.
Phase 3
After x145
You Can Now Fall Off.
Use Sidereal: Azena + Follow Up for DPS
P3 Full Meter
Typing + Stagger
Go to 3x Positions.
Identify the real Clone with debuff and Stagger it.
~4 min into P3
Freeze Aoe
Guard once the Circle reaches the Edge.
Dodge Cone or Succeed Typing Test
x0 Phase 4
Hard Mode Exclusive
Move outside of map.
Wait for 2nd explosion before coming in.
Outside segments break once triggered.
P4 Full Meter
Freeze + Guard
Use one of the methods below:
- Guard shortly before Circle reaches the Edge.
- Group up at same outer ring Segment, move in after 2nd Explosion.
- Use Hyper Awakening.
- Use Time Stop Potion.
~3min & 30sec left
Medusa
Don't look at Brelshaza.
Use special Sidereal: Azena and DPS at 3 o'clock.
Optional (No Azena): Destroy Dark Orbs.
~1:30min left
Cone Attack
Dodge Cone Attack.
Or Succeed Typing Test.
| Gold | Material | Bonus Loot | Bonus Loot Cost | Auction | First Clear | |
| Normal | ||||||
| Gate 1 | 6,000 | 3x | 3x | 2,400 | 20x 3x 10x 20x | |
| Gate 2 | 9,500 | 5x | 5x | 3,200 | ||
| Gate 3 | 12,500 | 10x 5x | 10x | 4,200 | 10x | |
| Total | 28,000 | 18x 5x | 18x | 9,800 | ||
| Hard | ||||||
| Gate 1 | 7,000 | 3x | 3x | 2,700 | 20x 3x 10x 20x | |
| Gate 2 | 11,000 | 5x | 5x | 4,100 | ||
| Gate 3 | 20,000 | 10x 7x | 10x | 5,800 | 10x | |
| Total | 38,000 | 18x 7x | 18x | 12,600 | ||
Check out the Gate 1 Guide for additional information!
| Normal Mode | Hard Mode | Monster Type | Weakness | Tauntable |
| 1680 Item Level | 1700 Item Level | Thaemine: Demon Dragon: Beast | None | Yes |
- HP Potion of your choice
- Dark Grenade or Whirlwind Grenade
- Atropine Potion or Stimulant
x300 HP
Retaliation
Attack Thaemine to proc his retaliation.
Avoid front, then Just Guard.
x270 HP
Memory & Stagger

Red telegraphs appear in order 1→2→3→4
They explode in reverse order 4→3→2→1
Stay on 1st line where it doesn't overlap.
Stagger the boss, dodge red telegraphs.
Complete another stagger, avoid red cones.
HM: If caught by a red cone: Just Guard/Counter to escape the clone dimension.
Post x270 HP
Bridge Run
Possibly Removed Mechanic
Pass the bridge, never turn backwards.
If necessary, run through damage fields.
x210 HP
Hidden Kharmine
Players with blue puddles → Out.
Players without puddles → Co-op counter.
Use  Sidereal: Kharmine, when his text box appears in the center of the screen.
Post x210 HP
Thaemine Transition
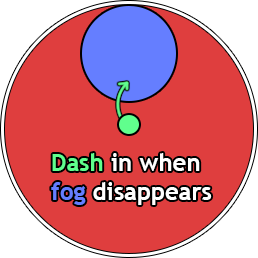
NM: Dodge attacks → Pizza safe spot
HM: Spread out to the edges, don't overlap blue AoE (x3, x3+1).
Just Guard when you see the telegraph
Stagger boss, if failed, then counter
Go 12 o'clock, wait for fog to disappear Then dash into the safe spot
x75 HP
Guard & Counter
Thaemine glows white and vanishes in a direction (returns from this direction).
Stack up and wait for Just Guard telegraph.
If players failed, dodge and counter boss.
x50 HP
Dodge & Guard
Dodge aerial dragon attacks → counter.
Stay between the black fog, dodge aerial attacks → Just Guard.
Use  Sidereal: Azakiel after Just Guard.
Check out the Gate 2 Guide for additional information!
| Normal Mode | Hard Mode | Monster Type | Weakness | Tauntable |
| 1680 Item Level | 1700 Item Level | Insect | None | Yes |
- HP Potion of your choice
- Dark Grenade
- Atropine Potion or Stimulant
x300-225 HP
Alberhastic Phase

Avoid getting Infection Stacks to x15
12:55
Timed Mechanic
Below 50%
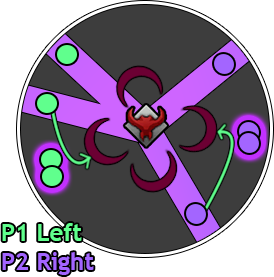
P1 → Left
P2 → Right
Players with puddles stack shortly before debuff goes away.
Non-debuff players bait laser and block waves.
12:55
Timed Mechanic
Above 50%
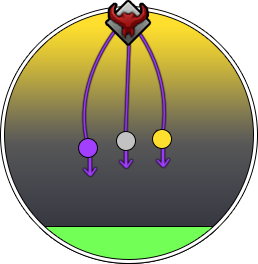
3 pairs of colors, 2 players each.
Matching people run together with tether.
Transport the tether to 6 o'clock.
Alternate whos pulling constantly.
No color → block rocks from 6 o'clock.
Purple = block, Red = Ignore.
x235 HP
Alberhastic Memory
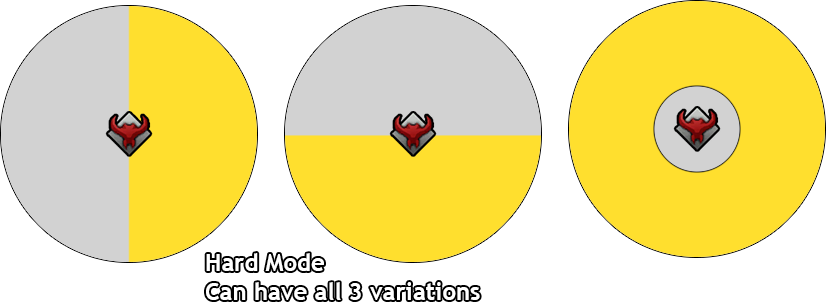
NM: All players have same shield color
In/Out
Orange → Blue orbs
HM: 4 Yellow/4 White colored shields
In/Out and split arena
Stagger→Just Guard→Orange→ Blue orbs
Use  Sidereal:Nineveh when time dial disappears, recast after cutscene
x235-105 HP
Yoho Phase
2min after phase starts → Timed Attack
Use  Sidereal:Mystic when boss lands.
x105 HP
Find Clones
Ping gold puddles when you see them.
Overlap location is the real target.
NM: counter the target x2 → stagger
HM: guard/counter target x2 → stagger
x105-0 HP
Velganos Phase
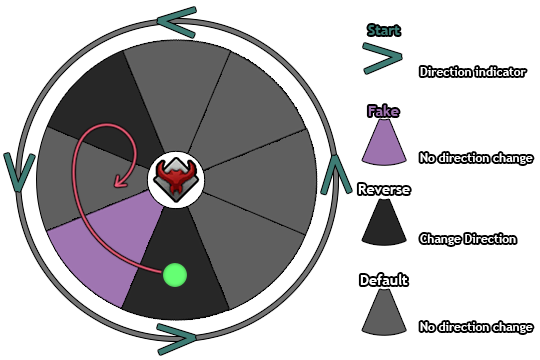
Velganos timed mechanic happens every 1min 30seconds.
Check out the Gate 3 Guide for additional information!
| Normal Mode | Hard Mode | Monster Type | Weakness | Tauntable |
| 1680 Item Level | 1700 Item Level | Ancient | Earth (5%) | No |
Battle Items:
- HP Potion of your choice
- Dark Grenade
- Sacred Charms
- Time Stop Potion
- 1 Support brings Corrosive Bomb instead of
x475 HP
Twister #1
Right arm hits → 3 blue cones explode.
Left arm hits → twisters emerge.
Inside twisters spins clockwise.
x425 HP
Laser
Group up in the shrinking safe zone.
Wait until telegraph fully expands.
Move to the other side of safe zone.
Run away from the laser.
Grab red/blue orbs, dodge → donut attacks.
x450 HP
Twister #2
Right arm hits → 3 blue cones explode.
Left arm hits → twisters emerge.
Inside twisters spins counter-clockwise.
Field divided in Red/Blue/Yellow slices.
x400 HP
Twister #3
Right arm hits → 3 blue cones explode.
Left arm hits → balls emerge.
Inside balls spins clockwise.
Field divided in Red/Blue/Yellow slices.
x375 HP
Break & Duel #1
Bait Boss to break orb → Just Guard x2.
x320 HP
Dome Smash
Dodge Lightning emerging from the dome, then spacebar into it.
Collect red/blue orbs around the arena.
x300 HP
Supernova
Wait all 3 attack animations → counter.
x275 HP
Anvil
Anvil drops.
Aim at it with cursor → Just Guard 3x.
In progression, use Hyper Awakening.
Timing: right before the first attack motion.
x250 HP
Break & Duel #2
Bait Boss to break orb → Just Guard x3.
x200 HP
Shield Disruption
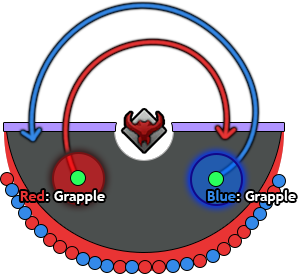
Go to the matching hammer side.
Destroy opposite incoming balls.
Use grappling hook to get to the other side.
Destroy opposite incoming balls.
x180 HP
Charged Field #1
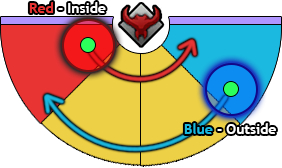
Go to the matching hammer side.
Match your color to the floor slice.
Move across the arena 1 by 1.
Red moves across inside lane.
Blue moves across outside lane.
x160 HP
Hammer Split
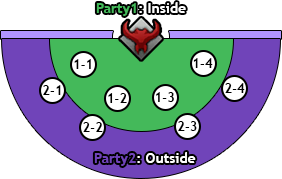
Go to the matching hammer side.
Use  Sidereal:Bastian to break one hammer.
Re-cast aiming at the other hammer.
Check party & number for the 8 safe spots.
Swap your color if your spot differs.
x125 HP
Charged Field #2
Go to the matching hammer side.
Match your color to the floor slice.
x120 HP
Break & Duel #3
Bait Boss to break orb → Just Guard x3.
<x120 HP
Dance Floor

Happens 30 seconds after 3rd stage break.
Match your color with the attacks.
Dodge to the Grappling Hook at the end.|
Mechanic is removed in Normal Mode.
<x120 HP
Supernova #2
Happens 1minute 20 seconds after 3rd stage break.
Wait all 3 attack animations → counter.
<x120 HP
Break & Duel #4
Happens 1minute 40 seconds after 3rd stage break.
Bait Boss to break orb → Just Guard x3.
Use  Sidereal: Balthor after failing 3rd Just Guard on purpose.
x0 HP
Last Stand
Hard Mode only
Match your color with the sphere.
Prevent red/blue orbs from reaching center.
Use  Sidereal:Bastian and Re-cast it.
Credits
Written by Perciculum