Valtan Gate 2 Legion Raid Guide
Enemy Information
| Normal Mode | Hard Mode | Monster Type | Weakness |
| 1415 Item Level | 1445 Item Level | Demon | None |
Battle Items:
- HP Potion of your choice
- Time Stop Potion
- Flame Grenade
- Corrosive Bomb or Destruction Bomb
Raid Rewards
| Gold | Material | Box Material | Box Cost | Auction Material | |
| Normal | |||||
| Gate 1 | 300 | 1 | 1 | 180 | |
| Gate 2 | 450 | 2 | 2 | 225 | |
| Hard | |||||
| Gate 1 | 400 | 3 | 3 | 255 | |
| Gate 2 | 700 | 3 | 3 | 380 | 5 |
This guide assumes that you are familiar with the recommended Raid Build for your class.
Also check Valtan Gate 1 guides.
Cheat Sheets
Once you have read through the detailed description of the main patterns, use the “cheat sheet” during the raid, or check out our condensed Cheat Sheet Collection for all Legion Raids on one page.
x160
Armor Break Phase
Make Valtan charge into a Wall.
Use Corrosive Bomb and Destruction Bomb to break his armor.
x130
Wipe Pattern

Use Sidereal: Balthorr.
x110
Pillar Hug

Pillar protects the player from Yellow Zone damage.
Dodge Red Zone at the last second to hide behind a Pillar in the Yellow Zone or use Time Stop Potion in Yellow Zone.
x85
Stage Break

Left or right side of the arena gets highlighted with a red telegraph. Move to the opposite side.
x65
Counter
Counter 3 seconds after his turning animation stops. Learn the timing.
x35
Stage Break
The other half of the arena breaks. Move to the opposite side.
x17-15
Ghost Transition
Group up to force Valtan strike a certain spot.
Use Sidereal: Balthorr on that spot.
x40
Ghost Phase
Counter the ghost clones to reduce the armor stacks and gain Sidereal meter.
Use Sidereal: Thirain after removing all armor stacks.
x160
Armor Break Phase
Make Valtan charge into a Wall.
Use Destruction Bomb and Weak Point skills to break his armor.
x130
Wipe Pattern
Use Sidereal: Balthorr.
or
Pick up Blue Orb and dodge pizza pattern.
x110
Pillar Hug
Pillar protects the player from Yellow Zone damage.
Dodge Red Zone at the last second to hide behind a Pillar in the Yellow Zone or use Time Stop Potion in Yellow Zone.
x85
Stage Break
Left or right side of the arena gets highlighted with a red telegraph. Move to the opposite side.
x65
Counter
Counter 3 seconds after his turning animation stops. Learn the timing.
x35
Stage Break
The other half of the arena breaks. Move to the opposite side.
x17-15
Ghost Transition
Group up to force Valtan strike a certain spot.
Use Sidereal: Balthorr on that spot.
or
Follow video on walking method.
x40
Ghost Phase
Counter the ghost clones to reduce the armor stacks and gain Sidereal meter.
Use Sidereal: Thirain after removing all armor stacks.
Main Mechanics
Telegraph
- Valtan will charge at you.
What to do
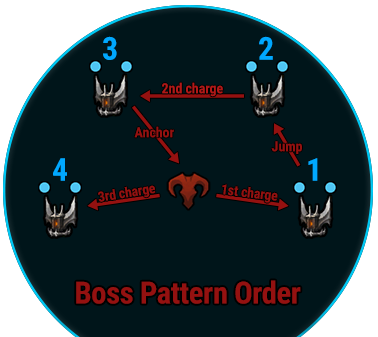
- You will need Right at the start of the battle, move and group up immediately at the tower number 1. Valtan will Charge after a short delay towards the tower, destroys it and gets incapacitated. If you follow the above-mentioned instruction to destroy the armor properly, his first layer of armor should break before he recovers.
- As soon as he starts to recover, group up at tower 2 and wait for him to perform the Jump & Spin pattern and dodge away. This should destroy the tower 2.
- There is no time to rest, since Valtan will follow up immediately with his 2nd Charge, for which everyone needs to group up in front of tower 3. Once he charges and destroys the tower, he will be incapacitated again. Use this opportunity to deal as much Weak Point Damage as possible.
- As soon as he recovers, he will use the Triple Axe Swing pattern followed by the Anchor pattern. For the Triple Axe Swing pattern, simply stay close and in front of Valtan. Survive the Anchor pattern by running a small circle to dodge the 8 projectiles, afterwards move immediately to the edge of the arena to survive the follow-up AoE. Use Time Stop Potion, in case you can't reach the edge of the arena on time.
- At the end of the Anchor pattern, Valtan will land back in the center of the arena and start, after a brief moment to prepare for his 3rd Charge attack for which everyone needs to group up at tower 4. If you follow the above-mentioned instruction to destroy the armor properly, his second and last layer of armor should break before he recovers. From that point on, simply deal damage to reach x130 HP to trigger the next main pattern.
Telegraph
- Once Valtan reaches x130 HP, he starts to prepare a combo attack consisting of 2 axe strikes towards the ground. The 2nd strike can one shot players if they don't fulfil certain requirements. To survive this patter, you can choose one of the 2 methods below.
What To Do
- The easiest way to survive this pattern is to simply use the Sidereal: Balthorr as a raid lead and provide everyone with the buff needed to prevent getting 1 shotted. Make sure to ping the location where you want to summon Balthorr, since a player needs to be in that summoning circle for a brief moment to get the buffAfter collecting your orb, stagger the boss.
- A method only used in Hell Mode, which makes use of the blue orbs dropped by each of the destroyed towers during the Armor Break Phase. Since each tower drops 2 blue orbs, every player can take a blue orb, which protects him from the 2nd strike of this pattern. But be aware to not get hit by the first strike, since it removes the protection of the blue orb on hit. The benefit of choosing this method is, that you can use Sidereal: Thirain instead of Balthorr to deal additional damage.
Telegraph
- Around x110 HP, Valtan summons 1 pillar at each ordinal direction and leaps into the sky. After a short delay, a huge yellow zone and a small cone-shaped red zone appear. The red zone locks on to a random player and follows his movements for a few seconds. Afterwards, Valtan lands in the center of the arena and deals damage. The damage from the yellow zone can be avoided by standing behind a pillar.
What To Do
- If you are the player targeted by the red zone, make sure to not point it towards a pillar. Place it right between 2 pillars and “wiggle” around until it stops tracing you. Once that is the case, either try to get fast behind a pillar in the yellow zone or simply move away from the red zone and use Time Stop Potion.
Telegraph
- At around x80-85 HP, Valtan leaps into the sky and returns to the ground after a short delay to destroy either the outer left or right ring of the arena. A red telegraph indicated the part which will be destroyed by Valtan. So make sure to group up in the center and move towards the opposite side as soon as you see the red telegraph.
What To Do
- After destroying a part of the arena, Valtan spins back to the center and summons 4 pillars. After a short delay, he roars and deals high damage to everyone who is not standing behind a pillar.
Telegraph
- At x65 HP, the Counter Attack pattern starts. Similar to most of the main patterns, Valtan leaps into the air and lands in the center of the arena. Afterwards, he stomps once on the ground and causes a delayed explosion below each player. To avoid taking unnecessary damage, group up a few steps away from the center, jump towards the boss as soon as he stomps on the ground.
What To Do
- After the stomp, group up immediately on the side of the platform that is not broken. He will turn towards the group and prepare a charge and grab attack. To interrupt it, start counting as soon as his “turn animation” stops and use your skills with Counter Attack affix on the 3rd second. If you fail to interrupt him, he will charge multiple times in a row and grab everyone in his path to follow up with a 1 shot skill.
Telegraph
- At around x35-40 HP, Valtan once again leaps into the sky and returns to the ground after a short delay to destroy the remaining outer ring of the arena.
What To Do
- Group up at the edge of the side, which already got its outer ring destroyed in the previous Stage Break + Pillar Hug pattern.
Telegraph
- This pattern starts at around x17-15 HP bar. Valtan charges into a portal and reappears back in the center with a slam attack towards the bottom side of the arena, so avoid standing on those positions. Afterwards, he performs a few attack patterns one after another in a fixed order listed below. Be aware, almost any hit can push you off the arena and kill you immediately.
What To Do
- The easiest way to survive this pattern is to group up on the left side of the arena, as soon Valtan initiate the pattern by disappearing into the portal. By doing so, you can force him to use the first of the four strikes towards the left. Dodge away from that side as soon as you see the telegraph and return to that place so that the raid lead can use Sidereal: Balthorr on the left side. With the protection of Balthorr, you can't get pushed down the ledge. But you should still try to avoid as much damage as possible from the 3 following attack patterns listed above.
Telegraph
- Valtan starts the Ghost mode with 4 armor stacks on Normal Mode and 6 on Hard Mode. To deal normal damage to him, you need to remove all the stacks by successfully countering the Ghost Clone Counter pattern.
What To Do
- Focus during this phase more on dodging attacks and countering the clones. Dealing a decent amount of damage is more than enough to kill Valtan with the help of Sidereal: Thirian.
Notable Patterns
Telegraph
- After successfully clearing the x160 HP Armor Break Phase, the charge attacks of Valtan can be interrupted. To do so, use a Counter Attack skill shortly after the 2nd fist stomp towards the ground.
Telegraph
- Valtan grabs and holds his axe on one hand in the air for a brief moment before slamming it into the ground. On impact, rocks in a cross shape pattern appear, which deal damage and push the player on hit. Safe spots are left and right side of the boss.
Telegraph
- If Valtan leaps forward and summons on impact, rocks in a cross shape pattern, stay away from him. He will follow up with a backwards spin attack.
Telegraph
- Valtan swings his axe 3 times and strikes the area in front, behind and in front of him again. On impact, a cone-shaped shockwave appears, dealing damage and pushing the player on hit.
Telegraph
- Valtan swings his axe 3 times and strikes the area in front, behind and in front of him again. On impact, a cone-shaped shockwave appears, dealing damage and pushing the player on hit.
Telegraph
- The boss locks on to a random player and strikes 3 times towards him, dealing damage around the axe impact area. The 4th strike strikes on the same area as the previous one, but deals more damage in a bigger area. Try to avoid leading the strikes towards party members.
Telegraph
- Valtan Roars, holds his axe on one hand and prepares for a forward swing attack. Pay attention to the axe. If the axe has a lightning effect, stay away from the impact area. If it doesn't, stand in front of the boss.
Telegraph
- Valtan prepares for a devastating attack while being protected by a shield. Destroy the shield with your normal skills first. Once it is destroyed, use your skills with high Stagger Damage to interrupt the boss. But pay attention to the floor, if cracks appear on the ground, move away from them to avoid the follow-up pull attack.
Telegraph
- This attack is slightly modified, if Valtan uses it after the Armor Break Phase. The major difference is, after throwing 3 projectiles, the boss returns to the ground, dealing damage in a small impact area but followed by a huge shockwave, which can be deadly if you are too close to a ledge. Avoid the shockwave by dodging to the area of initial impact.
Telegraph
- Valtan charges into a portal and summons multiple portals at random spots. He will use the portals to perform multiple charge attacks. A faint flowing line indicates his charging path. Stay away from ledges where you can fall off and use Time Stop Potion if needed.
Telegraph
- Valtan imprisons 3 random players. The remaining players need to lift the imprisonment as soon as possible. After a short delay, the boss roars and deals damage to everyone if anyone is still imprisoned.
Telegraph
- Valtan holds his hand in front of him and rushes towards the edge of the arena while grabbing everyone on his path. Once he reaches his destination, he turns around and roars, which hits everyone in a wide angle. Avoide getting grabbed and stay very close left or right of Valtan to avoid getting hit by the roar.
Telegraph
Valtan sends out a small shockwave around him and prepares for an attack while holding his axe in his right hand slightly behind him. Shortly before he unleashes the attack, a Counter Attack opportunity appears to interrupt it. This will be repeated 2 additional times. If you fail to interrupt his attack, everyone takes high damage.
Upon a successful counter, the boss silences the player, who countered and everyone close to him. So make sure to assign before the battle 3 people, each of who will attempt to interrupt one of the strikes. Assign the most reliable player to interrupt the last strike, since it deals the most amount of damage upon failure and can even wipe the entire raid. In most random groups, players will try to shield or heal through the damage of the first 2 strikes and try to interrupt the last one.
If that wasn't already enough, after the first strike or successful counter, some orbs will spawn close to random players, which explode on contact and send out shockwaves in frequent intervals. If triggered too close to Valtan, it can prevent the player close to Valtan from countering. So if you are not assigned to counter or if it is not your turn yet, stay far away from the boss.
Valtan summons 1 orb at each cardinal direction, which send out shockwaves in frequent intervals. The players need to split and consume the orbs as fast as possible. At the same time, Valtan starts doing a counterable Charge attack. Make sure to have at least 1 player close to the boss, who tries to interrupt the Charge with a Counter Attack skill. After a few seconds, every unconsumed Orb explodes and deals high damage in a huge area.
Valtan grabs his axes with both hands and pulls it to the side and prepares for a counter-attack. Everyone should stop dealing damage and stay right below the hilt of his axe. If you succeed, the follow-up spin attack won't hit the players below the axe. If not, the boss will perform a spin attack which will hit everyone. This attack is especially deadly during the Ghost Phase, since it can push you off the arena.
The boss smashes on the ground with both fists at the same time, causing an explosion in front of him, followed up by a shockwave. To avoid the shock wave, jump towards the initial explosion area.
During the Ghost Phase, Valtan summons frequently ghost clones at the edge of the arena, which needs to be countered. If you counter-attack and interrupt the clones, you can remove one of the armor stacks on Valtan. Additionally, the Sidereal bar fills up for a considerable amount. If you fail to interrupt the attack on time, the clone uses the Cross attack, which can push the players off the arena.
In frequent intervals, multiple pairs of portals spawn at the edge of the arena. After a short delay, a ghost clone of Valtan will charge from one portal to another while pushing down everyone on their path. So be especially careful, if you fight close to the ledge.
Valtan grabs nearby players and follows up with a roar attack. This attack has a high chance to kill the players who got grabbed or get hit by the roar attack. He uses this patter 3 times around x39, x27 and x14 HP bars.
Solo Mode Main Mechanics
Most of the attacks the boss does are exactly the same as in Normal mode. There's only a couple exceptions in the main mechanics.
What to do
- Lead Valtan to charge at a pillar with blue orbs.
- After the crash, use a Destruction Bomb (Bound).
- Collect Blue Orb for x130 mechanic.
What To Do
- Dodge pizza pattern.
- Make sure you have a blue orb before this phase or use Balthorr if you don't.
What To Do
- If you are the player targeted by the red zone, make sure to not point it towards a pillar. Place it right between 2 pillars and “wiggle” around until it stops tracing you. Once that is the case, either try to get fast behind a pillar in the yellow zone or simply move away from the red zone and use Time Stop Potion.
What To Do
- Dodge stage break and hug pillars.
- Aim target at 2 pillars and dodge accordingly.
What To Do
- Counter Valtan when he's about to charge.
What To Do
- Dodge stage break and hug pillars.
- Aim target at 2 pillars and dodge accordingly.
What To Do
- Move to the left.
- Dodge first strike and go back to the same place.
- Either use Sidereal: Balthorr to ignore the follow-up patterns, or run the path as shown in the footage.
What To Do
- Focus during this phase more on dodging attacks and countering the clones. Dealing a decent amount of damage is more than enough to kill Valtan with the help of Sidereal: Thirian.
Credits
Written by Perciculum, Starlast
Video Footage from Raeinor