Brelshaza Gate 1 Legion Raid Guide
Brelshaza Gate 1 focuses on your party's synergy. Especially, the proper distribution of classes with Weak Point and Stagger affix are very crucial. On top of that, make sure that each player in raid has a Skill slotted with the Counter Attack affix. This increases the chance of surviving the x45 HP Counter Attack Mechanic.
Enemy Information
| Normal Mode | Hard Mode | Monster Type | Weakness |
| 1490 Item Level | 1540 Item Level | Matter | None (Split) Earth (Fused) |
Party 1
- Panacea
- Whirlwind Grenade
- Destruction Bomb
Party 2
- Panacea
- Whirlwind Grenade for classes with low stagger damage, Frost Grenade or Flash Grenade
- Sleep Bomb
Rewards
| Gold | Material | Box Material | Box Cost | Auction Material | First Clear | |
| Normal | ||||||
| Gate 1 | 1000 | 4 | 4 | 250 | 30 | |
| Gate 2 | 1000 | 4 | 4 | 300 | ||
| Gate 3 | 1000 | 5 | 5 | 400 | 5 | |
| Gate 4 | 1600 | 7 | 7 | 600 | 15 | |
| Hard | ||||||
| Gate 1 | 1200 | 6 | 6 | 400 | 30 | |
| Gate 2 | 1200 | 6 | 6 | 400 | ||
| Gate 3 | 1200 | 7 | 7 | 500 | 5 | |
| Gate 4 | 2000 | 10 | 10 | 800 | 30 | |
Learn about Brelshaza Legion Raid Gate: 1 / 2 / 3 / 4.
Cheat Sheets
Phase 1
Statues & Dogs
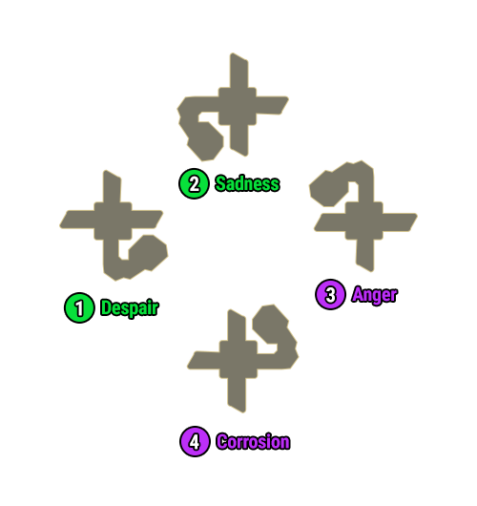
Despair:
- Stagger Check Statue
Sadness:
- Kite the Orb spawned by the Statue
Anger:
- Counter Statue once it flashes blue
Corrosion:
- Use CC to interrupt Statue's Blind Debuff
Phase 2
Hammer & Bow Split
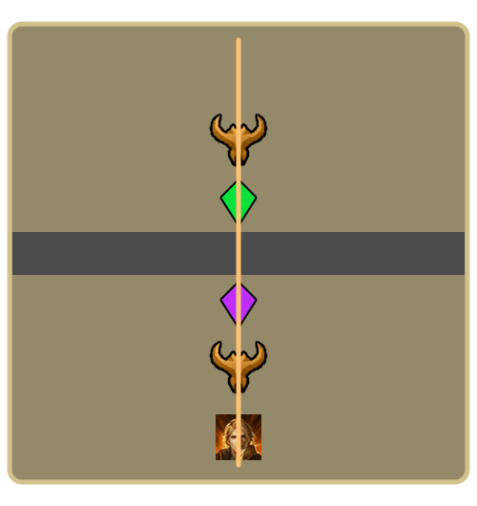

Use Thirain once both Bosses are aligned.
Try to kill both bosses at the same time.
x85
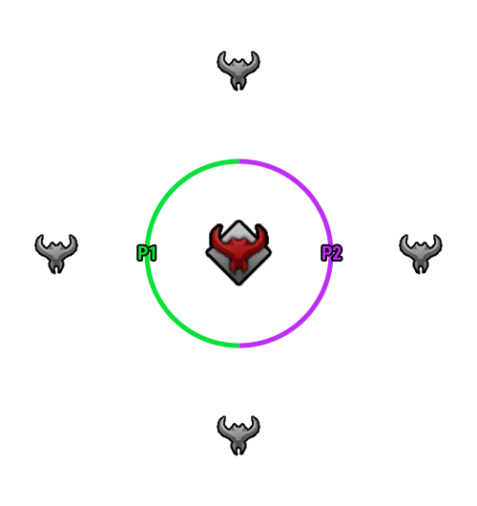
Safe zones
Go to your assigned position
Occupy the safe zones as soon as they spawn.
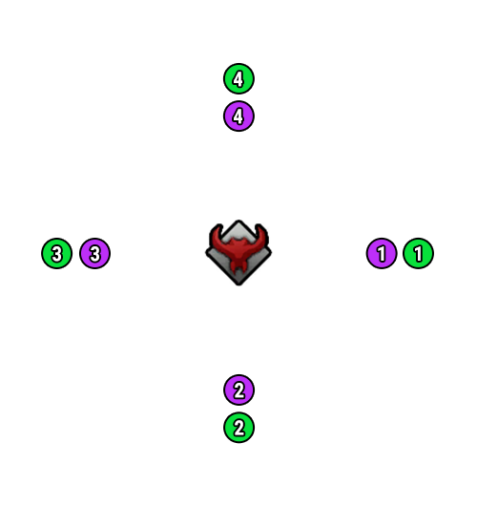
x45
6 Counters

Use Azena once mobs appear on Minimap.
Counter 6 times
Disclaimer! This guide only contains new or altered mechanics in Hard Mode and does not explain the entire mechanic.
Check the Normal Mode guide for the remainder of the attacks and strategies.
Main Mechanics
Main mechanics occur at certain HP intervals.
Telegraph
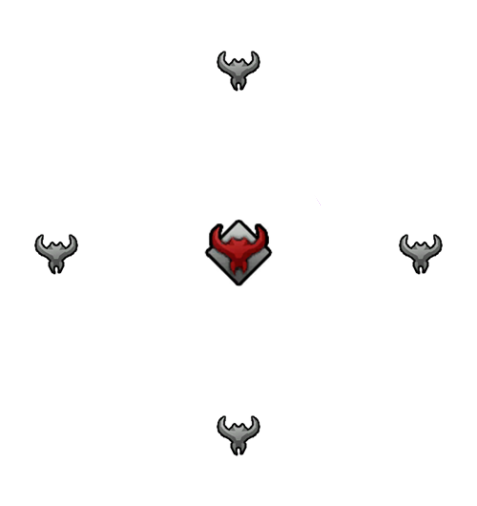
- Occurs at x85 HP.
- The boss teleports to the center of the arena with a stagger check requirement and summons safe zones around the cardinal directions (N, E, S and W).
Description
- Before going to your locations, complete the stagger check of the boss in the center of the map.
Telegraph
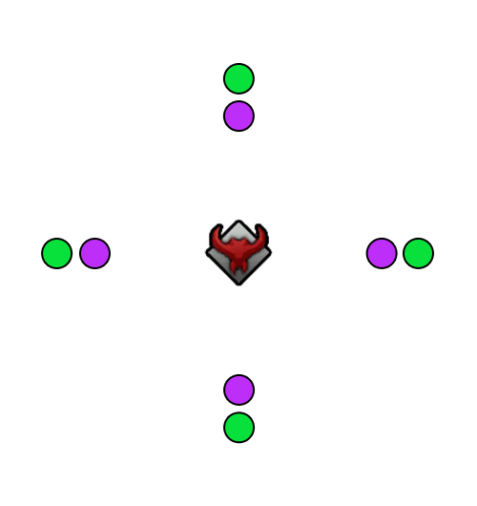
- Occurs at x45 HP.
- The boss teleports to the center of the arena and summons an Elite Monster at each cardinal direction.
Description
- Players who successfully counter the boss will get silenced for the reminder of the mechanic.
- Silenced players have to intercept lightning arrows coming towards the boss from the sides of the arena to prevent AoE explosions and slow debuffs.
New/Altered Notable Patterns
Telegraph
- The boss surrounds himself in a shield of either an orange or blue color.
What To Do
- Check the color of the shield.
- Orange - Stagger the boss to disrupt his attack.
- Blue - Stop attacking as this will initiate a retaliate attack from the boss.
These are all the Hard Mode changes of Brelshaza Gate 1
Below you'll find information about Normal Mode mechanics.
x85
Safe zones
Go to any of the safe zones. NPCs will cover the remaining ones.
x45
3 Counters
Use Azena once mobs appear on Minimap.
Counter boss 3 times
Main Mechanics
Preparation
- Get the proper Combat Items as mentioned above.
- Put classes with higher or more Weak Point Damage skills into Party 1.
- Put classes with higher Stagger Damage into Party 2.
Description
- Each party will be split into random groups of 2 Players each.
- The pairs spawn in a room with one unique Statue & Dog.
- To proceed to the next Phase, each pair needs to kill the big dog in their room.
- Party 1 pairs are teleported into either Sadness or Despair room. Party 2 pairs are teleported into either Anger or Corrosion room.
What To Do
Avoid or interrupt the Statue mechanic, while destroying the dog's shield first before killing it.
- Statue: Succeed the occasionally appearing Stagger check. Failing it, fears the entire raid.
- Occasionally, the Statue spawns an orb, which chases a player. Kite it! Absorbing it deals high Damage to every player in the raid.
- Statue: In regular intervals, the statue will flash blue. Use a Counter skill to interrupt the statue to prevent it from applying a debuff.
- Statue: A purple cloud appears periodically around the statue. If not interrupted, it applies a Blind Debuff to all players. To interrupt it, you need to use a Skill or a Combat Item with hard CC (Stun, Freeze, Feat, etc.), once the purple cloud around the Statue appears.
Telegraph
- Periodically, red, blue and white tiles appear on the floor.
What To Do
- Avoid standing in the red or blue tiles, since these deal damage and knock you up.
- The white tile is usually hard to reach, but provides a Damage Reduction buff.
- Or you can just stay in a normal tile to play it safe.
Description
- Upon clearing Phase 1, the raid splits into 2 parties.
- Each party faces a different boss, which is either the Hammer or the Bow boss.
- To proceed to the next Phase, you need to kill both bosses at the same time. If it takes too long to kill the second boss after killing one, the first one revives with a small amount of HP.
What To Do
- Line up both bosses at the center, as showcased in the image above.
- Use Sidereal: Thirain to hit both bosses to deal damage and break their armor.
- Stop dealing damage if needed, to synchronize the kills.
Telegraph
- Occurs once both bosses in Phase 2 are killed.
- The wall in the center disappears and 2 bosses merge together into one.
Description
- Starting from here, the next Main Mechanics trigger based on the merged boss's HP.
Telegraph
- Occurs at x85 HP.
- The boss teleports to the center of the arena and summons safe zones around the cardinal directions (N, E, S and W).
Description
- Safe spots appear in pairs around specific cardinal directions and summon 2 new spots once the previous ones are occupied by a player.
- The order of appearance is: (N+S) > (E+W) > (N+S) > (E+W)
- If a safe spot remains unoccupied for too long, it can wipe an entire party.
What To Do
- Go to your assigned positions as soon as the boss jumps to the center.
- At each cardinal direction, there should be 1 member of each party.
- The first time a safe spot appears around a specific cardinal direction, a member of Party 1 should step in.
- Once the first 4 safe spots are occupied by Party 1 players, Party 2 players can start to occupy a safe spot once one appears close to their assigned spots.
High DPS Party Method: Use Sidereal: Balthorr to keep dpsing while ignoring the safe zones. If you use this method, you have to manually kill the elites at x45 Counter pattern.
Telegraph
- Occurs at x45 HP.
- The boss teleports to the center of the arena and summons an Elite Monster at each cardinal direction.
Description
- Boss starts to use multiple Counterable attacks 6 times in succession. After each attack, the boss rotates towards a random direction.
- Successful counters reduce the Skill Cooldown of all players, but also summons 3 lightning strikes on the player who managed to counter the boss.
- Failing a counter deals high damage to everyone in the raid. Two failed counters lead to a raid wipe.
What To Do
- Go to your assigned positions as soon as the boss jumps to the center.
- Use Sidereal: Azena to kill the summoned Elite Monsters.
- Optional: Sidereal: Balthorr can also be used instead, which will help to massively reduce the damage taken upon failing the Counter.
- Party 1 players should stay on the left, and the Party 2 players on the right side of the boss.
- Use a Counter skill once the hammer is above the boss's head. Upon successful Counter, move away from other players to avoid dealing damage to them with the lightning strikes.
Notable Patterns
Telegraph
- Highlighted floor tiles appear periodically and move in specific patterns through the entire battlefield.
What To Do
- Pay attention to glowing and moving tiles and try to predict the pattern.
- Once it gets close to you, move to a safe position based on the tile's moving pattern. Otherwise, it deals damage and knocks you up, if it appears below you.
Telegraph
- Occasionally, on random floor tiles, with red and blue lightning effect appears.
Description
- Standing on it summons, after a short delay, either in cardinal or ordinal direction moving tiles.
- If the lightning effects remain on the floor too long, without getting triggered, it turns into a purple puddle.
- Purple puddle deals insane damage on players touching it. This can kill squishy classes within seconds.
What To Do
- If you spot a tile affected by the red or blue lightning effect, stand briefly on it to trigger the moving tiles.
- If you spot a purple puddle, warn everyone with a ping and stay away from it until it disappears.
Telegraph
- The boss remains stationary and starts to spin clockwise while shooting projectiles from the tip of his hammer and bow.
- At the end of the spin movement, after a short delay, the boss uses a swipe attack.
What To Do
- Stay close to the boss and rotate with him while dealing damage.
- To avoid the swipe attack, stay on the left side of the hammer.
Telegraph
- The boss thrusts the tip of the spear into the ground.
- The boss performs a spin attack.
- After a brief delay, the boss shoots arrows into the sky. The arrows rain down on random players.
What To Do
- Avoid the spin attack by staying close to the boss.
- Spread out and keep moving to dodge the arrow rain, if you are one of the targeted players.
Telegraph
- The boss uses a 180° spin attack, which briefly pushes away nearby players.
- After the initial spin attack, the boss shoots multiple arrows with the bow and a shock wave with the hammer, towards the front.
What To Do
- Move too the sides of the boss after the spin attack.
Telegraph
- The boss thrusts the spear in front of him, which sends out small lasers towards multiple directions.
- Boss jumps backwards while throwing the spear towards a random player.
What To Do
- Prepare to dodge the spear throw attack, as soon as you see the initial spear thrust movement. The spear throw deals high damage on hit!
Telegraph
- The boss glows blue for a few seconds before using a charge move followed by 3 hammer strikes.
What To Do
- Use Counter skill to interrupt the skill and stagger the boss for a few seconds.
Notable Patterns 2
Telegraph
- The boss leaps with the hammer towards a direction and hits the ground with it.
- After a brief delay, an explosion occurs around the hammer impact area.
What To Do
- Wait until the explosion occurs before moving too close to the boss.
Telegraph
- The boss aims towards the sky and shoots multiple arrows.
- Arrows rain down 5 times in a flower shape, expanding outwards.
- Four big arrows land around the boss after the last hit of the flower shaped arrow rain.
What To Do
- Dodge the flower shaped rain by standing between the “petals”.
- To avoid the big arrow, either move away from the boss or move to the spot where the first of the 5 flower shot arrows hit the ground.
Telegraph
- The boss opens a portal in front of his bow and aims an arrow towards it.
- After a short delay, small portals appear close to each player with a laser pointing towards them.
- The boss shoots the arrow into the portal, which reappears out of the mini portals.
Description
- Once you see the lasers coming out of the mini portals, move away from those.
Solo Mode Main Mechanics
Most of the attacks the boss does are exactly the same as in Normal mode. There's only a couple exceptions in the main mechanics.
What To Do
- Go to any of the safe spots in the cardinal directions. NPCs will cover the remaining ones.
- Wait until the Boss slams the ground with his hammer, then you're safe to move.
What To Do
- Suggestion: Use Sidereal: Azena to kill the summoned Elite Monsters in the four diagonals.
- Follow the boss as he moves around, and Counter him when he turns blue. Repeat this 3 times.
Credits
Written by Perciculum
Reviewed by Starlast
Updated by Sekwah