Brelshaza Gate 4 Legion Raid Guide
Brelshaza Gate 4 is no doubt the most challenging phase in this epic Legion Raid. Strategy, team play, reactions and quick thinking is what you can expect from here. Difficult and unforgiving attacks are coming your way. Can't wait to hop in? Well, you're not alone!
Enemy Information
| Normal Mode | Hard Mode | Monster Type | Weakness |
| 1520 Item Level | 1560 Item Level | Demon | None |
Battle Items:
- HP Potion of your choice
- Whirlwind Grenade or Dark Grenade
- Time Stop Potion or Atropine Potion
Rewards
| Gold | Material | Box Material | Box Cost | Auction Material | First Clear | |
| Normal | ||||||
| Gate 1 | 1000 | 4 | 4 | 250 | 30 | |
| Gate 2 | 1000 | 4 | 4 | 300 | ||
| Gate 3 | 1000 | 5 | 5 | 400 | 5 | |
| Gate 4 | 1600 | 7 | 7 | 600 | 15 | |
| Hard | ||||||
| Gate 1 | 1200 | 6 | 6 | 400 | 30 | |
| Gate 2 | 1200 | 6 | 6 | 400 | ||
| Gate 3 | 1200 | 7 | 7 | 500 | 5 | |
| Gate 4 | 2000 | 10 | 10 | 800 | 30 | |
Cheat Sheets
x212
Dream World 1
Check your shape, remember it
Projectile Safe spot on the 1 o'clock line
Inputs: Reverse → Normal → Reverse
Run to 3 safe areas, remember the order.
Type in chat: Shape & order
For Example: Star 7,11,0
x188
Golden Meteor 1
Pay attention to the order Blue meteors appearing in and go to those tiles.
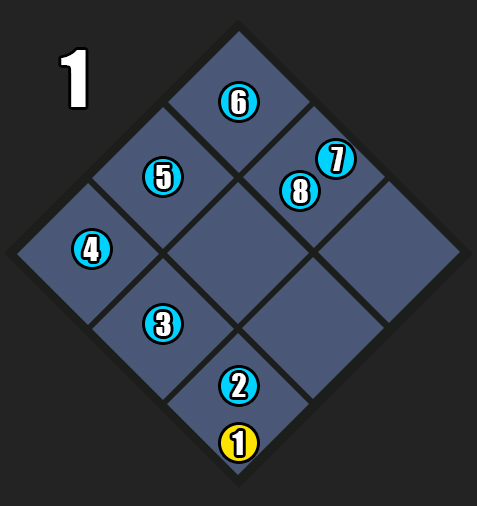
Gold - 12 o'clock
Blue 2,3 - 12 o'clock
Blue 4,5,6 - 11 o'clock
Blue 7,8 - 1 o'clock
When your meteor is placed, escape!
Damage Push!
Reclear Party: High nonstop damage on the boss while placing blue meteors without breaking tiles.
Learning Party: Refer to the Golden Meteor Setup to know how to proceed with your blue and gold meteor placement.
3 Minute Interval
Golden Meteor
Golden meteor spawns, place it in the most damaged corners of the arena: 6 or 12 o'clock.
x113
Black Hole

Party1 - x3
Party2 - x3+1
Don't stand in the middle of the tiles!
Stand on the lines!
Avoid red orbs floating to the center
Outside Team
- Collect 1 yellow orb
- Step into the ball when it has expanded
- Check illusions & ping location
Inside Team
- Collect 2 yellow orbs
- Counter/Stagger at ping location, consume the orb left behind.
x28
Dream World 2
Check your shape, remember it
Projectile Safe spot on the 1 o'clock line
Inputs: Random
Sidereal Innana to cleanse inputs!
Run to 3 safe areas, remember the order.
Type in chat: Shape & order
For Example: Star 7,11,0
x25
Final Nightmare
Avoid 3/6/9/12 o'clock positions as they will break.
Finish the fight!
Disclaimer! This guide only contains new or altered mechanics in Hard Mode and does not explain the entire mechanic.
Check the Normal Mode guide for the remainder of the attacks and strategies.
Main Mechanics
Main mechanics occur at certain HP intervals.
Telegraph
- Occurs at or near x188, and with a 3-minute cooldown afterward.
- A cutscene occurs for the first Golden meteor, them being shown crashing onto the arena.
- Consecutive Golden meteors happen based on a timer in 3 minute intervals.
- Golden meteors cannot appear during major mechanics.
Starting Golden Meteor Setup
All players gather at 6 o'clock.
Unlike Normal Mode, the speed at which blue meteors appear is drastically lowered, making it impossible to stack more than 2 blue meteors on 1 tile.
Because of this, the first golden and blue meteor get placed at 6 o'clock. Remaining players should run clockwise. Then based on the sequence the blue meteors appear, you need to place them 1 by 1 in a clockwise order: 7,9,11,12,1 and 1 o'clock.
From here on out, if you want the highest chances of succeeding, it's best to follow pre-determined blue meteor spots, as it will be difficult to otherwise coordinate remaining HP tiles on the fly.
Don't forget to avoid the golden meteor explosion radius!
How to proceed? (Learning Party)
From now on, every 60 seconds, Blue meteors will spawn on random players. Starting with 2 followed by a pattern that will alternate between 3 and 4 endlessly.
The strategy is to prepare yourself for the Golden meteor ahead of time at locations 12 & 6 o'clock. Meaning that majority of Blue meteors will always be placed on tiles: 11,12,1 or 5,6,7 depending on the current 3 destroyed tile locations.
There are countless variations of where they can be placed based on the current situation and availability. This is just an example of how you could proceed:


Telegraph
- Occurs at or near x7 HP
- A long cutscene starts playing and Brelshaza gains a massive shield of x165 HP.
Description
- Four people need to be assigned to x3+1 positions for meteor countering, as well as 1 person for a flex spot.
- Blue flash explosions coming from the intercardinal positions indicate when meteors are appearing.
- The first location from which a flash occurred will always have 2 meteors (Flex position).
- When the meteors get fully formed, they emit either a blue flash (counter) or a red flash (ignore).
- It is important not to attack meteors that had a red glow and let them travel to the center of the arena, otherwise they will explode and cause a massive AoE wide knockback.
- Successfully countered meteors grant you the power to shoot a laser towards Brelshaza, aim your cursor at her and position yourself, so it doesn't miss.
- This mechanic will repeat itself a total of 4 times. Each round containing 3 blue and 2 red meteors.
- If you succeed in removing her shield, the arena ground will spawn many orbs.
- Each player needs to pick up at least one of them to survive a wipe attack.
Telegraph
- Occurs at x0 HP
- A large orb spawns at 7 o'clock position.
Description
- When attacked, this orb spits out smaller orbs that grant a massive damage boost to players.
- Use this power to destroy the large orb and finish the raid!
High Damage Reclear Party Strategy
- Complete Starting Golden meteor setup.
- Place consecutive blue meteors how you would normally, but try to not break any tiles.
- Full damage on the boss until x113 HP.
- Utilize Dark Grenades if dps is lacking.
- Use Sidereal: Shandi and complete the Black Hole gimmick.
- If you used Sidereal: Azena at the start of the fight and Shandi wasn't up in time for the Black Hole gimmick, then save your sidereal at the start so Shandi can be available for it.
- Once completed, full damage until the end of the fight.
- Use Sidereal: Azena if you're confident, otherwise keep it for Innana so it can be used at x28 HP Dream World mechanic.
New/Altered Notable Patterns
Telegraph
- The screen gets shattered, and dark shapes form on the ground.
Description
- Yellow explosion zones will spawn under players after the mechanic ends.
Telegraph
- Red slowly floating orbs move around the arena.
Description
- Getting hit by these orbs will silence the use of your battle items for 8 seconds.
These are all the Hard Mode changes of Brelshaza Gate 4
Below you'll find information about Normal Mode mechanics.
x212, x28
Dream World 1
Dodge the small projectiles launched by Brelshaza.
Safe vertical/horizontal lines will be created across 3 tiles. Go into them. Repeat 3 times.
Once outside the Dream world, dodge the small projectiles again and move into the same safe zones as before, after each explosion.
Note: your controls will be inverted during the 1st and 3rd safe zones inside the second Dream World mech.
x188
Golden Meteor 1

Place the Golden meteor at the any of the corners of the map and run away, as the nearest 3 tiles will disappear.
After around 3 minutes another Golden meteor will spawn and you will need to repeat the process.
x113
Black Hole
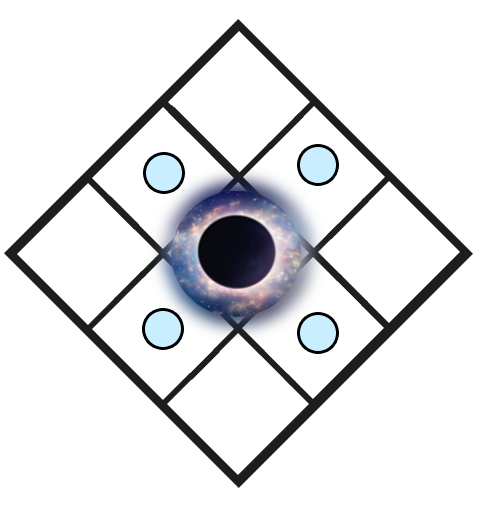
Find one tile with a small orb floating in the middle.
Catch two yellow balls coming from outside (dodge red ones).
Go inside the small orb in the middle of the tile when it starts to shiver.
Counter/Stagger the small clone that spawns around the outer tiles and pick up the buff. Repeat it twice.
x25
Final Nightmare
Avoid 3/6/9/12 o'clock positions as they will break.
Finish the fight!
Raid Mechanics
Raid mechanics cover the passive mechanics that are persistent through the entire raid.
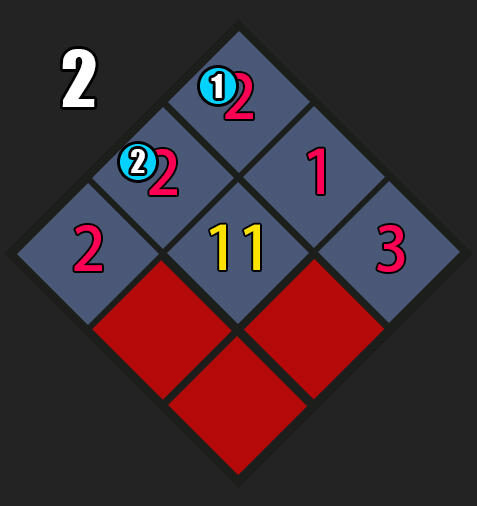
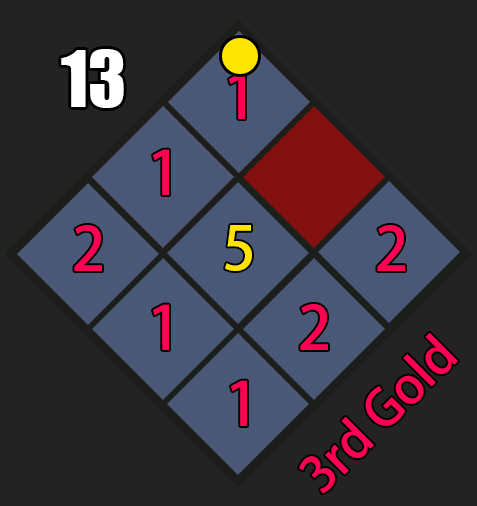
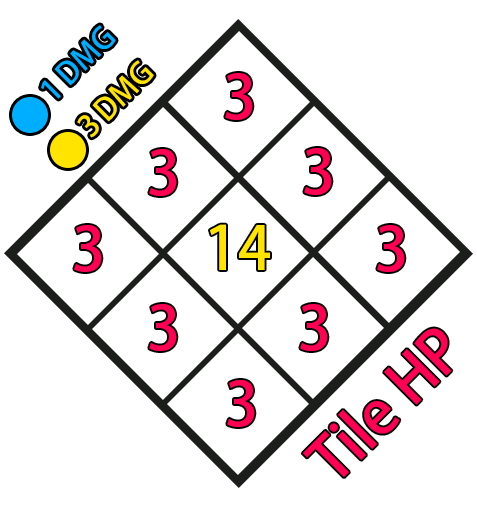
Meteor & Tile information
- Each tile has 3 hit points
- Center tile has 14 hit points
- Meteors start spawning from x188 HP
- Blue Meteor does - 1 Damage
- Golden Meteor does - 3 Damage
- Golden Meteor Spawn rate - 3 Minutes
- Blue Meteor spawn rate - every 60 seconds
- Blue Meteor spawn amount - 7, 2, 3, 4, 3, 4, 3, 4...
- Broken tile respawn rate - 1 min 20 seconds
- 4 broken tiles at the same time = game over
- Broken center tile = game over
Main Mechanics
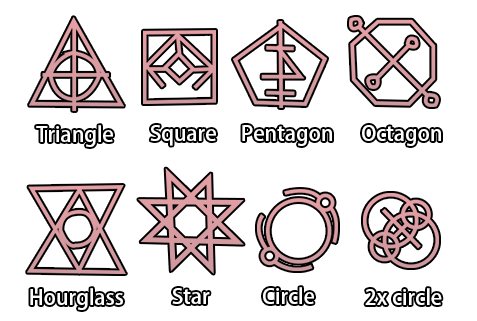
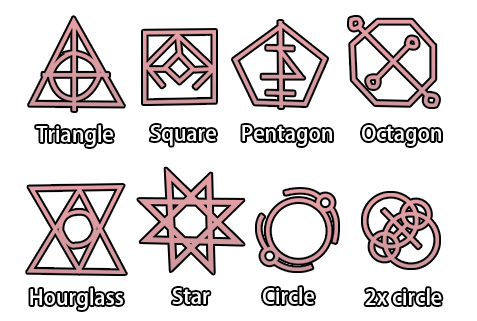
Possible Shapes
You will see one of these shapes floating around your screen when inside the Dream World. Learn to recognize them, so you can let your teammates know which safe spots to take when they occur.
Telegraph
- Occurs at or near x212 & x28 HP.
- Brelshaza teleports to the center of the arena, and emits a massive shockwave.
- She sends all players to their own dream dimension.
Description
- Check the edges of the screen for the Shape displayed and remember it (type it in chat).
- In the middle of the line between 0 and 1 o'clock is a safe location that prevents small projectiles from hitting you. Always position here.
- Your mouse inputs are reversed during the dream dimension.
- This will alternate between reversed and normal mouse controls during the mechanic. (Reversed - Normal - Reversed). Note that for x28 HP, the reverse controls are random.
- Shortly after, the boss will eliminate areas where to stand on.
- Run to the safe tiles while remembering them simultaneously.
- After 3 safe spots, all players will be brought back from the Dream World.
- Type the shape+the safe spot locations you saw in the Dream World into the chat box.
- The boss will choose a shape and display it.
- Staying close to the boss will reveal which shape she has chosen. People further away from the boss won't see the shape, so rely on your teammates or get close!
- Look for this player's safe spot locations in chat and run to them in the correct order to survive!
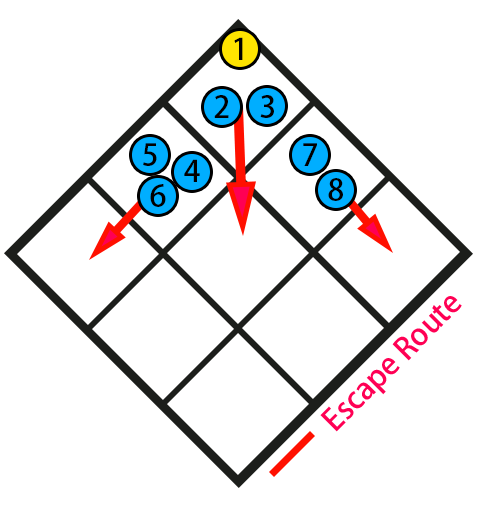
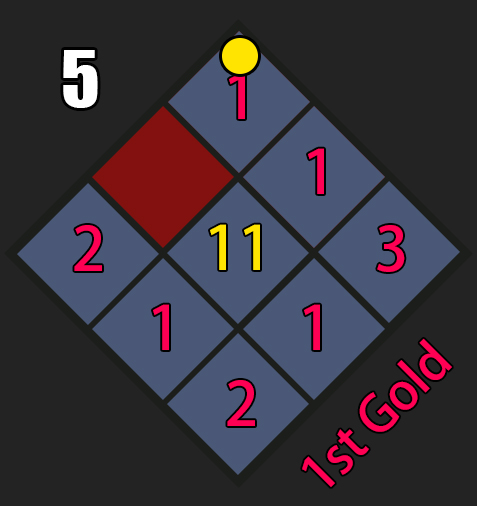
Starting Golden Meteor Setup
The First Golden Meteor is different from others, as it spawns together with 7 Blue Meteors, one for each player. To place these meteors correctly, you have to keep track of when they first appear on the players. Based on this sequence, you should position yourself to the correct tiles.
- Gold - 12 o'clock
- Blue 2,3 - 12 o'clock
- Blue 4,5,6 - 11 o'clock
- Blue 7,8 - 1 o'clock
Once the meteors have been placed, be quick to escape towards safety. Players 7 & 8 will have very short time to escape.
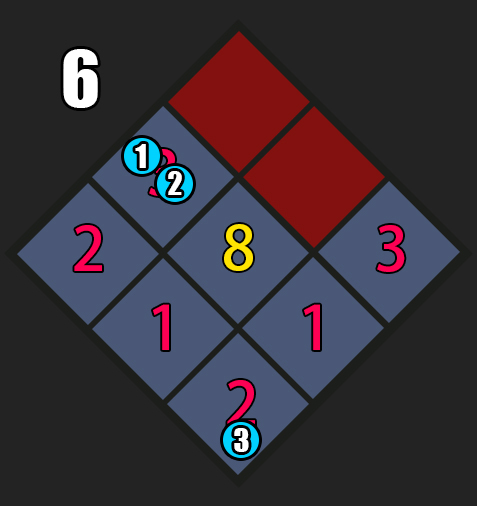
Telegraph
- Occurs at or near x188, and with a 3-minute cooldown afterward.
- A cutscene occurs for the first Golden meteor, them being shown crashing onto the arena.
- Consecutive Golden meteors happen based on a timer in 3 minute intervals.
- Reaching major mechanics resets this timer, so it's possible to never see another Golden meteor if your group's damage is extremely high.
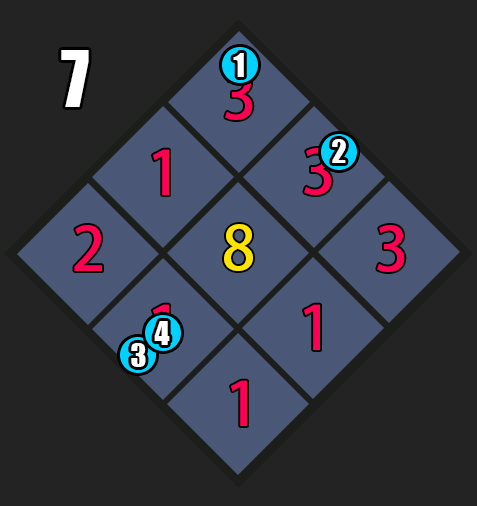
How to proceed? (Learning Party)
From now on, every 60 seconds, Blue meteors will spawn on random players. Starting with 2 followed by a pattern that will alternate between 3 and 4 endlessly.
The strategy is to prepare yourself for the Golden meteor ahead of time at locations 12 & 6 o'clock. Meaning that majority of Blue meteors will always be placed on tiles: 11,12,1 or 5,6,7 depending on the current 3 destroyed tile locations.
There are countless variations of where they can be placed based on the current situation and availability. This is just an example of how you could proceed.
High Damage Reclear Party Strategy
- Complete Starting Golden meteor setup.
- Place consecutive blue meteors how you would normally, but try to not break any tiles.
- Full damage on the boss until x113 HP.
- Utilize Dark Grenades if dps is lacking.
- Use Sidereal: Shandi and complete the Black Hole gimmick.
- If you used Sidereal: Azena at the start of the fight and Shandi wasn't up in time for the Black Hole gimmick, then save your sidereal at the start so Shandi can be available for it.
- Once completed, full damage until the end of the fight.
- Use Sidereal: Azena if you're confident you gonna skip all remaining mechanics, otherwise keep it for Shandi so it can be used at x28 HP Dream World.
- Brelshaza can be killed in Normal Mode before the x28 HP Dream World mechanic has occured if damage is high.
General tips
- After placing the 2nd Golden meteor, make sure to not bring Brelshaza to x113 HP before the bottom tiles have respawned. Otherwise, the Black Hole mechanic will start with broken tiles. Wait until the 4 Blue meteors spawn, place them, and proceed to phase the boss within the next 20 seconds.
- Utilize 3 & 9 o'clock tiles if you're in a dangerous situation, but try to save them for the late game.
- Easily track broken tile respawn times by subtracting 1 minute and 40 seconds from the raid enrage timer whenever a Golden meteor explodes.
- Try to never place Blue meteors between multiple tiles at once. This will damage them both equally.
Black Hole Setup
After Brelshaza slams the ground, spread out to your designated positions. Raid leader should use Shandi here to slow down time.
- Party1 - x3
- Party2 - x3+1
Find the spawned orbs, there are 4 in total. Decide who is going to step into the orbs and who isn't. This will create two teams, Inside & Outside.
- Avoid getting hit by red projectiles, 3 hits = dead
- The 4 orb spawn points are random
- Don't stand in the center of the tile when orbs spawn, you might accidentally consume it.
- Collect golden orbs floating towards the black hole.
- Inside team - needs 2 golden orbs to survive
- Outside team - needs 1 golden orb to survive
- When the white orb expands and shakes, jump into it!
- Don't be too late, it will disappear otherwise.
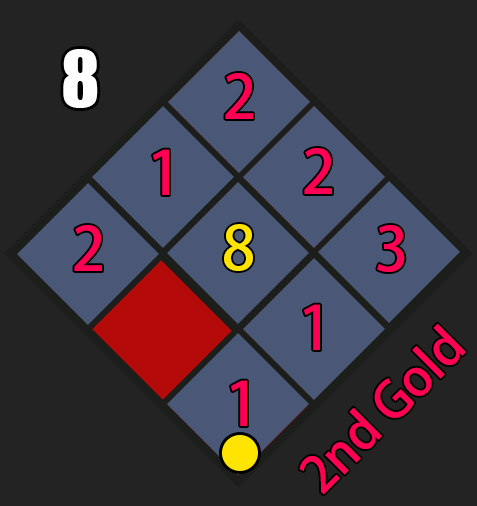
Telegraph
- Occurs at or near x113 HP.
- Brelshaza teleports to the center of the map and performs an epic cinematic.
Outside Team
Players who are stepping into the white orbs will remain outside.
Their responsibility is:
- Walk over Brelshaza's illusions and find the clone that turns around.
- Clockwise = stagger
- Counterclockwise = counter
- Note that telling players if it's counter/stagger is not productive.
- It's smarter to simply ping the location or say the clock position.
- Relay this information with a ping on that spot.
- This mechanic will happen twice with approximately 30 seconds in between.
- There are 2 illusions each round!
- Once you've found them, you can continue to dps the boss and stop looking for more.
Inside Team
Players not responsible for stepping into the white orbs will be brought inside the black hole.
Here your duty is:
- Wait for the Outside Team to ping locations on the map.
- Go to these locations and perform a counter or stagger onto Brelshaza's illusions.
- Note that you should always do counter first, then stagger afterwards.
- This way you won't create unnecessary communication mistakes.
- Collect orbs obtained from countering/staggering these illusions (one for each player).
- Wait for the mechanic to end when everyone has obtained their safety orb.
Counter Patterns
Telegraph
- Forward scratch attack, followed by another if not countered.
Description
- Don't stand in front of her.
- Counter is possible after she ends the scratches.
Telegraph
- Teleports away while drawing in a shield around her.
Description
- Counter when she re-appears.
Telegraph
- Brelshaza does her yellow combo attack.
Description
- If she teleports away after the first attack, It's going to be a counter afterwards.
Notable Patterns
Telegraph
- A blue circle is generated, and red nova emits from beneath Brelshaza.
Description
- Players without a green AoE stack will have a red HP bar above their head.
Stack inside the blue circle, forming a tether with others
Stay there until the HP bar depletes. - Green AoE players spread out until their field explodes.
Telegraph
- Blue patterns are generated around the boss.
Description
- Simply dodge.
- Getting hit will imprison the player.
- Teammates need to break you free.
Telegraph
- Brelshaza creates a red zone on the floor.
Description
- Step inside of it, wait for the blades to spin around you.
Telegraph
- The Boss marks the ground with red pulsating circles.
Description
- Hands will come towards this place and explode on impact, knocking up everyone hit.
Telegraph
- Brelshazas punches in front of her, grabing shortly after.
Description
- Stay on the back or the sides to be safe.
- If someone gets caught, lines will expand from the back, knocking up players.
- If nobody is caught, these lines expand from the front.
Telegraph
- The boss emits a large shockwave and spawns two safe zones.
Description
- Everyone will get knocked down during this.
- If you got knocked, use your get-up ability and dash to one of the safe zones.
- Once the explosion happens, you're free to attack again.
Telegraph
- The screen gets shattered, and dark shapes form on the ground.
Description
- Stand in the narrow safe spots.
- The player targeted with the yellow beam should aim it away from his team, and wait for it to lock on.
- Once it is locked, you can safely dodge.
Notable Patterns 2
Telegraph
- A large area with an eye will be placed on the floor.
Description
- Early Game
- If the smoke is being sucked in - look inside
- If the smoke pushes outwards - look away
- Late Game
- If the shockwave goes outwards - look away
- If the shockwave goes inwards - look inside
Telegraph
- Everyone except one player gets a huge green AoE around them.
Description
- Stack on the player with the small red AoE
- Wait until it expands
- Then players with green AoE's spread out to avoid the explosions
- Return and stack on the red AoE player
Telegraph
- Players will get attached with tethers, while others have knives.
Description
- Players with knives, find the tethered player and step in between the boss and him to cut the tether.
Telegraph
- A sequence of yellow lights will shoot out from the boss.
Description
- Four explosions in a sequence will happen, remember the order they began in and step on the safe spots.
Telegraph
- Brelshaza casts a large yellow AoE.
Description
- She will always follow up with another attack close to her.
- If it's not an attack, she will teleport and perform a counter.
Telegraph
- She places her arms outwards and starts firing lasers on both sides.
Description
- Try to run around the boss while avoiding the lasers.
- Early in the fight, this laser will only turn once.
- Later on, she will spin again and change direction.
Telegraph
- She shoots a laser in front of her, while being pushed backwards.
Description
- Stay in the back or far to the sides as this beam expands the longer it's channeled.
Telegraph
- Brelshaza performs a quick dash, leaving a black trail behind her.
Description
- Two players need to step in the red circles in front of her, getting grabbed in the process.
- One player stands on the blue circle created on the side of her.
- This prevents an orb from spawning and exploding afterwards. (Tytalos mechanic)
- Remaining players stagger the boss quickly.
- If too many players are dead before she starts this attack, don't enter the red circles. Everyone should use a Time Stop Potion after her first slam onto the ground.
Solo Mode Main Mechanics
Most of the attacks the boss does are exactly the same as in Normal mode. There's only a couple exceptions in the main mechanics.
What to do
- Go behind the boss and dodge the incoming projectiles.
- Stay inside the safe tiles. Move when they change, and remember the safe zones.
- Once outside dodge the incoming projectiles again and then move to the safe zones you previously discovered after each explosion.
- Important: The second time this mech happens, your controls will be inverted for the 1st and 3rd explosions.
What to do
- Move to one of the corners of the map and wait until the meteor starts falling.
- Move away as the tiles near the explosion will disappear.
What to do
- Boss will disappear and a cinematic will start. You need to move to the central tile and dodge the Pizza-shaped explosions twice.
- Wait until Brelshaza lifts her hand, then move outside the inner circle as Brelshaza will open a Black Hole.
- Find a tile with a small black orb on top (and avoid it for a little bit). You need to collect 2 yellow meteors to gain a buff.
- Suggested: Use Sidereal:Shandi to have an easier time dodging the small meteors falling into the black hole.
- When the small black hole starts shivering, move inside of it to get transported to the other dimension.
- Small Brelshaza clones spawn on top of some tiles. Move on top of them to check where the Real clones will spawn.
- If the clone spins, a Counter/Stagger will take place in that tile shortly afterwards. If it doesn't spin, no clone will spawn.
- Counter or Stagger the clones and then collect the small orb they drop to gain a buff to survive the following explosion.
- You need to do this correctly at least once.
What to do
- Periodically you will receive a blue aura which, after the timer runs out, drops a blue meteor. Place these meteors in the outer tiles avoiding to break them (by placing them repeatedly in the same tile).
- Every two blue meteors will also trigger 3 other blue meteors to drop in some tile. This will break said tile, so be mindful of where you're placing the blue meteors in case a Yellow Meteor spawns next.
What to do
- Ocasionally (previous to Dream World mech) Brelshaza will spawn several tornados which move from one side of the map to the other. You will receive a buff that you need to keep until the end of the mech by dodging the tornados.
- If you managed to maintain the buff, you will be transported to a new dimension with a small blackhole in one of the corners of the central tile. Destroy it.
- Failing to do so will spawn a big blackhole which hinders your movement and last for a while. It can be dangerous if you receive a Yellow/Blue meteor during this period.
Credits
Written by Choilicious
Reviewed by Perciculum
Updated by Sekwah