Brelshaza Gate 2 Legion Raid Guide
Brelshaza Gate 2 focuses on your ability to resolve and recognize the correct mechanics quickly. Keeping track of your positional requirements and understanding which version of a particular attack you're facing will be crucial in this gate.
Enemy Information
| Normal Mode | Hard Mode | Monster Type | Weakness |
| 1490 Item Level | 1540 Item Level | Demon | Lightning |
Battle Items:
- HP Potion of your choice
- Swiftness Robe
- Whirlwind Grenade or Dark Grenade
- Time Stop Potion or Atropine Potion
Rewards
| Gold | Material | Box Material | Box Cost | Auction Material | First Clear | |
| Normal | ||||||
| Gate 1 | 1000 | 4 | 4 | 250 | 30 | |
| Gate 2 | 1000 | 4 | 4 | 300 | ||
| Gate 3 | 1000 | 5 | 5 | 400 | 5 | |
| Gate 4 | 1600 | 7 | 7 | 600 | 15 | |
| Hard | ||||||
| Gate 1 | 1200 | 6 | 6 | 400 | 30 | |
| Gate 2 | 1200 | 6 | 6 | 400 | ||
| Gate 3 | 1200 | 7 | 7 | 500 | 5 | |
| Gate 4 | 2000 | 10 | 10 | 800 | 30 | |
Learn about Brelshaza Legion Raid Gate: 1 / 2 / 3 / 4.
Cheat Sheets
x145
Meteors+Typing+Stagger
Party1: x3 positions
Party2: x3+1 positions
Meteors spawn in these locations.
Step on them to start a typing test
Finish it and stagger the boss!
x100
Medusa+Stagger
Stagger the boss!
Play around one of 2 Medusa versions:
Cat's eye = Look away
Round eye = Look inside
x43~
Shapes
(Star, Square & Diamond)
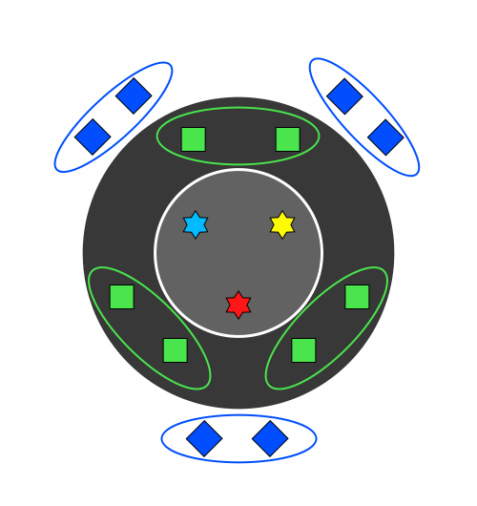
Check the glow on boss Red/Blue/Yellow
Avoid looking into medusa
Assign pre battle each player one of the positions & shapes below to destroy during this Mechanic.
1x Red/Yellow Stars
1x Blue/Yellow Stars
2 Squares around: 12 O'Clock ; 5 O'Clock ; 7 O'Clock
2 Diamonds around: 1 O'Clock ; 6 O'Clock ; 11 O'Clock
After destroying shapes:
Square markers group together with Star+Square player
Diamond markers stay away from Star+Diamond player and everyone else
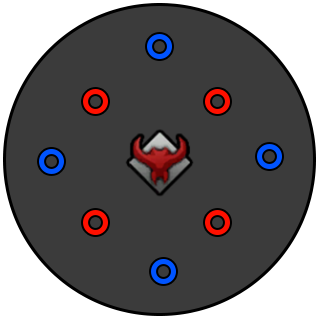
x0
Red & Blue Spears

Party1: x3 positions
Party2: x3+1 positions
Red & Blue areas will spawn, stand on them with the correct color to consume them.
Consume 6 marks to complete the raid!
Disclaimer! This guide only contains new or altered mechanics in Hard Mode and does not explain the entire mechanic.
Check the Normal Mode guide for the remainder of the attacks and strategies.
Main Mechanics
Main mechanics occur at certain HP intervals.
Telegraph
- Occurs at or near x145 HP.
- The Boss disappears and reappears in the center of the map. She is surrounded in a blue space circle with diamonds spinning around her.
Description
- 12 Meteors will fall in set positions on the map. (Party1 = x3, Party2 = x3+1).
- Players in Party2 have an additional meteor spawning at their x3+1 position that they have to clear.
Telegraph
- Occurs at or near x100 HP.
- The Boss disappears and reappears in the center of the map. She is surrounded in a blue space circle with diamonds spinning around her.
Description
- 9 yellow meteors will spawn around the arena
- Players who pick them up gain a stagger damage buff that can stack up to 3 times.
- Highest stagger damage classes should try to obtain this buff.
- Stagger check begins once all 9 meteors have fallen.
- The Medusa eyes will alternate between regular and cat's eye constantly.
Telegraph
- Occurs at or near x43 HP.
- The Boss disappears and reappears in the center of the map. Spawning Star, Square and Diamond Shapes on the arena.
Description
- Two large cat's eye medusa will spawn and cover a large portion of the arena.
- They will always be cat's eye versions (look away).
- These will periodically disappear and reappear in a random rotation.
- If you're confident, kill your shapes while medusa is ongoing, or do it afterward once they are gone.
- You have about 6-7 seconds to destroy them when the last medusa spawn disappears.
Telegraph
- Occurs at x0 HP.
- The boss teleports to the center of the arena and summons Red & Blue spears at x3 & x3+1 positions.
Description
- Medusa will spawn in the center and alternate between cat's eye and regular one repeatedly.
- This happens once the marks have been assigned.
- Sidereal: Inanna can be used for an easy completion, preventing knockback and damage.
- All 8 areas need to be completed to finish the raid.
- If you fail to do so, you will suffer raid wide damage which needs to be Time Stopped or you will die.
- On failure, the boss will heal back a portion of her HP based on the amount of marks completed.
- Kill her again to complete the raid.
New/Altered Notable Patterns
Telegraph
- The arena gets darkened.
- A shape appears on top of the boss.
What To Do
- Look at the boss and check the shape she is showing: Star or Pentagon.
- Two Star & Two Pentagon shapes will spawn around her.
- Both correct shapes need to be kited on top of the boss.
- Other players kite both of the opposite shapes around the room until the mechanic is resolved.
- Do not absorb/eat the opposite shapes in Hard Mode as they will inflict very high damage/kill you.
- Positions of x3 can be utilized for this mechanic, keep in mind that the shapes might spawn off angle.
- Use a Time Stop Potion after the first tick of damage if you've failed.
Telegraph
- The boss teleports to the center, silencing everyone and creating a giant maze covering the entire arena.
What To Do
- One outside gap has a yellow safe spot marker that can also be seen on the minimap as a yellow dot.
- 3 Random players will get surrounded in a shining yellow light.
- These players have to go to the marked yellow safe spot on the edge to resolve the mechanic correctly.
- If one of the 3 players doesn't reach the marked safe spot, random people get charmed for 5 seconds.
- Careful when dealing with charmed players, either Sleep Bomb them or avoid them.
These are all the Hard Mode changes of Brelshaza Gate 3
Below you'll find information about Normal Mode mechanics.
x145
Meteors+Typing+Stagger
Meteors spawn in these locations.
Step on one to start a typing test
Finish it and stagger the boss!
x100
Medusa+Stagger
Stagger the boss!
Look away or into the Medusa Eyes spawned around her.
x43~
Shapes
(Star, Square & Diamond)
Look away from the Medusa Eyes spawned around her.
Break the pair of shapes that spawn around the boss to gain a buff.
If the shape above your head is a Diamond, stay away from the NPC.
If the shape above your head is a Square, go near the NPC.
x0
Red & Blue Spears
Red or Blue areas will spawn, stand on one and wait to consume it.
Step on the spots that spawn later to "clear" them.
Raid Mechanics
Raid mechanics cover the passive mechanics that are persistent through the entire raid.
Description
- Each time the boss successfully lands an attack on a player, she will get a stacking buff.
- Once this buff reaches x5 stacks, she will perform a guaranteed special counter pattern.
- After a short while, she will be able to stack the buff again.
Main Mechanics
Telegraph
- Occurs at or near x145 HP.
- The Boss disappears and reappears in the center of the map. She is surrounded in a blue space circle with diamonds spinning around her.
Description
- 8 Meteors will fall in set positions on the map. (Party1 = x3, Party2 = x3+1).
- All players must step on the fallen meteors, which initiates a typing mechanic that they need to complete. (Not clearing a meteor will result in raid wide damage).
- The Boss will start a Stagger Check shortly after.
- Failure to Stagger the Boss will result in a wipe.
What To Do
- Once the boss teleports to the center, check your party number and go to your position.
- Step on your meteor, finish the typing test.
- Go to the center and Stagger the Boss. Use your best stagger skills or Whirlwind Grenades to break it quickly.
Telegraph
- Occurs at or near x100 HP.
- The Boss disappears and reappears in the center of the map. She is surrounded in a blue space circle with diamonds spinning around her.
Description
- The Boss spawns with a Stagger Check.
- There will be balls (eyes) spawning on the ground that require you to either look at them or look away from them while performing the Stagger Check. These eyes will disappear and reappear in either a clockwise or counter-clockwise rotation.
- Regular Eye = Look inside, its circular telegraph pulsates inwards.
Cat's Eye = Look away, its circular telegraph pulsates outwards. - Looking at the eye incorrectly will result in taking damage and getting knocked backwards.
What To Do
- Use your best stagger skills or Whirlwind Grenades to break the boss quickly.
- Position yourself near the boss based on which eye you are seeing. Then check if the eye reappears clockwise/counter-clockwise and keep turning together with it. This will allow you to stagger the boss without taking damage.
- Regular Eye = You → Boss → Eye.
- Cat's Eye = Boss → You → Eye.
- If your Sidereal is available, both Innana and Wei can be utilized here.
Innana - Will negate the damage taken and knock back from the eyes, letting you freely stagger.
Wei - Simply assists you with Stagger Damage.
Telegraph
- Occurs at or near x43 HP.
- The Boss disappears and reappears in the center of the map. Spawning Star, Square and Diamond Shapes on the arena.
Description
- Before starting this gate, communicate and assign each player a pack of 2 shapes to destroy during this mechanic. You can do so by calling clock positions.
- Medusa Eye pattern will be present in the center of the map (Regular/Cat's Eye).
- 2 Players assigned with Star: each breaks 1 Star opposite to each other and the color shown by the boss.
- 3 Players assigned with Square: each player breaks 2 Square Shapes.
- 12 O'Clock
- 5 O'Clock
- 7 O'Clock
- 3 Players assigned with Diamond: each player breaks 2 Diamond Shapes.
- 1 O'Clock
- 6 O'Clock
- 11 O'Clock
- Failing to break 2 correct shapes will result in death.
- Breaking 2 incorrect shapes will result in death.
- Not grouping up with the correct marked players will result in death.
What To Do
- Position yourself based on your assigned shape.
- Break the correct amount and type of shape assigned to you.
- After breaking your shapes, check the marker above your head to know which player to stand next to or to avoid.
- The 2 players who broke Stars will spawn with either Star+Square or Star+Diamond above their head.
- Square markers group together with Star+Square player to survive.
- Diamond markers stay away from Star+Diamond player and everyone else to survive.
Telegraph
- Occurs at x0 HP.
- The boss teleports to the center of the arena and summons Red & Blue spears at x3 & x3+1 positions.
Description
- Red & Blue starting positions will appear on the ground.
- Stand on them until they are consumed. These will mark you with the corresponding color.
- Afterwards, Red & Blue areas will spawn around the boss.
- Red & Blue marked players need to step on the correct color and consume it.
- A total of 8 areas will appear, 4 of each color.
- If at least 6 areas are consumed, the raid is over.
- If you fail to do so, you will suffer raid wide damage and the boss will heal back to x10 HP. Kill it to complete the raid.
What To Do
- Party1: Go to party number x3 positions. (Blue)
- Party2: Go to party number x3+1 positions. (Red)
- Consume your color by standing on it until it disappears and gives you a marker above your head.
- If all players are alive, spread out to x3 positions and search for Red & Blue areas that will appear randomly around the boss.
- If there are fewer players, you must communicate who searches the left & right side of the arena.
- Step on areas with your marked color and stand in them until they explode.
Counter Patterns
Telegraph
- Teleports and spawns scythes in a square pattern followed by horizontal lines.
- These scythes will shoot outwards and come back to the same position they started shortly after.
- Counter is possible after horizontal scythes have returned to their starting position.
Description
- The boss will perform a frontal attack that can easily be dodged if not countered.
Telegraph
- Teleports and spawns scythes in a horizontal line followed by another set of horizontal lines.
- These scythes will shoot outwards and come back to the same position they started shortly after.
- Then she will teleport nearby and perform a counter.
Description
- The boss will perform a frontal attack that can easily be dodged if not countered.
Telegraph
- Teleports and spawns clones around herself, damaging and knocking players in front of the boss and in line of sight of the clones. (Back attack is safe in the beginning)
- After the clones finish their stabbing attack, they use a followup attack that hits everywhere in their line of sight up to the boss. (Safe spot is left and right of the clones)
- Use a skill with Paralysis Immunity when the stabbing attack occurs to avoid getting flinched, so you can counter more easily.
- The boss performs her counter.
Description
- The boss dashes forwards if not countered, inflicting high damage.
Telegraph
- Teleports and performs forward slashes while spawning 3 clones (Left, Right, Back) which perform the same attack.
- After she finishes her slashes, she jumps backwards to her original position.
- The boss performs her counter.
Description
- The boss dashes forwards if not countered, inflicting high damage.
Telegraph
- The boss performs the Imprison mechanic.
- It can be 2 variations.
- A single cast of Imprison followed by a counter
- 4 casts of Imprison followed by a counter (enrage)
- The boss performs her counter at the end.
Description
- The boss dashes forwards if not countered, inflicting high damage.
Notable Patterns
Telegraph
- The arena gets darkened.
- A shape appears on top of the boss.
What To Do
- Look at the boss and check the shape she is showing: Star or Pentagon.
- Star & Pentagon shapes will spawn left and right of her.
- Go near the shape she is showing to aggro it and kite it on top of the boss.
- Consume the opposite shape immediately by running over it.
- 4 safe spots in yellow color will appear at x3+1 positions.
- Each party goes to their correct position, you'll end up as pairs in the safe spots.
- If done correctly, everyone will get a shield that absorbs the raid wide damage.
- If only one player is inside the safe area, he will die unless he uses a Time Stop Potion after receiving the 1st tick of raid aoe damage.
Telegraph
- The boss teleports to the center, silencing everyone and creating a giant maze covering the entire arena.
What To Do
- Players must escape to the very outer layer of the maze and find a gap in the wall.
- One outside gap has a yellow safe spot marker that can also be seen on the minimap as a yellow dot.
- 3 Random players will get surrounded in a shining yellow light.
- These players have to go to the marked yellow safe spot on the edge to resolve the mechanic correctly.
- If one of the 3 players doesn't reach the marked safe spot, everyone gets charmed for 5 seconds.
- Running into the wall will knock you backwards and inflict damage, so be careful.
- Players who are not marked can go to any safe spot they like.
Telegraph
- The boss surrounds herself in a spiral of aoe spear attacks.
Description
- Avoid getting hit by the aoe ground attacks.
- Your character gets imprisoned if you get hit.
- Help your teammates break free if they are caught.
- She performs a counter at the end. Make sure that she can be countered before attempting to stop it. (Counter cooldown is 30 seconds from previous successful counter)
Telegraph
- The boss flashes a colored circle beneath her, either: Red or Blue.
What To Do
- Color Red: Inside safe, then outside.
- Color Blue: Outside safe, then inside.
Telegraph
- The boss summons a massive aoe circle beneath herself in either Blue or Pink color.
What To Do
- Color Blue: Outside safe.
- Color Pink: Inside safe.
Telegraph
- The boss surrounds herself in a Blue circle, raising her scythe and spinning shortly after.
What To Do
- Dodge the attack!
- If anyone got hit by this attack, she will perform another spin shortly after.
Telegraph
- Spins her scythe above her head and creates 3 Purple beams that go outwards from the boss in a spiral shape.
What To Do
- Retreat to a medium distance and then dash close to the boss after the first explosion to be safe.
Notable Patterns 2
Telegraph
- The boss marks a location on the ground. Shortly after, she jumps to this spot.
What To Do
- Right as she jumps, make sure to follow her and stay close.
- A large explosion will occur around her landing position.
Telegraph
- For a short moment, the boss turns the ground beneath her into foggy space dust, from which 4 orbs emerge.
What To Do
- Standing directly on top of the boss or running away between the orbs will save you.
- She can summon more orbs that follow players during her enrage, in which case the targeted player needs to kite them away from his team and himself.
Telegraph
- At or near x80 HP the boss will enrage.
Description
- She will gain boosted attack damage and speed.
Telegraph
- She will cast a Pink clone in front of herself, following after it and performing a knockup.
Description
- She will repeat this attack 2 additional times if she is enraged.
Telegraph
- The boss stabs in front of her and creates 3 clones behind her which do the same attack.
Description
- Safe spot is directly to the left and right of her.
Telegraph
- The boss will create beams that travel across the screen either in a cross or horizontal formation.
What To Do
- The horizontal formation has its safe spot in the center.
- The beams traveling across the screen emit sparks to one of their sides. This will indicate the direction where the wave is going to expand.
- Based on that, you can spot the safe spot for the cross formation.
Telegraph
- The boss burns skid marks onto the ground, creating multiple shapes that will explode after a while.
What To Do
- Avoid standing in areas that have made a shape pattern below you.
Solo Mode Main Mechanics
Most of the attacks the boss does are exactly the same as in Normal mode. There's only a couple exceptions in the main mechanics.
What To Do
- Once the boss teleports to the center, go into one of the Meteors to trigger a Typing test.
- Complete it and stagger the boss.
What To Do
- Stagger the boss while looking away or into the Medusa eyes around her.
What To Do
- Wait for the shapes to spawn and break only one pair of them.
- Look for the symbol above your head.
- If your symbol is a Diamond, stay away from the NPC.
- If your symbol is a Square, stay near the NPC.
What To Do
- Go into any of the spots and wait a bit to consume that color.
- Go into the spots that appear afterwards with your matching color, wait until they are cleared.
What To Do
- Periodically the boss will teleport to the center and darken your screen a bit. Near her, a floating symbol will appear showing either a Star or a Pentagon.
- Two floating orbs with either forms will appear around her. You need to "lure" the matching symbol by going close to it (but not touching it!). Make it collide with the boss.
- If you did the previous step correctly, yellow zones will spawn in her diagonals. Go into one to gain a shield to survive the pulses afterward.
What To Do
- Periodically the boss will teleport to the center and darken your screen a bit. A yellow circle will spawn somewhere in the outer edge of the arena.
- Move into that spot while dodging the walls spawned in three rings.
Credits
Written by Choilicious
Reviewed by Perciculum
Updated by Sekwah