Kazeros Raid Mordum Gate 2 Guide
In Kazeros Raid Mordum Gate 2, Naitreya will challenge your pattern recognition skills. During this encounter, you have to play as a team to win.
| Normal Mode | Hard Mode | Monster Type | Weakness | Tauntable |
| 1680 Item Level | 1700 Item Level | Insect | None | Yes |
- HP Potion of your choice
- Dark Grenade
- Atropine Potion or Stimulant
This guide assumes that you are familiar with the recommended Raid Build for your class.
Learn about Kazeros Raid Mordum Gate 1 | 3.
Raid Rewards
| Gold | Material | Bonus Loot | Bonus Loot Cost | Auction | First Clear | |
| Normal | ||||||
| Gate 1 | 6,000 | 3x | 3x | 2,400 | 20x 3x 10x 20x | |
| Gate 2 | 9,500 | 5x | 5x | 3,200 | ||
| Gate 3 | 12,500 | 10x 5x | 10x | 4,200 | 10x | |
| Total | 28,000 | 18x 5x | 18x | 9,800 | ||
| Hard | ||||||
| Gate 1 | 7,000 | 3x | 3x | 2,700 | 20x 3x 10x 20x | |
| Gate 2 | 11,000 | 5x | 5x | 4,100 | ||
| Gate 3 | 20,000 | 10x 7x | 10x | 5,800 | 10x | |
| Total | 38,000 | 18x 7x | 18x | 12,600 | ||
Main Mechanics Overview
x300-235 HP - Alberhastic Phase
12:55 - Timed Mechanic
x235 HP - Alberhastic Memory
x235-105 HP - Yoho Phase
x105 HP - Find Clones
x105-0 HP - Velganus Phase
Once you have read through the detailed description of the main patterns, use the “cheat sheet” during the raid, or check out our condensed Cheat Sheet Collection for all Legion Raids on one page.
x300-225 HP
Alberhastic Phase

Avoid getting Infection Stacks to x15
12:55
Timed Mechanic
Below 50%
P1 → Left
P2 → Right
Players with puddles stack shortly before debuff goes away.
Non-debuff players bait laser and block waves.
12:55
Timed Mechanic
Above 50%
3 pairs of colors, 2 players each.
Matching people run together with tether.
Transport the tether to 6 o'clock.
Alternate who is pulling constantly.
No color → block rocks from 6 o'clock.
Purple = block, Red = Ignore.
x235 HP
Alberhastic Memory

NM: All players have same shield color
In/Out
Orange → Blue orbs
HM: 4 Yellow/4 White colored shields
In/Out and split arena
Stagger→Just Guard→Orange→ Blue orbs
Use  Sidereal:Nineveh when time dial disappears, recast after cutscene
x235-105 HP
Yoho Phase
2min after phase starts → Timed Attack
Use  Sidereal:Mystic when boss lands.
x105 HP
Find Clones
Ping gold puddles when you see them.
Overlap location is the real target.
NM: counter the target x2 → stagger
HM: guard/counter target x2 → stagger
x105-0 HP
Velganos Phase
Velganos timed mechanic happens every 1min 30seconds.
Raid Mechanics
Raid mechanics cover the passive mechanics that are persistent through the entire raid.
Infection
Poison

Devour Gauge

Infection
- Players receive stacks (seen above your mana bar) anytime they get hit by Naitreya's infection attacks.
- Stacks last 60 seconds.
- Any stacks found on players are shared with the boss (seen below boss HP).
- When the boss reaches x15 Infection Stacks, it triggers an automatic mechanic.
Paralyze/Just Guard Mechanic
- The boss paralyzes all players that are afflicted with the Infection debuff upon reaching x15 stacks.
- Then he tries to grab these players depending on how many are infected (max 3 grabs).
- Players who are not infected must block these grab attempts by performing Just Guards.
- Repositioning is required for these Just Guards, as the boss will turn towards random targets.
- Each time the boss performs a grab, he will increase the Team Meter gauge.
- If the infected player gets grabbed, he receives a lot of damage and gets a Poison debuff.
Poison
- This is a debuff inflicted to players who get grabbed.
- Lasts 2 minutes. Can be tracked above your mana bar or seen above your character as the Devour Gauge.
- If you get grabbed/swallowed again within these 2 minutes, it is an automatic death.
- This is a special gauge that can be seen in the top left of your screen when fighting Naitreya.
- This gauge is divided into 3 different parts.
- Below 50%
- Above 50%
- Full Meter
- The gauge naturally decreases over time in phase 1&2 (Alberhastic & Yoho).
- But in phase 3 (Velganos) it increases.
- The meter is responsible for multiple different mechanics during the fight based on the amount of gauge that is currently present. Two of which unlock starting when the enrage timer hits 12m 55s.
12:55 First Timed Mechanic
- Once the enrage timer hits 12:55 remaining, a timed mechanic will initiate.
- Reoccurring every 4~ minutes.
- There are two possible mechanics.
- They are decided based on your current team meter when it begins
- Above 50%.
- Below 50%.
- To see when these mechanics begin, check the stagger bar of the boss as it gets locked during them.
Full Meter

- Upon Reaching full meter, the boss flies to the center. Everyone should get close to the boss.
- Naitreya will roar and force players to run out of the arena. You must perform a quick time event (QTE). Press the correct letter shown to you in time.
- Then Naitreya will dash across the screen twice, indicated by a yellow telegraph.
- Choose one player who will purposely get hit by this to get grabbed.
- This will force a stagger check, complete it to finish the mechanic.
- Stagger him from the right side as he is casting an infectious attack to the left.
Sidereals
Nineveh
- Used after x235 HP Alberhastic Memory mechanic. The timing is when the time dial disappears from the floor.
- 3 Bar → Deals damage.
- 1 Bar → Deals damage.
 Mariu
Mariu
- Can be utilized to stagger Naitreya in the later phase of the fight.
- 3 Bar → Deals large amounts of stagger damage.
- 1 Bar → Grants attack power & stagger buff.
Mystic
- 2 minutes after Yoho gets absorbed a timed mechanic will occur, this is where Hidden Mystic is used.
- When Naitreya fully appears check for front & back indicators to be visible then cast Mystic.
- 3 Bar → Reduces the Team Meter.
- 1 Bar → Cleanses all debuffs.
Main Mechanics
Main mechanics occur at certain HP intervals.
Telegraph
- Naitreya gains damage reduction and moves to the center, spawning a time dial on the arena.

- As the mechanic begins, all players will be surrounded by a yellow shield.
- Shortly after Naitreya will show 4 different safe spots that you need to memorize, there are two possibilities:
- In → Out → In → Out
- Out → In → Out → In
- Move to them in the correct order. Then stagger the boss.
- Orange orbs will appear that anyone can destroy to spawn blue protective buffs in their place.
- Each player should gather only one of these
- 4 safe spots are repeated one more time → spawns more orange orbs.
- Then finally, Naitreya raises his arms and performs his big attack.
- Raid Leader should use Sidereal: Nineveh as soon as the time dial disappears from the arena.
- Recast it after cutscene to push Naitreya to x220 as soon as possible.
- Raid Leader should use
- Before the mechanic begins Naitreya will show either a yellow or white puddle beneath her feet.
- This puddle color indicates which players need to gather protective orbs later in the mechanic.
- As the mechanic begins players are randomly divided in two groups:
- 4 yellow
- 4 white
- Shortly after the boss flashes 4 different safe spots that you need to memorize.
- These spots are repeated in the same order directly afterwards at which point you must be standing in the correct spot. Based on what color you have, simply repeat the same sequence you saw.
- Then stagger the boss.
- 4 orange orbs will appear that anyone can destroy to spawn blue protective buffs in their place.
- Remember the initial color below Naitreya's feet at the start of the mechanic?
- If it was white → yellow players need to pickup the blue orbs.
- If it was yellow → white players need to pick up the blue orbs.
- However there are enough orbs for everyone. If you're unsure everyone can have an orb by the end.
- Players will loose this protective buff if they incorrectly perform the memory game and get hit by the opposite color.
- After stagger, Naitreya will lock-on to a random player and do a Just Guard towards him.
- You can either Just Guard or dodge after the boss is locked in place.
- Failing the Just Guard/dodge will make you lose the protective buff.
- 4 safe spots are repeated one more time → spawns more orange orbs → Just Guard.
- Then finally Naitreya raises her arms and performs her big attack.
- Raid Leader should use Sidereal: Nineveh as soon as the time dial disappears from the arena.
- Recast it after cutscene to push Naitreya to x220 as soon as possible.
- Raid Leader should use
Telegraph
- Naitreya flies into the sky, circling around the arena.
- 6 clones of Naitreya will appear around the arena.
- 4 random players will see yellow puddles below 2 of the 6 clones, they need to ping these spots.
- The spot that has two pings overlapping is the correct one.
- If only 1 ping can be seen, go to the one that doesn't spawn purple lasers.
- Go to this clone and observe his motion.
- Clone pulls one hand backwards → Counter.
- At the same time, two purple lasers will be shot from other clones that need to be aimed towards the center ideally, or away from the real clone.
- This mechanic will repeat one more time.
- Successful counters provide a stagger buff to you.
- After the 2nd round of finding the clones, Naitreya will reappear and require stagger.
- Stagger him from the right side as he is casting an infectious attack to the left.
- If your stagger is great, he might not even begin to cast the attack in time.
- Players are divided into two groups:
- 4 Monochrome Vision
- 4 Full Vision
- 6 clones of Naitreya will appear around the arena.
- 4 random players will see yellow puddles below 2 of the 6 clones, they need to ping these spots.
- The spot that has two pings overlapping is the correct one.
- If only 1 ping can be seen, go to the one that doesn't spawn purple lasers.
- Go to this clone and observe his motion.
- Clone arches both of his wings backwards → Just Guard.
- Clone pulls one hand backwards → Counter.
- At the same time, two purple lasers will be shot from other clones that need to be aimed towards the center ideally, or away from the real clone.
- This mechanic will repeat one more time.
- Successful Counter/Just Guard provides a stagger buff to you.
- After the 2nd round of finding the clones, Naitreya will reappear and require stagger.
Timed Attacks

- If the Team Meter was higher than 50% move to 12 o'clock and wait in the safe spot.
- After a short time, Naitreya will mark players into 3 different pairs in Hard mode (2 in Normal Mode):
- 2 Gold Markers
- 2 Silver Markers
- 2 Purple Markers
- 2 Unmarked players
- One marked player of each pair will get a tether that he has to drag to the bottom of the arena.
- The other player in the pair needs to intercept it and keep pulling it further. Repeat doing this between the two of you until you've reached the bottom (Similar to Akkan G3).
- Make sure not to hold onto the tether too long as you will be pulled back otherwise.
- To prevent you reaching the bottom, there are rocks which are forming and flying towards you. If hit by them, you get pushed backwards.
- Red Rocks → Everyone needs to ignore these.
- Purple Rocks → Unmarked players need to block these.
- Players without marks should position ahead of the marked players and block forming rocks.
- They can also intercept the tethers if they like.
- To have a cleaner vision ahead, I suggest disabling UI with "ALT+X".
- If the Team Meter was lower than 50% move to the center of the map (very short DPS timing).
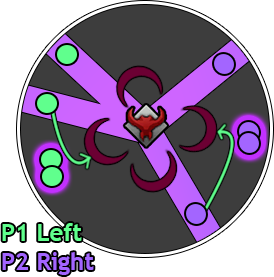
- Once the red telegraph explodes, quickly spread out:
- Party1 → Left
- Party2 → Right
- If you remain in the center, you'll get stunned and die to the fog.
- 4 Random players will get marked with a puddle below their feet, avoid being close to each other until they disappear.
- Other 4 will be targeted by rectangular lasers that they need to bait away and dodge.
- Getting hit by this laser will result in possible death.
- Additionally, there are 5 rounds of waves coming towards players, these also need to be avoided by everyone.
- Once completed, you must dodge a red telegraph, and you're done.
- When spreading out left and right, stay relatively close together.
- 4 Random players will get marked with a puddle below their feet and get charmed not long after.
- As the puddle is timing out, the affected players should quickly stack together before getting charmed.
- 4 remaining players will be targeted by rectangular lasers that they need to bait away from the charmed players.
- Getting hit by this laser will result in possible death.
- Once the laser is baited away, run in front of the charmed players to block the waves coming towards them.
- After the 3rd wave attack, the laser appears once more.
- If a charmed player gets hit by the wave, he gains increased movement speed and will die to the fog in the middle.
- After 5 completed waves, charmed players regain control of their character.
- Red telegraph will appear, dodge it and you've completed the mechanic.
- 2 minutes after the cutscene of Naitreya consuming Yoho a timed mechanic will happen.
- It's not important if it's below or above 50% version of it.
- Use Sidereal:Mystic when Naitreya fully appears with its back and front attack indicators visible.
- This will skip the timed mechanic and give you a massive DPS opportunity.
- After Naitreya has consumed Velganos the previous timed mechanics no longer appear.
- They are replaced with the Timed Velganos Pizza Mechanic.
- This mechanic occurs roughly every 1 min 30sec.
- Additionally, the Team Meter is now continuously increasing.
- Blue meter → Naitreya gains power.
- Yellow meter → Naitreya loses power.
- Meter can be lowered with:
- Sidereal:Mystic
- Light pools left by Velganos mechanics.
- Successfully completing Timed Velganos mechanic.
- However, standing in dark attacks raises meter.
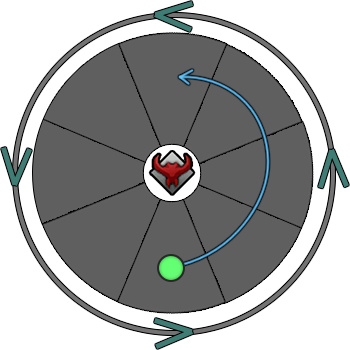
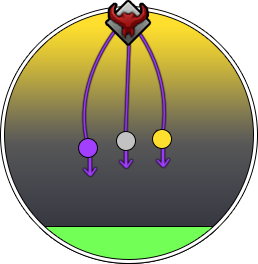
- Group up at 6 o'clock, as that is always the starting point of the pizza.
- Pay attention in which direction the dark swirl is spinning.
- Move in that direction after the 6 o'clock tile has lit up 1 by 1.
- After 5 tiles, the mechanic is complete (same as regular guardian).
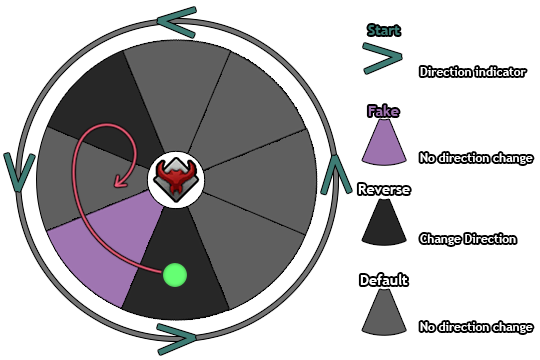
- During Hard Mode, additional tiles light up right before the start of the mechanic.
- Initially, 3 random black tiles appear.
- Then 1 of the black tiles turns purple right before the directional swirl.
- These tiles influence your direction:
- Black tile → Change direction upon reaching it.
- Purple tile → Keep going in the same direction.
- If a black tile spawns at 6 o'clock, the direction change happens immediately after it lights up.
- For example: If the dark swirl indicates a counter-clockwise rotation, then after 6 o'clock has lit up, you must go clockwise. Keep in mind, this is only true if the tile at 6 o'clock is black in the start.
Counter Patterns
Description
- Her fangs start to glow.
- She strikes twice in front, then does a spin, dashes backwards and asks for counter.
Description
- Her fangs start to glow.
- She strikes multiple times in front, then turns around to perform extra strikes and asks for counter.
Description
- Dark and light puddles are being summoned, while the boss disappears.
- She reappears and asks for counter.
Description
- Naitreya performs the basic cone attack multiple times, then asks for counter.
Description
- 6 illusions fly out from the front of the boss starting with the center, then she asks for a counter.
Notable Patterns
Description
- Naitreya crosses her fangs in front of her and stomps the ground.
- Multiple fire puddles are created, avoid them.
Description
- Naitreya stomps the ground twice.
- Dodge the first stomp, then move to where it exploded for the 2nd stomp.
- A delayed Just Guard will happen not long after.
- Listen for a hammer sound effect to time it.
Description
- A random Just Guard occurs.
- If someone succeeds, the boss strikes twice, then performs a counter.
Description
- Naitreya vanishes while spawning puddles on the ground.
- Run away and avoid her for a total of 3 grab attacks.
Description
- Naitreya vanishes while spawning puddles on the ground.
- Run away and avoid her first grab.
- If nobody was grabbed, she will reappear and perform a Veskal Scream.
- Everyone must stand completely still and the boss will get knocked down.
- Even if one person is moving, this mechanic will fail.
Description
- Two large frontal swipes that will grab you if hit.
Description
- Naitreya dashes away and throws a flaming spear where she was, creating a red telegraph that expands to her head attack position.
Description
- Naitreya strikes twice, pulls back her hand and launches 3 projectile waves.
- Then she pulls all of them to her self, this can shotgun both ways.
- This mechanic can occur later in the fight and be more deadly.
Infection Patterns
Description
- Folds his wings and performs a quick blast attack in the front, then steps back and does a cone attack.
Description
- Attacks 180° in a clockwise direction.
Description
- Naitreya attacks the front with a large cone shape.
Description
- Naitreya moves backwards while vomiting poison in front of her.
Description
- Naitreya's tail glows pink as she swings it 360° around her.
- This is a knock up, either spacebar or go out.
- Then move back in as she will attack the outside.
Description
- 4 Clones appear at intercardinal directions that perform a spin attack.
- Naitreya's tail glows pink as she swings it 360° around her.
- This is a knock up, either spacebar or go out.
- Then move back in as she will attack the outside.
- Back and front attack are safe spots at the end.
Description
- 4 Clones appear at intercardinal directions that perform a spin attack.
- Naitreya's tail glows pink as she swings it 360° around her.
- This is a knock up, either spacebar or go out.
- Then move back in as she will attack the outside.
- Both sides are safe spots at the end.
Description
- The tail lights up very bright, and slams the ground on the opposite side of it.
- Then swings wide on the other side.
- If anyone is hit by the wide swing, she performs another one to the same side.
- Head attack is safe for the entire pattern.
Description
- A pink burst of light emits from Naitreya's chest.
- Move out quickly and get ready to spacebar over the wave.
Description
- A blue burst of light emits from Naitreya's chest.
- Move out quickly and get ready to spacebar over the wave.
- There is an additional wave that comes out with a delay.
- Wait for both waves to align, then spacebar over them at the same time.
- Getting caught will imprison players.
- The boss can be co-op countered in the end.
Description
- Starts glowing purple for a brief moment, then dashes towards a random aggro target.
- Performs a slam where he dashed to.
Description
- Starts glowing purple for a brief moment, then dashes towards a random aggro target and disappears.
- Then reappears while slamming onto a random target.
- Go out, then in.
Description
- Starts glowing purple for a brief moment, then dashes towards a random aggro target and disappears.
- Leaves behind multiple red telegraphs.
- Then reappears onto a random target.
- Go out, then in.
Description
- Starts glowing blue for a brief moment, then dashes forward and back to where he came from.
- When dashing back, he attacks with two red telegraphs.
Description
- Naitreya briefly curls up, an AoE field spawns under her feet.
- Players are silenced if they're out of this field.
- She breathes twice in 180° around her.
- In the end, she throws a bomb that forms a safe zone where it explodes.
Description
- Naitreya briefly curls up, an AoE field spawns under her feet.
- Players are silenced if they're out of this field.
- She's doing a whirlwind attack, wait for her to finish it, then dash in quickly.
- In the end, she throws a bomb that forms a safe zone where it explodes.
Description
- Naitreya briefly curls up, an AoE field spawns under her feet.
- Players are silenced if they're out of this field.
- She's repeats multiple wing blasts and cone attacks, .
- In the end, she throws a bomb that forms a safe zone where it explodes.
Yoho Patterns
Description
- Blue flames swirl above the boss, then expand around her in a circle.
- An electric field expands to the outer circle, once it reaches it Just Guard.
- Avoid the follow-up cone attack.
Description
- Yoho spawns puddles outside → inside, followed by a donut shape attack.
- These puddles will imprison you if hit.
- If nobody was imprisoned during this, there is a counter.
Description
- The boss disappears and spawns multiple twisters and attacks on the field
- Getting hit by them will transform your character into a sexy fox lady (it is a bad thing).
- When she reappears, get close.
Velganos Patterns
Description
- Velganos spawns puddles outside → inside, followed by a donut shape attack.
- After this, he dashes multiple times very quickly and tries to grab players in front of him.
Description
- Velganos will emit electric fields that will stun anyone caught within them.
- Additionally, tentacles will emerge from these fields and try to interrupt you.
- If someone is stunned, he will follow up with a wide donut shape grab attack.
- No grab if nobody is stunned.
- A red donut shape attack at the very end.
Description
- Velganos glows very bright while butterfly clones dash out of him in 4 directions twice.
- After that, he requests a counter.
Description
- Naitreya emits a golden explosion while spawning a large yellow AoE field in front of him.
- Players are marked with 3 different hexagon signs:
- 6 yellow
- 1 Black
- 1 Red
- Black mark should stand inside the yellow AoE field to get eaten.
- Red mark has boss aggro and needs to stand behind the yellow AoE field (not inside it) so that the black marked player is between him and the boss.
- Yellow mark can freely attack the boss the entire time during this.
Credits
Written by Choilicious
Reviewed by Perciculum
Video Footage from Saintone