Kazeros Raid Mordum Gate 3 Guide
In Kazeros Raid Mordum Gate 3 it's all about endurance and focus. You must be on top of your game to do well in this gate.
| Normal Mode | Hard Mode | Monster Type | Weakness | Tauntable |
| 1680 Item Level | 1700 Item Level | Ancient | Earth (5%) | No |
- HP Potion of your choice
- Dark Grenade
- Sacred Charms
- Time Stop Potion
- 1 Support brings Corrosive Bomb instead of or
This guide assumes that you are familiar with the recommended Raid Build for your class.
Learn about Kazeros Raid Mordum Gate 1 | 2
Raid Rewards
| Gold | Material | Bonus Loot | Bonus Loot Cost | Auction | First Clear | |
| Normal | ||||||
| Gate 1 | 6,000 | 3x | 3x | 2,400 | 20x 3x 10x 20x | |
| Gate 2 | 9,500 | 5x | 5x | 3,200 | ||
| Gate 3 | 12,500 | 10x 5x | 10x | 4,200 | 10x | |
| Total | 28,000 | 18x 5x | 18x | 9,800 | ||
| Hard | ||||||
| Gate 1 | 7,000 | 3x | 3x | 2,700 | 20x 3x 10x 20x | |
| Gate 2 | 11,000 | 5x | 5x | 4,100 | ||
| Gate 3 | 20,000 | 10x 7x | 10x | 5,800 | 10x | |
| Total | 38,000 | 18x 7x | 18x | 12,600 | ||
Main Mechanics Overview
x475 HP - Twister #1
x425 HP - Laser
x450 HP - Twister #2
x400 HP - Twister #3
x375 HP - Break & Duel #1
x320 HP - Dome Smash
x300 HP - Supernova #1
x275 HP - Anvil [Hard Mode]
x250 HP - Break & Duel #2
x200 HP - Shield Disruption [Hard Mode]
x180 HP - Charged Field #1
x160 HP - Hammer Split [Hard Mode]
x125 HP - Charged Field #2
x120 HP - Break & Duel #3
<x120 HP - Dance Floor [Hard Mode]
<x120 HP - Supernova #2
<x120HP - Break & Duel #4
x0 HP - Last Stand [Hard Mode]
Once you have read through the detailed description of the main patterns, use the “cheat sheet” during the raid, or check out our condensed Cheat Sheet Collection for all Legion Raids on one page.
x475 HP
Twister #1
Right arm hits → 3 blue cones explode.
Left arm hits → twisters emerge.
Inside twisters spins clockwise.
x425 HP
Laser
Group up in the shrinking safe zone.
Wait until telegraph fully expands.
Move to the other side of safe zone.
Run away from the laser.
Grab red/blue orbs, dodge → donut attacks.
x450 HP
Twister #2
Right arm hits → 3 blue cones explode.
Left arm hits → twisters emerge.
Inside twisters spins counter-clockwise.
Field divided in Red/Blue/Yellow slices.
x400 HP
Twister #3
Right arm hits → 3 blue cones explode.
Left arm hits → balls emerge.
Inside balls spins clockwise.
Field divided in Red/Blue/Yellow slices.
x375 HP
Break & Duel #1
Bait Boss to break orb → Just Guard x2.
x320 HP
Dome Smash
Dodge Lightning emerging from the dome, then spacebar into it.
Collect red/blue orbs around the arena.
x300 HP
Supernova
Wait all 3 attack animations → counter.
x275 HP
Anvil
[Hard Mode] Only
Anvil drops.
Aim at it with cursor → Just Guard 3x.
In progression, use Hyper Awakening.
Timing: right before the first attack motion.
x250 HP
Break & Duel #2
Bait Boss to break orb → Just Guard x3.
x200 HP
Shield Disruption
[Hard Mode] Only
Go to the matching hammer side.
Destroy opposite incoming balls.
Use grappling hook to get to the other side.
Destroy opposite incoming balls.
x180 HP
Charged Field #1
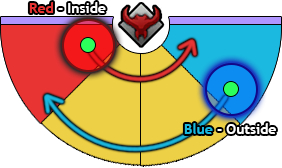
Go to the matching hammer side.
Match your color to the floor slice.
Move across the arena 1 by 1.
Red moves across inside lane.
Blue moves across outside lane.
x160 HP
Hammer Split

[Hard Mode] Only
Go to the matching hammer side.
Use  Sidereal:Bastian to break one hammer.
Re-cast aiming at the other hammer.
Check party & number for the 8 safe spots.
Swap your color if your spot differs.
x125 HP
Charged Field #2
Go to the matching hammer side.
Match your color to the floor slice.
x120 HP
Break & Duel #3
Bait Boss to break orb → Just Guard x3.
<x120 HP
Dance Floor
[Hard Mode] Only
Happens 30 seconds after 3rd stage break.
Match your color with the attacks.
Dodge to the Grappling Hook at the end.|
Mechanic is removed in Normal Mode.
<x120 HP
Supernova #2
Happens 1minute 20 seconds after 3rd stage break.
Wait all 3 attack animations → counter.
<x120 HP
Break & Duel #4
Happens 1minute 40 seconds after 3rd stage break.
Bait Boss to break orb → Just Guard x3.
Use  Sidereal: Balthor after failing 3rd Just Guard on purpose.
x0 HP
Last Stand
[Hard Mode]only
Match your color with the sphere.
Prevent red/blue orbs from reaching center.
Use Sidereal:Bastian and Re-cast it.
Raid Mechanics
Raid mechanics cover the passive mechanics that are persistent through the entire raid.
Red & Blue Charge
- At the start, players are divided evenly into 4 red and 4 blue charges.
- If these charges become uneven, the group with the higher size starts taking tick damage over time.
- Tick damage no longer occurs if the charge count is even.
- After the first natural stagger of Mordum, tick damage won't occur anymore for the rest of the fight.
Color Flip
- There are two ways to flip your charge to the opposite color:
- Reaching above 50% Electric Gauge.
- Side effect of causing large AoE damage and additional gauge buildup to your teammates of the opposite charge.
- Being inside the white Polarity Field when it expires.
- Reaching above 50% Electric Gauge.
Polarity Field

Electric Gauge
Polarity Field
- Mordum's hands will glow red/blue.
- As he claps them together, he will produce an expanding wave and spawn the Polarity Field at the same time.
- You can use paralysis immune skills to defend against the wave or spacebar it.
- 4 random players will be inflicted with lightning debuff.
- After 8 seconds, this debuff will produce a shock puddle where you stand, so bring this to the edge!
- Once the white Polarity Field telegraph has expanded fully, the player and anyone within the field will flip their charge color to the opposite one.

- This is a special gauge that can be seen underneath your character.
- It increases anytime you take damage from certain attacks or attacks from the opposite color charge of you.
- It triggers special effects:
- When reaching above 50%.
- At full gauge.
Above 50%
- Upon reaching 50% you will flip your color to the opposite charge.
- You will have a field around you that damages and gives gauge to the opposite color charge players.
- Try to avoid opposite charge players.
Full Gauge
- Upon reaching a full Electricity Gauge, you will trigger a map-wide explosion that paralyzes anyone caught within it as well as increase their gauge.
- To avoid this, either you or your teammates must take the Grappling Hook and time it as it explodes.
- If the arena is not broken, then you must run to the edge of the arena as there are no Grappling Hooks yet.
- After successfully performing counters/co-op counters in the starting phase of the fight, Mordum will give a brief window to inflict destruction to him.
- Before counters, Supports should always throw their Corrosive Bomb, to increase destruction.
- Chip away at this meter over time.
- Use Sidereal Balthor on a longer co-op counter pattern or at the 1st stage break to finish off the destruction if it hasn't been broken yet.

- When fighting Mordum, stage breaks occur at specific HP intervals, similar to Thaemine gate 3.
- Upon breaking the stage, players gain access to the Grappling Hook.
- These can be utilized on the side of the map by walking near the purple edges.
- When riding the Grappling Hook players must complete a typing test which always consists of the letter "A".
- If the stage has been broken 1–2 times, you're required to press "A" only once.
- Twice if the stage has been broken 3–4 times.
- The hook is used to avoid death from certain raid mechanics by timing it correctly.
- It goes on a 15-second cooldown from the moment of taking it.
Sidereals
 Shandi
- 3 Bar → Deals damage.
- 1 Bar → Deals damage.
Balthor
- Used at the start of the fight to break through the destruction gauge to reach omnidirectional state sooner.
- Hidden Balthor is used on the 4th stage break after failing the 3rd Just Guard.
- Timing is when Mordum has fully raised his hammers above his head.
- 3 Bar → Deals destruction & stagger damage.
- 1 Bar → Deals destruction & damage.
Bastian
- 3 Bar → Deals damage & reduces electric gauge.
- 1 Bar → Deals shield damage.
- Used for the Hammer Split mechanic in Hard Mode (potentially removed in Normal Mode).
Main Mechanics
Main mechanics occur at certain HP intervals.
Telegraph
- Mordum concentrates electricity in his right arm and smashes it to the ground, then does the same with his left arm.
Description
- Right arm hits the ground → 3 blue cone telegraphs explode.
- Left arm hits the ground → twisters emerge from where the explosion happened.
- While the twisters rotate, Mordum turns repeatedly and shoots 3 laser beams in front of him 1 by 1.
- Twisters and the laser both electrocute you, so teammates should be ready to use Sacred Charms.
- Twisters always rotate the same direction:
- Inside - clockwise
- Middle - counter-clockwise
- Outside - clockwise
- Use this to position yourself either left or right of the blue cone attack so you don't get caught off guard when the twisters come out.
Telegraph
- Mordum concentrates electricity in his right arm and smashes it to the ground, then does the same with his left arm.
Description
- Right arm hits the ground → 3 blue cone telegraphs explode.
- Left arm hits the ground → twisters emerge from where the explosion happened.
- Twisters electrocute you, so teammates should be ready to use Sacred Charms.
- Twisters always rotate the same direction (opposite from x475 Twisters):
- Inside - counter-clockwise
- Middle - clockwise
- Outside - counter-clockwise
- While this happens, Mordum will repeatedly slam the ground and divide the arena in random color pizza slices:
- Blue
- Red
- Yellow
- Stand in the same pizza slice as your color charge to avoid damage and Electricity Gauge.
- Avoid the yellow slice as that will give you a lot of Electricity Gauge as well.
Make sure before pushing the boss to x425 HP that Mordum isn't starting or is currently doing the Polarity Field mechanic (jump rope with white polarity field). If you force the x425 HP mechanic during this, the players placing puddles will most likely die.
Telegraph
- The boss opens up the ground on both sides and pulls out 2 yellow orbs that he holds above the ground.
Description
- The arena begins to shrink quickly.
- The 2 yellow orbs explode not long after and split into many smaller ones that dash across the screen.
- Players should spacebar through these when they approach, otherwise you get electrocuted.
- Be ready to use Sacred Charms to help out.
- As the arena shrinks Mordum will fire a large laser at someone.
- Everyone group up and position yourself at the very edge of the safe zone.
- Pay attention to the lasers telegraph as it expands from inside to the outer edges of the rectangle.
- When it has fully expanded the boss has locked-in his attack, and you're free to move to the opposite side of the safe spot.
- Don't run out of it before it has started to disappear!
- Start running in the opposite side of the laser along the arena.
- Inside lane deals a lot of tick damage.
- Inner/Outer lane has a clockwise rotating orb in it that slowly moves across (these stun you).
- The chasing laser is auto-death, can't timestop or hyper awaken through it.
- If you're experienced, and you trust your supports, you can stay inside lane and DR/Shield through this for DPS.
- You must grab a series of orbs on the ground matching your charge color: red/blue by touching them.
- Simultaneously, yellow donut shaped attacks will strike the middle/outer arena stage 4 times, dodge accordingly.
- Then 2 red/blue donut attacks to close out the mechanic.
- Stand in the lane that matches your charge.
- Tip: If your teammate gets knocked down by the yellow donut, make sure to Sacred Charm/cleanse him, as he won't be able to use his get-up since he will be electrocuted while on the ground and die to the chasing laser as a result.
Telegraph
- Mordum concentrates electricity in his right arm and smashes it to the ground, then does the same with his left arm.
Description
- Right arm hits the ground → 3 blue cone telegraphs explode.
- Left arm hits the ground → balls emerge from where the explosion happened.
- Balls will periodically shoot lasers out of them in a straight line,
- Since the balls and the laser both electrocute, teammates should be ready to use Sacred Charms.
- Balls always rotate the same direction:
- Inside - clockwise
- Middle - safe
- Outside - clockwise
- While this happens, Mordum will repeatedly slam the ground and divide the arena in random color pizza slices:
- Blue
- Red
- Yellow
- Stand in the same pizza slice as your color charge to avoid damage and Electricity Gauge.
- Avoid the yellow slice as that will give you a lot of Electricity Gauge as well.
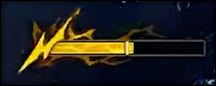
Telegraph
- Mordum's hands start glowing and a stagger bar appears.
Orb Break
- A yellow ball will spawn on the field.
- 3 random players will gain a yellow puddle below their feet, avoid touching your teammates with this!
- They disappear once the orb is broken.
- Simultaneously, one player will be marked with a
 crossed hammer symbol on his character and a debuff above his mana bar.
 - This player must stand in front of the yellow ball and bait Mordum's attack onto the orb, before dashing out.
- When Mordum raises his upper body is when you dodge!
- Make sure to not finish the stagger before the ball is broken.
- Once the ball is broken, finish the stagger and a cutscene will happen.
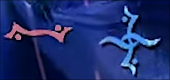
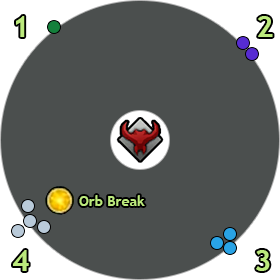
1st Duel
- Same player who was marked for the orb break must move to the quadrant marked with 1 dot on the mini-map.
- Stand in this area and await the attacks so you can Just Guard them.
- Even though there is a marked location within the quadrant, the whole quadrant works for the guard.
- You must succeed Just Guard 2x in a row.
- Each successful Just Guard does 2 billion damage.
- If the Destruction Gauge is still active, use a Corrosive Bomb and Sidereal: Balthor when Mordum completes his 2nd Just Guard.
- If Mordum has already been destroyed at this point, then use Sidereal: Bastian instead.
- He will proceed to break this quadrant shortly after and the Grappling Hook will become available on the sides.
Telegraph
- Mordum stretches out his arm and summons a dome in the center of the arena.
Description
- Pay attention to the purple stagger bar disappear from the boss → mechanic starts.
- After he creates the dome, blue telegraphs will shoot out trying to stun you.
- Dodge them and move into the dome quickly.
- Mordum will smash and anyone caught outside the dome will die.
- Red/Blue orbs will spawn across the arena, gather the orbs that match your color.
- Picking up the opposite orb will raise your Electricity Gauge.
- Orbs not gathered in time will turn into fields that raise your gauge if you walk into them.
- Pay attention to the boss while gathering orbs, as Mordum will continue fighting during this.
Telegraph
- Mordum fuses his hammers together and enters a swinging motion.
Description
- This is a 3 phase charging attack that can be countered.
- Do not counter during phase 1 & 2 of the attack, everyone will die!
- Be mindful of your DPS rotation if it contains a counter in it, so you don't accidentally press it by muscle memory.
- Each consecutive phase, Mordum moves his hammer further back.
- Don't panic as he stops between each phase so it's easy to tell apart.
- When the hammer is at the very back and is surrounded by massive yellow orb → counter.
Telegraph
- Mordum raises his left arm, a text box appears.
Description
- After the text box appears, a large red circle telegraph spawns an anvil in front of Mordum.
- If anyone is hit by the telegraph, it's instant death.
- Shortly after, he uses his right arm to smash the anvil 3 times in and requests Just Guards.
- Note that this mechanic is removed from Normal Mode.
- You must aim your cursor at the anvil to successfully Just Guard.
- First two Just Guards are back to back, the 3rd has a slight delay.
- Everyone has to succeed all 3 Just Guards to complete the mechanic.
- If someone fails to Just Guard they get stunned, teammates should cleanse them, because Mordum will do up to 3 follow-up Just Guards depending on how many players failed.
- Mordum turns towards the players who failed their Just Guard and tries to squish them from both sides.
- This attack needs to be Just Guarded at the moment of the impact.
- You must aim your cursor at the boss for these guards!
Hyper Awakening (Progression friendly)
- Use your hyper awakening the exact moment Mordum raises his right arm and tries to go for the first anvil hit.
- If everyone does this, then this mechanic cannot be failed and is advised in 1st/2nd week progression runs.
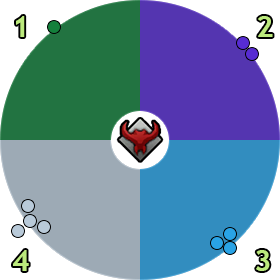
Telegraph
- Mordum's hands start glowing and a stagger bar appears.
Description
- Check x375 - #1 Duel Break for reference, as the mechanic exactly the same.
- Check if you have the mark debuff → bait orb attack.
- Just Guard happens in the quadrant with 2 dots.
- Instead of 2 times, you must Just Guard 3 times now.
- Only half the stage remains.
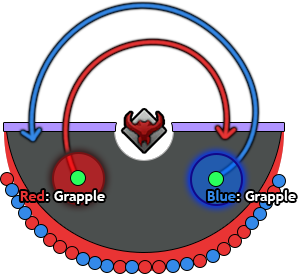
Telegraph
- Mordum speaks and his arms turn red/blue.
Description
Red: Grapple
Blue: Move across
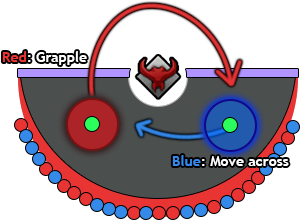
Red/Blue both use grapple
- Normal Mode: This mechanic removed.
- Before this mechanic begins, you should move to the color hand that matches your charge.
- Mordum smashes his arms together, forming an electric field on the outer side.
- Then he slams his arms down, spawning red/blue orbs on the outside, slowly moving towards the boss.
- Players gain a large static field matching their color.
- With this field, you must touch opposite color orbs to destroy them before they reach the boss.
- Each orb that reaches the boss grants shield to Mordum.
- (HM only) Small yellow balls will move across the arena, these electrocute you.
- There are two ways of completing this mechanic, choose whichever works best for you.
- The option with one team walking tends to clear more orbs and generate less shield.
Red & Blue Grappling Hook
- Players destroy the opposite orbs on their sides, then everybody takes the Grappling Hook to swap sides and destroy the remaining orbs left.
Red Grappling Hook/Blue Walk
- Red team destroys the opposite color orbs on their side → take the Grappling Hook.
- Blue team destroy their orbs and instead of using Grappling Hook, they simply move across the stage to the other side.
Telegraph
- Mordum's arms turn red/blue.
Description
- Before this mechanic begins, you should move to the color hand that matches your charge.
- Mordum will slam the ground 4 times, creating safe zones across the 4 pizza slices alternating their colors.
- Stand in the matching colored slice!
- The slice can also be yellow, it will deal damage and raise your Electricity Gauge if hit by it.
- Players are surrounded by a static field matching their color, to avoid overlapping damage from the fields:
- Red players move across the inside of the arena
- Blue players move across the outside of the arena
Telegraph
- A radio message starts playing, Mordum throws his red and blue hammers across the field.
Hammer Split
- Normal Mode: This mechanic removed.
- Before this mechanic begins, you should move to the color hand that matches your charge.
- Both hammers will reappear on the far corners of the arena and the boss needs to be staggered.
- Use Sidereal:Bastian next to one of the two hammers → Re-cast while aiming at the second hammer.
- It's crucial to aim the re-cast properly so it destroys the hammer and hits Mordum at the same time.
- After staggering the boss, a safe zone mechanic happens.
8 Safe Zones, Polarity Flip
- Normal Mode: This mechanic removed.
- Each player is assigned a specific safe spot based on their party number.
- Before the mechanic happens, make sure to check which spot is yours and what is your current color.
- The 8 safe zones will spawn, you must quickly identify if your safe zone is matching your color or not.
- If it matches, move away from the boss and the center of the arena and wait for your time to move back.
- If it doesn't match, move close to the center and close to the boss.
- The closet player gains the Polarity Swap Field (white AoE).
- All players who's safe zone doesn't match their current color must enter this Polarity Field to change it to the correct one.
- Once that is done, everyone quickly move to their assigned safe spots, and you're done!
- Only leave your safe zone after the 2nd strike from Mordum, 1st one is a fake-out.
- Shortly after the mechanic ends, another Polarity Field will appear to let you swap color if needed.
Telegraph
- Mordum's arms turn red/blue.
Description
- Before this mechanic begins, you should move to the color hand that matches your charge.
- Mordum will slam the ground 4 times, creating safe zones across the 4 pizza slices.
- Stand in the matching colored slice!
- The slice can also be yellow, it will deal damage and raise your Electricity Gauge if hit by it.
- In some cases, all 4 slices can simultaneously be either blue, red or yellow for one attack.
- If this occurs, simply tank the incoming DMG and do not take the Grappling Hook.
- There is a high chance Mordum will do the slow moving tracking laser after this mechanic, where Grappling Hook is needed, so if you use it during the pizza slices you'll die to the laser with no outplay potential.
- There are no static fields this time, instead random players get lightning puddles that they need to place outside.
Telegraph
- Mordum's hands start glowing and a stagger bar appears.
Description
- Check x375 - #1 Duel Break for reference, as the mechanic exactly the same.
- Check if you have the mark debuff → bait orb attack.
- Just Guard happens in the quadrant with 3 dots.
- Instead of 2 times, you must Just Guard 3 times now.
- Only 1/4th of the stage remains.
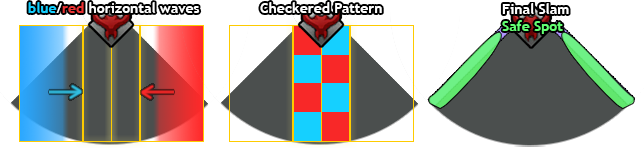
Telegraph
- Mordum turns his hammer upside-down and stabs the handle into the ground.
Description
Happens 30 seconds after the 3rd Stage Break.
[Hard Mode] Only Mechanic.
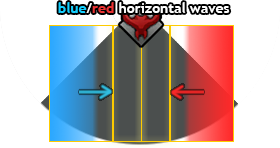
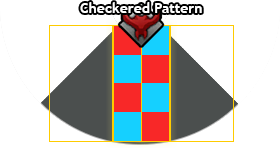
Horizontal Waves
Checkered Pattern
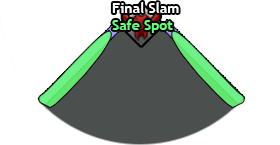
Safe Spot
- He creates two rectangle safe zones in the middle.
- Check your color and stand in between both safe zones so you can react in time.
- Mordum will do 3 different attacks during this:
- Incoming red/blue horizontal wave from outside.
- Red/Blue checkerboard
- Vertical Mordum hammer slam
- You must dodge/survive a total of 6 attacks:
- 4 color related attacks
- 2 Mordum hammer slams
- It is more important for Supports to Awaken/DR/Shield during this, than dodge.
- One player will gain the Polarity Field, this player should move to the back of the dance floor ideally.
- After these 6 attacks have happened, you must leave the center and run to the Grappling Platform on the side.
- However, don't use it, simply stand there to avoid the final slam.
Telegraph
- Mordum fuses his hammers together and enters a swinging motion.
Description
Happens 1minute 20seconds after the 3rd stage break.
- Same as the x300 HP Supernova.
- When the hammer is at the very back and is surrounded by massive yellow orb → counter.
Telegraph
- Mordum's hands start glowing and a stagger bar appears.
Description
Happens 1minute 40seconds after the 3rd Stage Break.
- Check x375 - #1 Duel Break for reference, as the mechanic exactly the same.
- Check if you have the mark debuff → bait orb attack.
- Just Guard happens in the tile you're standing, as it's the only one left.
- You must Just Guard 3 times now.
- Two possible strategies when Just Guarding:
Hidden Balthor
- To utilize Hidden Balthor, the marked player responsible for Just Guarding must fail the 3rd guard.
- Then use Sidereal: Balthor, cast it when Mordum lifts both of his arms above his head while holding the hammer.
- When the 3rd guard is failed, Mordum will slam the ground with a massive AoE attack, to avoid it either:
- Push immune
- Take Grappling Hook (timing is after 2nd completed guard).
Complete Just Guards → Shandi
- If the raid damage is extremely high and the boss is around x20 HP when the Just Guard starts, simply complete all 3 guards and use Sidereal: Shandi to push x0 as soon as possible (less risky, but requires insane dps).
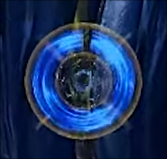
Description
- After reaching x0 a cutscene happens, you are transported to a new arena with a massive sphere in the center.
- Various telegraphed attacks will try to hinder you from damaging the sphere.
- Red/Blue orbs will fly towards the center, if absorbed, granting the sphere bonus damage against you.
- Gather the colored orbs with your matching color and DPS the boss.
- When the sphere is:
- Yellow → everyone can attack.
- Red → red attack.
- If blue attack during this, they will receive somewhat insignificant dot damage.
- Thankfully, a Polarity Field spawns on players quite often, so utilize it to swap to red if needed.
- Use Sidereal: Bastian and re-cast as soon as you have 4 bars and continue until the shield is depleted.
Counters
Description
- Mordum stretches his hands, and either red or blue lightning shoots out of his body and the surroundings.
- Shortly after, you can counter him.
- Only players with the same color should counter the boss, e.g. blue → blue and red → red.
- Puddles that appear don't hurt same color players, but do electrocute the opposite color.
- If the opposite color counters, Mordum retaliates.
Description
- Mordum spreads his hands to the side and channels lightning into the ground, shortly after it branches out onto the ground.
- 2 man co-op counter appears after the blue telegraphs.
Description
- The boss charges a slam in his left hand, then requests a counter, immediately after he requests another counter.
Phase1 Attacks
Description
- Mordum smashes the ground in front of him targeting a player, then repeats the attack again.
Description
- Mordum smashes the ground in front of him while his body glows yellow, if someone is hit he follows up with a laser.
Description
- Mordum leans forward and scratches the ground back to him, then attacks where he scratched.
Description
- Hits the ground in front of him, then proceeds to swing 180° to the back, grabbing anyone in his path.
- If someone is grabbed, Mordum smashes them front and back repeatedly.
Description
- Mordum smashes both arms in front of him, then closes them together quickly, grabbing anyone caught.
- If nobody is hit, there is no follow-up attack.
- If someone is grabbed, he requests a Just Guard and needs to be staggered.
Description
- Mordum forms a yellow ball and squishes it, twisters expand from it in all directions.
- Shortly after, he smashes the ground in a donut shape across 2 of the 3 layers randomly.
Description
- Mordum spawns a lot of lightning puddles, then a Just Guard ring expands.
Description
- Mordum puts his hands flat on the surface and channels lightning into the ground.
- 2 Lightning cones will appear.
- The safe spot is where his initial hand channeling location was.
Description
- Mordum spreads his arms to the sides while shooting lightning everywhere.
- 4 Pizza slices emerge 1 by 1.
- Simultaneously, orbs spin around, shooting lasers periodically.
- Remember the order and dodge accordingly.
Phase2 Attacks
Description
- Mordum attacks twice at a target, leaving behind an AoE shock puddle.
- The 2nd hit generates small twisters that spread outwards (front of boss safe).
Description
- Mordum turns his hammer upside down and slams twice onto the arena.
- 1st attack is safe inside & outer layer
- 2nd attack is safe in the middle.
Description
- The boss flips his hammer upside down while charging it.
- A red circle AoE spawns while 3 players get aggroed with yellow cone attacks.
- Mordum will smash the ground twice.
Description
- Mordum holds his hammer in one hand while charging it for an extended period of time.
- Then he smashes it into the ground and does a follow-up explosion.
- This attack does huge damage, so beware.
Description
- The boss raises his hammer behind his back with one hand while charging it in red or blue.
- Then smashes the ground, creating 2 safe zones.
- Careful of the hammer impact itself, as that does lots of damage.
- The color matching his hammer is always inside safe, while the opposite color is outside safe.
Description
- The boss raises his hammer above his head with two hands while charging it in red or blue.
- Then he strikes the ground and divides the arena in red /blue pizza slices.
- Careful of the actual hammer impact location itself, as it does damage.
- The pizza slice right in front of him is matching his hammer color.
- Other slices alternate their colors from this point.
- The ground remains static for a few seconds after the slam, so stay in your pizza slice to avoid dot dmg.
Description
- Mordum puts his hands together and creates two hammers while swinging with one of them.
- Go to the side of the attacking hand.
Description
- Mordum looks down at a player while raising his both hammers above his head, then smashes them to the aggro location.
- Simply dodge to the side.
- This attack has a variation where he strikes 3 consecutive times with one hand, leaving behind shocked ground.
- Safe zone is his striking hand side.
Description
- Mordum's hammers glow red/blue as he holds them together above his chest.
- He will strike each side with the color of the hammers.
- Simply match your color with the hammers.
Description
- Mordum smashes the ground with the flat side of both hammers.
- He then claps them together, inflicting insane amounts of damage to players caught in it followed by an explosion.
- Based on the location where the initial smash happened, determines the explosion.
- If he smashed inside → outside safe
- If he smashed outside → inside safe.
Description
- Mordum throws his hammers at a target 3 times, then shows red/blue hands.
- Color showed by his hands is inside safe, opposite is outside.
Description
- Mordum throws his hammer behind his back, when it clashes with his other hammer it creates an X telegraphed attack.
- Close to the front is safe.
- In the final phase, this attack does an additional slam that is safe if you hug the front attack indicator of the boss, otherwise you need to dodge or push immune it!
Description
- Mordum throws both of his hammers around his back, when they return they slam the outer side.
- Inside safe.
Phase3 Attacks
Description
- Mordum starts glowing either red or blue, then spreads his arms and pulls them to his chest.
- Matching color players can look at the boss, the opposite color has to look away.
- If the wrong color looks at the boss, he will shoot a frontal laser.
Description
- Mordum channels, a similar laser to the x425 Laser mechanic.
- Stand either left or right of this beam while moving towards the Grappling Hook spot.
- If the beam turns towards your side when its fully charged, take the Hook and swing around.
- If it doesn't turn towards you, just DPS.
Description
- The boss turns yellow then tries to grab players with his right arm.
- If someone is grabbed, he will do a delayed counter.
Description
- Mordum smashes the ground with his arm and pushes players next to it to the side.
Description
- Mordum's arms start glowing yellow as he smashes them together.
- He proceeds to swing with his left arm and generate multiple waves going clockwise.
- Finally he slams in front of him, generating a yellow donut telegraph with 2 safe spots:
- Inner ring (wait after his slam to move into this spot).
- Outer ring (pre-position yourself on the outer edge and adjust for the safespot).
Description
- This attack only appears when 1/4 of the platform is remaining.
- Mordum moves his hammer hand across his body behind his back, getting ready for a swing.
- Then swings in front of him, knocking anyone who doesn't use Push Immunity off the map.
Credits
Written by Choilicious
Reviewed by Perciculum
Video Footage from Saintone