Echidna Gate 1 Guide
The first gate of Echidna is relatively simple and straight forward compared to Thaemine gates. Only Hard Mode requires additional communication between the teams to resolve certain mechanics.
| Normal Mode | Hard Mode | Monster Type | Weakness | Tauntable |
| 1620 Item Level | 1630 Item Level | Human | Fire | Yes |
- HP Potion of your choice
- Sacred Charm
- Highest stagger party: Whirlwind Grenade
Other Party: Dark Grenade - Atropine Potion or Stimulant
This guide assumes that you are familiar with the recommended Raid Build for your class.
Learn about Echidna Gate 2.
Raid Rewards
| Gold | Material | Bonus Loot | Bonus Loot Cost | Auction | First Clear | |
| Normal | ||||||
| Gate 1 | 6000 | 3x | 3x | 2,200 | 10x | |
| Gate 2 | 10000 | 6x | 6x | 3,400 | 5x | |
| Total | 16000 | |||||
| Hard | ||||||
| Gate 1 | 7000 | 3x | 3x | 2,800 | ||
| Gate 2 | 12500 | 6x | 6x | 4,100 | 5x | |
| Total | 19500 | |||||
Main Mechanics Overview
x180 HP - First Encounter
x162 HP - Run Phase
x135 HP - Clone Split
x110 HP - Invasion
x90 HP - Mini Boss
x90 - x50 HP - Safezone
x50 HP (Either Boss) - Smoke and Stagger
x55 HP - Final Phase
Once you have read through the detailed description of the main patterns, you can use the cheatsheet during the raid, or check out our condensed Cheat Sheet Collection for all raids on one page.
x180 HP
First Encounter
Avoid Flame Breath, Stun and Grab
Kill both Elite Mobs next to the Boss
Use Ally Skill: Azena on Boss after his shield breaks
x162 HP
Run Phase
Reach Boss before time runs out
Stagger Boss
Use Ally Skill: Azena whenever it is available
x135 HP
Clone Split
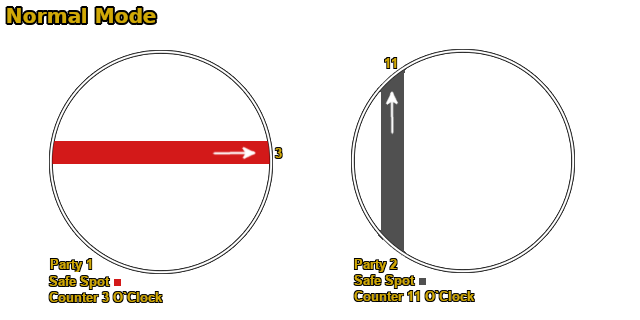
Safe spot on odd colored line
4th odd colored line points to Counter location
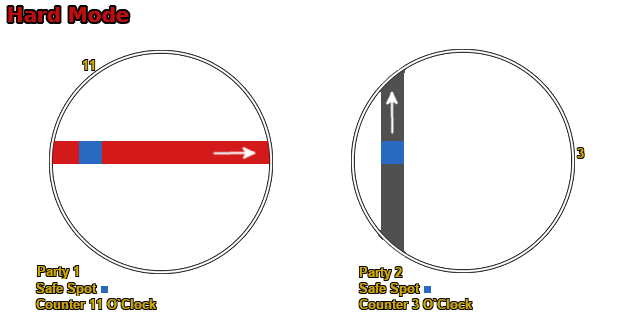
Safe spot on overlap of odd colored lines
4th odd colored line points to Counter location of the other party
x110 HP
Invasion
Use Ally Skill: Avele next to Boss
Wait for mobs to close in and use Follow-up Ally Skill
Kill remaining mobs before they explode
x90 HP
Mini Boss
Highest stagger party moves to Mini Boss
Use Whirlwind Grenade (Bound) and stagger Mini Boss
x90 - x50 HP
Safe Zone
Mini Boss Party writes safe spot in chat
Center or Outside Vertical ⇾ I or V
Center or Outside Horizontal ⇾ - or H
Clockwise Spin:
Center Vertical or Horizontal
Counterclockwise Spin:
Outside Vertical or Horizontal
x50 HP
(Either Boss)
Smoke and
Stagger
Mini Boss Party:
Kill all Mobs to reveal smoke color
Write color in chat
Stagger Mini Boss and escape
Main Boss Party:
5 stacks required to reveal censer
Pass tether before 10 stacks
Destroy censer called out by other party
Use Ally Skill: Avele & Follow-up to remove Boss' shield
x55 HP
Final Phase
Use Ally Skill: Azena or Avele once ready
Hard Mode: Interact with censer and rotate debuff before it stacks to 100
x180 HP
First Encounter
Avoid Flame Breath, Stun and Grab
Kill the Elite Mobs next to the Boss
Use Ally Skill: Azena on Boss after his shield breaks
x162 HP
Run Phase
Reach Boss before time runs out
Stagger Boss
Use Ally Skill: Azena whenever it is available
x135 HP
Clone Split

Safe spot on odd colored line
2nd odd colored line points to Counter location
x110 HP
Invasion
Use Ally Skill: Avele next to Boss
Wait for mobs to close in and use Follow-up Ally Skill
Kill remaining mobs before they explode
x90 HP
Mini Boss
Use Whirlwind Grenade (Bound) and stagger Mini Boss
x50 HP
Final Phase
Use Ally Skill: Azena or Avele once ready
Avoid standing in the red fog area at the edge of the arena.
Ally Skills
This is a new system introduced in this Legion Raid. The Ally Skill Bar at the top left has 5 segments, which fill up over time or through specific patterns. After activating an Ally Skill, you can use a unique follow-up skill within 20 seconds. Main skill consumes 3 segments and follow-up skill consumes 1 segment upon cast.
Azena (Highest Damage)
- Main Skill: High Damage in a straight line
- Follow-up Skill: Damage and Freeze
Avele (High Damage on Shield)
- Main Skill: Damage in a circle
- Follow-up Skill: Damage covering the entire field
Thar (Highest Stagger)
- Main Skill: Damage and Stagger
- Follow-up Skill: Push Immunity & Incoming Damage Reduction Buff
Main Mechanics
Main mechanics occur at certain HP intervals.
Telegraph
- Mobs spawn between the players and the Boss. Some mobs can stun the players. (Blue Telegraph)
- The Shadow of a big dragon flies over the battlefield, followed by a flame breath attack.
- Periodically, small dragons fly over the battlefield and try to grab players. (Yellow Telegraph)
- Two elite mobs connected with a line to the boss prevent him from taking any damage.
Description
- Party 1 runs towards the left elite mob (top) and Party 2 towards the right one, and try to kill both as soon as possible.
- While doing so, dodge the stuns and grabs of the normal mobs. And avoid standing in the flame breath path.
- After killing both elite mobs, raid lead should use Ally Skill: Azena on the Boss after his shield gets taken down by Avele.
Telegraph
- Boss teleports away.
- A timer appears on the top left of your screen.
Description
- Use the jump interaction on the right side of the battlefield to move towards the new area.
- Kill mobs on the way and avoid getting hit by AoEs.
- Upon reaching the big dragon, stay close to it, while dodging its attacks and kill it.
- After reaching the boss, deplete his stagger bar.
- Whenever you have at least 3 segments on the Ally Skill Bar, use Ally Skill: Azena on the boss.
Telegraph
- Boss teleports to the center and disappears.
- The parties get separated.
- Four waves of lines appear. Each wave has one line, which has a different color than the rest.
- One party will only see horizontal lines, the other only vertical ones.
- At the end of each wave, a clone runs through the field on each of the lines, followed by a big AoE attack.
- After the fourth wave, boss appears at a specific spot for each party and requests a coop counter.
No communication between the parties required.
Description
- To avoid taking damage from the AoE at the end of each wave, stay on the odd colored line, which creates a safe spot after getting hit by the running clone.
- During the 4th wave, pay attention to the flow direction of the odd colored line, since it points towards the location where the boss will appear for the coop counter.
- Once you stand on the line, move towards the flow direction until you reach the edge of the circle.
- Wait for the clones to run past the lines and prepare to coop counter the boss.
Communication between the parties is mandatory.
Description
- To avoid taking damage from the AoE at the end of each wave, everyone needs to stay on the spot on which the odd colored line from each side overlap. If successful, a safe spot is created upon collision with the running clone.
- To find the correct spot, each party should move to their odd colored line first.
- Afterward, move on that line towards the members of the other party displayed on the minimap.
- Tip: By knowing, that the other party has the opposite line orientation (vertical or horizontal), you can pinpoint the safe spot by looking at the minimap as soon as both parties steps on their odd colored line.
- During the 4th wave, pay attention to the flow direction of the odd colored line, since it points towards the location where the boss will appear to request a coop counter for the other party.
- Write the clock position in the chat to inform the other party where the boss will appear for their coop counter.
- Once you stand on the odd colored line, wait for the clones to run past the lines and move immediately to the clock position written by the other party to coop counter the boss.
Telegraph
- Armen speaks and his dialogue is displayed at the bottom of your screen.
- Mobs spawn outside the Battlefield and rush towards the players.
- After a short duration, surviving mobs on the field explode and hit players in a big area.
Description
- As soon as you see Armen's dialogue, use Ally Skill: Avele while standing close to the boss.
- Wait for the mobs to move closer to the Boss and use the Follow-up Ally Skill.
- Make sure to cast it within 20 seconds after using Ally Skill: Avele.
- If mobs survived the Ally Skills, focus and kill those fast, before they explode.
Telegraph
- A Cutscene plays.
- Interaction at the southern edge of the battlefield becomes available, which leads to the Mini Boss.
Description
- The party with the highest stagger should use the jump interaction in the south to move immediately to the Mini Boss.
- Use Whirlwind Grenade (Bound) and stagger skills on the Mini Boss to prevent a wipe.
Telegraph
- In specific intervals, the Mini Boss teleports to the center and her folding fans start to spin around her for a few seconds.
- Huge fans fly horizontally or vertically in a big area and deal massive damage to everyone in their path.
- After a brief delay, a clone of the Mini Boss appears on the other team's battlefield to mirror the same attack.
Description
- On the Mini Boss' side, where this pattern occurs first, it is easier to move to the safe spot. That party should write in the chat and inform the other party about their safe spot. For easier communication of the safe spots, you may type the following letters in the chat:
- Center or Outside Vertical ⇾ I or V
- Center or Outside Horizontal ⇾ - or H
- The party on the Main boss side, needs to pay attention to the fan's roation direction and combine it with the orientation written by Mini Boss' side party.
- If they wrote I or V and fans rotate clockwise ⇾ safespot is center vertical
- If they wrote I or V and fans rotate counterclockwise ⇾ safespot is outside vertical
- If they wrote - or H and fans rotate clockwise ⇾ safespot is center horizontal
- If they wrote - or H and fans rotate counterclockwise ⇾ safespot is outside horizontal
- In case there are any issues with the communication, the party on the Main Boss' side should know the following things to avoid taking too much damage.
- If the fans around the clone rotate clockwise, then there is always a safe spot in the center.
- If they rotate counterclockwise, there are safe spots at x3+1 positions at the edge of the map.
Telegraph
- If one of the Bosses reaches x50 HP, the Mini Boss disappears and summons a censer and a lot of mobs.
- The Main Boss surrounds himself with a purple shield and tethers a random player.
Description
- The party at the Mini Boss' side should kill all the mobs on the field to reveal the color of the smoke of the censer. It can be either red or black. Write the color in the chat as soon as it gets revealed.
- Important information regarding the tether:
- Tethered player is more likely to get targeted by the boss.
- Tethered player gets a stacking slow debuff, which imprisons the player at 10 stacks.
- Once a player has 5 or more stacks, everyone in the team can see nearby hidden censers and their smoke color.
- Another player can take over the tether by breaking the teather.
- As soon as the Mini Boss team writes the color of the smoke in the chat, spread out and try to find the censer with the matching color and destroy it.
- While searching, make sure to pass the tether to a different player before it stacks to 10 on a player.
- Additionally, keep in mind, that the tethered player needs to have at least 5 stacks, so that everyone in his team can see the hidden censers.
- Once the correct censer is destroyed, the Mini Boss' location gets revealed. The party at her side needs to use Whirlwind Grenade (Bound) and stagger skills on the Mini Boss to prevent a wipe.
- After the successful stagger, the party on the Mini Boss' side needs to flee from the area before it gets destroyed. Use the jump interaction at 7 O'Clock and return to the main battlefield and support the other party.
- Meanwhile, the Main Boss will try to cast a wipe attack. To prevent it, you need to remove his shield by dealing damage. Use Ally Skill: Avele & Follow-up Ally Skill on the main boss. If necessary, use Atropine Potion.
- Hard Mode only: Boss reflects damage dealt to his sides.
Telegraph
- Cutscene gets played.
- A red fog surrounds and shrinks the battlefield.
Description
- Touching the red fog deals high damage to the player.
- Normal Mode: Proceed as usual and bring down Boss' HP to x0 to clear this gate.
- Use Ally Skill: Azena or Avele whenever it is ready.
Hard Mode:
- A censer spawns at 12 O'Clock, which deals massive damage and applies a stacking damage increase debuff to everyone periodically.
- To prevent the censer from dealing damage, a player needs to interact with it.
- That player gets a stacking debuff, which also increases the chance of being targeted by the boss.
- If it stacks to 100, the boss performs a special pattern and executes the player.
- You can remove the stacks by interacting with the censer again. At the same time, you get a different debuff (Red Aura) for a minute. During this time, if you interact with the censer again, you die.
- Ideally, you assign 2 supports and a DPS to take, return and rotate the censer debuff between each other.
- If there are too many Puddles on the battlefield, a player can forcefully trigger the 100 stack execution pattern to sacrifice themselves and to remove all puddles.
Counter Patterns
Telegraph
- This pattern only occurs during the Final Phase.
- Boss summons a big blood orb in front of him, which explodes shortly after.
- Blood puddles drop on each player 4 times.
- Boss glows purple and requests a coop counter.
Description
- As soon as you see the red orb, avoid standing in front of him to create space for the coop counter.
- Ideally, move far away together and make sure to return to the boss right after the 4th puddle drops to succeed the coop counter.
Telegraph
- The boss performs a whirlwind attack.
- Variant 1: The first glows blue after 2-3 turns and requests a counter.
- Variant 2: The boss stops briefly, before performing another set of enhanced whirlwind attacks.
Description
- The counterable variant's first set of attacks are slower and are accompanied by wind effects around the boss.
Telegraph
- Boss drives his sword into the ground and creates a small red aura below him.
- Red ring shaped lines appear around the boss in 3 waves, which explode after a short delay.
- Variant: This attack can be accompanied by lines which lock onto each player and shoot lasers.
- Boss swings his sword twice and requests a counter.
Description
- Don't stay too close to the boss and dodge the 3 eaves of explosions.
- Variant: Run around the boss while dodging the ring explosions to also dodge the lines.
- Wait for the two swings before you close the gap to counter.
Notable Patterns
Telegraph
- Only occurs between x130 - x55 HP
- The boss tries to absorb an NPC to turn them into a monster.
- There are 3 different absorption patterns, and each requires are different action from the players to prevent the absorption.
- Upon saving the NPCs, the players get a short 10% AP buff.
Telegraph
- A green mist briefly surrounds the boss, before he teleports to a random NPC.
- 4 Clones appear around that NPC and prepare a swing the sword for an attack towards the NPC.
- One of the clones is the real boss, who requests a counter.
Description
- Only the boss has a red outline, so make sure to use your counter skill on that one.
Telegraph
- The boss extends his arm and creates a green cone in front of him.
- He locks this attack on a random player and traces that player's movement for a few seconds.
- Afterward, he absorbs everything in the cone's area.
Description
- The targeted player should turn and point the cone away from all the NPCS.
- Dodge out of the cone as soon as the boss moves his arm.
Telegraph
- The boss teleports to the center, and a green mist surrounds him.
- Green smoke wall consisting of multiple segments moves from outside towards the center.
- Any NPC touched by the segments will be absorbed.
Description
- As soon as this pattern starts, locate the NPCs and try to absorb the smoke segments before it touches them.
Telegraph
- 2 players will be marked with a red circle above their head, and 2 others will be marked with a red mist below their feet.
- Boss summons 2 red orbs, which follow the 2 players marked with the red circle. Upon contact, they explode in a huge AOE, with a small safe spot in the center.
- Blood drops multiple times from above on the players marked with the mist.
Description
- The players marked with the orbs should run away from their teammates and group to trigger and overlap the orb explosion area.
- The players marked with the mist should move away from the teammates and should keep moving until the pattern ends.
Telegraph
- Boss rests his swords on his shoulder for a brief moment and jumps into the air.
- Boss throws his sword towards the ground and follows it after a brief delay.
- Blue telegraph surrounds the boss in a huge area and earthquakes everyone shortly after.
Description
- Avoid standing on the sword impact spot until the boss lands on it.
- Avoid the earthquake, either with a timed spacebar or by running out of the blue telegraphed area.
Telegraph
- Boss rests his swords on his shoulder for a brief moment and jumps back while swinging his sword towards the front.
- He performs a 360° swing attack, followed by a big explosion with a safe spot close to the boss.
- Boss throws his sword into the air, follows and grabs it after a second and slams towards the ground on a blue telegraphed area.
- He drives his sword deeper into the ground and creates another big explosion, with a safe spot close to the boss.
Description
- Stay close to the boss until he throws the sword.
- Avoid the small blue telegraphed area on the impact point.
- As soon as the blue telegraph disappears, move close to the boss to avoid the final explosion.
Telegraph
- The boss slowly draws his sword towards the back while tracking a player.
- Boss slams his sword towards his front.
- Option 1: If the initial attack hits a player, that player will be hooked.
- Option 2: If none got hit, the boss swings his sword in a large yellow telegraphed area and hooks everyone hit on his sword.
- Boss moves a few steps while dragging the hooked players behind him and performs multiple slash attacks on those players.
Description
- The Targeted player should turn the boss away from the other players.
- If none gets hit by the initial attack, everyone should move away from the boss to avoid being hooked.
- Optional: A tanky or support player can let them get hit by the attack to create a short dps window for the others.
Telegraph
- Boss moves his right arm towards his back and his left hand glows red for a brief moment.
- A small yellow telegraph appears around the boss, followed by a grab attack.
- If anyone got grabbed, the boss throws them in front of him and slashes 3 times towards the players.
- He finishes the combo with a leap attack, which causes a delayed star shaped explosion.
Description
- As soon as you see his left hand glowing red, move away from the boss to dodge the grab.
- If you got grabbed, spam spacebar, since there is a small window between the slashes, which allows you to escape the combo.
- Avoid standing in the star shaped final explosion.
Telegraph
- This pattern only occurs during the Final Phase.
- Periodically, the boss summons red circles below each player.
- After a short delay, a puddle is placed below each player.
Description
- Group up and place the puddles away and at the edge of the battlefield.
- Avoid standing in the puddles, since they deal tick dmg as long as you stand on them.
- If there are too many puddles on the battlefield, consider sacrificing a player to remove them all as explained in the Main Mechanics ⇾ Final Phase.
Telegraph
- Boss leaps into the air and disappears for a brief moment.
- A red telegraph covered by black smoke appears below each player's feet.
- Boss returns to the ground.
- The red area explodes and deals high damage after a brief delay.
- If a player gets hit, a puddle is created.
Description
- Move away from the black smoke and wait for the explosions to occur.
Mini Boss Patterns
Telegraph
- She points her folding fans towards the front and glows blue.
Description
- This pattern has a huge counter window, and it should be easy to interrupt the attack on time.
Telegraph
- Boss charges in a direction and summons 4 folding fans around her.
- 4 red telegraphs appear around the boss, followed up by the fans shooting lasers towards the telegraphed area.
Description
- Stay away from the red telegraphed area to avoid getting hit by the lasers.
Telegraph
- 4 fans appear further away from the boss and start to rotate.
- Red telegraphs appear in 2 waves surrounding the boss followed up by an explosion.
Description
- The red telegraphs have 2 small, narrow safe spots, which rotate 90° after the first explosion. Use the safe spots to avoid taking damage.
- You can also jump outside the affected area, as soon as you see the 4 fans around the boss.
Solo Mode Main Mechanics
Telegraph
- Mobs spawn between the players and the Boss. Some mobs can stun the players. (Blue Telegraph)
- The Shadow of a big dragon flies over the battlefield, followed by a flame breath attack.
- Periodically, small dragons fly over the battlefield and try to grab players. (Yellow Telegraph)
- An elite mob connected with a line to the boss prevent him from taking any damage.
Description
- Run to the elite mob, and try to kill it as soon as possible.
- While doing so, dodge the stuns and grabs of the normal mobs. And avoid standing in the flame breath path.
- After killing the elite mob, use Ally Skill: Azena on the Boss after his shield gets taken down by Avele.
Telegraph
- Boss teleports away.
- A timer appears on the top left of your screen.
Description
- Use the jump interaction on the right side of the battlefield to move towards the new area.
- Kill mobs on the way and avoid getting hit by AoEs.
- Upon reaching the big dragon, stay close to it, while dodging its attacks and kill it.
- After reaching the boss, deplete his stagger bar.
- Whenever you have at least 3 segments on the Ally Skill Bar, use Ally Skill: Azena on the boss.
Telegraph
- Boss teleports to the center and disappears.
- Two waves of lines appear. Each wave has one line, which has a different color than the rest.
- At the end of each wave, a clone runs through the field on each of the lines, followed by a big AoE attack.
- After the second wave, boss appears at a specific spot and requests a counter.
Description
- To avoid taking damage from the AoE at the end of first wave, stay on the odd colored line, which creates a safe spot after getting hit by the running clone.
- During the 2nd wave, pay attention to the flow direction of the odd colored line, since it points towards the location where the boss will appear for the counter.
- Once you stand on the line, move towards the flow direction until you reach the edge of the circle.
- Wait for the clones to run past the lines and prepare to counter the boss.
Telegraph
- Armen speaks and his dialogue is displayed at the bottom of your screen.
- Mobs spawn outside the Battlefield and rush towards the players.
- After a short duration, surviving mobs on the field explode and hit players in a big area.
Description
- As soon as you see Armen's dialogue, use Ally Skill: Avele while standing close to the boss.
- Wait for the mobs to move closer to the Boss and use the Follow-up Ally Skill.
- Make sure to cast it within 20 seconds after using Ally Skill: Avele.
- If mobs survived the Ally Skills, focus and kill those fast, before they explode.
Telegraph
- A Cutscene plays.
- You are teleported to the mini boss.
Description
- Use Whirlwind Grenade (Bound) and stagger skills on the Mini Boss to succeed the stagger check.
- Bring the mini boss' hp to x50 to trigger the final phase.
Telegraph
- Cutscene gets played.
- A red fog surrounds and shrinks the battlefield.
Description
- Touching the red fog deals damage to the player.
- Bring down Boss' HP to x0 to clear this gate.
- Use Ally Skill: Azena or Avele whenever it is ready.
Credits
Written by Perciculum
Reviewed by Starlast
Video Footage from Saintone