Aegir Gate 1 Guide
In Aegir Gate 1, you have to defeat Akkan, Lord of Death. While fighting him, you also have to pay attention to the attacks the giant in the background throws at you. The giants' attacks should not be taken lightly. They either one shot or increase the damage you take.
| Normal Mode | Hard Mode | Monster Type | Weakness | Tauntable |
| 1660 Item Level | 1680 Item Level | Demon | None | No |
- HP Potion of your choice
- Splendid Sacred Charm
- Dark Grenade
- Atropine Potion or Stimulant
This guide assumes that you are familiar with the recommended Raid Build for your class.
Learn about Aegir Gate 2.
Raid Rewards
| Gold | Material | Bonus Loot | Bonus Loot Cost | Auction | First Clear | |
| Normal | ||||||
| Gate 1 | 7,500 | 4x | 4x | 3,200 | 20x | |
| Gate 2 | 16,500 | 6x | 6x | 5,300 | 5x | |
| Total | 24,000 | 10x | 10x | 8,500 | ||
| Hard | ||||||
| Gate 1 | 10,000 | 8x | 8x | 4,100 | ||
| Gate 2 | 20,000 | 12x | 12x | 6,600 | 10x | |
| Total | 30,000 | 20x | 20x | 10,700 | ||
Main Mechanics Overview
x195 HP - Aegir Appears + Banishment
x170 HP - Ghost Phase
x150 HP (Hard Mode) - Earthquake
x143 HP - Flame Breath/Pillars
x115 HP - Shield Break + Valtan Counter
x85 HP - Aegir Attacks
x60 HP - Aegir's Arm + Guard
x30 HP - Final Stagger
Once you have read through the detailed description of the main patterns, use the “cheat sheet” during the raid, or check out our condensed Cheat Sheet Collection for all Legion Raids on one page.
x195 HP
Aegir Appears + Banishment
Dodge Boulder Shadow
Avoid Akkan's Scythe Slash
x170 HP
Ghost Phase
P1: 9 o'clock
P2: 3 o'clock
Call positions for symbols post stagger
x143 HP
Flame Breath/Pillars
Dodge rocks and hide behind pillars
x115 HP
Shield Break + Valtan Counters

Earthquake (inside or outside)
Valtan Counter Pattern
Earthquake (opposite)
Repeat
Use Ally Skill: Wei or Thar + Follow-Up
x85 HP
Aegir Attack
Dodge red telegraphs
x60 HP
Aegir's Arm + Guard
Dodge Aegir attacks
Guard after break
Use Ally Skill: Thar for stagger, or Wei after stagger
x30 HP
Final Stagger
Stagger Akkan/dodge attacks
Use Ally Skill: Thar
Main Mechanics
Main mechanics occur at certain HP intervals.
Telegraph
- Cutscene will happen and Aegir will appear.
Description
- Dodge the boulder by looking at the shadow of the boulder.
- Akkan will appear with a scythe slash that will banish players hit to the shadow realm.
- 10 seconds imprisonment in the realm.
- You can't use battle items in the realm.
Telegraph
- Akkan teleports to the center and turns towards a random player.
- Slashes towards that player and banishes everyone hit.
- Up to 4 players can be banished.
Description
- P1 groups up at 9 o'clock and P2 at 3 o'clock.
- Banished Party
- Stagger 4 ghosts around the map.
- Fake Ghosts will fear you.
- Hard Mode: Staggered ghosts will show you 4 total symbols below. Type out their clock position for the Regroup mechanic later.
- Stagger 4 ghosts around the map.
- Party Outside
- Kill mobs.
- Hard Mode: Stagger Akkan.
- Regroup: Stagger Akkan then use Wei after mechanic.
- Hard Mode: After Akkan Stagger, line up corresponding Hard Mode Symbols to correct clock position ghost.
Telegraph
- There will be a map-wide earthquake with blue telegraph AOE.
Description
- Use any CC immunity items/skills.
- Splendid Sacred Charm
- Guardian Tune
- Spacebar
Telegraph
- Cutscene will start with Aegir roaring.
Description
- Hide behind pillars to avoid attack (will drop at yellow telegraphs).
Telegraph
- Akkan appears in the middle and gains a shield.
Description
- Players will need to break the shield, avoid patterns, and do counters.
- Use Ally Skill Wei or Thar + Follow-Up | Wei ⇾ damage | Thar ⇾ Stagger
- Akkan Pattern:
- Earthquake (inside or outside)
- Valtan Counter (check below for telegraphs)
- Earthquake (whatever wasn't used previously)
- Repeat
Telegraph
- Cutscene of Aegir appears and attacks.
Description
- Dodge red telegraphs.
Telegraph
- Akkan will disappear and appear on the right side of the map.
- Red telegraph will cover the map.
Description
- Dodge attacks and DPS Aegir's Arm.
- After the DPS check, you will need to Guard the arm swing.
- Stagger Akkan right after the Guard.
- Use Ally Skill: Thar for stagger, or Wei after stagger
Telegraph
- Long cutscene starts and Akkan appears for a Stagger Check.
Description
- Stagger Akkan while dodging. Use Ally Skill: Thar.
- CC immune blue earthquake AOE.
Counter Patterns
Description
- Akkan disappears and spawns blue line telegraphs.
- He will reappear on a player and can be countered.
- Group up.
Description
- Akkan summons 3 jumping Valtans.
Guard Patterns
Description
- Press the “G” key shortly before the yellow gear shape telegraph finishes.
Description
- Press the “G” key shortly before the fire hits your character.
Description
- Press the “G” key shortly before the arm hits you. There will be fire effects around the arm as it moves forward.
Description
- Press the “G” key as soon as you see the green ring effects.
Notable Patterns
Description
- Akkan will shoot out 2 balls.
- Safe zone on the balls.
Description
- Explosions come into Akkan. Avoid the Square sides.
Description
- Safe spot shadow when he spawns it.
Description
Description
- When Akkan slashes and dashes right after, he will spawn skulls behind him, fearing you when hit.
Description
- Akkan will charge up a flame breath to shoot in a large cone.
- There will be an aura/puddle emitting from him during the charge.
Description
- Ghosts will spawn from the sky and will explode if not killed.
Description
- A player is targetted with a meteor.
- Drop it outside and dodge the explosion.
Description
- Akkan will create safe spots and push players before the slash.
- Get pushed on purpose into the safe spots or get into the safe spots and use tenacity skills.
Description
- Akkan smashes the ground and spawns portals.
- Valtan will always charge through Akkan.
Description
- Akkan dashes and raises his hand.
- This will spawn Valtan that grabs.
Description
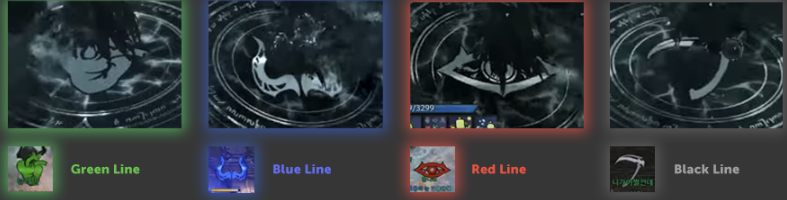
- Akkan spawns 2 colored lines.
- Look at his scythe color and avoid that side.
Credits
Written by Starlast
Reviewed by Perciculum
Video Footage from Saintone & Choilicious