Kazeros Raid Brelshaza Gate 1 Guide
In Kazeros Raid Brelshaza Gate 1, you battle Narok the Butcher. During this encounter, you have to deal enough damage and avoid getting hit to prevent freezing.
| Normal Mode | Hard Mode | Monster Type | Weakness | Tauntable |
| 1670 Item Level | 1690 Item Level | Ancient | Lightning | No |
- HP Potion of your choice
- Dark Grenade or Whirlwind Grenade (Normal Mode)
- Destruction Bomb or Corrosive Bomb
- Atropine Potion or Stimulant
- For re-clear runs:
- DPS replace Destruction Bomb with Flame Magic Scroll.
- Supports replace Stimulant with Flame Magic Scroll.
This guide assumes that you are familiar with the recommended Raid Build for your class.
Learn about Kazeros Raid Brelshaza Gate 2.
Raid Rewards
| Gold | Material | Bonus Loot | Bonus Loot Cost | Auction | First Clear | |
| Normal | ||||||
| Gate 1 | 9,000 | 4x | 4x | 3,800 | 20x 3x 10x 20x | |
| Gate 2 | 18,500 | 6x 4x | 6x | 5,600 | 5x | |
| Total | 27,500 | 10x 4x | 10x | 9,400 | ||
| Hard | ||||||
| Gate 1 | 11,000 | 8x | 8x | 4,500 | ||
| Gate 2 | 23,000 | 12x 6x | 12x | 7,200 | 10x | |
| Total | 34,000 | 20x 6x | 20x | 11,700 | ||
Main Mechanics Overview
x300-240 HP - Armor Destruction
x240 HP - Ice Wall
Post x240 HP - Laser Dodge (70 seconds after x240 HP)
x180 HP - Perfect Guard and Time Attack 1
x120 HP - Chase and Stagger
x60 HP - Perfect Guard and Time Attack 2
Once you have read through the detailed description of the main patterns, use the “cheat sheet” during the raid, or check out our condensed Cheat Sheet Collection for all Legion Raids on one page.
x300-240 HP
Armor Destruction
Apply Corrosive Bomb and use Destruction Bombs.
x240 HP
Ice Wall
Move to center, break ice, bait laser.
Stand in the safe spot.
Cast and re-cast Sidereal:Ephernia.
Co-op Counter.
Post x240 HP
Laser Dodge

Move to 11 o'clock.
Go up after 2nd red line explosion.
Then move back.
x180 HP
Perfect Guard
and
Time Attack
Group up at the front.
Wait for Perfect Guard.
Stay at the front until boomerangs finish.
Remove the shield in 60 seconds.
Cast and re-cast Sidereal:Ephernia.
Party1: User Hyper Awakenings.
x120 HP
Chase and Stagger
Chase the boss, wait for everyone.
Break barrier, move in.
Stagger the boss.
Cast and re-cast Sidereal:Ephernia.
[Hard Mode] block the 2 real lasers.
[Hard Mode] stagger the boss again.
x60 HP
Perfect Guard
and
Time Attack
Group up at the front.
Wait for Perfect Guard.
Stay at the front until boomerangs finish.
Remove the shield in 60 seconds.
Cast and re-cast Sidereal:Ephernia.
Party2: User Hyper Awakenings.
Raid Mechanics
Raid mechanics cover the passive mechanics that are persistent through the entire raid.
Warm

Cold

Frozen

Players enter the raid with a Heat Meter that depletes slowly over time as well as being reduced by hits from the boss, this meter plays a large role in dictating the flow of the fight. There are two ways of regenerating heat.
- Sidereal: Ephernia - Initial cast slightly refills some meter while the recast recovers 50% of maximum heat.
- Flame Magic Scroll - Obtained through the North Kurzan reputation tasks (8 days). A consumable item that recovers 20% heat for you and 10% for your teammates in a small radius.
Warm
- Meter from 100-50% is considered warm, this state doesn't inflict any penalties.
Cold
- If you drop in the zone of 49-1% you are considered cold.
- Being cold for over 1 minute will generate Ice Orbs on the arena, granting the boss Orb Stacks.
- While in this state, ice attacks from the boss have a chance to freeze you (works like a stun, not 0% frozen).
Frozen
- Players who reach 0% will have their character frozen in place, indicated by a purple bar above their Heat Meter.
- 1x Orb Stack will automatically be generated.
- Other players must free them with multihit abilities.
- Unfrozen players will recover 75% of their temperature.
- Getting frozen 2 times during the fight will cause your character to instantly die.
Boss Effects
Boss Effects

Each Buff provides various effects:
- These effects are present from the start of the fight.
- The boss is able to regenerate these effects by consuming Orb Stacks.
- Effects must be removed using Destruction in the form of Skills/Destruction Bombs and the help of Corrosive Bomb.
- 1st Effect - grants 30% damage reduction to the boss.
- 2nd Effect - allows the boss to mark a random player with a yellow crosshair debuff that spawns an ice orb beneath his feet, reducing heat in its radius.
- 3rd Effect - Increases the damage of the boss by 5%.
Orb Stacks
Orb Stacks
- Orb Stacks are generated based on the Heat Meter management of the party members.
- Each frozen player generates 1 stack
- Being below 50% Heat Meter for 1minute generates 1 stack.
- The boss can consume Orb Stacks to regenerate his effects.
- 3x Orb Stacks are consumed to regain one Boss Effect.
- If 9x or more Orb Stacks are present, the boss can regain all of his buffs at once.
- If the boss reaches 20x Orb Stacks, then it wipes the raid.
Main Mechanics
Main mechanics occur at certain HP intervals.
Telegraph
- The boss starts the fight with all of his buff effects.
Description
- Players need to remove all the effects by inflicting destruction to the boss by the time they reach 240x HP.
- Remove the 1st buff effect by throwing a Corrosive Bomb followed by Destruction Bombs at the very start of the fight.
- Remove the 2nd and 3rd effects by rotating your Corrosive Bombs and inflicting as much natural destruction with your skills as possible.
- If this is a re-clear party, then the 3rd buff can be removed with the help of Sidereal: Jederico.
Telegraph
- Boss jumps into the air.
- Safe zone appears in the center of the map.
Description
1st Ice Wall
- Move to the center.
- Ice Walls will surround the entire arena, players must break them with skills/autoattacks.
- [Hard Mode] Ice Walls that are left standing will reduce the Heat Meter of everyone between each stage (Destroy them all). This does not apply to [Normal Mode].
- Find the yellow safe spot indicated by red arrows pulsating towards it and stand inside it.
2nd & 3rd Ice Wall
- Boss will reappear in the center with a blue aura beneath him.
- Ice Walls will surround the arena again, break them with skills/autoattacks.
- Avoid the blue aura under the boss, as that will decrease your Heat Meter.
- One random player will be marked with a crosshair, he must bait this attack away from the yellow safe spot, then move towards it himself.
- Find the yellow safe spot indicated by red arrows pulsating towards it and stand inside it.
Sidereal or Flame Scroll
- Players who are doing this raid for the first time or don't have access to Flame Magic Scroll, should use Sidereal: Ephernia after breaking the Ice Walls for the 3rd time.
- Sidereal timing: cast it when the boss starts moving forwards while attacking.
- If you cast it before the co-op counter happens, you're refunded 1 sidereal bar.
- Don't forget to recast Ephernia for extra Heat Meter generation.
- Sidereal timing: cast it when the boss starts moving forwards while attacking.
- Re-clear parties should use Flame Magic Scroll after breaking the Ice Walls for the 3rd time.
Co-op Counter
- After the 3rd wall break, the boss will perform a forward attack with a backdash.
- Then he will turn towards the players and require a 3-person co-op counter (Fast Counter timing beware).
- Successfully countering ends the mechanic.
- Failing to counter will initiate another co-op counter attempt right after.
- Failing both will result in a raid wipe in [Hard Mode], and freeze everyone in [Normal Mode].
Telegraph
- Roughly 70 seconds after completing the x240 mechanic, the boss will zoom out the camera and move to 6 o'clock.

Description
- Quickly move to the 11 o'clock position.
- A red line attack will spawn right above you, this attack will trigger a second time shortly after.
- Move to this spot quickly right after the second explosion has happened.
- Then proceed to go back to 11 o'clock immediately and stay there until the end.
- Getting hit by these line attacks will reduce your Heat Meter.
Telegraph
- The boss stabs the ground with his hands.
- Then proceeds to absorb all Ice Orbs that are present on the arena.
Description
Perfect Guard
- Gather in front of the boss and await the Perfect Guard, then press "G" when you see the yellow flash.
- The boss will throw 3 sets of boomerangs to his sides.
- Remain in front until the boss has finished throwing his boomerang attack.
Time Attack
- The boss will obtain a 47 billion HP shield and restore 1 Buff Effect.
- For each Ice Orb that the boss absorbs, he will gain an additional Buff Effect and 2 billion HP shield, making it harder to complete.
- Make sure to not have 10 or more Ice Orbs active when the mechanic begins, as that will grant the boss 400+ billion HP.
- Players have 60 seconds to remove the shield to complete the mechanic.
- Boss Attacks are enhanced during this time period and are extremely deadly (be extra cautious).
- Party1 uses their Hyper Awakenings during the x180 Time Attack.
- Party2 uses their Hyper Awakenings for the x60 Time Attack later on.
Sidereal Strategy
Ephernia
Players without Flame Magic Scroll, should use Sidereal: Ephernia and the re-cast it to keep their Heat Meter high, this will prevent the boss from gaining Ice Orb stacks.
Jederico
Re-clear parties should use their Flame Magic Scroll in front of the boss while they await the Perfect Guard. After that, they have two options:
- 3 Buffs on boss: Apply Corrosive Bomb and use Destruction Bombs to remove the 30% Damage Reduction, then use Sidereal: Jederico.
- 2 Buffs on boss: Use Sidereal: Jederico immediately after Perfect Guard.
Telegraph
- A cutscene is triggered with the boss leaving.
Description
Chase
- Players need to chase after the boss quickly.
- It's possible to move during the cutscene already to save time.
- When you reach the top of the hill, you MUST wait for everyone before proceeding.
- If you don't wait for your team, they will get cutoff and die.
- Hit the ice barricade when everyone has arrived and move through it quickly.
Stagger [Normal Mode]
- Stay away from the outer edges and avoid the ice wave coming from the boss until it disappears.
- Then move in to the boss and stagger him.
- While staggering, you must perform 3 Perfect Guards.
- A lot of heat is lost if you fail to guard.
- Right before completing the stagger, cast Sidereal: Ephernia as the completion refunds 1 Sidereal Bar.
- Don't forget to re-cast Ephernia.
Stagger [Hard Mode]

- Stay away from the outer edges and avoid the ice wave coming from the boss until it disappears.
- Split up
- Party1: Top
- Party2: Bot
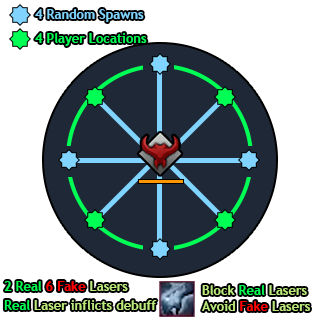
- 4 Objects will spawn in random spots on the arena.
- Shortly after, 4 random players will get a yellow marker on them. These players must place the remaining objects.
- Avoid standing next to the original 4 objects to not overlap them!
- Once all 8 objects have spawned, they will shoot a laser towards the boss.
- 2 out of the 8 are real and need to be blocked with your body (similar to Akkan gate 3).
- Real lasers give players a debuff above their mana bar
 and inflict small damage.
- Fake lasers do massive damage and need to be avoided.
- To check, simply step inside it quickly and look above your mana bar for the debuff.
- Both real lasers MUST be blocked at the same time, before any stagger damage can be inflicted to the boss.
- Don't waste your stagger abilities until both correct towers are being blocked.
- Don't hold important skills because the boss has damage reduction until the next stagger phase.
- Players blocking the laser should swap with their teammate when reaching x14
 or more stacks (signal your swap with an assist ping or similar).
 - Important: Make sure not to reach x20
 stacks, otherwise you will explode and kill everyone in your surroundings.
 - Stagger the boss. When completed, the boss will jump around and try to pick up all 8 objects from the ground while needing to be staggered once more.
- Each object he collects will spawn 2 Ice Orbs.
- Right before staggering the boss, cast Sidereal:Ephernia as the stagger completion refunds 1 Sidereal Bar.
- Don't forget to re-cast Ephernia.
Counter Patterns
Description
- The boss jumps up for a long duration, then slams down and can be countered.
- Ice walls will be generated in a square shape around him once he lands.
Description
- The boss lifts his shield in front of him, dashes forward, then turns 180° and can be countered.
Guard Patterns
Description
- The boss raises his shield and dashes forward, this can be guarded at the end "G".
- Then he selects a player and jumps towards him.
Description
- The boss stabs forward with his weapons at his sides, this can be guarded "G".
- Then backdashes and throws a boomerang forward that circles around him clockwise.
Description
- 8 crystals fly towards the boss which need to be intercepted and guarded against "G".
- If the crystals reach the boss, you can't guard against the final attack.
- Then a final large yellow circle expands for the final guard.
Description
- The boss lifts his arms up and is surrounded in blue ice.
- Dodge the yellow telegraph underneath him outwards.
- Then move close and stagger him quickly.
- Press guard "G" at the end.
Notable Patterns
Description
- The boss expands 2 blue cones in front and behind him.
- Dodge them, then stay close to his body as he will grab 360° in front of him (very close to him is safe).
- Then he will turn around 180° and slam the ground twice.
Description
- The boss lifts his hands to the sides, channeling energy into a ball.
- The camera zooms out.
- Then rains icicles onto the surrounding ground that explode dealing massive damage.
Description
- Boss jumps backwards, dropping his shield on the ground, then grabbing a massive boulder from beneath the ground.
- Proceeds to throw the boulder in front of him that hits in a huge radius.
Description
- The boss attacks both of his sides 3 times with boomerangs.
- Then jumps and does an AoE around him.
Description
- One player is targeted and marked with a crosshair, while the boss is throwing huge boomerangs at him 2 times.
- The boss has a very limited turn radius for this attack, so if you move behind him, he won't be able to turn around completely for the 2nd attack.
- If you get hit, these split into 3 and spin uncontrollably around the arena, inflicting massive damage.
Description
- The boss chooses an aggro target, then tries to grab him repeatedly 3 times.
- If someone is caught, he slams him forwards and backwards, then throws him on the ground.
- Jumps after him and performs a swipe and upper cut that is safe when standing right of him.
Description
- The boss vanishes and reappears, trying to grab a player.
- If nobody is grabbed, he appears in the center of the map and charges a set distance forward.
- If someone is caught, he will repeatedly try to teleport and grab players until he fails.
Description
- Boss teleports, reappears in the center and charges forward followed by multiple red telegraphs going in a clockwise direction.
- Don't stand in the center as you can get grabbed by the charge!
- At the end, he leaps to the center and does an alternating donut attack (stay in the safe spot, then move in).
Description
- The tail and his right arm start glowing bright blue.
- Then the boss uppercuts and tail swipes at the same time (stay on his side).
- This is followed by a 360° outer attack (move inside) and 2 slams in the back.
Description
- The tail glows bright blue.
- He lifts it in the air and slams the ground, expanding to the sides.
Description
- The boss spins his weapons in the front and on his sides, then jumps forward, performing a slam hitting an area around him.
Description
- The boss does a right and left frontal attack.
- Then spins his weapons rapidly on his sides in the ground.
- Directly behind him and in front of him is safe.
Description
- The boss does a left and right frontal attack followed by a jump (back safe).
Description
- The boss stomps the ground 3 times, creating red rectangle telegraphs that expand outwards.
- If you're caught by the rectangle ice attack, you get impaled and grabbed.
- In the end, the boss pushes the ice forward hitting them against the wall.
Description
- The boss does a right then left frontal swipe followed by a 360° outer hit (close back is safe).
Description
- The boss throws 3 boomerangs in front, then dashes backwards.
- Right after, a frost wave is expanding outwards, freezing you if you're hit (similar to Thaemine Gate 3 Darkness wave).
- Either spacebar this or move far away until it disappears.
- If you're frozen, the boss will perform a follow-up attack, putting you to low HP.
Enhanced Time Attack Patterns
Enhanced pattern info is marked with a red *
Description
- The boss stabs forward with his weapons at his sides, this can be guarded "G".
- *Don't stand in front if you can't guard it as it will stun you for a long time.
- *Then backdashes twice and throws a boomerang forward that circles around him clockwise.
Description
- The boss attacks both of his sides 3 times with boomerangs.
- Then jumps and does an AoE around him.
- *He can jump again and perfom a yellow frontal cone attack.
Description
- The boss lifts his shield in front of him, dashes forward, then turns 180° and can be countered.
- *He may glow red (fake), wait until it's blue.
Description
- The tail and his right arm start glowing bright blue.
- Then the boss uppercuts and tail swipes at the same time (stay on his side).
- This is followed by a 360° outer attack (move inside) and 2 slams in the back.
- *After his 360° outer attack he might target someone with 2 jump attacks.
Description
- The boss does a right and left frontal attack.
- *He might turn around and do a right/left frontal attack again.
- Then spins his weapons rapidly on his sides in the ground.
- Directly behind him and in front of him is safe.
Description
- The boss does a left and right frontal attack followed by a jump (back safe).
- *After his frontal attacks he also performs 2 back attacks into a jump.
Description
- The boss spins his weapons in the front and on his sides, then jumps forward, performing a slam hitting an area around him.
- *He does an additional Cross followed by an X attack.
Credits
Written by Choilicious
Reviewed by Perciculum, Sekwah
Video Footage from Saintone