Aegir Gate 2 Guide
In Aegir Gate 2, you must venture into the heart of the giant to battle Aegir, the Oppressor. The scenery changes multiple times during this fight. You have to adapt to stop the giant once and for all.
| Normal Mode | Hard Mode | Monster Type | Weakness | Tauntable |
| 1660 Item Level | 1680 Item Level | Ancient | None | No |
- HP Potion of your choice
- Sacred Charm
- Dark Grenade
- Atropine Potion or Stimulant
This guide assumes that you are familiar with the recommended Raid Build for your class.
Learn about Aegir Gate 1.
Raid Rewards
| Gold | Material | Bonus Loot | Bonus Loot Cost | Auction | First Clear | |
| Normal | ||||||
| Gate 1 | 7,500 | 4x | 4x | 3,200 | 20x | |
| Gate 2 | 16,500 | 6x | 6x | 5,300 | 5x | |
| Total | 24,000 | 10x | 10x | 8,500 | ||
| Hard | ||||||
| Gate 1 | 10,000 | 8x | 8x | 4,100 | ||
| Gate 2 | 20,000 | 12x | 12x | 6,600 | 10x | |
| Total | 30,000 | 20x | 20x | 10,700 | ||
Main Mechanics Overview
x260 HP - 1st Heart
x260 HP - Armor Break (Left Room)
x250 HP - Distorted Space
x165 HP - 2nd Heart
x165 HP - Armor Break (Right Room)
x153 HP - Distorted Space
x95 HP - Stage Break
x0 HP - Final Struggle (Hard Mode Only)
Once you have read through the detailed description of the main patterns, use the “cheat sheet” during the raid, or check out our condensed Cheat Sheet Collection for all Legion Raids on one page.
x260 HP
1st Heart
Normal
- Party 1: 12 ⇾ 3
Party 2: 6 ⇾ 9 - Destroy Stones, dodge Laser and attack Heart
- Guard
Hard
- Positions: x3 (One at each side)
- Destroy Stones
- Counter
- Auto Attack
- Stagger
- Guard
- Dodge Laser and attack Heart
- Guard
x260 HP
Armor Break
- P1 Top | P2 Bottom
- Left Corners to Dodge Feet
- Right Corner for Target Puddle (Hard Mode)
- Damage, Stagger, or Counter Spears
- Damage boss
- After 3rd spear wave, use Ally Skill: Avele
x250 HP
Distorted Space
Debuff stacks to 7 (5 HM) ⇾ 1 HP
Teleports to x3 ⇾ Coop Counter
Teleports to x3+1 ⇾ Stagger
Wall: Use Ally Skill: Avele
x165 HP
2nd Heart
Remove Aegir's Shield ⇾ Destroy Heart
Guard to reduce Cooldown
Use Ally Skill: Ealyn after 2nd Guard
Use Follow-Up skill to destroy Heart
x165 HP
Armor Break
- P1 Top | P2 Bottom
- Left Corners to Dodge Feet
- Right Corner for Target Puddle (Hard Mode)
- Damage, Stagger, or Counter Spears
- Damage boss
- After 3rd spear wave, use Ally Skill: Avele
x153 HP
Distorted Space
Debuff stacks to 7 (5 HM) ⇾ 1 HP
Teleports to x3 ⇾ Coop Counter
Teleports to x3+1 ⇾ Stagger
Wall: Use Ally Skill: Avele + Follow-Up
x95 HP
Stage Break
Use Ally Skill: Ealyn when Thirain speaks
You can fall to death
Use Ally Skill based on preference when ready
x0 HP
Final Struggle
Hard Mode only
Every 50 seconds:
Guard ⇾ Coop Counter ⇾ Laser
Use Ally Skill based on preference when ready
Main Mechanics
Main mechanics occur at certain HP intervals.
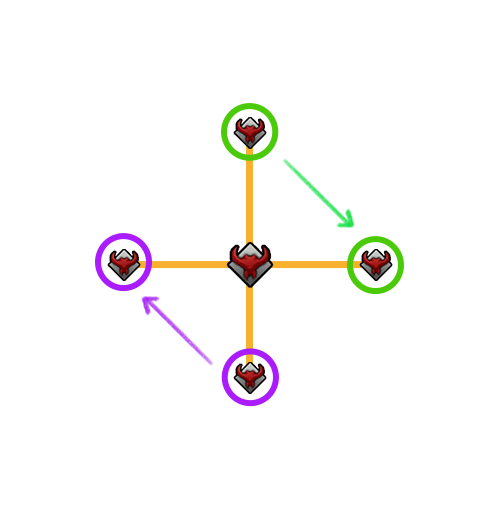
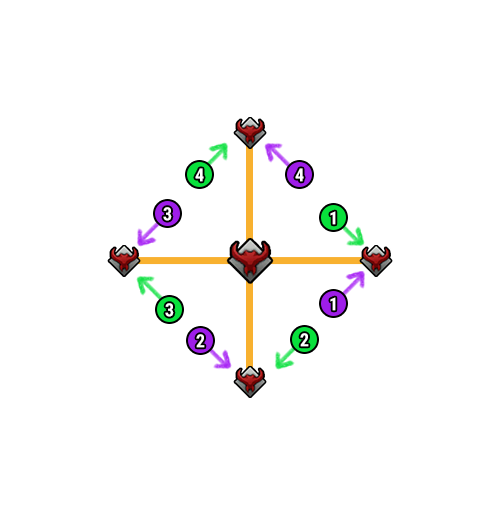
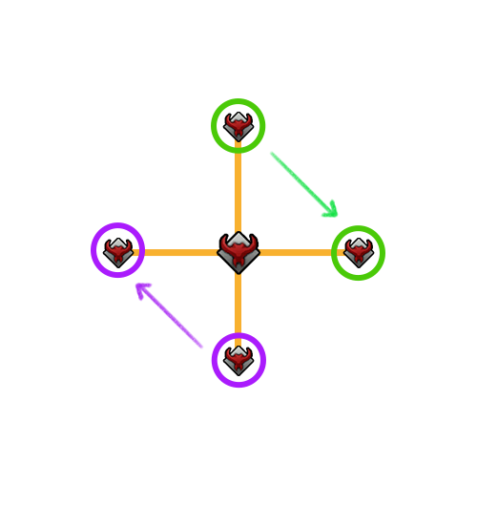
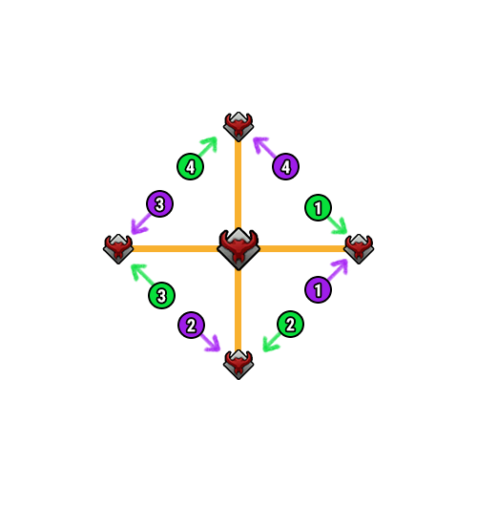
Telegraph
- A cutscene begins to play.
- A stone spawns at each x3 (cardinal) position, which are linked to the heart in the center.
- Multiple rotating blades spawn periodically.
Normal Mode
Hard Mode
Description
- Normal Mode
- Party 1 goes to the stone located at 12 o'clock, while Party 2 goes to the one located at 6 o'clock.
- Destroy the stones and rotate clockwise to destroy the remaining stones.
- Hard Mode
- Players of each party go to x3 positions, as displayed in the image above.
- Counter the rotating blades from the direction of the arrows.
- Auto attack the blade towards the stone you are assigned to while standing inside the blue circle.
- Stagger the blade.
- Guard pattern occurs. The right time to press “G” key while looking at him (cursor on the boss) is when his spear is about to hit the stone after he jumps.
- Repeat steps 2 to 5 until all stones are broken.
- Once all stones are destroyed, deal damage to the heart in the center while avoiding the rotating lasers.
- Guard pattern occurs in frequent intervals, indicated by the yellow flash. The right time to press the “G” key while looking at him is when his spear is about to hit the stone after he jumps.
Telegraph
- After successfully completing the Heart mechanic, the room tilts to a side.
- Aegir spawns with 15 stacks of damage reduction buff on him.
- A foot spawns periodically in the center, which swipes across the field and stuns players.
- Three spears spawn on each side, which request either stagger, counter, or damage.
Please note, that the 2nd Armor Break mechanic at x165 HP can be skipped entirely if you pushed Aegir to x165 HP at the end of the 2nd Heart mechanic.
Description
- Party 1 goes to the top and Party 2 goes to the bottom side of the room.
- Dodge the foot swipe attack by standing in a corner.
- On Hard Mode, a golden target appears on the 2 furthest players from the boss, which spawns a big puddle below the player after a brief delay. Ideally, each support remains a little longer in the corner to get targeted. Place the puddle at the right corners.
- Properly resolve the requested interaction of each of the 3 spears to remove damage reduction stacks from the boss.
- Failing to resolve this, imprisons nearby players.
- Deal some damage to the boss until the foot spawns in the center. You should avoid being hit by it and repeat steps 2 and 3 two additional times.
- After you resolve the 3rd wave of spear interaction, which hopefully removed all damage reduction stacks from the boss, use Ally Skill: Avele on him.
Telegraph
- After resolving or skipping the Armor Break mechanic, the room tilts again and returns all players back to the previous battle area.
- The area narrows to a small circle surrounded by a black fog of war.
Description
- If a player touches the fog, they will get teleported to the opposite side and get a debuff. Getting 5 (Hard Mode) or 7 (Normal Mode) stacks of this debuff, reduces your HP to 1.
- You can use this to dodge some dangerous patterns, but keep an eye on the stacks.
- During this mechanic, the boss uses special patterns, which are explained in the Distorted Space Patterns section below.
- Deal around 40 bars of HP damage to resolve this mechanic.
Telegraph
- A cutscene begins to play.
- Aegir's heart spawns in the center, rotates while shooting lasers, and requests stagger.
- After the successful stagger, the boss spawns with a massive shield while being connected to the heart.
- Once the bar above Aegir's head depletes, a Guard pattern occurs.
Description
- To resolve this pattern, it is necessary to first remove Aegir's shield and then deal damage to the heart located in its center to destroy it within 80 seconds.
- The depleting dial around the heart displays the remaining time before a wipe occurs.
- Succeed Guard pattern to reduce all active skill cooldowns by 50%. (Except Awakening cooldown.)
- Guard Timing: Use the “G” key when the boss is about to strike the ground with his spear while looking at him.
- Use Ally Skill: Ealyn after you succeed the 2nd Guard pattern to get push immunity buff. Use Atropine Potion and deal as much damage as possible to the boss. Use your Hyper Awakening.
- Use Ally Skill: Ealyn's follow-up skill on the heart before it becomes unavailable. Destroy the heart to move to the next mechanic
Telegraph
- A cutscene begins to play.
Description
- Use Ally Skill: Ealyn once you see Thirain's dialogue box to trigger a special interaction.
- Once you are back at the boss, deal damage until you see a red telegraph, which indicates feet spawning spot.
- Feet spawn and walk in periodic intervals. They stun on hit. In Hard Mode, they can perform a kick attack, which can knock you off the stage.
- Group up at one spot to force the boss to perform a jump attack on a predictable spot. Once you see the red telegraph, move a few steps away from it.
- The stage breaks in specific intervals, indicated by a white outline. If you fall off the stage, you will die.
- Use Ally Skill (+ Follow-Up) based on preference when ready.
- Wei or Avele for damage
- Ealyn for CC immunity (For high dps groups)
- Reduce Aegir's HP to 0.
- Normal Mode: Raid clear
- Hard Mode: Final Struggle Mechanic
Telegraph
- This mechanic only occurs in Hard Mode.
- A cutscene begins to play.
- The boss gets 44 bars of HP back, and his enrage timer starts counting down from 1 minute and 30 seconds.
- Once the enrage timer hits 0, a raid wipe occurs.
Description
- A Guard pattern occurs every 50 seconds when the boss summons a black hole in front of him.
- Guard timing: Press the “G” key when the black hole is about to disappear, while looking at its direction.
- Players who fail to Guard, take massive damage and get imprisoned.
- Aegir requests a Coop Counter. Succeeding this marks three players with a depleting bar above their head. Those players need to look at the boss to shoot a laser at him, which increases the enrage time by 8 seconds per laser hit.
- Focus on Coop Counter and hitting the boss with the laser first, before you liberate imprisoned players.
- Use Ally Skill (+ Follow-Up) based on preference when ready.
- Wei or Avele for damage
- Ealyn for CC immunity (For high dps groups)
Counter Patterns
Description
- Group up and succeed the Coop Counter, which occurs after the third air walk.
Description
- Spread out and counter the 3 spears.
- Dodge Aegir's follow-up attack.
Description
- Normal the boss disappears, summons clones, and teleports around before striking towards a random player.
- But this pattern is enhanced during the last phase of the fight. Two of the four clones are counterable. Succeed the counters to stagger the boss briefly.
Guard Patterns
Description
- Press the “G” key when the yellow circle is about get fully covered while looking at the center of the circle.
Description
- Press the “G” key as soon his he starts moving his spear towards his back.
Description
- Press the “G” key as soon you see the first red telegraph while looking at it.
Description
- Press the “G” key shortly before the spear strike hits the ground while looking at the impact point.
Distorted Space Patterns
Description
- Boss summons a wall around 50 seconds into this mechanic, which moves across the field.
- To avoid a wipe, destroy the wall using Ally Skill: Avele.
- You can use the Ally Skill: Avele's follow-up skill during the x153 HP mechanic to deal additional damage.
- After destroying the wall, boss gets staggered. Use Atropine Potion and deal as much damage as possible.
Description
- Occurs when Aegir teleports to any of the x3+1 (ordinal) spots at the edge.
- Stay away from the red telegraphed area and stagger the boss.
Description
- Occurs when Aegir teleports to any of the x3 (cardinal) spots at the edge.
- Group up in front of the boss and succeed the coop counter.
- One player gets a target, that player shifts boss focus to one side while everyone else moves to the opposite side to deal damage.
- To avoid getting hit by the laser, the targeted player should dodge as soon as he sees the hand cannon flashing.
Description
- Boss floats and slows time.
- Move immediately to the back of the boss to dodge the follow-up attack.
Description
- This pattern only occurs in Hard Mode.
- Boos locks onto a random player while spinning his spear on his right side.
- Players standing in front or behind him get grabbed in specific intervals and take high damage at the end of this pattern.
- Targeted player should strafe left and right to minimize boss movement.
Description
- Wait for the boss to grab an orb, and move to that grabbed side to avoid the splash damage.
Description
- The lines create waves expanding towards the outside.
- Stand on the opposite side to dodge it.
Description
- After the first few explosions, space bar to the front of the boss.
Description
- Boss summons big or small puddles on players and random locations.
- Avoid standing on those.
Notable Patterns
These patterns are very dangerous, since getting grabbed can either lead to taking high damage or falling off the stage.
Description
- Avoid standing in front of the boss.
- Stagger boss to liberate grabbed players while avoiding the cone-shaped attacks.
Description
- Avoid standing in front of the boss.
- The 3rd hit, which grabs hit players, won't occur if no one got hit by the first 2 attacks.
Description
- Dodge the spears' thrust attack and avoid getting grabbed by Aegir's follow-up grab attack.
- Liberate grabbed players by staggering the boss.
Description
- Move out of the red circle close to the poss while avoiding the red lines.
- Move back in to avoid the outer explosion while dodging the cone-shaped attacks.
- Avoid standing in front of the boss to dodge the thrust attack.
- If players got hit by any one of the previous attacks, the boss spawns multiple clones, which perform a thrust attack.
- This pattern is enhanced during the last phase of the fight.
- Instead of the final thrust attack, the boss attacks everyone further away from him. Stay close to him.
- A cone-shaped safe zone appears. Stand on it to avoid the final attack.
Description
- Stagger the boss while avoiding the saws,
Description
- Avoid standing in front of him as soon as you see the boss throwing the first saw.
Description
- Once you see the spear expanding while being held horizontally in front of the boss, stay away from his sides.
- One Support or Front Attacker can get hit intentionally, to trigger the follow up attack, which increases the dps window.
Description
- Move behind him and avoid the first few frontal swipe attacks.
- As soon as he turns and locks in position, dodge towards his back. Don't stay too close to his back.
Description
- Variant 1: If arms close in, dodge or move through it towards the narrow safe spot between the arms and the magma outside.
- Variant 2: If arms don't close in, move closer to one of the hands to dodge the magma in the center.
Description
- Wait for the first strike to occur and move to that spot.
Description
- As soon as you see him spinning the spear in front of him, move towards his back.
- Wait out the explosions left in his path before chasing after Aegir.
Credits
Written by Perciculum
Reviewed by
Video Footage from