Kazeros Raid Mordum Gate 1 Guide
In Kazeros Raid Mordum Gate 1, Thaemine is making a return. During this encounter, you have to deal enough damage and avoid getting hit to prevent freezing.
| Normal Mode | Hard Mode | Monster Type | Weakness | Tauntable |
| 1680 Item Level | 1700 Item Level | Thaemine: Demon Dragon: Beast | None | No |
- HP Potion of your choice
- Dark Grenade or Whirlwind Grenade
- Atropine Potion or Stimulant
This guide assumes that you are familiar with the recommended Raid Build for your class.
Learn about Kazeros Raid Mordum Gate 2 | 3.
Raid Rewards
| Gold | Material | Bonus Loot | Bonus Loot Cost | Auction | First Clear | |
| Normal | ||||||
| Gate 1 | 6,000 | 3x | 3x | 2,400 | 20x 3x 10x 20x | |
| Gate 2 | 9,500 | 5x | 5x | 3,200 | ||
| Gate 3 | 12,500 | 10x 5x | 10x | 4,200 | 10x | |
| Total | 28,000 | 18x 5x | 18x | 9,800 | ||
| Hard | ||||||
| Gate 1 | 7,000 | 3x | 3x | 2,700 | 20x 3x 10x 20x | |
| Gate 2 | 11,000 | 5x | 5x | 4,100 | ||
| Gate 3 | 20,000 | 10x 7x | 10x | 5,800 | 10x | |
| Total | 38,000 | 18x 7x | 18x | 12,600 | ||
Main Mechanics Overview
x300 HP - Retaliation
x270 HP - Memory & Stagger
Phase 2 Post x270 HP - Dragon Transition
x210 HP - Hidden Kharmine
Phase 3 Post x210 HP - Thaemine Transition
x75 HP - Guard & Counter
x50 HP - Dodge & Guard
Once you have read through the detailed description of the main patterns, use the “cheat sheet” during the raid, or check out our condensed Cheat Sheet Collection for all Legion Raids on one page.
x300 HP
Retaliation
Attack Thaemine to proc his retaliation.
Avoid front, then Just Guard.
x270 HP
Memory & Stagger
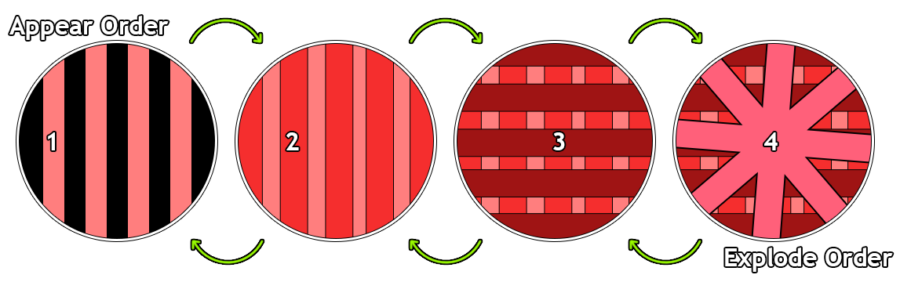
Red telegraphs appear in order 1→2→3→4
They explode in reverse order 4→3→2→1
Stay on 1st line where it doesn't overlap.
Stagger the boss, dodge red telegraphs.
Complete another stagger, avoid red cones.
HM: If caught by a red cone: Just Guard/Counter to escape the clone dimension.
Post x270 HP
Dragon Transition
Take the escape portal.
Stay in the center of the arena and dodge.
The dragon will fly in then → Just Guard.
Don't stand in blue puddles left behind.
x210 HP
Hidden Kharmine
Players with blue puddles → Out.
Players without puddles → Co-op counter.
Use  Sidereal: Kharmine, when his text box appears in the center of the screen.
Post x210 HP
Thaemine Transition
NM: Dodge attacks → Pizza safe spot
HM: Spread out to the edges, don't overlap blue AoE (x3, x3+1).
Just Guard when you see the telegraph
Stagger boss, if failed, then counter
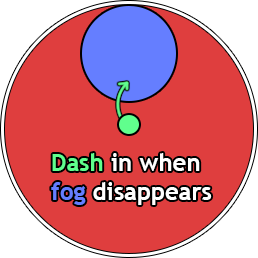
Go 12 o'clock, wait for fog to disappear Then dash into the safe spot
x75 HP
Guard & Counter
Thaemine glows white and vanishes in a direction (returns from this direction).
Stack up and wait for Just Guard telegraph.
If players failed, dodge and counter boss.
x50 HP
Dodge & Guard
Dodge aerial dragon attacks → counter.
Stay between the black fog, dodge aerial attacks → Just Guard.
Use  Sidereal: Azakiel after Just Guard.
Sidereals
 Thirain
- 3 Bar → Provides damage.
- 1 Bar → Provides damage.
- Can be tricky to land as the boss is quite agile.
Azakiel
- Used after the x50 HP mechanic has concluded.
- 3 Bar → Grants Push Immunity/Shield/Darkness Gauge Immunity for 25 seconds.
- 1 Bar → Grants Damage Reduction and resets the 25sec buff timer.
- Excellent sidereal for progression as it minimizes potential mistakes.
Kharmine
- Used for the Hidden Sidereal interaction at the x210 HP mechanic.
- Activate it when the Kharmine's text box appears on the screen.
- 3 Bar → Grants Attack Speed/Movement Speed/Attack Power.
- 1 Bar → Grants a random Attack Power buff from 5-25%.
Main Mechanics
Main mechanics occur at certain HP intervals.
Telegraph
- The boss always starts the fight with his retaliation attack.
- Raises his sword above his head, sword starts glowing.
Description
- Everyone should DPS Thaemine to trigger his retaliation.
- Thaemine will proceed to stab his front, which is a knockdown, then do a Just Guard attack.
- If retaliation is not triggered, Thaemine performs multiple AoE ground attacks
- It's advised to always trigger this retaliation.
- Proceed to fight until x270
Telegraph
- Boss goes to the center of the arena.
- Proceeds to cast 2 cross shaped telegraphs.
Description
Memory
- Thamine will display 4 red line attacks on the ground that remain visible until they begin to explode.
- These telegraphs will appear in order of 1→ 2 → 3 → 4.
- Then explode in reverse order that was shown, starting with 4 → 3 → 2 → 1.
- Locate the 1st red line and stay on it in a location that doesn't overlap with the others.
- Remain still on the 1st line while the other 3 red lines (4, 3 and 2) explode, then dodge to a safe spot.
- Getting hit by the explosions inflicts a weakness debuff & silences you briefly.
- Weakness can stack and reduces your stagger damage.
Stagger
- After the memory explosions, stagger Thaemine (yellow stagger).
- Shortly 4 additional basic red attacks will occur, dodge them.
- Then Thaemine will gain a purple stagger bar below his HP that needs to be depleted.
- From here Thaemine will alternate between red cross, red cone and clone safespot attacks until he is staggered.
- Weakness is inflicted each time you're hit, it's crucial to avoid attacks so stagger is easier.
- Important: If the stagger is about to complete and someone is stuck in the clone dimension, you must hold stagger until he leaves, otherwise this player will die.
Red Cone (Hard Mode)
- While in Normal mode you simply get knocked back, in hard mode you get teleported to a clone dimension.
- Here you must either succeed a Just Guard or a Counter versus Thaemine to leave.
- It is a large time loss, so avoid the red cone at all costs.
- Simply stand on the opposite side of which the clone dashes to, and don't hug Thaemine during this attack to avoid it.
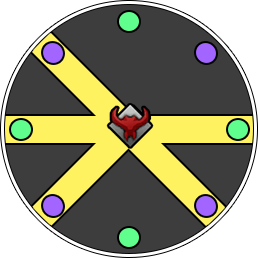
Clone Safespot
- Identical mechanic of Thaemine Gate 4-2.
- There are 8 clones surrounding the boss.
- Stand on the clones that have their sword facing outwards.
Telegraph
- Right after succeeding the purple stagger of x270, you escape through a portal that appears on the map as fast as possible.
Dragon Transition
- After depleting the Thaemine's stagger and escaping through the portal, you get teleported to the next stage.
- A large red telegraph surrounds the arena, stay in the middle!
- The dragon will proceed to cast multiple red AoE attacks on the field.
- Supporters should use their damage reduction/shields/awakening to prevent damage.
- Afterward, the dragon will fly up and come towards you.
- Just Guard when the dragon is about to collide with you.
- Red circle telegraph will appear in the center, dodge to the outside!
- Phase2 with fighting the dragon begins.
Darkness Gauge
- During this phase, attacks leaving blue lingering ground effects will inflict darkness gauge to players.
- When this gauge fills up, you get petrified.
- Other players should free you with multi-hit attacks.
- Fight until x210 HP for the next mechanic.
Telegraph
- The dragon roars and pushes everyone backwards.
- Then proceeds to slam into the center of the arena.
Description
- Dodge the center slam, then move inside, a cutscene will happen, and the mechanic will begin.
- Random players will be selected and marked with a debuff, that can be seen below your feet as a blue puddle.
- Marked players must place these puddles away from the boss, make sure to not run outside the arena with them.
- Unaffected players must get ready for a co-op counter attack.
- The dragon will slam the ground.
- Creating blue lingering fields on the first slam.
- Co-op counter on the 2nd slam.
- Shortly after, Kharmine's text box will appear at the bottom of the screen.
- At this moment Raid Lead should use Sidereal: Kharmine, this will skip the remainder of the mechanic.
- At this moment Raid Lead should use
- Once Kharmine's attack has ended, everyone should run out to dodge the dragons' meteor attack.
- This attack can be survived with damage reduction, but is not advised to be done on progression runs.
Telegraph
- This happens immediately after x210 Hidden Kharmine mechanic.
- Thaemine jumps down from the dragon and initiates an attack.
Description
Normal Mode
- Thaemine slashes the ground with blue line attacks twice.
- Then shows a pizza cone safe spot location, stand inside the narrow cone!
- A red telegraph surrounding the arena will appear. With a safe spot at 12 o'clock surrounded by fog.
- You must wait outside the safe zone until the fog has disappeared, then dash inside.
- Thaemine gets new attacks, proceed with the phase 3 fight until x75 HP.
Hard Mode
- Thaemine dashes to the center of the map.
- Everyone is inflicted with a blue AoE surrounding them.
- Spread out to the edge and readjust quickly, so the puddles don't overlap with each other.
- Alternatively, you can use x3 and x3+1 for this, but it's not needed.
- Then anywhere from 3-8 random players will have to perform a Just Guard.
- You can spam "G" the moment you see the yellow telegraph as there is no timing necesary.
- Players who failed the Just Guard will be grabbed and set to 1HP.
- Thaemine will request a very quick and hard stagger check.
- If the stagger check fails, group up at the front and perform a counter-attack.
- If the counter fails, then the grabbed players will die, otherwise they are set free.
- If everyone succeeds the Just Guard, Thaemine will try to grab a random person, so dodge this, otherwise the follow-up is the same.
- Once completed, a red telegraph surrounding the arena will appear. With a safe spot at 12 o'clock surrounded by fog.
- You must wait outside the safe zone until the fog has disappeared, then dash inside.
- Thaemine gets new attacks, proceed with the phase 3 fight until x75 HP.
Telegraph
- Thaemine glows white and disappears in a random direction shortly after.
- Remember the direction where he went to!
Description
- Everyone should group up and wait for Thaemine to reappear with a Just Guard.
- Thaemine will arrive from the direction he vanished to initially.
- Spam Just Guard in the direction he's returning from the moment the telegraph appears.
- If everyone succeeds, you can continue with the fight.
- Players who fail the Just Guard are stunned and brought to low HP.
- Other players must dodge the follow-up attack and counter the boss when he returns.
- If the counter fails, stunned players will die.
- Continue until x50 HP.
Telegraph
- Thaemine mounts his dragon and surrounds the arena in smoke.
Description
- You must dodge the aerial attacks from the dragon.
- Then Counter Thaemine when he slams down onto the arena.
- Cutscene happens.
- Players are surrounded by a dense black fog.
- Stay in-between the fog and dodge the red telegraphs thrown at you.
- After the attacks are done, the camera will shift, and you must Just Guard when the dragon is approaching you.
- Raid Leader should use Sidereal: Azakiel right after the Just Guard.
- Fight the dragon until x0 and complete the raid.
Thaemine Attacks
Description
- Swings left then circle AoE and jumps forward
- The final jump knockdowns.
- Dodge them, then stay close to his body as he will grab 360° in front of him (very close to him is safe).
- Then he will turn around 180° and slam the ground twice.
Description
- Thaemine dashes twice in a short time, following up with a frontal attack that has a massive knock back.
Description
- Thaemine strikes twice in both side directions, then stabs the aggro target.
Description
- Jumps to a random target, stabs the ground and proceeds to tumble backwards.
- Don't stay close to him when he's going backwards, as that's a knock up.
- When he lands, stay inside the blue AoE.
Description
- Thaemine's sword glows white as he dashes forward, followed by multiple slashes.
- Then he uppercuts and slams down anyone who's caught.
- Players hit by the telegraph or uppercut get stunned.
- If anyone is stunned, the boss does a halfmoon attack, back attack safe.
- If nobody is hit, then there is no follow-up attack.
Description
- Narrow red line behind him indicates the beginning of this attack.
- Shortly after, he will strike with a cone shape in front of him that can be Just Guarded.
- If nobody guards, Thaemine strikes the back with another cone.
- If the guard succeeds, there is no follow-up cone in the back.
Glass
- Thaemine is aggroed onto a target.
- He shoots glass shards towards this player.
- Dodge while keeping the mirror still (Similar to Kayangel G3).
- Stagger the boss to stop this mechanic.
Dragon Target
- The dragon targets a random player with a yellow marker.
- Bait this attack away from the group.
- Alternatively, supports can simply use damage reduction, as these attacks aren't that threatening.
115x Dodge
- Thaemine goes to the center, then disappears.
- Dodge multiple red telegraphs.
- Try to stay close to the center of the arena to not get pushed out.
- He will try to grab someone when he reappears.
- If nobody is grabbed, continue fighting.
- If someone got grabbed, wait for Thaemine to land, then move into the safe spot.
Teleport Grab
- Thaemine teleports and performs a quick cone grab in front of him.
- Anyone caught is dragged across the ground.
- Stagger the boss to break free others.
- Be ready to use a potion if you're dragged to the outer fog as it does lots of damage, and move back in.
Dragon Attacks
Description
- The boss slams his right wing to the ground and surrounds himself in red telegraphs, leaving puddles behind.
Description
- Slams his tail in the back, then does a half spin tail swipe.
Description
- Attacks in a wide range in front of him, then attacks the back with lines, leaving puddles.
Description
- Thaemine throws his sword, which causes waves to erupt in both ways from the impact spot.
Description
- The dragon spins twice in a circle, then shoots out lines that leave puddles behind.
Credits
Written by Choilicious
Reviewed by Perciculum
Video Footage from Saintone