Thaemine Gate 2 Guide
The second gate of Thaemine requires the ability to recognize counterattacks quickly and keep track and manage debuffs applied to you during the fight.
Enemy Information
| Normal Mode | Hard Mode | Monster Type | Weakness | Tauntable |
| 1610 Item Level | 1620 Item Level | Demon | None | Only phase 1 |
- HP Potion of your choice
- Sacred Charm
- Dark Grenade
- Time Stop Potion
Raid Rewards
| Gold | Material | Box Material | Box Cost | Auction Material | First Clear | |
| Normal | ||||||
| Gate 1 | 2700 |  3 3 2 2 | 3 2 | 1500 | 1,000,000 x20 x8 x20 | |
| Gate 2 | 3300 | 4 3 | 4 3 | 1800 | ||
| Gate 3 | 5000 | 6 4 | 6 4 | 2500 | 5 | |
| Hard | ||||||
| Gate 1 | 4400 | 6 6 | 6 6 | 2000 | 1,000,000 x20 x8 x20 | |
| Gate 2 | 5500 | 8 9 | 8 9 | 2400 | ||
| Gate 3 | 8900 | 12 12 | 12 12 | 2800 | 10 | |
| Gate 4 | 9800 | 12 12 | 12 12 | 3600 | 10 | |
This guide assumes that you are familiar with the recommended Raid Build for your class.
Learn about the Thaemine Gates: 1 / 3 / 4
Main Mechanics Overview
Once you have read through the detailed description of the main patterns, use the “cheat sheet” during the raid, or check out our condensed Cheat Sheet Collection for all Legion Raids on one page.
x153 (Hard Mode)
Arena Break
Top or Bottom side of the arena breaks off.
x135
8 Counters & Run Phase
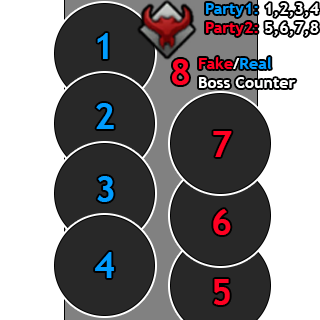
Counter in order:
Party1: Player1,2,3,4 then Party2: Player5,6,7,8
Boss counter can be Red or Blue Flash.
Countering Red Flash = Wipe
30 seconds after arrival
Hidden Azena & Run Phase 2
After Wings + Shockwave attack.
Use Sidereal:Azena shortly after it.
x72
Black or Blue Stagger
Identify the swirl color around the Boss, Black or Blue.
Attack the opposite color orbs towards the boss.
Aggro target dodges laser.
x18 HP
3 Monster Waves
Wave 1: Defeat 8 weak monsters
Wave 2: Defeat 4 elite monsters
Wave 3: Defeat 2 boss monsters
Do not counterattack, and dodge.
Use Sidereal: Thirain to hit both dragons.
x135
Counter
Counter the Orb
Boss counter can be Red or Blue Flash.
Countering Red Flash = Wipe
Move to the safe spot closer to the bottom side.
Hidden Azena
After Wings + Shockwave attack.
Use Sidereal:Azena shortly after it.
x72
Black or Blue Stagger

Identify the swirl color around the Boss, Black or Blue.
Attack the opposite color orbs towards the boss.
Use Hyper Awakening once available.
x18 HP
3 Monster Waves
Wave 1: Defeat 8 weak monsters
Wave 2: Defeat 4 elite monsters
Wave 3: Defeat 2 boss monsters
Do not counterattack, and dodge.
Use Sidereal: Thirain to hit both dragons.
Sidereal
 Hidden Azena
- Used after completing Run Phase 1.
- Happens roughly 30 seconds from when the boss slams back onto the arena.
- The Boss raises his wings and emits a shockwave from his sides, use Sidereal: Azena at this moment.
 Thirain
- Used at the 3 Monster Wave mechanic.
- On the 3rd wave, wait for one of the dragons to charge to the center.
- Then go behind it and use Sidreal: Thirain to hit both dragons.
Raid Mechanics
Raid mechanics cover the passive mechanics that are persistent through the entire raid.
Weakness
- Lasts 20 seconds
- Cannot be cleansed
- Damage received is increased
- max 5 stacks
- Getting hit with various attacks that have a blue telegraph will inflict 1 Weakness stack to you.
- If you get electrocuted while having Weakness stacks, your character creates an explosion around you that does massive damage based on your stack amount. Two or more stacks are lethal to most classes if not shielded.
- Getting electrocuted without Weakness stacks just stuns you with no side effects.
- Getting electrocuted without
- Play safe if you've got many stacks and wait out their duration.
Darkness
- 4 second debuff timer
- Given to 4 players randomly
- This is an ongoing mechanic after Run Phase 2 is completed.
- Players that are affected by this debuff must run to either 12 or 6 o'clock before the timer runs out.
- When the timer expires, a puddle is created beneath them.
- Place it at the edge of the map and return to the fight.
- Make sure to not overlap the puddles with each other!
Main Mechanics
Main mechanics occur at certain HP intervals.
Telegraph
- Occurs at or near x153 bars.
- The Boss teleports to the center of the arena and spawns a red telegraphed circle attack beneath him.
- Proceeds to either break the top or bottom half of the arena.
Description
- You can fall off the map on the broken side.
8 Counters
Telegraph
- Occurs at or near x135 bars.
- A cutscene is shown and the side of the arena breaks off.
Description
- Assign a counterattack order.
- Usually this is done based on Party numbers, e.g. Party1: Player1,2,3,4 then Party2: Player5,6,7,8.
- Otherwise assign the order manually.
- Group up in front of where the boss is landing (red telegraph).
- Once lighting strikes beneath all players, proceed to run down.
- Gather on the bottom side of the bridge and counter the orbs flying towards you based on the order you're assigned.
- After you counter your orb, you've got 3 seconds to run to the pre-determined drop location based on your counter number.
- Once the timer runs out, you'll be frozen in place and spawn a big puddle around you, similar to the Kayangel Gate3 Laser mechanic.
- Make sure the edge of the circle doesn't touch the other players character models.
- Players responsible for counters: 1, 2 and 7 need to make sure the area in front of the boss is free.
- Once all 7 balls are countered, the 8th person must wait in front of the boss and counter him.
- The 8th person can already pre-position himself in front of the boss at the start of the mechanic.
- Look out for a fake counter which can occur, the boss will flash Red instead of Blue.
- If you counter the Red flash, it's a raid wipe!
- Once completed, group up on the bottom of the bridge, wait for lightning to strike below your feet, dodge it and counter the boss after it.
- Break the wall and proceed to the Run Phase.
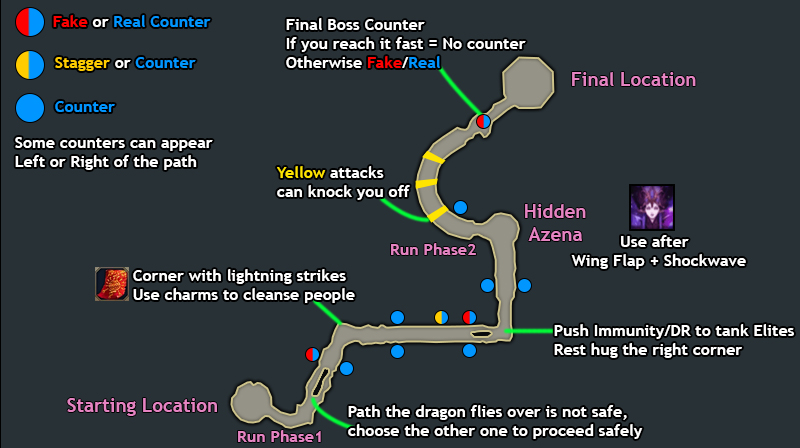
Run Phase
Counter Stacks

- This buff indicates if Hidden Azena will be possible after the Run Phase is completed and can be tracked below the Boss HP.
- These stacks can be depleted by performing successful counterattacks on the emerging dragons.
- If you fail more than 1 of the first 4 dragon counterattacks, Hidden Azena won't work for the upcoming fight.
Description
- At the very start, 2 random players will generate lightning strikes below their feet.
- You will reach a split road section, a dragon will fly over one of the paths.
- The path the dragon flew over is not safe, choose the other one to proceed safely.
- You may outrun this if you're very quick, or use Push Immune skills to avoid his ambush.
- The boss will appear either on the left or right side and request a counterattack.
- If the boss appears on the left, it can be a fake counter with a Red flash, watch out to not proc that.
- You reach the corner point, the floor will be covered with random lightning strikes and purple pools.
- Cleanse caught teammates with skills or Sacred Charms.
- You and your teammates can pre-use Splendid Sacred Charm to grant CC immunity for 2 seconds to cross this safely.
- Pass the bridge up ahead, make sure not to step on the area's glowing white, as you will fall off the map otherwise.
- After this, a counterattack is going to appear either at the top or bottom of the runway.
- Pass the next monster pack, and you'll have to either counterattack or stagger the dragon on the top side.
- Right before the bridge splits off, another counterattack will spawn, either top or bottom.
- If the dragon appears at the top, this could be a fake counter with a Red Flash, be careful!
- Cross the bridge and move to the far right to avoid risk of falling down.
- Three larger enemies will spawn and explode, classes with Push Immunity and Damage Reduction should tank them to prevent other players from taking damage or falling off the map.
- Break the wall, watch out for a counterattack spawning left or right here.
- Don't walk over the bridge parts glowing white and reach the end of the passage!
- Remain in the right corner at the end of the pathway and wait for the boss to land, then proceed with the fight.
Telegraph
- The Boss raises his wings and emits a shockwave from his sides.
- Happens roughly 30 seconds from when the boss slams back onto the arena after the Run Phase.
Hidden Azena Method
- Utilize this method if you succeeded to land at least 3 out of the 4 counterattacks during the initial Run Phase.
- Wait for the boss to do his wings + shockwave attack, then use Sidereal:Azena after.
- Don't stand on the side of the boss, as the shockwave can push you off the map.
- This will freeze the boss and give you a massive DPS window.
- Complete Run Phase 2 after it and reach the final platform.
Regular Method
- If you failed more than 1 counterattack during the initial Run Phase, you must dodge the final attack of the boss.
- There are two variations:
- Yellow circle below the boss → outside safe
- Yellow donut → middle safe.
- Complete Run Phase 2 after it and reach the final platform.
Run Phase 2
There will be obstacles that include:
- 1 counterattack dragon at the start
- 3 yellow line attacks that push you off the bridge if hit by them
- The boss at the very end of the bridge.
- If you reach him before he has landed, he will simply leave.
- If not, he will shoot a yellow line telegraph towards you, stay on the left side of the bridge when approaching.
- Once you reach him, he can do a fake Red Flash counter, pay attention and counter only when it's Blue.
- Break the barrier, enter the final arena and do not stand in the center as that's where the boss will be landing.
Telegraph
- Occurs at or near x72 bars.
- Thirain's text popup appears on the screen, and the Boss teleports to the center of the arena.
- A stagger check is required.
Description
- Pay attention to the color that is swirling around the boss (Black or Blue), as this indicates which orb needs to be used.
- Attack the opposite color orb, while facing the boss with your character.
- Make sure not change your direction too quickly, otherwise the orb may take an incorrect path.
- The same color orb can be attacked to push away from the boss for more space.
- This will fling the orb at the boss and inflict large amounts of stagger damage.
- During this, one player receives two red eyes above his character.
- He is targeted with a yellow line telegraph that can destroy the orbs and push you off the map.
- Stand in an area clear of all the orbs and dodge the attack.
- Hitting an orb with the yellow attack will cause a large AoE explosion.
- Manually complete the remaining stagger damage needed if some orbs were missed.
- Failing to stagger in time is a raid wipe.
Telegraph
- Occurs at or near x18 bars.
- The Boss disappears, and the arena is surrounded in black and blue fog.
Description
Three waves of monsters will spawn that need to be killed within a time limit of around 1minute.
Wave1: 8 weak monsters
- Stay in the center, wait for the monsters to approach and group up, then blow them up.
Wave2: 4 elite monsters
- The monsters do lightning strikes that can trigger your Weakness stacks, so be careful.
- Use Dark Grenade to kill them quicker.
- Utilize skills with crowd control effects.
Wave3: 2 boss monsters
- At 3 and 9 o'clock, dragons will spawn.
- One of them will perform a counterattack, do not counter it!
- This dragon will charge towards the center of the arena.
- Everyone should stay away from the center of the arena and dodge attacks.
- Supports/Gunlancer should use their awakenings to prevent accidents.
- The raid leader should go behind this dragon and use Sidereal: Thirain towards both dragons.
- This kills one of the two dragons and leaves the remaining one with low HP.
- Finish off the dragon to complete the mechanic.
Counter Patterns
Telegraph
- The Boss raises his hands in front of his face and flashes Blue.
Description
- The very first attack when entering Gate 2 is this pattern.
- Can't be counterattacked as an opening attack.
- Counter is active all other times.
- If you fail to counter, the boss dashes forwards and performs cone attacks around him.
Telegraph
- The Boss raises his left hand and draws lightning from the heavens.
Description
- Once you recognize the white glow around the hand, dodge out of the away.
- The Boss will turn 180° and grab everyone in his path.
- Counterattack the boss, otherwise the grabbed players will risk dying to falling off the map.
Telegraph
- The dragon quickly changes direction.
Description
- Counter him if possible.
Telegraph
- The dragon hits the ground with his left arm and swipes his wing in front of him.
Description
- Counterattack is possible after the wing swipe.
Human Form Patterns
Telegraph
- The boss puts his hands together, crouches and spreads his wings.
- Then shoots a blue telegraph in front of him and spins clockwise 180°.
Telegraph
- The boss vanishes, then proceeds to strike lightning on the floor.
- If players are electrocuted, he chooses one of them to be grabbed.
- Strikes the ground with a yellow donut attack.
Telegraph
- Boss strikes the ground in front of him in a cone attack.
- Followed by a few forward autoattacks.
- Then shoots a blue line telegraph in front.
Telegraph
- Boss slams the ground twice creating lightning puddles.
- Then creates an X shaped attack.
Telegraph
- The boss dashes slightly backwards, slams the ground in front of him.
- Then jumps further back and shoots dragons in front of him.
Telegraph
- The boss raises his hands, emits a shockwave around him.
- Then proceeds to strike a chosen target 3 times.
Telegraph
- The boss flings his hands backwards and shoots a blue line at a chosen player.
- This attack is repeated a second time.
Dragon Form Patterns
Telegraph
- The boss vanishes, the camera zooms.
- Then the boss appears somewhere on the edge of the map.
- Go to the spot where the boss was and remain there (safe spot).
- The boss will slam down in the center of the map.
Telegraph
- The boss attacks with a red rectangle below him.
- Then shoots lightning in front of him in a cone that explodes 3 times.
Telegraph
- The boss shoots out black dust in front of him.
- Followed by two yellow cone attacks.
Telegraph
- The boss creates a donut shape with a safe spot inside it.
- Shrouds the arena in dark mist.
- When the mist clears, you get surrounded by lightning gates.
- After a while, only two lightning gates remain.
- Hide behind these to survive, otherwise use a Time Stop Potion
Telegraph
- The boss teleports to the center of the stage.
- Lightning strikes in a lot of places.
- 3 White orbs are created in a triangular formation around the boss.
- Players need to aggro these orbs by going close to them.
- Then proceed to kite them to the puddles that are on the outskirts of the stage.
- If you touch a white puddle, it will explode (no damage).
- This explosion can delete blue puddles from the floor.
Telegraph
- The dragon stomps the ground multiple times.
- All players generate black geysers below their feet, which explode.
- This happens a total of 3 times.
- On the final hit, he inflicts the darkness debuff on a few players.
- Then he raises his wings and does a red circle telegraph in front of him.
- All players affected by darkness should go near the edge of the telegraph and place their puddle there.
- If the puddle is placed on the red telegraph (very edge), it automatically gets rid of the created puddles.
- Make sure to not overlap them.
Solo Mode Main Mechanics
Weakness
- Lasts 20 seconds
- Cannot be cleansed
- Damage received is increased
- max 5 stacks
- Getting hit with various attacks that have a blue telegraph will inflict 1 Weakness stack to you.
- If you get electrocuted while having Weakness stacks, your character creates an explosion around you that does massive damage based on your stack amount.
- Getting electrocuted without Weakness stacks just stuns you with no side effects.
- Getting electrocuted without
- Play safe if you've got many stacks and wait out their duration.
Darkness
- 4 second debuff timer
- This is an ongoing mechanic during the final Phase.
- If you are affected by this debuff, you must run to either 12 or 6 o'clock before the timer runs out.
- When the timer expires, a puddle is created beneath them.
- Place it at the edge of the map and return to the fight.
- Make sure to not overlap the puddles with each other!
Telegraph
- Occurs at or near x135 bars.
- A cutscene is shown and the side of the arena breaks off.
Description
- Go to the bottom side of the bridge and counter the orb flying towards you.
- After you counter the orb, go to the boss and wait for him to glow blue before countering him.
- Move the safe spot at the bottom between the 2 yellow telegraphs.
Telegraph
- Briefly after you enter the new arena, the Boss raises his wings and emits a shockwave from his sides.
- Use Sidereal:Azena shortly after it to freeze and deal high damage to him.
Telegraph
- Occurs at or near x72 bars.
- Thirain's text popup appears on the screen, and the Boss teleports to the center of the arena.
- A stagger check is required.
Description
- Pay attention to the color that is swirling around the boss (Black or Blue), as this indicates which orb needs to be used.
- Attack the opposite color orb, while facing the boss with your character.
- Make sure not change your direction too quickly, otherwise the orb may take an incorrect path.
- The same color orb can be attacked to push away from the boss for more space.
- This will fling the orb at the boss and inflict large amounts of stagger damage.
- Manually complete the remaining stagger damage needed if some orbs were missed.
- Failing to stagger in time is a raid wipe.
- Use Hyper Awakening once available.
Telegraph
- Occurs at or near x18 bars.
- The Boss disappears, and the arena is surrounded in black and blue fog.
Description
Three waves of monsters will spawn that need to be killed within a time limit of around 1minute.
Wave1: 8 weak monsters
- Stay in the center, wait for the monsters to approach and group up, then blow them up.
Wave2: 4 elite monsters
- The monsters do lightning strikes that can trigger your Weakness stacks, so be careful.
- Use Dark Grenade to kill them quicker.
- Utilize skills with crowd control effects.
Wave3: 2 boss monsters
- At 3 and 9 o'clock, dragons will spawn.
- Stay at the center.
- One of them will perform a counterattack, do not counter it!
- This dragon will charge towards you. Dodge towards top or bottom side.
- Go behind this dragon and use Sidereal: Thirain towards both dragons.
- This kills one of the two dragons and leaves the remaining one with low HP.
- Finish off the dragon to complete the mechanic.
Credits
Written by Choilicious
Video Footage by Saintone