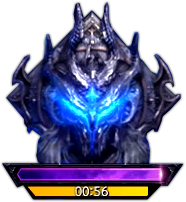
Thaemine Gate 4 Guide
If you were missing team based main mechanics in gate 3, then rest assured that they are back in full force for gate 4. Team coordination and pattern recognition is the name of the game here.
Enemy Information
| Normal Mode | Hard Mode | Monster Type | Weakness | Tauntable |
| 1610 Item Level | 1620 Item Level | Demon | None | No |
- HP Potion of your choice
- Sacred Charm/Splendid Sacred Charm
- Dark Grenade
- Time Stop Potion(The First) or Atropine Potion/Stimulant(Hard Mode)
Raid Rewards
| Gold | Material | Box Material | Box Cost | Auction Material | First Clear | |
| Normal | ||||||
| Gate 1 | 2700 |  3 3 2 2 | 3 2 | 1500 | 1,000,000 x20 x8 x20 | |
| Gate 2 | 3300 | 4 3 | 4 3 | 1800 | ||
| Gate 3 | 5000 | 6 4 | 6 4 | 2500 | 5 | |
| Hard | ||||||
| Gate 1 | 4400 | 6 6 | 6 6 | 2000 | 1,000,000 x20 x8 x20 | |
| Gate 2 | 5500 | 8 9 | 8 9 | 2400 | ||
| Gate 3 | 8900 | 12 12 | 12 12 | 2800 | 10 | |
| Gate 4 | 9800 | 12 12 | 12 12 | 3600 | 10 | |
This guide assumes that you are familiar with the recommended Raid Build for your class.
Learn about the Thaemine Gates: 1 / 2 / 3
Main Mechanics Overview
x315 HP - Red Marks
x280 HP - Co-op Counter + Prokel
x175 - Tethers + Clash
x87 HP - 6 Counters
x63 HP - Puddle Walk + Crit
Once you have read through the detailed description of the main patterns, use the “cheat sheet” during the raid, or check out our condensed Cheat Sheet Collection for all Legion Raids on one page.
x315
Red Marks
Place Red Markers.
Dodge and move to your location.
Stagger the statue.
Aim at least x2 tethers at each statue.
x280
Co-op Counter + Prokel
Group behind the boss.
Dodge cone attack, move to the bottom left.
Perform Co-op Counter (3 people).
2 DPS enter blue orb, kill Clone → Stagger Sword.
Remaining players, 11 o'clock → Spacebar Blue Wall, Stagger Thaemine.
x175
Tethers + Clash
Eliminate blue circles with tethers.
Gather x1 yellow orb → run bottom.
Complete Maze.
Clash1 + Sideral:Shandi → Clash2
x87
6 Counters
Party1: 9 o'clock
Party2: 3 o'clock
Spacebar when blue puddles appear → stagger Thaemine.
Tethered Players +1 clockwise → Counter on blue line.
x63
Puddle Walk + Crit
Party1: 9 o'clock
Party2: 3 o'clock
Run to 12 o'clock when you see blue puddles.
Run back after blue explosion.
Use Splendid Sacred Charms after 3rd explosion.
G4-2
Pace
6m20sec~ - First Domain Expansion
5m~ - Full Identity + Offense Kadan
x210 HP - Stagger Check
3-2m - Second Domain Expansion.
2m-1m - Full Identity + Offense Kadan
G4-3 - Transition to Gate 4-3
G4-2 x210
Stagger Check
Avoid blue/red overlapping telegraphs.
Dodge a series of 4 red attack variations.
Stagger the boss.
G4-3
Hidden Kadan
Approximately 1minute into G4-3.
Watch for Thaemine raising his sword and teleporting to the center.
Use Sidereal: Defense Kadan
Sidereal
 Thirain
- Used during x280 HP mechanic by the 6 Outside players.
 Azena
Azena
- Used during x87 HP mechanic after all moving swords have been countered to destroy stationary ones.
 Shandi
- Used when the 1st Clash is ongoing to refresh cooldowns of all DPS for the burst phase.
Raid Mechanics
Raid mechanics cover the passive mechanics that are persistent through the entire raid.
Thaemine's Identity
This is a special gauge that can be seen in the top left of your screen when fighting Thaemine.
- This gauge is divided into 5 different parts.
- Automatically builds up during the fight.
- Players getting hit by attacks of Thaemine also fill this identity.
- Starting from 40% identity and every 20% after that, Thaemine will perform a co-op counter pattern.
- When the gauge is fully filled, the boss does a special counter mechanic with impaired vision.
Co-op counters
Sword
Axe
Sword+Axe
Full Identity Mechanic
Full Identity
- When the Identity fills up, it gets replaced with a new gauge.
- Players have 60 seconds to remove x15 HP or wipe.
- Players must complete 3 Fake & 3 Real counter mechanic.
- You are affected by Darkness for the duration of the mechanic.
Up or Down
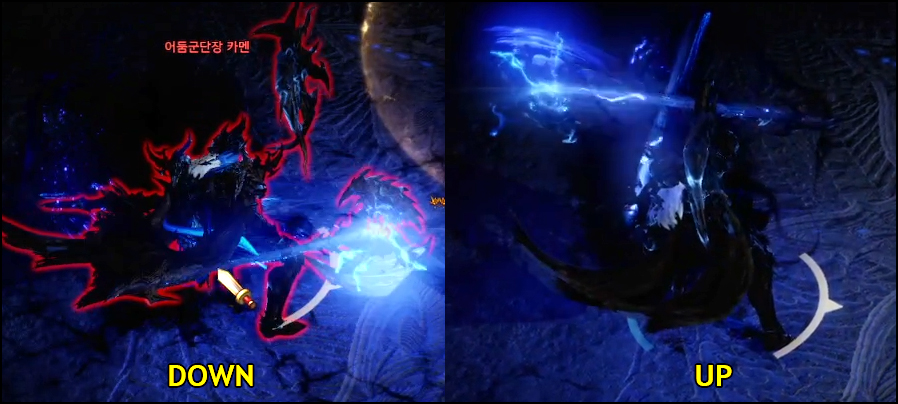
- When Thaemine has Full Identity he raises his sword and spawns many blue telegraphed explosions around him that expand outwards.
- Then he teleports to the center of the arena and requests a counterattack.
- The blue flash of this cannot be seen as players are affected by Darkness.
- Two versions of the counterattack are possible, and you must know how they look like to succeed.
- Up - Thaemine lifts his weapons up in the air.
- Down - Thamine crouches, aiming his weapons to the ground.
- When he has finished his stance, you must counter him and call out to your team what version it was.
3 Fake / 3 Real
- Thaemine will vanish and spawn 6 clones of him around the center of the map, showing a version of the counter.
- 3 Up
- 3 Down
- Counterattack 3 clones that show the original attack Thaemine used in the beginning.
- Don't interact with the opposite clones.
- For every Real clone you failed to counter, you will take raid wide damage and be inflicted with x1
 Death Debuff.
 - After the clones are completed, gather in the center of the arena and perform a final counterattack on Thaemine.
- If this fails, everyone gets x1 Death Debuff as well.
- If this fails, everyone gets x1
Death Debuff
Thaemine applies this debuff during certain mechanics in the raid if they are performed incorrectly: Full Identity, x315, x175, x87.
- +5% incoming damage per stack.
- x3 stacks = Mind Control that can't be cleansed (death).
Darkness

Getting hit by certain attacks from Thaemine inflicts you with Darkness.
- You lose the ability to see boss telegraphs for its duration.
- Some major raid mechanics inflict an uncleansable version of this debuff so watch out.
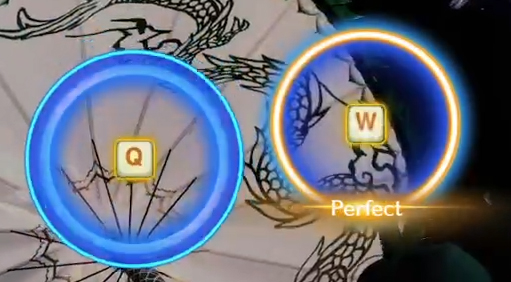
Clash is a new mechanic in Lost Ark that requires the player to press "G" and enter a timed minigame. These occur at specific moments in the raid after Thaemine emits a very bright flash of light.
- A total of 2 Clashes are available in gate 4.
- Only 1 Clash per person is allowed.
- Perfect - greatly increase the duration of the Clash (More DPS uptime).
- Good - small time increase.
- Bad - stops the Clash and inflicts damage to the player (Mostly lethal).
- 2 Clashes for x175 HP mechanic.
- Possible letters within the minigame:
- 1st Clash, 1st set: Q, W, E, R
- 1st Clash, 2nd set: Q/QQ/QQQ
- 2nd Clash: Q, W, E, R
- A Clash must be initiated with the "G" key at designated locations.
- There is a training area for them in Trixion.
1st Clash
- Occurs at x175 HP after completing the Tether mechanic and running through the maze.
- Located in front of Thaemine inside a blue circle.
- Perform a set of 1 key → 6 keys in succession.
2nd Clash
- Occurs after the 1st Clash.
- Thaemine teleports → appears in the center → slam → Clash.
- Located in front of Thaemine inside a blue circle.
- Perform a set of 2 keys in succession.
Shattered Armor

Dark Shock

Shattered Armor
- This debuff can be inflicted after x175 HP.
- Getting knocked into a wall from Thaemine attacks inflicts Shattered Armor.
- Incoming damage by +15% for 20 seconds.
Dark Shock
- This debuff can be inflicted after x63 HP.
- Getting knocked into a wall from Thaemine attacks inflicts Shattered Armor and Darkness.
- Incoming damage by +15% for 25 seconds + unable to see ground patterns and counterattack indicators.
Main Mechanics
Main mechanics occur at certain HP intervals.
Telegraph
- Occurs at or near x315 HP.
- Two random players in the raid gain large Red Markers below their feet.
Initial Red Marks
- If you are one of the two marked targets, group up and move to either the far left or right of the arena.
- Proceed to doge the red ground telegraphs as they expand and become very large.
- After that a single person will receive another Red Marker, deal with it the same way.
- If you get caught within the red explosions, you are inflicted with x1 Death Debuff.
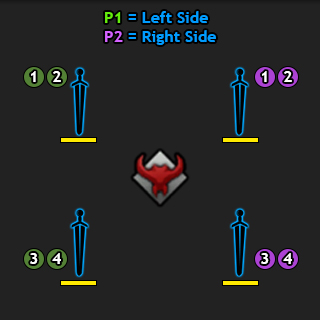
4 Sword Positions
- Setup positions for the four swords, typically Party1: 1,2 (top left) 3,4 (bottom left), Party2: 1,2 (top right) 3,4 (bottom right).
- After the initial marks have exploded, run to any x3 position (12,3,6,9) and prepare to dodge another set of red explosions.
- Try to spacebar/dodge inwards after the first layer of the pizza has exploded and go to your designated spot.
- 4 Swords will descend in positions 1,5,7 and 11 o'clock that need to be staggered.
Stagger + Tethers
- Thaemine will attach several raid members with orange tethers in two separate waves.
- 1 Tether inflicts 40-45% stagger damage to swords.
- Tethers must be aimed towards the swords.
- To succeed, at least 2 tethers and manual stagger must be inflicted to all 4 swords.
- After the first wave of tethers, communicate with your team which of the swords needs assistance.
- Then on the 2nd wave of tethers, move over to those spots with any leftover tethers to help out.
- Once all 4 swords are staggered, group up behind the swords at 5 and 7 o'clock and wait out the explosion.
- Failing to stagger 1 sword = Raid Wipe.
- Approach the boss after that, Thaemine will perform a large blue fear AoE attack which must be dodged by using spacebar/awakening/Splendid Sacred Charm or Guardian Tune(Bard).
- Then at least 3 players must co-op counter Thaemine to complete the mechanic.
- Failed co-op counter = Raid Wipe.
Telegraph
- Occurs at or near x280 HP bars.
- Thaemine teleports to the center, surrounds the outside of the arena in a blue donut shape.
- A cutscene happens.
Co-op Counter
- After the cutscene, group up at the back of Thaemine and wait for him to turn towards you with a cone attack.
- Dodge towards the left side of his back attack indicator.
- Then Thaemine will request a co-op counter (3 person counter).
- Counter him and stagger the sword on the ground.
- Two blue orbs will spawn on the ground, whoever runs into them gets teleported into the "Prokel" fight.
- At this point, the mechanic will split into two separate teams: Inside/Outside.
Inside 2 Players
- Choose two DPS players that are able to counter reliably, do a lot of damage in a short time, and can recognize boss patterns.
- These players must take the blue orbs and enter the inside arena.
- Defeat the clone of Thaemine and stagger the sword on the ground to leave.
- This must be done in 60 seconds, after that the arena starts to get smaller.
Inside Counterattacks:
- The boss vanishes and reappears shortly after, performing a frontal attack.
- Then turns towards a player and requests a counterattack.
- The Ground flashes red twice, on the third you need to counter the boss.
Outside 6 Players
- Outside players should position themselves at 11 o'clock (safe zone) and wait out several red cone attacks.
- When Thaemine lands in the center, the raid leader should use Sidereal: Thirain.
- Wait out tornado attacks coming from the center, then run to Thaemine and stagger him.
- Make sure to spacebar through the blue pulsating shield around Thaemine to reach him.
- Skills with push immunity can also be used.
- Stagger the boss.
- You must bring Thaemine to x240 HP to complete the mechanic and for the arena to expand again.
Telegraph
- Occurs at or near x175 HP bars.
- Thaemine jumps to the top of the arena and spawns blue circles across the field.
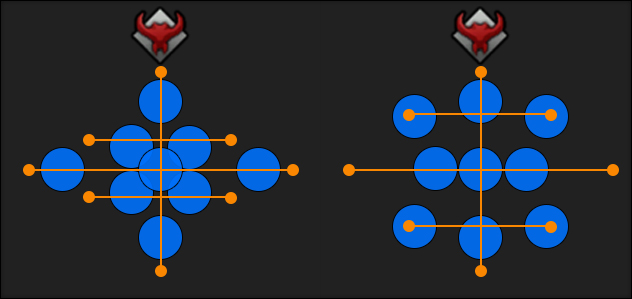
Tether
- Four blue tether connections will be created between all players (pairs of 2).
- You must overlap these tethers with all blue circles to destroy them and create yellow orbs in the process.
- Typically, the easiest way is for one person to stay at the top, while his partner matches him at the bottom.
- Then remaining players adjust horizontally depending on the situation.
- Each player needs to grab x1 yellow orb and proceed to the bottom of the arena (safe spot).
- If a blue circle isn't destroyed, it blows up, dealing damage and inflicting x1 Death Debuff.
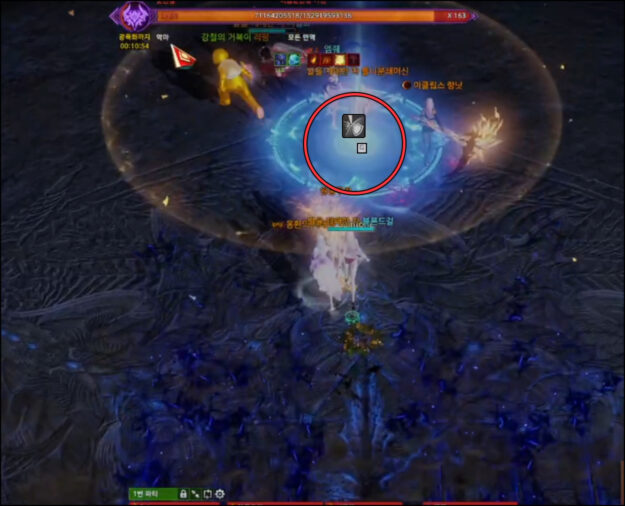
Maze + Clash
- After the cutscene finishes, you must reach the boss while avoiding a maze of swords flying towards you.
- There are several open gaps that you must run through.
- (1st Clash) Whoever reaches the end must press "G" in front of the boss to begin the 1st Clash.
- If nobody reaches the boss in time, or nobody enters the Clash = Raid Wipe.
- The 1st Clash requires sets of 1 key → 6 keys.
- 1st set keys: Q, W, E, R
- 2nd set keys: Q / QQ / QQQ
- If all keys are Perfect, then Thaemine dashes forward and stands still for a long time.
- If some keys include Good, then a red pizza pattern is generated around the boss and 2 blue orbs spawn.
- These orbs give -40% ATK Power to the player.
- Supports should grab these as -ATK Power doesn't affect them.
- If orbs aren't picked up, they explode and give -ATK Power to everyone.
- While the 1st Clash is ongoing, raid leader should use Sidereal:Shandi to reset cooldowns of all DPS players for a greater burst window.
- (2nd Clash) Thaemine will vanish and slam the center of the arena, spawning the 2nd Clash zone.
- The clash requires 1 set of 2 keys.
- Q, W, E, R
- Ideally, this clash should be done by your weakest member.
- Once completed, Thaemine will slam the arena with a large red AoE and surround the arena with walls of stone.
- If you hit a wall from boss attacks, the player receives damage + the Shattered Armor debuff, increasing incoming damage by 15% for 20 seconds.
Telegraph
- Occurs at or near x87 HP bars.
- Thaemine disappears and lands in the center, with a blue pentagram beneath him.
- 6 swords spawn along the edges of the arena.
Puddles + Stagger
- Gather at either 3 or 9 o'clock.
- Several players will receive a
 debuff for 12 seconds.
- This debuff can be removed by using your spacebar.
- If it isn't removed, the player generates a large red AoE below him.
- When blue puddles appear below players, use your spacebar and run either clockwise or counterclockwise
- 4 blue puddles will spawn.
- After this, go to the center and stagger Thaemine.
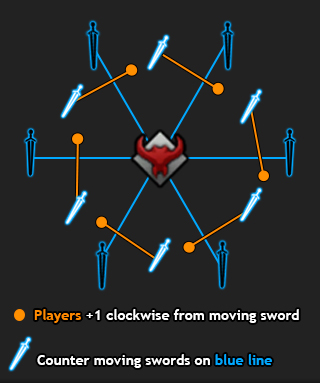
6 Tethers + Counters
- After succeeding the stagger, 6 additional moving swords spawn at 12,2,4,6,8,10 o'clock positions.
- These swords are attached to random players with an orange tether.
- If you're attached with a tether, move clockwise +1 hour from where your linked sword is located.
- Then the sword will move towards you, counter it when it's about to cross the blue line on the ground.
- Once all swords have been countered, the raid leader should use Sidereal:Azena to destroy stationary swords.
- If successful, you will gain x6
 stacks of shield, get flung in the air and survive.
- If one of the moving swords isn't countered, you won't obtain full shield stacks and lose players by receiving damage.
- You can try to prevent this by using Support awakenings and healing to full HP.
Telegraph
- Occurs at or near x63 HP bars.
- Thaemine jumps to the center of the map.
- Many blue puddles begin to spawn under the players and in random places.
Puddle Walk
- Party1 go to 9 o'clock and Party2 at 3 o'clock positions.
- When you see blue puddles appearing, both parties should run towards the 12 o'clock position and stay there.
- Wait out the large blue AoE attack from Thaemine, then proceed to run back where you came from (3 & 9).
- Count the blue puddles appearing below you on your way back, after the 3rd explosion players should use Splendid Sacred Charms to give themselves 2 second CC Immunity.
- Groups with Bard can utilize Guardian Tune.
- This is to prevent getting rooted on the 4th puddle spawn.
- Keep running until the puddles stop spawning and you've completed the mechanic.
Crit
- After the x63 HP mechanic, all of Thaemine attacks can critically hit you.
- You can check Thaemine's HP bar for this buff to know if it's active
 .
. - Getting critically hit will crack your screen.
- If it cracks completely, you die.
- If you hit a wall from boss attacks at this stage, the player receives damage and is inflicted with Dark Shock (Shattered Armor + Darkness).
Sword Patterns
Special Co-op Counterxx
- Thaemine extends his sword forwards and it starts glowing
- As he winds it back to strike, he requests a co-op counter.
- He can request 2-3 counterattacks.
- After countering the first attack he will either grab or counterattack again.
- Grabbed players will get slammed into the ground in front of him.
Red Puddles + Teleport + Counter
- Thaemine sword starts glowing as he lifts his sword upside down and red telegraphs appear.
- Then he teleports to random locations multiple times.
- A counter can possibly appear after the 2nd or 3rd teleport.
- The ground will be surround in black mist indicating its a counterattack.
- If there is no mist he will strike forwards at the end.
Sword Pizza
- Thaemine slashes in front of him, while stepping backwards, creating red ground telegraphs.
- Then strikes forward twice and slams down in front of him creating a pizza attack.
Yellow Back Grab
- Thaemine attempts to grab behind him.
- Nothing happens if nobody is grabbed.
- Otherwise he tries to grab additional players, toss them in the air and hit them with a forward strike.
Wind + Cone
- Thaemine marks 2 players with a target above their heads and links them together.
- These must move to a spot that doesn't hinder attacking the boss.
- Shortly wind will blow across the path of the marked players.
- At the same time Thaemine is channeling a cone attack that he will unleast to a targeted player.
Black Puddles & Blue Orb
- Thaemine raises his sword and channels it for a very long time.
- Black puddles start spawning around him, and 2 Blue Orbs appear.
- Blue Orbs must be picked up by supports, otherwise they explode and the group receives -40% ATK Power for 20 seconds.
Shoulder Charge
- Thaemine dashes forwards and strikes in front of him twice, knocking back players if hit.
Blue & Red Cones
- Thameine strikes his left side, then attacks with a blue cone in front/back.
- Attacks his right side, followed by a 180 degree red cone.
- After x60 HP a jellyfish is added (before the red pizza) if you look at the boss during a black flash you get petrified.
- There is a variant without the Blue Cone.
Lauriel
- A very quick swipe attack with the sword, followed by a backdash turnaround.
- Players hit by the shockwave will get pushed really far.
Inside or Outside
- Thaemine surrounds himself with swords pointing either outside or inside.
- If swords point outside → inside safe
- If swords point inside → outside safe.
- When players are hit a massive flury of attacks surrounds Thaemine inflicting large damage followed by a slam in front, watch out!
Massive AoE attack
- Thaemine quickly charges forward, then turns back.
- Extends his sword with a blue glow.
- A large blue AoE effect can be seen below the boss.
- Run behind the boss to be safe.
Axe Patterns
Special Co-op Counter
- Thaemine erupts with black energy around his body.
- Then proceeds to slam the entire arena (Earthquake).
- Players must spacebar this or Bard (Guardian Tune).
- Co-op counter Thaemine after it.
2 Hits + Leap + Counter
- Thaemine hits twice in front of him, does a small leap forwards.
- Counterattack after the leap.
Dark Forg + Counterattack + Stagger
- Thaemine creates a large black shroud around him that he sucks towards him.
- Then requests a counterattack.
- 3-5 players will get a sword marker above their head.
- They must place them away from the boss and quickly leave the dropzone.
- If hit by the attack you gain stacks, 3 stacks = death.
Stuck Axe
- Thaemines axe starts glowing as he strikes forward hitting the ground in front of him.
- The axe gets stuck in the ground and blue puddles spawn around him.
- Then the area in front of him explodes in a large AoE.
Front Puddles + Grab + stagger
- Thaemine creates cone shaped puddles in front of him.
- Players caught in them get grabbed.
- If players are grabbed he requests a stagger check.
- Afterwards a frontal slam.
Axe Pizza
- Two frontal attacks, followed by a slam that creates a red pizza telegraph.
Orianna
- Dark fog can be seen around Thaemine for a short period.
- Then he surrounds the ground around his feet in a large electric circle.
- Pulls players in → Pushes them out.
- Push Immune/Spacebar the mechanic or outrange it.
Backstep + Cone Earthquake
- Thaemine steps back and strikes in front of him in a 180 degree cone.
- Getting hit by this will inflict Earthquake on your character.
- Ask for a cleanse/damage reduction from your teammates, as the follow up attack is deadly.
Blue Electric Puddles
- Thaemine performs a short whirlwind of blue and black color.
- Then suddenly blue electric puddles spawn.
- After a short while wind will blow from the Thaemine's back attack direction.
- You must run away as quickly as possible and avoid standing on these.
- Standing in the dark fields places a debuff that reduces attack power by 20% for each stack, and x3 stacks - Mind Control (Death).
Sword+Axe Patterns / Dual Swords
Special Co-op Counter
- Thaemine emits black fog around his character, then vanishes and reappears.
- He strikes down in a red cross+circle.
- Then requires a co-op counter.
- Proceeds to slash his front (Earthquake) → Stab → Counter
- And hits his front in a donut shape.
Axe + Sword swing + Counter
- Thaemine swings with his axe, then his sword.
- You can counter him after his sword strike.
- If you succeed he will perform an attack in front.
Charged Attack + Stagger
- Thaemine raises both his weapons behind his back charges them then attacks in front.
- A stagger check appears, followed by a frontal slam when completed.
3 Frontal Attacks
- Thaemine charges his swords above his head for a short time.
- Then attacks in front of him 3 times.
Front Cone + Double Back Swing
- Thaemine charges his swords above his head for a short time (they flash).
- Then attacks in front followed by 2 back attacks.
Gate 4-2

When entering the next "gate" you will spawn inside a Workshop Area. Here you can refresh and swap any Combat Item you own. Interact with the orb in the center of the Workshop to proceed when ready. This is only available for Hard Mode and is not present in "The First" difficulty.
Pace Overview
6m20sec~ - First Domain Expansion
5m~ - Full Identity + Offense Kadan
x210 HP - Stagger Check
3-2m - Second Domain Expansion.
2m-1m - Full Identity + Offense Kadan
G4-3 - Transition to Gate 4-3
Sidereal
 Offense Kadan
- Used after Full Identity mechanic to stagger Thaemine and give an attack opportunity.
- Otherwise used to cancel patterns like Domain Expansion if needed.
 Defense Kadan
- Only used to activate Hidden Kadan in Gate4-3.
Main Mechanics
- If Thaemine's Identity is far from full with 5m30s remaining on the enrage timer, then Supports/GL should tank patterns on purpose to build gauge and activate Full Identity.
- This is done to optimize Sidereal gauge as it most likely will be full before Thaemine's Identity fills up.
- You do not need to tank patterns later in the fight.
- When Thaemine reaches Full Identity, he teleports away and red spikes spawn around the edge of the arena and a Black Hole appears in the center that constantly pulls players towards it.
- Party1&2 should separate themselves from each other, typically far left and right.
- Shortly after, clusters of red balls will spawn on top of players that explode and inflict a
 debuff which reduces healing by 45% per stack (max 2).
- This is not an important attack that needs to be avoided at all costs.
- Run along the outer edge and pay attention to the Identity timer, when it reaches 20 seconds Thaemine will pull everyone towards the center and reduce their HP to 1.
- You should spacebar towards the outer edge here.
- If you're pulled too close to the boss, you will die from damage.
- Players gain 2 debuffs for 30 seconds:
 Unable to use Combat Item.
 Small % of life steal.
- Raid leader should use Sidereal: Offense Kadan right after getting up to stagger Thaemine and grant everyone an opportunity to attack freely for lifesteal benefits.
- At the same time, Supports/GL should provide shields/awakening so that players don't die while at 1HP.
- Proceed with the fight carefully until you're able to use Combat Items again.
This is a periodic attack that begins between 6m20s~6m0s on the enrage timer. After that, roughly every 2 minutes. The time is not taken into account during the Full Identity (35 seconds) and x210 HP Stagger Check mechanics. Completion grants +40% Sidereal Gauge.
- The boss turns the screen into black & white colors, then slashes the screen 4 times.
- Players should spread in x3 and x3+1 positions around the boss as soon as possible.
- Thaemine then delivers 4 consecutive hits to random targets. 1 hit = 120% of the player’s maximum HP (death).
- When the headattack indicator points at your position, you should do one of these 3 things:
- Time Stop Potion
- Damage reduction/Shield
- Spacebar (Only classes with quick animations)
Telegraph
- A cutscene happens, then players are ambushed by blue/red overlapping telegraphs.
Description
- After a while, the attacks stop and a stagger bar appears below Thaemine.
- Players must stagger the boss while avoiding 4 variations of different red telegraphs.
- Large Square safe zones
- Small Square safe zones
- Star Shape Hands
- Clockwise Hands
- Getting hit inflicts a debuff that kills you if it reaches x5 stacks.
- If you succeed the stagger, the arena becomes larger again.
- If you fail, an AoE explosion happens, pushing everyone outwards (stay close to the boss) and the stage remains tiny until you reach x105.
Description
There are certain conditions players need to think about before transitioning to Gate 4-3 such as: Thaemine's Identity gauge state and Inflicted DPS up to this point.
DPS Timing
Great Pace
- Reached x210 HP Stagger Check before 2nd Domain Expansion.
- 2nd Domain Expansion happened around 3-2 min before enrage.
- Use Sidereal: Offense Kadan when boss is x135 HP or lower.
Good Pace
- Reached x210 HP Stagger Check before 2nd Domain Expansion.
- 2nd Domain Expansion happened around 3 min before enrage.
- Black Hole mechanic was activated around x145-140 HP.
- Use Sidereal: Offense Kadan and push to x105 HP.
Bad Pace
- 2nd Domain Expansion happened before x210 HP Stagger Check.
- Make sure to not activate Black Hole.
- If you do, don't use Kadan and utilize Support/Gl shields.
- If HP is higher than x145 by this point:
- Save Sidereal: Offense Kadan to cancel the 3rd Domain Expansion and push to x105 HP if possible.
Identity Levels
Intentionally watching the cutscene based on the gauge levels prevents the Black Hole mechanic from activating not long after you reach G4-3. This way you can preserve your Sidereal: Defense Kadan for the Hidden version and use a 2nd Sidereal at the very end of G4-3. Otherwise you're left with 1 Sidereal use, which can be tight.
- Thaemine's Gauge is 80% ⇾ Watch full cutscene.
- 40% or less ⇾ You may skip cutscene.
- Black Hole was just completed ⇾ Wait out the debuff timers for 30 seconds, then skip.
Regular Patterns
Multihit Counter
- Thaemine crouches with his sword tucked behind his back.
- Then quickly slashes in front of him 8 times.
- This pattern is counterable midway through the attack.
Jump + Counter
- Thaemine jumps really high, then slams down with a red circle telegraph.
- Counterattacking right after he lands.
Air Jumps + Co-op Counter
- Thaemine starts jumping in the air.
- Then tries to grab nearby players.
- If someone is grabbed co-op counter is required (3 players).
Rammus
- Thaemine jumps forwards while slaming into the ground.
- Then flies up again and starts spinning towards an aggroed player.
- Explodes the area front/back of him, then it expands to both sides.
- Dash inside once the initial spot has exploded.
Dome + Stagger
- Thaemine darkens the arena.
- A black dome surrounds him and a stagger bar appears.
- Stagger Thaemine from the front or back of the dome.
- You will take reflect damage if you attack him from the line that splits the arena in half.
Grab + Slam & Donut
- Thaemine crouches, targets a player then charges towards him grabbing anyone in his path.
- Then he teleports and slams grabbed players in front of him creating a donut shape.
4 or 5 Orbs
- Thaemine spawns massive orbs around him.
- Then he shoots them outwards.
- 4 orbs → safe in the back
- 5 orbs → safe in the front
X + #
- Thaemine flies into the air and throws a red X shaped attack followed by a blue # shape.
Uppercut + Grind
- Thaemine tries to grab players with a yellow frontal attack.
- Afterwards he teleports and slams down onto the ground, grinding his sword across the floor.
Right + Left Cone
- Thaemine slices the ground in two directions back to back.
- If hit you get imprisoned.
Telegraph
- Red light shines from the heaven.
- Thaemine stands still with his sword raised above his head.
- Stop all attacks.
Telegraph
- Thaemine crouches, then vanishes and chooses a player that he petrifies.
- Around this player spawn 8 Clones.
- The 2 clones whos swords are facing outwards are safe spots.
- Stand at the back attack indicator when hes showing a moon on the floor.
Telegraph
- Thaemine puts his sword behind his back and it starts glowing bright red/orange.
- Move away from the boss and get ready to dodge waves of sawblades.
- Afterwards spacebar past the ground wave attack.
Telegraph
- Thaemine flies in the air, slices the ground with red lines twice.
- Then a narrow safe spot appears.
- Everyone should group up to make it to the pizza slice in time.
Gate 4-3
Main Mechanics
- During Gate 4-3 you should avoid getting hit as much as possible to reduce the amount of gauge you gain.
- When Thaemine reaches Full Identity, he teleports away and red spikes spawn around the edge of the arena and a Black Hole appears in the center that constantly pulls players towards it.
- Party1&2 should separate themselves from each other, typically far left and right.
- Shortly after, clusters of red balls will spawn on top of players that explode and inflict a debuff which reduces healing by 45% per stack (max 2).
- This is not an important attack that needs to be avoided at all costs.
- Run along the outer edge and pay attention to the Identity timer, when it reaches 20 seconds Thaemine will pull everyone towards the center and reduce their HP to 1.
- You should spacebar towards the outer edge here.
- If you're pulled too close to the boss, you will die from damage.
- Players gain 2 debuffs for 30 seconds:
- Unable to use Combat Item.
- Small % of life steal.
- Raid leader should use Sidereal: Offense Kadan right after getting up to stagger Thaemine and grant everyone an opportunity to attack freely for lifesteal benefits.
- At the same time, Supports/GL should provide shields/awakening so that players don't die while at 1HP.
- Proceed with the fight carefully until you're able to use Combat Items again.
This is a periodic attack that happens roughly every 2 minutes. The time is not taken into account during the Full Identity (35 seconds) mechanic. Completion grants +40% Sidereal Gauge.
- The boss turns the screen into black & white colors, then slashes the screen 4 times.
- Players should spread in x3 and x3+1 positions around the boss as soon as possible.
- Thaemine then delivers 4 consecutive hits to random targets. 1 hit = 120% of the player’s maximum HP (death).
- When the headattack indicator points at your position, you should do one of these 3 things:
- Time Stop Potion
- Damage reduction/Shield
- Spacebar (Only classes with quick animations)
Telegraph
- Thaemine raises his sword then teleports to the center of the arena and holds his sword sideways above his head.
Description
- When entering Gate4-3 players should push Thaemine's HP as much as possible.
- Depleting a certain amount of HP will activate this mechanic.
- Typically 1minute~ into G4-3.
- Raid leader should use Sidereal: Defense Kadan.
- Offense Kadan works too, but has to be cast from the headattack indicator of Thaemine.
- This will provide everyone with 15seconds~ of free DPS time.
- Thaemine gets pushed backwards during the Clash, so position wisely.
- If Hidden Kadan is missed, there is a Clash opportunity at 6 o'clock from Thaemine's location.

- The HP of the boss is hidden during the final gate of Thaemine.
- The enrage timer is replaced with a red moon thats slowly depleting.
- If it reaches a full Eclipse, the raid wipes.
- This happens roughly after 4 minutes within the gate.
Regular Patterns
4 Dashes
- Thaemine charges in a line 4 consecutive times.
- The 4th charge can be countered.
Random Rammus
- Unlike in G4-2 the safe spot after the initial explosion can be in a random direction.
Lazaram
- Similar to Voldis G4, Thaemine dashes towards an aggro target and leaves a trail of blades that uppercut you.
Star + Waffle
- Upgraded from X + # in gate4-2.
Telegraph
- Thaemine stomps the ground and covers the entire arena in red.
- Use spacebar, Splendid Sacred Charm or Bard(Guardian Tune).
- Otherwise you get imprisoned.
- This can be a challenging mechanic right after Black Hole's battle item silence debuff.
- There can be a yellow pizza slice safe spot sometimes.
Telegraph
- Thaemine raises his sword for a very long time and it starts glowing red.
- Then red puddles spawn and Thaemine releases his attack towards the aggroed player.
- In Gate4-3 additional black spheres are spawned around the boss that explode at the very end.
Telegraph
- Thaemine teleports, reappears and tries to grab players with a yellow cone attack.
- Nothing happens if players dont get grabbed.
- If they are grabbed however, Thaemine grinds them across the floor and requests a stagger check.
- Stagger the boss to free your teammates.
Credits
Written by Choilicious
Video Footage by Saintone