Thaemine Gate 3 Guide
The third gate of Thaemine requires a high level of pattern recognition and focus. Mess up once, and you'll find yourself dead in no time.
Enemy Information
| Normal Mode | Hard Mode | Monster Type | Weakness | Tauntable |
| 1610 Item Level | 1620 Item Level | Demon | None | No |
- HP Potion of your choice
- Sacred Charm
- Dark Grenade
- Time Stop Potion or Atropine Potion/Stimulant
Raid Rewards
| Gold | Material | Box Material | Box Cost | Auction Material | First Clear | |
| Normal | ||||||
| Gate 1 | 2700 |  3 3 2 2 | 3 2 | 1500 | 1,000,000 x20 x8 x20 | |
| Gate 2 | 3300 | 4 3 | 4 3 | 1800 | ||
| Gate 3 | 5000 | 6 4 | 6 4 | 2500 | 5 | |
| Hard | ||||||
| Gate 1 | 4400 | 6 6 | 6 6 | 2000 | 1,000,000 x20 x8 x20 | |
| Gate 2 | 5500 | 8 9 | 8 9 | 2400 | ||
| Gate 3 | 8900 | 12 12 | 12 12 | 2800 | 10 | |
| Gate 4 | 9800 | 12 12 | 12 12 | 3600 | 10 | |
This guide assumes that you are familiar with the recommended Raid Build for your class.
Learn about the Thaemine Gates: 1 / 2 / 4
Main Mechanics Overview
Once you have read through the detailed description of the main patterns, use the “cheat sheet” during the raid, or check out our condensed Cheat Sheet Collection for all Legion Raids on one page.
x300
Sword Fight 1
Check which hand Thaemine is raising.
Go to the same side.
x275
Albion
Observe the patterns.
Then walk to the shown safe spots.
x255
Sword Fight 2
Dodge Blue/Red pizza
Bait the sword to 9 o'clock and kill it.
x225
Safe Spot
Player with the puddle goes top.
Remaining players go bottom.
x210
Shield
& Clash
Assign 5 different players responsible for the Clash.
Perform 1st Clash.
Use Sidereal:Inanna versus red telegraphs.
Perform 2nd Clash.
DPS burst the 40 HP shield of Thaemine.
x210-x90
Stage Break
& Clash
Every 45 seconds, Thaemine tries to break the stage in half.
Perform 3rd Clash.
Then let the stage break.
Perform 4th Clash or use Sidereal:Nineveh.
Use Sidereal:Nineveh for the 5th Clash if you didn't skip the 4th.
x90-x55
Fog
Black Fog starts to spread from the outer edges, reducing the playing field.
Get Thaemine to x55 as fast as possible.
x55
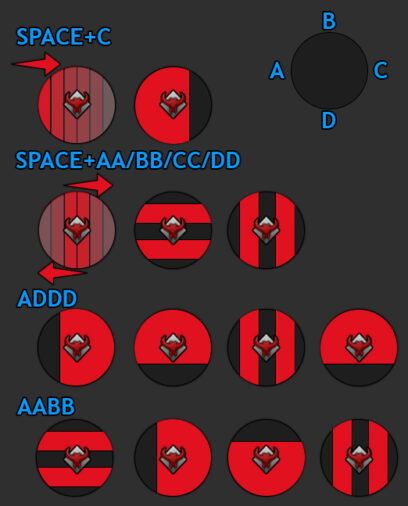
Safe Spot
Movement is inverted!
Complete the typing minigame.
Hard Mode: Typing is from right to left and inverted.
Player with the puddle goes top.
Remaining players go bottom.
x55-x0
Fog + Clash
Fog spreads from the center to outer edges!
It expands: 20, 70 and 120 seconds from the start
5th Clash at x43
Use Sidereal:Wei versus Ghosts if overwhelmed.
x300
Sword Fight 1
Check which hand Thaemine is raising.
Go to the same side.
x275
Albion
Observe the patterns.
Then walk to the shown safe spots.
x255
Sword Fight 2
Dodge Red pizza while dealing damage to the sword.
x225
Safe Spot
Spacebar to avoid the darkness wave
Move to a safe spot
x210
Shield
& Clash
Perform 1st Clash.
Use Sidereal:Inanna versus red telegraphs.
Perform 2nd Clash.
Remove 40 HP shield of Thaemine.
x210-x90
Stage Break
& Clash
Every 45 seconds, Thaemine tries to break the stage in half.
Perform 3rd Clash.
Then let the stage break.
Perform 4th Clash or use Sidereal:Nineveh.
Use Sidereal:Nineveh for the 5th Clash if you didn't skip the 4th.
x90-x55
Fog
Black Fog starts to spread from the outer edges, reducing the playing field.
Get Thaemine to x55 as fast as possible.
x55
Safe Spot
Movement is inverted!
Complete the typing minigame.
Kill your clone.
Use Sidereal:Wei after this mechanic.
x55-x0
Fog + Clash
Fog spreads from the center to outer edges!
It expands: 20, 70 and 120 seconds from the start
5th Clash at x43
Sidereal
 Wei
Wei
- Can be used during Sword Fight 2 at x255 HP to reduce the time needing to kill the sword and reduce risk in your attempts.
- Also used during the x55 HP Fog Phase to contain the Ghost spawns on the field and reduce risk of failure.
 Inanna
- Used after the completion of the 1st Clash, to guard players versus the red telegraphed horse dashes.
- If the group has DPS issues, Sidereal:Wei can also be used.
 Hidden Nineveh
- Used either to ignore Clash 4 or right after it on the next stage break.
Raid Mechanics
Raid mechanics cover the passive mechanics that are persistent through the entire raid.
Thaemine's Identity
This is a special gauge that can be seen in the top left of your screen when fighting Thaemine.
- This gauge is divided into 5 different parts.
- Automatically builds up during the fight.
- Every 40 seconds 1 part is filled (30 seconds "The First")
- If a part is filled, the boss proceeds to do a special AoE attack.
- Normal or Enhanced (check below).
- If the gauge is fully filled, the boss does 2 special AoE attacks with impaired vision.
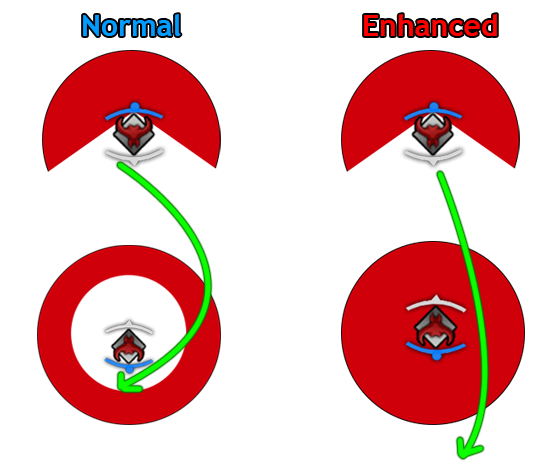
Normal vs. Enhanced
The type of attack Thaemine performs is based on his current HP. It is crucial to let your team know what kind of special attacks to expect, so people can dodge them correctly.
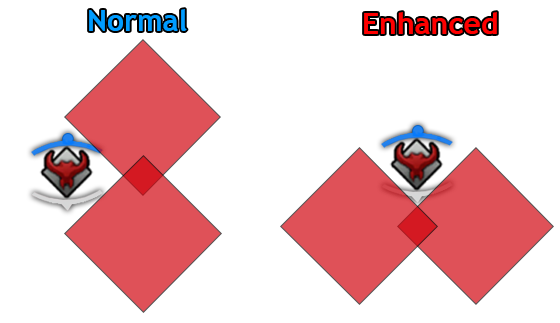
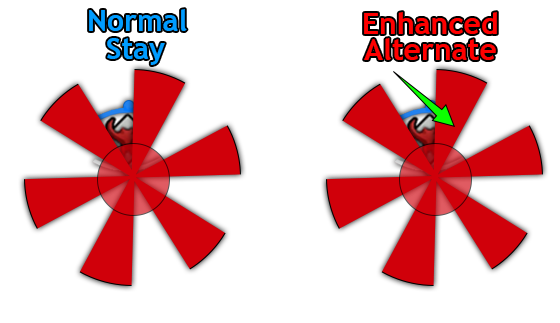
- x300 - x255 → Normal AoE
- x255 - 1st Arena Break → Enhanced AoE
- 1st Arena Break - x90 → Normal AoE
- x90 - 0x → Enhanced AoE
Cube
- Normal - Vertical sword, strikes left.
- Enhanced - Sword above right shoulder, strikes in front.
Circle
- Normal - Horizontal sword, stay in between the red.
- Enhanced - Stand behind, front or on the sides.

Pizza
- Normal - Flies in the air and puts sword behind his head. Stay in the safe spot for 2 explosions.
- Enhanced - Stay in the initial safe spot, then move to where the explosions happened.
Pacman (Hard Mode)
- Normal - Creates red electric ground around his feet. Headattack position → Inside safe.
- Enhanced - Headattack position → Outside safe.
- It's best to stand at his head position when the pattern begins. He turns his body around for the 2nd part of the attack.
Special Attack
- When the Identity meter is full, Thaemine performs 2 random special patterns back-to-back.
- All players are affected by Darkness, you must know the safe spots based on the animations to survive.
- Darkness cannot be cleansed.
Mortal Wound
Getting hit by many of Thaemine attacks inflicts this debuff, each stack provides:
- +20% incoming damage
- Lasts 2 minutes
- Cannot be cleansed
Darkness

Getting hit by certain attacks from Thaemine inflicts you with Darkness.
- You lose the ability to see boss telegraphs for its duration.
- Some major raid mechanics inflict an uncleansable version of this debuff so watch out.
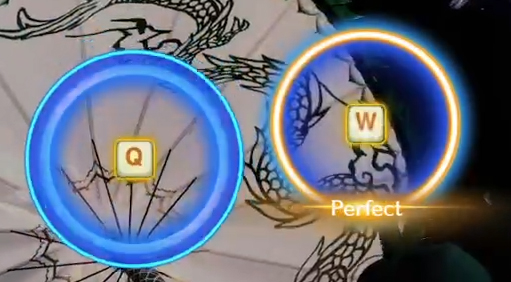
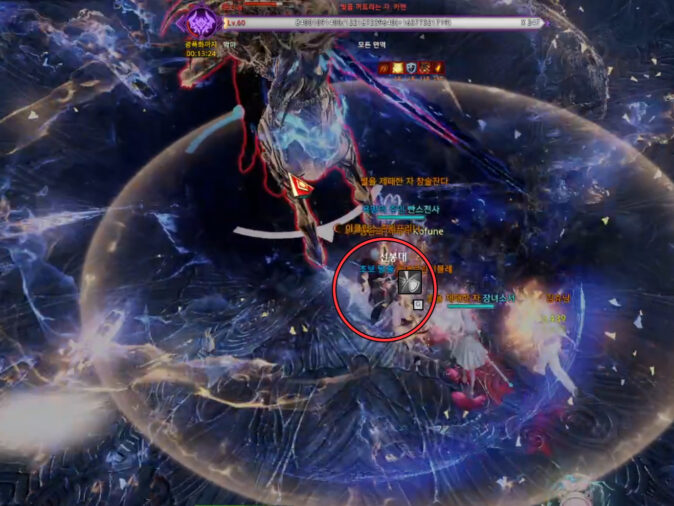
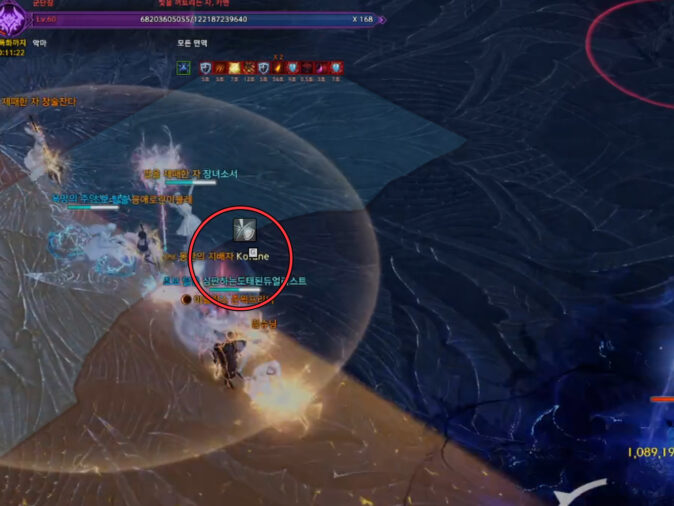
Clash is a new mechanic in Lost Ark that requires the player to press "G" and enter a timed minigame. These occur at specific moments in the raid after Thaemine emits a very bright flash of light.
- A total of 5 Clashes are available in gate 3.
- 6 if you include Hidden Nineveh as one.
- Only 1 Clash per person is allowed.
- Perfect - greatly increase the duration of the Clash (More DPS uptime).
- Good - small time increase.
- Bad - stops the Clash and inflicts damage to the player (Mostly lethal).
- Perfect Clash increases your ATK Power by +10% for 25 seconds (Only to the person doing the Clash).
- x1 stack per Perfect.
1st Clash
- Occurs at x210 HP after Thaemine gets a x40 HP shield and travels his designated path on his horse in a "U" shape.
- Located slightly in front of his headattack indicator.
- Perform a set of 1 key → 1 key → 1 key in succession.
2nd Clash
- Occurs after the Horse Dash mechanic has ended.
- Most groups use Sidereal:Inanna here.
- Thaemine teleports → appears, dashes across the stage → teleports → appears → clash
- Located slightly in front of his headattack indicator.
- He may turn instantly, but the spot remains his initial position.
- Perform a set of 1 key → 2 keys → 2 keys in succession.

3rd/4th/Hidden Nineveh Clash
- After x210 HP mechanic is completed, every 45 seconds, Thaemine will try to break the stage.
- These attempts can be interrupted with a Clash or Hidden Nineveh.
- Note that if a Clash is used to prevent a stage break, then you can't do another clash on the next break.
- The "G" location is close to the center of the arena while facing the boss.
- Imagine the center tile as a square block, and stand on the edge of it.
- Based on which side Thaemine chooses, the Clash location is always in that center spot.
- Perform a set of 1 key → 1 key in succession.
5th Clash
- Occurs at or near x42 HP
- Thaemine raises his sword behind his back, then teleports and leaps with 3 shadow clones towards an aggroed target.
- Players should group up and force the boss to move in a good position (typically 9 o'clock).
- The location is behind the boss.
- Perform a set of 1 key → 2 keys → 3 keys in succession.

Dark Aura
Dark Mark
Dark Aura
- Thaemine raises his hand holding a blue energy orb, then explodes it.
- Then he teleports, slams in front of him and shoots a blue beam.
- He spins either 180 or 270 degrees counter-clockwise and strikes the ground twice.
- Roughly every 60 seconds, he does this pattern if he's not interrupted by main mechanics.
- He marks 2 random people(+1 for each stack of Dark Aura on the boss) and inflicts them with a Dark Mark debuff for 6 seconds.
- Marked players have a small blue sword above their heads. They must place it on the outskirts of the stage and return to the fight.
- Don't overlap these, as they create advanced puddles that do continuous damage and inflict darkness if you step on them.
- Right before the Dark Mark disappears, all existing Shadow Clones will shoot red telegraphed blades towards a random person that inflict Mortal Wound and do a lot of damage.
Blue Sword(Dark Mark)
Shadow Clone
Main Mechanics
Main mechanics occur at certain HP intervals.
(Inverted Controls)
Telegraph
- Occurs at the start of the fight.
- The Boss sits on his throne in the very back of the arena.
- He raises either his left or right hand.
Description
- Go to the same side that Thaemine indicated with his raised arm (from your perspective).
- Wait on the outskirts until he throws his energy ball and it explodes.
- Proceed to stagger the sword and inflict as much damage as possible.
- Damage you've inflicted will persist for the 2nd Sword Fight later.
Telegraph
- Occurs at or near x275 HP bars.
- Thaemine teleports to the center of the arena.
- Starts walking downwards while surrounded by a red tornado.
- Floats into the air and emits a darkness wave.
Description
- Try to space bar the darkness wave if possible, otherwise cleanse or use purify.
- Players affected by the darkness debuff won't see the ground pattern.
- Thaemine shows a series of red telegraphed attacks on the ground,
- Remember the safe spots and walk to all of them to be safe.
- One random player will have a purple AoE beneath him.
- Keep a distance to your teammates, as the AoE will explode when it expires.
Telegraph
- Occurs at or near x255 HP bars.
- Thaemine surrounds himself in a blue shield and creates a donut shape attack below him.
Description
- Thaemine's sword spawns and one random player gets aggro of him.
- Two pizza attacks are visible, Red & Blue, and both are aggroed to a random target.
- Blue explodes periodically.
- Red explodes at the very end of the pattern.
- There's a total of 3 blue cone attacks followed by a blue 180 degree attack.
- As the aggro player, try to keep the blue cone attack in one direction.
- Once the blue attacks are finished, the Red telegraph explodes.
- After this, the player with the aggro should run to 9 o'clock, as the sword will charge after him.
- This is to create space between the boss and the sword.
- [Hard Mode] A tether with a ball at its end will spin continuously around the arena in a counter-clockwise rotation. This ball does very high damage and can be avoided by being at the outer edge.
- Deplete the HP of the sword to x0 to finish this phase.
- Check the Sword Pattern section to find out about its attacks.
- All Identity attacks become enhanced when below x255 HP. This lasts until the first stage break happens.
Telegraph
- Occurs at or near x225 HP bars.
- Thaemine teleports to the center of the arena, kneels down, and emits a darkness wave.
- The field gets flooded with red telegraphs.
Description
- Use your spacebar to avoid the darkness wave.
- You won't be able to see safe spots if you get hit with the debuff.
- One player receives a dark AoE that will explode, just like in the Albion mechanic.
- This player needs to find his own safe spot (typically at the top side).
- All remaining players should choose a safe spot anywhere on the bottom side.
- Cutscene happens and the mechanic ends.
- If you stay in the red, you die.
Telegraph
- Occurs at or near x210 HP bars.
- A cutscene happens.
- Thaemine reappears while on his horse with a massive shield of x40 HP.
Description
- Thaemine rides in a "U" shape across the arena (avoid his front), returns to the center, and emits a bright flash (Clash).
- The player assigned to the first clash should ready himself to press "G" in the correct spot to initiate the clash.
- Slightly in front of the boss (Check Raid Mechanics for more info on Clashes).
- Perform 3 sets of 1 key press each.
- After completing the clash, a random player will receive aggro.
- This player needs to stay in place even if he's a back attacker, so that Thaemine doesn't spin around chaotically.
- Raid leader should use Sidereal:Inanna here so that the red ground attacks don't interrupt everyone's DPS window.
- After a few seconds, Thaemine will teleport to the center and flash again (2nd Clash).
- The spot is once again slightly in front of where the flash happened.
- Perform a set of 1 key → 2 keys → 2 keys in succession.
- Other players should be trying to do their maximum damage possible during these clashes.
- If the shield is depleted in time, the mechanic ends.
- If you fail, it's a raid wipe.
Telegraph
- Occurs between x210 - 90 HP bars.
- Every 45 seconds, Thaemine teleports to one edge of the arena.
- Shows a yellow telegraph splitting the stage in half.
Description
- Clash 3: The player responsible for the 3rd Clash should be in position to prevent the first stage break.
- Near the center of the map in front of the boss.
- Perform 2 sets of 1 key press each.
- All remaining players unleash their maximum DPS possible.
- Break: After 45 seconds, Thaemine will try to break the stage again.
- Since you can't Clash on two stage breaks in a row, you must let him break the stage this time.
- Do not stand near the part where the arena gets split in half.
- All Identity attacks become their normal version once the stage is broken, this lasts until x90 HP.
- Clash 4: The player responsible for the 4th Clash should be in position to prevent the stage break.
- Perform 2 sets of 1 key press each.
- If the group's DPS is high enough to reach x90 HP quickly, then Hidden Nineveh can be used to skip Clash 4 otherwise proceed normally.
- Break: After another 45 seconds, Thaemine will try to break the stage again.
- If you didn't use Hidden Nineveh to skip Clash 4 then use her here.
Telegraph
- Occurs at or near x90 HP bars.
- The fight happens on a new stage.
- All Identity attacks are the enhanced version until the end of the fight.
- Black Fog starts to spread from the outer edges, reducing the playing field.
Description
- During this phase, it is advised to stack the Shadow Clones on the same spot to reduce the attacking area of them, as the playing field gets smaller.
- DPS the boss until x55 HP and avoid all the regular attacks.
Telegraph
- Occurs at or near x55 HP bars.
- Thaemine teleports to the center of the arena.
- The field gets flooded with red telegraphs.
Description
- One player receives a purple AoE that will explode, just like in the Albion mechanic.
- This player needs to find his own safe spot (typically at the top side).
- All remaining players should choose a safe spot anywhere on the bottom side.
- There are additional complications compared to the Safe Spot mechanic at x225 HP.
- Players have their movement controls inverted.
- A typing mechanic must be completed while the red telegraphs are appearing.
- [Hard Mode] This mechanic is flipped upside down and must be completed from right to left.
- If you succeed, all players are teleported to a separate room, where they must kill a clone of themselves (Inverted movement is still active here).
- Once players have killed their clone, they are brought back out where they can DPS the boss with a 50% damage reduction.
- Dodge a pizza pattern once everyone is out and the mechanic is complete.
Telegraph
- Occurs at or near x55 HP bars.
- Black Fog starts to spread from the center to the outer edges, reducing the playing field.
- The Fog expands 3 times: 20, 70 and 120 seconds from the start.
- The playfield will shrink to just the edges of the map eventually.
Description
- New attack is added: Ghosts.
- Once you reach x43 HP, the 5th Clash happens, ready yourself to press "G" in the correct spot.
- This spot is behind the boss.
- Perform a set of 1 key → 2 keys → 3 keys in succession.
- Everyone else should do as much DPS as they can here.
- You may use Sidereal: Wei for whenever Ghosts spawn if you're unable to kill them.
- Bring Thaemine to x0 HP and you've completed the raid.
Sword Patterns
Dash
- The sword turns towards a player and requests a counterattack.
- This can be either a single counter or x2.
- Then you must stagger the sword.
- If you fail to counter, the sword will dash multiple times rapidly and leave uppercut tornadoes behind it.
Spin
- The sword faces towards a player, requests a counterattack and starts slowly spinning.
- If the counter is missed, he will unleash a dangerous whirl attack.
Teleport
- The sword teleports.
- Reappears sideways and requests a counterattack.
Telegraph
- The sword flies up high, angled diagonally.
- Then slams down, generating a wave attack.
Telegraph
- The sword dives below the ground.
- Then emerges shortly after knocking up anyone in his path.
- After that, he explodes the outer area.
- Dodge Outside → Inside
Telegraph
- The sword glows with electricity while floating in the air and shaking.
- It slams into the ground and emits a wave of darkness.
Telegraph
- The sword lays down flat and uppercuts in front of it.
- Then proceeds to unleash a series of slash attacks.
Telegraph
- One random player is marked with a yellow target.
- He needs to run away from his teammates and bait Thaemines attack towards him.
- This attack can either be a red sword that tracks you. Or a blue beam targeted to your location.
- Both of these attacks alternate between them.
- So if you've seen the red sword, be on the lookout for the beam, and vice versa.
Thaemine Patterns
Back dash + Front Laser
- Thaemine surrounds himself in black fog while dashing backwards.
- Then shoots a laser in front of him for a prolonged period of time.
Back dash + Energy Ball
- Thaemine dashes backwards and channels an energy ball in his left hand.
- Then releases it in front of him.
Back dash + Grab
- Thaemine dashes backwards, kneels down and slowly thrusts his sword forwards.
- Then releases a long range frontal attack that grabs anyone in its path.
Backdash + X Slam
- Thaemine dashes backwards, simultaneously he shoots a shadow clone forwards.
- Then proceeds to jump to his original location and does an X shape attack.
- Stay on the sides or front/back.
Backdash + Flash
- Thaemine splits the floor and illuminates one side.
- Remain on the dark side.
One Shot
- Thaemine charges his sword for a prolonged time, then teleports.
- Reappears and slashes in front of him.
- If anyone gets hit by this attack, they are instantly dead.
- Group up and await the teleport, then dodge to the side.
Slash x2 → Back Grab → Left Slam
- Thaemine slashes forward twice.
- Teleports his sword to his back and tries to grab players.
- Then slams the left side of him.
- Avoid being directly behind him during the grab and never be on his left.
Multidash & Slash
- Thaemine jumps multiple times in a sequence of Dash → Slash → Dash → Slash → Dash → Targeted Swords.
- If you are the target of the final attack, you must kite it in one direction.
Front & Back
- The boss raises his sword and quickly strikes in front of him, then turns around and hits his back.
Draven
- Thaemine spins two spectral daggers on both of his sides.
- Then throws them forward → back → forward
- The front is a safe spot the entire time.
- Ask for damage reduction if you're a backattacker.
x2 Slash → Teleport → Slash
- A random player gets targeted with 2 slash attacks.
- Thaemine teleports and slashes for a 3rd time.
360 Slash
- Thaemine creates a red circle telegraph behind him.
- Then he quickly jumps backwards while slashing in a 360-degree angle.
- Use Push Immunity, or quickly dash to where the red circle was to avoid getting knocked off the map.
180 Slash
- Thaemine shoots a narrow blue light across the floor in front of him.
- Shortly after, he slashes in front of him in a huge 180-degree angle.
- Then dashes back and hits the front of him multiple times.
7 Portals
- Thaemine throws a spinning sword forwards that comes back.
- Then he vanishes and attacks the stage 7 times by shooting swords through portals with narrow blue lines.
- After that, he slams down his sword in front of him.
- This slam expands sideways, so stay behind the boss.
Telegraph
- Thaemine kneels down, then stomps the ground with his right leg.
- A dark cloud in a 360 degree radius will spawn and travel across the entire stage.
- If hit, you receive a darkness debuff.
- You must either space bar through it or use purify/cleanse.
- Starting from x255 HP, he will choose a random player and jump towards him, slamming the ground (Use Push Immunity skills).
Telegraph
- Thaemine spreads his hands and flies in the air, while spawning many swords around him.
- These rain down on the floor with red circle telegraphs.
- Then he charges his blade with a blue glow behind his left shoulder.
- Finally, he slashes in a 180-degree angle in front of him.
Telegraph
- Thaemine gathers his shadows all around him.
- Then proceeds to shoot lasers in a clockwise formation.
- Move along with the laser, otherwise ask for damage reduction.
Telegraph
- Thaemine raises his sword in the air, summons black mist around him then stabs the ground.
- Dodge the red telegraphs.
- The second safe spot is always diagonal from the first.
Telegraph
- Yellow circles spawn beneath players.
- Out of them emerge elite monsters.
- If you're grabbed, they try to bring you to the center of the map.
Telegraph
- Thaemine stabs the ground with 4 tentacles.
- An ambush of blue circles continuously spawn below 4 closest players.
- Black spikes will emerge from these puddles, deal damage and apply darkness if hit.
- You must slowly kite these to the outer edge of the map.
Telegraph
- If the circle is drawn clockwise, → inside safe.
- Counter-clockwise → outside safe.
Telegraph
- Certain players receive a target above their heads.
- These are responsible for kiting the red AoE zones away from the boss.
- In the meantime, Thaemine is channeling a massive energy blast towards a player.
- If you're the target, try to stay still until it's exploding.
Telegraph
- Thaemine creates a red circle in front of him.
- After it explodes, move inside, as the outside is going to explode.
- Outside → Inside.
- After that, don't stand in front of him, as he will slam the ground and grab anyone caught.
Telegraph
- Thaemine holds up a small ball and channels it.
- After a while, he releases multiple white orbs that split upon contact and fear the players.
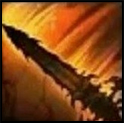
- To minimize the risk, the usual strategy is to dash in front of the boss and use a Time Stop Potion to absorb all orbs.
Solo Mode Main Mechanics
(Inverted Controls)
Thaemine's Identity
This is a special gauge that can be seen in the top left of your screen when fighting Thaemine.
- This gauge is divided into 5 different parts.
- Automatically builds up during the fight.
- Every 40 seconds 1 part is filled (30 seconds "The First")
- If a part is filled, the boss proceeds to do a special AoE attack.
- Normal or Enhanced (check below).
- If the gauge is fully filled, the boss does 2 special AoE attacks with impaired vision.
Normal vs. Enhanced
The type of attack Thaemine performs is based on his current HP. It is crucial to let your team know what kind of special attacks to expect, so people can dodge them correctly.
- x300 - x255 → Normal AoE
- x255 - 1st Arena Break → Enhanced AoE
- 1st Arena Break - x90 → Normal AoE
- x90 - 0x → Enhanced AoE
Cube
- Normal - Vertical sword, strikes left.
- Enhanced - Sword above right shoulder, strikes in front.
Circle
- Normal - Horizontal sword, stay in between the red.
- Enhanced - Stand behind, front or on the sides.
Pizza
- Normal - Flies in the air and puts sword behind his head. Stay in the safe spot for 2 explosions.
- Enhanced - Stay in the initial safe spot, then move to where the explosions happened.
Special Attack
- When the Identity meter is full, Thaemine performs 2 random special patterns back-to-back.
- All players are affected by Darkness, you must know the safe spots based on the animations to survive.
- Darkness cannot be cleansed.
Mortal Wound
Getting hit by many of Thaemine attacks inflicts this debuff, each stack applies:
- +20% incoming damage
- Lasts 2 minutes
- Cannot be cleansed
Darkness
Getting hit by certain attacks from Thaemine inflicts you with Darkness.
- You lose the ability to see boss telegraphs for its duration.
- Some major raid mechanics inflict an uncleansable version of this debuff so watch out.
Clash is a new mechanic in Lost Ark that requires the player to press "G" and enter a timed minigame. These occur at specific moments in the raid after Thaemine emits a very bright flash of light.
- A total of 5 Clashes are available in gate 3.
- 6 if you include Hidden Nineveh as one.
- Perfect - greatly increase the damage you deal through Clash.
- Good - normal damage.
- Bad - stops the Clash and inflicts damage to you.
- Perfect Clash increases your ATK Power by +10% for 25 seconds per stack.
Dark Aura
Dark Mark
Dark Aura
- Thaemine raises his hand holding a blue energy orb, then explodes it.
- Then he teleports, slams in front of him and shoots a blue beam.
- He spins either 180 or 270 degrees counter-clockwise and strikes the ground twice.
- Roughly every 60 seconds, he does this pattern if he's not interrupted by main mechanics.
- He marks and inflicts you with a Dark Mark debuff for 6 seconds.
- You have a small blue sword above your heads. You must place it on the outskirts of the stage and return to the fight.
- Don't overlap these, as they create advanced puddles that do continuous damage and inflict darkness if you step on them.
- Right before the Dark Mark disappears, all existing Shadow Clones will shoot red telegraphed blades towards a random person that inflict Mortal Wound and do a lot of damage.
Blue Sword(Dark Mark)
Shadow Clone
Telegraph
- Occurs at the start of the fight.
- The Boss sits on his throne in the very back of the arena.
- He raises either his left or right hand.
Description
- Go to the same side that Thaemine indicated with his raised arm (from your perspective).
- Wait on the outskirts until he throws his energy ball and it explodes.
- Proceed to stagger the sword and inflict as much damage as possible.
- Damage you've inflicted will persist for the 2nd Sword Fight later.
Telegraph
- Occurs at or near x275 HP bars.
- Thaemine teleports to the center of the arena.
- Starts walking downwards while surrounded by a red tornado.
- Floats into the air and emits a darkness wave.
Description
- Try to space bar the darkness wave if possible, otherwise cleanse or use purify.
- Players affected by the darkness debuff won't see the ground pattern.
- Thaemine shows a series of red telegraphed attacks on the ground,
- Remember the safe spots and walk to all of them to be safe.
Telegraph
- Occurs at or near x255 HP bars.
- Thaemine surrounds himself in a blue shield and creates a donut shape attack below him.
Description
- Thaemine's sword spawns in the center.
- A Red pizza attack is visible, and tracks your movement.
- The Red telegraph explodes at the very end of this pattern.
- After this, the player with the aggro should run to 9 o'clock, as the sword will charge after him.
- This is to create space between the boss and the sword.
- Deplete the HP of the sword to x0 to finish this phase.
- If you struggle during this phase, check the Sword Pattern section in the normal guide.
- All Identity attacks become enhanced when below x255 HP. This lasts until the first stage break happens.
Telegraph
- Occurs at or near x225 HP bars.
- Thaemine teleports to the center of the arena, kneels down, and emits a darkness wave.
- The field gets flooded with red telegraphs.
Description
- Use your spacebar to avoid the darkness wave.
- You won't be able to see safe spots if you get hit with the debuff.
- Choose a safe spot anywhere on the bottom side.
- Cutscene happens and the mechanic ends.
Telegraph
- Occurs at or near x210 HP bars.
- A cutscene happens.
- Thaemine reappears while on his horse with a massive shield of x40 HP.
Description
- Thaemine rides in a "U" shape across the arena (avoid his front), returns to the center, and emits a bright flash (Clash).
- Press "G" in the white glowing spot to initiate the clash.
- Perform 3 sets of 1 key press each.
- Use Sidereal:Inanna here so that the red ground attacks don't interrupt you while dealing damage to the boss.
- Skippable: After a few seconds, Thaemine will teleport to the center and flash again (2nd Clash), if you didn't break his shield yet.
- The spot is once again slightly in front of where the flash happened.
- Perform a set of 1 key → 2 keys → 2 keys in succession.
- If the shield is depleted in time, the mechanic ends.
- If you fail, it's a raid wipe.
Telegraph
- Occurs between x210 - 90 HP bars.
- Every 45 seconds, Thaemine teleports to one edge of the arena.
- Shows a yellow telegraph splitting the stage in half.
Description
- Clash 3: Take the clash near the center of the map in front of the boss.
- Perform 2 sets of 1 key press each.
- Break: After 45 seconds, Thaemine will try to break the stage again.
- Since you can't Clash on two stage breaks in a row, you must let him break the stage this time.
- Do not stand near the part where the arena gets split in half.
- All Identity attacks become their normal version once the stage is broken, this lasts until x90 HP.
- Clash 4: Take the clash near the center of the broken arena in front of the boss.
- Perform 2 sets of 1 key press each.
- If your DPS is high enough to reach x90 HP quickly, then Hidden Nineveh can be used in front of Thaemine to skip Clash 4.
- Break: After another 45 seconds, Thaemine will try to break the stage again.
- If you didn't use Hidden Nineveh to skip Clash 4 then use her by standing in front of the boss here.
Telegraph
- Occurs at or near x90 HP bars.
- The fight happens on a new stage.
- All Identity attacks are the enhanced version until the end of the fight.
- Black Fog starts to spread from the outer edges, reducing the playing field.
Description
- During this phase, it is advised to stack the Shadow Clones on the same spot to reduce the attacking area of them, as the playing field gets smaller.
- DPS the boss until x55 HP and avoid all the regular attacks.
Telegraph
- Occurs at or near x55 HP bars.
- Thaemine teleports to the center of the arena.
- The field gets flooded with red telegraphs.
Description
- A typing mechanic must be completed while the red telegraphs appear.
- Solve the typing test and move to a safe spot (not red).
- Movement controls are inverted.
- If you succeed, you are teleported to a separate room, where you must kill a clone (Inverted movement is still active here).
- After killing your clone, you are brought back out where you can DPS the boss with a 50% damage reduction.
- Dodge a pizza pattern, and the mechanic is complete.
- After this mechanic, use Sidereal:Wei as soon as you can to skip to the final mechanic.
Telegraph
- Occurs at or near x55 HP bars.
- Black Fog starts to spread from the center to the outer edges, reducing the playing field.
- The Fog expands 3 times: 20, 70 and 120 seconds from the start.
- The playfield will shrink to just the edges of the map eventually.
Description
- Once you reach x43 HP, the 5th Clash happens, ready yourself to press "G" in the correct spot.
- This spot is behind the boss.
- Perform a set of 1 key → 2 keys → 3 keys in succession.
- Bring Thaemine to x0 HP and you've completed the raid.
- Thaemine dashes backwards, kneels down and slowly thrusts his sword forwards.
- Then releases a long range frontal attack that grabs anyone in its path.
- Dodge to the sides as soon as you see him dashing backwards.
- Thaemine slashes forward twice.
- Teleports his sword to his back and tries to grab you.
- Then slams the left side of him.
- Avoid being directly behind him during the grab and never be on his left.
- Thaemine jumps multiple times in a sequence of Dash → Slash → Dash → Slash → Dash → Targeted Swords.
- During the final attacks, you must kite it in one direction.
Credits
Written by Choilicious
Video Footage by Saintone