Kayangel Gate 3
Enemy Information
| Normal Mode | Hard Mode | Monster Type | Weakness |
| 1540 Item Level | 1580 Item Level | Human | Dark |
Battle Items:
- HP Potion of your choice
- Time Stop Potion or Atropine Potion
- Flame Grenade or Dark Grenade
Raid Rewards
| Gold | Material | Box Material | Box Cost | Auction Material | |
| Normal | |||||
| Gate 1 | 800 | - | - | 300 | |
| Gate 2 | 1200 | 1 | 1 | 400 | |
| Gate 3 | 1600 | 2 | 2 | 500 | 3 |
| Hard | |||||
| Gate 1 | 1000 | 1 | 1 | 350 | |
| Gate 2 | 1600 | 1 | 1 | 500 | |
| Gate 3 | 2200 | 3 | 3 | 700 | 5 |
This guide assumes that you are familiar with the recommended Raid Build for your class.
Learn about Kayangel Abyssal Raid Gate: 2 / 3
Cheat Sheets
Once you have read through the detailed description of the main patterns, use the “cheat sheet” during the raid, or check out our condensed Cheat Sheet Collection for all Legion Raids on one page.
During Raid
Mirror
Boss will target player with mirror
Hit around mirror
Don't touch mirror
x180
Explosions/Egg Break
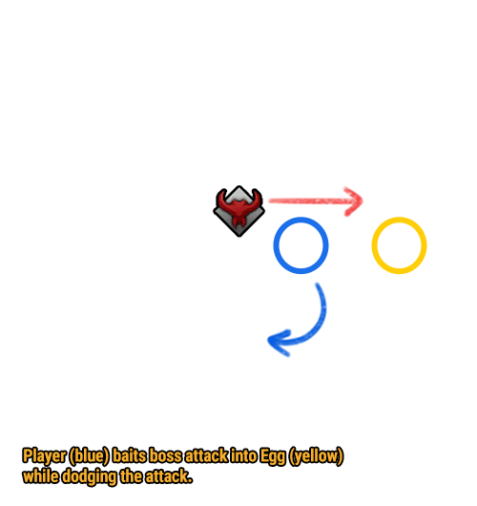
Dodge 3 explosions
Aim Laser at egg
Activate egg for buff
x135
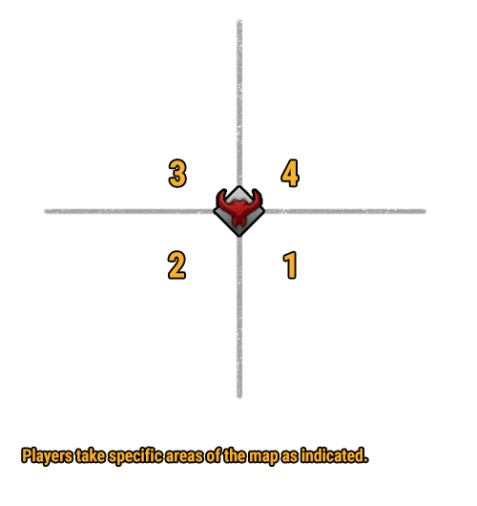
Light Delivery
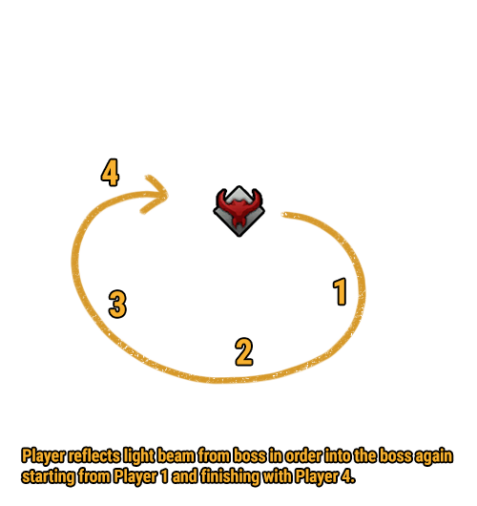
P1 take intial laser
P2, P3, then P4
Don't stack rings
x100
White Orbs/Sunlight
Clock Position 3x+1
Watch sunlight safespots
Collect 5 white orbs
Safespots
x60
Pillars/Clones
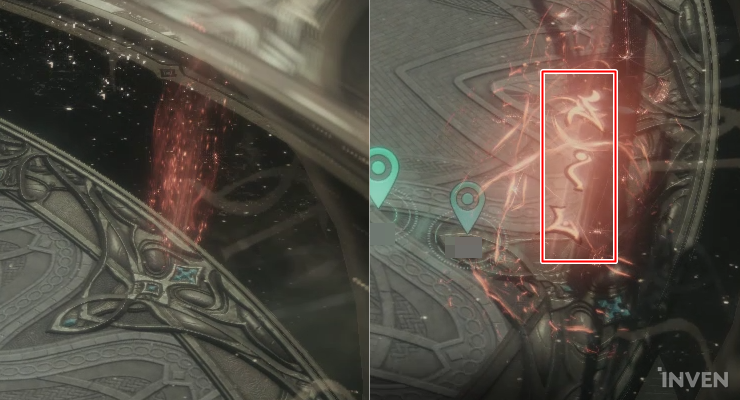
Ping Red Rune Pillars
Stagger Pinged Clone
Final Phase
Kill Fast use Dark Grenade
Ping Sunlight Safe Spots
Spacebar after "Intense Gaze" goes away
x180
Explosions/Egg Break
Dodge 3 explosions
Aim Laser at egg
Activate egg for buff
x135
Light Delivery
Take final laser
Don't stack rings
x100
White Orbs/Sunlight
Watch sunlight safespots
Collect 5 white orbs
Safespots
x60
Pillars/Clones
Stagger pillar with runes.
Final Phase
Kill Fast use Dark Grenade
Ping Sunlight Safe Spots
Spacebar after "Intense Gaze" goes away
Main Mechanics
Description
- Boss will target a player with a mirror.
What To Do
- Getting close to the mirror will launch you back and set your HP low.
- Damaging him from that side of the mirror will do reduced damage.
- If you are targetted try not to spin the boss around. Move when you hear the mirror.
Telegraph
- Boss will teleport to center.
- He will perform 3 explosions on the field.
Description
- The 1st explosion will be under your feet, 2nd around center, and 3rd under your feet again.
- The boss will teleport to a player and show a mirror at them (the player will also have a gaze debuff on bar).
- The player will be pulled towards the boss during this period.
- He will then shoot a laser at the player after a few seconds.
- Player with the aggro will need to hit one of the eggs on the map.
- The egg will light up and grant a buff shortly after hitting.
- Egg buff will last 2min
- The rings around players will grant buffs to others that need it.
What To Do
- Dodge 3 explosions.
- Find out who is aiming the laser.
- Boss will target closest person in middle after explosions.
- If anyone wants to take aggro, everyone will need to hug a wall and have 1 person in the middle near boss.
- When you hear the "glass" breaking noise, that's the timing when he fires the laser.
- Aim at an egg on the map to activate it.
- Break the egg to be granted a buff to damage the boss up to 2 min.
- 2 players max, get near the egg after breaking it
- You will need to constantly lure the boss to hit eggs to refresh the egg buff to damage the boss on the map.
Telegraph
- Boss teleports to center
- You will be silenced and can only use normal attacks.
Description
- Players will need to reflect the beam of light through each of them into the boss.
- Black puddles will imprison players and wipe the raid.
What To Do
- Go by party order. P1 will take initial laser and adjust.
- Don't step into other players circle or you will be imprisoned and wiped.
- Use auto attacks to help guide the laser.
Hard Mode: There will be additional black puddles that players will need to adjust to for the laser angle. Don't stand in them.
Telegraph
- Boss will teleport to center and launch an inside safe AoE.
Description
- Boss will summon a bunch of yellow orbs that will change colors after the boss sends out the explosion.
- At the same time, there will be 2 white glow on the ground that will indicate safe spots for the mech after orbs (sunlight).
- Some orbs will be either black or white. You need to collect 5 white orbs for a shield.
- Collecting a black one will stun you and decrease 1x white stack.
- You can prediocally see the white orbs after collecting one.
- After the mechanic, players will need to go to the white zone safe spots (shade under the sun).
What To Do
- Go to clock positions for your orbs.
- Remember the safe zones that are shown before the orb mechanic starts.
- Be sure to ping extra white orbs if a teammate needs.
- Go to safe spots in the shadow after 5 white orbs.
- You don't need white orb shield until final mech (after 2 sunlights).
- If you cannot make it to the safe spot, you can use Time Stop Potion.
Hard Mode: There will be explosions during orb collection phase.
Telegraph
- Boss will teleport to middle and "phase you"
Description
- Similar to the Vykas clone mechanic, everyone will see different things.
- You will need to ping red pillars with symbols/runes inside of them.
- If one of them matches with a boss, you will need to stagger it.
What To Do
- Ping red rune pillars for your team.
- If the pings match up with a clone, stagger it.
Telegraph
- Boss will periodically spawn a white safe zone for sunlight.
- During this phase, boss will also debuff players to take more damage.
Description
- Players will get stacks of defense debuff during this final phase that is not removable, so you will need to kill him quickly.
- Boss will also spawn white safe zones after every 3 moves in this phase.
What To Do
- Kill boss quickly to avoid stacking debuff.
- Ping white safe zones for sunlight mechanic. Boss will try to pull players during this mechanic as well and finish with a targeted laser at a player like x180. Use Time Stop Potion if needed.
- Boss will pull you in as the sunlight safe spots happen.
- To avoid the pull mechanic, when you receive the purple debuff text "Intense Gaze", wait until the text/debuff goes away, then immediately press a movement skill (spacebar) to nullify the pull. You can also use Time Stop Potion instead.
Notable Patterns
Telegraph
- Boss will summon orbs that will imprison players when hit.
What To Do
- Dodge the rings or...
- Stack on Boss an deep DPSing the boss and use Flame Grenade on top of party before imprison.
Telegraph
- Boss spins with a scythe and a whirlwind appears around him.
- Boss will target a random player and swipe at him.
What To Do
- Look at who is targetted.
- Dodge behind him when he swipes.
Solo Mode Main Mechanics
Most of the attacks the boss does are exactly the same as in Normal mode. There's only a couple exceptions in the main mechanics.
What To Do
- Dodge 3 explosions.
- Go close to one of the eggs at the edge of the map and wait for the boss to spawn at you.
- Turn the boss slightly to make the glass shield touch the egg.
- Move away when you hear a glass breaking noise to dodge the laser.
- Aim the laser at an egg in case the glass shield isn't able to touch an egg.
- Break the egg, while standing close to it, to be granted a damage buff for 2 min.
- You will need to constantly lure the boss to hit eggs to refresh this buff.
What To Do
- Guide final laser to boss. Watch out for teammates puddle.
- Use auto attacks to help guide the laser.
What To Do
- Get 5 white orbs.
- Go to safe spots in the shadow after 5 white orbs.
- You don't need white orb shield until final mech (after 2 sunlights).
- If you cannot make it to the safe spot, you can use Time Stop Potion.
What To Do
- Stagger pillar with runes.
What To Do
- Kill boss quickly to avoid stacking debuff.
- White glowing rune in the center indicate the next sunlight safe spot location.
- Boss will pull you in as the sunlight safe spots happen.
- To avoid the pull mechanic, when you receive the purple debuff text "Intense Gaze", wait until the text/debuff goes away, then immediately press a movement skill (spacebar) to nullify the pull. You can also use Time Stop Potion instead.
Credits
Written by Starlast