Akkan Gate 3 Legion Raid Guide
Just like in gate 2 you need to manage your Disease Meter while completing a few team oriented mechanics. This gate introduces an Underground area that is utilized for keeping the main arena clean from disease patches.
Enemy Information
| Normal Mode | Hard Mode | Monster Type | Weakness |
| 1580 Item Level | 1600 Item Level | Demon Undead (Extra Stage) | None |
- HP Potion of your choice
- Sacred Charm or Sacred Bomb
- Dark Grenade or Destruction Bomb
- Atropine Potion or Time Stop Potion
Rewards
| Gold | Material | Box Material | Box Cost | Auction Material | First Clear | |
| Normal | ||||||
| Gate 1 | 1000 | 3 | 3 | 450 | 20 | |
| Gate 2 | 1800 | 3 | 3 | 550 | ||
| Gate 3 | 2600 | 5 | 5 | 750 | 5 | |
| Total | 5400 | |||||
| Hard | ||||||
| Gate 1 | 1500 | 7 | 7 | 600 | 20 | |
| Gate 2 | 2500 | 7 | 7 | 700 | ||
| Gate 3 | 3500 | 8 | 8 | 950 | 10 | |
| Total | 7500 | |||||
This guide assumes that you are familiar with the recommended Raid Build for your class.
Learn about the Akkan Gates: 1 / 2
Cheat Sheets
Once you have read through the detailed description of the main patterns, use the “cheat sheet” during the raid, or check out our condensed Cheat Sheet Collection for all Legion Raids on one page.
x200
X Stagger
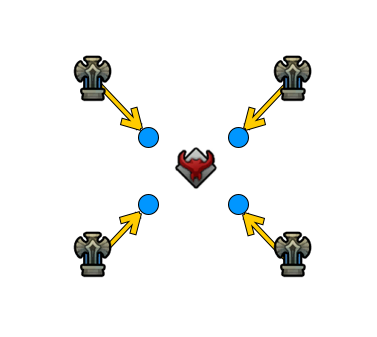
Players - Intercept orange lasers, stagger the boss, avoid red attacks.
x165
Line Delivery & Stagger
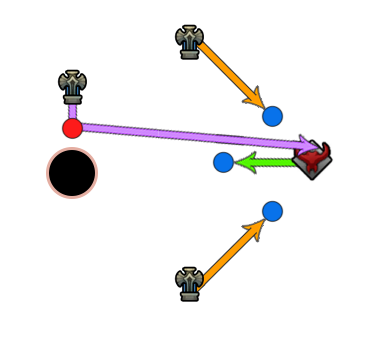
Players - block orange lasers from reaching Akkan and green from reaching 9 o'clock.
Players - intercept purple laser and deliver it to Akkan.
x140
Star or Hexagon
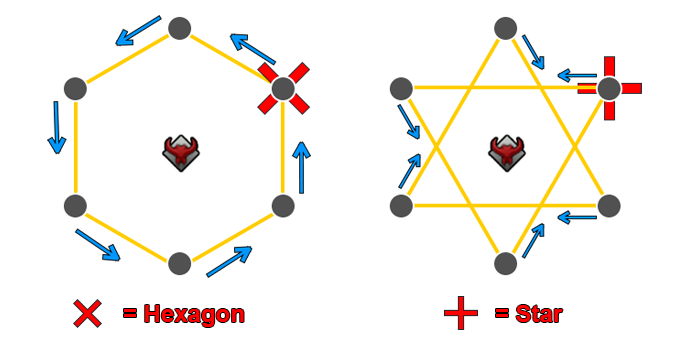
Check 11 & 1 o'clock positions:
Lasers facing diagonal = Hexagon
Lasers facing straight = Star
x139-30
Random Gimmics

Stand Left or Right of Akkans back
Then far backside
Lastly go inside
x139-30
Random Gimmics

Green Curse: Walk together, place 3 explosions
Blue Curse: 2 marked players stack together
Black Curse: 3 marked players stack together (Hard Mode Only)
Red Curse: 2 marked players separate each other
x30
Arena Break
Outside arena breaks.
Use Sidereal: Wei at x15 HP to skip x0 HP mechanic
x0
Destruction
Akkan goes into a cocoon
Use Sidereal: Inanna for safety. Complete Akkan's Destruction check.
x200
X Stagger

Player - Intercept the orange laser, stagger the boss, avoid red attacks.
x165
Line Delivery & Stagger

Player - intercept purple laser and deliver it to Akkan.
x140
Star or Hexagon

Turn the statues to form either a Hexagon or a Star
x139-30
Random Gimmics

Stand Left or Right of Akkans back
Then far backside
Lastly go inside
x139-30
Random Gimmics

Green Curse: Place and dodge 3 explosions spawning beneath you
Blue Curse: Stay close to Akkan
Red Curse: Move away from Akkan
x30
Arena Break
Outside arena breaks.
Use Sidereal: Wei at x15 HP to skip x0 HP mechanic
x0
Destruction
Akkan goes into a cocoon
Use Sidereal: Inanna for safety. Complete Akkan's Destruction check.
Raid Mechanics
Raid mechanics cover the passive mechanics that are persistent through the entire raid.
The Disease Meter below the player fills up upon getting hit by Akkan's patterns or during specific mechanics. Every time it fills up to maximum, it fears the player and adds a permanent debuff. This debuff can stack up to 5 times. Each stack adds another harmful effect.
Stack effects:
- Permanent low Poison damage based on player's max HP.
- Increases the poison damage.
- A poison aura appears around the player, which fills up the Disease Meter of nearby players.
- A poison aura appears around the player, which fills up the Disease Meter of nearby players.
- Player gets charmed and attacks other players. After a short duration, the player explodes and kills nearby players.
Description
- To liberate feared players, use cleanse skills or Sacred Charm/Sacred Bomb.
A well-timed Awakening or dodge can negate the fear effect. - If you get the third or fourth stack, don't stand too close to other players.
- In order to survive the exploding of the fifth stack, either utilize a Time Stop Potion or move away from the affected player.


At or near x200 HP bars, you gain access to the underground area by utilizing Akkan's Lantern, which spawns at 7 o'clock initially. This area and the player responsible for it are crucial for safely completing Main Mechanics in the raid.
Akkan's Lantern
- Players can enter the underground by pressing the "G" key near the object
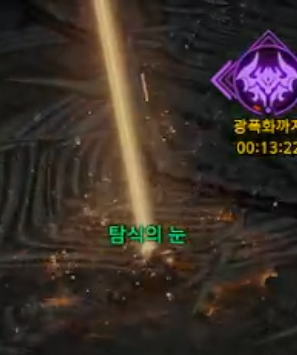
Underground layers
- Layer 1 is the initial spore spawning location
- Layer 2 is where spores expand when untreated
- Every 10 seconds, a spore is spawned
- After x140 HP, two spores spawn every 10 seconds
 Laser Button (Q), used for destroying spores and basic monsters.
 Petrify Button (W), used for petrifying enemies and the ghost monster in Hard Mode.
 Exit Button (R), lets you leave the Underground.
Description
- Patches of disease regularly spawn in random locations on the inside, which are mirrored on the outside arena.
- These patches begin spawning from the outer layer, and if left untouched, expand to layers closer to the center.
- The player needs to utilize the lantern he is carrying to destroy spawned spores with his "Q" ability.
- While you are underground, monsters continuously chase after you, they can be petrified with your "W" ability, killed with "Q", or just avoided by running. In Hard Mode a special ghoul monster is present which can only be petrified with "W".
- You gain Disease Meter passively when underground, roughly 1 gauge tick every 4 seconds, eventually reaching 100% gauge.
- Whenever entering the underground, 1 tick is automatically applied, which gives you about 68 seconds to spend in the underground before you get feared from full gauge.
- Players leaving/entering the underground gain temporary invincibility for 3~ seconds. Around 2–3 seconds before reaching your final gauge tick, you want to leave and re-enter the underground to avoid getting feared, letting you safely continue your spore cleaning duty.
- Regular strategy is to only have one player responsible for the underground. While, it isn't possible for one player to remain underground for the entire fight before he reaches 5 Disease Meter stacks and dies. The duration can be extended by utilizing Sidereal: Inanna whenever you reach high gauge. Letting you remain below significantly longer.
- Alternate the underground with another player if you run into time restraints or your disease stacks are too high.
Underground Player Duties
- x200~ HP - Akkan's Lantern spawns at 7 o'clock, but do not enter it immediately! Wait for a few disease patches to form first, and go underground when you feel like you need to start cleaning.
- x165~ HP - While players are performing the Line Delivery & Stagger mechanic, Sidereal: Inanna should be used at the 3 o'clock position where Akkan is located. Her area that depletes gauge also appears in the Underground, letting you lower your gauge and stay inside for longer. And it helps your teammates to tank the laser damage they receive. Priority areas to clean during this mechanic are: 9, 1, 3 and 5 o'clock
- x140~ HP - Your duty is to find two towers underground and stagger them with your "Q" laser ability, this makes them appear on the main floor, so your team can complete the Star or Hexagon mechanic Priority areas to clean are: 11, 12, 1, 5, 6 and 7 o'clock
- x139-30 HP - Continue to clean spore patches and manage your gauge, so you don't get feared underground.
- Whenever a player's Disease Meter is filled, and they do not negate it by using their space bar or awakening, they get feared.
- Akkan will teleport to the feared player and try to kill them with a scythe attack. The damage of this attack further increases each time it gets triggered.
On Hard Mode, this attack always 1 shots players hit. - Free this player by using a Sacred Charm/Sacred Bomb. or a skill that cleanses.
- Anyone caught in front of Akkan during this attack will get one shot!
Main Mechanics

Players - Intercept orange lasers, stagger Akkan
Telegraph
- Occurs at or near x200 bars.
- Akkan teleports to the center and summons a poison aura around him.
- Four towers spawn that shoot an orange laser at Akkan forming an X shape.
- A stagger bar appears below the boss.
Description
- Players should spread out in x3+1 positions.
- Stand in front of the laser to break the link between the tower and Akkan.
- If all four links are severed, Akkan can be inflicted with stagger damage.
- The stagger bar will not decrease if even one of the links is active.
- The player who is severing the link will gain a slowly stacking debuff that increases the damage they take from the laser.
- If the damage you receive becomes too large, swap with your teammate to remove your debuff stacks.
- Dangerous attacks marked with red telegraphs will periodically spawn and try to interrupt the process.
- Anyone hit by them will instantly die, so it is important to avoid them first and then proceed with the stagger.
- Hard Mode only: Additional large scythe paths are created, that spawn with a delay of a few seconds.

Players - block orange lasers from reaching Akkan and green from reaching 9 o'clock.
Players - intercept purple laser and deliver it to Akkan.
Telegraph
- Occurs at or near x165 bars.
- Akkan teleports to the 3 o'clock position on the arena.
- Additional towers are created at the 12, 6 and 9 o'clock positions.
- There are a total of 4 lasers that players can interact with: 2 orange, 1 green and 1 purple.
Description
- To complete the mechanic, you must stagger the boss, but to be able to do that you must block both orange lasers going towards Akkan and the green laser shooting out of him. While also dragging the purple laser towards Akkan from the far left.
- Towers at 6 & 12 o'clock shoot orange lasers towards Akkan. Assign 2 players to the 6 o'clock position and 1 to the 12 o'clock, responsible for blocking the laser.
- A green laser is being shot from the front of Akkan himself, assign one player responsible for blocking this. If this is not blocked, the boss will recover HP over time.
- Just like with the X Stagger mechanic, you will get a stacking debuff the longer you block the lasers.
If this damage becomes unbearable, swap with your teammate. - The remaining players go to the 9 o'clock position and obtain the purple laser that is attached to a cage.
- Rub your character against the laser to pick it up, then proceed to drag it across the arena towards Akkan at 3 o'clock.
- The player dragging the purple laser will gain a stacking movement speed reduction debuff that stacks to 3.
If it reaches 3 stacks, your character will get dragged back to the starting position. The other players responsible for the purple laser need to intercept it before it reaches 3 stacks and keep dragging it forward. Alternate like this between yourselves until you've delivered the laser to the boss and attached it. - Once the purple laser is attached to Akkan and the other lasers are being blocked, you can stagger him and the mechanic is resolved.
- (Tip) If your group has an Artist, place portals to help players quickly deliver the purple laser by teleporting a large distance.

Telegraph
- Occurs at or near x140 bars.
- Akkan teleports to the center, draws a large green area around him.
- Six towers spawn on the arena at 11, 12, 1, 5, 6 and 7 o'clock positions.
Description
- Your goal is to recognize which of the two shapes you must create, either Star or Hexagon. Then stagger the statues, and turn them in the right direction to create the required shape.
- The shape is easily identified by checking the initial direction red telegraphs appear around the tower at 11 & 1 o'clock positions.
- Lasers facing diagonal = Hexagon
- Lasers facing straight = Star
- There will be towers that have not appeared, the player responsible for the Underground needs to unlock them by shooting his laser ability at the tower downstairs and stagger it.
- When the towers spawn, there is a wide area explosion followed by a smaller one around them.
- Avoid these and stagger the statue. Doing so will let you interact with it by pressing "G" and turn it clockwise.
Towers can already be shooting in the correct direction when spawned, so if you've memorized which direction a laser should be pointing depending on the shape, make sure not to change its direction for no reason. - Once all lasers are targeted to the correct direction and the shape is formed, the mechanic gets resolved.
- Be very careful not to stand in the path of the black lasers for too long, as they inflict large amounts of damage very quickly. On the contrary, white lasers do minimal damage.
- If you take too long to assemble the required shape, the raid will die to a periodical aoe explosion that Akkan is performing during the mechanic.
Three Shape Safespots

Telegraph
- Akkan teleports to the center of the arena.
- Flashes a large green pentagram on the ground.
Description
- Avoid the first attack by moving to either the 5 or 7 o'clock position when facing his backside.
- Then go directly behind him but stay at a large distance.
- And for the final safe spot, move inside, but avoid his small green aoe zone.
Four Curses
Telegraph
- Akkan places a green pentagram below him.
- Assigns players from the raid with a random curse.
- Finishes with casting a laser towards a non-cursed player.
Description
- Blue Curse
Two players are marked with a blue icon above their head, as well as linked by a tether. You must remain close to each other. When the debuff of the tether reaches 3 seconds remaining, both players lose control of their character and start moving the opposite direction. If the tether doesn't break because of your distance between each other, you clear the mechanic. If it breaks, both of you get charmed and attack your teammates.
- Black Curse
Three players are marked with a black icon as well as linked by a tether. They must remain close to each other until the mechanic is resolved. Other players moving through these tethers receive damage, so be careful not to damage them.
- Red Curse
Two players are marked with a red icon above their head, as well as linked by a tether. Unlike the blue curse, you must spread out far away from each other. At 3 seconds remaining on the debuff, both players lose control and are being pushed towards each other. If you're not too close by the end of it the mechanic is resolved, otherwise you get charmed.
- Green Curse
Four players are marked with a green icon, and linked by a tether in groups of 2. Stack together with your linked partner. Move away from the boss. Periodically, green explosions will occur under your feet. Wait for them to appear, then move to a safe spot with your partner and repeat this process 3 times. The explosions leave poisonous areas behind for a short period of time.
Skulls
Telegraph
- Akkan teleports to the center of the arena.
- Places a green pentagram below him.
- Green & White skulls move across the arena and from Akkan itself.
Description
- Move to the outer edges of the arena.
- Focus on dodging the green colored skulls, as they do not alter their trajectory.
- White skulls coming from Akkan aggro onto players and fear you if hit, but they do not reach the outer edges of the map.
Slimes & Tentacles
Description
- Akkan summons multiple tentacles on the arena, accompanied by a slime.
- Focus on killing the slime first. On its death, it creates a blue telegraphed explosion. Do not stand in it!
Plague Wave
Description
- Akkan suddenly dissapears and reappears at the edge of the map either at 3/6/9 or 12 o'clock.
- Quickly move to the opposite side of him to avoid this attack.
- Group up with your teammates as a horde of monsters will approach you.
- After this attack, Akkan will teleport to one player and perform an Execution attack.
Telegraph
- Occurs at or near x30 bars.
- Akkan teleports to the center and slams the ground in front of him repeatedly.
- He breaks the outer edge of the arena and despawns all disease puddles.
- A pack of monsters ambush and try to prevent you from dodging.
Description
Arena Break
- Your ideal safe spot during this entire mechanic is the back side of Akkan at all times.
- He can perform a frontal, side and a rotating laser during this phase, getting hit by them will knock you off the ledge.
- If your Sidereal gauge is ready, use Wei at x15 HP or lower, this will initiate a special sidereal attack that immediately completes the fight and brings Akkan to x0 HP skipping the final mechanic.
Destruction
- If you deplete his HP to x0 naturally, you must complete a destruction check similarly to gate 2 of Akkan.
- During this destruction Akkan will explode areas on the ground, always repeating the same pattern: Center, Middle, Sides. Use your Paralysis or Push immune skills to not get knocked off the ledge.
- Utilize Sidereal: Inanna to prevent random deaths from falling off.
Hard Mode Extra Phase
Telegraph
- After a short cutscene, players are teleported to a squared arena with a Giant Akkan at the end of it.
General extra phase information
- Players can be pushed off all ledges, they fall in the water if they do and have to perform a minigame just like in Akkan Gate 1. However, getting pushed off the front where Akkan is located will result in an instant death.
- Akkan has a hidden stagger bar, successfully staggering him results in a destruction check that provides a damage boost for all players. 50% for 1st and 2nd destruction and 100% damage increase for the 3rd.
- Safe spots for the majority of the fight are on the side where his hand is touching the ground, or the corner that he is holding with his arm when switching the sides of the arena.
- Just like in the first part of Gate 3, dead players will occasionally be resurrected and fight against you.
- Back attack is the backside of his hand, front attack is in the front of it.
Telegraph
- Occurs at or near x235 and x135 bars.
- Akkan raises both his arms, which start glowing green.
- After a short time, he smashes the ground of the arena
Description
- There are two ways to survive this attack:
- Players need to get pushed off the ledge on purpose utilizing the Water Waves (unintended way).
- Players group up around the Worm Trap on the ground and step into it before the smash (intended way).
Black Mist + Worm Trap
Telegraph
- Akkan presses his hands together, forming a black sphere that explodes and travels as smoke across the arena.
- This is a guaranteed first attack when the Extra Phase begins.
Description
- The attack inflicts moderate amounts of gauge. Safe spot is located at the far end of the arena.
- After the mechanic ends, multiple tentacles are spawned, killing them provides you with a stagger damage bonus.
- Additionally, 1 player gets the Worm Trap debuff. Place it away from the action, ideally in the back corners of the arena.
- Make sure not to step on this trap and activate it by accident before the Akkan Smash, you will have to wait for the Black Mist attack to gain another Worm Trap or you might wipe otherwise.
Telegraph
- Occurs at or near x200 bars.
- Akkan zooms out the camera, grabs both side pillars and tilts the arena sideways.
Description
- Similar to Kayangel gate 4 mirror attack, you are constantly being pulled towards the lower side of the platform.
- Run against this pull and avoid aoe spore attacks that periodically are being spawned on the ground.
- Akkan himself will perform a scratch attack followed by a laser that can be aimed at either a low/mid or high direction.
- Then the arena flips to the other side, and it repeats, except he performs a laser into a scratch attack now!
- If your dps is very high, be careful not to go under x140~ HP during this mechanic or make sure you have a Worm Trap available to avoid the Akkan Smash otherwise it will result in a wipe.
4 Slams
Telegraph
- Akkan raises one of his arms and slams the ground repeatedly four times.
Description
- Stand on the opposite side to avoid this attack. The aoe expands with each consecutive hit.
Various Lasers
Telegraph
- Akkan raises one of his arms to perform a laser.
Description
- Stay near the hand that remains on the ground or the pillar that he holds when switching sides to be safe.
- Careful when he raises both of his arms and aims them on the side, the lasers will shoot in the center instead!
Water Waves
Telegraph
- Akkan emits a scream that pulsates with black waves around him.
Description
- There will be yellow telegraphs indicating the path of the wave attacks.
- These attacks can either come from the front or backside of the arena, simply avoid them to be safe.
Notable Patterns
Telegraph
- Akkan holds his scythe behind him and glows blue.
Description
Counter 1
- Akkan steps backwards while surrounded by a green fog.
- On a failed counter, step away from the front of the boss.
- He will dash forwards quickly and slice knockup players in his path.
Counter 2
- Akkan places his scythe sideways behind his back and starts charging it.
- On a failed counter, step away from the front of the boss.
- Akkan moves forward while spinning and shooting out green skulls from his front.
- Stay on his backside and follow him.
Counter 3
- Akkan places his scythe behind him and stabs the ground while charging it.
- On a failed counter, step away from the front of the boss.
- Akkan will move forwards, perform an uppercut whirlwind and fly up in the air.
- Skulls will rain down on the floor and Akkan will slam the ground, showing a red telegraph.
Telegraph
- Akkan jumps into the air, slamming the ground in front of him and then perform a backwards spin.
Description
- When beginning the fight, Akkan will always start with this attack!
- If a player gets hit with the frontal slam, another frontal slam is repeated.
- If everyone dodges the slam, Akkan performs a backwards spin instead.
- Players with Push Immunity skills should tank this pattern to create attack opportunities for your teammates.
Telegraph
- Akkan strikes twice in front of him creating a crescent moon shape on the ground.
- Then he throws his scythe, backdashes and slams the ground in front of him.
Description
- Try to sidestep this attack or move to the back of the boss.
- His aiming direction can change based on the targeted player's position, so watch out.
Telegraph
- Akkan strikes the ground in front of him twice in a row, followed by a back attack.
- As his final attack, he releases energy waves from both of his sides.
Description
- Observe the 3 slams, then move either to the front or back to be safe from the sideways energy waves.
Telegraph
- Akkan creates a portal that summons a giant scythe, hitting the surrounding ground.
What To Do
- Stay outside, wait for the red telegraph to disappear, then move inside.
Telegraph
- The boss raises his scythe and gathers energy.
- Then swipes in front of him, creating a green cone-shaped area.
Description
- Avoid the green area and find a safe spot.
- Getting hit by the follow-up explosion will fear your character.
Telegraph
- Akkan flips his scythe around and slams the surrounding ground.
Description
Melee Earthquake
- Run away from Akkan if you see an upside down scythe.
- If players are caught within this slam, they get stunned.
- An additional AoE strike is performed if the scythe is being held for a long time by Akkan.
- There is a high chance of Akkan performing Execution on stunned players, so cleanse them as soon as possible.
Ranged Earthquake
- Akkan raises his scythe and slams the ground, creating a shockwave that travels forward.
- Players hit by this attack get stunned.
- The boss will teleport in front of them and repeat this attack a second time.
- There is a high chance of Akkan performing Execution on stunned players, so cleanse them as soon as possible.
Telegraph
- Akkan stabs his scythe into the ground in front of him.
- Circular shapes with safe spots are created.
- Afterward, he pulls his scythe backwards and creates horizontal line attacks.
Description
- Look for the gaps in the ground and stand between the green telegraphed attacks to be safe.
Notable Patterns 2
Telegraph
- Akkan spins his scythe quickly and surrounds himself in a green tornado.
Description
- Stay close to the boss to avoid taking damage.
- If you're on the outside, careful of the big scythe spinning around the tornado.
Telegraph
- The boss stabs the ground in front of him, dragging his scythe backwards and grabbing a player.
Description
- A stagger check will appear if a player is grabbed.
- Akkan will teleport to a random location after grabbing a player, look for him on the minimap!
- If you fail to stagger, the player will die.
Telegraph
- Akkan creates two lasers that meet in front of him and start rotating in a random direction, 300°.
Description
- Simply stay in the back and move with the boss to avoid the rotating laser.
Telegraph
- Akkan vanishes and dashes backwards.
- After reappearing, he performs a frontal laser on a random target.
Description
- Don't stay in his path, as the laser inflicts a large amount of gauge.
- Careful of Akkan turning during the attack based on his targeted player.
Telegraph
- Boss lifts from the ground and rapidly shoots green lasers in front of him.
- He will resurrect dead players.
Description
- Back side is safe!
- Kill the players who are being resurrected as soon as possible.
Telegraph
- Akkan creates a red pathway on the ground for a large scythe attack.
Description
- Don't stand in the path.
- Make sure the scythe has been cast before going back to the boss.
- This attack is an instant kill if you're hit!
Telegraph
- Akkan dashes backwards while floating in the air.
- Chooses a target and slams his scythe onto him.
Description
- The first slam creates a cross shaped pattern followed by an X shape directly afterward.
- Dodge this by positioning left or right of Akkan's back to dodge the cross, then move behind him to avoid the X.
Telegraph
- The boss summons two red skulls rotating around his body in a random direction.
- A pizza slice appears on the ground and indicates the starting position.
Description
- Look at the two skulls and check the direction they are spinning.
- Find the starting pizza slice and position yourself there.
- Start running in the direction of the two spinning skulls when the pizza slice has retracted into the boss.
- There are a total of 5 explosions.
- You will receive large amounts of gauge if you get hit once, more than that, and you risk getting feared and killed from full gauge.
- Use a Time Stop Potion if you're not confident you'll make it.
Telegraph
- Akkan chooses a target and swipes in his direction 4 times.
Description
- If you are the target, try to bait his swipes by going left and right in front of the boss.
- Alternatively, you can run far away and outrange this attack.
- The first three swipes are small.
- The 4th swipe covers a large area around him, you can move very close in front of Akkan to be safe.
Solo Mode Main Mechanics

Player - Intercept orange laser, stagger Akkan
What To Do
- Find the location that is not being blocked by NPC's.
- Stand in front of the laser to break the link between the tower and Akkan.
- If all four links are severed, Akkan can be inflicted with stagger damage.
- The stagger bar will not decrease if you're not blocking the laser.
- You will gain a slowly stacking debuff that increases the damage they take from the laser.
- If the damage you receive becomes too large move out until the debuff stacks run out, then go back.
- Dangerous attacks marked with red telegraphs will periodically spawn and try to interrupt the process.
- Anyone hit by them will instantly die, so it is important to avoid them first and then proceed with the stagger.

NPC's - block orange lasers from reaching Akkan and green from reaching 9 o'clock.
Player - intercepts purple laser and deliver it to Akkan.
What To Do
- To complete the mechanic, you must stagger the boss, but to be able to do that you must carry the purple laser towards Akkan from the far left.
- Rub your character against the laser at the 9 o'clock position to pick it up, then proceed to drag it across the arena towards Akkan at 3 o'clock.
- While dragging the purple laser, you will gain a movement speed reduction debuff that stacks to 3. If it reaches 3 stacks, your character will get dragged back to the starting position.
- An NPC will be standing in the center of the arena, blocking the green laser. Carry the purple laser to him and attach it to the NPC.
- Once the purple laser is attached to the NPC, wait until your debuff times out. Then re-take the laser from the NPC and finish dragging it over to Akkan and attach it to him.
- Then stagger Akkan and you're done.

What To Do
- Your goal is to recognize which of the two shapes you must create, either Star or Hexagon. Then turn them in the right direction to create the required shape.
- The shape can either be a Star or Hexagon.
- Go to the towers that are facing the wrong way and interact with them by pressing "G" to turn them clockwise.
- Once all lasers are targeted to the correct direction and the shape is formed, the mechanic gets resolved.
- Be very careful not to stand in the path of the black lasers for too long, as they inflict large amounts of damage very quickly. On the contrary, white lasers do minimal damage.
- If you take too long to assemble the required shape, the raid will die to a periodical aoe explosion that Akkan is performing during the mechanic.
Three Shape Safespots

What To Do
- Avoid the first attack by moving to either the 5 or 7 o'clock position when facing his backside.
- Then go directly behind him but stay at a large distance.
- And for the final safe spot, move inside, but avoid his small green aoe zone.
Four Curses
Telegraph
- Akkan places a green pentagram below him.
- Assigns players from the raid with a random curse.
- Finishes with casting a laser towards a non-cursed player.
Description
- Blue Curse
Stay close to Akkan, your character will run outwards, if it runs out of the marked area you die.
- Black Curse
Stay close to Akkan and make sure not to get knocked outside the zone by his attacks.
- Red Curse
Move away from Akkan, you will get pulled in. If you touch Akkan during this pull you'll die.
- Green Curse
Move away from the boss. Periodically, green explosions will occur under your feet. Wait for them to appear, then move to a safe spot and repeat this process 3 times. The explosions leave poisonous areas behind for a short period of time.
Skulls
Telegraph
- Akkan teleports to the center of the arena.
- Places a green pentagram below him.
- Green & White skulls move across the arena and from Akkan itself.
Description
- Move to the outer edges of the arena.
- Focus on dodging the green colored skulls, as they do not alter their trajectory.
- White skulls coming from Akkan aggro onto players and fear you if hit, but they do not reach the outer edges of the map.
Slimes & Tentacles
Description
- Akkan summons multiple tentacles on the arena, accompanied by a slime.
- Focus on killing the slime first. On its death, it creates a blue telegraphed explosion. Do not stand in it!
Plague Wave
Description
- Akkan suddenly dissapears and reappears at the edge of the map either at 3/6/9 or 12 o'clock.
- Quickly move to the opposite side of him to avoid this attack.
- Group up with your teammates as a horde of monsters will approach you.
- After this attack, Akkan will teleport to one player and perform an Execution attack.
What To Do
Arena Break
- Your ideal safe spot during this entire mechanic is the back side of Akkan at all times.
- He can perform a frontal, side and a rotating laser during this phase, getting hit by them will knock you off the ledge.
- If your Sidereal gauge is ready, use Wei at x15 HP or lower, this will initiate a special sidereal attack that immediately completes the fight and brings Akkan to x0 HP skipping the final mechanic.
Destruction
- If you deplete his HP to x0 naturally, you must complete a destruction check similarly to gate 2 of Akkan.
- During this destruction Akkan will explode areas on the ground, always repeating the same pattern: Center, Middle, Sides. Use your Paralysis or Push immune skills to not get knocked off the ledge.
- Utilize Sidereal: Inanna to prevent random deaths from falling off.
Credits
Written by Choilicious