Akkan Gate 2 Legion Raid Guide
Akkan Gate 2 is mainly focused around controlling your Disease Meter and interrupting Akkan's clones during different mechanics by using your Counter Attack skills.
Enemy Information
| Normal Mode | Hard Mode | Monster Type | Weakness |
| 1580 Item Level | 1600 Item Level | Demon | None |
- HP Potion of your choice
- Time Stop Potion or Atropine Potion
- Sacred Charm (or Camouflage Robe)
- Corrosive Bomb or Destruction Bomb
Rewards
| Gold | Material | Box Material | Box Cost | Auction Material | First Clear | |
| Normal | ||||||
| Gate 1 | 1000 | 3 | 3 | 450 | 20 | |
| Gate 2 | 1800 | 3 | 3 | 550 | ||
| Gate 3 | 2600 | 5 | 5 | 750 | 5 | |
| Total | 5400 | |||||
| Hard | ||||||
| Gate 1 | 1500 | 7 | 7 | 600 | 20 | |
| Gate 2 | 2500 | 7 | 7 | 700 | ||
| Gate 3 | 3500 | 8 | 8 | 950 | 10 | |
| Total | 7500 | |||||
This guide assumes that you are familiar with the recommended Raid Build for your class.
Learn about the Akkan Gates: 1 / 3
Cheat Sheets
Once you have read through the detailed description of the main patterns, use the “cheat sheet” during the raid, or check out our condensed Cheat Sheet Collection for all Legion Raids on one page.
x175
Tentacles
Avoid standing in the center.
Destroy Tentacles.
x160
Ghost

Avoid green ghosts and place puddles at the edge of the arena.
Pick up skull and run away from ghost clockwise.
Pass skull to the next player before the red ghost touches you.
Optional: Use Camouflage Robe method.
Hard Mode: Counter Clones.
x140
Red Hole
Avoid standing in the center and dodge red explosions.
After 3rd explosion, dodge Akkan's 1 hit attack.
x110
Hide
Stay in the shadow behind Akkan.
Pay attention to the skulls to see Akkan's turning direction.
If the Lantern glows, Akkan will use the laser attack.
x85
Red Hole
Avoid standing in the center and dodge red explosions.
At the start, dodge Akkan's 1 hit attack.
Optional: Use Sidereal: Thirain towards the front of the boss.
x55
Ghost
Similar to x160 Ghost.
x30
Red Hole
Avoid standing in the center and dodge red explosions.
After 3rd explosion, dodge Akkan's 1 hit attack.
x0
Destruction
Go to assigned positions.
Use Corrosive Bomb, Destruction Bomb and Weak Point skills on Akkan.
Counter Clones and use Sidereal: Thirain.
x175
Tentacles
Avoid standing in the center.
Destroy Tentacles.
x160
Ghost
Avoid green ghosts and puddles at the edge of the arena.
Pick up the skull and move clockwise.
Throw the skull to the yellow marked locations at 5, 7, 11 and 1 o'clock positions to cleanse your ms debuff.
Optional: Use Camouflage Robe method.
x140
Red Hole
Avoid standing in the center and dodge red explosions.
After 3rd explosion, dodge Akkan's 1 hit attack.
x110
Hide
Stay in the shadow behind Akkan.
Pay attention to the skulls to see Akkan's turning direction.
If the Lantern glows, Akkan will use the laser attack.
x85
Red Hole
Avoid standing in the center and dodge red explosions.
At the start, dodge Akkan's 1 hit attack.
Optional: Use Sidereal: Thirain towards the front of the boss.
x55
Ghost
Same as x160 Ghost.
x30
Red Hole
Avoid standing in the center and dodge red explosions.
After 3rd explosion, dodge Akkan's 1 hit attack.
x0
Destruction
Use Destruction Bomb and Weak Point skills on Akkan.
Counter Clones and use Sidereal: Thirain.
Raid Mechanics
Raid mechanics cover the passive mechanics that are persistent through the entire raid.
The Disease Meter below the player fills up upon getting hit by Akkan's patterns or during specific mechanics. Every time it fills up to maximum, it fears the player and adds a permanent debuff to the player. This debuff can stack up to 5 times. Each stack adds an additional debuff and/or triggers a harmful effect.
Stack effects:
- Permanent low Poison damage based on player's max HP.
- Increases the poison damage.
- A poison aura appears around the player, which fills up the Disease Meter of nearby players.
- A poison aura appears around the player, which fills up the Disease Meter of nearby players.
- Player gets charmed and attacks other players. After a short duration, the player explodes and kills nearby players.
What To Do
- To liberate feared players, use cleanse skills or Sacred Charm.
A well-timed Awakening or dodge can negate the fear effect. - If you get the third or fourth stack, don't stand too close to other players.
- In order to survive the exploding of the fifth stack, it is imperative to either utilize Time Stop Potion or move away from the affected player.
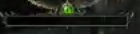
Telegraph
A red aura below the player.
Description
A red eye jumps every 20 seconds to a random player. While being attached, it increases the Disease Meter of that player over time.
What To Do
- Pay attention to the state of your Disease Meter.
- Once it is about to reach Maximum, react based on what is explained in the Disease Meter mechanic instructions. (Previous Tab)

Main Mechanics
Telegraph
- Occurs at or near x175 bars and randomly below x85 bars.
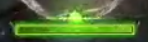
- Akkan teleports to the center and summons a poison aura around him.
- Green ground explosions occur at random spots.
- Tentacles spawn at random locations.
What To Do
- Avoid staying too close to the center.
- Spread out, dodge the ground explosions and destroy the tentacles as soon as possible.
Telegraph
- Occurs at x160 and x55 bars.
- Akkan teleports to the center and summons a poison aura around him.
- A skull shaped object spawns at a random location.
- One red and two green ghosts spawn. One additional green ghost spawns on Hard Mode.
- Periodically, random players get a disease aura, which summons a puddle after a few seconds.
- Counterable Akkan clones appear randomly at the edge of the map on 3x+1 spots. (Only Hard Mode)
What To Do
- To survive the mechanic, you need to prevent the red ghost from reaching the skull for a certain duration.
If the red ghost touches the skull, it is a raid wipe. If the green ghost touches a player, the player is forced to walk towards Akkan's green aura in the center and receives massive damage. - Assign an agile player as the first one to carry the skull, who should take position at 5 O'clock (South-East).
If the skull spawns at a different location, other players need to pick it up and throw it (Q) to the 5 O'clock position asap. - Once the skull and the player are at the correct position, wait for the red ghost to walk a few steps towards the skull before picking it up and start running clockwise. Everyone else should run clockwise too but a few steps a head of the skull carrier.
- Optional Camouflage Robe strategy: The first player activates Camouflage Robe shortly before picking up the skull and goes to 8 O'clock position and waits. As long as the player is invisible, the red ghost will stop the chase. Once visible, wait for the red ghost to get closer before passing the skull to the next player. The next player should use the same strategy. If timed correctly, the mechanic should end right after the 2nd player's invisibility lifts.
- The skull carrier gets a stacking slow debuff, which is why that player needs to pass the skull to players running ahead by pressing “Q”.
- The puddle left behind by the disease aura deals damage and increase Disease Meter of players standing on top of it. Furthermore, these puddles reappear in the exact same location once the mechanic repeats at x55 bars. So make sure to place the puddles at the edge of the map, while avoiding the green ghosts patrolling that area.
- Hard Mode only: After passing the skull to another player, you get a debuff which prevents you from picking up the skull again. To get rid of it, you have to counter a clone spawning randomly at the edge of the map. Uncountered clones move diagonally to the opposite side of map and deal high damage to players on their path. Either assign players to counter clones or avoid standing in their path.
Telegraph
- Occurs at or near x140, x85 and x30 bars.
- Akkan summons a red hole in the center.
- In certain intervals, a ring shaped explosion occurs either close to the red hole or at the edge of the map.
What To Do
- While fighting Akkan, avoid touching the red hole or standing in the ring shaped explosions, since these increase your Disease Meter heavily.
- After the 3rd explosion, Akkan disappears and teleports to a random player to perform a 1-hit frontal attack. Dodge it by moving away or behind Akkan.
- Optional: The raid lead can use Sidereal: Innana between x160 and x140 bars.
- This mechanic at x85 bars is slightly different. The 1-hit attack occurs right at the start of the mechanic. So group up at 6 O'clock and wait for Akkan to reappear before moving/dodging away. After that, the raid lead should use Sidereal: Thirain in front of the boss to trigger a special sidereal interaction, which deals high damage and provides the players with a big window to deal uninterrupted damage.
Disclaimer: On Normal Mode, the "1-hit attack" deals critical damage if getting hit twice.
Telegraph
- Occurs at or near x110 bars and afterward in specific intervals.
- Akkan teleports to the center, draws a circle around him.
- A big shadow appears at the back of the boss.
What To Do
- The goal is to stay always in the moving shadow of Akkan. Getting exposed to Akkan increases the damage the player takes.
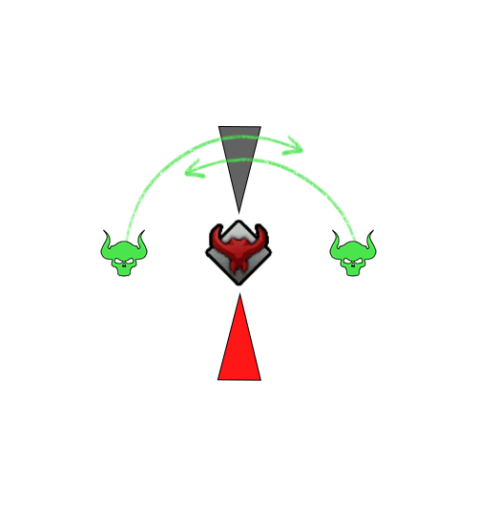
- Hard Mode: Getting exposed to Akkan petrifies, the player. At the end of the mechanics, all petrified players will be executed by Akkan.
- There is one skull on each side of the boss. A glowing skull indicates in which direction the boss is about to turn. From the player's point of view, if the right skull glows, the boss will turn left. If the left skull glows, then Akkan will turn right. So pay attention to the skulls and follow the shadow closely to survive this mechanic.
- This pattern can be split into 3 rounds. Each round consists of 3 individual “turning moves” except for the 3rd segment, which is always a 180° rotation to one side and slowly rotating back to the default position.
- Tips: The first time the turning direction changes during the first 2 rounds, the boss always rotates 180°. So this means there are only a limited amount of patterns which can occur during the first 2 rounds. [90°⇾90°⇾180°] or [90°⇾180°⇾90°]
- The boss can also perform a rotating laser attack. Akkan's red lantern glowing is the indicator for this pattern. Make sure to rotate clockwise or counterclockwise with the shadow to avoid getting hit by the laser.
Telegraph
- Occurs once boss reaches 0 hp.
- Akkan teleports to the center and summons a ring shaped poison fog covering the outside of the battle area.
- A crosshair appears on the boss, indicating that “destruction” is possible.
- Counterable Akkan clones appear randomly at the edge of the map.
What To Do
- To succeed this mechanic and the raid, you have to deal a certain amount of Weak Point damage within a short duration. If you fail to do so, Akkan does a map wide 1-hit attack and heals back multiple bars. You can survive this by using Time Stop Potion, but in most cases, you won't have enough time to get Akkan back to 0 bars, before the boss enrages.
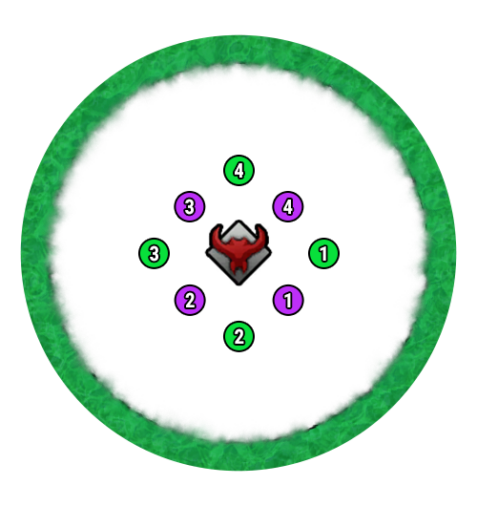
- At the start of this mechanic, everyone should take position around the boss based on x3 (party 1) and x3+1 (party 2).
- Once the crosshair on the boss appears, the supports should start using Corrosive Bomb on rotation. The remaining members should use Destruction Bomb and skills with Weak Point damage on cooldown after the first Corrosive Bomb was thrown.
- The raid lead should use Sidereal: Thirain as soon as it is available to assist with the destruction. Countering the clones, increases the Sidereal Meter by around 33%, which is why it is important to spread out and cover as much ground as possible to counter all clones. If any party member dies, everyone else should rotate to cover ground evenly.
- During this entire mechanic, the following patterns can occur, which you need to avoid while leading Weak Point damage to the boss and countering the clones.
- Cone-shaped shockwave: Follows a player briefly before shooting a shockwave, which 1 shots most players.
- Cross lasers: Avoid standing in the cross shaped area.
- Ground Explosions: These have different shapes, move to unaffected safe spots to avoid getting hit.
- Tentacles: Dodge tentacle's attacks and destroy it.
Notable Patterns
Telegraph
- Akkan holds the scythe with both hands and glows blue.
- The boss does 3 spin attacks while moving forward and summons a ground explosion at the end.
What To Do
- Prevent the follow-up attacks by using a Counter Attack skill while the boss glows blue.
- In case you failed to counter, follow the boss closely from the back, to avoid getting hid by the ground explosion.
Telegraph
- The scythe and lantern glow for a brief moment.
- Boss starts to spin and shoot lasers from both hands.
What To Do
- Stay in front or behind the boss and rotate with him.
Telegraph
- Six random players and the boss are connected with a laser. The lasers explode after a few seconds.
- Two random players get a green circle around them, which explodes in a huge area with a safe zone close to the player.
What To Do
- Players with the laser should move briefly away from the boss and dodge the laser explosion. Afterward, stay either farm away from the players with the circle or move into the safe zone close to them.
- The two players with the circle should move away from each other before the explosion occurs.
You can also try to overlap the circles close to the boss, the remaining players move immediately towards the safe zone after the laser was fired. This is risky but helps to keep up the dps.
Telegraph
- Akkan teleports to the center and draws a huge magic circle around him.
- A cone-shaped safe spot appears.
What To Do
- Move to the cone-shaped area as soon as possible to survive the 3 follow-up shockwaves.
Telegraph
- Boss holds his lantern high up and summons a big red eye above him.
What To Do
- Look away from the boss.
Telegraph
- Green variant: A random player gets targeted by a small cone and the rest get circle around them.
- Yellow variant: A random player gets targeted by a big cone and another random player is stunned and surrounded by an expanding circle.
What To Do
- Green variant: Spread out and run away from each other. Player targeted by the cone should be able to run away before the cone explodes.
- Yellow variant: The player targeted by the cone should avoid aiming it towards the stunned player and dodge away from it as soon as it stops tracing the player. The remaining 6 should avoid standing in neither of the 2 shapes and can keep dealing damage to the boss.
Telegraph
- The boss links 4 random players with a chain.
- A cross shaped area appears below these players.
What To Do
- The linked players should spread out and run away from the rest.
- Once the cross glows, step out of it to avoid the explosion.
Solo Raid Main Mechancis
What To Do
- Avoid staying too close to the center.
- Destroy the tentacles spawning around the boss.
What To Do
- To survive the mechanic, you need to prevent the red ghost from reaching the skull for a certain duration.
If the red ghost touches the skull, it is a raid wipe. If the green ghost touches a player, the player is forced to walk towards Akkan's green aura in the center and receives massive damage. - Pick up the skull, move to the 5 o'clock position and throw it inside the yellow marked circle on the ground.
- Once the skull and the player are at the correct position, wait for the red ghost to walk a few steps towards the skull before picking it up and start running clockwise.
- Optional Camouflage Robe strategy: Activate Camouflage Robe shortly before picking up the skull and go clockwise. As long as the player is invisible, the red ghost will stop the chase. Once visible, wait for the red ghost to get closer before throwing the skull to yellow marker to cleanse yourself. Pick up the skull and proceed clockwise repeating the same actions.
- The skull carrier gets a stacking slow debuff, which is why that player needs to throw the skull to the locations at 5, 7, 11 and 1 o'clock by pressing “Q”.
- The puddles left behind by the disease aura deal damage and increase Disease Meter of players standing on top of it. Furthermore, these puddles reappear in the exact same location once the mechanic repeats at x55 bars. So make sure to place the puddles at the edge of the map, while avoiding the green ghosts patrolling that area.
What To Do
- While fighting Akkan, avoid touching the red hole or standing in the ring shaped explosions, since these increase your Disease Meter heavily.
- After the 3rd explosion, Akkan disappears and teleports to a random player to perform a 1-hit frontal attack. Dodge it by moving away or behind Akkan.
- Optional: The raid lead can use Sidereal: Innana between x160 and x140 bars.
- This mechanic at x85 bars is slightly different. The 1-hit attack occurs right at the start of the mechanic. So group up at 6 O'clock and wait for Akkan to reappear before moving/dodging away. After that, the raid lead can use Sidereal: Thirain in front of the boss to trigger a special sidereal interaction, which deals high damage and provides the players with a big window to deal uninterrupted damage.
What To Do
- The goal is to stay always in the moving shadow of Akkan. Getting exposed to Akkan petrifies, the player. At the end of the mechanics, all petrified players die.
- There is one skull on each side of the boss. A glowing skull indicates in which direction the boss is about to turn. From the player's point of view, if the right skull glows, the boss will turn left. If the left skull glows, then Akkan will turn right. So pay attention to the skulls and follow the shadow closely to survive this mechanic.
- This pattern can be split into 3 rounds. Each round consists of 3 individual “turning moves” except for the 3rd segment, which is always a 180° rotation to one side and slowly rotating back to the default position.
- Tips: The first time the turning direction changes during the first 2 rounds, the boss always rotates 180°. So this means there are only a limited amount of patterns which can occur during the first 2 rounds. [90°⇾90°⇾180°] or [90°⇾180°⇾90°]
- The boss can also perform a rotating laser attack. Akkan's red lantern glowing is the indicator for this pattern. Make sure to rotate clockwise or counterclockwise with the shadow to avoid getting hit by the laser.
What To Do
- To succeed this mechanic and the raid, you have to deal a certain amount of Weak Point damage within a short duration. If you fail to do so, Akkan does a map wide 1-hit attack and heals back multiple bars. You can survive this by using Time Stop Potion, but in most cases, you won't have enough time to get Akkan back to 0 bars, before the boss enrages.
- Once the crosshair on the boss appears, use Destruction Bomb and skills with Weak Point damage on cooldown.
- Use Sidereal: Thirain as soon as it is available to assist with the destruction.
- Counter the clones on the outer edge of the arena.
- Successful counters increase the Sidereal Meter by 50% and reset your skill cooldowns, which is why it is important to not miss.
- During this entire mechanic, the following patterns can occur, which you need to avoid while leading Weak Point damage to the boss and countering the clones.
- Cone-shaped shockwave: Follows a player briefly before shooting a shockwave, which 1 shots most players.
- Cross lasers: Avoid standing in the cross shaped area.
- Ground Explosions: These have different shapes, move to unaffected safe spots to avoid getting hit.
- Tentacles: Dodge tentacle's attacks and destroy it.
Credits
Written by Perciculum