Behemoth Gate 1 Guide
The first gate of Behemoth is relatively straightforward and is a 16 player raid. Beating Behemoth will unlock the Transcendence system for your weapon. This raid will also have 8 revive tokens.
| Normal Mode | Monster Type | Weakness | Tauntable |
| 1620 Item Level | Ancient | None | No |
- HP Potion of your choice
- Nacrasena Party: Destruction Bomb
- Yoho Party: Flame Grenade
- Velganos & Calventus Parties: Dark Grenade
- Atropine Potion or Stimulant
This guide assumes that you are familiar with the recommended Raid Build for your class.
Learn about Behemoth Gate 2.
Raid Rewards
| Gold | Material | Bonus Loot | Bonus Loot Cost | Auction | First Clear | |
| Normal | ||||||
| Gate 1 | 7000 | 10x Behemoth's Scale 10x Magical Spring Water | 10x Behemoth's Scale 10x Magical Spring Water | 1,800 | 100x Behemoth's Scale | |
| Gate 2 | 11000 | 20x Behemoth's Scale 18x Magical Spring Water | 20x Behemoth's Scale 18x Magical Spring Water | 2,700 | 20x Behemoth's Scale | |
Main Mechanics Overview
Once you have read through the detailed description of the main patterns, you can use the cheat sheet during the raid, or check out our condensed Cheat Sheet Collection for all raids on one page.
x460 HP
4 Guardians
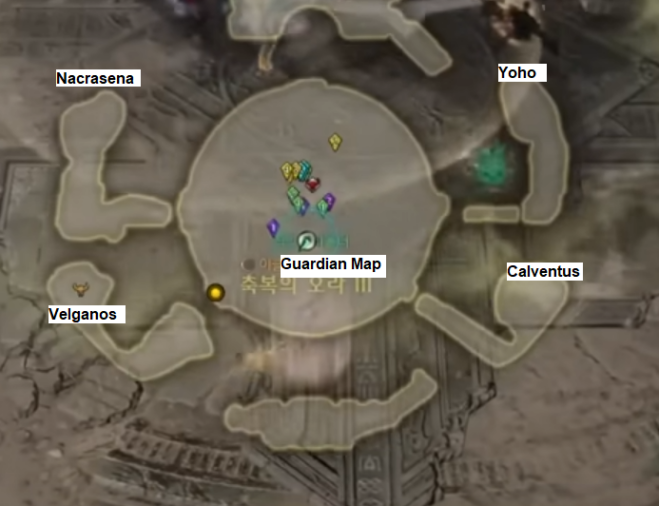
9 o clock: Nacrasena (will always spawn first)
3 o clock: Yoho
5 o clock: Calventus
7 o clock: Velganos
Periodically
Twisters
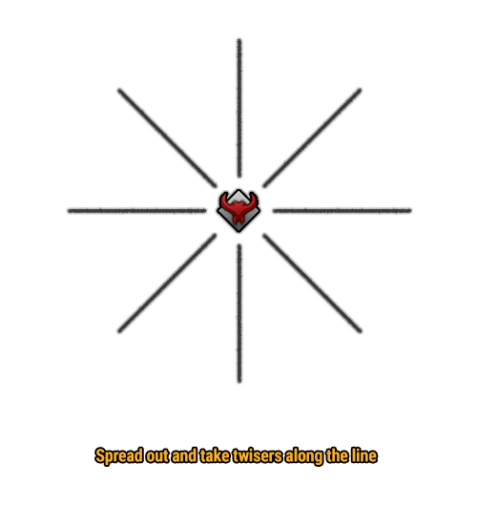
Spread out on the twister lines
Take twisters outside
Wait 2 seconds before taking another
x190 HP
Group Counter/Stagger
Boss will charge across the map twice
Co-Op counter on 2nd charge (opposite direction of his initial charge)
Raid Mechanics
This is a new system introduced in this Raid. Attacking the boss at specific body parts will contribute to weak point damage shown top left of your UI.
- Part Break Window Period: Contributes Part Break Damage to the UI (Grey -> Yellow -> Orange -> Red).
- There will be certain attack patterns that will spawn the Part Break Window.
Hitting the body will eventually destroy it (red) this will:
- Destroying the body reveals wing weak points. Destroy both wings fast (Atropine Potion), to reveal head weak point.
- Tail weak point can be ignored.
- Failing to break both wings before the boss recovers also fully restores any broken parts except the head, as the boss fully restores any broken parts except the head.
- Breaking its head increases damage dealt to the head during the weak point mechanic for the rest of the fight.
- When the boss recovers, he also fully restores all broken parts, except the head.
Boss attacks will debuff with certain elementals.
Water

Water: "Drenched debuff above head"
- When around 7-9 players are "Drenched", boss will queue a lightning attack.
Lightning
Lighting: High damage.
- Water + Lightning = Bleed debuff (%HP DoT and take 50% more damage)
Wind


Wind: Extends debuffs (can be cleansed).
- Water + Wind = Extends Drench
- Lighting + Wind = Extends Bleed
- While having this debuff, you cannot accumulate Atk Buff Stack.
Atk Buff
Attacking boss will accumulate damage stacks for yourself.
- 0.1% Atk Power per stack + an additional 5% at max stacks (max 45 stacks = 9.5% increase)
- Getting hit by elemental attacks will remove 3 stacks.
Tail/Claw Debuff
Any tail/claw attacks apply a 10 second debuff that causes you to take 10% more damage.
Main Mechanics
Main mechanics occur at certain HP intervals.
Description
- Damage Behemoth's body till it breaks.
- Once the body reaches 100% red. He will be staggered, and weak points will appear.
- Focus on one wing at a time. Try to destroy both wings.
- Ignore Tails.
- If you break both wings before the body recovers, he will expose the weakness point in the head.
- Focus on hitting the head for maximum damage. Head broken = double damage.
- Repeat this process until phase.
Note for average/weaker parties:
Bring both wings to low HP and break together on the next cycle. This will allow for a longer DPS time on the head.
In case you fail to destroy both wings on time, they will retain their damaged state after the body recovers. So it will make the next DPS check easier. But completely broken parts will fully recover!
Telegraph
- A cutscene triggers.
- 4 different guardians will spawn 1 by 1 around the map (press your map key to check).
- 9 o clock: Nacrasena (will always spawn first)
- 3 o clock: Yoho
- 5 o clock: Calventus
- 7 o clock: Velganos
- NPC will start a dialogue when a guardian spawns.
Description
- Kill the guardian before the NPC's HP reaches 0 (it's a wipe if he dies).
Description
- Bring Destruction Bomb (Bound).
- Be careful of the shock patterns
- Counter his charge to break his tail with Destruction Bomb (Bound).
Description
- Bring Flame Grenades.
- Use Flame Grenades for Tornado Imprisonment and Stagger.
Description
- Destroy the 4 Orbs before it reaches him to get a damage buff.
Description
- Pizza Pattern
- When the wind starts to swirl around him, it'll show the direction of the pizza (similar to Akkan). Start behind the boss.
- Player Grab
- A yellow ring will spawn.
- Players will have a golden orb above their head.
- One of the orbs will turn black and that player will need to get into the ring to be grabbed.
Description
- 8 twister lines will spawn (where the boss is facing).
- Twisers will follow the white lines outwards.
- players will need to take the twisters before they explode.
- players that are around the tornado will receive a "Shock" debuff that lasts 2 seconds.
- players who take another twister during this debuff will be "Confused" for 30 min and 50% more damage.
What to do
- Organize parties by clock positions (look at minimap to adjust).
- Take the twisters when they are further out.
- Wait till the debuff runs out before taking another twister.
- One person can remove multiple twisters if they pay attention to their debuff.
Telegraph
- Boss flies away and charges 2x.
Description
- Co-op counter on the 2nd charge.
- Stagger.
Counter Patterns
Telegraph
- Eyes glow red.
- Counter to do reveal head weak point.
Notable Patterns
Telegraph
- Boss sticks one wing into the ground.
- weak point will be shown for this wing that you can damage.
- The other wing will swipe and create a donut explosion.
Telegraph
- Boss raises both wings and flaps them.
Description
- Stay close back or front side.
Telegraph
- Tail will emit water and slam.
- Boss will shoot beam from the front.
- Boss can also shoot this towards the backside.
Description
- You can hit the head weak point during this phase from the sides/back.
Telegraph
- Boss readies itself and shoots a water beam into the ground, creating puddles.
Telegraph
- Slams tail and lowers head.
Description
- Dodge tail, then move to back.
Telegraph
- Boss looks towards the sky and drops water puddles.
Telegraph
- Electric Orb in the front.
Description
- Stay back side and dodge lines.
Telegraph
- Memorize and dodge attacks.
- Dodge pizza at the end.
Telegraph
- Boss readies it's wings and plants them into the ground, creating electric lines and weak points on the wings.
Credits
Written by Starlast
Reviewed by Perciculum
Video Footage from Saintone