Elixir System Guide
Last Updated:December 19, 2024|Changelog
Introduction
Elixirs are a system that increases your character's power with new special set effects alongside powerful general damage increase options. While their outcome is based on random chance, you have the ability to influence this in the refining process. Find out how and why you should be invested in this system!
Once you have memorized the basics described below, you can test your knowledge by using the Elixir Simulator.
How to acquire them?
Voldis and the ![]() Abyssal Dungeon: Ivory Tower introduces new materials related to the Elixir System:
Abyssal Dungeon: Ivory Tower introduces new materials related to the Elixir System:
- Splendid Elixir of Wisdom
- Splendid Energy of Wisdom
- Splendid Essence of Wisdom
- Stabilized Ductility Catalysts
Ways of obtaining the Elixirs and Materials include:
- Clearing the Voldis
 Abyssal Dungeon: Ivory Tower.
 - 2 Elixirs in Gate 3 of Ivory Tower's extra bid window.
- Crafting process utilizing Splendid Energy of Wisdom obtained from Ivory Tower.
- 20 Weekly crafted Elixirs using Splendid Essence of Wisdom obtained from dismantling unsuccessfully refined Elixirs or the Auction House.
- 50 Stabilized Ductility Catalysts can be purchased from the Wandering Merchant for 2000 Silver each. A batch of x30 can be crafted at the Elixir vendor for the price of one Chaos Stone and 420 gold.
Elixir Cutting Interface
Obtain an unrefined Elixir and find the [Transmute Elixir] building marked with a flask icon in all major cities to open the Elixir crafting menu. You will be greeted by the screen seen in the image below. This is the initial setup process of your Elixir, here you select the last Effect of your choice to begin the refining process. Make sure to check out the Elixir Set and Effect section to know which options are best for your character.
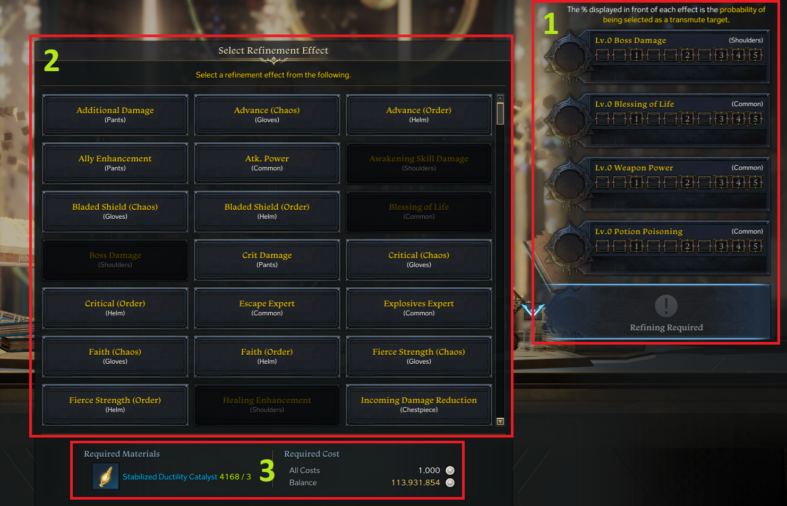
1. This is the list of effects present in your Elixir. All Elixirs come with 4 effects pre-selected, being randomly chosen from all the possible options.
2. This selection screen allows you to pick the last effect from all the available options.
3. This is the cost of each transmutation. Depending on the source of your elixir, it may cost either gold or silver to transmute.
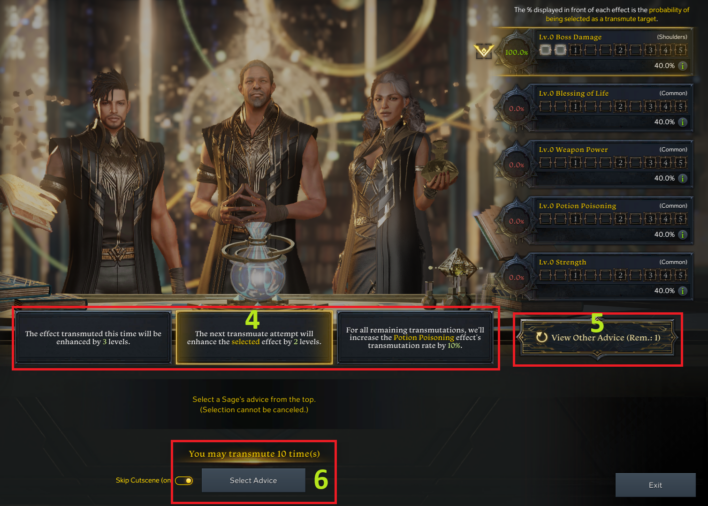
4. This is each advice option for any given turn. Each sage offers a different choice and you can pick one of the three.
5. This button lets you re-roll the choices given by the Sages. You start with 1 charge, additional ones can be obtained through special options granted by the Sages.
6. This is the number of remaining transmutations. It starts at 10.
Guaranteed Selectable Refinement Effect
Players are able to choose the option they want as their final effect (5th slot). Based on your first given options your final selection may vary. This leads to two scenarios on how you would ideally approach this:
- If you find your set or special effect in your first 4 slots 🠒 proceed with picking a common damage option: (ATK Power, STR/DEX/INT or Weapon Power as the 5th option).
- If you find ATK Power, STR/DEX/INT or Weapon Power 🠒 choose either of the special effects: (Set, Crit DMG, Additional DMG, Boss DMG e,g.) that you want to min-max, otherwise take another common damage option for your chest.
Elixir Effect Nodes
During the refining process percentages and nodes within your effects will be constantly changing based on your choices. An effect requires 10 nodes for it to be filled to its max state. Reaching specific checkpoints unlocks higher levels for your effect, granting higher bonuses from it. Points required for reaching level milestones:
Level 1 - 3 Points
Level 2 - 6 Points
Level 3 - 8 Points
Level 4 - 9 Points
Level 5 - 10 Points
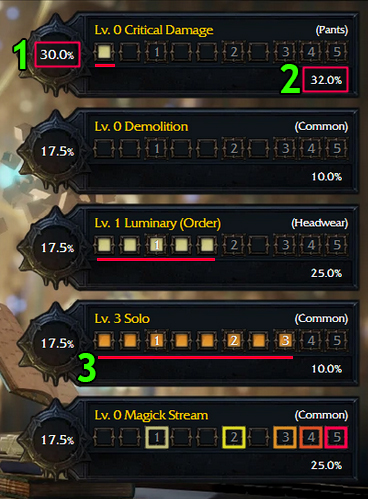
1. The % chance on the left side of your effect indicates the probability of a transmuted point to land in this slot. This can be modified with the options Sages grant you. By default, the chance is 20% across all options. Modifying one will adjust other options accordingly, for a total of 100%.
2. The % chance on the right side indicates the probability of a transmuted node to have a great success. If successful, the node receives 2 points instead of 1. This chance is independent for each effect and can be increased with options granted by the Sages. Base value is 40%.
3. Filled nodes indicate how many points you've unlocked for a specific effect. The number within the nodes indicates the unlocked effect level. If the specific checkpoint for a level is not reached, all the extra nodes don't provide any bonus.
Elixir Sets and Effects
There are a total of 6 effect types for Elixirs to choose from: Common, Helm (set), Gloves (set), Shoulder, Chestpiece and Pants. Common effects can be applied to all armor types, while armor specific effects like Helm, Shoulder, Chestpiece, Pants and Gloves will only function if applied to their corresponding armor slot. These effects will not grant any points towards your Elixir set bonus if applied to the wrong slot, so be careful!
Important: Set effects will only activate if both the Gloves and the Helm slot have the same set applied to them. Having different sets applied to each of the slots will not activate either of them!
- You must obtain a combined total of 35 points across your armors to unlock level 1 set bonus and 40 points for level 2.
- This means each armor slot must have either 7 or 8 points between both effects on avarage for set level 1 or 2.
- All minor effects will still grant their bonuses regardless of the total amount achieved.
- Attack Power +122 / 253 / 383 / 575 / 767
- Weapon Power +236 / 488 / 740 / 1110 / 1480
- Strength/Intelligence/Dexterity +720 / 1782 / 2700 / 4050 / 5400
- Stagger +0.38 / 0.79 / 1.2 / 1.8 / 2.4%
- Master of Evasion (Movement Skill Cooldown Reduction) +0.38 / 0.79 / 1.2 / 1.8 / 2.4%
- Escape Expert (Stand Up Cooldown Reduction) +0.38 / 0.79 / 1.2 / 1.8 / 2.4%
- Explosives Expert (Battle Item Damage) +1.6 / 3.3 / 5 / 7.5 / 10%
- Potion Poisoning (Battle Item cooldown recovery) +1.13 / 2.34 / 3.55 / 5.32 / 7.1%
- MP +15 / 32 / 49 / 73 / 98
- Blessing of Life (combat hp recovery) +6 / 12 / 19 / 29 / 39
- Resource Blessing (Combat Resource Natural Recovery) +0.46 / 0.95 / 1.45 / 2.17 / 2.9%
- Vagabond (When not in a party, Damage) +0.8 / 1.65 / 2.5 / 3.75 / 5%
- Awakening Skill Damage +1.2 / 2.47 / 3.75 / 5.62 / 7.5%
- Boss Damage (Damage to Boss monsters or higher) +0.38 / 0.79 / 1.2 / 1.8 / 2.4%
- Shield Enhancement (Shield effectiveness on Party Members) +0.67 / 1.38 / 2.1 / 3.15 / 4.2%
- Healing Enhancement (Healing effectiveness on Party Members) +0.67 / 1.38 / 2.1 / 3.15 / 4.2%
- Incoming Damage Reduction -1.6 / 3.3 / 5 / 7.5 / 10%
- Mag. Defense +960 / 1980 / 3000 / 4500 / 6000
- Phy. Defense +960 / 1980 / 3000 / 4500 / 6000
- Max HP +2720 / 5610 / 8500 / 12750 / 17000
- Additional Damage +0.49 / 1.02 / 1.55 / 2.32 / 3.1%
- Crit Damage +1.12 / 2.31 / 3.5 / 5.25 / 7%
- Specialty Gain +0.64 / 1.32 / 2 / 3 / 4%
- Ally Enhancement (ATK Buff effectiveness) +0.96 / 1.98 / 3 / 4.5 / 6%
Damage Dealer Sets
All DPS sets provide same basic stat bonuses across all sets:
Damage +0.23 / 0.47 / 0.72 / 1.08 / 1.44%
Atk. Power +0.23/ 0.47 / 0.72 / 1.08 / 1.44%
Mag. Def +480 / 990 / 1500 / 2250 / 3000
- Bladed Shield - Lv1. On hit, creates a shield that absorbs damage equal to 6% of Max HP for 15s. (Cooldown: 12s) Outgoing Damage +4% while protected by Bladed Shield.
Lv2. Outgoing Damage +8% while protected by Bladed Shield.
- Critical - Lv1. Crit Hit Damage +6%..
Lv2. (Replaces previous bonus) Crit Hit damage +12%.
- Master - Lv1. Crit Rate +1.4% (Stacks up to 5 times) 1 stack of Master is lost when hit, but no more than once every 0.5s.
Lv2. Increased Master effectiveness. Additional Damage per stack +1.7%.
- Luck - Lv1. 5% chance to reset skill cooldown. Cooldown reset does not apply to Movement, Stand Up, or Awakening Skills and triggers upon the first use of a skill.
Lv2. Effect chance is doubled.
- Fierce Strength - Lv1. While HP is 50% or below, Incoming Damage -6% and Outgoing Damage +3%. While HP is 50% or above, Incoming Damage -4% and Outgoing Damage +4%.
Lv2. Level 1 Set Effect is doubled.
- Vanguard - Lv1. Grants Charge when using a Movement Skill. Charge: Non-Awakening Skill Damage +3% for 20s. Grants Valiance on hit. Valiance: Atk. Power +3% for 6s.
Lv2. Gaining both Charge and Valiance at the same time triggers Vanguard: Outgoing Damage +5%.
Support Sets
All Support sets provide same basic stat bonuses across all sets:
Heal and Shield effectiveness +0.23 / 0.47 / 0.72 / 1.08 / 1.44%
Atk. Power Buff Efficiency +0.64/ 1.32 / 2 / 3 / 4%
HP Regen +9 / 19 / 29 / 43 / 58
- Faith - Lv1. Grants Faith when using an Awakening Skill. Faith: Party Atk. Power Buff based on own Atk. Power +8%. Lasts 3m.
Lv2. Enhanced Faith effectiveness. Specialty Meter Gain on Hit +5%. Party Atk. Power Buff based on own Atk. Power +6%.
- Luminary - Lv1. Grants a stack of Insight on skill use. Insight lasts 8s and does not trigger with Movement or Stand Up Skills. Insight: Party Atk. Power Buff based on own Atk. Power +1.6% (Stacks up to 5 times).
Lv2. When Insight is fully stacked, Party Atk. Power Buff based on own Atk. Power +6%. Skill cooldown -5%. (Excluding Movement, Stand Up, and Awakening Skills).
- Advance - Lv1. Casting a protective effect on an ally creates an Ether that grants a buff to allies within 8 meters. (Cooldown: 10s) Advanced Ether: Weapon Power +2230 for 15s.
Lv2. When Advanced Ether is created, own Move Speed +8%. Party Atk. Power Buff based on own Atk. Power +6%. Lasts 15s.
Best Effects Per Slot
Damage Dealer
- Common Effects - Attack Power > Weapon Power > Main Stat
- While Attack Power is the strongest between the 3, Main Stat and Weapon Power are close to equal and may vary based on your build choices.
- Helm & Gloves - Master or Critical + Common Effect
- Set choice depends on your class/build, both are good.
- Shoulder - Boss Damage + Common Effect
- Chestpiece - x2 Common Effect or Common + Incoming Damage Reduction
- Pants - Additional dmg or Critical dmg + Common Effect
- Special effect choice depends on your class/build, both are good.
Support
- Common Effects - Weapon Power = Main Stat
- Attack Power does not increase buff effectiveness for supports as it doesn't scale your base attack power or engravings, please avoid it!
- Helm & Gloves - Faith, Luminary or Advance + Common Effect
- All 3 set effects can be utilized as a support based on your playstyle and build. Luminary is the recommended option.
- Shoulder - Healing + General Effect
- Chestpiece - Max HP + Common Effect
- Pants - Ally Enhancement + Common Effect
Transmuting Strategies
When starting out on your Elixirs, you should set yourself a few goals. You shouldn't aim for the perfect elixir to start out with. Take whatever you can get and build upon it slowly to maximize power early. That means:
- Reaching Set Level 1 (35 points) and Set Level 2 (40 points) as soon as possible.
- Don't be afraid to utilize bad Elixir effects as long as they provide a large amount of points towards your set level.
- Be satisfied with your 2nd best set option for the time being if it's given to you. (Replace it later)
- Finish cutting all of your elixirs before you decide where to place them on your gear, as you might cut a better one at a later point letting you maximize more armor slots and points without compromising your options.
- Once you've achieved set level 2 start working on armor specific damage/support options and replace your old pieces in the process.
- After this, try to min/max armors with 2 ideal options for your build. While looking out for your best set option if you haven't found it yet. (Lengthy process)
How to apply an Elixir?
Completed Elixirs can be imbued to your gear through the [Imbue or Craft Elixir] NPC found in all major cities marked with a chestpiece & flask icon on the map.
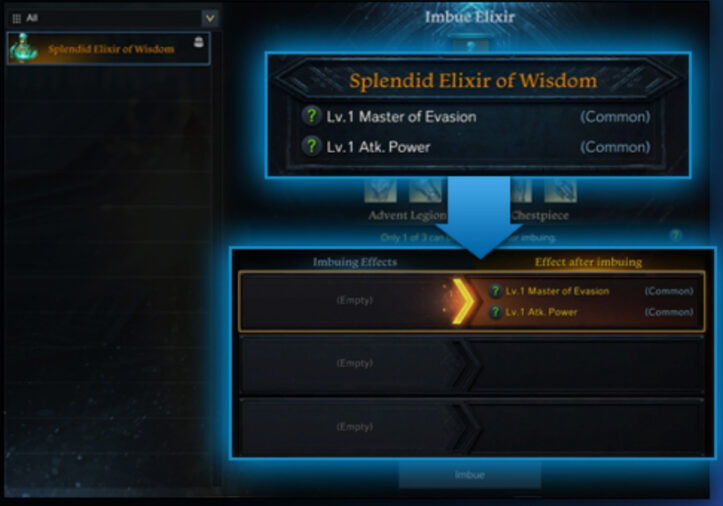
- Select your completed Elixir, choose the correct armor slot you want to apply it to and save it in one of the 3 storage slots.
- Elixirs that have been placed within armors cannot be removed or transfered to a different piece.
- You can freely choose between saved effects within the storage without any penalties.
- You can overwrite an effect slot if all 3 options are outdated/occupied.
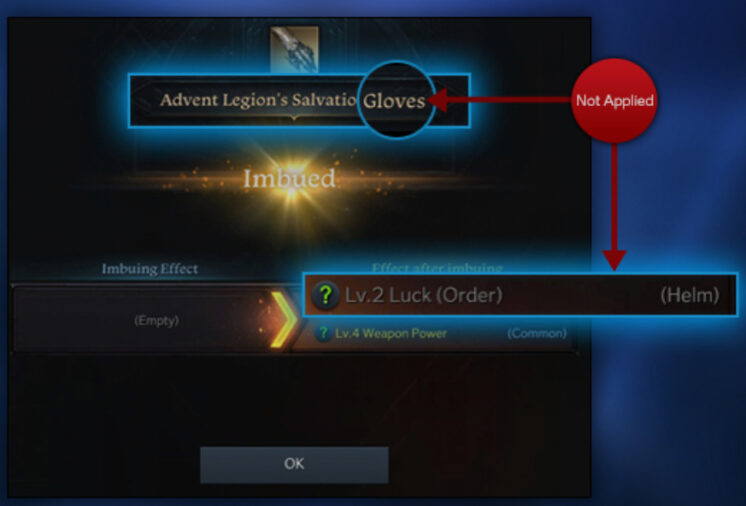
- Elixirs that contain special effects for armor slots such as Helm & Gloves (set), Shoulders, Chestpiece or Pants must be matched with the corresponding armor slot for them to activate their effect.
- If e.g. a Helm effect is placed within the Glove slot, the obtained level will not provide any bonus to your character.
Summary
- Clear Voldis Abyssal Dungeon: Ivory Tower to obtain Splendid Elixir of Wisdom and Splendid Energy of Wisdom to craft more of them.
- Refined Elixirs can be dismantled into Splendid Essence of Wisdom that can be sold on the Auction House or used to craft more Elixirs.
- Finish cutting your Elixir while focusing points into your two best options.
- Place your finished Elixir in an appropriate armor slot that doesn't conflict with your effect choices.
- To activate set effects they must match! And must be placed in the Head and Glove slots.
- Reach 35 or 40 total Elixir points to unlock your set effect bonus at level 1 or 2.
Credits
Written by Choilicious
Updated by Sekwah