General Guardian Raid Guide
Introduction
Raids in Lost Ark are unique challenges that become available once you reach level 50 and are one of the most important parts of end game PvE content. Raids can be completed solo or in a group and have various restrictions and rewards tied to them. There are many preparations you can make before you enter a Raid that not only increase the chance of success but also reduce the amount of resources used.
This guide includes basic and advanced tips to help you master Raids in Lost Ark. To learn more about Guardian and Boss specifics, check out the Raids and Abyssal Dungeons guides.
Raid Board
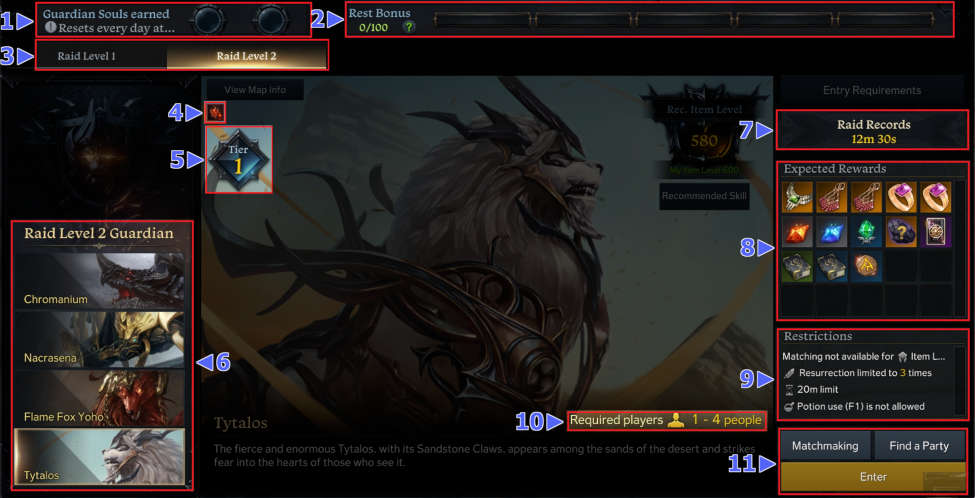
Once you reach level 50 you can unlock the Guardian Raid by following the tutorial purple quests in Vern City. Interact with the Raid board to see the Raid window shown above. The Raid board is packed with tons of useful information.
1. Guardian Souls
The daily reset time shows you when the Guardian Souls reset, which is displayed in the one circle. If the circle is empty, you can still clear any of the unlocked Guardians and harvest their souls at the end of battle. The Guardian Soul drops a massive amount of loot once you interact with it. The circle on the board fills in with the icon of the Guardian you slayed. Only one Guardians can be harvested each day, so choose wisely based on what rewards you're after. Further kills after harvesting a soul won't reward you with a Guardian Soul.
Be aware that slaying a Guardian and teleporting back to a city without harvesting the dropped soul still fills one soul slot. Failing to clear a Raid does not consume your daily Guardian Soul limit or the Rest Bonus.
2. Rest Bonus
At daily reset time, a unfilled Guardian Soul circle adds 10 points to the Rest Bonus bar. You can accumulate up to 100 points and every 20 points accumulated allows you to harvest 1 additional Guardian Soul per kill. These additional Guardian Souls can only be obtained in addition to your first daily kill and won't be available for any kills after your circle is filled in.
Empty Soul Circles

Full Soul Circles

3. Raid Level
Every Raid Level contains 4 Guardians. You need to slay each Guardian of the current level at least once to unlock the next level. Guardians of higher Raid Level reward you with higher Tier and rarity drops but the difficulty increases accordingly.
4. Weakness
Some Guardians use attacks from certain elements which all have a corresponding weakness. Any skill with the correct element attached to it deals 10% (Weak) or 15%(Very Weak) more damage to the Guardian. The downwards arrows on the element icon indicates the weakness level. Two arrows indiceate "Weak" and three arrows indicate "Very Weak" against the displayed element.
Some class skills have a default element attached to them and others can obtain an element by using Tripods like Shadowcleave, Intense Shock or Flame Explosion.
 |  |  |  |  |  |
| Darkness | Light | Earth | Lightning | Water | Fire |
5. Tier
This icon shows the Tier of the gear and upgrade materials the selected Guardian can drop. A lot of new players get confused by the Raid Level mentioned above, Raid Level and Tier are 2 separate things. As you can see in the image above, Tytalos belongs to Raid Level 2 but drops Tier 1 gear and upgrade materials.
6. Guardians
Here you see the Guardians available in the selected Raid Level. The first clear of each Guardian with your character rewards you with a "First Clear Box". This box gives you additional materials and accessories.
7. Raid Records
Simply displays your fastest clear time against the selected Guardian.
8. Expected Rewards
This small box displays all possible rewards you can obtain after slaying the Guardian. The rewards usually include common drops like Accessories, Upgrade materials and Ability Stones of the corresponding Guardian Tier. Rare drops include Runes, Engraving Books and Cards.
9. Restrictions
The following information is displayed in the Restriction box:
- Minimum Item Level needed to start this Guardian Raid.
- Resurrection Limit, which dictates how often resurrection is possible for the entire party during the Raid. The default value is 3. In other words, after the 3rd death, every following death is permanent. Once everyone in the party dies without being able to resurrect, the raid attempt fails.
- 20 minutes time limit is the maximum amount of time given to slay the Guardian. Passing the 20 minutes mark results in party wipe and a failed attempt.
- Combat Items have limited usage once you enter the Guardian Raid. For example normal Healing Potions like Adept Healing Potion are not usable at all and other Combat Items have a maximum usage amount.
10. Party Size
Guardian Raids can be cleared solo or with up to 3 additional players. The following parameters increase for each additional player in the party.
- Health Points of the Guardian
- Stagger damage needed to interrupt some mechanics
- Weak Point damage needed to break some Guardian's armor
11. Matchmaking
You have 3 different options to choose from to enter a Guardian Raid.
- "Enter" immediately starts the Raid for you and your current party.
- "Matchmaking" places you in a queue and attempts to find 3 random teammates in the same queue to create a party and enter the Guardian Raid.
- "Find a Party" opens a new window which displays "Looking for Member"(LFM) posts for the selected content. You can either request to join or make your own LFM post. This is the recommended option if you don't have a full group for the selected content. Compared to the random Matchmaking queue, you can inspect each player and their gear before joining a group or accepting an application.
Preparation
It is important to properly prepare before entering a Guardian Raid. Using the wrong Battle Items or strategy can extend the duration of the fight or lead to a Raid wipe. Every wipe wastes gold and resources making this even more important in the early stages of your progress. The information below will help you to greatly improve your clear time and avoid unnecessary wipes.
Combat items
Combat Items are game changer in Lost Ark. These items help you to stay alive or interact with certain boss mechanics like the Shell Break mechanic of the Guardian Chromanium.
Once you enter a Guardian Raid or any other instanced content, a usage limit is placed on every Combat Item. The limit is different for each Combat Item and usually increases with rarity of the item. For example a HP Potion can be used up to 5 times but Elemental HP Potion can be used 7 times per Raid. Besides from the usage limit, you can only slot 4 different Combat Items, limited to 1 per category. Here is an overview of all Combat Items separated by category:
Grenades
- Clay Grenade
- Dark Grenade
- Electric Grenade
- Flame Grenade
- Flash Grenade
- Frost Grenade
- Whirlwind Grenade
Bombs
- Sacred Bomb
- Sleep Bomb
- Destruction Bomb
- Corrosive Bomb
Note: Some Guardians can escape mid-battle to a different area on the battleground. To prevent this from happening you should throw Pheromone Bomb at the Guardian right when the escape animation starts. An "Invincible" floating text appears instead of the damage numbers as an indicator for the escape attempt. Not using the Pheromone Bomb forces you and your teammates to waste time by running to the new battle area.
Potions
- Panacea
- Thunder Potion
- Protective Potion
- Adrophine Potion
- Time Stop Potion
- Awakening Potion
Healing Potions
- HP Potion
- Major HP Potion
- Elemental HP Potion
- Splendid Elemental HP Potion
Uncategorized
- Flare
- Taunting Scarecrow
- Marching Flag
- Sacred Charm
- Repair Shop Portal Scroll
- Swiftness Robe
- Camouflage Robe
- Stealth Robe
- Luterra's Horn
- Pheromone Bomb
During the early Guardian tiers, the game provides you with free combat items and shows small tutorials upon entering the raid and interacting with the Box at the resupply zone.
Note: Flare is one of the most important Combat Items. On use it highlights on the minimap the Guardian. If you don't use a Flare, you have to search the entire battle ground for the Guardian which results in a lot of wasted time. It is common that everyone slots flare in their Combat Item slots and uses it in the order dictated by the number on the group UI at the left side of your screen. Player with the number 1 uses his Flare right after entering the battleground, Player number 2 throws his Flare once the Guardian escapes to a new battle area the first time and etc.
Party Synergy
Party synergy is an important factor which can greatly improve your party's performance during the Raid. Some classes provide the team with a buff or apply a debuff to the target. Communicating and synchronizing the buffs and debuffs results in faster clear time.
Be aware that you can't stack buffs and debuffs of the same class. This is why a normal party of 4 consists of 1 support and 3 different damage focused classes with buffs and debuffs.
Combat Optimization & Tips
A well prepared party already has a high chance to clear the raid. After entering the battleground, pay attention to the following pointers to further increase your performance.
Skill Affixes
Every skill in Lost Ark has a combination of Skill Affixes attached to it which add another layer of situational depth. Always be aware of the attached Affixes on each of your skills to use them to your advantage.

Front Attack
A skill with this Frontal Attack affix attached to it, does 20% more skill damage and 10% more Stagger damage to the boss as long as you attack their front.
Back Attack
Dealing damage to the back of the enemy with a Back Attack skill does 5% more skill damage and increases the Crit Chance by 10%.
Weak Point
During some boss mechanics, Weak Points helps to destroy armor or cut parts of the boss. The Combat Item Destruction Bomb has Weak Point affix and is also useful during those mechanics. Check out the Shell Break in the Guardian Raid: Chromanium article to learn about the Weak Point mechanic.
Stagger
Stagger damage is the damage you deal to the purple bar below the HP of the boss. This bar exists for most of the Guardians but is hidden. Once the purple Stagger bar hits 0, the boss is incapacitated for a few seconds. This situation is usually used to synchronize party buffs and to deal as much damage as possible to the boss. Stagger damage is fixed, based on the level described in the skill tool tip and doesn't scale with your attack power.
Counter Attack
Counter Attack is a risky but a rewarding mechanic. Some bosses glow blue for a brief moment before they use a charge attack pattern. The player has a short window to cast a skill with a Counter Attack affix while standing in front of the boss. If you manage to pull this off fast enough, the boss's attack are interrupted and staggered for a few seconds. This gives you and your team a short window to use buffs and deal additional damage.
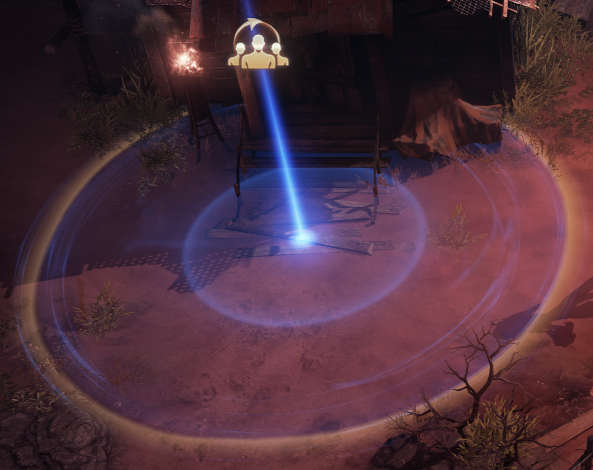
Workshop
The Workshop is the area you spawn in when starting the Raid. This is a special circle which cancels a lot of the Raid restrictions placed on players outside of this zone. While standing in it, you can change your Equipment, Build, Runes, Cards and even your Combat Items. Additionally, every time you reenter the Resupply Zone, your Combat Items are refilled.
Utilize this zone if you have used up all your Healing Potions and don't want to risk dying. Be aware that running to the Resupply zone and back to the Guardian consumes a considerable amount of time.
Range Disadvantage
In Lost Ark playing a range class doesn't translate into staying at max range to the target at any given time. It is often even disadvantageous. A lot of the end-game Guardians have attacks which are harder to dodge the further away you are from it. You might even miss some of the synergy buffs of your party members so make sure to have always vision on the Boss and stay in buff range of your teammates.
Pings
Communication is key to success, that is why Lost Ark has a Ping System that can be used to communicate with your party. Use it to ask for help, mark dangerous areas or place a rally point.
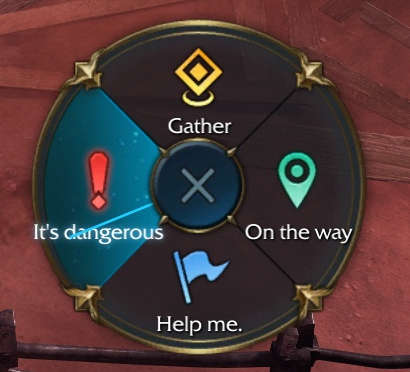
How to Ping:
- Move your cursor to the desired ping location.
- Hold down CTRL key and then the left mouse button(LMB).
- Move your cursor to one of the 4 ping options.
- Release LMB.
Summary
- Raids are unlocked at level 50 and are an important part of end game progression.
- The Raid Board is filled with useful information and is unlocked through a quest line in Vern City.
- Raids are challenging and often require coordination with a full party of players to be successful.
- All Raids are covered in greater detail in their individual guides found here.
Credits
Written by Perciculum
Reviewed by Facefoot