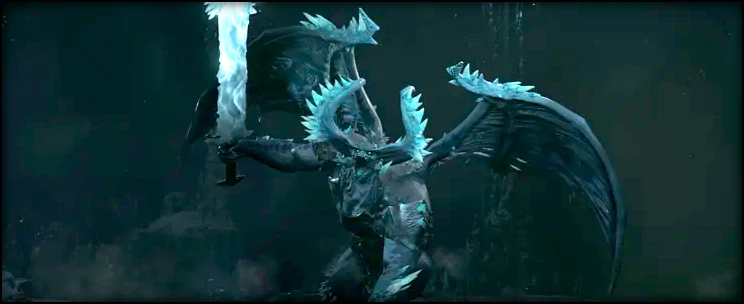
The Beast in Ice Boss Guide
Last Updated:June 24, 2025|Changelog
Welcome to The Beast in the Ice Boss Guide. Here you will find all the information to gather Boss Lair Keys, summon the Boss, and successfully defeat it.
Basic Information
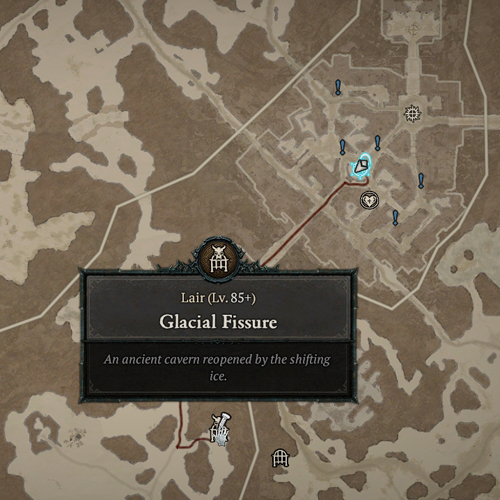
- Location: Glacial Fissure, south of Kyovashad
- Requires Torment 1 or higher.
- Element Type: Cold
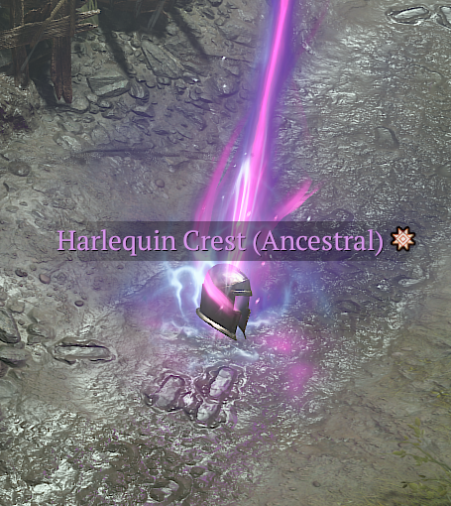
- Cosmetic Reward: Skull Torch and Binding the Fell Steed
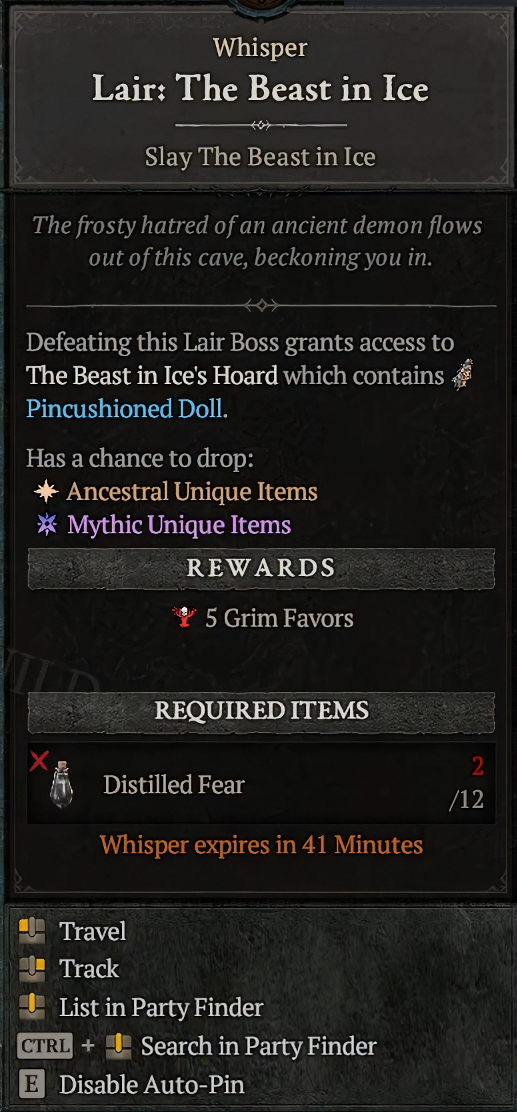
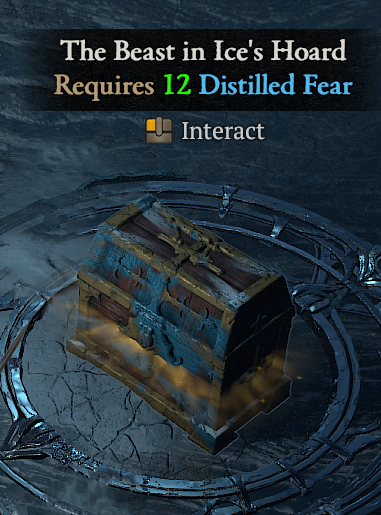
- Boss Lair Key: 12x Distilled Fear
- Source: Complete Nightmare Dungeons
Boss Location
The Beast in the Ice can be summoned within the Glacial Fissure located southwest of Kyovashad. To challenge him, use the quick travel option by clicking Glacial Fissure, or travel there normally using the Kyovashad Waypoint.
Boss Mechanics and Strategy
Pay attention to each of the attacks used by The Beast in the Ice! The following section guides you through the boss's most dangerous abilities.
Phase 1
Initially, the Beast in the Ice attacks you using his sword, breath, and ice spikes. His attacks don't deal much damage individually, but often release multiple icy projectiles, which can be difficult to avoid.
- Frozen Strike - Whenever the Beast in the Ice slashes with his sword, ice crystals are released. These shatter after traveling a short distance, releasing multiple smaller ice spikes.
- Move behind the boss to avoid his melee attacks, and watch for incoming ice spikes.
- Icy Breath - Occasionally, he inhales deeply and then exhales multiple ice crystals. These shatter after traveling a short distance, releasing multiple smaller ice spikes.
- Move out of the frontal cone and watch for incoming ice spikes.
- Frostquake - The Beast in the Ice roars and repeatedly slams his sword into the ground, generating multiple frost pools that deal damage when they land after a short delay.
- Don't stand in front of the boss, and avoid the large circles on the ground.
- Leap Attack - After taking some damage, the Beast in the Ice leaps into the air, then slams down, dealing damage in a large area. In addition to dealing damage, the impact releases several ice crystals. These shatter after traveling a short distance, creating a dangerous ring of ice spikes.
- When you see him jump, use a defensive to tank the damage or use a movement skill before he lands to move out of the area.
- If you dodge the main slam, be prepared to dodge ice spikes after.
Intermission
At 66% and 33% Health, The Beast in the Ice enters an intermission phase where he summons a blizzard to constrict the space you have to fight. During this intermission, he is invulnerable and cannot be targeted.
- Intermission Adds - During the intermission, there are several smaller enemies. Watch out for enemies that explode!
- Kill them, but position yourself carefully so you aren't hit by Strafing Run.
- Strafing Run - The Beast in the Ice summons waves of ice that sweep across the arena. If these hit you, you'll be knocked into the storm and take significant damage.
- Try to stay near the center of the room. When the lines appear telegraphing the attack, look for the safe zone and stand in it.
- If you don't think you'll make it, try to pop a source of Unstoppable so you're not Frozen and knocked into the storm.
Phase 2
After the first intermission, The Beast in the Ice returns, crashing back into the arena.
- Icy Hail - The Beast in the Ice plants his blade into the ground and begins to channel, causing a series of 4 icy explosions targeted at your location. The explosions release 5 icy waves in a pentagonal formation.
- To avoid this, try to be moving in an arc around the boss. If you see one of the lines projected under your character, adjust and move out of the effect.
- Try to keep a source of Unstoppable ready. A single hit is unlikely to kill you, but getting Frozen and tanking the entire mechanic is dangerous.
- At 33% Health, the second intermission begins.
Phase 3
During the fight's final phase, the storm remains active, leaving you precious little room to dodge, and occasionally, The Beast in the Ice uses Strafing Run.
- Enhanced Icy Hail - this works identically to Icy Hail. However, on the final explosion, there's a second spread of 5 icy waves.
- Avoid this in the same manner as Icy Hail. However, on the last tick, dodge a second time.
Useful Tips!
To see our best Boss killers, check out our Boss Killer Tier List!
Loot Tables and Rewards
Each Boss has a different loot table of Uniques and cosmetic item(s), with a chance of dropping the highly sought-after Mythic Unique items. How loot is distributed and rewarded has been changed with Season 8, and is now tied to using the Boss Lair Keys.
To receive loot, you must use 12x Distilled Fear to open the Hoard. The Hoard has 2 Unique items in Torment 1, granting one extra for each Torment difficulty increase, and 2 extra for Torment 4. You are guaranteed one boss-specific Unique when you open a Hoard. You can increase this by 1 for doing Torment 3 or higher, and another 1 for being in a party. While in a party, you have a 33% chance of getting 1 additional class-specific item per party member.
New for Season 8 is the General Unique Pool. On average, 50% of the non-guaranteed drops are now from the General Unique pool, and the other 50% are boss-specific Uniques.
Unique Loot table
The items listed below have an increased chance of dropping from this Boss. You can still find items that aren't on the list, and you are not guaranteed to find a Unique every time you kill the boss.
Barbarian:
- Ancients' Oath
- Hellhammer
- Ring of the Ravenous
- Mantle of Mountain's Fury NEW
Druid:
- Storm's Companion
- Unsung Ascetic's Wraps
- Stone of Vehemen
Necromancer:
- Ring of Mendeln
- Mutilator Plate
- The Unmaker
- Indira's Memory NEW
Rogue:
- Windforce
- Eaglehorn
- Beastfall Boots
Sorcerer:
- Gloves of the Illuminator
- The Oculus
- Starfall Coronet
- Strike of Stormhorn NEW
Spiritborn:
- Scorn of the Earth
- Wound Drinker
- Harmony of Ebewaka
Multiple Classes:
- Fists of Fate
- Tassets of the Dawning Sky
- Paingorger's Gauntlets
Mythic Uniques
- All bosses have a chance to drop Mythic Unique items.
- These items are very powerful and very rare.
Most endgame builds use one of these items. Thankfully, the Boss ladder encounters have a greater chance of dropping them. This means you can focus on any boss that drops regular Unique items you are looking to obtain or upgrade while still having a chance at a Mythic Unique.
- Check out our Unique and Mythic Unique Guide for more details and more ways to obtain these truly Mythic items.
If you want a handy reference for the items you can farm from each of the endgame bosses, check out our Boss Cheat Sheet!
Cosmetic Reward
You can unlock the following exclusive cosmetic reward when you defeat The Beast in the Ice.
Video
The Beast in the Ice boss fight video guide.
Summary
The Beast in the Ice boss guide covers everything you need to know about where to go, and how to complete this encounter.
- Complete Nightmare Dungeons and other endgame activities to collect 12x Distilled Fear and enter the Glacial Fissure.
- Make sure your gear is the best it can be with Upgraded Armor and Gems.
- The Beast in the Ice's attacks deal Cold damage, so try grabbing Elixirs that increase your Cold Resistance.
- In Phase 1, dodge the boss's attacks and the resulting secondary projectiles.
- In the intermission phases, focus on dodging and killing adds when you have time.
- In Phases 2 & 3, the Beast in the Ice gains new abilities. Remember to use Unstoppable to prevent yourself from being Frozen.
Credits
Maintained by Avarilyn
Written by Tenkiei