Affliction Warlock Raid Guide
Welcome to the Affliction Warlock Raid guide for the World of Warcraft patch 11.1.7! This guide covers everything you need to know to understand your character! Are you starting out and leveling up from 70? Check out the leveling guide!
Overview
Hero Talents
- Soul Harvester performs better in lower ilvl gear while Hellcaller becomes better closer to BiS gear.
- Generating a Soul Shard now has a chance to grant a Succulent Soul.
- Succulent Soul empowers your next Malefic Rapture cast.
- Sataiel's Volition makes Haunt grant you a Nightfall proc.
- Be careful to not overcap on Nightfall stacks as Sataiel's Volition also makes your Corruption tick faster which leads to more frequent procs.
- Necrolyte Teachings increases Shadow Bolt and Drain Soul damage and amplifies Nightfall.
- Shadow of Death makes your Soul Rot grant 3 Soul Shards that each contain a Succulent Soul.
- Your Corruption is turned into Wither.
- You have access to a 1-minute cooldown called Malevolence.
- Wither can stack up and has multiple neat interactions with different talents which can increase its stack count or have other benefits.
- Spending Soul Shards on damaging spells increases the stacks of Wither by 1 and has a chance to gain an additional stack due to Blackened Soul.
- Casting Malevolence increases all active Wither stacks by 6 while each Malefic Rapture adds 1 additional stack during its duration.
- Mark of Peroth'arn gives Wither the chance to add a stack whenever it crits.
- Whenever Blackened Soul deals damage you have a chance to gain Tormented Crescendo stack.
- Wither has a built-in mechanic which consumes its' accumulated stacks one after another for more damage. This mechanic is called Acute.
- The Acute state of Wither is triggered by the following:
- Chance whenever Wither gains a stack.
- If Wither reaches 8 stacks.
- If the target Wither is on reaches 20% hp or is below 20% already.
- When Malevolence is up.
- The Acute state of Wither is triggered by the following:
Talents
← Scroll for more Talent Builds →
Gameplay Altering Talents
Discover all talents that significantly alter your gameplay within the Spec and Class Talent trees. This section gives a concise overview of these talents and their applications but for a more detailed look check out the Rotation and Deep Dive sections below.
Spec Tree
- Seed of Corruption
- Allows you to spread your Corruption on a large number of targets quickly. Costs 1 Soul Shard.
- Phantom Singularity
- Strong DoT that also cleaves off the target it was applied onto.
- Infirmity makes your Burn Windows even stronger.
- Soul Rot
- Strong AoE DoT on up to 5 targets.
- Malign Omen allows you to have a short damage burst every minute both on ST and AoE.
- Dark Harvest makes your Burn Windows stronger the more targets Soul Rot hits.
- Nightfall
- Buff that reduces the cast time of your next Drain Soul by half and increases its damage. Stacks up to 2.
- Tormented Crescendo
- Buff that helps you with Soul Shard drought on ST or when there are a low number of targets. Stacks up to 2.
- Haunt
- Flat 10% damage increase debuff on your main target.
- Summon Darkglare
- Main cooldown for burst windows. Extends the duration of all your DoTs on every enemy.
- Malevolent Visionary also grants the ability to do instant AoE burst damage on demand.
- Cunning Cruelty and Volatile Agony
- Boost your filler windows with passive AoE during your Drain Soul spam and refreshing Agony with less than 10 seconds remaining.
Class Tree
- Fel Domination
- Helps you recover quickly in the event of death by allowing you to resummon a pet rapidly without cost.
- Burning Rush
- Your main mobility spell aside from Demonic Circle and Demonic Gateway, however, both of which require preplanning.
- Curses of Enfeeblement
- Gives you access to Curse of Exhaustion and Curse of Tongues.
- Remember that you can only have one curse active per target.
- Curse of Tongues can be very useful in pug groups to make it easier to deal with dangerous enemy casts.
- Soulburn
- Empowers a multitude of utility spells for the cost of 1 Soul Shard.
- Mainly used for Demonic Circle: Teleport, Demonic Gateway and Healthstone.
- Mortal Coil
- A single-target CC that can also be used as a defensive spell if you need to heal on demand.
- Dark Pact
- A defensive spell that grants you a big absorb shield depending on your current health plus a certain amount on top of it.
- Sweet Souls
- Passive heal whenever your teammates use a Healthstone from you.
- Can be considered a fairly big defensive and shouldn't be overlapped with your own Healthstone to avoid overhealing.
- Pact of Gluttony
- Combining Healthstone with Soulburn becomes a strong 1 minute defensive CD on long boss fights.
Hero Talents
- Friends In Dark Places
- Your default pick because it increases your overall survivability unlike the other talent choice.
- Shared Fate
- Outperforms Feast of Souls.
- Eternal Servitude
- Your default pick but can be swapped for Gorefiend's Resolve if you are the only CR in the team.
When to use this Spec
Use this spec if you're fighting 2 or 3 enemies for an extended period of the fight.
Talent Adjustments
Listing all the changes within the Class and Spec tree compared to the default build.
Spec Tree
- Added
- Cull the Weak
- Dark Harvest
- Removed
- Ravenous Afflictions
- Contagion
When to use this Spec
Use this spec if you're fighting 4 or more stacked enemies for an extended period of the fight.
Talent Adjustments
Listing all the changes within the Class and Spec tree compared to the default build.
Spec Tree
- Added
- Vile Taint
- Cull the Weak
- Malediction
- Dark Harvest
- Removed
- Phantom Singularity
- Infirmity
- Improved Haunt
- Ravenous Afflictions
- Contagion
When to use this Spec
Use this spec if you're fighting a single enemy but need more mobility.
Talent Adjustments
Listing all the changes within the Class and Spec tree compared to the default build.
Spec Tree
- Added
- Improved Shadow Bolt
- Sacrolash's Dark Strike
- Malediction
- Siphon Life
- Removed
- Drain Soul
- Improved Haunt
- Dark Harvest
- Ravenous Afflictions
- Absolute Corruption
Hero Talents
Changed Soul Harvester to Hellcaller for more info visit the Hero Talent section above.
- Curse of the Satyr
- Your default pick since both talent choices are very niche and this one has more use cases than the other one.
- Hatefury Rituals
- Outperforms Bleakheart Tactics currently.
- Zevrim's Resilience
- Helps you recover your lost health from using Dark Pact.
When to use this Spec
Use this spec if you're fighting 2 or 3 enemies for an extended period of the fight and need more mobility.
Talent Adjustments
Listing all the changes within the Class and Spec tree compared to the default build.
Spec Tree
- Added
- Improved Shadow Bolt
- Malediction
- Cull the Weak
- Removed
- Drain Soul
- Ravenous Afflictions
- Contagion
- Improved Haunt
- Withering Bolt
Hero Talents
Changed Soul Harvester to Hellcaller for more info visit the Hero Talent section above.
- Curse of the Satyr
- Your default pick since both talent choices are very niche and this one has more use cases than the other one.
- Hatefury Rituals
- Outperforms Bleakheart Tactics currently.
- Zevrim's Resilience
- Helps you recover your lost health from using Dark Pact.
When to use this Spec
Use this spec if you're fighting 4 or more stacked enemies for an extended period of the fight and need more mobility.
Talent Adjustments
Listing all the changes within the Class and Spec tree compared to the default build.
Spec Tree
- Added
- Vile Taint
- Sacrolash's Dark Strike
- Improved Shadow Bolt
- Malediction
- Cull the Weak
- Removed
- Phantom Singularity
- Infirmity
- Drain Soul
- Ravenous Afflictions
- Contagion
- Improved Haunt
- Withering Bolt
Hero Talents
Changed Soul Harvester to Hellcaller for more info visit the Hero Talent section above.
- Curse of the Satyr
- Your default pick since both talent choices are very niche and this one has more use cases than the other one.
- Hatefury Rituals
- Outperforms Bleakheart Tactics currently.
- Zevrim's Resilience
- Helps you recover your lost health from using Dark Pact.
Rotation
Tier Set
- 2-Set: Your spells and abilities have a chance to hit a Jackpot! that increases your Haste by 12% for 12 seconds. Casting Summon Darkglare always hits a Jackpot!
- 4-Set: Hitting a Jackpot! also increases damage of Unstable Affliction by 50% and causes Unstable Affliction to spread to up to 3 targets within 40 yards for 17 seconds.
Single-Target
Opener
- Your goal in the opener is to apply and maintain all the DoTs and debuffs while also not overcapping on Soul Shards with Nightfall and Tormented Crescendo procs. Below, you can see an example of how your opener looks when using the recommended Soul Harvester single-target spec.
- Always keep up Unstable Affliction, Agony, Corruption, Haunt and Shadow Embrace on the target.
- Keep in mind that Haunt has travel time so you should precast it roughly ~2 seconds before the pull. Thus, half of your next cast, Unstable Affliction, is also casted before the fight even starts.
- Soul Harvester has a higher number of total Nightfall procs over the fight which leads to a higher amount of Tormented Crescendo procs compared to Hellcaller. Always keep that in mind and never overcap on either of the procs.
Priority List
This is a general priority you aim to maintain throughout the fight.
- Keep up Unstable Affliction, Agony and Corruption.
- Cast Haunt on cooldown but you can delay it for a few seconds if the debuff is not about to expire on the target and you have maximum amount of Nightfall stacks.
- Cast Summon Darkglare on cooldown whenever Phantom Singularity and Soul Rot are up.
- Cast Malefic Rapture if you are otherwise capping on Soul Shards or have Tormented Crescendo stacks.
- Cast Drain Soul to refresh Shadow Embrace stacks or have Nightfall stacks.
- Cast Phantom Singularity whenever you have Soul Rot ready to follow up.
- Cast Soul Rot on cooldown.
- Cast Malefic Rapture whenever you have Soul Shards.
- Cast Drain Soul as your filler spell.
Opener
- Your goal in the opener is to apply and maintain all the DoTs and debuffs while also not overcapping on Soul Shards with Nightfall and Tormented Crescendo procs. Below, you can see an example of how your opener looks when using the recommended Hellcaller single-target spec.
- Always keep up Unstable Affliction, Agony, Wither, Haunt and Shadow Embrace on the target.
- Keep in mind that Haunt has travel time so you should precast it roughly ~2 seconds before the pull. Thus, half of your next cast, Unstable Affliction, is also casted before the fight even starts.
- All Soul Shards should be spent while Soul Rot and Phantom Singularity are active on the target.
Priority List
This is a general priority you aim to maintain throughout the fight.
- Keep up Unstable Affliction, Agony and Wither.
- Cast Haunt on cooldown.
- Cast Summon Darkglare on cooldown whenever Phantom Singularity and Soul Rot are up.
- Cast Malefic Rapture if you are otherwise capping on Soul Shards or have Tormented Crescendo stacks.
- Cast Shadow Bolt to refresh Shadow Embrace stacks or have Nightfall stacks.
- Cast Phantom Singularity whenever you have Soul Rot ready to follow up.
- Cast Malevolence on cooldown. Sync it with Soul Rot every time.
- Cast Soul Rot on cooldown.
- Cast Malefic Rapture to spend all Soul Shards whenever Phantom Singularity and Soul Rot are up.
- Cast Shadow Bolt as your filler spell.
Multi-Target
Opener
Multi-Target rotation is identical to single-target, only difference is the opener you do and amount of procs you get.
- Your goal in the opener is to apply and maintain all the DoTs and debuffs while also not overcapping on Soul Shards with Nightfall and Tormented Crescendo procs. Below, you can see an example of how your opener looks when using the recommended Soul Harvester Multi-Target spec.
- Always keep up Unstable Affliction and Haunt on main target and Agony, Corruption and Shadow Embrace on both targets.
- Keep in mind that Haunt has travel time so you should precast it roughly ~2 seconds before the pull. Thus, half of your next cast, Unstable Affliction, is also casted before the fight even starts.
- Soul Harvester has a higher number of total Nightfall procs over the fight which leads to a higher amount of Tormented Crescendo procs compared to Hellcaller. Always keep that in mind and never overcap on either of the procs.
Priority List
This is a general priority you aim to maintain throughout the fight.
- Keep up Unstable Affliction, Agony and Corruption.
- Cast Haunt on cooldown but you can delay it for a few seconds if the debuff is not about to expire on the target and you have maximum amount of Nightfall stacks.
- Cast Summon Darkglare on cooldown whenever Phantom Singularity and Soul Rot are up.
- Cast Malefic Rapture if you are otherwise capping on Soul Shards or have Tormented Crescendo stacks.
- Cast Drain Soul to refresh Shadow Embrace stacks or have Nightfall stacks.
- Cast Phantom Singularity whenever you have Soul Rot ready to follow up.
- Cast Soul Rot on cooldown.
- Cast Malefic Rapture whenever you have Soul Shards.
- Cast Drain Soul as your filler spell.
Opener
Multi-Target rotation is identical to single-target, only difference is the opener you do and amount of procs you get.
- Your goal in the opener is to apply and maintain all the DoTs and debuffs while also not overcapping on Soul Shards with Nightfall and Tormented Crescendo procs. Below, you can see an example of how your opener looks when using the recommended Hellcaller Multi-Target spec.
- Always keep up Unstable Affliction and Haunt on main target and Agony, Corruption and Shadow Embrace on both targets.
- Keep in mind that Haunt has travel time so you should precast it roughly ~2 seconds before the pull. Thus, half of your next cast, Unstable Affliction, is also casted before the fight even starts.
- All Soul Shards should be spent while Soul Rot and Phantom Singularity are active on the target.
Priority List
This is a general priority you aim to maintain throughout the fight.
- Keep up Unstable Affliction, Agony and Wither.
- Cast Haunt on cooldown.
- Cast Summon Darkglare on cooldown whenever Phantom Singularity and Soul Rot are up.
- Cast Malefic Rapture if you are otherwise capping on Soul Shards or have Tormented Crescendo stacks.
- Cast Shadow Bolt to refresh Shadow Embrace stacks or have Nightfall stacks.
- Cast Phantom Singularity whenever you have Soul Rot ready to follow up.
- Cast Malevolence on cooldown. Sync it with Soul Rot every time.
- Cast Soul Rot on cooldown.
- Cast Malefic Rapture to spend all Soul Shards whenever Phantom Singularity and Soul Rot are up.
- Cast Shadow Bolt as your filler spell.
AoE
Opener
- Your goal in the AoE opener is similar to single-target with the only difference of applying DoTs to more targets, mostly through Seed of Corruption and Vile Taint. Below, you can see an example of how your opener looks when using the recommended Soul Harvester AoE spec.
- All Soul Shards should be spent while Soul Rot and Vile Taint are up.
- Apply Corruption and Agony manually on spread targets that didn't get hit by Seed of Corruption and Vile Taint.
Priority List
- Keep up Agony on up to 8 targets.
- Keep up Unstable Affliction on the main target.
- Cast Haunt on cooldown on the main target.
- Cast Summon Darkglare on cooldown when Vile Taint and Soul Rot are up.
- Cast Vile Taint on cooldown. Make sure to have every second cast line up with Soul Rot.
- Cast Soul Rot on cooldown.
- Cast Malefic Rapture if you are about to cap on Soul Shards or have Tormented Crescendo proc.
- Cast Drain Soul if you have Nightfall procs.
- Cast Malefic Rapture whenever you have Soul Shards.
- Cast Drain Soul as your filler spell.
While Haunt, Drain Soul and Unstable Affliction could lower your overall dps, it's still a damage gain on a priority target which is often more important than overall in many boss fights.
Opener
- Your goal in the AoE opener is similar to single-target with the only difference of applying DoTs to more targets, mostly through Seed of Corruption and Vile Taint. Below, you can see an example of how your opener looks when using the recommended Hellcaller AoE spec.
- All Soul Shards should be spent while Soul Rot and Vile Taint are up.
- Apply Wither and Agony manually on spread targets that didn't get hit by Seed of Corruption and Vile Taint.
Priority List
- Keep up Agony on up to 8 targets.
- Keep up Unstable Affliction on the main target.
- Cast Haunt on cooldown on the main target.
- Cast Summon Darkglare on cooldown when Vile Taint and Soul Rot are up.
- Cast Vile Taint on cooldown. Make sure to have every second cast line up with Soul Rot.
- Cast Malevolence on cooldown. Sync it with Soul Rot every time.
- Cast Soul Rot on cooldown.
- Cast Malefic Rapture if you are about to cap on Soul Shards or have Tormented Crescendo proc.
- Cast Shadow Bolt if you have Nightfall procs.
- Cast Malefic Rapture whenever you have Soul Shards.
- Cast Shadow Bolt as your filler spell.
While Haunt, Shadow Bolt and Unstable Affliction could lower your overall dps, it's still a damage gain on a priority target which is often more important than overall in many boss fights.
Deep Dive
Burn Windows
As an Affliction Warlock, you want to cast as many Malefic Raptures as possible during your Burn Windows.
- Burn Window is whenever you have Soul Rot with Phantom Singularity or Vile Taint up. Thus, your main goal is to save as many Soul Shards as you can for those windows without overcapping them.
- Keep in mind that you can use Vile Taint as a Mini-Burn Window all alone and spend some Shards here as well. Still, your main goal is to save as many Soul Shards as you can for your Main Burn with Soul Rot. Any extra Soul Shards that would have been used to not overcap could all be spent in Mini-Burn instead. The amount of Soul Shards spent in Mini-Burn depends on the number of targets you fight. For example, if you fight 8 targets or more then you can spend every Shard you get during Vile Taint but if it is single or low number of targets then it would only be few casts of Malefic Rapture. It all depends on how many Soul Shards you can generate in a 30 second window in between your Mini and Main Burn.
With experience, you get a better understanding of how many Soul Shards you want to spend outside of your burns, which varies on the number of targets you fight.
Managing Soul Shards as Hellcaller vs Soul Harvester
Main difference is that as a Hellcaller you want to save Soul Shards for your Burn Windows but as a Soul Harvester it is the opposite. You shouldn't save any Soul Shards and spend them whenever you can. Your main goal is to cast as few unbuffed Drain Souls as possible, almost never. That way it will be much easier to manage and not overcap on your procs and Soul Shards.
Once you are more used to the Soul Harvester playstyle you can try saving *1* Soul Shard for your Burn Windows to make them slightly more efficient. It is not recommended to save any more than 1 as it is very likely or guaranteed to overcap with 2 or more.
Although Burn Windows are more important with Hellcaller playstyle rather than Soul Harvester, it is still useful to know for the later one as it may change your priority slightly. For an example, in the end of the Burn Window, if you have a Nightfall proc but not overcapping on it, you may want to cast Malefic Rapture, if you can, instead of Drain Soul.
Nightfall and Tormented Crescendo
With the addition of hero talents, the amount of procs you get over the fight is significantly increased. To the point that managing them and not overcapping is as important as keeping up your DoTs and not failing you Burn Windows.
Hellcaller increases your Tormented Crescendo proc rate with Seeds of Their Demise and Soul Harvester increases amount of Nightfalls you get with Sataiel's Volition.
Difference between Hellcaller and Soul Harvester is quite big to the point that you need to manage your Soul Shards differently depending on the spec. That is due to Nightfall also interacting with how you get Tormented Crescendo. You have a very high chance of getting Tormented Crescendo proc during your Drain Soul channel buffed by Nightfall. Thus, as a Soul Harvester, you end up with an increased amount of both Tormented Crescendo and Nightfall procs.
Drain Soul clipping
Clipping means manually interrupting your cast. It is not necessary to finish your Drain Soul channel cast unless it is buffed by Nightfall. So any time you cast Drain Soul without it, you should clip it whenever any other spell higher in priority comes in.
For example, if you are casting normal unbuffed Drain Soul and you get a Nightfall or Tormented Crescendo proc then you should clip your cast and spend the proc.
Malefic Rapture vs Seed of Corruption
With The War Within coming, there is no more confusion on what spender to cast anymore. Your next cast should always be:
- Seed of Corruption if you need to apply Corruption on the pack of mobs.
- Malefic Rapture in any other situation, it is your main and only spender.
Vile Taint, Phantom Singularity and Soul Rot
Although usage of these spells is pretty straightforward, there are a couple of things you need to keep in mind:
- Soul Rot is a 1 minute cooldown spell and should always be paired with Vile Taint or Phantom Singularity.
- Phantom Singularity should always be held for Soul Rot unless the fight is ending and you are not getting another cast of Soul Rot lined up.
- Vile Taint being a 30 second cooldown spell allows it one additional use before Soul Rot comes off CD.
Minmaxing Volatile Agony
Another small thing to manage in The War Within is a new passive effect of refreshing Agony with less than 10 seconds remaining as it does decent AoE damage if executed properly. Aside from manually refreshing Agony, it is more important to remember that Vile Taint also triggers Volatile Agony. So in AoE scenarios, if trash lives long enough for a second Vile Taint, it's often beneficial to hold it for a few seconds to trigger more Volatile Agonys for more AoE output.
Optimizing Summon Darkglare
The main feature of Summon Darkglare lies in extending your DoTs, rather than just gaining pure damage from it, thus increasing the duration of your Burn Windows. Make sure to only cast it when Vile Taint and Soul Rot are up alongside your other DoTs.
Another important thing to know is that Summon Darkglare is a guardian and how it updates its stats. It happens differently the moment Darkglare is summoned and when it is already up.
Once you cast Summon Darkglare it snapshots your characters stats instantly but when it is already active it may take up to few seconds to update. That is why you should press potion, racial and any on use stat trinket right before Summon Darkglare and not after.
Understanding Mechanics
Rotational min-maxing is just one aspect of mastering a specialization, but there are numerous other key mechanics that influence your performance. Use the following guides to improve them.
Liberation of Undermine
← Scroll for more Bosses →
Offensive Cooldown Usage
Boss Tips
- It is possible to delay the Tune-Up phase until around 2 minutes into the fight which means you can use your Summon Darkglare on pull and have it on time for the Tune-Up damage amplification.
- Place a Demonic Gateway to help your raid get away with Spew Oil quickly.
- Use your defensives whenever you're affected by Incendiary Fire.
Offensive Cooldown Usage
Defensive Cooldown Usage
- Use Dark Pact and Unending Resolve alternating each Scrapbomb soak. You get 3 Scrapbombs per phase meaning you can cover all of them this way.
Boss Tips
- Place your Demonic Circle in the middle of the room to be able to cross it later when you need to swap sides quickly.
- Set up a Demonic Gateway the same way to help out your fellow raiders.
- Start the fight on the opposite side of your assignment to apply all your DoTs on both bosses on pull and use your Demonic Gateway towards the correct side right after to gain an edge on your opener.
- You can also play the whole fight in the middle of the room, cleaving both bosses, which increases your DPS significantly.
Offensive Cooldown Usage
Boss Tips
- Use your defensives on Sound Cannon or when you're about to get hit by Resonant Echoes.
- If you can't make it to an Amplifier before Blaring Drop hits you during the intermission utilize your Demonic Circle: Teleport to skip a wave and catch up with your raid!
- Prioritize dotting far barrels rather than those in melee. You can still precast Seed of Corruption to cleave some but apply Corruption and Agony only on those outside, otherwise it is not worth the global as they die too fast. Make sure to also be fast with casting Soul Rot to benefit from Dark Harvest before melee barrels die.
Offensive Cooldown Usage
Boss Tips
- Use Summon Felhunter on this boss to be able to interrupt Scrap Rockets as often as possible with Spell Lock.
- Use your defensives whenever you're afflicted by Incinerator and make sure to be spread from your teammates to not cleave each other.
- Use Unending Resolve and be ready to consume Demonic Healthstone with Soulburn whenever you are targeted by a Prototype Powercoil, this is the most lethal spell in this fight which ramps up over time on you, which makes it very deadly by the end of its duration.
- Prioritize dotting Territorial Bombshells and Scrap Shooters. Keep in mind that Scrap Shooters and Junkyard Hyenas lose any DoTs applied to them once they are consumed by Rolling Rubbish. Make sure to only DoT those after they are consumed and mostly only those that are not in melee and will live for a decent amount of time.
Offensive Cooldown Usage
Defensive Cooldown Usage
- Use your defensives on overlaps of Sonic Ba-Boom and Foot-Blasters explosions.
Boss Tips
- Use Demonic Circle: Teleport right after Beta Launch goes off to quickly reposition yourself.
- Additionally, place a Demonic Gateway for your raid to make it easier to get in position in the intermission.
- Make sure to utilize conveyor belts on the sides whenever you have to go activate any far mines or drop Screw Ups, standing on those will allow you to get some free casts off while still moving towards needed direction.
Offensive Cooldown Usage
Boss Tips
- Use defensives whenever the Reel Assistants cast Withering Flames on you. This together with Pay-Line explosions is dangerous.
- Interrupt Overload! as late as possible to avoid potential Withering Flames casts.
- Apply Curse of Tongues on those together with Amplify Curse to delay Withering Flames cast.
- Put Demonic Circle in the middle of the room to quickly come back after dropping Withering Flames on the sides of the room.
Boss Tips
- Place Demonic Circle somewhere nearby to have an option to get out of Earthshaker Gaol.
- Be ready to use defensives whenever you are blowing up Unstable Crawler Mines.
Boss Tips
- Apply Curse of Tongues with Amplify Curse on Sharpshot Sentrys to give your team more time to deal with them.
- Plan ahead and pre-place your Demonic Circle and Demonic Gateway to ease the movement.
- Don't hesitate to consume Demonic Healthstone and use Mortal Coil whenever you are soaking Mechengineer's Canisters, especially if your heal absorb is about to expire.
Stat Priority
Understand your secondary stat priority and the tertiary stats needed for optimal performance during Raid boss fights as an Affliction Warlock. For more detailed information, visit the Stats and Attributes guide.
For early gearing your main goal is to avoid Vers, every other stat is good for Affliction Warlocks.
For an accurate representation of what item to equip you should use Simcraft!
A static "Stat Priority" is just a starting point and can easily shift depending on your current gear.
- All secondary stats are affected by diminishing returns. Click here to learn more!
Tertiary
- Avoidance - Great stat to reduce the damage intake of "Area of Effect" abilities.
- Leech - Provides additional healing through damage dealing. The damage of your pets does not heal you thus Leech is a great tertiary for you since most of your damage is coming from your own spells.
- Speed - Niche tertiary that can be very useful and has been proven useful in the past. Makes playing certain mechanics a lot easier.
Gear
| Slot | Item | Location |
|---|---|---|
| Head | Spliced Fiendtrader's Transcendence | Tier / Catalyst |
| Neck | Semi-Charmed Amulet | Rik Reverb |
| Shoulder | Spliced Fiendtrader's Loyal Servants | Tier / Catalyst |
| Cloak | Test Pilot's Go-Pack | Sprocketmonger Lockenstock |
| Chest | Bottom-Dollar Blouse | The One-Armed Bandit |
| Wrist | Consecrated Cuffs | Crafting |
| Gloves | Spliced Fiendtrader's Demonic Grasp | Tier / Catalyst |
| Belt | Durable Information Securing Container | Questline |
| Legs | Spliced Fiendtrader's Skin Tights | Tier / Catalyst |
| Boots | Hotstep Heel-Turners | Cauldron of Carnage |
| Ring 1 | Faded Championship Ring | Cauldron of Carnage |
| Ring 2 | The Jastor Diamond | Chrome King Gallywix |
| Trinket 1 | House of Cards | The One-Armed Bandit |
| Trinket 2 | Eye of Kezan | Chrome King Gallywix |
| Weapon | Blastfurious Machete | Vexie and the Geargrinders |
| Off-hand | Vagabond's Torch | Crafting |
Below you are presented with a good list of farmable alternatives that are obtainable outside of WoW’s weekly lockout system. While replaced in time as you progress, these offer immediate character power.
| Slot | Item | Location |
|---|---|---|
| Head | Inventor's Ingenious Trifocals | Operation Mechagon: Workshop |
| Neck | Strapped Rescue-Keg | Cinderbrew Meadery |
| Shoulder | Shoulderguards of Fraying Sanity | Operation Mechagon: Workshop |
| Cloak | Electrician's Siphoning Filter | Operation: Floodgate |
| Chest | Petticoat of the Self-Stylized Azerite Baron | The MOTHERLODE!!! |
| Wrist | Gleamwax Shackles | Darkflame Cleft |
| Gloves | Operator's Mitts | Operation Mechagon: Workshop |
| Belt | Durable Information Securing Container | Questline |
| Legs | Razorchoke Slacks | Operation: Floodgate |
| Boots | Deranged Alchemist's Slippers | The MOTHERLODE!!! |
| Ring 1 | Footbomb Championship Ring | The MOTHERLODE!!! |
| Ring 2 | Ring of Perpetual Conflict | Theater of Pain |
| Trinket 1 | Signet of the Priory | Priory of the Sacred Flame |
| Trinket 2 | Carved Blazikon Wax | Darkflame Cleft |
| Weapon | Voltaic Stormcaller | The Rookery |
Trinkets
Below you can find active and passive alternatives to our recommended trinkets. Do note that some trinkets are better than others depending on the raid boss.
Active Trinket alternatives
- Signet of the Priory
- Very good on use alternative.
- Soulletting Ruby
- Good active trinket, can be "cheesed" sometimes by sniping low health mobs to get maximum value of the trinket.
- Geargrinder's Spare Keys
- Decent on use damage trinket for single target but loses value during AoE.
Passive Trinket alternatives
- Mug's Moxie Jug
- Second best passive trinket, just a high uptime Crit stat stick.
- Synergistic Brewterializer
- Strong option for single target but loses value the more targets you add to the encounter. Also can be quite annoying and hard at times to trigger during AoE.
- Carved Blazikon Wax
- Good passive trinket that increases your Versatility.
- Suspicious Energy Drink
- One of the best passive trinkets in its item level range. Drops from delves which caps its ilvl at 665, still a very good passive option though.
- Reverb Radio
- Decent passive stat stick.
Embellishments
- 1x Darkmoon Sigil: Ascension
- Only crafted on your main hand or off-hand weapon. Craft it on your main hand for more power early on or on your off-hand for long-term BiS.
- 1x Writhing Armor Banding
- The optimal slots to craft on are Wrists, Boots or Waist depending on your available gear.
or
- 1-2x Elemental Focusing Lens
- Deals a decent amount of damage in Single-Target.
- The optimal slots to craft on are Wrists, Boots or Waist depending on your available gear.
or
- 1-2x Dawnthread Lining
- The optimal slots to craft on are Wrists, Boots or Waist depending on your available gear.
Simcraft
To find the best combination of gear available to you or identify the best possible upgrades, visit our Simcraft guide to learn how to utilize Simcraft easily and effectively.
Consumables
- Phials
- Flask of Alchemical Chaos -- maximum DPS.
- Flask of Tempered Versatility -- less DPS but more survivability.
- Food
- Feast of the Midnight Masquerade -- default
- Combat Potion
- Tempered Potion
- Health Potion
- Algari Healing Potion -- a big burst of healing
- Weapon Oil
- Algari Mana Oil -- default
- Oil of Deep Toxins
- Augment Rune
- Crystallized Augment Rune
- Sockets
- Masterful Ruby
- Culminating Blasphemite -- Unique, use one of each gem color to enhance your Culminating Blasphemite.
- Masterful Sapphire
- Masterful Emerald
- Deadly Onyx
Enchantments
| Head | S.A.D. Greater Rune of the Void Ritual |
| Neck | Magnificent Jeweler's Setting 2x |
| Cloak | Enchant Cloak - Chant of Winged Grace |
| Chest | Enchant Chest - Crystalline Radiance |
| Wrist | Enchant Bracer - Chant of Armored Avoidance S.A.D. |
| Waist | S.A.D. |
| Legs | Sunset Spellthread |
| Boots | Enchant Boots - Scout's March |
| Ring 1 | Enchant Ring - Radiant Critical Strike Magnificent Jeweler's Setting 2x |
| Ring 2 | Enchant Ring - Radiant Critical Strike Magnificent Jeweler's Setting 2x |
| Weapon | Enchant Weapon - Authority of the Depths |
You buy S.A.D. from the Great Vault Vendor to add sockets to your Helm, Wrists & Waist.
Races
For min-maxing an Affliction Warlock in raiding, different racial traits can provide a tremendous benefit to your character. If this is not your top goal, picking a race that fits your style works just as well.
- Stoneform -- Dwarf
- Dispels Magic and Bleed debuffs. Has been useful in the past on some bosses with Bleeds.
- Rocket Jump -- Goblin
- Do a small jump in the direction your character is facing.
- While you're in the Rocket Jump animation you are placed on a global cooldown until your character lands.
- Berserking -- Troll
- Strong DPS racial but lines up poorly with Summon Darkglare.
- Reduce the duration of movement-impairing effects by 20%. This was only useful once in the recent history of progression raiding but is still worth noting.
- Blood Fury -- Orc
- Strong racial for damage because of both Command and Blood Fury which lines up with Summon Darkglare.
- 20% reduced stun duration on you which can be useful in some situations.
- Ancestral Call -- Mag'har Orc
- Strong DPS racial which lines up with Summon Darkglare.
- Spatial Rift -- Void Elf
- Spawn a shadow traveling into your facing direction, and activate it again to teleport to it.
- Maximum range of 100 yards.
Recommendation
In general, it's safe to say that if you care about min-maxing your DPS, you should go with the highest DPS racial. That being said, the story is a bit different if it's about progression raiding. Some help out massively to speed up the progression on certain bosses. Notably, Dwarf with their Stoneform helped out on Tindral Sageswift and Fyrakk the Blazing in the latest Race to World First by having easy access to dispelling yourself at crucial points of the fights mentioned.
Macros
Discover recommended macros for Affliction Warlocks during Raid encounters and watch a quick video guide on creating simple macros for your character.
Phantom Singularity and Vile Taint -- Casts Phantom Singularity on your target or Vile Taint on your cursor without confirmation, depending on what spell is picked in your talent tree.
#showtooltip
/cast [known:Phantom Singularity,harm,nodead]Phantom Singularity; [known:Vile Taint,@cursor] Vile Taint
Shadowfury -- Casts Shadowfury on your cursor without confirmation.
#showtooltip
/cast [@cursor] ShadowfuryUnstable Affliction -- Casts Unstable Affliction on your mouseover or target.
#showtooltip Unstable Affliction
/cast [@mouseover,exists] Unstable Affliction;Unstable Affliction
Agony -- Casts Agony on your mouseover or target.
#showtooltip Agony
/cast [@mouseover,exists] Agony;Agony
Corruption -- Casts Corruption on your mouseover or target. Swaps automatically to Wither if Hellcaller is picked.
#showtooltip Corruption
/cast [@mouseover,exists] Corruption;Corruption
Curse of Weakness -- Amplify Curse before applying Curse of Weakness to your mouseover target or target.
#showtooltip Curse of Weakness
/cast [known:328774] Amplify Curse
/cast [@mouseover, exists, harm, nodead] Curse of Weakness; Curse of Weakness
Curse of Tongues -- Uses Amplify Curse before applying Curse of Tongues to your mouseover target or target..
#showtooltip Curse of Tongues
/cast [known:328774] Amplify Curse
/cast [@mouseover, exists, harm, nodead] Curse of Tongues; Curse of Tongues
Curse of Exhaustion -- Uses Amplify Curse before applying Curse of Exhaustion to your mouseover target or target.
#showtooltip Curse of Exhaustion
/cast [known:328774] Amplify Curse
/cast [@mouseover, exists, harm, nodead] Curse of Exhaustion;[@target] Curse of Exhaustion
Drain Life -- Uses Drain Life on your mouseover target or target.
#showtooltip
/cast [@mouseover,exists] Drain Life;Drain Life
Banish -- Casts Banish on your mouseover target if it exists.
#showtooltip
/cast [@mouseover,harm,nodead,exists] Banish; [harm,nodead] BanishWe're mainly using custom macros for Pets because the normal functionality of Command Demon proved unreliable in the past.
Pet Ability 1 Macro -- Casts your main pet abilities for each pet on your mouseover target.
/cast [@mouseover]Singe Magic
/cast [@mouseover,exists]Spell Lock;Spell Lock
/cast [@mouseover]Suffering
/cast [@mouseover,exists]Seduce;Seduce
/cast [@mouseover,exists]Axe Toss;Axe Toss
/cast [nopet,@mouseover,exists]Command Demon;[nopet]Command Demon
Focus Pet Ability 1 Macro -- Casts your main pet abilities for each pet on your focus target.
/cast [@focus] Singe Magic
/cast [@focus] Spell Lock
/cast [@focus] Suffering
/cast [@focus] Seduce
/cast [@focus] Axe Toss
/cast [nopet,@focus] Command Demon
Pet Ability 2 Macro -- Casts your second relevant pet ability on your mouseover target if needed.
/cast [@mouseover] Singe Magic
/cast [@mouseover,exists] Devour Magic;Devour Magic
/cast Shadow Bulwark
/cast Felstorm
/cast [nopet,@mouseover] Command Demon
Focus Pet Ability 2 Macro -- Casts the second relevant Pet ability on your focus target, also sends your pet to attack your focus.
/cast [@focus]Singe Magic;
/cast [@focus] Devour Magic;
/cast [@focus] Lesser Invisibility;
/cast Shadow Bulwark;
/cast [nopet,@focus] Command Demon
/petattack [@focus]
Grimoire of Sacrifice & dismiss pet -- Casts Grimoire of Sacrifice if you specced into it. If you don't have Grimoire of Sacrifice talented it dismisses your pet instead.
#showtooltip
/run if not IsSpellKnown(108503) then PetDismiss(); end
/cast Grimoire of SacrificeSoulstone Mouseover -- Casts Soulstone on your mouseover, conventional [@mouseover,exists] macros got broken a while ago, this is a work around for it.
#showtooltip Soulstone
/target [@mouseover,help]
/cast Soulstone
/targetlasttarget
Unending Breath Selftcast -- Casts Unending Breath on yourself without targeting anything. Useful for situations where you're not able to DPS anything to still fish for trinket proccs / stacks.
#showtooltip
/cast [@player] Unending Breath
Mortal Coil / Howl of Terror choice -- Swaps between Mortal Coil and Howl of Terror depending on which talent got picked. Useful to add your own macro conditions like @focus or @mouseover etc.
/cast [known:Mortal Coil] Mortal Coil
/cast [known:Howl of Terror] Howl of Terror
Addons
Below, you see a screenshot of the author's User Interface for their Affliction Warlock, outlining which addons are used and how they are utilized in Raids to make your life easier.
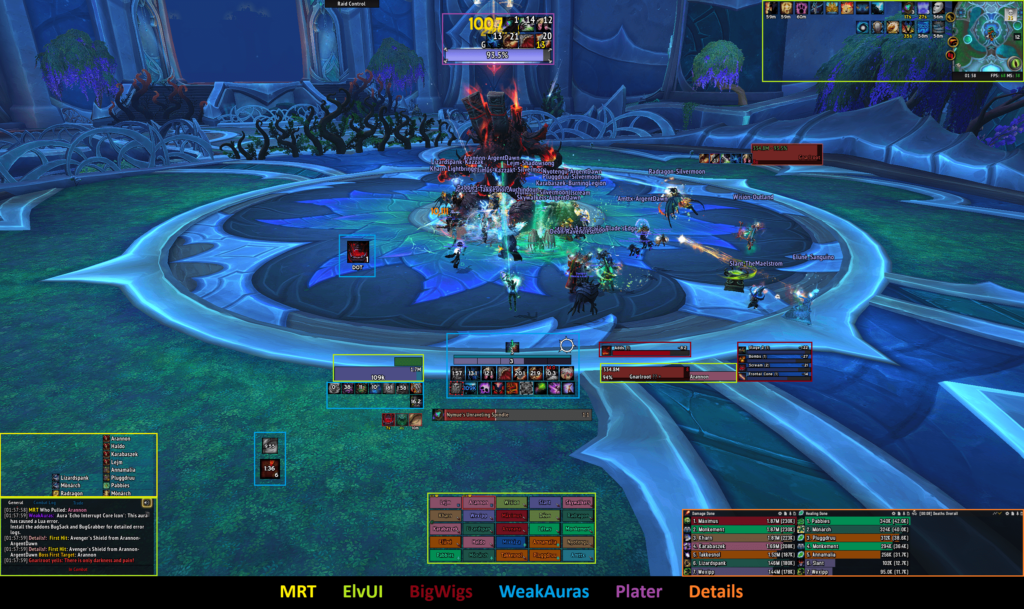
- MRT -- Notes, Raid cooldowns, and more
- Helpful addon for Raiders, especially for Raid leaders and officers.
- ElvUI -- Full User Interface replacement
- A user interface designed around user-friendliness with extra features that are not included in the standard UI.
- Alternatively, you can also use Shadowed Unit Frames (SUF) and an action bar addon of your choice or of course the stock UI.
- BigWigs -- Generic Boss Mod
- BigWigs is a boss encounter add-on. It consists of many individual encounter scripts, or boss modules; mini add-ons that are designed to trigger alert messages, timer bars, sounds, and so forth, for one specific Raid encounter.
- WeakAuras -- Jack of all trades
- WeakAuras is a powerful and flexible framework that allows the display of highly customizable graphics on World of Warcraft's user interface to indicate buffs, debuffs, and other relevant information. This addon was created to be a lightweight replacement for Power Auras but has since introduced more functionalities while remaining efficient and easy to use.
- Plater -- Advanced Nameplates
- Plater is a nameplate addon with an extraordinary amount of settings, out of the box debuff tracking, threat coloring, and support for scripting similar to WeakAuras and wago.io + the WeakAuras-Companion for Mod/Script/Profile updates.
- Details -- In-depth Damage Meter
- Most powerful, reliable, handsome, damage meter.
Soulshard Bar
Shows your current shards.

Changes this Patch
- Warlock
- Drain Life damage increased by 300%.
- Affliction
- Soul Rot has been redesigned - Devour the life force of your current target and up to 4 additional targets nearby, causing your primary target to suffer Shadow damage and secondary targets to suffer Shadow damage over 8 seconds. Damage dealt by Soul Rot also heals you for 50% of damage done.
- Summon Darkglare has been adjusted – Darkglare damage increased by 40% and each damage over time effect you have active on their current target increases their damage dealt by 45% (was 25%).
- Focused Malignancy has been adjusted – Malefic Rapture deals 40% increased damage to targets suffering from Unstable Affliction (was 25%). Does not affect PvP combat.
- Unstable Affliction damage increased by 30%. Does not affect PvP combat.
- Shadow Bolt damage increased by 20%. Does not affect PvP combat.
- Drain Soul damage increased by 20%. Does not affect PvP combat.
- Affliction
- Drain Life damage increased by 300%.
FAQ
A: You aren't managing your Soul Shards properly and most likely failing your Burn Windows. Another reason could be not managing Nightfall and Tormented Crescendo procs correctly if playing Soul Harvester. For more information check out Deep Dive section.
A: You should be using Summon Succubus or Summon Imp if Succubus is struggling with melee uptime.
Credits
Written By: Wexi
Reviewed By: Wolfdisco