Demonology Warlock Mythic+ Guide
Welcome to the Demonology Warlock Mythic+ guide for the World of Warcraft patch 11.1.7! This guide covers everything you need to know to understand your character! Are you starting out and leveling up from 70? Check out the leveling guide!
Overview
Hero Talents
- Diabolist and Soul Harvester perform similarly in both single-target and AoE. With Diabolist your burst damage through Summon Demonic Tyrant becomes a lot stronger and Soul Harvester emphasizes Implosion and AoE damage.
- Since both Hero Talents are extremely close in performance Diabolist is the recommended pick as it has a lot less variance in damage and is less punishing if you make mistakes.
- Spending a Soul Shard starts a cycle of one of 3 different Diabolic Rituals.
- Diabolic Ritual: Overlord
- Diabolic Ritual: Mother of Chaos
- Diabolic Ritual: Pit Lord
- Starts on 1. again.
- Only 1 Diabolic Ritual can be up at a time and each turns into their respective Demonic Art after it expires which is triggered after you spend your next Soul Shard:
- Demonic Art: Overlord
- A Fel Lord jumps at your target and applies Cloven Soul for 15 seconds.
- Demonic Art:Mother of Chaos
- Deals damage to your target and turns your next Shadow Bolt into Infernal Bolt which generates 3 Soul Shards.
- Demonic Art: Pit Lord
- Summons a Pit Lord that attacks your target with Felseeker and turns your next Hand of Gul'dan into Ruination which summons 3 Wild Imps at a 0 Soul Shard cost.
- Demonic Art: Overlord
- Your Summon Demonic Tyrant windows become a lot more important with Abyssal Dominion.
- Succulent Souls empower your Hand of Gul'dan and makes it apply Soul Anathema.
- Succulent Soul
- Every time you generate a Soul Shard it has a chance to give you a Succulent Soul.
- Summon Demonic Tyrant grants you 3 Soul Shards and 3 Succulent Souls.
- Soul Anathema
- Hand of Gul'dan applies Soul Anathema to all targets hit.
- Consuming a Demonic Core applies Soul Anathema to your current target.
- Shared Fate
- When you consume a Demonic Core your target gets afflicted by Shared Fate.
- During AoE scenarios it's important to never cast Demonbolts on targets that are too far away to benefit from Shared Fate AoE damage.
- Sataiel's Volition
- Combined with Demoniac you now have a 15% chance per Wild Imp to receive Demonic Core after casting Implosion.
- Make sure to be on a low amount of Demonic Core stacks before casting Implosion.
- Succulent Soul
Talents
Gameplay Altering Talents
Discover all talents that significantly alter your gameplay within the Spec and Class Talent trees. This section gives a concise overview of these talents and their applications but for a more detailed look check out the Rotation and Deep Dive sections below.
Spec Tree
- Call Dreadstalkers
- One of your key abilities which is enhanced by a multitude of talents.
- Dreadlash makes your Call Dreadstalkers deal AoE damage.
- Wicked Maw empowers other damaging spells like Implosion.
- Carnivorous Stalkers significantly increases the uptime of Wicked Maw.
- Demonic Calling allows you to cast Call Dreadstalkers for free and without a cast time.
- Implosion
- One of the main tools to deal AoE damage, it does increased damage scaling linearly with the amount of Wild Imps.
- The main difference between single-target & AoE rotation is Implosion usage.
- Demonic Strength
- Strong AoE burst cooldown which requires no setup time unlike Implosion and Summon Demonic Tyrant.
- Power Siphon
- Significantly boosts your influx of Demonic Cores.
- Make sure to always have 2+ Wild Imp before you use it.
- Fel Invocation
- Makes your Soul Strike generate 1 Soul Shard, keep this in mind to prevent overcapping.
- Summon Demonic Tyrant
- Main cooldown for Demonology, synergizes with the majority of spells within the spec.
- Reign of Tyranny enables you to empower 5 additional Wild Imps.
- Summon Vilefiend
- One of your key demons to empower with Summon Demonic Tyrant.
- Mark of F'harg makes your Summon Vilefiend deal very high AoE damage in addition to the already great single-target.
- Doom
- Demonbolt leaves a strong DoT which also spawns a Wild Imp when it expires.
- This talent emphasizes swapping targets between each Demonbolt.
Class Tree
- Curses of Enfeeblement
- Gives you access to Curse of Tongues and Curse of Exhaustion which both have many different use cases.
- Get in the habit of applying curses when you are forced to move without any Demonic Cores available.
- Soulburn
- Enhances multiple utility spells, mainly used together with Demonic Circle: Teleport, Healthstone, Demonic Gateway and Drain Life.
- Sweet Souls
- Only works if other people use the Healthstones that you created.
- Soul Conduit
- Sometimes alters your cast sequence by refunding Soul Shards.
- Pact of Gluttony
- Massive for survivability since it alters your Demonic Healthstone to be usable multiple times per combat.
Hero Talents
- Soul-Etched Circles
- Your default pick since you rarely use Howl of Terror.
- Cruelty of Kerxan
- Outperforms Infernal Machine.
- Infernal Bulwark
- An additional absorb is usually better in most scenarios.
- Good to pair with Dark Accord and Resolute Barrier for more frequent uses.
Rotation
Tier Set
- 2-Set: Your spells and abilities have a chance to hit a Jackpot! that summons a Greater Dreadstalker at 265% effectiveness. Casting Summon Demonic Tyrant always hits a Jackpot!
- 4-Set: Casting Hand of Gul'dan causes your active Dreadstalkers to cast Dreadbite at 50% effectiveness. This damage is increased by 10% for each Soul Shard spent on Hand of Gul'dan.
Single-Target
Opener
Soul Strike and Felstorm are assumed to be on autocast and are therefore not included in any Openers & Priority Lists.
- The goal of your opener is to empower and extend Call Dreadstalkers, Summon Vilefiend and as many Wild Imps as possible with Summon Demonic Tyrant.
- Below, you can see an example of how your opener looks like using the recommended Diabolist Mythic+ Build and depending on the number of Soul Conduit procs, among other factors.
- Pre-cast Power Siphon when you have 2 Wild Imps ideally with 8-10 seconds left on the pull timer / until combat.
- Use your active trinkets, Tempered Potion and racials like Blood Fury or Berserking in combination with Summon Demonic Tyrant.
Priority List
This is a general priority you aim to maintain throughout the fight.
- Cast Summon Vilefiend and Call Dreadstalkers before Summon Demonic Tyrant.
- Cast Summon Vilefiend on cooldown.
- Cast Call Dreadstalkers on cooldown.
- Cast Demonic Strength after Summon Demonic Tyrant.
- Cast Power Siphon when you have 2 or less Demonic Core stacks and 2+ Wild Imps.
- Cast Ruination if Ruination is up.
- Cast Hand of Gul'dan if you are about to overcap on Soul Shards.
- Cast Infernal Bolt if you are below 3 Soul Shards and Infernal Bolt is up.
- Cast Demonbolt if you have 2+ stacks of Demonic Core.
- Cast Hand of Gul'dan with 3 Soul Shards.
- Cast Shadow Bolt to generate Soul Shards.
Opener
Soul Strike and Felstorm are assumed to be on autocast and are therefore not included in any Openers & Priority Lists.
- The goal of your opener is to empower and extend Call Dreadstalkers, Summon Vilefiend and as many Wild Imps as possible with Summon Demonic Tyrant.
- Below, you can see an example of how your opener looks like using the recommended Diabolist Mythic+ Build and depending on the number of Soul Conduit procs, among other factors.
- Pre-cast Power Siphon when you have 2 Wild Imps ideally with 8-10 seconds left on the pull timer / until combat.
- Use your active trinkets, Tempered Potion and racials like Blood Fury or Berserking in combination with Summon Demonic Tyrant.
Priority List
This is a general priority you aim to maintain throughout the fight.
- Cast Summon Vilefiend and Call Dreadstalkers before Summon Demonic Tyrant.
- Cast Summon Vilefiend on cooldown.
- Cast Call Dreadstalkers on cooldown.
- Cast Demonic Strength after Summon Demonic Tyrant.
- Cast Power Siphon when you have 2 or less Demonic Core stacks and 2+ Wild Imps.
- Cast Hand of Gul'dan if you are about to overcap on Soul Shards.
- Cast Demonbolt if you have 2+ stacks of Demonic Core.
- Cast Hand of Gul'dan with 3 Soul Shards.
- Cast Shadow Bolt to generate Soul Shards.
AoE
Opener
- Below, you can see an example of how your opener looks like using the recommended Diabolist Mythic+ Build and depending on the number of Soul Conduit procs, among other factors.
- Pre-cast Power Siphon when you have 2 Wild Imps and ideally 8-10 seconds left on the pulltimer / until combat.
- Use your active trinkets, Elemental Potion of Ultimate Power and racials like Blood Fury or Berserking in combination with Summon Demonic Tyrant.
Priority List
- Cast Summon Vilefiend and Call Dreadstalkers before Summon Demonic Tyrant.
- Cast Summon Vilefiend on cooldown.
- Cast Call Dreadstalkers on cooldown.
- Cast Demonic Strength on cooldown.
- Cast Power Siphon when you have 2 or less Demonic Core stacks and 2+ Wild Imps.
- Cast Ruination if Ruination is up.
- Cast Hand of Gul'dan if you are about to overcap on Soul Shards.
- Cast Infernal Bolt if you are below 3 Soul Shards and Infernal Bolt is up.
- Cast Demonbolt if you have 2+ stacks of Demonic Core.
- Cast Implosion on 2+ targets with 6+ Wild Imps.
- Cast Power Siphon when you have 2 or less Demonic Core stacks.
- Cast Hand of Gul'dan with 3 Soul Shards.
- Cast Shadow Bolt to generate Soul Shards.
Opener
- Below, you can see an example of how your opener looks like using the recommended Diabolist Mythic+ Build and depending on the number of Soul Conduit procs, among other factors.
- Pre-cast Power Siphon when you have 2 Wild Imps and ideally 8-10 seconds left on the pulltimer / until combat.
- Use your active trinkets, Tempered Potion and racials like Blood Fury or Berserking in combination with Summon Demonic Tyrant.
Priority List
- Cast Summon Vilefiend and Call Dreadstalkers before Summon Demonic Tyrant.
- Cast Summon Vilefiend on cooldown.
- Cast Call Dreadstalkers on cooldown.
- Cast Demonic Strength on cooldown.
- Cast Power Siphon when you have 2 or less Demonic Core stacks and 2+ Wild Imps.
- Cast Hand of Gul'dan if you are about to overcap on Soul Shards.
- Cast Demonbolt if you have 2+ stacks of Demonic Core.
- Cast Implosion on 2+ targets with 6+ Wild Imps.
- Cast Power Siphon when you have 2 or less Demonic Core stacks.
- Cast Hand of Gul'dan with 3 Soul Shards.
- Cast Shadow Bolt to generate Soul Shards.
Deep Dive
Implosion Cycles
Implosion is a unique spell, making it potentially confusing. Here are some tips and tricks:
- Best Usage:
- For maximum damage use Implosion with at least 6 Wild Imps.
- Always use Implosion when targets have the Wicked Maw debuff.
- You sometimes need to use Implosion without this debuff due to low amount of Carnivorous Stalkers procs.
- During Demonic Tyrant:
- For maximum uptime of empowered Wild Imps you should avoid using Implosion until the end of Demonic Tyrants duration.
- If most targets die before Demonic Tyrant expires, use Implosion earlier.
- If you have 10+ Wild Imps that expire soon, use Implosion earlier.
Execution
For an ideal Implosion cycle, ensure you have at least 2 Demonic Cores. After casting the last Hand of Gul'dan, wait for the Wild Imps to spawn or use a filler global before casting Implosion.
When you don't have the luxury of having 2+ Demonic Cores you have to settle for 2 Hand of Gul'dans between each Implosion.
Felguard Priority List
Your Felguard has these four key spells:
- Demonic Strength
- Felstorm
- Guillotine
- Soul Strike
When your Felguard is casting Felstorm, Demonic Strength, or Guillotine, it cannot cast the other two until the current spell's duration ends. This creates a priority list for these three spells to optimize damage, applicable in both single and multi-target scenarios:
- Cast Felstorm
- Cast Demonic Strength
- Cast Guillotine
Soul Strike is not included in this list because it can be cast during the effects of the other spells. Note that Soul Strike generates 1 Soul Shard, so plan accordingly to avoid overcapping.
Minmaxing Doom and Pact of the Ered'ruin
When Doom expires you have a chance to spawn a Doomguard. This talent combination gives you a few important things to keep in mind to maximize your damage output.
- Single-target
- To ensure maximum uptime of Doom it is beneficial to keep at least 1 Demonic Core in the backpocket to avoid periods of downtime on Doom.
- While doing this it's important to not overcap on Demonic Cores as the maximum amount of charges is 4.
- Multi-target
- When facing multiple targets, prioritize applying Doom to different targets for a higher chance of spawning a Doomguard. During large pulls, tab between each Demonbolt to cycle through targets.
- Even if a target dies before Doom expires, it can still spawn a Doomguard, which is beneficial for boss damage in add-heavy fights.
Demonic Tyrant Mechanics
Your Demonic Tyrant is a so called Guardian pet that works a bit differently compared to your primary pet called Felguard that is a combat pet. Demonic Tyrant targets whatever your Felguard targets.
Guardian Pet Stat Update
Demonic Tyrant like many other Guardians does update dynamically with stat increases such as haste but sometimes does so very slowly.
Time Warp is cast at 0:02 but your Demonic Tyrant doesn't update his haste until 0:04. The same applies to all stats and damage increases.
This is just an example of an inconsistent mechanic and might not be accurate in every scenario!
Extending Duration of Wild Imps
- Whenever you cast Demonic Tyrant it extends the duration of any active demon by 15 seconds. This does not work for Diabolist demons or Doomguard.
- However, Wild Imps that are spawned after Demonic Tyrant still get their duration extended for as long as your Demonic Tyrant is up for. This works for a maximum of 10 Wild Imps, 15 with Reign of Tyranny.
- Technically Wild Imps don't get extended, they just don't consume their Energy.
Reign of Tyranny Snapshot
The amount of % damage increase your Demonic Tyrant gets from Reign of Tyranny is calculated when your Demonic Tyrant spawns and does not change for the entirety of its duration even if you spawn more demons.
Understanding Mechanics
Rotational min-maxing is just one aspect of mastering a specialization, but there are numerous other key mechanics that influence your performance. Use the following guides to improve them.
Dungeons
← Scroll for more Dungeons →
Boss Tips
Brew Master Aldryr
- Always use Dark Pact on Throw Cinderbrew.
- In the intermission Happy Hour you have to bring the Cinderbrew infront of the boss to the Thirsty Patrons across the room.
- Utilize Demonic Gateway to help you and your team clear the intermission faster.
- Intermission is a good place to use a defensive like Unending Resolve.
I'pa
- Use your Dark Pact on Spouting Stout.
- Focus the Brew Drops and use Shadowfury if they are getting close to the boss.
Benk Buzzbee
- Make sure to dodge the tank circle.
- Use your Dark Pact on Fluttering Wing.
Goldie Baronbottom
- Use Dark Pact during Let It Hail! cast from the boss.
- When you are targeted by Burning Ricochet you want to stand on barrels to destroy them
- Make sure to only hit one Volatile Barrel (these are the bigger barrels which also glow) at the time, but feel free to hit multiple barrels without a glow.
- Destroying any barrel causes a Cinder-BOOM! which spawns a fire wave in every cardinal direction.
Trash Tips
- Important abilities to interrupt in this dungeon are:
- Venture Co. Pyromaniac - Boiling Flames
- Royal Jelly Purveyor - Honey Volley
- Pay extra attention to these casts:
- Worker Bee - Final Sting
- If multiple are being casted on the same player, make sure to use an AoE stop or a big defensive cooldown.
- Worker Bee - Final Sting
Pre Dungeon Start
- Always use Soulstone on the tank/healer before the key starts since it stays active and might come in handy.
- Use Fel Domination shortly before starting the dungeon. Starting a dungeon despawns your pet, and this enables you to rapidly summon your pet without spending a Soul Shard while still having Fel Domination off cooldown in case your pet dies later.
- You may also want to use a Tempered Potion right before the Dungeon starts if there is a pull happening very early.
Boss Tips
Ol' Waxbeard
- Make sure not to stand on the rails.
- Instantly swap onto the cart when it spawns.
- If you get targeted by Reckless Charge, try to run the adds over and hit a nearby wall.
Blazikon
- Always make sure to hit a candle with Enkindling Inferno.
- If you get targeted by Wicklighter Barrage, use your Burning Rush to make sure you do not get hit.
The Candle King
- If you get targeted by Darkflame Pickaxe, hide behind one of the statues.
- Use your Axe Toss on Paranoid Mind.
The Darkness
- Use Dark Pact on Eternal Darkness boss cast.
- Use your Axe Toss on Call Darkspawn cast that spawns adds.
- Use your defensives for Splice since it's the highest damage event during this fight.
Trash Tips
- Important abilities to interrupt in this dungeon are:
- Blazing Fiends - Explosive Flame
- Shuffling Horror - Drain Light
- Royal Wicklighter - Flashpoint
- Sootsnout - Flaming Tether
Pre Dungeon Start
- Always use Soulstone on the tank/healer before the key starts since it stays active and might come in handy.
- Use Fel Domination shortly before starting the dungeon. Starting a dungeon despawns your pet, and this enables you to rapidly summon your pet without spending a Soul Shard while still having Fel Domination off cooldown in case your pet dies later.
- You may also want to use a Tempered Potion right before the Dungeon starts if there is a pull happening very early.
Boss Tips
Captain Dailcry
- Before engaging this boss you have to kill a few mini-bosses, the boss fight changes depending on which mini-boss you decided to leave up.
- The boss itself always has the same abilites, but the mini-boss have different abilites to deal with.
- The boss casts Battle Cry, make sure to interrupt it.
- Elaena Emberlanz alive:
- Casts Repentance, make sure to interrupt.
- Can also be dispelled.
- Holy Radiance deals groupwide AoE damage.
- Casts Repentance, make sure to interrupt.
- Sergeant Shaynemail alive:
- Make sure to dodge Brutal Smash on the ground as it stuns you and does fatal damage when hit.
- Do not stack with other people because of Lunging Strike.
- Taener Duelmal alive:
- This mini-boss adds a lot of additional kicks to the fight, firstly Cinderblast and secondly Fireball.
- On top he starts casting Ember Storm, watch out and dodge fire swirlies on the ground.
- Elaena Emberlanz alive:
Baron Braunpyke
- Use your Axe Toss on Burning Light.
- Use Dark Pact if you are soaking Sacrificial Pyre.
Prioress Murrpray
- Break Barrier of Light asap and then use your Dark Pact on it.
- Walk away from the boss during this phase to avoid taking damage from Arathi Neophyte's Overwhelming Power.
- Make sure to look away when the boss casts Blinding Light.
Trash Tips
- Important abilities to interrupt in this dungeon are:
- Devout Priest - Inner Fire
- Devout Priest - Greater Heal
- Forge Master Damian - Heat Wave
- Risen Mage - Fireball Volley.
Pre Dungeon Start
- Always use Soulstone on the tank/healer before the key starts since it stays active and might come in handy.
- Use Fel Domination shortly before starting the dungeon. Starting a dungeon despawns your pet, and this enables you to rapidly summon your pet without spending a Soul Shard while still having Fel Domination off cooldown in case your pet dies later.
- You may also want to use a Tempered Potion right before the Dungeon starts if there is a pull happening very early.
Boss Tips
Kyrioss
- Generally you always want to be spread out during this boss to deal with Crashing Thunder easier.
- Dodge Grounding Bolt on the ground.
Stormguard Gorren
- Make sure to dodge Crush Reality.
- Run away from the boss when he casts Dark Gravity.
- You can stand in it until the last second and then Demonic Circle out of it.
- During Chaotic Corruption, make sure to juggle the debuff to the tank or other people without Chaotic Vulnerability.
Voidstone Monstrosity
- Hit as many Voidstone Fragments as possible with Stormrider's Charge.
- Try to line up your cooldowns with Void Shell after you break the shield.
Trash Tips
- Important abilities to interrupt in this dungeon are:
- Cursed Thunderer - Lightning Bolt
- Unruly Stormrook - Energized Barrage
- Cursed Rooktender - Lightning Surge
- Void Ascendant - Feasting Void
Pre Dungeon Start
- Always use Soulstone on the tank/healer before the key starts since it stays active and might come in handy.
- Use Fel Domination shortly before starting the dungeon. Starting a dungeon despawns your pet, and this enables you to rapidly summon your pet without spending a Soul Shard while still having Fel Domination off cooldown in case your pet dies later.
- You may also want to use a Tempered Potion right before the Dungeon starts if there is a pull happening very early.
Boss Tips
Big M.O.M.M.A.
- Use your interrupt against the Darkfuse Mechadrone's cast Maximum Distortion.
- Try to line up your cooldowns with Jumpstart as the boss takes 200% increased damage.
Demolition Duo
- While targeted by Barreling Charge make sure to hit as many Bombs on the ground as possible.
- Maintain Doom on both bosses as much as possible.
Swampface
- Make sure to coordinate with your group as to which side you are dodging towards since you will be linked with Razorchoke Vines.
- Use your Dark Pact during Awaken the Swamp cast from the boss and dodge the Rushing Tide.
Geezle Gigazap
- Use Dark Pact during Turbo Charge.
- While fixated by Leaping Sparks make sure to kite it through Dam Water pools on the ground.Use your Feint on Giga Zap.
Trash Tips
- Important abilities to interrupt in this dungeon are:
- Mechadrone Sniper - Trickshot
- Venture Co. Diver - Harpoon
- Disturbed Kelp - Restorative Algae
- Darkfuse Bloodwarper - Blood Blast
- Pay extra attention to these casts:
- Shreddinator 3000 - Shreddation
- Make sure to start moving at the end of this cast so you do not get hit by the blades spawning.
- If you have multiple melees in the group it can be good to stack up to bait this.
- Disturbed Kelp - Jettison Kelp
- Shreddinator 3000 - Shreddation
Pre Dungeon Start
- Always use Soulstone on the tank/healer before the key starts since it stays active and might come in handy.
- Use Fel Domination shortly before starting the dungeon. Starting a dungeon despawns your pet, and this enables you to rapidly summon your pet without spending a Soul Shard while still having Fel Domination off cooldown in case your pet dies later.
- You may also want to use a Tempered Potion right before the Dungeon starts if there is a pull happening very early.
Boss Tips
An Affront of Challengers
- Spread out with Searing Death.
- Dodge green swirlies on the ground caused by Paceran's Noxious Spores cast.
- Use your interrupt against Sathel's Necrotic Bolt.
Xav the Unfallen
- During Might of Maldraxxus the boss will cast 3 different abilities that you should dodge.
- Use Demonic Circle to your advantage during these dodges.
Kul'tharok
- Use Dark Pact on Draw Soul
- Spread out with Well of Darkness.
- Interrupt Necrotic Bolt as much as possible.
- Curse of Tongues can be good on this boss if your tank is taking a lot of damage.
Gorechop
- Do not get caught by Meat Hooks crossing the arena.
Mordretha, the Endless Empress
- Use your Dark Pact on Manifest Death and spread out.
- After the boss reaches 50% HP, he occasionally summons Ghostly Combatants which cast Ghostly Charge, running from one side of the room towards the other, make sure to dodge them.
Trash Tips
- Important abilities to interrupt in this dungeon are:
- Blighted Sludge-Spewer - Withering Discharge
- Maniacal Soulbinder - Necrotic Bolt Volley
- Bone Magus - Bone Spear
Pre Dungeon Start
- Always use Soulstone on the tank/healer before the key starts since it stays active and might come in handy.
- Use Fel Domination shortly before starting the dungeon. Starting a dungeon despawns your pet, and this enables you to rapidly summon your pet without spending a Soul Shard while still having Fel Domination off cooldown in case your pet dies later.
- You may also want to use a Tempered Potion right before the Dungeon starts if there is a pull happening very early.
Boss Tips
Tussle Tonks
- When Gnomercy 4.U. reaches 100 energy make sure to aim his Maximum Thrust towards a nearby wall.
- Do not to pop cooldowns when Platinum Plating is up.
- The boss occasionally spawns B.4.T.T.L.3. Mines, stay away from them as much as possible.
- Kill both bosses at the same time or you might wipe to Electrical Storm.
K.U.-J.0.
- Spread when you get targeted by Explosive Leap.
- Very important to not stand too close to a Junk Cube from Air Drop as this could lead to a wipe.
- During the Venting Flames cast, hide behind one of the boxes, and try to keep hitting the boss. As long as you have Hiding Behind Junk you are safe.
Machinist's Garden
- When the boss spawns a Inconspicuous Plant, make sure to target swap to it and kill it as fast as possible.
King Mechagon
- Dodge Plasma Orb in Phase 1.
- Use your Dark Pact when targeted by Mega-Zap and try to stand still in Phase 2.
- If you have Shadowmeld you can use it on this mechanic and it won't recast.
Trash Tips
- Important abilities to interrupt in this dungeon are:
- Bomb Tonk - Detonate
- Mechagon Tinkerer - Giga-Wallop
- Mechagon Mechanic - Tune Up
Pre Dungeon Start
- Always use Soulstone on the tank/healer before the key starts since it stays active and might come in handy.
- Use Fel Domination shortly before starting the dungeon. Starting a dungeon despawns your pet, and this enables you to rapidly summon your pet without spending a Soul Shard while still having Fel Domination off cooldown in case your pet dies later.
- You may also want to use a Tempered Potion right before the Dungeon starts if there is a pull happening very early.
Boss Tips
Coin-Operated Crowd Pummeler
- Pop your cooldowns when the boss has a few stacks of Blazing Azerite on the boss.
- Use Dark Pact on Static Pulse.
- When the boss casts Coin Magnet make sure to not be near any coins on the ground.
Azerokk
- Apply Doom to the Earthrager adds.
- You can freely use Axe Toss to get some distance from the Earthragers when you or a teammate is fixated.
- Use Dark Pact on Resonant Quake.
Rixxa Fluxflame
- Use Dark Pact when you are targeted by Propellant Blast and make sure you clear the floor with it.
Mogul Razdunk
- Make sure to stand next to a Drill when targeted by Drill Smash in the intermission.
- Very important to look where the Summon B.O.O.M.B.A. are positioned and move away from them, this makes it much easier to dodge Micro Missiles.
- Use Dark Pact when targeted by Homing Missile.
Trash Tips
- Important abilities to interrupt in this dungeon are:
- Refreshment Vendor - Iced Spritzer
- Hired Assassin - Toxic Blades
- Venture Co. Earthshaper - Rock Lance
- Stonefury - Furious Quake
- Venture Co. Alchemist - Transmute: Enemy to Goo
- Pay extra attention to these casts:
- Hired Assassin - Fan of Knives
- Use Shockwave or Storm Bolt stop this cast.
- Hired Assassin - Fan of Knives
Pre Dungeon Start
- Always use Soulstone on the tank/healer before the key starts since it stays active and might come in handy.
- Use Fel Domination shortly before starting the dungeon. Starting a dungeon despawns your pet, and this enables you to rapidly summon your pet without spending a Soul Shard while still having Fel Domination off cooldown in case your pet dies later.
- You may also want to use a Tempered Potion right before the Dungeon starts if there is a pull happening very early.
Affixes
The Affix system got revamped going into The War Within Season 1 retiring most Affixes as well as introducing new kiss-curse ones while also changing on which key level these appear.
- +4 Affixes -- Rotates on a weekly basis
- Xal'atath's Bargain: Ascendant
- Xal'atath's Bargain: Voidbound
- Xal'atath's Bargain: Oblivion
- Xal'atath's Bargain: Devour
- Xal'atath's Bargain: Pulsar
- +7 Affixes -- Alternates between each other on a weekly basis
- Tyrannical
- Fortified
- +10 Affixes -- Alternates between each other on a weekly basis, is always the opposite of the +7 Affix
- Tyrannical
- Fortified
- +12 Affix
- Xal'atath's Guile -- Replaces the +4 Affix
Following you get some useful tips for handling different Mythic+ Affixes as a Demonology Warlock.
- Xal'atath's Bargain: Ascendant
- Cast Shadowfury on any large stack.
- Xal'atath's Bargain: Voidbound
- Make sure to instantly swap all your pets to the Void Emissary when it spawns as the other mobs take reduced damage while it's up.
- Xal'atath's Bargain: Oblivion
- Burning Rush
- Xal'atath's Bargain: Devour
- Consider using Dark Pact so that other people can be prioritized to be dispelled first.
Stat Priority
Understand your secondary stat priority and the tertiary stats needed for optimal performance during Mythic+ dungeons as a Demonology Warlock. For more detailed information, visit the Stats and Attributes guide.
Higher Item level items are better in most scenarios. For an accurate representation of what item to equip you should use Simcraft! A static "Stat Priority" is just a starting point and can easily shift depending on your individual gear.
All secondary stats are affected by diminishing returns. Click here to learn more!
Tertiary
- Avoidance - Great stat to reduce the damage intake of "Area of Effect" abilities.
- Leech - Provides additional healing through damage dealing. The damage of your pets does not heal you thus Leech is a bad tertiary for you since most of your damage is from your pets.
- Speed - Niche tertiary that can be very useful and has been proven useful in the past. Makes playing certain mechanics a lot easier.
Gear
| Slot | Item | Location |
|---|---|---|
| Head | Spliced Fiendtrader's Transcendence | Tier / Catalyst |
| Neck | Semi-Charmed Amulet | Rik Reverb |
| Shoulder | Spliced Fiendtrader's Loyal Servants | Tier / Catalyst |
| Cloak | Consecrated Cloak | Crafting |
| Chest | Spliced Fiendtrader's Surgical Gown | Tier / Catalyst |
| Wrist | Spliced Fiendtrader's Skinbands | Catalyst |
| Gloves | Spliced Fiendtrader's Demonic Grasp | Tier / Catalyst |
| Belt | Durable Information Securing Container | Overcharged Delve |
| Legs | Spliced Fiendtrader's Skin Tights | Tier / Catalyst |
| Boots | Cemented Murloc-Swimmers | Mug'Zee |
| Ring 1 | The Jastor Diamond | Chrome King Gallywix |
| Ring 2 | Faded Championship Ring | Cauldron of Carnage |
| Trinket 1 | House of Cards | The One-Armed Bandit |
| Trinket 2 | Mug's Moxie Jug | Mug'Zee |
| Weapon | Stix's Metal Detector | Stix Bunkjunker |
| Offhand | Vagabond's Torch | Crafting |
Below you are presented with a good list of farmable alternatives that are obtainable outside of WoW’s weekly lockout system. While replaced in time as you progress, these offer immediate character power.
| Slot | Item | Location |
|---|---|---|
| Head | Inventor's Ingenious Trifocals | Operation Mechagon: Workshop |
| Neck | Strapped Rescue-Keg | Cinderbrew Meadery |
| Shoulder | Moneymaking Businessmantle | Cinderbrew Meadery |
| Cloak | Cloak of Questionable Intent | THE MOTHERLODE!! |
| Chest | Saboteur's Rubber Jacket | Operation: Floodgate |
| Wrist | Hyperthread Wristwraps | Operation Mechagon: Workshop |
| Gloves | Punctured Apiary Gloves | Cinderbrew Meadery |
| Belt | Ringmaster's Cummerbund | Operation Mechagon: Workshop |
| Legs | Rowdy Reveler's Legwraps | THE MOTHERLODE!! |
| Boots | Hyperthread Boots | Operation Mechagon: Workshop |
| Ring 1 | Bloodoath Signet | Theater of Pain |
| Ring 2 | Wick's Golden Loop | Darkflame Cleft |
| Trinket 1 | Signet of the Priory | Priory of the Sacred Flame |
| Trinket 2 | Sigil of Algari Concordance | The Rookery |
| Weapon | Voltaic Stormcaller | The Rookery |
Trinkets
Below you can find active and passive alternatives to our recommended trinkets. Do note that some trinkets are better than others depending on the mythic+ dungeon.
Active Trinket alternatives
- Signet of the Priory
- Strong on-use trinket that lines up with your cooldowns.
- Soulletting Ruby
- Strong on-use trinket that lines up with your cooldowns.
Passive Trinket alternatives
- Eye of Kezan
- Strongest trinket in the game if you manage to maintain the stacks throughout the dungeon.
Embellishments
- Writhing Armor Banding
- Empowers any Nerubian embellishment by 100%.
- Darkmoon Sigil: Ascension
- Gain a random secondary stat stacking up over time.
Remaining Sparks
- Crafted items are 675 item level and regular items are 678 on max item level therefore it's not beneficial to equip crafted items outside of your 2x embellishments unless you don't have access to other high item level gear on that slot.
Simcraft
To find the best combination of gear available to you or identify the best possible upgrades, visit our Simcraft guide to learn how to utilize Simcraft easily and effectively.
Consumables
- Phials
- Flask of Alchemical Chaos -- maximum DPS.
- Flask of Tempered Versatility -- less DPS but more survivability.
- Food
- Feast of the Divine Day
- Feast of the Midnight Masquerade
- Combat Potion
- Tempered Potion
- Health Potion
- Algari Healing Potion -- a big burst of healing
- Weapon Oil
- Algari Mana Oil -- default
- Oil of Deep Toxins
- Augment Rune
- Crystallized Augment Rune
- Sockets
- Versatile Emerald
- Culminating Blasphemite -- Unique, use one of each gem color to enhance your Culminating Blasphemite.
- Masterful Sapphire
- Quick Ruby
- Versatile Onyx
Enchantments
| Head | Greater Rune of the Void Ritual S.A.D. |
| Neck | Magnificent Jeweler's Setting 2x |
| Cloak | Enchant Cloak - Chant of Winged Grace |
| Chest | Enchant Chest - Crystalline Radiance |
| Wrist | Enchant Bracer - Chant of Armored Avoidance S.A.D. |
| Waist | S.A.D. |
| Legs | Sunset Spellthread |
| Boots | Enchant Boots - Scout's March |
| Ring 1 | Enchant Ring - Radiant Versatility Magnificent Jeweler's Setting 2x |
| Ring 2 | Enchant Ring - Radiant Versatility Magnificent Jeweler's Setting 2x |
| Weapon | Enchant Weapon - Authority of Radiant Power |
You buy S.A.D. from the Great Vault Vendor to add sockets to your Helm, Wrists & Waist.
Races
For min-maxing a Demonology Warlock in Mythic+, different racial traits can provide a tremendous benefit to your character. If this is not your top goal, picking a race that fits your style works just as well.
- Stoneform -- Dwarf
- One of the most potent racials in Mythic+ currently and historically.
- Dispels Magic and Bleed debuffs.
- Shadowmeld -- Night Elf
- Also one of the most potent racials in Mythic+ historically.
- Run past basically any mob and then cast Shadowmeld to make them reset. Even works on mobs that have stealth detection if you get enough distance before you Shadowmeld.
- Blood Fury -- Orc
- Strong racial for damage both because of Command and Blood Fury which lines up with Summon Demonic Tyrant.
- 20% reduced Stun duration on you which can be useful in some Mythic+ dungeons.
- Escape Artist -- Gnome
- Free yourself from roots.
- Rocket Jump -- Goblin
- Do a small jump in the direction your character is facing.
- While you're in the Rocket Jump animation you are placed on a global cooldown until your character lands.
Recommendation
Dwarf and Night Elf abilities have such a big impact on your Mythic+ experience that you need to use either of them if you're serious about pushing keys with your Demonology Warlock.
Macros
Discover recommended macros for Demonology Warlocks during Mythic+ dungeons and watch a quick video guide on creating simple macros for your character.
Guillotine -- Casts Guillotine on your cursor without confirmation.
#showtooltip
/cast [@cursor] Guillotine
Demonic Strength / Bilescourge Bombers -- simple macro to have both Demonic Strength & Bilescourge Bombers on the same keybind while also casting Bilescourge Bombers on your cursor without confirmation.
#showtooltip
/cast [known: 267171] Demonic Strength
/cast [@cursor][known: 267211] Bilescourge Bombers
Shadowfury -- Casts Shadowfury on your cursor without confirmation.
#showtooltip
/cast [@cursor] ShadowfuryCurse of Weakness -- Amplify Curse before applying Curse of Weakness to your mouseover target or target.
#showtooltip Curse of Weakness
/cast [known:328774] Amplify Curse
/cast [@mouseover, exists, harm, nodead] Curse of Weakness; Curse of Weakness
Curse of Tongues -- Uses Amplify Curse before applying Curse of Tongues to your mouseover target or target..
#showtooltip Curse of Tongues
/cast [known:328774] Amplify Curse
/cast [@mouseover, exists, harm, nodead] Curse of Tongues; Curse of Tongues
Curse of Exhaustion -- Uses Amplify Curse before applying Curse of Exhaustion to your mouseover target or target.
#showtooltip Curse of Exhaustion
/cast [known:328774] Amplify Curse
/cast [@mouseover, exists, harm, nodead] Curse of Exhaustion;[@target] Curse of Exhaustion
Banish -- Casts Banish on your mouseover target if it exists.
#showtooltip
/cast [@mouseover,harm,nodead,exists] Banish; [harm,nodead] Banish
Fear -- Casts Fear on your mouseover target if it exists.
#showtooltip
/cast [@mouseover,exists]Fear;Fear
Soulstone Mouseover -- Casts Soulstone on your mouseover, conventional [@mouseover,exists] macros got broken a while ago, this is a workaround for it.
#showtooltip Soulstone
/target [@mouseover,help]
/cast Soulstone
/targetlasttargetWe're mainly using custom macros for Pets because the normal functionality of Command Demon proved unreliable in the past.
Pet Ability 1 Macro -- Casts your main pet abilities for each pet on your mouseover target.
/cast [@mouseover]Singe Magic
/cast [@mouseover,exists]Spell Lock;Spell Lock
/cast [@mouseover]Suffering
/cast [@mouseover,exists]Seduce;Seduce
/cast [@mouseover,exists]Axe Toss;Axe Toss
/cast [nopet,@mouseover,exists]Command Demon;[nopet]Command Demon
Focus Pet Ability 1 Macro -- Casts your main pet abilities for each pet on your focus target.
/cast [@focus] Singe Magic
/cast [@focus] Spell Lock
/cast [@focus] Suffering
/cast [@focus] Seduce
/cast [@focus] Axe Toss
/cast [nopet,@focus] Command Demon
Pet Ability 2 Macro -- Casts your second relevant pet ability on your mouseover target if needed.
/cast [@mouseover] Singe Magic
/cast [@mouseover,exists] Devour Magic;Devour Magic
/cast Shadow Bulwark
/cast Felstorm
/cast [nopet,@mouseover] Command Demon
Focus Pet Ability 2 Macro -- Casts the second relevant Pet ability on your focus target, and also sends your pet to attack your focus.
/cast [@focus]Singe Magic;
/cast [@focus] Devour Magic;
/cast [@focus] Lesser Invisibility;
/cast Shadow Bulwark;
/cast [nopet,@focus] Command Demon
/petattack [@focus]Unending Breath Selftcast -- Casts Unending Breath on yourself without targeting anything. Useful for situations where you're not able to DPS anything to still fish for trinket procs/stacks.
#showtooltip
/cast [@player] Unending Breath
Mortal Coil / Howl of Terror choice -- Swaps between Mortal Coil and Howl of Terror depending on which talent got picked. Useful to add your own macro conditions like @focus or @mouseover etc.
/cast [known:Mortal Coil] Mortal Coil
/cast [known:Howl of Terror] Howl of Terror
All-In-One Potion -- all the different damage Tempered Potion, uses Grotesque Vial if you're dead.
/use [@player,nodead] item:212971
/use [@player,nodead] item:212265
/use [@player,nodead] item:212970
/use [@player,nodead] item:212264
/use [@player,nodead] item:212969
/use [@player,nodead] item:212263
/use [@player,dead]Grotesque Vial
Addons
Below, you see a screenshot of the author's User Interface for their Demonology Warlock, outlining which addons are used and how they are utilized in Mythic+ dungeons to make your life easier.
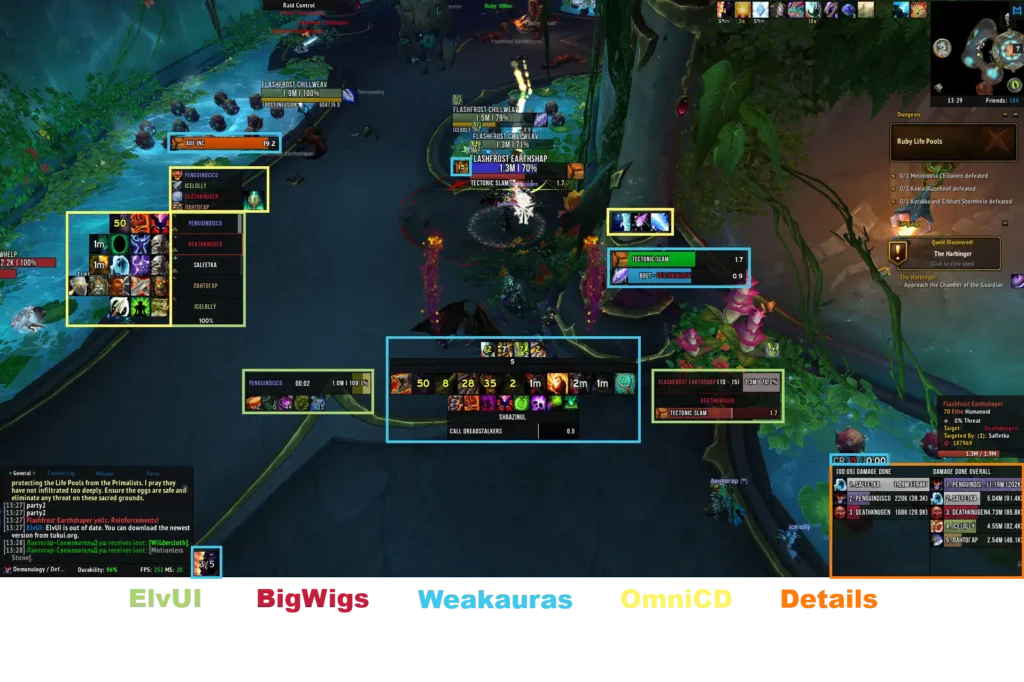
- ElvUI -- Full User Interface replacement
- A user interface designed around user-friendliness with extra features that are not included in the standard UI.
- Alternatively, you can also use Shadowed Unit Frames (SUF) and an action bar addon of your choice or of course the stock UI.
- LittleWigs -- Generic Boss Mod
- BigWigs is a boss encounter add-on. It consists of many individual encounter scripts, or boss modules; mini add-ons that are designed to trigger alert messages, timer bars, sounds, and so forth, for one specific encounter.
- You need to download LittleWigs to have the same functionalities as BigWigs work for dungeon bosses and trash mobs.
- WeakAuras -- Jack of all trades
- WeakAuras is a powerful and flexible framework that allows the display of highly customizable graphics on World of Warcraft's user interface to indicate buffs, debuffs, and other relevant information. This addon was created to be a lightweight replacement for Power Auras but has since introduced more functionalities while remaining efficient and easy to use.
- Plater -- Advanced Nameplates
- Plater is a nameplate addon with an extraordinary amount of settings, out of the box debuff tracking, threat coloring, and support for scripting similar to WeakAuras and wago.io + the WeakAuras-Companion for Mod/Script/Profile updates.
- Details -- In-depth Damage Meter
- Most powerful, reliable, handsome, damage meter.
- OmniCD -- Party track addon
- Helpful addon for Mythic+ to check the available cooldowns of your party.
Soulshard Bar
Shows your current shards.

Changes this Patch
- Warlock
- Drain Life damage increased by 300%.
- Demonology
- Developers' notes: In Undermine(d), the duration of Doom is now reduced for each Soul Shard spent on Hand of Gul'dan. Our goal with this change is to provide more control over when Doom explodes since its application is dependent on randomly receiving a Demonic Core. In addition, Doom Eternal wasn’t attractive enough to warrant a talent point but still felt missed as it made Doom feel incomplete since its duration reduction wasn’t maximized. Considering this, we’ve redesigned Doom Eternal to increase the uptime of Doom and provide a slight nudge to the Demonic Core economy.
- Doom has been updated – Consuming a Demonic Core no longer reduces the duration of Doom. The duration of Doom is now reduced by 1 second per Soul Shard spent on Hand of Gul'dan.
- Doom Eternal has been redesigned – When Doom expires, you have a 30% chance to generate a Demonic Core.
- Demonic Calling now has a 20% chance to make your next Call Dreadstalkers cost 2 fewer Soul Shards and have no cast time (was 10%).
- Warlock
- Diabolist
- The cycle of Diabolic Ritual is now reset when entering an arena, entering a battleground, starting a raid encounter, or starting a Mythic+ dungeon.
- Overlord will now use an alternative attack if there are no available paths for charging. There should be no difference in throughput between the alternative attack and his current attack.
- Demonology
- Dreadstalkers now have a 100% chance to generate a Demonic Core (was 50%).
- Grimoire: Felguard damage is now increased by 125% (was 60%).
- Hand of Gul’dan damage increased by 25%.
- Call Dreadstalkers damage increased by 20%.
- Diabolist
- Warlock
- Demon Skin now creates an absorb for 0.12/0.24% maximum health (was 0.2/0.4%) and may stack up to 5/10% of your maximum health (was 8/15%).
- Fixed an issue where Lifeblood was giving Leech higher than the intended amount.
- Demonology
- Wild Imp damage increased by 15%.
- Demonbolt damage increased by 55%.
- Demonic Core now has a 50% chance to grant a Demonic Core when your summoned Call Dreadstalkers fade away (was 35%).
- Fixed an issue where Shadowtouched did not benefit Felseeker, Implosion, Gloom Slash, or Guillotine.
- Fixed an issue where Demonic Brutality would not increase the critical strike damage of your demons.
- Fixed an issue where Impending Doom would not summon a Wild Imp when Doom expires.
- Warlock
- All talent trees have had many talents move locations or have had their pathing updated.
- New Talent: Pact of Gluttony – Healthstones you conjure for yourself are now Demonic Healthstones and can be used multiple times in combat. Demonic Healthstones cannot be traded.
- New Talent: Swift Artifice – Reduces the cast time of Soulstone and Create Healthstone by 50%.
- New Talent: Demonic Tactics – Increases melee and spell critical strike chance for you and your summoned demon by 2%.
- Fel Pact has been redesigned – Fel Domination cooldown is reduced by 60 seconds and is now a 1-point talent (was 2).
- Fiendish Stride has been redesigned – Reduces the damage dealt by Burning Rush by 10%. Burning Rush increases your movement speed by an additional 20%. Now a 1-point talent (was 2).
- Soul Leech is now a talent (was learned at level 10).
- Mortal Coil has a new visual effect.
- Soul Conduit now a 1-point talent.
- The following talents have been removed:
- Grimoire of Synergy
- Inquisitor's Gaze
- Summon Soulkeeper
- Profane Bargain
- Demonology
- New Talent: Shadowcaster – Increases the damage of Hand of Gul’dan by 20% and Demonbolt by 10%.
- New Talent: Pact of the Ered’ruin – When Doom expires, you have a chance to summon a Doomguard that casts 5 Doom Bolts before departing. Each Doom Bolt deals Shadow damage.
- New Talent: Mark of Shatug – Your Summon Vilefiend becomes Summon Gloomhound and learns the following ability: Gloom Slash – Tooth and claw are drenched in malignant shadow magic, causing the Gloomhound’s melee attacks to deal Shadow damage over 6 seconds. If this effect is reapplied, any remaining damage will be added to the new Gloom Slash.
- New Talent: Flametouched – Increases the attack speed of your Dreadstalkers by 20% and their critical strike chance by 15%.
- New Talent: Rune of Shadows – Increases all damage done by your pet by 4%. Reduces the cast time of Shadow Bolt by 25% and increases its damage by 40%.
- New Talent: Demonic Brutality – Critical strikes from your spells and your demons deal 4% increased damage.
- New Talent: Fiendish Prowess – Increases the attack speed of your primary demon by 25%.
- New Talent: Improved Demonic Tactics – Increases your primary Felguard’s critical strike chance equal to 30% of your critical strike chance.
- New Talent: Mark of F’harg – Your Summon Vilefiend becomes Summon Charhound and learns the following ability: Infernal Presence – Cloaked in the ever-burning flames of the abyss, dealing Fire damage to enemies within 10 yards every 1 second.
- New Talent: Shadowtouched – Wicked Maw causes the target to take 20% additional Shadow damage from your demons.
- New Talent: Foul Mouth – Increases Vilefiend damage by 20% and your Vilefiend’s Bile Spit now applies Wicked Maw.
- New Talent: The Houndmaster’s Gambit – Your Dreadstalkers deal 50% increased damage while your Vilefiend is active.
- New Talent: Blood Invocation – Power Siphon increases the damage of Demonbolt by an additional 25%.
- New Talent: Fiendish Oblation – Damage dealt by Grimoire: Felguard is increased by an additional 10% and you gain a Demonic Core when Grimoire: Felguard ends.
- New Talent: Doom Eternal – Demonic Cores reduce the duration of Doom by an additional 2 seconds.
- New Talent: Impending Doom – Increases the damage of Doom by 30% and Doom summons 1 Wild Imp when it expires.
- Doom is now passive and has been redesigned – When Demonbolt consumes a Demonic Core it inflicts impending doom upon the target, dealing Shadow damage to enemies within 10 yards of its target after 20 seconds. Damage is reduced beyond 8 targets. Consuming a Demonic Core reduces the duration of Doom by 2 seconds.
- Fel Invocation has been redesigned – Soul Strike deals 20% increased damage and generates a Soul Shard.
- You now have a 35% chance to generate a Demonic Core from your summoned Dreadstalkers when they fade (was 100% chance).
- Summon Vilefiend cooldown reduced to 30 seconds (was 45 seconds).
- Summon Demonic Tyrant cooldown reduced to 1 minute (was 1 minute and 30 seconds).
- Your Felguard now charges its target when using Soul Strike.
- Houndmaster’s Stratagem has been renamed to Wicked Maw and its icon has been updated.
- Dread Calling and Grimoire: Felguard icons have been updated.
- Dragonflight Season 4 class set bonuses have been updated to the Dragonflight Season 1 class set bonuses:
- 2 Set Bonus – Demonbolt and Felstorm damage increased by 20%.
- 4 Set Bonus – Demonbolt has a chance to make your next Hand of Gul'dan instant and deal 150% increased damage.
- Developer's note: In The War Within pre-patch we had several season 4 class sets that were made into spec talents. In order to prevent any oddities we are updating those select few class sets with earlier tier sets from Dragonflight to prevent any overlap or potential bugs.
- The following talents are now 1 point:
- Imp Gang Boss
- Umbral Blaze
- Pact of the Imp Mother
- Dread Calling
- Demonic Brutality
- Flametouched
- The following talents have been removed:
- Demonic Knowledge
- Nether Portal
- Ner’zhul’s Volition
- Gul’dan’s Ambition
- Stolen Power
- Heavy-Handed
- Fiendish Prowess
- Shadow’s Bite
- Infernal Command
- Fel and Steel
- Shadowcaster
- Malefic Impact
- Cavitation
- Grand Warlock’s Design
FAQ
A: Because your Felguard is already casting Felstorm. Check out the Deep Dive section for more info on this topic.
Credits
Written By: Wolfdisco
Reviewed By: Xerwo