Retribution Paladin Mythic+ Guide
Welcome to the Retribution Paladin Mythic+ guide for the World of Warcraft patch 11.1.5! This guide covers everything you need to know to understand your character! Are you starting out and leveling up from 70? Check out the leveling guide!
Overview
Hero Talents
Templar is focused on Single target with stacked cleave from Shake the Heavens, while Herald of the Sun is focused on buffing your Divine Storm and a dealing damage via dots from Dawnlight.
- Casting Wake of Ashes Grants you Hammer of Light a 5 Holy Power spender that replaces Wake of Ashes until it’s used.
- Over time you gain stacks of Light's Deliverance. At 60 Stacks, you gain a freeHammer of Light that you must cast before Wake of Ashes since they have the same key bind.
Shake the Heavens Interactions
- After casting Hammer of Light you gain Shake the Heavens which casts an Empyrean Hammer on your target every 2 seconds for 8 seconds, which can be extended by Higher Calling
- Shake the Heavens also grants you 12% haste for 6 seconds.
Empyrean Hammer Interactions
- Casting any Holy Power spender triggers an Empyrean Hammer which activates Wrathful Descent if it crits. Shake the Heavens triggers an additional Empyrean Hammer.
- After casting Hammer of Light you instantly trigger 2 Empyrean Hammers on your main target.
- Sanctification
- Trying to maintain a high stack is very important, casting Divine Toll grants you 1 stack per enemy hit.
Defensive Traits
- Sacrosanct Crusade
- Wake of Ashes grants you an absorb shield while Hammer of Light heals you upon use.
Dawnlight Interactions
- Wake of Ashes causes your 2 next Holy Power spenders to apply Dawnlight to your target. This debuff radiates damage around the target for 8 seconds. Additionally , when you activate Avenging Wrath or Crusade you also apply Dawnlight on 4 nearby targets and start Sun's Avatar.
- As long as there is any Dawnlight DoT active your Holy Power spenders gain 5% additional damage. On top of this every time you apply any Dawnlight you gain 2% Haste for 12 seconds which can overlap.
- Wake of Ashes grants you Divine Purpose.
Divine Storm and Hammer of Wrath gain some new passives
- Second Sunrise
- They have a 15% chance to be casted again for 30% effectiveness.
- Luminosity
- They both gain 10% increased damage.
- Sun Sear
- When they critical strike any target they burn the target for some radiant damage for 4 seconds.
- Blessing of An'she
- Your overtime effects have a chance to buff your next Hammer of Wrath by 200% and make it usable on the target regardless of its health.
Defensive Traits
- Eternal Flame
- Replaces Word of Glory and also heals a small amount over 16 seconds, and its healing is increased by 25% when used on your self.
- Illumine
- When you have Dawnlight on a target its now slowed by 50%.
Talents
Templar
Templar
Herald of the Sun
Herald of the Sun
When to use this Spec
Use this spec in your Mythic+ keys, this should be your standard overall build for AoE. This build allows you to spam Divine Storm while your generators cleave everything around you. check the deep dive section below to learn how to fully optimize this build!
Gameplay Altering Talents
Discover all talents that significantly alter your gameplay within the Spec and Class Talent trees. This section gives a concise overview of these talents and their applications but for a more detailed look check out the Rotation and Deep Dive sections below.
Spec Tree
- Radiant Glory
- Automatically activates Crusade when you cast Wake of Ashes.
- Crusade
- Spend Holy Power to increase its stack to 10, and try to extend its duration with procs from Radiant Glory.
- Final Reckoning
- A strong Aoe burst cooldown.
- Divine Hammer
- Strong Single/cleave Cooldown.
- Holy Power you spend into this increases its duration by 0.5 sec.
- This will proc Empyrean Hammer.
- Final Verdict
- Your main single-target Holy Power spender.
- Blessed Champion
- Your Judgment and Crusader Strike now Cleaves to 4 additional targets.
- Blade of Vengeance
- Blade of Justice now Cleaves to 5 nearby enemies and additionally debuffs them with Expurgation.
- Tempest of the Lightbringer
- When you cast Divine Storm it now hits an additional time for 20% of the base damage and hits anyone up to 20 yards away.
- Boundless Judgment
- Your Judgment generates an additional Holy Power.
- Improved Blade of Justice
- 2 charges of Blade of Justice instead of 1.
- Crusading Strikes
- Generates 1 Holy Power every 2nd auto attack, replaces your Crusader Strike.
- Look below in Deep Dive to see how to play around this.
- Empyrean Power
- Somtimes grants you a free Divine Storm.
- Art of War
- Your auto attacks have a 20% chance to reset Blade of Justice.
- Penitence
- Buffs your Dot effects by 10%
- Burning Crusade
- Divine Storm Now deals 5% more damage.
- Searing Light
- Divine Storm and Judgment has a small chance to activate a beam of light dealing damage around the target.
Class Tree
- Divine Toll
- Casts Judgment on your target.
- Mainly used for its Holy Power gain.
- Divine Purpose
- Your Holy Power spenders have a 10% chance to make your next Holy Power spender free and deal 10% increased damage.
- Vengeful Wrath
- Hammer of Wrath Deals more damage on enemies below 35%.
- Holy Aegis
- Armor and Crit increased by 4%
- Lead the Charge
- When you cast Divine Steed you now reduce your teammate's movements spells by 3-sec pr use.
- Divine Steed
- Move at 100% movement speed for 3 seconds.
- Cavalier Grants you 2 charges instead of 1.
- Move at 100% movement speed for 3 seconds.
- Lay on Hands
- Strong single target heal that can be used on a friendly target to save them.
- Blessing of Protection
- Great way to avoid aggro or prevent Physical damage.
- Blessing of Sacrifice
- Perfect to use on tanks or players dealing with certain spells during boss fights.
- Rebuke
- A kick to interrupt any spell.
- Blessing of Freedom
- You become immune to slow effects for 8 sec.
- Unbound Freedom
- When you cast Blessing of Freedom on another player you also gain it and both of you also gain 30% movement speed
- Of Dusk and Dawn
- After you cast 3 generators your next spender deals 30% more damage you can stack this.
- Lightbearer
- 10% of any healing you get is put on your melee camp as well.
- Light's Revocation
- you can now use Divine Shield even tho you have Forbearance, and now you gain a small shield after your Divine Shield is over.
- Cleanse Toxins
- A Cleanse to remove portion and disease effects.
- Blinding Light
- When you have no aoe stops this can be very useful as it stop all casts around you
Hero Talents
For more info visit the Hero Talent section above.
- Zealous Vindication
- Sanctification
- Unrelenting Charger
When to use this Spec
Use this build when you need more single target in your Mythic+.
Talent Adjustments
Listing all the changes within the Class and Spec tree compared to the default build.
Spec Tree
- Added
- Execution Sentence
- Executioner's Will
- Zealot's Fervor x2
- Rush of Light
- Swift Justice
- Empyrean Legacy
- Divine Arbiter
- Divine Arbiter
- Holy Flames
- Removed
- Final Reckoning
- Sanctify
- Lightforged Blessing
- Cleanse Toxins
- Empyrean Power
- Searing Light
- Blessed Champion
- Tempest of the Lightbringer
- Light of Justice
- Blade of Vengeance
Class Tree
- Added
- Empyreal Ward
- Obduracy
- Blessed Calling
- Removed
- Cleanse Toxins
- Blinding Light
- Lightforged Blessing
When to use this Spec
This build utilizes Herald of the Sun as your hero talent pick, some dungeons may need more Dot damage or passive spread out cleave compared to Templar burst and close ranged cleave.
Talent Adjustments
Nothing Changed.
Hero Talents
For more info visit the Hero Talent section above.
Swapped To Herald of the Sun.
- Gleaming Rays
- Spender deal 5% more damage while any Dawnlight is active.
- Will of the Dawn
- Faster movement speed while above 80% and when you fall below 35% you grain a small burst of speed once every 1 min.
- Blessing of An'she
- Your damaging spells have a chance to make your Hammer of Wrath be used with increased damage.
When to use this Spec
Use this build when you need more single target in your Mythic+, this build utilizes Herald of the Sun as your hero talent pick, some dungeons may need more Dot damage or passive spread out cleave compared to Templar burst and close ranged cleave.
Talent Adjustments
Listing all the changes within the Class and Spec tree compared to the default build.
Spec Tree
- Added
- Vanguard's Momentum
- Rush of Light
- Swift Justice
- Empyrean Legacy
- Divine Arbiter
- Divine Arbiter
- Removed
- Burning Crusade
- Searing Light
- Blessed Champion
- Empyrean Power
- Tempest of the Lightbringer
- Light of Justice
Class Tree
- Added
- Empyreal Ward
- Obduracy
- Blessed Calling
- Removed
- Cleanse Toxins
- Blinding Light
- Lightforged Blessing
Hero Talents
For more info visit the Hero Talent section above.
Swapped To Herald of the Sun.
- Gleaming Rays
- Spender deal 5% more damage while any Dawnlight is active.
- Will of the Dawn
- Faster movement speed while above 80% and when you fall below 35% you grain a small burst of speed once every 1 min.
- Blessing of An'she
- Your damaging spells have a chance to make your Hammer of Wrath be used with increased damage.
Rotation
Tier Set
- 2-Set: Your spells and abilities have a chance to activate a Winning Streak! increasing the damage of your Templar's Verdict and Divine Storm by 2%, stacking up to 10 times. Templar's Verdict and Divine Storm have a 12% chance to remove Winning Streak!
- 4-Set: When you lose your Winning Streak! you get the last Holy Power spent back, and for 4 seconds you cannot lose Holy Power and the damage of your Holy Power abilities are increased by 10%.
Single-Target
To read more about Radiant Glory head down to the Deep Dive section!
Opener
Your main goal in your opener should be to get to 3 Holy Power by using Blade of Justice followed up by Divine Toll before starting in your Execution Sentence window. There are also 2 different openers you can play with, if you see that Divine Toll is not ready for your burst window and it's a few seconds behind dont hold your Execution Sentence simply follow the 2nd version below.
The Crusading Strikes trait has an RNG factor that affects when you gain Holy Power. Specifically, Holy Power is gained on the 2nd auto attack, but this can vary due to the RNG factor. During your opener, be aware of this variability. Suppose you don't gain Holy Power as expected. In that case, you may need to use a generator ability to fill in the gaps or skip 1 generator as Crusading Strikes as already gained you the Holy Power that's needed to cast Templar's Verdict in your Execution Sentence window.
Divine Hammer after Execution Sentence Opener.
Delayed Execution Sentence with Divine Hammer Opener.
Blade of Justice Into Divine Toll Opener.
Quick Divine Toll Opener.
Delayed Divine Toll with Judgment as first Opener.
Priority List
This is a general priority you aim to maintain throughout the fight.
- Cast Templar's Verdict (When close to 5 Holy Power, to not mess up your burst windows with overcapped Holy Power).
- Cast Execution Sentence on cooldown.
- Cast Divine Hammer on cooldown.
- Cast Wake of Ashes on cooldown to proc Radiant Glory (with 2 Holy Power).
- Cast Hammer of Light to proc Shake the Heavens.
- Cast Blade of Justice (to keep up Expurgation and Holy Flames).
- Cast Divine Toll on cooldown.
- Cast Hammer of Wrath (During Avenging Wrath or on any target below 20%).
- Cast Judgment (if 3 Holy Power or below).
- Cast Blade of Justice (if 3 Holy Power or below).
To read more about Avenging Wrath head down to the Deep Dive section!
Opener
Your main goal in your opener should be to get to 3 Holy Power by using Blade of Justice followed up by Divine Toll before starting in your Execution Sentence window. There are also 2 different openers you can play with, if you see that Divine Toll is not ready for your burst window and it's a few seconds behind dont hold your Execution Sentence simply follow the 2nd version below.
The Crusading Strikes trait has an RNG factor that affects when you gain Holy Power. Specifically, Holy Power is gained on the 2nd auto attack, but this can vary due to the RNG factor. During your opener, be aware of this variability. If you don't gain Holy Power as expected, you may need to use a generator ability to fill in the gaps or skip 1 generator as Crusading Strikes as already gained you the Holy Power thats needed to cast Templar's Verdict in your Execution Sentence window.
Standard Opener with Divine Hammer
Delayed Execution Sentence with Divine Hammer Opener.
Opener without Divine Hammer
Delayed Divine Toll Opener
Priority List
This is a general priority you aim to maintain throughout the fight.
- Cast Templar's Verdict (When close to 5 Holy Power, to not mess up your burst windows with overcapped Holy Power).
- Cast Execution Sentence on cooldown.
- Cast Divine Hammer on cooldown.
- Cast Avenging Wrath on cooldown.
- Cast Wake of Ashes (on cooldown with 2 Holy Power).
- Cast Hammer of Light to proc Shake the Heavens.
- Cast Blade of Justice (to keep up Expurgation and Holy Flames).
- Cast Divine Toll on cooldown.
- Cast Hammer of Wrath (During Avenging Wrath or on any target below 20%).
- Cast Judgment (if 3 Holy Power or below).
- Cast Blade of Justice (if 3 Holy Power or below).
AoE
To read more about Radiant Glory head down to the Deep Dive section!
Opener
If you are going to overcap on Holy Power by using Divine Toll early in the combo, you can delay it to after your Hammer of Light in some situations.
Early Divine Hammer opener.
Opener without Divine Hammer.
Multitarget / AoE Priority List
- Cast Divine Storm if you’re close to 5 Holy Power.
- Cast Final Reckoning on cooldown.
- Cast Divine Hammer on cooldown.
- Cast Wake of Ashes on cooldown to proc Radiant Glory if you are at <=2 Holy Power.
- Cast Hammer of Light to proc Shake the Heavens.
- Cast Blade of Justice to keep up Expurgation and Holy Flames.
- Cast Divine Toll on cooldown.
- Cast Judgment if you are low on Holy Power or to keep up Sanctification.
- Cast Divine Storm if you have 3 Holy Power.
- Cast Hammer of Wrath on any target below 20%.
To read more about Avenging Wrath head down to the Deep Dive section!
Opener
If you are going to overcap on Holy Power by using Divine Toll early in the combo, you can delay it to after your Hammer of Light in some situations.
Early Divine Hammer opener.
Opener without Divine Hammer.
Multitarget / AoE Priority List
- Cast Divine Storm if you’re close to 5 Holy Power.
- Cast Avenging Wrath on cooldown.
- Cast Final Reckoning on cooldown.
- Cast Divine Hammer on cooldown.
- Cast Wake of Ashes on cooldown if you are at 2 Holy Power.
- Cast Hammer of Light to proc Shake the Heavens.
- Cast Blade of Justice to keep up Expurgation and Holy Flames.
- Cast Divine Toll on cooldown.
- Cast Judgment if you are low on Holy Power or to keep up Sanctification.
- Cast Divine Storm if you have <= 3 Holy Power.
- Cast Hammer of Wrath on any target below 20%.
Deep dive
- When talented into Radiant Glory, you cannot use Avenging Wrath or Crusade directly. Instead, using Wake of Ashes triggers the cooldown you have chosen in your talents for a few seconds. Additionally, there is a small chance that any Holy Power spender can proc your chosen talent for an additional 5 seconds, this extends your Crusade or Avenging Wrath if it procs while the spell is active.
- Never sit on Wake of Ashes since Final Reckoning has a 1-minute cooldown and Execution Sentence has a 30-second cooldown. Delaying Wake of Ashes also delays all of your other cooldowns.
Execution Sentence
- When you have chosen Execution Sentence as your minor cooldown, it is optimal to use Wake of Ashes after Execution Sentence. This is because the gain from getting Avenging Wrath does not affect Execution Sentence, and you want the full uptime on wings during the Execution Sentence window. Try to have 3 Holy Power ready right before Execution Sentence goes off cooldown so you can use it instantly.
With Hero Talent Templar
With Hero Talent Herald of the Sun
Final Reckoning
- The optimal Wake of Ashes usage, when you have chosen Final Reckoning, is to use Wake of Ashes after Final Reckoning. Try to have 3 Holy Power ready right before using Final Reckoning so you can instantly spend your Holy Power.
With Hero Talent Templar
With Hero Talent Herald of the Sun
- Choose this talent when boss fights or dungeons allow you to never miss a cooldown window.
- Never sit on Avenging Wrath for more than a few seconds, as most of your damage comes from combining it with other 1-minute cooldowns. As mentioned earlier, always use Avenging Wrath first unless you are using Execution Sentence, in which case follow the specific strategy explained below.
- Delaying Avenging Wrath also delays your other minor cooldowns.
- When using trinkets, do not hold your Avenging Wrath, as it does not significantly buff the overall damage of trinkets but it does increase their crit chance.
- For trinkets with a 90-second cooldown, use them on cooldown unless you have a trinket that provides a massive mastery or strength buff. In that case, try to align it with Avenging Wrath.
- The main reason to play this talent is if there is a boss where you can utilize your strong 2-minute cooldown burst, or if you have heavy haste with Radiant Glory, which grants you a decent amount of proc wings.
- Optimally you instantly use Templar's Verdict to quickly build up your stacks. Aim to get to 7-10 stacks before using Execution Sentence or Final Reckoning for the most damage. However, be mindful of the fight or dungeon scenario. If holding these cooldowns for later in the Crusade window means losing a full usage overall, it is better to use them early.
Below you can see an explanation of how to delay your Execution Sentence or Final Reckoning in your Crusade window.
Minor Cooldown
To reach your full potential, you must also know how to maximize your minor cooldowns.
- Your plan during Execution Sentence is to fit as many spenders as possible within its duration. It's not strong outside of Avenging Wrath or Crusade due to its short burst window and lack of initial damage.
- Always cast Execution Sentence before Avenging Wrath.
- Use Execution Sentence on cooldown to ensure it aligns with other cooldowns.
- If you are playing Radiant Glory, make sure to use Execution Sentence before Wake of Ashes.
With Hero Talent Templar
With Hero Talent Herald of the Sun
- Your big AoE cooldown Final Reckoning, it's mainly used for AoE or in fights where getting good single target usage out of Execution Sentence is not possible.
- It puts a 12-second debuff on the target, increasing your single-target Holy Power spenders by 30% and other spenders by 15%.
- Optimal usage of Final Reckoning is to combo it with your other 1-minute cooldowns such as Avenging Wrath, since they share the same cooldown.
- If playing Crusade, try to save Final Reckoning for when you are at 7-10 stacks before using it. This provides the most damage overall since Crusade lasts 30 seconds.
- If playing Radiant Glory, refer to the opener/prioritization list above for usage instructions.
The idea around Divine Hammer is for it to proc Empyrean Hammer from Templar hero talent.
Instead of Execution Sentence where you have an 8-second window to burst, here it's more about how good you are at keeping this up. it works very similar to Breath of Sindragosa from Frost Deathknights, the more Holy Power you spend into this the longer it will last and therefore you will generate a lot of Empyrean Hammer and these can even cleave from Wrathful Descent.
You can extend Divine Hammer from using any Holy Power spender, such as Templar's Verdict / Divine Storm and don't forget your hero power from templar Hammer of Light.
Quick opener to show you how to play around Divine Hammer.
General Retribution Mechanics
If you don't respect the basics, you cannot master Retribution Paladin.
Crusading Strikes
- This replaces your auto-attacks and your normal Crusader Strike spell, becoming its own auto-attack that generates 1 Holy Power every 2nd attack. Below there is a WeakAura for tracking this, so you know when it's close to proccing. Always keep an eye on it to avoid going above 5 Holy Power and wasting a full proc.
- During your opener or any cooldowns during a fight, your Holy Power might vary. You could start with 4-5 Holy Power right before Execution Sentence, which means you need to press Templar's Verdict instantly before any other spell. This might make your opener look different, so it's important to understand the priority list to know what to press and when.
Mastery
- Retribution Paladins Mastery: Highlord's Judgment has been reworked for the new expansion. It now makes Judgment not only buff your spenders but also have a chance to proc extra holy damage to your main target. As mastery has been a weak point for a long time, this change is significantly beneficial.
Understanding Mechanics
Rotational min-maxing is just one aspect of mastering a specialization, but there are numerous other key mechanics that influence your performance. Use the following guides to improve them.
Dungeons
← Scroll for more Dungeons →
In any dungeon or boss fight you would prefer to never hold the 30 sec and 1 min cooldowns for more than a few seconds, if holding a few seconds would result in a better lineup overall and not losing a full use in the dungeon then its worth it, always make sure to have at least your 30 sec cooldowns ready for any boss.
Here is a simple 30 sec + 1 min rotation to do.
Here is a simple 30 sec rotation to do, note you wanna get 5 Holy Power before you use Divine Hammer.
Boss Tips
Brew Master Aldryr
- Use small defensives whenever you are targeted by a Throw Cinderbrew.
- Always be close to the boss to have an easier time dodging the Blazing Belch frontal.
- Try to communicate with your group where to go during the Happy Hour intermissions. During this phase everyone is spread out and running around while taking physical damage during the whole phase. Keep an eye on your health and be ready to press a health potion if needed since you can be out of range of your healer at times.
I'pa
- Use a small defensive during the Spouting Stout.
- Use a big defensive whenever you are targeted by a Burning Fermentation and didn't get a dispel.
- If any Brew Drops are coming to close to the boss make sure to Hammer of Justice so the tank can quickly move around it.
Benk Buzzbee
- Use a defensive if you get multiple stacks of Shredding Sting.
- Always help with destroying the barrels from Snack Time by riding the defeated Ravenous Cinderbees. It is very easy to get overwhelmed by them if the mechanic is not respected properly.
Goldie Baronbottom
- Use a defensive whenever you get more than 1 stack of Cindering Wounds.
- Rotate defensives during each Let It Hail! cast.
- Can alternate Divine Protection and [Shield of Vengeance for each cast.
- Be careful with your positioning whenever it is time for a Cash Cannon frontal. Don't be too far from the boss while being behind the tank since the frontal is always fixated on the tank.
Trash Tips
- Important abilities to interrupt in this dungeon are:
- Boiling Flames from Venture Co. Pyromaniac.
- Free Samples? from Taste Tester.
- Rejuvenating Honey from Flavor Scientist.
- Ask a mage to use Spellsteal if the cast goes through or ask a shaman to Purge it.
- Bee-stial Wrath from Bee Wrangler.
- Honey Volley from Royal Jelly Purveyor.
- Pay extra attention to these casts:
- Throw Chair from Hired Muscle.
- Inflicts physical damage to a random player. Make sure you are always full health whenever getting targeted by this spell. Always be ready to press a strong defensive.
- Failed Batch from Flavor Scientist.
- Summons a Failed Batch that starts a 10 second cast which will inflict AoE fire damage to all players upon succeeding. Focus it immediately because letting it go through may easily lead to a wipe.
- Swarming Surprise from Venture Co. Honey Harvester.
- An AoE cast that ramps in damage done per cast.
- Throw Chair from Hired Muscle.
- Dangerous debuffs to be wary of:
- Erupting Inferno from Venture Co. Pyromaniac.
- Applies a Magic debuff to a random player, inflicting heavy fire damage. Be careful if you are not dispelled and use a defensive.
- Shredding Sting from Worker Bee.
- A stacking Bleed that is applied to random players. Use a defensive or Blessing of Protection if you get multiple of those stacks.
- Erupting Inferno from Venture Co. Pyromaniac.
Pre Dungeon Start
- As a Retribution Paladin its only worth to pre use Tempered Potion.
In any dungeon or boss fight you would prefer to never hold the 30 sec and 1 min cooldowns for more than a few seconds, if holding a few seconds would result in a better lineup overall and not losing a full use in the dungeon then its worth it, always make sure to have at least your 30 sec cooldowns ready for any boss.
Here is a simple 30 sec + 1 min rotation to do.
Here is a simple 30 sec rotation to do, note you wanna get 5 Holy Power before you use Divine Hammer.
Boss Tips
Ol' Waxbeard
- Aim Reckless Charge to the nearby walls or pillars.
- Don't tank too many stacks of Crude Weapons from Menial Laborers, especially if you are debuffed by a Luring Candleflame. Kite them if needed.
- Always instantly swap to a dynamite laden cart whenever Underhanded Track-tics happens.
Blazikon
- Use a defensive every time Enkindling Inferno happens.
- Light as many candles as you can with Wicklighter Barrage debuff.
- As a paladin make sure to use Divine Steed to help your team with candles if you find yourself in a low movement group.
The Candle King
- Always be ready to kick Paranoid Mind as it is casted very often.
- Use a defensive whenever you are targeted by a Throw Darkflame.
The Darkness
- Help out with filling up Candlelight if your healer is struggling with it.
- Use a defensive for Eternal Darkness.
- Use a defensive whenever you are targeted with a Shadowblast.
Trash Tips
- Important abilities to interrupt in this dungeon are:
- Wicklighter Bolt from Royal Wicklighter.
- Mole Frenzy from Lowly Moleherd.
- Explosive Flame from Blazing Fiend.
- Flaming Tether from Sootsnout.
- Drain Light from Shuffling Horror.
- Pay extra attention to these casts:
- Throw Rock from Lowly Moleherd.
- Pay attention to your health whenever you are spam targeted by this spell, especially if Lowly Moleherd is Panicked!.
- Throw Rock from Lowly Moleherd.
- Dangerous debuffs to be wary of:
- Flashpoint from Royal Wicklighter.
- Applies a Magic debuff to a random player, inflicting heavy fire damage. Be careful if you are not dispelled and use a defensive.
- Explosive Flame from Blazing Fiend.
- Be careful if you get too many stacks of this debuff and press a defensive if the cast goes through multiple times.
- Flashpoint from Royal Wicklighter.
Pre Dungeon Start
- As a Retribution Paladin its only worth to pre use Tempered Potion.
In any dungeon or boss fight you would prefer to never hold the 30 sec and 1 min cooldowns for more than a few seconds, if holding a few seconds would result in a better lineup overall and not losing a full use in the dungeon then its worth it, always make sure to have at least your 30 sec cooldowns ready for any boss.
Here is a simple 30 sec + 1 min rotation to do.
Here is a simple 30 sec rotation to do, note you wanna get 5 Holy Power before you use Divine Hammer.
Boss Tips
Tussle Tonks
- Don't be too far from the boss to have an easier time aiming Maximum Thrust to the close wall and not baiting Foe Flipper too far away from the other boss.
- B.4.T.T.L.3. Mine are baited by range players.
- Use defensives during Ground Pounds.
K.U.-J.0.
- Air Drops are baited on players so be careful of not placing two of them too close to each other.
- Spread out with Explosive Leap and use a defensive each time it happens. Leap goes first on the furthest target.
- Use a defensive whenever Blazing Chomp is being dispelled.
Machinist's Garden
- Swap to the Inconspicuous Plant whenever it spawns.
- If you find yourself behind the group or hit by a laser quickly cast Divine Shield to immune the damage and catch back up with the boss.
King Mechagon
- Use a defensive whenever you are targeted by a Mega-Zap.
- As a melee try to be up close to the boss in phase 2 and be either left or right and let the ranged beam go more in the middle of the room.
Trash Tips
- Important abilities to interrupt in this dungeon are:
- Detonate from Bomb Tonk.
- Giga-Wallop from Mechagon Tinkerer.
- Tune Up from Mechagon Mechanic.
- Pay extra attention to these casts:
- Mega Drill from Waste Processing Unit.
- Inflicts nature damage to all players. Stack up with the group and use defensives.
- Short Out from Defense Bot Mk III.
- Short channeled cast that inflicts nature damage to all players. Use a defensive whenever it happens.
- Mega Drill from Waste Processing Unit.
- Dangerous debuffs to be wary of:
- Fiery Jaws from Junkyard D.0.G.
- Applies a Magic debuff to a random player, inflicting heavy fire damage. Be careful if you are not dispelled and use a defensive.
- Arcing Zap from Defense Bot Mk I and Defense Bot Mk III.
- Applies a Magic debuff to a random player, inflicting nature damage. Be careful if you are not dispelled and use a defensive.
- Fiery Jaws from Junkyard D.0.G.
Pre Dungeon Start
- As a Retribution Paladin its only worth to pre use Tempered Potion.
In any dungeon or boss fight you would prefer to never hold the 30 sec and 1 min cooldowns for more than a few seconds, if holding a few seconds would result in a better lineup overall and not losing a full use in the dungeon then its worth it, always make sure to have at least your 30 sec cooldowns ready for any boss.
Here is a simple 30 sec + 1 min rotation to do.
Here is a simple 30 sec rotation to do, note you wanna get 5 Holy Power before you use Divine Hammer.
Boss Tips
Big M.O.M.M.A.
- Care for Sonic Boom.
- Always be ready to kick Maximum Distortion.
- Don't forget that increased damage phase comes right after you kill all the Darkfuse Mechadrones, so plan you offensive cooldowns accordingly.
- Use a big defensive during the Kill-o-Block Barrier if you are slow with killing all the Darkfuse Mechadrones.
Demolition Duo
- Use defensive whenever you are targeted by a Kinetic Explosive Gel.
- Aim Barreling Charge to the far bombs first because last charge always happens on a tank, which he can use to clear all the melee bombs.
- As a melee you 100% will have to lose uptime here to deal with the charges or Gel debuff.
Swampface
- Use a defensive during the Awaken the Swamp casts.
Geezle Gigazap
- Try to stack up for healing during the Turbo Charge cast or use a defensive if you are far away.
- Try to "claim" far and awkward Dam Water pools as a Mage, since it is easy for you to deal with Leaping Sparks with your mobility.
- Use a defensive if you are targeted with a Gigazap.
Trash Tips
- Important abilities to interrupt in this dungeon are:
- Trickshot from Mechadrone Sniper.
- Surveying Beam from Venture Co. Surveyor.
- Bloodthirsty Cackle from Darkfuse Hyena.
- Blood Blast from Darkfuse Bloodwarper.
- Restorative Algae from Disturbed Kelp.
- Harpoon from Venture Co. Diver.
- Lightning Bolt from Venture Co. Electrician.
- Pay extra attention to these casts:
- Wind Up from Loaderbot.
- Fixates a random player, inflicting physical damage to players within 3.5 yards for 6 seconds. Don't be in melee or close to the mob whenever it happens.
- Shreddation from Shreddinator 3000.
- Summons several spinning sawblades at the location of every player, inflicting physical damage every 0.3 seconds to players within the effect. This damage increases with consecutive hits. Damage can be fully avoided by prerunning out of it before the cast finishes.
- Wind Up from Loaderbot.
- Dangerous debuffs to be wary of:
- Overcharge from Venture Co. Electrician.
- Applies a Magic debuff to a random player, inflicting nature damage and stuns if the effect persists without being dispelled.
- Overcharge from Venture Co. Electrician.
Pre Dungeon Start
- As a Retribution Paladin its only worth to pre use Tempered Potion.
In any dungeon or boss fight you would prefer to never hold the 30 sec and 1 min cooldowns for more than a few seconds, if holding a few seconds would result in a better lineup overall and not losing a full use in the dungeon then its worth it, always make sure to have at least your 30 sec cooldowns ready for any boss.
Here is a simple 30 sec + 1 min rotation to do.
Here is a simple 30 sec rotation to do, note you wanna get 5 Holy Power before you use Divine Hammer.
Boss Tips
Captain Dailcry
- Always be ready to kick Battle Cry.
Baron Braunpyke
- Always be ready to kick Burning Light.
- Use a defensive during Sacrificial Pyre soaks.
Prioress Murrpray
- Use a defensive whenever Blinding Light happens.
- During phase 2, run all together on one side to stack incoming Arathi Neophytes. Remember that your goal is to just let them rot down from Overwhelming Power. Run away from them and help with crowd controls and slows if needed.
- A very good time to use Divine Shield as the damage intake is quite strong and the adds can hit you.
Trash Tips
- Important abilities to interrupt in this dungeon are:
- Boiling Flames from Venture Co. Pyromaniac.
- Holy Smite from High Priest Aemya.
- Cinderblast from Taener Duelmal.
- Fireball from Taener Duelmal.
- Holy Smite from Devout Priest.
- Greater Heal from Devout Priest.
- Fireball from Fanatical Conjuror.
- Flamestrike from Fanatical Conjuror.
- Fireball Volley from Risen Mage.
- Fireball from Risen Mage.
- Pay extra attention to these casts:
- Defend from Arathi Footman.
- A channeled cast that reduces damage taken by any ally around the caster by 50% for up to 5 seconds. Stop it with any crowd control immediately.
- Pot Shot from Fervent Sharpshooter.
- Inflicts physical damage to a random player. Use a defensive if you are targeted by multiple of those.
- Disrupting Shout from Arathi Knight.
- Inflicts physical damage to all players within 40 yards and interrupts spell casting for 4 seconds.
- Holy Radiance from Elaena Emberlanz.
- Inflicts holy damage to all players for 8 seconds.
- Lunging Strike from Sergeant Shaynemail.
- Leaps at a random player, inflicting physical damage and applying a Bleed.
- You can immune it with Blessing of Protection.
- Leaps at a random player, inflicting physical damage and applying a Bleed.
- Purification from Lightspawn.
- Channeled cast that fixates on a random player and inflicts holy damage every second for 6 seconds.
- Defend from Arathi Footman.
- Dangerous debuffs to be wary of:
- Pounce from War Lynx.
- A Bleed effect inflicting physical damage for 14 seconds or until fully healed.
- Look for an Alter Time. Preusing it at full health would make it very easy to remove with healing. Can be also dodged with a Shimmer.
- A Bleed effect inflicting physical damage for 14 seconds or until fully healed.
- Impale from Arathi Knight.
- A Bleed that is applied to a random player.
- Heat Wave from Forge Master Damian.
- A Magic slow debuff for 4 seconds. In combination with Molten Pools can be very deadly.
- You can immune the slow with Blessing of Freedom.
- A Magic slow debuff for 4 seconds. In combination with Molten Pools can be very deadly.
- Pounce from War Lynx.
- Useful purges:
- Templar's Wrath from Zealous Templar.
- Magic buff increasing all damage done by 30%.
- Can be purged with a Spellsteal from a mage.
- Magic buff increasing all damage done by 30%.
- Templar's Wrath from Zealous Templar.
Pre Dungeon Start
- As a Retribution Paladin its only worth to pre use Tempered Potion.
In any dungeon or boss fight you would prefer to never hold the 30 sec and 1 min cooldowns for more than a few seconds, if holding a few seconds would result in a better lineup overall and not losing a full use in the dungeon then its worth it, always make sure to have at least your 30 sec cooldowns ready for any boss.
Here is a simple 30 sec + 1 min rotation to do.
Here is a simple 30 sec rotation to do, note you wanna get 5 Holy Power before you use Divine Hammer.
Boss Tips
Kyrioss
- Take an extra step to dodge the beams during the Lightning Torrent phase because their hitbox is bigger than their visuals.
- Use a defensive during Crashing Thunder.
- Be either very spread or stacked during the Wild Lightning to not bait them bad and put someone in an awkward situation.
Stormguard Gorren
- Use a defensive whenever you get Chaotic Corruption.
Voidstone Monstrosity
- Use a defensive if you get Unleash Corruption and not getting dispelled.
- Always remember that once you break the Void Shell absorb shield, the increased damage phase comes right after, so plan your offensive cooldowns accordingly.
Trash Tips
- Important abilities to interrupt in this dungeon are:
- Lightning Bolt from Cursed Thunderer.
- Lightning Surge from Cursed Rooktender.
- Void Bolt from Corrupted Oracle.
- Void Bolt from Void Ascendant.
- Pay extra attention to these casts:
- Bounding Void from Quartermaster Koratite.
- Targets a random player and launches void infused orbs towards him that travels out and returns back to the caster.
- Attracting Shadows from Coalescing Void Diffuser.
- Pulls in all players inflicting shadow damage every second and additionally inflicts even more damage to players within 7 yards of the center of the pull in effect at the end of the cast.
- Bounding Void from Quartermaster Koratite.
Pre Dungeon Start
- As a Retribution Paladin its only worth to pre use Tempered Potion.
In any dungeon or boss fight you would prefer to never hold the 30 sec and 1 min cooldowns for more than a few seconds, if holding a few seconds would result in a better lineup overall and not losing a full use in the dungeon then its worth it, always make sure to have at least your 30 sec cooldowns ready for any boss.
Here is a simple 30 sec + 1 min rotation to do.
Here is a simple 30 sec rotation to do, note you wanna get 5 Holy Power before you use Divine Hammer.
Boss Tips
Coin-Operated Crowd Pummeler
- Use a defensive whenever Static Pulse happens.
- Be close to the boss to have an easier time dodging Shocking Claw frontal.
Azerokk
- Use a defensive whenever Resonant Quake happens.
- Swap to Earthragers whenever they are Azerite Infused.
- Be close to the boss if possible to have an easier time dodging Tectonic Smash frontal.
Rixxa Fluxflame
- Use a defensive if you are targeted with the Propellant Blast.
Mogul Razdunk
- Be close to the boss whenever it's time for a Gatling Gun because it is almost impossible to outrun if you are far away from the boss.
- Be always ready to run away with a Homing Missile if you are targeted, to not hit the rest of the group.
Trash Tips
- Important abilities to interrupt in this dungeon are:
- Toxic Blades from Hired Assassin.
- Iced Spritzer from Refreshment Vendor.
- Rock Lance from Venture Co. Earthshaper.
- Furious Quake from Stonefury.
- Tectonic Barrier from Stonefury.
- Transmute: Enemy to Goo from Venture Co. Alchemist.
- Pay extra attention to these casts:
- Uppercut from Addled Thug.
- Charges to a random player, inflicting physical damage and knocking all players withing 4 yards of impact into the air.
- Activate Mech from Mech Jockey.
- Activates a nearby Mechanized Peacekeeper.
- Stop it using any crowd control available.
- Activates a nearby Mechanized Peacekeeper.
- Fan of Knives from Hired Assassin.
- Channeled cast that inflicts physical damage to anyone within 45 yards. Extremely dangerous if Toxic Blades cast went through.
- Stop it using any crowd control available.
- Channeled cast that inflicts physical damage to anyone within 45 yards. Extremely dangerous if Toxic Blades cast went through.
- Rapid Extraction from Azerite Extractor.
- Inflicts physical damage to all players and spawns ground effects at nearby location.
- Mind Lash from Venture Co. Mastermind.
- Targets a random player and channels at him, inflicting arcane damage every second over 4 seconds.
- Uppercut from Addled Thug.
- Dangerous debuffs to be wary of:
- Seek and Destroy from Crawler Mine.
- Crawler Mine crawls towards a player and detonates when nearby, inflicting fire damage on impact and every 2 seconds for 6 seconds.
- Caustic Compound from Venture Co. Alchemist.
- A Poison effect, inflicting nature damage for 6 seconds.
- Seek and Destroy from Crawler Mine.
Pre Dungeon Start
- As a Retribution Paladin its only worth to pre use Tempered Potion.
In any dungeon or boss fight you would prefer to never hold the 30 sec and 1 min cooldowns for more than a few seconds, if holding a few seconds would result in a better lineup overall and not losing a full use in the dungeon then its worth it, always make sure to have at least your 30 sec cooldowns ready for any boss.
Here is a simple 30 sec + 1 min rotation to do.
Here is a simple 30 sec rotation to do, note you wanna get 5 Holy Power before you use Divine Hammer.
Boss Tips
Wake of Ashes is VERY powerful in this dungeon as it stuns undead / demons for 5 seconds, so hover over what you currently are fighting to see if you will stun them.
An Affront of Challengers
- Always be close to the boss to have an easier time dodging a Decaying Breath frontal.
- Use a defensive whenever Searing Death or Mighty Smash happens.
- Use a defensive if you are afflicted with a Withering Touch and not getting dispelled.
Xav the Unfallen
- Stacks from the Oppressive Banner slow can be refreshed with an Ice Barrier due to Energized Barriers talent.
Kul'tharok
- Use a defensive whenever you are afflicted with a Well of Darkness.
- Group up with your teammates for a Draw Soul and press a defensive for the initial hit.
- Always be ready to interrupt a Necrotic Bolt.
Gorechop
- Meat Hooks can be immune with Divine Shield or Blessing of Protection.
- Be close to the boss to avoid being gripped by a Tenderizing Smash whenever it happens.
Mordretha, the Endless Empress
- Use a defensive whenever Manifest Death or Echoes of Carnage happens.
- Be close to the boss to have an easier time dodging Dark Devastation.
- Dark Devastation is baited at players so if you feel like it, you can bait it away from the group to reduce the risk of someone dying to it. Can be very helpful during phase 2.
Trash Tips
- Important abilities to interrupt in this dungeon are:
- Necrotic Bolt from Battlefield Ritualist.
- Unholy Fervor from Battlefield Ritualist.
- A mage can Spellsteal if it goes through.
- Demoralizing Shout from Ancient Captain.
- Necrotic Bolt Volley from Maniacal Soulbinder.
- Necrotic Bolt from Maniacal Soulbinder.
- Bone Spear from Bone Magus.
- Bind Soul from Shackled Soul.
- Withering Discharge from Blighted Sludge-Spewer.
- Decaying Filth from Blighted Sludge-Spewer.
- Pay extra attention to these casts:
- Raging Tantrum from Raging Bloodhorn.
- Raging Bloodhorn goes into a Raging Tantrum inflicting physical damage to all enemies every 2 seconds.
- Interrupting Roar from Nekthara the Mangler and Heavin the Breaker.
- Interrupts spell casting and inflicts physical damage to all players.
- Ricocheting Blade from Harugia the Bloodthirsty and Advent Nevermore.
- Inflicts physical damage to a random target and applies a Bleed. Can be avoided by going line-of-sight, or simply using Blessing of Protection to immune the Bleed.
- Soulstorm from Portal Guardian.
- Inflicts shadow damage to all players every 2 seconds for 8 seconds.
- Death Winds from Nefarious Darkspeaker.
- A frontal tornado that inflicts shadow damage and knocks any player caught in the path.
- Raging Tantrum from Raging Bloodhorn.
- Dangerous debuffs to be wary of:
- Jagged Quarrel from Shambling Arbalest.
- Inflicts physical damage to a random target and applies a Bleed.
- You can use Blessing of Protection to immune the Bleed.
- Shadow Vulnerability from Portal Guardian.
- A Curse inflicting shadow damage and increasing shadow damage taken by 30%.
- Curse of Desolation from Nefarious Darkspeaker.
- A Curse that spawns pools on the ground every 3 seconds under the afflicted player, inflicting damage to players within 3 yards of the impact and fearing them for a second.
- Jagged Quarrel from Shambling Arbalest.
Pre Dungeon Start
- As a Retribution Paladin its only worth to pre use Tempered Potion.
Affixes
The Affix system got revamped going into The War Within Season 1 retiring most Affixes as well as introducing new kiss-curse ones while also changing on which key level these appear.
- +4 Affixes -- Rotates on a weekly basis
- Xal'atath's Bargain: Ascendant
- Xal'atath's Bargain: Voidbound
- Xal'atath's Bargain: Oblivion
- Xal'atath's Bargain: Devour
- Xal'atath's Bargain: Pulsar
- +7 Affixes -- Alternates between each other on a weekly basis
- Tyrannical
- Fortified
- +10 Affixes -- Alternates between each other on a weekly basis, is always the opposite of the +7 Affix
- Tyrannical
- Fortified
- +12 Affix
- Xal'atath's Guile -- Replaces the +4 Affix
Following you get some useful tips for handling different Mythic+ Affixes as a Retribution Paladin.
- Xal'atath's Bargain: Ascendant
- Use Hammer of Justice, Rebuke and Blinding Light to clear the sparks and get the big haste buff.
- Xal'atath's Bargain: Voidbound
- Use Execution Sentence on the Void Emissary while you cleave from it.
- Xal'atath's Bargain: Oblivion
- Watch behind you and collect any orbs flying into the melee, intercept them before they hit any enemies.
- Divine Steed is very useful here.
- Watch behind you and collect any orbs flying into the melee, intercept them before they hit any enemies.
- Xal'atath's Bargain: Devour
- This is a healing absorb so quickly heal yourself up with either Word of Glory or Lay on Hands if needed.
- If you're playing Templar you can time a good Wake of Ashes as the trait Sacrosanct Crusade heals you.
- This is a healing absorb so quickly heal yourself up with either Word of Glory or Lay on Hands if needed.
Stat Priority
Understand your secondary stat priority and the tertiary stats needed for optimal performance during Mythic+ dungeons as a Retribution Paladin. For more detailed information, visit the Stats and Attributes guide.
Higher Item level items are better in most scenarios. For an accurate representation of what item to equip you should use Simcraft! A static "Stat Priority" is just a starting point and can easily shift depending on your individual gear.
All secondary stats are affected by diminishing returns. Click here to learn more!
Tertiary
- Avoidance - Great stat to reduce the damage intake of "Area of Effect" abilities.
- Leech - Provides additional healing through damage dealing.
- Speed - Niche tertiary that can be very useful and has been proven useful in the past. Makes playing certain mechanics a lot easier.
Gear
| Slot | Item | Location |
|---|---|---|
| Head | Aureate Sentry's Pledge | Tier Slot |
| Neck | Gobfather's Gifted Bling | Mug'Zee |
| Shoulder | Aureate Sentry's Roaring Will | Tier Slot |
| Cloak | Test Pilot's Go-Pack | Sprocketmonger |
| Chest | Aureate Sentry's Encasement | Tier Slot |
| Wrist | Test Subject's Clasps | Sprocketmonger |
| Gloves | Aureate Sentry's Gauntlets | Tier Slot |
| Belt | Coin-Operated Girdle | One-Armed Bandit |
| Legs | Aureate Sentry's Legguards | Tier Slot |
| Boots | Rik's Walkin' Boots | Rik Reverb |
| Ring 1 | The Jastor Diamond | King Gallywix |
| Ring 2 | Miniature Roulette Wheel | One-Armed Bandit |
| Trinket 1 | Eye of Kezan | King Gallywix |
| Trinket 2 | House of Cards | One-Armed Bandit |
| Weapon | Best-in-Slots | One-Armed Bandit |
Below you are presented with a good list of farmable alternatives that are obtainable outside of WoW’s weekly lockout system. While replaced in time as you progress, these offer immediate character power.
| Slot | Item | Location |
|---|---|---|
| Head | Aureate Sentry's Pledge | Tier Slot |
| Neck | Strapped Rescue-Keg | Cinderbrew Meadery |
| Shoulder | Aureate Sentry's Roaring Will | Tier Slot |
| Cloak | Chef Chewie's Towel | Cinderbrew Meadery |
| Chest | Aureate Sentry's Encasement | Tier Slot |
| Wrist | Stonefury Vambraces | The Motherload |
| Gloves | Aureate Sentry's Gauntlets | Tier Slot |
| Belt | Automatic Waist Tightener | Mechagon |
| Legs | Aureate Sentry's Legguards | Tier Slot |
| Boots | Hops-Laden Greatboots | Cinderbrew Meadery |
| Ring 1 | 85-Year Tenure Ring | Cinderbrew Meadery |
| Ring 2 | Fleshfused Circle | Theater Of Pain |
| Trinket 1 | Signet of the Priory | Priory Of the Scared Flame |
| Trinket 2 | Improvised Seaforium Pacemaker | Floodgate |
| Weapon | Crashing Thunderhammer | The Rookery |
Trinkets
Below you can find active and passive alternatives to our recommended trinkets. Do note that some trinkets are better than others depending on the mythic+ dungeon.
Active Trinket alternatives
- House of Cards
- Very strong on use Mastery trinket, sadly this will never line up with you're 1 min cooldowns other then the opener, but as most of your damage comes from the 30 seconds cooldowns it will not matter much.
- Signet of the Priory
- The only downside to this trinket is the fact it has a 2 min cooldown compared to the other use trinkets. This could be useful on some fights that have damage phases every 2 min or you would prefer to have your 1min cooldowns empowerd during the 3rd use.
Passive Trinket alternatives
- Eye of Kezan
- A very powerful passive trinket but has a decently long stack up time.
- Improvised Seaforium Pacemaker
- overall good trinket
These are currently the best overall trinkets you should aim for there are other trinkets that would not be bad but I would suggest a sim on those trinkets if you end up in that situation.
Embellishments
- Darkmoon Sigil: Ascension
- On your crafted 2h weapon.
- Writhing Armor Banding
- The optimal slots to craft on are Wrists, Boots, Waist, or Cloak depending on your available gear.
or
- 2x Dawnthread Lining
- Gain a small amount of Critical Strike while above 80% Health.
- It is a good choice if you have over 80% health most of the time and during your cooldowns.
- The optimal slots to craft on are Wrists, Boots, Waist, or Cloak depending on your available gear.
Remaining Sparks
- Crafted items are 681 item level and regular items are 684 on max item level, therefore, it's not beneficial to equip crafted items outside of your 2x embellishments unless you don't have access to other high item level gear on that slot.
Simcraft
To find the best combination of gear available to you or identify the best possible upgrades, visit our Simcraft guide to learn how to utilize Simcraft easily and effectively.
Consumables
- Phials
- Flask of Alchemical Chaos -- maximum DPS with an rng element.
- Food
- Feast of the Midnight Masquerade
- Combat Potion
- Tempered Potion
- Health Potion
- Algari Healing Potion -- a big burst of healing.
- Weapon Oil
- Algari Mana Oil
- Augment Rune
- Crystallized Augment Rune
- Sockets
- Deadly Onyx
- Culminating Blasphemite -- Unique, use one of each gem color to enhance your Culminating Blasphemite.
- Masterful Emerald
- Masterful Ruby
- Masterful Sapphire
Enchantments
| Head | S.A.D. |
| Neck | Magnificent Jeweler's Setting 2x |
| Cloak | Enchant Cloak - Chant of Winged Grace |
| Chest | Enchant Chest - Crystalline Radiance |
| Wrist | Enchant Bracer - Chant of Armored Avoidance S.A.D. |
| Waist | S.A.D. |
| Legs | Stormbound Armor Kit |
| Boots | Enchant Boots - Scout's March |
| Ring 1 | Enchant Ring - Radiant Mastery Magnificent Jeweler's Setting 2x |
| Ring 2 | Enchant Ring - Radiant Mastery Magnificent Jeweler's Setting 2x |
| Weapon | Enchant Weapon - Authority of the Depths Or Enchant Weapon - Authority of Radiant Power |
You buy Nerubian Gemweaver from the Great Vault Vendor to add sockets to your Helm, Wrists & Waist.
Races
For min-maxing a Retribution Paladin in Mythic+, different racial traits can provide a tremendous benefit to your character. If this is not your top goal, picking a race that fits your style or transmog works just as well since the DPS gain is not as massive as people make it out to be.
- Stoneform -- Dwarf
- Can dispel Magic and Bleed debuffs. Has been useful in the past on some bosses with Bleeds.
- War Stomp -- Tauren
- An AoE stun is beneficial since paladins currently lack one. Additionally, Endurance is very useful when doing high-level content.
- Fireblood -- Dark Iron Dwarf
- It can remove almost any debuff for a small damage buff.
- Arcane Torrent -- Blood Elf
- Removes 1 buff from a target around you.
- Embrace of Pa'ku -- Zandalari Troll
- Provides a small crit buff with an RNG proc rate. A great benefit of being Zandalari is that you can combo Regeneratin' and Divine Shield to heal yourself fully.
- Will to Survive -- Human
- Removes any stun effect on you, similar to a PvP trinket. The Human Spirit is the main reason to play as a human.
- Gift of the Naaru -- Draenei
- No particularly useful racial except for Heroic Presence.
- Light's Judgment -- Lightforged Draenei
- More of a just-for-fun racial, but don't forget Light's Reckoning – it explodes for a small amount of damage when you die!
Recommendation
In general, it's safe to say that if you care about min-maxing your DPS you should go with the highest DPS racial. That being said the story is a bit different if it's about pushing endgame Raid or Mythic+ progression. Some help out massively to speed up the progression of certain bosses in dungeons or raids. Notably Dwarf with their Stoneform helped out on Tindral Sageswift & Fyrakk the Blazing in the latest Race to World First by having easy access to dispelling yourself at crucial points of the fights mentioned.
Macros
Discover recommended macros for Retribution Paladins during Mythic+ dungeons and watch a quick video guide on creating simple macros for your character.
Cast Final Reckoning on your cursor.
#showtooltip Final Reckoning
/cast [@cursor] Final Reckoning
Cast Rebuke on your Focus without targeting it.
#showtooltip Rebuke
/cast [@focus] Rebuke
Cast Hammer of Justice on your Focus without ever targeting it.
#showtooltip Hammer of Justice
/cast [@focus] Hammer of JusticeFor all of these Marcos If you hold down Right click on your mouse this is cast on you instead of your mouseover.
Moseover for Flash of Light
#showtooltip flash of light
/cast [@mouseover,exists,help] Flash of Light [@player] Flash of Light
Moseover for Word of Glory
#showtooltip Word of Glory
/cast [@mouseover,exists,help] Word of Glory [@player] Word of Glory
Moseover for Lay on Hands
#showtooltip Lay on Hands
/cast [@mouseover,exists,help] Lay on Hands [@player] Lay on Hands
Moseover forUnbound Freedom
#showtooltip Blessing of Freedom
/cast [@mouseover,exists,help] Blessing of Freedom [@player] Blessing of Freedom
Moseover for Blessing of Sacrifice
#showtooltip Blessing of sacrifice
/cast [@mouseover,exists,help] Blessing of sacrifice; Blessing of sacrifice
Moseover for Blessing of Protection
#showtooltip Blessing of Protection
/cast [@mouseover,exists,help] Blessing of Protection [@player] Blessing of Protection
Moseover for Cleanse Toxins
#showtooltip Cleanse Toxins
/cast [@mouseover,exists,help] Cleanse Toxins [@player] Cleanse ToxinsThese Marcos cast their spells on top of your player no matter where your mouse is.
Casts Final Reckoning on top of your player
#showtooltip Final Reckoning
/cast [@player] Final ReckoningMarco to use a trinket into Avenging Wrath
#showtooltip Avenging wrath
#show Avenging wrath
/cast Avenging wrath
/use Ashes of the Embersoul
/use 14
Addons
Below, you see a screenshot of the author's User Interface for their Retribution Paladin, outlining which addons are used and how they are utilized in Mythic+ dungeons to make your life easier.
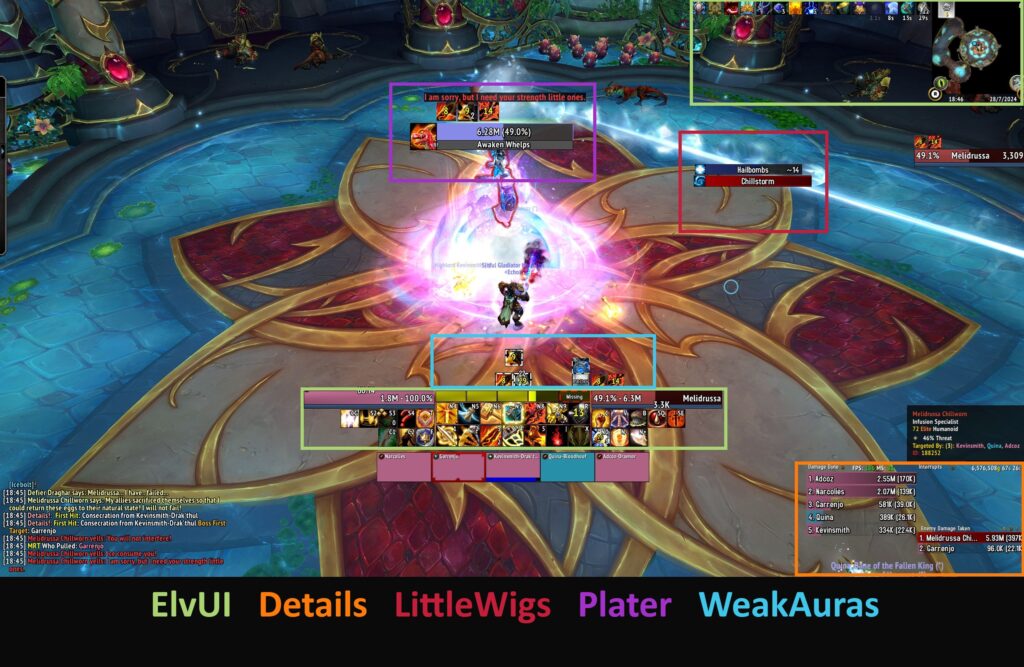
- ElvUI -- Full User Interface replacement
- A user interface designed around user-friendliness with extra features that are not included in the standard UI.
- Alternatively, you can also use Shadowed Unit Frames (SUF) and an action bar addon of your choice or of course the stock UI.
- LittleWigs -- Generic Boss Mod
- BigWigs is a boss encounter add-on. It consists of many individual encounter scripts, or boss modules; mini add-ons that are designed to trigger alert messages, timer bars, sounds, and so forth, for one specific Mythic+ encounter.
- WeakAuras -- Jack of all trades
- WeakAuras is a powerful and flexible framework that allows the display of highly customizable graphics on World of Warcraft's user interface to indicate buffs, debuffs, and other relevant information. This addon was created to be a lightweight replacement for Power Auras but has since introduced more functionalities while remaining efficient and easy to use.
- Plater -- Advanced Nameplates
- Plater is a nameplate addon with an extraordinary amount of settings, out of the box debuff tracking, threat coloring, and support for scripting similar to WeakAuras and wago.io + the WeakAuras-Companion for Mod/Script/Profile updates.
- Details -- In-depth Damage Meter
- Most powerful, reliable, handsome, damage meter.
- OmniCD -- Party track addon
- Helpful addon for Mythic+ to check the available cooldowns of your party.
Holy power Bar
id=404542]Crusading Strikes[/wow-spell] into the Holy Power bar.
Changes this Patch
- Retribution
- Damage increased by 6%.
- Shield of the Righteous damage increased by 20%.
- Word of Glory healing increased by 10%.
- Developer's note: We’re moving some power back into Word of Glory and Shield of the Righteous baseline with the removal of the Strength of Conviction talent.
- Developers’ note
- New Talent: Holy Ritual – Allies are healed when you cast a Blessing spell on them and healed again when the blessing ends.
- New Talent: Worthy Sacrifice – You automatically cast Blessing of Sacrifice onto allies within 40 yards when they receive damage while below 35% health and you are not in a loss of control effect. This effect activates 100% of Blessing of Sacrifice's cooldown.
- New Talent: Steed of Liberty – Divine Steed also grants Blessing of Freedom for 3 seconds.
- New Talent: Eye for an Eye – Melee and ranged attackers receive Holy damage each time they strike you during Ardent Defender or Divine Protection and Divine Shield.
- New Talent: Stoicism – The duration of stun effects on you is reduced by 20%. 10% in PvP combat.
- New Talent: Wrench Evil – Turn Evil's cast time is reduced by 100%.
- New Talent: Stand Against Evil – Turn Evil now affects 5 additional nearby enemies.
- New Talent: Righteous Protection – Blessing of Sacrifice now removes and prevents all Poison and Disease effects.
- New Talent: Light's Countenance – The cooldowns of Repentance and Blinding Light are reduced by 15 seconds.
- New Talent: Sacred Strength – Holy Power spending abilities are 2% more effective. Choice node with Divine Purpose.
- New Talent: Divine Spurs – Divine Steed's cooldown is reduced by 20%, but its duration is reduced by 40%.
- New Talent: A Just Reward – After Cleanse successfully removes an effect from an ally, they are healed.
- New Talent: Empyreal Ward – Lay on Hands grants the target 100% increased armor for 30 seconds and now ignores healing reduction effects.
- New Talent: Lightbearer – 10% of all healing done to you from other sources heals up to 4 nearby allies, divided evenly among them.
- New Talent: Selfless Healer – Flash of Light and Holy Light are 30% more effective on your allies and 40% of the healing done also heals you.
- New Talent: Inspired Guard – Ardent Defender and Divine Protection increase healing taken by 15% for their duration.
- New Talent: Holy Reprieve – Your Forbearance's duration is reduced by 10 seconds.
- New Talent: Light's Revocation – Removing harmful effects with Divine Shield heals you for 10% for each effect removed. This heal cannot exceed 30% of your maximum health. Divine Shield may now be cast while Forbearance is active.
- New Talent: Blessed Calling – Allies affected by your Blessings have 15% increased movement speed.
- New Talent: Lead the Charge – Divine Steed reduces the cooldown of 4 nearby ally's major movement ability by 3 seconds. Your movement speed is increased by 3%.
- New Talent: Divine Reach – The radius of your auras is increased by 20 yards.
- Fist of Justice has been redesigned – The cooldown of Hammer of Justice is reduced by 15 seconds.
- Sanctified Wrath has been redesigned – Now increases the duration of Avenging Wrath and causes its respective specialization effect (was able to be its own spell).
- Consecrated Ground is now a class tree talent (was a Protection and Retribution talent).
- Auras of the Resolute now additionally teaches the paladin Crusader Aura.
- Seasoned Warhorse is now a passive learned at level 40.
- Judgment damage increased by 10%.
- Judgment cooldown has been reduced by 1 second.
- Hammer of Justice base cooldown is reduced to 45 seconds (was 60 seconds).
- Avenging Wrath now increases Critical Strike chance by default.
- Unbound Freedom now additionally targets a nearby ally by default if you cast Blessing of Freedom on yourself.
- Lightforged Blessing now heals for 3% of maximum health for all specializations (was 1% for Holy/Protection and 2% for Retribution).
- Of Dusk and Dawn: Blessing of Dawn's effect has been increased by 10% for Protection and Retribution and by 5% for Holy Paladins.
- Fixed an issue that caused Seal of the Crusader to display the incorrect heal value.
- Fixed an issue that caused Faith’s Armor to appear multiple times in the talent tree for Protection Paladins.
- Divine Toll's icon has been updated.
- Many talents have changed locations.
- The following talents are now 1 point:
- Fist of Justice
- Holy Aegis
- The following talents are now 2 points:
- Vengeful Wrath
- Zealot's Paragon
- The following talents have been removed:
- Avenging Wrath: Might
- Crusader Aura
- Fading Light
- Golden Path
- Incandescence
- Seal of Mercy
- Seal of Order
- Seal of the Crusader (Retribution and Protection)
- Seasoned Warhorse (now learned at level 40)
- Strength of Conviction
- Touch of Light
- Developers’ note: New Talent: Holy Flames – Divine Storm deals 10% increased damage and when it hits an enemy affected by your Expurgation, it spreads the effect to up to 4 targets hit. You deal 3% increased Holy damage to targets burning from your Expurgation.
- Crusader Aura talent is no longer granted by default in the Class tree for Retribution.
- Greater Judgment talent is now granted by default in the Class tree for Retribution.
- Consecrated Blade is no longer a talent and now learned at level 11.
- Word of Glory healing increased by 44%.
- Final Verdict damage reduced by 10%.
- Templar's Verdict damage reduced by 10%.
- Justicar's Vengeance damage reduced by 10% and now heals for 3% of maximum health (was 5%).
- Hammer of Wrath damage reduced by 15%.
- Blade of Justice damage reduced by 20%. Does not effect Blade of Vengeance.
- Blade of Vengeance damage increased by 25%.
- Expurgation damage reduced by 10%.
- Divine Storm damage increased by 25%.
- Templar Strike damage reduced by 10%.
- Templar Slash damage reduced by 10%.
- Crusading Strikes damage reduced by 10%.
- Crusader Strike damage reduced by 10%.
- Blessed Champion now deals 25% reduced damage to secondary targets (was 50% reduced damage) and is now a 1-point talent (was 2).
- An issue causing Radiant Glory to not function with fast back to back procs has been resolved.
- The following talents are now 2 points (was 1):Heart of the Crusader
- Zealot’s Fervor
- Vanguard of Justice has been removed.
- Empyrean Legacy moved to where Vanguard of Justice was on the talent tree.
- Holy Flames is now in a choice node with Blade of Vengeance.
- Developers’ note
- Divine Hammer has been redesigned -- Divine Hammers spin around you, striking enemies nearby for Holy damage every 2 seconds for 8 seconds. While active, each Holy Power spent increases the duration of Divine Hammer by 0.5 seconds. Deals reduced damage beyond 8 targets. Costs 3 Holy Power and has a 1 minute cooldown.
- All ability damage increased by 5%.
- Developers' notes: Empyrean Hammer's damage output was higher than desired on the overall breakdown. We're redistributing the power across the rest of the abilities.
- Final Reckoning damage increased by 75%.
- Flash of Light healing increased by 35%.
- Word of Glory’s mana cost has been increased to 15% (was 10%).
- Healing Hands now only functions to increase Word of Glory’s healing on the Paladin themselves (was increased healing on allies).
- Divine Toll will now cast Judgments at units near your main target, even if you're not in combat with them.
- Crusade will now consistently display the correct spell visual when Glyph of Winged Vengeance is being used.
- Herald of the Sun
- Second Sunrise has been updated – Divine Storm and Hammer of Wrath has a 20% chance to cast again at 50% effectiveness (was 15% chance at 30% effectiveness).
- Sun's Avatar damage increased by 50%.
- Templar
- Empyrean Hammer damage reduced by 30%.
- Hammer of Light now benefits from Undisputed Ruling Judgment.
- Hammer of Light now benefits from the stacks it adds to Crusade.
- Developers’ notes: The reimplementation of Hammer of Light inadvertently altered its interactions with Crusade and Judgment. We have now adjusted these interactions to match the current live versions.
- Hammer of Light initial hit now benefits from Final Reckoning.
FAQ
A: If you are setting up for Execution Sentence then yes, if not try to get a Final Verdict out first then use it!
A: You still generate aggro while using these two, so be careful when they drop, as mobs might instantly target you if you keep pumping.
Credits
Written By: Narcolies
Reviewed By: Xerwo, Nicememes