Gear & Crafting
Poison Spark Occultist Endgame Gear Progression, Important Milestones, Budget Items, Jewels & Crafting.
Core Items
The equipment shown is core to the build. Great care must be placed to make sure all defensive/offensive thresholds are met in order for the build to operate at it's best. If you wish to learn about how to craft your own gear like this please refer to our crafting guides to understand the way items like these are created with current means.
Main Hand
Item: Fate Knell
The weapon provides+1 to level of all Lightning Spell Skill Gems and a large amount of flat Lightning damage to Spells which is converted to Chaos damage thanks to Spark's alt quality. It also provides Cast Speed for smoother casting and damage over time multiplier granting more damage.
The modifiers you are looking for on your scepter are:
- % to Chaos Damage over Time Multiplier
- Adds # to # Lightning Damage to Spells
- +1 to Level of all Lightning Spell Skill Gems
- % increased Lightning/Chaos Damage
- % increased Cast Speed
- % chance to Shock
Off-Hand
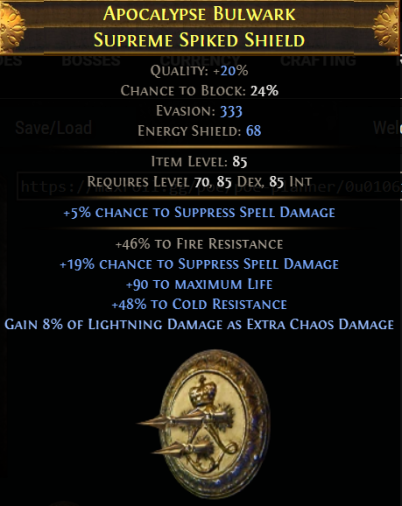
Item: Apocalypse Bulwark
The Shield slot serves to fill all of the remaining Spell Suppression and Resistances that you are missing. It is advisable to buy a tier two Fractured Chance to Suppress Spell Damage or tier one % increased Elemental Resistance roll here otherwise refer to Path of Building or the Character Defense tab to make sure that you have enough of these stats to cap out. The Supreme Spiked Shield base provides the largest amount of Evasion and Energy Shield, so try prioritizing it if possible.
- Purchase an Ilvl 85+ Supreme Spiked Shield with +46–48% to Fire/Cold/Lightning Resistance fractured.
- Spam Deafening Essence of Anger, Deafening Essence of Wrath or Deafening Essence of Hatred until you roll 17-22% chance to Suppress Spell Damage. Note that you can later change resistances with Harvest, so just buy the cheapest essence you can find in bulk for this step.
- Now that you have your 3 suffixes: 17-22% chance to Suppress Spell, & two +46–48% to Fire/Cold/Lightning Resistance rolls. If you would rather not risk, but not gain extra damage from the final step as a result, you can simply craft +(60–69) to maximum Life at this stage and use an Exalted Orb to fill your remaining Prefixes.
- Craft Suffixes Cannot be Changed and use a Harvest Reforge Life in hopes of hitting at least T3+ Life. If you hit a low Tier modifier, repeat this step until you do. If your prefixes are filled when reforging, you must take a risk and use an Orb of Annulment to remove a Prefix. If you remove a suffix instead, go back to step 2.
- Once you have hit T3+ Life, if you have 2 open Prefixes, craft Mana with the bench and slam with an Exalted Orb. if you only have 1 open prefix craft Gain 7–8% of Lightning Damage as Extra Chaos Damage
Helmet
Item: The Devouring Diadem
The The Devouring Diadem allocates Eldritch Battery saving you 3 Passive Skill points. This helmet is used in the Endgame is because on top of saving you some Passive Skill points, it grants Socketed Gems have 25% increased Reservation Efficiency. This modifier allows you to socket Determination, Grace and Herald of Agony in it saving you a lot of Mana for your Blasphemy Support setup. The The Devouring Diadem also gives a substantial amount of Energy Shield which is converted into HP with Mind Over Matter.
The ideal Veiled Modifier for this helmet is:
- % increased Duration of Ailments you inflict while Focused
The ideal Enchant for this helmet:
- Spark Fires 3 additional Projectiles
Body Armour
Item: Skin of the Lords
The Skin of the Lords is an extremely powerful Unique Armour because of it's 100% Increased Global Defences, +2 to Level of Socketed Gems and it's Unique modifier granting you a Keystone. Global Defences scale your Evasion , Armour and Energy Shield making this unique very efficient for scaling your defensive layers. The +2 to Level of Socketed Gems modifier boost your damage substantially when you socket PhantasmalSpark into it.
The best keystones to look for when searching for this Armour on trade are:
- Mind Over Matter
- Ghost Dance
- Divine Shield
- Lethe Shade
Keystones you MUST AVOID:
- Acrobatics
- Ancestral Bond
- Avatar of Fire
- Blood Magic
- Chaos Inoculation
- Eternal Youth
- Ghost Reaver
- Hex Master
- Iron Reflexes
- Necromantic Aegis
- Solipsism
- Supreme Ego
- The Agnostic
- Unwavering Stance
IMPORTANT: You cannot modify the colours on this Body Armour; It must be purchased with the correct Gem colours. It also only allows for corrupted Gems to be socketed within in, so you have to corrupt all your Skill Gems.
As the Skin of the Lords Body armour can be rare and expensive to find with the correct socket colours, you can consider to following body armours with an implicit corruption as suitable alternatives until you can afford one:
- Dendrobate
- Cloak of Flame
Suitable Corruption Implicits:
- +2 to Level of Socketed Duration Gems
- +2 to Level of Socketed Projectile Gems
- +1 to Level of Socketed Gems
Gloves
Item: Asenath's Gentle Touch
The Asenath's Gentle Touch Gloves provide you with the Curse Enemies with Temporal Chains on Hit modifier. This is especially great because as of the 3.20 Curse changes, gem levels on Curse Skills matter more than ever. This is not the case for Temporal Chain's Offensive capabilities as the modifier which grants Other effects on Cursed enemies expire 40% slower does not change with it's level. This means that offensively a curse on hit is as powerful as a leveled gem. The downside to this is that it won't slow enemies much compared to if you were to manually cast it, but this downside is worth the quality of life gained by automating it on hit. Make sure to get a pair of these as well rolled as possible, and if you can find one with the following Corruptions that is a bonus:
- % increased Cast Speed
- increased maximum Life
- % increased maximum Energy Shield
- # to Level of Socketed Gems
IMPORTANT: Do not get an additional curse on hit as it overwrites your curses.
Boots
Item: Demon Spark
Thanks to Eldritch implicits and the Deafening Essence of Torment you get 100% chance to Avoid Being Shocked on your Boots. This enables you to be fully ailment immune with the Stormshroud jewel It is difficult to land good suffixes by spamming Essences, therefore make sure to purchase a pair with a fractured resistance.
Amulet
Item: Ashes of the Stars
It is essential for the build to get 30% on this roll as otherwise you do not have 100% of Lightning Damage Converted to Chaos, resulting in a massive loss of total damage. Poison damage also relies on Poison Chance to inflict it's damaging ailment. 100% Chance to Poison is achieved by equipping a Divergent Herald of Agony which thankfully is also scaled by Ashes of the Stars.
Rings
Item: Ring, Death Rush & Nimis
Use this slot to fill out as much of the stats that you are missing as possible. This makes this slot unique to your current setup as that might change depending on the stats you have on your other items. The best way to fill this slot is to look for a combination of the stats you are currently missing on the Trade website, as crafting with Essences most likely costs way more than one you can find there. Try look for a ring with 3 good suffixes, then you can craft Life and use it as is, or craft Suffixes Cannot be Changed, scour and craft Suffixes Cannot be Changed before using a Veiled Chaos Orb. Block +# to Maximum Mana before unveiling Life, finally craft % increased Damage to finish the ring. Look for a combination of the following suffixes on a ring while keeping in mind the build has many available Jewel Sockets where you can also fill out remaining resistance and Attribute requirements:
- % increased Cast Speed
- % to Fire Resistance
- % to Cold Resistance
- % to Lightning Resistance
- % to Chaos Resistance
- % to all Elemental Resistances
- # to Strength
- % to Damage over Time Multiplier
For your second ring, a Death Rush is the best option for when you are mapping. It provides a massive DPS and speed boost as well some physical damage reduction and life gained on kill. This is by far the best option overall for mapping, but for bossing you can swap the ring out for a Circle of Nostalgia with the following affixes:
- % increased Chaos Damage while affected by Herald of Agony
- Herald of Agony has % increased Buff Effect
The Nimis can be used to replace either of your rings, ideally your resistance ring once you have gotten enough of it from other pieces of gear or jewels. It will change your skill's behaviour by firing projectiles in a nova around your character. It is an optional upgrade, but definitely worth it as an end goal.
Belt
Item: Stygian Vise
The belt is a great source of Resistances and Life. These stats are interchangeable with the rings. The best base to craft on is a Stygian Vise as this build scales really well with stats granted by Hypnotic Eye Jewels. Your Abyss Jewel should be left for last, as it can fill for whatever you need + x% chance to gain Phasing for 4 seconds on Kill. Try to buy one with Corrupted Blood cannot be inflicted on you.
Flasks
Flasks provide a massive amount of defense and damage. Roll, use and enchant all your Flasks following these combinations:
- Experimenter's Jade Flask of the Impala
- Experimenter's Granite Flask of the Impala
- Experimenter's Quicksilver Flask of the Cheetah
- Experimenter's Silver Flask of the Horsefly
- Catalysed Eternal Life Flask of Assuaging
Progenesis can replace your Life flask if you feel confident enough with your sustain granted by the watcher's eye for mapping as it will provide you with a nice boost in survivability.
Enchant your flasks with Instilling Orbs:
- Used when Charges Reach Full
Ensure your flasks have 1 of these prefixes:
- +(32–35) to Maximum Charges
- (31–35)% chance to gain a Flask Charge when you deal a Critical Strike
- Gain 3 Charges when you are Hit by an Enemy
- (36–40)% increased Duration
Have 1 of each of these suffixes:
- % increased Movement Speed during Effect
- % increased Evasion during Effect
- % increased Armour during Effect
- % increased Cast Speed during Effect
Jewels
Watcher's Eye
Item: Watcher's Eye
The Watcher's Eye can grant a boost to both your defenses and offenses. Since this build utilises two defensive, and one offensive aura there is a wide range of stats we can look for on it. Look for a jewel with the Gain # Life per Enemy Hit while affected by Vitality and if possible an additional mod listed below:
- % chance to Suppress Spell Damage while affected by Grace
- % chance to Evade Attack Hits while affected by Grace
- % increased Movement Speed while affected by Grace
- % additional Physical Damage Reduction while affected by Determination
- to Armour while affected by Determination
Stormshroud
The Stormshroud Unique Jewel is an essential part of your defenses, It allows you to stack % chance to Avoid being Shocked instead of % chance to Avoid Elemental Ailments. This is beneficial because it is a much more easily accessible stat which can be rolled on Boots to grant you full ailment immunity.
Rare Jewels
In the remaining Jewel sockets you slot Rare Jewels to grant additional :ife and damage . The stats you are looking for on these can be any combination of the following:
- % increased maximum Life
- % increased Chaos Damage
- % increased Cast Speed
- Damaging Ailments deal damage % faster
- % increased Damage over Time
- + to Strength
- % to all Elemental Resistances
- % increased Poison Duration, % chance to Poison on Hit
- % to Chaos Damage over Time Multiplier
Cluster Jewel
This build makes use of 2 Cataclysm Glisten granting 12% increased Chaos damage. You can slot these in the sockets at the edge of the Passive Skill Tree. The notables you are looking to buy for these clusters are:
You want to buy two Cataclysm Glisten with the small passives granting 12% increased Chaos Damage over Time with the following notable:
IMPORTANT: To enable the Touch of Cruelty notable you will need at least 1 Hypnotic Eye Jewel granting % chance to Hinder Enemies on Hit with Spells
Buy one to two depending on your level Pandemonium Ruin with the small passives granting 10% increased Projectile Damage with the following notables: