Twisting Blades Rogue Endgame Build Guide
Welcome to the Twisting Blades Rogue Endgame guide! This is a great speedfarming build for clearing content faster than many others in the game, but it is also coming with a high skill ceiling. If you are looking for a fun & agile Rogue build that flies around the battlefield, you've come to the right place!
Twisting Blades is a two-step melee attack: First, you attack a single enemy for a moderate amount of damage, then the blades return to you from that enemy's position after a short delay. These returning blades are the core of the build and what you need to play around to succeed. Finally, these returning blades rotate around you with Bladedancer's Aspect, transforming you a walking dervish as you fly across the map with Dash.
The strongest version plays around permanent Poison Imbuement applications to produce large DoT ticks. All in all, Twisting Blades is a very versatile skill that can do everything reasonably well, making this build a great allrounder choice.
The Twisting Blades Rogue is powered by the Alchemical Admixture Key Passive allowing you to scale your Poison DoTs extremely high!
Even though it may be difficult for you to play the build well at the beginning, do not despair! With some practice and our guide, you too are able to succeed with the Twisting Blades Rogue in Diablo 4.
Let's twist again!
This build guide assumes you have a Level 60 Character and unlocked Torment 1. To get there, level up with one of our Rogue Leveling Guides. See how this Build compares against others with our various Build Tier Lists.
Boss Powers
Season 8 is the Season of Belial's Return. It allows you to tap into Boss Powers obtained from World, Event, and Lair Bosses throughout Sanctuary. The new seasonal mechanic, Apparition Incursions, is available at any difficulty level and gives you the opportunity to unlock a subset of these powers very early on. Various Apparition Monsters appear in these special timed events throughout Sanctuary. Defeating these monsters spawns 1 of 10 Apparition Bosses to hunt you down and defeating them grants you their Boss Power. After defeating the first Boss, continue the event for a chance to fight a second Apparition Boss, after which Belial himself joins the fray.
There are 24 Boss Powers available and the first time you defeat one of these Bosses, you claim their power for yourself. Boss Powers each have Main and Modifier effects to boost your build. 13 are available in all difficulties (from Apparition Incursions and World Bosses), while 11 can only be acquired in Torment 1 difficulty or higher from Lair Bosses and Lilith. You can equip 1 Main Power and 3 Modifiers, and all powers can be upgraded up to Rank 20, increasing the potency of both the Main and Modifier effect. You use Spectral Ash to upgrade these powers, dropped from Apparition Incursions and by defeating any Bosses. Boss Powers also scale with your Paragon Level, growing stronger as you progress.
Endgame Boss Powers
Main Power
Ashava's Poison Breath - Deals high Poisoning damage and helps trigger our modifier.
Modifiers
- Andariel's Flaming Skull - Significant damage increase to our Poison DoT.
- Sinerat's Flames - A simple yet effective damage increase for elemental damage, which we deal through our Imbuements.
- Harbinger of Hatred's Volley - This power provides you with a simple yet effective damage increase.
Alternate Boss Powers
- Torusk's Rage - before you get access to Harbinger of Hatred's Volley.
- Flesh Reaper's Disruption - A decent substitute before you acquire Andariel's Flaming Skull.
- Hatred's Embrace's Haste - A great way to increase your Critical Strike Chance early on
- Urivar's Lobbed Bombs - The Main Modifier is great if you are lacking Cooldown Reduction.
Learn more details about the season theme in our full Season Guide.
Skills & Gameplay
Essentials
- Pick up points in Blade Shift to advance the Skill Tree.
- Twisting Blades is your main skill, and you want to use it as often as possible. This gives you access to a ramping damage boost, which increases per hit and lasts 3 seconds. You want to stack a lot of attack speed to stack as many of these damage buffs as possible. Furthermore, Twisting Blades allows you to daze enemies to stack Trick Attacks for some free Critical Strike Chance.
Mobility & Defense
- Dash enables you to move faster across the map, and is also a great tool to engage fights.
- Dark Shroud makes us very tanky and increases our Movement Speed per stack. It also boosts our Critical Strike Chance, which is important for Blended Poison Imbuement. The Umbrous aspect allows you to take it off your skill bar.
Imbuements
- Poison Imbuement is your main Imbuement. Activating it adds an extra Damage over Time effect to your next Twisting Blades casts. Therefore, you invest heavily in it and eventually deal almost all of your damage through its Poison applications.
- You can get extra Imbuement charges from Tempering mods on Pants and Boots. Moreover, Preparation also allows you to reset the cooldown. In the Mythic variant, you need 14 charges to sustain permanent uptime.
- Until you can fully sustain it, Bursting Venoms can be imprinted to reset its cooldown.
Ultimate and Key Passive
- Rain of Arrows is used to activate No Witnesses and Alchemical Admixture through Word of Hakan.
- Word of Hakancauses Rain of Arrows to cast all three imbuements, which in turn buffs our Imbuement Potency significantly through Eldritch Bounty.
Skill Rotation
Fundamentals
- Use Rain of Arrows on cooldown to reset your Poison Imbuement and other cooldowns through Preparation and gain all of its other benefits through nodes like No Witnesses and Eldritch Bounty.
- Imbue your Twisting Blades with Poison Imbuement
- Generate Dark Shroud stacks with Umbrous.
- Use Dash for Mobility and repositioning.
- Drop Poison Trap on elites and bosses for a significant damage boost.
- Use Concealment with the Countering Concealment upgrade to remain permanently Unstoppable.
Rogue Specialization
Preparation
Preparation reduces your Ultimate Cooldown by 5 seconds for every 75 Energy that you spend.
We relentlessly attack with Twisting Blades and spend a lot of Resources that way.
This allows you to reduce the Cooldown of your Ultimate Skill significantly for permanent uptime and gives us damage reduction.
Learn more details and how to unlock this system in our full Rogue Class Overview.
Paragon & Glyphs
Carefully check your Paragon Boards to ensure correct board rotation. Glyphs go from a radius of 3 to 4 at level 15 and from 4 to 5 at level 46. Some of them cannot be activated before reaching these thresholds! Progress through The Pit to rank up your Glyphs.
Use the slider to see the progression steps. At around Paragon 200, leveling slows down significantly and all important Rare clusters, Legendary nodes and Glyph sockets should be unlocked. Afterwards, you can min/max your build with minor tweaks and by picking up additional smaller nodes.
Twisting Blades Rogue Endgame Paragon
Some Glyph position swaps, board changes and other pathing adjustments may occur as you unlock your full potential. The setup displayed by default is the final version of the build before spending additional points that do not significantly impact your character's power.
Glyph Leveling Priorities
To Level 15
- Bane
- Canny
- Versatility
- Tracker
- Efficacy
To Level 46
- Bane
- Canny
- Versatility
- Tracker
- Efficacy
Learn more about the Paragon System in our in-depth Paragon Boards and Glyphs guide.
Runes
You can have up to two Runewords in your setup, each consisting of one Ritual and one Invocation Rune. Socket them into your Armor pieces to replace normal gems. The Twisting Blades Rogue focuses on the following combos:
Best in Slot
- Tam + Thul - Mystical Frost Nova is very strong, it freezes, amplifies damage, and applies vulnerable. The activation is very consistent as you spend a lot of energy.
- Cir + Kry - Groups enemies tightly together, which is something this build desperately needs.
Alternative Choices
If you haven't unlocked the final setup or found the top runes, you can also benefit from these options:
- Wat - Decrepify helps with stagger, defense and allows an execute at 10% HP, can be combined with Xol in your other Runeword to generate large amounts of offering.
- Yax - Great way to generate offering that synergizes with Unstable Elixirs.
- Jah - for more Mobility when farming, can replace either bottom rune.
- Poc - If you have not found Tam yet.
- Vex - Massive damage boost through skill ranks.
Learn more about Runes and how they work in our dedicated Runewords Overview and Runewords Tier List.
Mercenaries
Mercenaries are unlocked during the Vessel of Hatred campaign and assist you in battle. There are 4 separate Mercenaries to choose from, each with their own skill trees and abilities. You can have one hired (permanent) mercenary during solo play and a reinforcement who assists you from time to time in certain situations.
Hired: Subo
He reveals all enemies and materials on the minimap, allowing you to farm Iron Chunks and Bundled Herbs easily. The highlighting is a useful tool to spot out Elites in Dungeons, as you will quickly recognize the pattern for elites after getting used to it.
Scorched Earth improves your Damage over Time massively.
Reinforcement: Varyana
We choose Bloodthirst for more Attack Speed.
Learn more about Mercenaries and how they work in our dedicated Mercenaries Overview.
Stat Priorities & Item Progression
To enable the Twisting Blades Rogue to perform optimally, hunt for these stats on your gear with good rolls and aim to Temper ⚒️ & Masterwork Crit ↑ them accordingly. The green arrow ↑ indicates which affix is most impactful to Masterwork Crit, and it does not indicate how many Masterwork Crits you need on that particular affix. Keep in mind that certain stats, such as Armor, Resistances, Extra Size Tempers, Attack Speed, and more, have caps that may affect your priorities according to the items and Paragon points available at that moment.
Recommended Stat Thresholds:
- 70%+ Critical Strike Chance
- 2500+ Dexterity
- 300%+ Poison Damage
- 8+ Extra Poison Imbue Charges
- 100% Attack Speed
- Armor Capped 1,000
- Resistance Capped 70%+
- 7,000+ Life
- 80%+ Chance for Twisting Blades to Hit Twice
- 30%+ Rain of Arrows Cooldown Reduction
Item Progression Goals
Before you dive into the Endgame with the Twisting Blades Rogue, take a look at this overview of the items used in the build. See below for further details about the different progression steps and variants. Some of your Skill Tree choices depend on what Legendary Aspects and Unique items are available to you. Keep in mind that while we can guarantee that everyone has access to the same Codex of Power Aspects, the exact progression is different for everyone.
Learn more details and how to farm Legendary Aspects and Uniques in our General Farming Guide.
Build Variants
This section is designed to guide your Twisting Blades Rogue from a fresh level 60 into the very late endgame using the three variants Starter, Ancestral, and Mythic. At the final step, you should be fully decked out with a great all-rounder build.
If you are fresh in Torment 1 coming from a leveling guide, this is where you begin. Since only some Aspects can be guaranteed from Dungeon unlocks for the Codex of Power, focus on acquiring the additional aspects via gambling with Murmuring Obols.
Gear & Skills
- Early on in your progression, focus on Armor & Resistances to survive. Each Torment difficulty adds a penalty of -250 Armor and -25% to all Resistances and it is recommended to keep both capped (1000 Armor, 70%+ Resistances) at all times. As you unlock higher item power gear, Masterworking levels and more Paragon points, you naturally scale your character into the higher difficulties and can start replacing some of these rolls with offensive or utility stats.
- Umbrous is an important survivability tool for many Rogue builds. As long as you have not found it, use Mot and/or Dark Shroud on your skill bar for extra defense.
The goal here is to progress through the Torment difficulties as you unlock Ancestrals, Paragon points, all Legendary Aspects, Temper mods and the most important Uniques to pilot this build. Some Legendary Aspects are used temporarily to fill slots that may be replaced with more Unique items later on.
Gear & Skills
- As you upgrade your gear to Ancestrals with more masterworking levels and reach higher paragon, you can focus more and more on replacing Armor & Resistance rolls with better stats, but ensure to stay capped at 1000 Armor and 70%+ Resistances for the difficulty you're currently in.
This is the final version of the build's progression, including all regular Unique items, Mythic Uniques, Legendary Aspects, Temper mods and Masterworking, leaving you with a great all-rounder build for all content in the game. Additional variants use this as a baseline to optimize around certain activities.
Gear & Skills
- Heir of Perdition - Provides us with important Core Skill Ranks and Critical Strike Chance.
- Shroud of False Death - Generally the best Chest Armor to use.
- Ring of Starless Skies - Amazing choice with how much Resource we consume to increase our damage output.
This setup optimizes the build to push the highest possible Tiers in The Pit after you have finished the Mythic variant and reached a plateau in your progression.
These are the key changes:
We drop Dash for Caltrops for more Crowd Control sources for Creeping Death.
Gear & Skills
- When fighting monsters in high tiers of the Pit, remember that after crowd controlling elites for 5 seconds, they become Unstoppable for 8 seconds. This may be the right moment to start kiting them around because your damage done goes way down, and they can freely retaliate.
- In high tier boss fights, beware that many of your conditional damage and damage reduction modifiers cannot activate outside of stagger phases. This means they generally deal more damage against you than regular monsters, and you have to prioritize dodging the attacks from shadow bosses while you can barely scratch them outside of stagger bursts.
- Remember to use Consumables when Pushing:
- Elixir of Advantage II to reach Cap 1 Attack Speed.
- Elixir of Fortitude II if you have trouble surviving.
- Queen's Supreme
- Soothing Spices
- Song of the Mountain
FAQ & Mechanics
Once a guide is released, many players have questions on why and how we are approaching certain choices. In this section you can find the answers to the questions that have been asked the most about the Twisting Blades Rogue Build.
The build works really well when you decimate everything in seconds, but may get overwhelmed if fights are long against high level monsters. There are several adjustments you can make when you have trouble with more difficult content:
- Check if your Armor & Resists are capped.
- Use defensive consumables.
- Roll Maximum Life instead of offensive stats on as many pieces as possible.
- Kite enemies when they become Unstoppable.
Concealment is mainly used for the 5 seconds of Unstoppable that it provides through Countering Concealment.
In the early game, you may occasionally starve on resources before you get the full combo online. The Starter version uses Inner Sight to counter this. Once you have the Ancestral version, resources should feel pretty comfortable. Alternatively, investing more into Resource Cost Reduction (esp. on Crossbow) helps with this. Additionally, you can put more points into Innervation or temper Resource Generation, Resource Cost Reduction, or Lucky Hit: Chance to restore Resource on your rings.
Dark Shroud stacks are generated through Umbrous.
Mechanics
For more Rogue Mechanics and Interactions, visit the Rogue Compendium by Avarilyn.
- Dark Shroud stacks damage reduction additively for each active shadow. Due to the additive stacking, each increase in the skill's rank and active shadows boosts your survivability exponentially.
- Shadows have a 1.5 seconds cooldown between losing stacks, but the damage reduction still applies depending on how many are active at all times.
- At maximum stacks, your effective hit points (EHP) scale as follows in these examples:
- Rank 1: 66.6% more EHP
- Rank 5: 92.3% more EHP
- Rank 10: 138.1% more EHP
- Rank 15: 215% more EHP
- Rank 20: 354.5% more EHP
Damage Formula
Admixture Multiplier: ((Shadow DMG% x [Shadow Legendary Glyph^Total] x Eldritch Bounty [If Shadow Imbuement]) + (Poison DMG% x [Poison Legendary Glyph^Total] x Eldritch Bounty [If Poison Imbuement]) + (Cold DMG% x [Cold Legendary Glyph^Total] x Eldritch Bounty [if Cold Imbuement])) x (1+Elements) x 0.2 + 0.4
Double Dipping
We have certain multipliers double-dipping the final damage and Alchemical Admixture. Effects such as Elements and Eldritch Bounty both multiply the Additive Shadow, Poison, and Cold damage you have and also affect the damage you deal with the Imbuements themselves.
Find out more about Rogue Interactions and Mechanics in our Rogue Compendium by Avarilyn.
- While all the exact mechanics are much more nuanced, there are two separate Attack Speed Bonus caps of +100% that apply to all builds for a total potential of +200%. For Rogues, these two caps are distributed in the following way:
Cap 1
- Gear rolls
- Paragon nodes
- Elixirs
- Flurry buff
- Close Quarters Combat (Cutthroat portion)
- Moonrise
- Artillery Shrine
Cap 2
- Close Quarters Combat (Marksman portion)
- Enhanced Heartseeker
- Alchemical Advantage
- Haste
- Accelerating
- High Velocity
- Asheara's Khanjar
Read up more on Attack Speed in our dedicated guide by Ava.
Attack Speed
The following Attack Speed % sources function for Twisting Blades. For a more in-depth explanation of how attack speed works, please read our Attack Speed Mechanics article.
Cap 1
- Moonrise
- Close Quarters Combat (Cutthroat)
- Flurry
- Elixir of Advantage II
- Attack Speed (Gear Affix)
- Andariel's Visage
- Ring of Starless Skies
- Culler
- Nimble
- Artillery Shrine (100% AS)
Cap 2
- Close Quarters Combat (Marksman)
- Alchemical Advantage
- Accelerating
- Asheara's Khanjar
- Haste
- High Velocity
- Enhanced Heartseeker
- Cutthroat Attack Speed (Tempering)
| Frames | APS | Sword % | Sword + Dagger % | Dagger % |
|---|---|---|---|---|
| 28 | 1.1 | 0% | - | - |
| 27 | 1.1138 | 1.3% | 0% | - |
| 26 | 1.1688 | 6.3% | 1.6% | 0% |
| 25 | 1.2128 | 10.3% | 5.5% | 1.1% |
| 24 | 1.2788 | 16.3% | 11.2% | 6.6% |
| 23 | 1.32 | 20% | 14.8% | 10% |
| 22 | 1.3888 | 26.3% | 20.8% | 15.7% |
| 21 | 1.455 | 32.3% | 26.5% | 21.3% |
| 20 | 1.542 | 40.2% | 34.1% | 28.5% |
| 19 | 1.602 | 45.6% | 39.3% | 33.5% |
| 18 | 1.707 | 55.2% | 48.4% | 42.3% |
| 17 | 1.821 | 65.5% | 58.3% | 51.8% |
| 16 | 1.905 | 73.2% | 65.7% | 58.8% |
| 15 | 2.055 | 86.8% | 78.7% | 71.3% |
| 14 | 2.223 | 102.1% | 93.3% | 85.3% |
| 13 | 2.43 | 120.9% | 111.3% | 102.5% |
| 12 | 2.583 | 134.8% | 124.6% | 115.3% |
| 11 | 2.859 | 159.9% | 148.6% | 138.3% |
| 10 | 3.201 | 191% | 178.3% | 166.8% |
Lucky Hit Chance
The Lucky Hit Chance of Twisting Blades continues to differ from expectations. In a brief interaction test of 300 points of data for the base version of Twisting Blades and 500 points of data for Twisting Blades using Bladedancer's, overall Lucky Hit Chance was significantly lower than expected.
Each hit of Twisting Blades was expected to have the Tooltip Lucky Hit Chance% (in this case, 114%). The test was set up in a way where we tracked Doombringer triggers per hit and tracked all damage instances individually using recorded footage. Based on other spell functions, Twisting Blades was expected to have either a 114% Chance to Lucky Hit per hit, or 1-(1-1.14)^(1/2) = 100% chance to Lucky Hit due to the limitations of the formula when a skill has two damage instances on it. However, it turns out that the data was distributed in the following way:
Without Bladedancer's
| Data | Total Triggers of Doombringer | Hits Registered | Calculated Trigger Chance |
|---|---|---|---|
| Impales | 33 | 147 | 33 / 147 = 22.45% |
| Returns | 8 | 147 | 8 / 147 = 5.44% |
| Spins | 0 | 0 | 0% |
| Total | 41 | 294 | 41 / 294 = 13.95% |
| Expected | 114% x 25% x 294 = 83.79 | 294 | 83.79 / 294 = 28.5% |
With Bladedancer's
| Data | Total Triggers of Doombringer | Hits Registered | Calculated Trigger Chance |
|---|---|---|---|
| Impales | 29 | 124 | 29 / 124 = 23.39% |
| Returns | 7 | 124 | 7 / 124 = 5.65% |
| Spins | 25 | 248 | 25 / 248 = 10.08% |
| Total | 61 | 496 | 61 / 496 =12.3% |
| Expected | 114% x 25% x 496 = 141.36 | 496 | 141.36 / 496 = 28.5% |
As we can see, the Doombringer Triggers to Total Hits ratio is off by a significant margin compared to the expected ratio. We are getting roughly half the expected triggers, which makes Twisting Blades very poor in Lucky Hit Chance contexts. More on Lucky Hit functionality in our Lucky Hit Mechanics article.
Interactions that work with Twisting Blades
The following interactions have been verified through damage recording or footage to ensure they are functional. Anything not listed here has not explicitly been verified during the creation of this list.
- Aspects
- Retribution
- Inner Calm
- Elements
- Conceited
- Edgemaster's
- Accelerating
- Expectant
- Blood Boiling
- Bladedancer's
- Passives
- Frigid Finesse
- Mixed Shadow Imbuement requires imbuements
- Exploit
- Subverting Poison Trap with Poison Imbuement
- Enhanced Smoke Grenade
- Malice
- Unstable Elixirs
- Trick Attacks
- Weapon Mastery
- Enhanced Caltrops
- Mixed Cold Imbuement
- Enhanced Cold Imbuement
- Blended Cold Imbuement
- Legendary Nodes
- No Witnesses
- Cheap Shot
- Eldritch Bounty requires imbuements
- Exploit Weakness
- Tricks of the Trade
- Deadly Ambush
- Cunning Stratagem with Combo Points
- Glyphs
- Ambush
- Canny requires imbuements
- Chip
- Closer
- Combat
- Control
- Devious
- Fluidity
- Infusion
- Pride
- Turf
- Uniques and Mythic Uniques
- Penitent Greaves
- Godslayer Crown
- Fists of Fate
- Ring of Starless Skies
- Locran's Talisman
- Beastfall Boots
- Banished Lord's Talisman
- Condemnation
- Tibault's Will
- Scoundrel's Leathers
- Saboteur's Signet
- Grasp of Shadow
- Stats
- Chance for Barrage Projectiles to Cast Twice
Interactions that partially works with Twisting Blades
- Aspects
- Dark Dance, which gives 40% damage instead of 80%
- Uniques and Mythic Uniques
- Crown of Lucion
Interactions that do not work with Twisting Blades
N/A
Poison Imbuement is an imbuement that empowers abilities that can be imbued, such as core skills like Twisting Blades, and converts it to the poison element damage type. Although the imbuement has charges, if your imbued ability hits multiple times per cast, the skill applies the imbuement with every damage instance. This implies that tempering that allows your skills to hit multiple times is excellent for frequently applying Poison Imbuement to the target. To understand how its damage is calculated and how DoT duration influences the damage dealt, refer to the Damage Calculations accordion below.
Poison Imbuement uses the base damage of the ability it imbues in its damage calculation, meaning the skill % (including Combo Points multiplier) and weapon damage from the imbued skill. This could be summarized as:
Average Damage: [Weapon Damage] x [Imbued Skill %] x [Combo Point Multiplier] x [Imbuement Skill %] x [Additive Multiplier] x [Global Multiplier 1] x [Global Multiplier 2] x ... x [Global Multiplier N] Essentially, it is the standard damage calculation (which can be found in our in-depth damage article) with the addition of one more skill % and Combo Points multiplier if you play with Combo Points. This implies that anything multiplying your core damage, such as Condemnation does not work for Poison Imbuement damage.
Importantly, the damage from Poison Imbuement is calculated as a summation of poisoning damage. This means each time you attack with Poison Imbuement, you add poisoning damage onto the target. This is then distributed over its full duration across each damage instance. To illustrate this quickly, we can use a quick math example:
- Deal 1000 poisoning damage to the target over 5 seconds, you deal 1000/10 = 100 damage per tick.
- One tick occurs before next application, damage remaining on the target is 900.
- Deal another 1000 poisoning damage, you now deal (900+1000)/10 = 190 damage per tick.
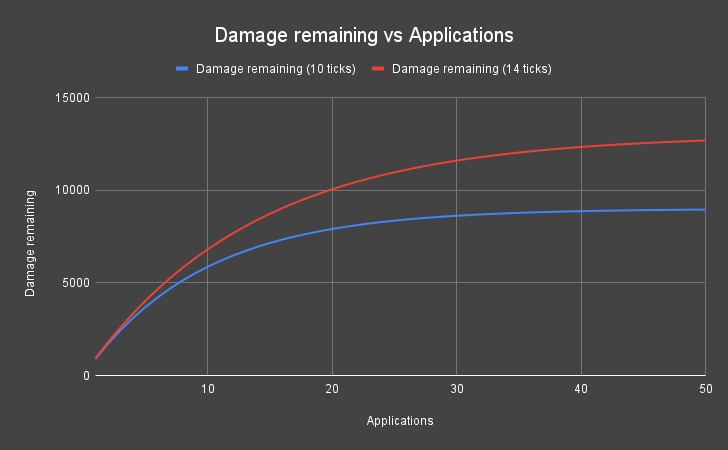
If repeated, we get the curve below.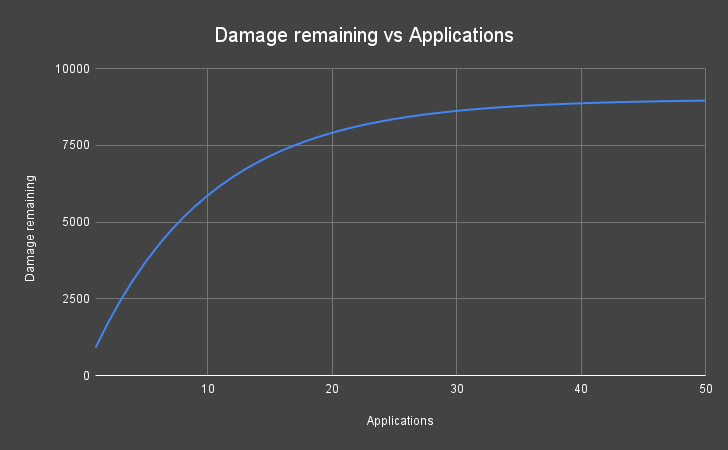
The consequence of the damage being calculated this way is that adding duration to Poison Imbuement increases the top-end proportionally to the increased duration. For example, adding Tracker to the example above would result in a 41% damage increase once the damage starts declining (as shown below).
Lucky Hit Chance
The Lucky Hit Chance per damage instance for Poison Imbuement is calculated according to the following formula:

Because this formula has (100% - Tooltip LHC%) as a part of its calculation, it was theorized that you gain no more benefit from Lucky Hit once you reach 100% Tooltip Lucky Hit. If the theory was correct, as (100% - Tooltip LHC%) approaches 0, the chance to trigger Lucky Hit effects skyrockets until finally getting to 100% Lucky Hit per tick. At 203.03% Lucky Hit, we would have had 99.99% Tooltip Lucky Hit and an expected proc total of (1-(1-[0.33 x (1+2.03)])^(1/12)) x 0.75 x 792 = 318 X'fals triggers. This was not nearly the case, and similar tests were conducted at other Lucky Hit values to verify this functionality. Further testing has to be conducted, but based on this test, the following was true for Poison Imbuement
DoT Damage Instance LHC = (100% - (100% - 33%)^(1/12)) x (100% + Sum of [+]Lucky Hit Chance)More on Lucky Hit functionality in our Lucky Hit Mechanics article.
Imbuement Potency
The game has a stat called imbuement potency, which can be found on things such as Efficacy and Corruption. Potency increases the effectiveness of the imbuement you use.
- Poison Imbuement: Increases the damage over time it deals.
- Cold Imbuement: Increases the amount of chill you apply to the target
- Shadow Imbuement: Increases the damage it deals.
A misconception within the community was that imbuement potency increased the passive benefits from the enhancement nodes such as Blended Poison Imbuement or Mixed Shadow Imbuement. This has been verified not to be the case, it only increases the functionality of the base skill.
Imbuement Improvements
- Mixed Poison Imbuement can trigger per damage instance. This means that Barrage with High Velocity and Branching Volleys can trigger Mixed Poison Imbuement on each individual damage instance.
- Blended Poison Imbuement increases the poisoning damage by 75% with the condition that you caused a critical strike with the imbued skill applying Poison Imbuement. This does not mean that Poison Imbuement now scales with Critical Strike Damage.
Interactions that work with Poison Imbuement
The following interactions have been verified through damage recording or footage to ensure they are functional. Anything not listed here has not explicitly been verified during the creation of this list.
- Aspects
- Retribution (Snapshots)
- Inner Calm
- Noxious Ice
- Corruption
- Elements
- Conceited (Dynamic)
- Creeping Death
- Passives
- Frigid Finesse
- Deadly Venom
- Mixed Shadow Imbuement
- Exploit
- Subverting Poison Trap
- Enhanced Smoke Grenade
- Malice
- Enhanced Caltrops
- Legendary Nodes
- No Witnesses
- Cheap Shot
- Eldritch Bounty
- Exploit Weakness
- Glyphs
- Ambush
- Bane
- Canny
- Chip
- Control
- Devious
- Efficacy
- Fluidity
- Tracker
- Versatility
- Uniques and Mythic Uniques
- Penitent Greaves
- Godslayer Crown
- Fists of Fate
- Ring of Starless Skies
- Yen's Blessing gives one charge
- Stats
- Chance to Cast Twice Tempering
Interactions that do not work with Poison Imbuement
- Aspects
- Expectant
- Edgemaster's
- Encircling Blades
- Breakneck Bandit's
- Passives
- Weapon Mastery
- Impetus
- Legendary Nodes
- Tricks of the Trade
- Uniques
- Condemnation
- Windforce
- Beastfall Boots
- Stats
- Chance to deal Double Damage Tempering
- Damage vs Poisoned Enemy (if only Poison Imbuement is applied)
Bosses are immune to Crowd Control (CC) and instead take Stagger Damage when hit by one. The amount of stagger damage dealt depends on the type of CC and is proportional to its duration. After being hit by a CC effect, the Boss will temporarily take less Stagger Damage from CC of the same type.
Effectively, this means that when you're just spamming one type of CC you don't need to spam any more of it than what you need to keep a normal enemy permanently CC-d. To stagger the Boss quickly you need to use as many different types of CC as possible.
After the Boss is staggered it gains a certain amount of stacking Stagger Damage Reduction for the rest of the fight:
- After 1st Stagger: 20%
- After 2nd Stagger: 40%
- After 3rd Stagger: 60%
- After 4th Stagger: 90%
Bosses naturally regain 1% of their Stagger HP every second and when that regen is combined with 90% Stagger Damage Reduction it becomes borderline impossible to Stagger the Boss again.
Summary
The Twisting Blades Rogue is a super fun and mobile assassin that speedfarms content better than almost anything else and can pull its weight in higher end content thanks to Poison Imbuement.
- Use Rain of Arrows on cooldown to reset your Poison Imbuement and other cooldowns through Preparation and gain all of its other benefits.
- Imbue your Twisting Blades with Poison Imbuement.
- Place Poison Trap whenever it would immediately trigger.
- Use Dash for Mobility and repositioning.
- Use Concealment for Unstoppable.
Credits
Written by Avarilyn
Credits to Mattias for Optimization contribution.