Death Trap Rogue Endgame Build Guide
Welcome to the Death Trap Rogue Endgame Guide! This build focuses on spamming your ultimate skill unlike any other to deal with anything the game has to offer. While various traps may be included in any Rogue build, this one specializes in dealing damage almost exclusively by spamming Death Trap non-stop. This is achieved by stacking enough Trap, Ultimate, and regular Cooldown Reduction to get Death Trap's cooldown to below 15 seconds and then triggering Preparation trice with one shot using Beastfall Boots and a pool of min. 225 Energy to instantly reset the skill. Thanks to Aftermath, you can instantly fill your Energy bar again and repeat.
A big advantage of this playstyle is the constant resets of all of your abilities and the opportunity to pull enemies together at will with Prime Death Trap, which makes the build stand out and defuses the danger in most elite fights.
The key item that enables the build is Eyes in the Dark, and it is recommended to acquire it before transitioning to this build. These pants solve several problems at once and boost the ultimate's damage through the roof. While the best setups run the aforementioned Beastfall Boots combo, it is possible to get started without them by using the Exposure key passive to reset your traps, which is later replaced by Momentum and focusing around Overpower. Let us jump in and see what it is all about!
Requirements for this build
- Eyes in the Dark
This build guide assumes you have a Level 60 Character and unlocked Torment 1. To get there, level up with one of our Rogue Leveling Guides. See how this Build compares against others with our various Build Tier Lists.
Boss Powers
Season 8 is the Season of Belial's Return. It allows you to tap into Boss Powers obtained from World, Event, and Lair Bosses throughout Sanctuary. The new seasonal mechanic, Apparition Incursions, is available at any difficulty level and gives you the opportunity to unlock a subset of these powers very early on. Various Apparition Monsters appear in these special timed events throughout Sanctuary. Defeating these monsters spawns 1 of 10 Apparition Bosses to hunt you down and defeating them grants you their Boss Power. After defeating the first Boss, continue the event for a chance to fight a second Apparition Boss, after which Belial himself joins the fray.
There are 24 Boss Powers available and the first time you defeat one of these Bosses, you claim their power for yourself. Boss Powers each have Main and Modifier effects to boost your build. 13 are available in all difficulties (from Apparition Incursions and World Bosses), while 11 can only be acquired in Torment 1 difficulty or higher from Lair Bosses and Lilith. You can equip 1 Main Power and 3 Modifiers, and all powers can be upgraded up to Rank 20, increasing the potency of both the Main and Modifier effect. You use Spectral Ash to upgrade these powers, dropped from Apparition Incursions and by defeating any Bosses. Boss Powers also scale with your Paragon Level, growing stronger as you progress.
Endgame Boss Powers
Main Power
Beast in the Ice's Sleet - Reliable source of Freeze to increase our damage through Frigid Finesse.
Modifiers
- Belial's Eye Beams - Damage multiplier to Overpower damage. This is permanently active due to how often we trigger our main boss power.
- Sinerat's Flames - A simple yet effective damage increase for elemental damage.
- Harbinger of Hatred's Volley - This power provides you with another damage increase.
Alternate Boss Powers
- Torusk's Rage - before you get access to Harbinger of Hatred's Volley.
- Flesh Reaper's Disruption - A decent substitute until you acquire the legendary powers.
- Urivar's Lobbed Bombs - Helps to reduce the cooldown of our Death Trap. Especially useful early on.
- Hatred's Embrace's Haste - amazing for increasing your Critical Strike Chance in the early game.
- Outlaw Sharpshooter's Eye - This is not ideal as you do not want to stand in distant range versus bosses, as Supreme Death Trap only hits when in Close Range.
Learn more details about the season theme in our full Season Guide.
Skills & Gameplay
- Barrage is only used in the Starter Variant to bridge the gaps for when Death Trap is inevitably on Cooldown due to not having good enough Death Trap Cooldown Reduction tempers.
- Death Trap is our Ultimate Skill and main damage dealer. With enough cooldown reduction, we can get to the point where we can spam this indefinitely and fill our entire resource bar with Beastfall Boots + Aftermath.
- In the early progression, we instead rely on Exposure to reset its cooldown.
- Dash grants us high mobility and can be used to apply imbuements.
- Shadow Imbuement is used to activate Eldritch Bounty.
- Concealment is primarily used as our source of Unstoppable. It also has the added benefit of making our next Death Trap guaranteed to Critically Strike, applies Vulnerable, and gain benefit from Danse Macabre.
Note: Concealment can only be cast every 0.5 seconds, so it does not remove the need for Critical Strike Chance. - Caltrops adds a powerful damage buff with Enhanced Caltrops. Use Disciplined Caltrops for as long as you need extra Critical Strike Chance, and swap to Methodical Caltrops when it is no longer needed.
- Smoke Grenade adds another powerful damage buff through Enhanced Smoke Grenade, and applies poisoning required for Alchemical Advantage through Subverting Smoke Grenade.
- Momentum is our Key Passive. It most importantly increases our maximum Energy to reach 275 more easily and grants us a decent damage multiplier.
Skill Rotation
- Keep Shadow Imbuement up for Dash. Make sure to cast this combination every 9 seconds to refresh Eldritch Bounty.
- Versus Bosses and Elites: Apply your various debuffs on the target and make sure they do not fall off.
- Start with Caltrops and keep them inside the area for Enhanced Caltrops.
- Use Smoke Grenade to make them take more damage, and increase your attack speed through Alchemical Advantage.
- Use Concealment every 0.5 seconds to become Stealthed and ensure your next attack is a Critical Strike and applies Vulnerable. This also activates Danse Macabre.
- Activate Death Trap for a massive nuke.
- Keep alternating between Concealment and Death Trap as frequently as possible (every 0.5 seconds).
- Use your Evade (especially if you have Jah equipped) and Dash to keep moving. Evading also activates Balestra, which provides a decent damage boost.
- Keep an eye on the Boss Stagger Bar and prepare to nuke right when it fills, as some of our damage modifiers rely on crowd controls.
Rogue Specialization
Preparation - Spend resources to reset your Ultimate Skill, which in turn resets all your other skills.
This choice is the key to playing this build, as it allows us to immediately reset Death Trap and the rest of our abilities all the time.
Learn more details and how to unlock this system in our full Rogue Class Overview.
Paragon & Glyphs
Carefully check your Paragon Boards to ensure correct board rotation. Glyphs go from a radius of 3 to 4 at level 15 and from 4 to 5 at level 46. Some of them cannot be activated before reaching these thresholds! Progress through The Pit to rank up your Glyphs.
Use the slider to see the progression steps. At around Paragon 200, leveling slows down significantly and all important Rare clusters, Legendary nodes and Glyph sockets should be unlocked. Afterwards, you can min/max your build with minor tweaks and by picking up additional smaller nodes.
Death Trap Rogue Endgame Paragon
Some Glyph position swaps, board changes, and other pathing adjustments may occur as you unlock your full potential. The setup displayed by default is the final version of the build before spending additional points that do not significantly impact your character's power.
Glyph Leveling Priorities
To Level 15
- Explosive
- Ambush
- Versatility
- Canny
- Headhunter
To Level 46
- Explosive
- Ambush
- Versatility
- Canny
- Headhunter
Learn more about the Paragon System in our in-depth Paragon Boards and Glyphs guide.
Runes
You can have up to two Runewords in your setup, each consisting of one Ritual and one Invocation Rune. Socket them in Two-Handed Weapons if your build calls for them, otherwise place them into your Armor pieces to replace normal gems. The Death Trap Rogue focuses on the following combos:
Best in Slot
- Zan + Thul - Allows you to cast Mystical Frost Nova on your cursor, giving you easy Vulnerable, damage increase, and Frozen uptime for Frigid Finesse.
- Neo + Xal - Massively increases your Maximum Life, which is important to increase your Overpower damage.
- Poc + Jah - For Speedfarming only, this combination allows us to Teleport around while also gaining access to the damage bonus from Balestra.
Alternative choices
If you haven't unlocked the final setup or found the top runes, you can also benefit from these options:
- Cir + Vex - The extra skill ranks help with increasing damage and reducing cooldown of Death Trap.
- Gar - To reach 100% crit more reliably.
- Wat - Decrepify helps with stagger, defense, and allows an execute at 10% HP, can be combined with Xol in your other Runeword to generate large amounts of offering.
- Ohm - War Cry buffs us with helpful extra damage.
Learn more about Runes and how they work in our dedicated Runewords Overview and Runewords Tier List.
Mercenaries
Mercenaries are unlocked during the Vessel of Hatred campaign and assist you in battle. There are 4 separate Mercenaries to choose from, each with their own skill trees and abilities. You can have one hired (permanent) mercenary during solo play and a reinforcement who assists you from time to time in certain situations.
Hired: Raheir
He provides us with more defense and Fortify through Shield Charge, which is important for Overpower Damage. We also gain extra damage through his Provoke.
Reinforcement: Varyana
We choose Shockwave for higher uptime on knock down for Malice.
Learn more about Mercenaries and how they work in our dedicated Mercenaries Overview.
Stat Priorities & Item Progression
To enable the Death Trap Rogue to perform optimally, hunt for these stats on your gear with good rolls and aim to Temper ⚒️ & Masterwork Crit ↑ them accordingly. The green arrow ↑ indicates which affix is most impactful to Masterwork Crit, and it does not indicate how many Masterwork Crits you need on that particular affix. Keep in mind that certain stats, such as Armor, Resistances, Extra Size Tempers, Attack Speed, and more, have caps that may affect your priorities according to the items and Paragon points available at that moment.
Recommended Endgame Stat Thresholds
- Sub 15 sec Death Trap Cooldown
- 600%+Overpower Damage
- 50%+ Attack Speed
- 500%+ Overpower Damage
- 2000+ Dexterity
- 400%+ Ultimate Damage
- Armor Capped 1,000
- Resistance Capped 70%+
- 20,000+ Life
- 150%+ Movement Speed
- 275+ Max. Energy
- 1000%+ Stun Grenade Damage
- 15+ Ranks of Death Trap
Item Progression Goals
Before you dive into the Endgame with the Death Trap Rogue, take a look at this overview of the items used in the build. See below for further details about the different progression steps and variants. Some of your Skill Tree choices depend on what Legendary Aspects and Unique items are available to you. Keep in mind that while we can guarantee that everyone has access to the same Codex of Power Aspects, the exact progression is different for everyone.
Learn more details and how to farm Legendary Aspects and Uniques in our General Farming Guide.
Build Variants
This section is designed to guide your Death Trap Rogue from a fresh level 60 into the very late endgame using the three variants Starter, Ancestral and Mythic. At the final step, you should be fully decked out with a great all-rounder build. From there, follow the other min/max variants if you want to optimize around certain activities such as Pit Pushing, Speedfarming and more.
You need 186 energy (so +86 from Gear and if needed Galvanized Slasher's) to have enough for Momentum and Elixir of Resourcefulness II to bring you to 275 Maximum Energy. This is the breakpoint required for Banished Lord's Talisman to Overpower on every single cast of Death Trap. You also need at least 9 Ranks for Aftermath to restore enough Energy per Cast. Do not swap to the Ancestral Variant without it.
If you are fresh in Torment 1 coming from a leveling guide, this is where you begin. Since only some Aspects can be guaranteed from Dungeon unlocks for the Codex of Power, focus on acquiring the additional aspects via gambling with Murmuring Obols.
Gear & Skills
- Early on in your progression, focus on Armor & Resistances to survive. Each Torment difficulty adds a penalty of -250 Armor and -25% all Res, and it is recommended to keep both capped (1000 Armor, 70+ Res) at all times. As you unlock higher power gear, masterworking levels, and more Paragon points, you naturally scale your character into the higher difficulties and can start replacing some of these rolls with offensive or utility stats.
- In the Starter Variant, we use Barrage to bridge the gaps in our Cooldowns for Death Trap until our gear is ready to move to the Ancestral variant.
- In order to spam our ultimate non-stop, we need to to spend 75 energy for each 5 second of cooldown you have on Death Trap. In other words, you need 300 max energy if you have 20 seconds cooldown, 225 max energy for 15 seconds cooldown, and 150 max energy for 10 seconds cooldown.
- Without Beastfall Boots and some masterworking, this is impossible, so instead we play with Exposure to reset the cooldown until this combo is unlocked.
- Explosive Verve allows us to easily trigger Exposure with Caltrops, Smoke Grenade, Death Trap and the grenades from the key passive itself to ensure we have a good flow in the build.
- Before unlocking the build's final setup, you may be stuck with your ultimate on cooldown from time to time. Use your Trap skills to activate Exposure to reset it. Otherwise, follow the general gameplay described in the sections above.
The goal here is to progress through the Torment difficulties as you unlock Ancestrals, Paragon points, all Legendary Aspects, Temper mods and the most important Uniques to pilot this build. Some Legendary Aspects are used temporarily to fill slots that may be replaced with more Unique items later on.
Gear & Skills
- You can swap to the Ancestral Variant as soon as you drop Banished Lord's Talisman, Beastfall Boots and Scoundrel's Leathers, and get over 275 Energy (after buffs from Momentum).
- You can drink an Elixir of Resourcefulness II if you can not reach the necessary Energy, even with Galvanized Slasher's on a ring.
This is the final version of the build's progression, including all regular Unique items, Mythic Uniques, Legendary Aspects, Temper mods and Masterworking, leaving you with a great all-rounder build for all content in the game. Additional variants use this as a baseline to optimize around certain activities.
Gear & Skills
- Ring of Starless Skies is a big damage multiplier since there aren't many good tools available to boost Death Trap otherwise. It also helps us to cap resistances while wearing so many uniques.
- Harlequin Crest is Best in Slot because it provides us with necessary CDR, Energy and Skill Ranks. It even provides Maximum Life!
- Doombringer is used for its gigantic Max Life boost. This greatly benefits our Overpower Damage.
This setup optimizes the build to push the highest possible Tiers in The Pit after you have finished the Mythic variant and reached a plateau in your progression.
As the meta is evolving rapidly, expect to find more frequent changes to this variant.
Using this variant is NOT required to level your glyphs to 100. This variant is exclusively used for pushing very high into the pit. If you only want to get your Glyphs to 100, stick with the Mythic variant. This variant is also not as fast for Speedfarming as the Mythic variant.
- This variant requires you to change quite a few pieces of gear, the skill tree and the entire paragon board.
- You also need Turf.
- The playstyle changes, as you need to keep up Close Quarters Combat. You do so by using Penetrating Shot and Shadow Step every 8 seconds.
- You need Perpetual affix on your ranged weapon to restore resource for when Qax triggers.
- Otherwise, the build plays mostly the same as the Mythic Variant, you just need to stay in Close Range.
- Supreme Death Trap only works in Close Range, so stay close against the boss.
- You need near perfect Tempers of Death Trap Cooldown Reduction, else you need to Masterwork crit them.
Gear & Skills
- When fighting monsters in high tiers of the Pit, remember that after crowd controlling elites for 5 seconds, they become Unstoppable for 8 seconds. This may be the right moment to start kiting them around because your damage done goes way down and they can freely retaliate.
- In high tier boss fights, beware that many of your conditional damage and damage reduction modifiers cannot activate outside of stagger phases. This means they generally deal more damage against you than regular monsters and you have to prioritize dodging the attacks from shadow bosses while you can barely scratch them outside of stagger bursts.
Credits to mattias for the initial idea of this variant. This iteration was made in collaboration with him.
This setup optimizes the build to run the highest possible Tiers in The Pit as fast as possible after you have finished the Mythic variant and reached a plateau in your progression.
Important Information
This build has very specific gear requirements to function. You need Beastfall Boots with GA Maximum Resource Masterwork Crit 3 times, a Galvanized Slasher's with 30 energy or higher, and Elixir of Resourcefulness II to meet the 275 Energy Requirement.
- This variant changes the final board in your Paragon to Exploit Weakness.
- You need at least 29.5% Death Trap Cooldown Reduction on one ring, 20 ranks of Death Trap, and Urivar's Lobbed Bombs to get Death Trap below 15 seconds.
- You need to cast Dash twice to get enough Maximum Energy through Momentum to spam Death Trap.
Playstyle
- You apply Vulnerable and Freeze with Zan + Thul, which casts Mystical Frost Nova on your cursor thanks to Zan.
- You get 100% Crit Chance thanks to Heir of Perdition, Trick Attacks, Trap Mastery, Enhanced Dash, and Enhanced Shadow Imbuement. All of these happen naturally while moving around the map.
- No Weapon Swapping shenanigans! Casting Smoke Grenade gives you the final attack speed you need to be Attack Speed capped through Alchemical Advantage. This also increases damage dealt through Enhanced Smoke Grenade.
- No Reliance on Stagger of Crowd Control. The only damage amplifier we have is Frigid Finesse.
- If you need more damage for Elites and Bosses, throw Subverting Poison Trap and Enhanced Smoke Grenade at their feet and melt their HP.
- This build drops Danse Macabre as spamming Concealment until your wrist aches is not good for long farming sessions. Instead, use Concealment to get out of Crowd Control that stops you from blasting.
Gear & Skills
FAQ & Mechanics
Once a guide is released, many players have questions on why and how we are approaching certain choices. In this section you can find the answers to the questions that have been asked the most.
Your massive Health pool from stacking it to have Overpower benefit will keep you alive, even without having armor and resistances capped. Further, Harlequin Crest, Momentum and many other sources of flat damage reduction are present in the build.
Scoundrel's Leathers makes Death Trap a Core Skill and allows it to benefit from the additional Ranks. This increases the damage and reduces the base cooldown. It also allows it to benefit from Beastfall Boots and Banished Lord's Talisman.
You need 186 energy (so +86 from Gear and if needed Galvanized Slasher's) to have enough for Momentum and Elixir of Resourcefulness II to bring you to 275 Maximum Energy. This is the breakpoint required for Banished Lord's Talisman to Overpower on every single cast of Death Trap. You also need at least 9 Ranks for Aftermath to restore enough Energy per Cast.
The build works really well when you decimate everything in seconds, but may get overwhelmed if fights are long against high level monsters. There are several adjustments you can make when you have trouble with more difficult content:
- Check if your Armor & Resists are capped.
- Use defensive consumables.
- Roll Maximum Life instead of offensive stats on as many pieces as possible.
- Kite enemies when they become Unstoppable.
Rogues don't have many sources of Unstoppable, but a good way to break out of crowd controls is with Concealment. Using Jah can also help.
In the early game, you may occasionally starve on resources before you get the full combo online. Investing more into Resource Cost Reduction (esp. on Crossbow) helps with this. Using Death Trap will also recover Energy through Aftermath.
Generally hardcore and softcore share the same builds. Outside of being more prudent in your gameplay, you can also tweak the setup slightly to raise your survivability:
- Focus more on Armor & Resists, making sure that they are always capped especially as you transition into higher torment difficulties.
- Focus more on maximum life rolls, for example replacing DPS stats like main attributes, attack speed, critical strike chance and additive increased damage rolls. Also masterwork life more than normal if no other crucial stats have priority.
- Focus on adding defensive skills, passives and paragon nodes first as you level up.
- Play on a slightly lower difficulty than normal, don't push into difficult territory. As long as you can deal with all enemies swiftly, they can't retaliate.
- Include a source of Unstoppable if possible to get out of crowd controls.
- Use defensive elixirs and incenses instead of offensive ones.
Mechanics
- Overpower Formula:
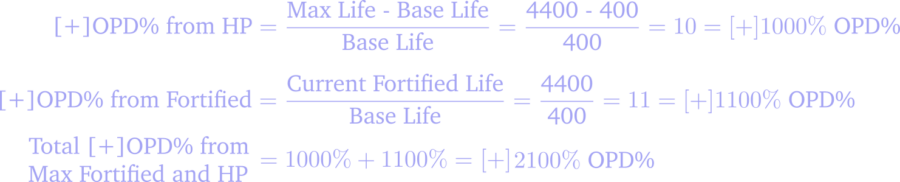
- For this build, the most important thing to know is stacking Maximum Life and having Fortify from Raheir.
- For a thorough explanation of how Overpower works, visit our in-depth Damage Guide by Avarilyn
- Dark Shroud stacks damage reduction additively for each active shadow. Due to the additive stacking, each increase in the skill's rank and active shadows boosts your survivability exponentially.
- Shadows have a 1.5 seconds cooldown between losing stacks, but the damage reduction still applies depending on how many are active at all times.
- At maximum stacks, your effective hit points (EHP) scale as follows in these examples:
- Rank 1: 66.6% more EHP
- Rank 5: 92.3% more EHP
- Rank 10: 138.1% more EHP
- Rank 15: 215% more EHP
- Rank 20: 354.5% more EHP
- Rank 31: Invincibility
- With these unique boots equipped, it's possible to trigger Preparation multiple times with the same attack, granting plenty of cooldown reduction.
- 150 energy reduces your ultimate cooldown by 10 seconds.
- 225 energy reduces your ultimate cooldown by 15 seconds.
- 300 energy reduces your ultimate cooldown by 20 seconds.
- While all the exact mechanics are much more nuanced, there are two separate Attack Speed Bonus caps of +100% that apply to all builds for a total potential of +200%. For Rogues, these two caps are distributed in the following way:
Cap 1
- Gear rolls
- Paragon nodes
- Elixirs
- Flurry combo points buff
- Close Quarters Combat (Cutthroat portion)
- Moonrise
- Artillery Shrine
Cap 2
- Close Quarters Combat (Marksman portion)
- Enhanced Heartseeker
- Alchemical Advantage
- Haste
- Accelerating
- High Velocity
- Asheara's Khanjar
Read up more on Attack Speed in our dedicated guide by Ava.
Bosses are immune to Crowd Control (CC) effects and instead take Stagger Damage when hit by one. The amount of stagger damage dealt depends on the type of CC and is proportional to its duration. After being hit by a CC effect, the Boss will temporarily take less Stagger Damage from a CC of the same type.
Effectively, this means that when you're just spamming one type of CC you don't need to spam any more of it than what you need to keep a normal enemy permanently CC-d. To stagger the Boss quickly you need to use as many different types of CC as possible. After the Boss is staggered it gains a certain amount of stacking Stagger Damage Reduction for the rest of the fight:
- After 1st Stagger: 20%
- After 2nd Stagger: 40%
- After 3rd Stagger: 60%
- After 4th Stagger: 90%
Bosses naturally regain 1% of their Stagger HP every second and when that regen is combined with 90% Stagger Damage Reduction it becomes borderline impossible to Stagger the Boss again unless you bring a serious amount of crowd controls.
Summary
The Death Trap Rogue is a fun to play, fast-paced tactical genius that performs well in almost any scenario. With a range of tricks and devices up your sleeve, and constant resets on all of your cooldowns, you can deal with anything.
- Invest in Energy recovery as much as possible early on so you can spam Barrage for Exposure until you can do the 225 Energy + Beastfall Boots combo.
- For Endgame, you want to cast Concealment before as many Death Trap's as possible.
- Stack Momentum while keeping on the move with Dash.
- Remember to imbue these from time to time with Shadow Imbuement.
- Drop Caltrops and Smoke Grenade on Bosses and other tough enemies.
- Your massive Health pool will be able to keep you alive even without having armor or resistances capped.
Credits
Written by Avarilyn
Initally written by wudijo