Paragon Boards & Glyphs in Diablo 4
Last Updated:April 24, 2025|Changelog
Paragon Boards when unlocked are a powerful way to continue progressing your character after reaching level 60. You place points in Normal Nodes to increase your character’s base Attributes, which are important for Glyphs later on. You can also select from more specialized Magic, Rare, and Legendary Nodes that enhance certain affixes or skills you are using. Glyphs are particularly strong enhancements and can only be placed into a Glyph Socket on a Paragon Board. Ultimately, the system forces you to make meaningful decisions that can impact your build greatly. Make as efficient use of your points as possible!
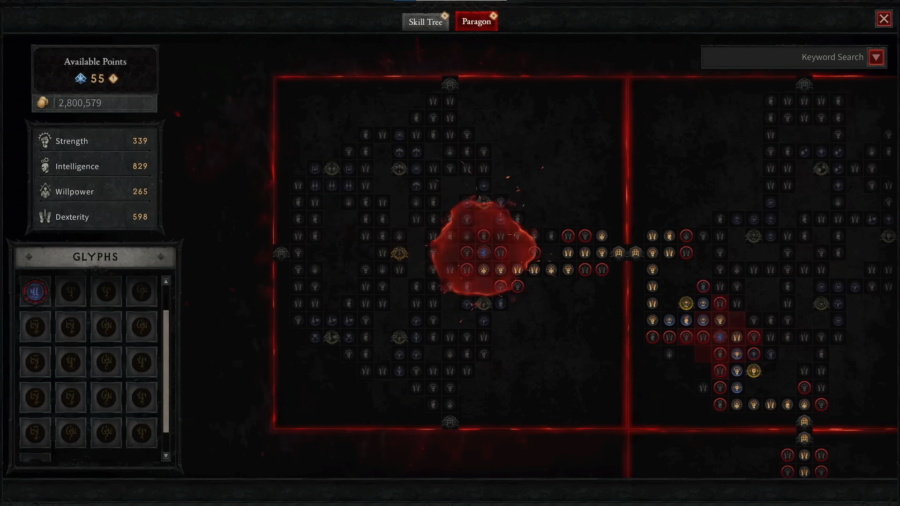
Paragon Nodes
The boards are structured with 6 different node types that are combined to create a massive grid for you to navigate through.
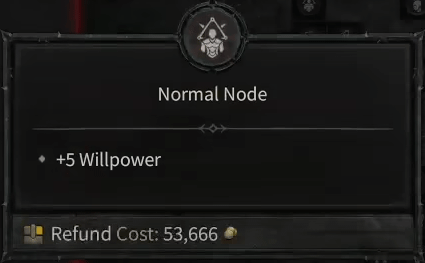
Normal Node
These Nodes are the "veins" of Paragon Boards. They connect all other nodes and always grant +5 to an Attribute (Strength, Intelligence, Willpower, or Dexterity).
Choosing the correct route allows you to unlock additional bonuses from Rare Nodes and Glyphs, as they require a minimum amount of certain Attributes to achieve.
Magic Node
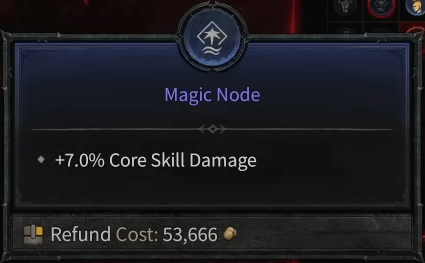
These Nodes can give larger amounts of Attributes compared to Normal Nodes or grant a power affix bonuses. There are always 5 Magic Nodes surrounding any Rare Node at all times.
While leveling, they are a nice increase to your character's power. Be sure the bonus they provide works with your build prior to selecting them to not waste points. Magic Nodes that are near Glyph Sockets are especially valuable to either increase a Glyph's power or when the placed Glyph increases Magic Nodes' power in its Radius.
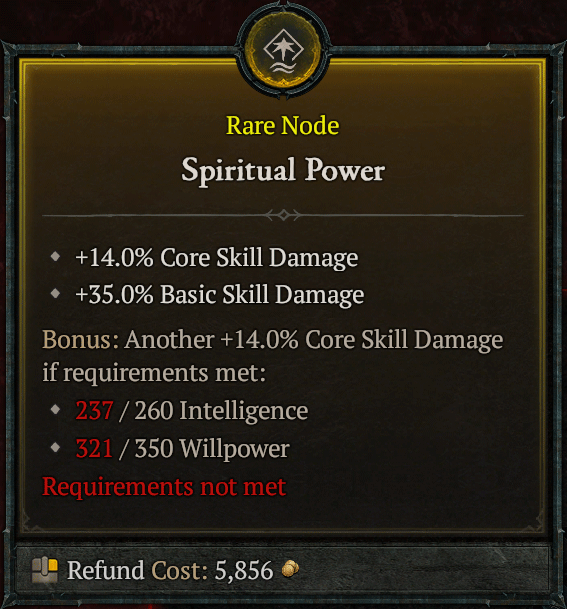
Rare Node
These Nodes have a significant impact on your character's build. They are especially powerful while leveling up. Rare Nodes consist of 2 Attributes and a Bonus that needs to be unlocked. To do so, your character must meet the minimum Attribute requirement stated on the Node. This requirement consists of one or two Attributes. When you attach multiple Paragon Boards, the thresholds for those Bonuses increase, making them more difficult to unlock.
The Spiritual Power example Rare Node requires both Intelligence and Willpower. The base Node grants 14% Core Skill Damage and 35% Basic Skill Damage. When both requirements are met, the Core Skill Value doubles to 28% and the line turns green to indicate that the Bonus is unlocked.
Legendary Node
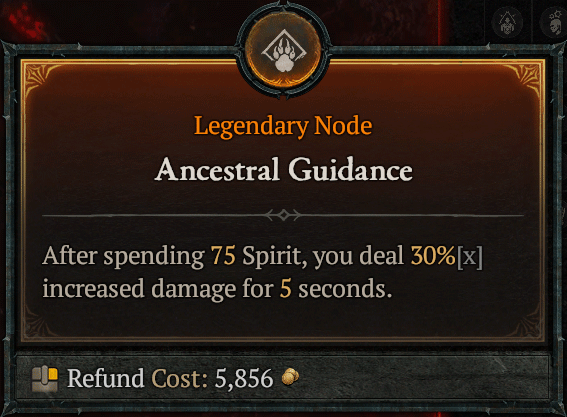
These are the flashy orange nodes that the entire Board is designed around and named after. Because of this, many players assume they are also the most important nodes on the Board, and this is often the case. However, the other options we cover below can be just as important or more, so don't just assume that the Legendary is all that matters! Consider all of the important nodes on a Board before committing. If two Legendary Nodes are similar in power, a good Rare node or well-placed Glyph socket may be the difference.
One important factor to bear in mind is that offensive Legendary nodes provide multiplicative damage, which makes them even more powerful than they may seem. If it fits really well with your build, then it should be factored heavily in your decision to use the board.
Glyph Sockets
Glyph sockets are the most complex of all the nodes and will require the most thought and planning to get the most out of. Glyphs are acquired as drops and can be placed in these special sockets. Each Glyph has an effect that either improves the power of nearby Rare or Magic nodes or draws power from nearby nodes to grant a special effect. Make sure to read the description carefully to understand how to maximize these benefits
Once you understand the benefits, the biggest factor for your board is determining what sockets will be most beneficial to the Glyphs you want to use. For example, a Glyph that provides a bonus to Rare nodes within range should be used in a socket that has the most impactful Rare nodes nearby so that you get the most benefit. A Glyph that gets stronger from selecting nodes with a certain attribute will want to be in a socket that has the most density for that attribute within range.

Board Attachment Node
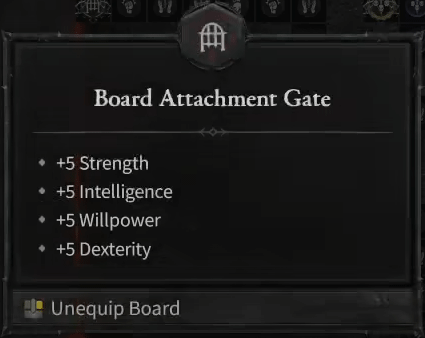
To attach a new Paragon Board, you have to reach something called a Board Attachment Gate. These Nodes connect one Paragon Board to another one. Every board contains four Board Attachment Gates in the center of the four board edges. One is used to enter the board, the other three can be used to connect the next board. They also grant +5 to all Attributes.
Making Your Choices
Since you won't be able to invest in every board, you need to choose the best and leave the rest. How you choose those is going to vary somewhat from build to build, but here's some general rules to follow:
- Make a priority list of all eight Boards. Pick the 5-6 best and order them from most desirable to least. Remember that you can pick a maximum of four additional boards for your final setup.
- If a Legendary node is especially powerful and synergistic for your build, you're almost always going to want to invest in it and it should probably be high on your priority list. The Legendary node dictates the general theme of the board so if it's that good, chances are the rest of the nodes are as well.
- Some Legendary nodes might not be best for your final setup but are great at early endgame before you've acquired all of your gear. In these circumstances, it may be best to set up two versions of your Paragon Board: one for early endgame and one for later when your build is fully online.
- Don't just look at the Rare nodes, also consider the Magic nodes surrounding it. Two Rares might have similar value, but the Magic nodes could put one over the top. Think of Rare and Magic Nodes as a single cluster, and evaluate the cluster as a whole.
- Not every cluster has to be good in order for a Board to be worth it. Remember, you don't need to invest in every cluster, and not investing in some might save you enough points to add another Board.
- Plan for the Glyphs you want to use and look for the sockets that best fit them. Try to find at least one good socket for every Glyph you want. The more sockets that work for each Glyph the better, as it will give you added flexibility when choosing your path.
- Consider the path you need to take to pick up the nodes you want. We talk about this much more in the next section, but even before optimizing your path you still need to factor in how far away nodes are from each other when determining which Boards you want. If two Boards seem like they have similar value, count the number of points you need to invest in order to make each Board work. If one requires fewer points, that might be enough to tip the scale in its favor by allowing you to invest more in other areas.
- Don't forget defense! Many players over value offensive nodes and ultimately end up too squishy. Make sure your selected Boards have a good balance of both offense and defense.
Gaining Paragon Points
Paragon Points are a limited resource. There are only three ways to gain them:
- Leveling from Paragon 1 to 300 after reaching level 60.
- Completing Renown
- Collecting Altars of Lilith
When you complete all of these objectives, you gain up to 327 Paragon Points. These Paragon Points are used to path across the Paragon Boards and reach the various Paragon Nodes across them.
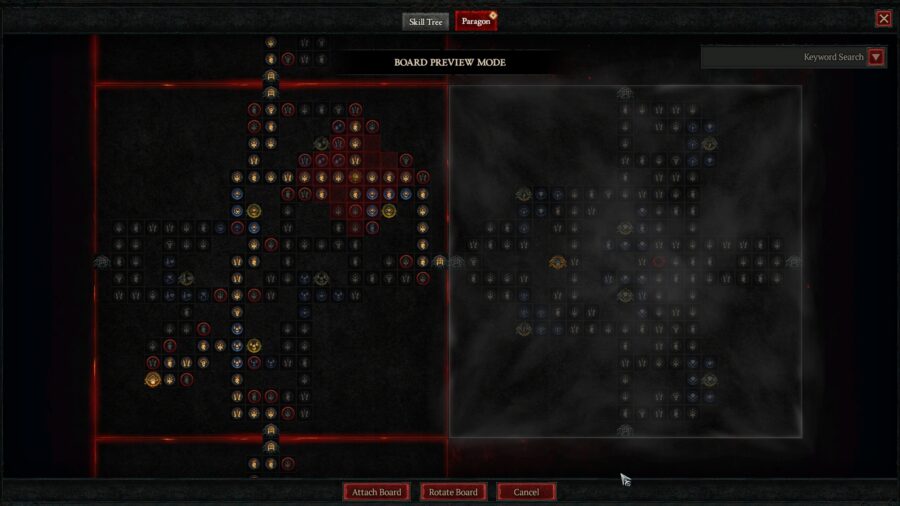
Paragon Board Selection
When you reach a Board Attachment Gate, you have the option to select your next Paragon Board. Every class has 8 unique Paragon Boards to choose from. As of Season 6, you can have a maximum of 5 boards including the starting board.
Initially, you get an overview of each board's Legendary, and Rare Nodes. Each board has a specific theme, for example, the Eldritch Bounty board focuses on the Imbuement Skills of the Rogue.
When you hit the "Preview" button, the Board Preview Mode shows up. Here you can see the layout of the selected board and rotate it in 90° steps, allowing you to optimize your path through it. When you are happy with the board and its rotation, you hit the "Attach Board" button to finalize your decision. You can also cancel the preview and go back to the Board Selection.

Paragon Board Pathing
When you've selected the Boards you want to use, it's time to plan out your path through the connected Boards. This step is all about maximizing efficiency; we want to get the most possible desirable nodes into our board within the allotted points while also prioritizing the very best ones. To accomplish this, we need to employ several strategies. We do this for every board, starting from highest priority to lowest, until we've exhausted all of our points and cannot find a more optimal path that maximizes the amount of desired nodes we can pick up.
Determine The Shortest Route
The first thing we want to accomplish is finding the shortest route through each of our boards that still picks up all of the major nodes we want. This is usually accomplished by taking the most direct path to each node, starting with the node closest to the entrance to the board first and ending with the node closest to the exit. Nodes in between these two can be trickier, but you can generally move to the next closest until you reach the exit. Due to the way some boards are set up, it may make more sense to branch out to access a valuable node or cluster and then go back to a previous one to continue on the path.
Speaking of the exit, when possible always choose the one that is closest to a node that you can end with. This will save you several points that you can use elsewhere.
Rotating Boards
Boards have 4 different connection points, and the orientation of each Board is not static. They can be rotated 90 degrees, which allows you to connect a Board from any point. Use this to your advantage to create the shortest possible path and avoid wasting points. Having the ability to rotate your boards also means you don't have to worry about which connection point you end at, since the next Board can be reoriented to accommodate the connection point. The only exception to this is if the ending point on the Board would lead you back into a previously established board, preventing a connection to a new board.
Far Away Valuable Nodes
Sometimes a Board will have multiple valuable nodes on it that are very far away from each other, and the stuff in between provides little additional value. In these cases, it may be better to jump into a Board multiple times.
In this scenario, we would enter a Board near a valuable node and then immediately move on to the nearest exit node. We would then set up the rest of our boards in a way that could circle back to the other side of the Board with the far away nodes. This only works if we have enough additional boards to invest in and naturally want the points in them. It can take a lot of planning to pull off, but success can mean saving several points to spend in more valuable areas.
Strategic Paragon Board Reset
Early on you simply focus on rushing to specific nodes that empowers your character. Later on, this can be optimized as we have an abundance of Paragon Points to use in the endgame. A strategic Paragon Board reset is utilized by builds that benefits from a specific route early on, but once you have progressed further in the build can change for something more optimal. This is communicated in our build guides with the Paragon Board progression slider, where one step features a completely new layout compared to the previous one.
Paragon Glyphs
Glyphs are a powerful addition to further enhance your character after reaching Level 60. They are rune-like items that are placed in special Socket Nodes on each board. These glyphs can be leveled in the Pit, but to understand how to utilize these powerful additions to your endgame power, lets elaborate what a Glyph is and where you can find them.
What are Paragon Glyphs?
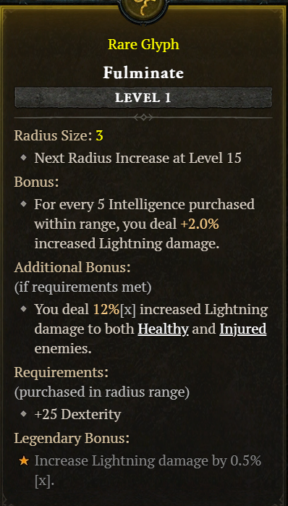
A Paragon Glyph is your way of empowering your endgame build further through powerful effects such as increased damage dealt versus Healthy and Injured enemies, or gaining more energy after using an agility skill. These customizations puts your build apart from others and allows your character to grow stronger the further you progress in the Pit. To fully understand how a Glyph is structured and functions, let us look into Fulminate.
- The first bonus either empowers nearby Normal, Magic, and Rare paragon nodes or gives your character some additive damage stat.
- An additional bonus is unlocked by allocating enough Paragon Nodes in its Radius to reach the specified Attribute.
- Glyphs start with a Radius of 3. When put into a Socket Node, they affect or are affected by Paragon Nodes within 3 Nodes.
- At Level 15, their effect Radius increases to 4.
For example, Fulminate grants +3.0% increased Lightning damage for every 5 Dexterity allocated in range. The additional bonus requires you to reach 25 Dexterity on allocated Paragon Nodes in its Radius. You should put this into a Glyph Socket that has as much Dexterity in range as possible.
Once the Glyph reaches level 46, it becomes Legendary and gains an additional radius increase to its maximum of 5. This Legendary increase is extremely powerful as it gives you access to a new Legendary Bonus multiplier at the bottom of the Glyph.
Using Glyphs
To use a Glyph, you have to place it into a Socket Node on your Paragon Board. Each board has one of these Nodes. Every Glyph has a "base bonus" that applies to your character when socketed.
- Some scale with a specific Attribute on Paragon Nodes allocated in its radius. Make sure to utilize your Paragon Boards to maximize this effect.
Example: If your Glyph scales with Dexterity, make sure to put it in the Socket Node with the highest Dexterity you can find. - Or increases the effectiveness of Paragon Nodes (Magic and Rare Nodes) within its Radius. Make sure to utilize these Glyphs in Socket Nodes that are surrounded by nodes that benefit your build!
Rare and Legendary Glyphs have an additional bonus that is unlocked when the specified Attribute from allocated Paragon Nodes is reached. Make sure to unlock these secondary bonuses!
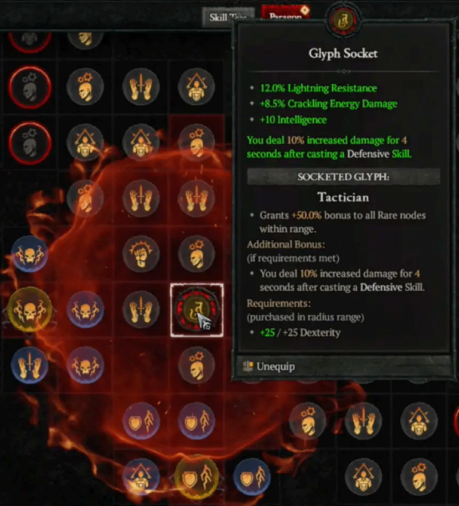
The example image shows a block of green text at the top. These are the total bonuses that the Glyph adds to your character.
Acquiring Glyphs
Obtaining these powerful Glyphs is easy, but may take a while to obtain before having the full set you require for your build. Once you hit level 60, any activity has a chance of dropping a Glyph for you. The best way, as you could guess, is to run the Pit or Nightmare Dungeons. You can open your Paragon Board and check for the ones you have obtained and which have not yet been found. They can look very similar to regular items when dropped, so be on the lookout to not miss any.
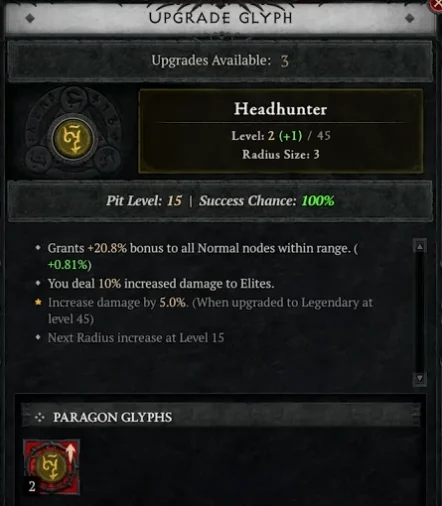
Upgrading Paragon Glyphs
Players who manage to clear the entire pit and slay the boss before the timer runs out can upgrade their glyphs. If you successfully clear the pit, you gain:
- 3 attempts at upgrading your glyphs
- 1 extra if you do not die during the run.
Depending on the difficulty of the pit, the odds of successfully upgrading your glyph increase based on the level difference between the glyph and the pit run. This chance is 100% if the Pit level is 10 levels ahead of the Glyph, with reduced effectiveness if the Pit level is closer to the Glyph's level. If the level difference between your glyph and the Pit level is greater than 20, your glyph gets an additional upgrade.
The max level of glyphs has been increased from level 21 to level 100. Once you reach Glyph level 45, it costs 10k gem fragments to upgrade from Rare to Legendary quality, giving it an additional radius size and a new affix.
List of Paragon Glyphs
- Ambidextrous
- Bloodfeeder
- Brawl
- Challenger
- Cleaver
- Crusher
- Disembowel
- Dominate
- Executioner
- Exploit
- Imbiber
- Ire
- Marshal
- Might
- Mortal Draw
- Revenge
- Rumble
- Seething
- Territorial
- Twister
- Undaunted
- Weapon Master
- Wrath
- Bane
- Dominate
- Earth and Sky
- Electrocution
- Exploit
- Fang and Claw
- Fulminate
- Guzzler
- Headhunter
- Human
- Keeper
- Outmatch
- Poise
- Protector
- Shapeshifter
- Spirit
- Tectonic
- Territorial
- Tracker
- Undaunted
- Werebear
- Werewolf
- Wilds
- Abyssal
- Amplify
- Blood-drinker
- Control
- Corporeal
- Darkness
- Deadraiser
- Desecration
- Dominate
- Eliminator
- Essence
- Exhumation
- Exploit
- Golem
- Gravekeeper
- Imbiber
- Mage
- Revenge
- Sacrificial
- Scourge
- Territorial
- Undaunted
- Warrior
- Ambush
- Bane
- Canny
- Chip
- Closer
- Combat
- Control
- Devious
- Diminish
- Efficacy
- Exploit
- Explosive
- Fluidity
- Frostfeeder
- Headhunter
- Infusion
- Nightstalker
- Pride
- Ranger
- Snare
- Tracker
- Turf
- Versatility
- Adept
- Charged
- Conjurer
- Control
- Destruction
- Electrocute
- Elementalist
- Eliminator
- Enchanter
- Exploit
- Flamefeeder
- Frostbite
- Imbiber
- Invocation
- Pyromaniac
- Reinforced
- Stalagmite
- Tactician
- Territorial
- Torch
- Unleash
- Warding
- Winter
- Bane
- Canny
- Colossal
- Consumption
- Exploit
- Fester
- Fitness
- Fulminate
- Guzzler
- Headhunter
- Hone
- Hubris
- Innate
- Jagged Plume
- Menagerist
- Outmatch
- Revenge
- Ritual
- Spirit
- Talon
- Turf
- Wildfire
Summary
- Paragon Boards are structured in a grid with Normal, Magic, Rare, and Legendary Nodes, and require careful planning and a solid strategy to get the most out of them.
- Optimize your path through the Paragon Boards you choose to save you valuable points that can then be spent on more impactful nodes.
- Each board has one Legendary Node and a Board Attachment Gate in the middle of each edge.
- Rare Nodes have stats that unlock when certain Attribute requirements are met.
- You can gain up to 327 Paragon Points.
- One Glyph can be put in each board. All allocated nodes within its radius contribute to its total power output!
- Increase a Glyph's Radius by leveling it up to the listed requirement.
- Glyphs start at Rare quality and can be upgraded to a powerful Legendary version.
- Be careful not to over prioritize Glyphs too early. They need to be found and leveled up before they reach their true potential.
Credits
Maintained by Avarilyn
Written by Teo1904