Last Updated:April 11, 2024|Changelog
Disclaimer: This guide is the Season 27 Guide for the Natalya Rapid Fire Build which does not exist anymore due to the Natalya's Vengeance rework. For up-to-date Natalya guide, go to the Natalya Spike Trap Guide!
Introduction
VIew all variants
Natalya Rapid Fire Demon Hunter first became a real build in Season 17, when two of its key items, Wojahnni Assaulter and Sin Seekers, received tremendous buffs. Compared to it's LoD cousin, Natalya Rapid Fire is a lot squishier and a bit clunkier but (in its ultimate high-paragon form) it deals almost double the damage!
The Rapid Fire builds were so powerful that they immediately claimed the top spot on solo Demon Hunter leaderboards, destroying the fragile balance we had after Season 12 and Season 16 balance patches. Instead of 4 different builds (Impale, UE MS, N6M4, and M6 CA) performing within 3 tiers of each other, we suddenly had only one undisputed top dog.
Rapid Fire stayed on the top of DH leaderboards for 4 seasons until the Gears of Dreadlands set was introduced in Season 21. But in Season 23 Hungering Arrow builds received a massive nerf bringing GoD DH down to the Rapid Fire level.
Due to the generic multiplier provided by the set, there are many different Natalya-based builds available. Rapid Fire is by far the strongest one of them.
High AoE Damage ✔
Very High Recovery ✔
Scales well with Density ✔
Satisfying Visual Effects ✔
❌ Low Toughness
❌ Requires High Paragon
❌ Terrible at Speedfarming
❌ Almost no room for Skill Expression
Core Setup
Items
- Natalya's Vengeance provides 14,000% damage and 60% damage reduction after casting Rain of Vengeance.
- Aughild's Authority gives some extra damage and toughness and even more against elites.
- Ring of Royal Grandeur lets us combine the two sets.
- Wojahnni Assaulter is our strongest multiplier, giving 3,000% additive Rapid Fire damage. Unfortunately it also makes all other sources of additive damage (Rapid Fire rolls on gear, Strongarm Bracers, Taeguk, etc.) completely irrelevant.
- Sin Seekers increase Rapid Fire damage by 300% and remove its channeling cost.
- Hellcat Waistguard is an effective x2.5-5 multiplier (see Mechanics section for details) which works with all grenade skills including Rapid Fire Bombardment.
- Dawn lets us achieve easy 100% Vengeance uptime.
- Stone Gauntlets roughly triple our toughness with no downside due to permanent Vengeance.
- Endless Walk provides another up to 100% damage bonus or 50% toughness bonus. This can be used both offensively or defensively depending on the situation.
Season 27 Sanctified Items
Angelic Crucibles are new consumables that drop anywhere once you're Level 70. Using them on items reforges them into Sanctified Items with Primal Ancient stats, and adds one of three new unique Class Powers listed below. For full details on how they work, check out this Seasonal Guide by Chewingnom!
Let's look at our Class Powers and see how they apply to our build:
- The best power for us is the Sanctified Vengeance. It occasionally fires extra Rockets we can use to deal some damage to elites or bosses.
- The Sanctified Strafe power doesn't help us, so go for the one listed above.
- The Sanctified Cluster Arrow power doesn't help us, so go for the one at the top.
Since you can only equip one of them, choosing the right item to craft it on matters! Great candidates are Weapons, Offhands, Jewelry or any item with an important multiplier. With that in mind, we recommend Sanctifying one of the following items:
- Dawn
- Sin Seekers
- The Compass Rose
Global Stat Priorities
The most important for almost any Demon Hunter build is reaching permanent Vengeance uptime. This is achievable through the 65% Cooldown Reduction effect provided by Dawn and having 37% Cooldown Reduction on your character. This is done with Flawless Royal Diamond in your helmet, 10% from Paragon Points and 8% rolled on your Shoulders. The last two rolls will typically be on your Gloves and Quiver. If your Dawn has less than 64-63% on the legendary affix, you should consider adding a 4th Cooldown item to make up for it, as any lower will leave you with a significant gap.
Attack Speed is largely irrelevant due to massive boost from Pain Enhancer, only the multiplicative 7% roll on Dawn is important, but even there it's not necessary.
Aside from that, you want to stack damage stats wherever possible: Critical Hit Chance, Critical Hit Damage, Fire Damage and Area Damage. For your defensive stats you just need to focus on increasing the raw toughness value. Your recovery is based on percentage of your maximum life, there's no reason to prioritize mitigation over health pool. Physical Resistance is also extremely useful, as you will stand directly inside your enemies and most of the incoming damage will be of that type. You should always use Flawless Royal Diamond in your Chest and Pants sockets.
1. Do the Challenge Rift for the materials to cube Legendary Powers. You can complete this once a week for additional resources and we always update the guide for you!
2. Gather all the armor pieces from Natalya's Vengeance set. Each piece can be gambled from Kadala for 25 Bloodshards. Do not salvage any duplicate pieces you find! Instead convert them to another part of the set with Recipe 4 in Kanai's Cube. If you have extra materials you can use Recipe 3 to craft the remaining pieces, but this is expensive and not recommended for new players.
3. Gamble from Kadala in this order:
- Natalya's Vengeance set except for the Ring and Weapon.
- Sin Seekers
- Hellcat Waistguard
- Stone Gauntlets
- Convention of Elements, Elusive Ring, The Compass Rose
inplace
4. Craft using Recipe 3 in Kanai's Cube in this order:
- Crossbows to get Wojahnni Assaulter
- Hand-Crossbows to get Dawn
- Amulets to get The Traveler's Pledge
- Anything from the Gamble list in Step 3 that you haven't already acquired
5. Do Bounties to acquire several important items for this build:
- Act 1: Ring of Royal Grandeur
- Act 4: Can drop any bounty item from any act
- Bounty Turn-in: Recipe for Aughild's Authority set
| SLOT | ITEM | STAT PRIORITY |
| Main-Hand | Dawn Wojahnni Assaulter (Cubed) | 1. Damage Range 2. Socket Ramaladni's Gift 3. Damage % 4. Area Damage 5. Attack Speed 6. Dexterity |
| Off-Hand | Sin Seekers | 1. Critical Hit Chance 2. Area Damage 3. Cooldown Reduction 4. Elite Damage 5. Dexterity |
| Helm | Natalya's Sight | 1. Socket Flawless Royal Diamond 2. Dexterity 3. Critical Hit Chance 4. Vitality |
| Gloves | Stone Gauntlets (Cubed) Natalya's Touch | 1. Critical Hit Chance 2. Critical Hit Damage 3. Area Damage 4. Cooldown Reduction 5. Dexterity |
| Shoulders | Aughild's Power (Crafted) | 1. Dexterity 2. Cooldown Reduction 3. Area Damage 4. Vitality 5. All Resistance |
| Chest | Natalya's Embrace | 1. Sockets Flawless Royal Diamond 2. Dexterity 3. Vitality 4. Life % 5. Elite Damage Reduction |
| Pants | Natalya's Leggings | 1. Sockets Flawless Royal Diamond 2. All Resistance 3. Dexterity 4. Vitality |
| Boots | Natalya's Bloody Footprints | 1. Dexterity 2. Vitality 3. All Resistance 4. Armor 5. Rapid Fire Damage |
| Ring 1 | Convention of Elements Elusive Ring | 1. Socket 2. Critical Hit Chance 3. Critical Hit Damage 4. Area Damage 5. Damage Range |
| Ring 2 | The Compass Rose Ring of Royal Grandeur (A1 Bounties, Cubed) | 1. Socket 2. Critical Hit Chance 3. Critical Hit Damage 4. Area Damage 5. Damage Range 6. Dexterity |
| Bracers | Aughild's Search (Crafted) | 1. Fire Damage 2. Critical Hit Chance 3. Dexterity 4. Vitality 5. All Resistance |
| Amulet | The Traveler's Pledge | 1. Socket 2. Critical Hit Damage 3. Fire Damage 4. Critical Hit Chance 5. Cooldown Reduction |
| Belt | Hellcat Waistguard | 1. Dexterity 2. Vitality 3. Life % 4. All Resistance |
| Potion | Bottomless Potion of Kulle-Aid | For breaking walls to pull enemies and increase DPS |
- Pain Enhancer gives us about 100% DPS increase in large pulls, which can also be snapshot so it persists even when the mobs start dying.
- Bane of the Stricken is necessary to kill the Rift Guardian.
- The third gem is usually Esoteric Alteration which is needed to stay alive but at very high Paragon it can be replaced by Bane of the Trapped for 60% extra damage.
- Rapid Fire Bombardment is your main damage skill. Bombardment is the only useable rune because of its AoE nature and synergy with Hellcat Waistguard.
- Rain of Vengeance is necessary to activate Natalya's Vengeance (6) Bonus. The freeze from Flying Strike rune helps us stay alive. Alternatively Shade can be used to better proc Pain Enhancer.
- Vengeance Side Cannons provides x1.4 damage, x2 toughness (from Visage of Gunes) and tremendous amounts of healing. In a decently sized pull it takes you less than half a second to go from 1% HP to full.
- Smoke Screen Special Recipe is an excellent defensive option for this build, that can also be used to easily activate Elusive Ring.
- Vault Tumble is used for mobility and to avoid getting stuck.
- Preparation Focused Mind lets us use Smoke Screen more often. This slot can be occupied by another defensive skill such as Boar Companion or Shadow Power Gloom. In that case Smoke Screen Vanishing Powder is used.
- Cull the Weak is the strongest offensive DH passive providing 20% multiplicative damage increase.
- Grenadier increases damage by 10% and AoE size by 20%.
- Numbing Traps reduce incoming damage by 25%.
- Awareness allows us to cheat death.
| Core | Offensive | Defensive | Utility |
| 1. Movement Speed | 1. Critical Hit Damage | 1. All Resistance | 1. Area Damage |
| 2. Vitality1 | 2. Critical Hit Chance | 2. Life % | 2. Resource Cost Reduction |
| 3. Maximum Hatred | 3. Cooldown Reduction | 3. Armor | 3. Pickup Radius |
| 4. Dexterity | 4. Attack Speed | 4. Life Regeneration | 4. Life per Hit |
1 High paragon versions of this build need about 1.5m Life to function. A low paragon variant with Elusive Ring can get away with about 800,000 Life.
Patch 2.7.0 revamped the follower system giving all 3 hirelings new powers and the emanate system. The first thing you should do is read our complete follower guide and remember the key takeaways:
- The emanation system allows followers to share certain legendary and set powers with you. The most important ones are: The Flavor of Time, Nemesis Bracers, Avarice Band, Sage’s Journey and Cain’s Destiny. Click the guide above for the full list.
- Follower’s powers are based on their main stat (maxed at 25,000, but they have a 2.5x multiplier so you only need 10,000). This means we stack Intelligence on the Enchantress, Dexterity on the Scoundrel and Strength on the Templar.
- Guardian's Jeopardy (2) Bonus works for followers by improving their inherent stat multiplier from x2.5 to x3.5, making it slightly easier to hit the 25,000 main stat threshold if needed.
- Followers share 20% of their Experience, Magic and Gold Find stats with you.
- Legendary gems do not work on followers, except Esoteric Alteration and Mutilation Guard.
- Cooldown Reduction does not work for any follower skill except the Templar’s Heal.
- Followers never deal significant damage; you’re on your own to clear the content.
With these in mind, let’s get into our recommendations for this build.
GR Pushing Enchantress
For Greater Rift Pushing we recommend this Enchantress setup for the Slow from Temporal Pulse, Fire Damage from Amplification, Damage Reduction and Armor from Powered Shield, and the cheat death from Fate's Lapse.
Stat Priorities:Since we have the immortality relic, we do not need to stack survivability on our Enchantress.
Intelligence > Attack Speed.
Key Items:
- The Flavor of Time: For double duration on Pylons.
- Nemesis Bracers: For more progression from Elites.
- Oculus Ring: For 85% increased damage.
- Unity: For 50% damage reduction if you're also wearing one.
- Ice Climbers: To make your follower immune to Freeze and Immobilize effects.
- Mempo of Twilight and Cain's Destiny: For more Attack Speed.
The build is overall fairly simple:
- Spam Vengeance and Preparation on cooldown.
- Cast Rain of Vengeance to refresh the buff, Vault in position and start holding down Rapid Fire.
- Keep holding it for at least 5 seconds while spamming Smoke Screen to stay alive.
- Repeat #2 and #3 until most of the mobs are dead.
This build can be played on hardcore but it's not gonna be fun. Use the low paragon high toughness version and be very careful around Waller elites.
Check out our dedicated Hardcore Survival Guide to learn more about how to succeed in this game mode!
Variants
Concept
This variant uses Elusive Ring and Esoteric Alteration to stay alive. It's still not very tanky and you need about 2,000 Paragon to make it work somewhat well. Because of Wojahnni Assaulter you are forced to stand still for a long time and facetank everything. This means that there's no clever or skillful way to play this build at low paragon, you simply must pass the stat-check.
Gameplay
Since there's no Convention of Elements in this variant, our DPS rotation will mostly revolve around Oculus Ring. When you see one spawn, Immediately Vault into it and cast Rain of Vengeance. After that you have 6 seconds to deal damage and then the next Oculus Ring will spawn and you can start over from the beginning.
Try going mostly for large packs of trash as you have double density scaling from Area Damage and Pain Enhancer. Elites should be mostly ignored because they are both deadly and very difficult to kill.
Setups
Before you progress to high paragon setups you can do some less radical +damage -toughness trade-offs such as switching a defensive passive for Ambush or replacing Preparation with Caltrops Bait the Trap.
Concept
This variant becomes playable at around 4,000 Paragon. We drop Elusive Ring to get Convention of Elements. To compensate for the lost toughness we need to invest a lot of Paragon points into Vitality: at least 1,500k life is recommended.
Gameplay
Here we do the rotation around Convention of Elements cycle. At the end of Physical stop moving and spray Rapid Fire everywhere to apply Pain Enhancer DoT. 1 second into Cold cast Rain of Vengeance and then Vault into the pull. Keep holding down Rapid Fire until Fire ends, then Vault out and spend the next 7 seconds to move the pull forward.
Setups
At very high Paragon (8,000+) you can do the final change and replace Esoteric Alteration with Bane of the Trapped. Only then this build becomes strong enough to beat GoD DH and become #1 on the global Demon Hunter Leaderboards.
Video Guide
Currently none available.
Mechanics
- Fires grenades dealing 181.6667% weapon damage each.
- Has a maximum range of 50 yards.
- Has an Attack Speed Coefficient of 3.0. The highest possible breakpoint (4 Frames Per Attack) is achieved at 4.0001 sheet APS.
- Attack Speed is snapshot at the start of channel. Meaning that if you make a large pull giving you a lot of Pain Enhancer stacks and then start a 4 FPA Rapid Fire, it will continue firing 15 grenades per second even if you reach 100% progression and all mobs despawn.
- Each grenade you shoot has a 50% chance to start bouncing
- A bouncing grenade will deal 150% damage on the first impact, 50% more damage on each consecutive one, and finally 800% damage on the final impact. For the 5 Bounce belt the sequence is 150%, 200%, 250%, 300%, 800%.
- Bouncing grenades can proc Area Damage and on-hit effects and have the same proc coefficient as the original skill.
- On each bounce the grenade will move 11 yards in a random direction.
- Upon hitting the impassable terrain or leaving the map, the grenade will stop bouncing.
- Grenade skills bounce one time by default, so even the grenades that didn't proc the bounces from Hellcat Waistguard will deal 150% damage.
- The randomness of bounces makes effectiveness of Hellcat Waistguard vary depending on the size of the target and explosion radius. A bigger target is more likely to be hit by multiple bounces and the 800% final bounce. Higher number of bounces will make average spread of grenades wider, however it will always deal more damage on average even to the smallest targets. That rule is only broken when you are fighting in a tight spot and grenades are likely to stop bouncing before they reach the final 800% bounce.
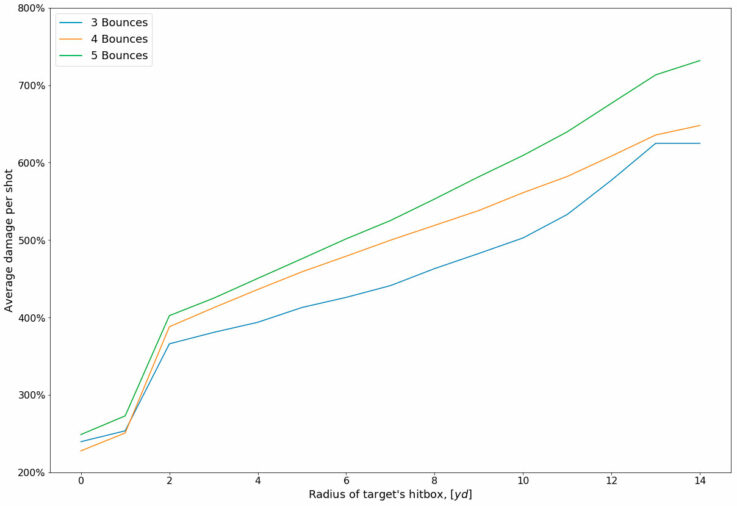
- The above graph was simulated using 100,000 shots with Rapid Fire Bombardment with Grenadier passive (9.6 yd explosion radius). Most targets will have hitbox radius of 1 or 2 yards, but some mobs such as Toxic Lurkers or Punishers, as well as Rift Guardians can be a lot bigger.
- Gives 10 stacks of buff for each second spent channeling Rapid Fire, regardless of Attack Speed.
- Each stack gives up to 100% additive Rapid Fire damage.
- All stacks are immediately lost when you stop channeling.
- The damage bonus is fully dynamic. You need to have the buff up when Rapid Fire hits enemies.
- Fires two piercing shots (lasers) every time you perform an attack.
- This effect has 0.9s/APS internal cooldown.
- Each laser heals you for 3% max HP per enemy hit.
- In LoD RF build you will typically have about 3-4 APS thanks to Pain Enhancer and each of your lasers will hit about 10 enemies, resulting in more than 200% max HP restored per second.
Summary
- Reach the necessary Cooldown Reduction for permanent Vengeance (37% with a perfect Dawn).
- Apply Pain Enhancer to everything.
- Recast Rapid Fire to snapshot the Attack Speed and hold on for dear life.
- Activate your defensive and utility skills when necessary.
Credits
Written by Northwar & wudijo.
Updated by wudijo.