Last Updated:May 24, 2025|Changelog
Introduction
View all variants
The Gears of Dreadlands Hungering Arrow Demon Hunter has made its entry during Season 21 and immediately surged to the top of all builds in the game, especially in solo pushing. With its excellent mobility and damage it is an all-rounder for speed content.
In Season 23 (Patch 2.7.0), the build has been tweaked to bring down its top-end pushing and fishing potential by capping the pierces on The Ninth Cirri Satchel to 4 while buffing the (6) Bonus from 10,000% to 15,000% to compensate. In Season 29 (Patch 2.7.6), the (2) Bonus Momentum mechanic was enhanced by giving it a 5-second delay before the timer starts ticking down, making the farming playstyle even more care-free.
The build focuses on Strafe and Hungering Arrow to deal damage, which is done semi-automatically thanks to the (4) Bonus that will automatically fire your last used Primary whenever you hit an enemy with Strafe. This allows you to deal damage while moving. The (2) Bonus gives you a Momentum stacking Movement Speed and Damage buff. This bonus stacks up to a total of 160% Movement Speed letting you literally fly through the rifts while destroying everything in your path.
While it is possible to play with other Primary skills, they lack proper legendary support to be an effective choice. Bolas is the only real alternative for T16 and Greater Rifts around 5-7 tiers lower than Hungering Arrow. Entangling Shot can be used in a solo pushing variant to increase your damage output by weaving two different skills, but it is quite difficult to play. During Season 24, Ethereals and the astonishing Buriza-Do-Kyanon incredibly buffed the build, skyrocketing it back as one of the most effective choice to farm Speeds Greater Rifts. Yet even outside of seasonal buffs, the GoD DH remains a solid popular farming build.
This is an Area Damage (AD) build, since Hungering Arrows as well as all the procs from Gears of Dreadlands (4) Bonus can proc it. The build and gameplay itself are easy to learn, however when it comes to optimizing the setup especially in solo push, there are a lot of details and intricate interactions to consider (see Mechanics) in order to get the most out of it. Let's get into it!
Lots of variants ✔
Strong season starter ✔
Top solo farming build ✔
Fast and smooth gameplay ✔
❌ Complicated mechanics
❌ Hits a brick wall in pushing
❌ No direct targeting possible
❌ Lacks massive AoE potential
Core Setup
Items
- The Gears of Dreadlands set provides huge damage bonuses: x3 through the (2) Bonus, and x151 through the (6) Bonus, for a total of x453 damage with your Hungering Arrow. On top of that, the (4) Bonus can also be counted as roughly a x2-2.5 multiplier due to effectively providing hidden extra Attack Speed. Finally, the set gives you 60% damage reduction and up to 160% Movement Speed while using Strafe.
- The Ninth Cirri Satchel is the key item of the build, adding 100% pierce chance to Hungering Arrow (up to 4 times) as well as an up to 600% multiplicative damage increase.
- Hunter's Wrath is another high-value DPS item, providing a 30% Attack Speed bonus to your Primaries (which makes keeping up Momentum stacks easier) as well as another 200% multiplicative damage bonus.
- Dawn can be either worn or cubed, depending on what you find and the variation you play. It will help you to reach permanent Vengeance uptime.
- Depth Diggers provide another 100% multiplicative damage increase to Hungering Arrow.
- Wraps of Clarity add a valuable 50% damage reduction.
- As long as you are not using a Two-Handed Weapon, you can generally use a Quiver or a second Weapon interchangeably (while cubing the other). With perfect rolls on all your gear, dual wielding wins out by about 0.5%.
Season Theme - Eternal Conflict
For the duration of this season, all players will benefit from the Pandemonium Kill Streak buff initially available in Season 19. For each stack of this buff, you’ll receive a small boost to movement speed and bonus damage, ultimately capping out at 50% movement speed and 100% damage at 1000 stacks. In addition, reaching certain kill streak goals will trigger a special effect and cause even more mayhem on the battlefield! For full details on how this works, check out this exclusive Seasonal Guide!
The Kill Streak effects are:
- 15 Kills: Exploding Chickens seek and destroy
- 30 Kills: A wide Frost Nova freezes enemies
- 50 Kills: Corpses rain from the sky
- 100 Kills: Five massive Energy Twisters are unleashed
- 150 Kills: Dark Geysers form beneath enemies
- 200 Kills: Treasure Chests fall from the sky
- 300 Kills: A Ring of Fire engulfs everything
- 400 Kills: Meteors hail from above
- 500 Kills: Angels descend upon the battlefield to fight
- 1000 Kills: Diablo appears!
In speedruns, you usually don't profit much from this season theme, however in pushing it opens up a lot of strategic depth by playing around various key kill counts. Especially the Geysers (150), Meteors (400) and Angels (500) are the most impactful and can kill anything in an instant, allowing you to get a significant progression boost if used correctly.
Depending on the situation, it may be best to voluntarily reset your kill streak after 150 to get the Geysers multiple times, or to set up for a boss kill by getting as close as possible to that number and then hoping for a Rift Guardian with adds or a few kills from Nemesis Bracers.
Build Adjustments
Furthermore, each of these three procs can finish the rift guardian instantly all the way up to GR150, allowing you to push without Bane of the Stricken if you manage to set it up properly. Unlike most others, this build doesn't normally use that gem, so we don't make any other adjustments to the setup, but you can still save a significant amount of time by setting up an instant boss kill.
Global Stat Priorities
The most important for almost any DH build is reaching permanent Vengeance uptime. This is achievable through the 65% Cooldown Reduction effect provided by Dawn and having 37% Cooldown Reduction on your character, usually from Flawless Royal Diamond, Paragon Points, Shoulders, Weapons (if dual wielding) or your Gloves + Quiver (if using one Weapon). If you are wearing a Dawn and it has less than 64-63% on the legendary affix, you should consider adding another Cooldown roll to make up for it, as any lower will leave you with a noticeable gap.
This build uses specific Attack Speed Breakpoints for optimal damage output depending on your Weapon, due to the Gears of Dreadlands (4) Bonus (see Mechanics).
Aside from that, you want to stack damage stats wherever possible, especially Crit stats, Cold Damage, Hungering Arrow Damage, and lastly Area Damage in this order of priority. For your defensive stats you just need to focus on increasing the raw toughness value. Since almost all of your recovery is based on percentage-based healing from Simplicity's Strength there's no reason to prioritize mitigation over health pool. Physical Resistance is also extremely useful, as you will generally move very close to your enemies and most of the incoming damage will be of that type. Because of that, you should always use Flawless Royal Diamond in your Chest and Pants sockets.
1. Do the Challenge Rift for the materials to cube Legendary Powers. You can complete this once a week for additional resources and we always update the guide for you!
2. Gather the full Gears of Dreadlands set. Each piece can be gambled from Kadala for Bloodshards. Do not salvage any duplicate pieces you find! Instead convert them to another part of the set with Recipe 4 in Kanai's Cube. If you have extra materials you can use Recipe 3 to craft the remaining pieces, but this is expensive and not recommended for new players.
3. Gamble from Kadala in this order:
- The full Gears of Dreadlands set
- The Ninth Cirri Satchel
- Hunter's Wrath and Goldwrap
- Depth Diggers
- Nemesis Bracers, Warzechian Armguards and Wraps of Clarity
- Convention of Elements, Elusive Ring, Stone of Jordan, Rechel's Ring of Larceny, Focus and Restraint
4. Craft using Recipe 3 in Kanai's Cube in this order:
- Hand Crossbows to get Dawn, Fortress Ballista and Valla's Bequest
- Bows to get Yang's Recurve
- Amulets to get Squirt's Necklace and The Flavor of Time
- Anything from the Gamble list in Step 3 that you haven't already acquired.
5. Do Bounties to acquire several important items for this build:
- Act 1: Ring of Royal Grandeur
- Act 2: Gloves of Worship
- Act 3: Avarice Band
- Act 4: Can drop any bounty item from any act
- Bounty Turn In: Recipes for Sage's Journey, Cain's Destiny, Guardian's Jeopardy and Aughild's Authority
6. At this point you can somewhat comfortably farm Nephalem or Speed Greater Rifts where you can find all the remaining items you need for different variants of the build. It's better to spend your materials improving your set pieces, getting ancient weapon etc.
7. Use Primordial Ashes in Kanai's Cube with the new Curiosity of Lorath Nahr recipe to obtain a free Crafted Primal Ancient. Since you can only equip one of them, choosing the right item to focus matters! Great candidates are Weapons, Offhands, Jewelry or any item with an important multiplier. With that in mind, we recommend getting one of the following items:
- Dawn
- Fortress Ballista
- The Ninth Cirri Satchel
| SLOT | ITEM | STAT PRIORITY |
| Main-Hand | Dawn Yang's Recurve Odyssey's End Valla's Bequest Fortress Ballista | 1. Damage Range 2. Socket Ramaladni's Gift 3. Damage % 4. Area Damage 5. Cooldown Reduction 6. Dexterity |
| Off-Hand | The Ninth Cirri Satchel | 1. Critical Hit Chance 2. Hungering Arrow Damage 3. Area Damage 4. Cooldown Reduction 5. Dexterity |
| Dual-Wield | Dawn Valla's Bequest Fortress Ballista | 1. Socket Ramaldni's Gift 2. Cooldown Reduction 3. Area Damage 4. Dexterity 5. Elite Damage 6. Damage % |
| The difference between dual-wielding and a single weapon is marginal. The former has slightly more Area Damage while the latter has slightly more raw DPS. In general, just go with the best available item and cube the other. | ||
| Helm | Dystopian Goggles Aughild's Spike (Crafted) Guardian's Gaze (Crafted) | 1. Socket Flawless Royal Diamond 2. Dexterity 3. Critical Hit Chance 4. Vitality |
| Gloves | Gas Powered Automail Forearm | 1. Critical Hit Chance 2. Critical Hit Damage 3. Area Damage 4. Cooldown Reduction 5. Dexterity |
| Shoulders | Mechanical Pauldrons Aughild's Power (Crafted) | 1. Dexterity 2. Cooldown Reduction 3. Area Damage 4. Vitality 5. All Resistance |
| Chest | Galvanized Vest Aughild's Rule (Crafted) | 1. Sockets Flawless Royal Diamond 2. Dexterity 3. Vitality 4. Life % 5. Elite Damage Reduction |
| Pants | Cold Cathode Trousers Depth Diggers (Cubed) | 1. Hungering Arrow damage 2. Sockets Flawless Royal Diamond 3. Dexterity 4. Vitality |
| Boots | Antique Vintage Boots | 1. Dexterity 2. Vitality 3. All Resistance 4. Armor |
| Ring 1 | Focus Avarice Band (A3 Bounties) Elusive Ring Stone of Jordan | 1. Socket 2. Critical Hit Chance 3. Critical Hit Damage 4. Area Damage 5. Damage Range |
| Ring 2 | Restraint Rechel's Ring of Larceny Ring of Royal Grandeur (A1 Bounties, Cubed) Convention of Elements (Cubed) | 1. Socket 2. Critical Hit Chance 3. Critical Hit Damage 4. Area Damage 5. Damage Range |
| Bracers | Wraps of Clarity Aughild's Search (Crafted) Guardian's Aversion (Crafted) Nemesis Bracers Warzechian Armguards | 1. Cold Damage 2. Critical Hit Chance 3. Dexterity 4. Vitality 5. All Resistance |
| Amulet | Squirt's Necklace | 1. Socket 2. Critical Hit Damage 3. Cold Damage 4. Critical Hit Chance 5. Dexterity |
| Belt | Hunter's Wrath Guardian's Case (Crafted) Goldwrap | 1. Hungering Arrow damage 2. Dexterity 3. Vitality 4. Life % 5. All Resistance |
| Potion | Bottomless Potion of Kulle-Aid | For breaking walls to pull enemies and increase DPS |
- Simplicity's Strength is the strongest DPS gem for Primary-based builds. It provides 100% multiplicative damage buff and a ton of recovery.
- Taeguk is a great offensive (up to 80% additive damage) and defensive (20% armor) choice for channeling builds.
- Bane of the Trapped is the third gem for optimal damage output, giving another 60% multiplicative damage against slowed enemies. You will mainly proc this effect from the aura and your follower.
- Other options include Boon of the Hoarder for T16 farming, Molten Wildebeest's Gizzard to protect Squirt's Necklace buff for Speed Greater Rifts, and Wreath of Lightning for maximum Movement Speed in Bounties. Since the build's single target damage is very high, Bane of the Stricken is not required to kill the boss even on high pushing tiers.
- Hungering Arrow Devouring Arrow is your main damage skill.
- Strafe is necessary to activate all the bonuses from Gears of Dreadlands set, and it also serves as your main mobility skill. Only two runes on this skill are relevant: Rocket Storm adds a little bit of DPS, Drifting Shadow a bit of Movement Speed.
- Vengeance Dark Heart provides 40% damage and 100% toughness bonuses.
- The last 3 skill slots are open and can be changed for a variety of defensive or utility options. However, almost every variant includes Smoke Screen — the strongest DH defensive skill that can also provide some mobility via the Displacement rune and Tactical Advantage.
- Preparation Focused Mind provides Discipline necessary to spam Smoke Screen.
- Finally, the last skill slot is usually another damage, toughness or Movement Speed buff. It can be any of Companion, Fan of Knives Bladed Armor, Caltrops Bait The Trap, Shadow Power Gloom or Shadow Glide, or even Entangling Shot for variations with Odyssey's End.
- Numbing Traps is a very strong defensive passive that can be used in almost any variation of this build, as Hungering Arrow Devouring Arrow procs it by default.
- Awareness, helps you out in tough times and saves you a death.
- Other options include Ambush, Tactical Advantage, Blood Vengeance, Single Out, Cull the Weak, Perfectionist for most purposes like farming or pushing. Choose what you need depending on your activity, all of these are decent options giving you damage, defense or utility.
| Core | Offensive | Defensive | Utility |
| 1. Movement Speed | 1. Critical Hit Damage | 1. All Resistance | 1. Area Damage |
| 2. Dexterity | 2. Critical Hit Chance | 2. Life % | 2. Resource Cost Reduction |
| 3. Vitality1 | 3. Cooldown Reduction | 3. Armor | 3. Life per Hit |
| 4. Attack Speed | 4. Life Regeneration | 4. Pickup Radius |
1 Add a bit of Vitality if you feel too squishy (a total of 800,000 Life is recommended).
The Altar of Rites is a tree that grants tremendous powers to your entire account in exchange for sacrifices. It requires you to farm Bounties, kill the Ubers, craft the Staff of Herding, and more. Completing all 26 of these tasks, along with sacrificing 6 Primal Ancients grants you extra Damage, Defense, Quality of Life, Increased Drops and 3 Potion Super Powers. Read the full guides on Unlocking the Altar and the Altar Mechanics by Raxxanterax and Chewingnom to learn everything about this fantastic mechanic!
Note: The suggested path assumes you are playing Solo and used the Challenge Rift Cache to help you level up.
Optimal Path
Node 2: Choose Anointed to gain a full set of 70 yellows from level 18-70!
Node 6: Rush to gain double Bounties to help unlock other Nodes in the Altar.
Nodes 7-14: These are the last Nodes you can gain until the Challenge Rift resets. Take at least 1 Node at the bottom of each path to unlock all 3 Potion Super Powers. Pick up the Mirror Node at the top for a colossal 41% extra XP all season. Remember to unlock Father once you clear GR70 solo and have your first Primal!
Nodes 15-26: Pick up the final Quality of Life, Damage, and Defense Nodes (in that order) to finish the Altar.
Potion Super Powers: Take Father first, then Mother, and finally Mortal.
Disclaimer: The Mortal and Mother Potions require you to salvage 2 and 3 Primals respectively. Unlock them as soon as you have those materials as they don't cost a point!
Use the Scroll Bar to see Altar Progression
Patch 2.7.0 revamped the follower system giving all 3 hirelings new powers and the emanate system. The first thing you should do is read our complete follower guide and remember the key takeaways:
- The emanation system allows followers to share certain legendary and set powers with you. The most important ones are: The Flavor of Time, Nemesis Bracers, Avarice Band, Sage’s Journey and Cain’s Destiny. Click the guide above for the full list.
- Follower’s powers are based on their main stat (maxed at 25,000, but they have a 2.5x multiplier so you only need 10,000). This means we stack Intelligence on the Enchantress, Dexterity on the Scoundrel and Strength on the Templar.
- Guardian's Jeopardy (2) Bonus works for followers by improving their inherent stat multiplier from x2.5 to x3.5, making it slightly easier to hit the 25,000 main stat threshold if needed.
- Followers share 20% of their Experience, Magic and Gold Find stats with you.
- Legendary gems do not work on followers, except Esoteric Alteration and Mutilation Guard.
- Cooldown Reduction does not work for any follower skill except the Templar’s Heal.
- Followers never deal significant damage; you’re on your own to clear the content.
Select Follower
For T16 we recommend this Enchantress setup because she is the only follower that gives Cooldown Reduction, allowing you to spam your abilities more. Since this is T16 content, she’ll stay alive with Esoteric Alteration and Mutilation Guard and use Hand of the Prophet to gain all skills. This will give us Cooldown Reduction, Elemental Damage, Reduced Damage from Ranged Attacks, Armor, Attack Speed, and a Cheat Death.
Stat Priorities:Since we do not have the immortality focus, we need to stack survivability on our Enchantress.
Intelligence > Vitality > Life % > Armor > All Resistance > Life Per Hit > Attack Speed.
Key Items:
- The Flavor of Time: For double duration on Pylons.
- Nemesis Bracers: For extra Elites, Death’s Breaths and In-geom procs.
- Avarice Band: For the insane pickup radius.
- Ring of Royal Grandeur: To complete our sets.
- Gloves of Worship: For 10 Minute Shrine Buffs.
- Sage’s Journey: For double Death’s Breaths.
- Cain’s Destiny: For 25% more Greater Rift Keystones.
For speed Greater Rifts we recommend this Enchantress setup because she is the only follower that gives Cooldown Reduction, allowing you to spam your abilities more. Since this is speed content, she’ll stay alive with Esoteric Alteration and Mutilation Guard and use Hand of the Prophet to gain all skills. This will give us Cooldown Reduction, Elemental Damage, Reduced Damage from Ranged Attacks, Armor, Attack Speed, and a Cheat Death.
Stat Priorities:Since we do not have the immortality focus, we need to stack survivability on our Enchantress.
Intelligence > Vitality > Life % > Armor > All Resistance > Life Per Hit > Attack Speed.
Key Items:
- The Flavor of Time: For double duration on Pylons.
- Nemesis Bracers: For more progression from Elites.
- Oculus Ring: For 85% increased damage.
- Ice Climbers: To make your follower immune to Freeze and Immobilize effects.
- Hellfire Ring, Leoric's Crown and Cain's Destiny: For more Experience and Attack Speed.
GR Pushing Templar
For Greater Rift pushing we recommend this Templar setup for the sustain from Heal, 10% increased damage from Onslaught, and the very powerful cheat death mechanic from Guardian. This is the only follower build that stacks Cooldown Reduction because it works with Heal.
Stat Priorities:
Since we have the immortality relic, we do not need to stack survivability on our Templar.
Strength > Cooldown Reduction > Toughness.
Key Items:
- The Flavor of Time: For double duration on Pylons.
- Gloves of Worship: For 10 Minute Shrine Buffs.
- Nemesis Bracers: For more progression from Elites.
- Oculus Ring: For 85% increased damage.
- Unity: For 50% damage reduction if you're also wearing one.
- Ice Climbers: To make your follower immune to Freeze and Immobilize effects.
- Leoric's Crown and Captain Crimson's Trimmings: For more Cooldown Reduction on Heal.
The build is overall fairly easy to play once you understand the core concept.
- Keep your Momentum stacks (from the set's 2-piece bonus) high by attacking with your Hungering Arrow at least 5 times at the start of a run, and then refresh it back to 20 (maximum) whenever you reach 17. Like this, you will ensure the highest possible DPS and mobility from the buff.*
- Keep up Vengeance at all times to gain its damage and toughness buffs (activate once every 20 seconds).
- Pull enemies close together and position yourself nearby while channeling Strafe.
- Hold down Strafe at all times when you want to attack, and then press Hungering Arrow for individual attacks to gain Momentum stacks. Make sure you don't drain yourself of Hatred when no enemies are around (happens especially in Bounties and Nephalem Rifts when you have big empty spaces).
- Keep up your defensive buffs such as (Fan of Knives Bladed Armor, Smoke Screen or Shadow Power) as much as possible.
- When using Squirt's Necklace, play a bit more defensively to keep up the damage buff better whenever you are fighting easy enemies.
- In Greater Rifts (especially pushing), you can weave in manual Hungering Arrow casts as much as possible (around twice a second) between your Strafe ticks for more DPS after you have prepared a pull and are ready to attack. Only do this when you don't have any pulling/dodging to do at the moment.
* Momentum stacks are somewhat buggy and don't always give you the stacks even after you attacked. Keep an eye on your buff bar to see when that happens and shoot another Hungering Arrow.
The build is quite tanky for Demon Hunters and is a great choice choice for Hardcore players. You have permanent immunity to Crowd Control effects and high mobility to get out of dangerous situations with ease when you have to. Don't forget to use the Awareness passive at all times! Ambush is usually your weakest offensive passive so this is a good candidate to be dropped.
Important: When fighting Dune Dervishes (spinners) or Sand Dwellers you can easily oneshot and kill yourself from your barrage of Hungering Arrows. There is absolutely no way to survive an incoming reflected hit from your own attacks when these monster types use their abilities, so always keep an eye out for them. The first type can spawn as minions from Nemesis Bracers, so you will encounter them very frequently.
Check out our dedicated Hardcore Survival Guide to learn more about how to succeed in this game mode!
Variants
Gears of Dreadlands is a great Torment farming build due to it's incredible Movement Speed (with 160% bonus baked into the 4-piece set), really high damage and ability to deal damage while moving. It's among the top builds in the game for Nephalem Rifts. Yang's Recurve is included for the massive amount of Resource Cost Reduction it provides.
Concept
The idea here is to stack lots of movement speed while still being able to kill most big enemies quickly as you are passing by. To achieve this, we use the whole arsenal: Boon of the Hoarder and Goldwrap, Tactical Advantage and Rechel's Ring of Larceny (try to get Fear on Hit on your helmet, weapon and quiver). Your follower assists you with Avarice Band, Nemesis Bracers, The Flavor of Time, Sage's Journey and Cain's Destiny. Blood Vengeance will help you spam your mobility skills without stacking too much Resource Cost Reduction.
Gameplay
Keep up Momentum at 17 or more, spam your mobility skill (Smoke Screen & Shadow Power Shadow Glide) and Strafe away! You don't have to wait until enemies are dead, Hungering Arrows will continue to fly around for a few seconds after you're gone; just make sure to keep an eye out for star icons on the minimap.
Setups
In groups you have to change your setup slightly due to the missing follower. Nemesis Bracers needs to be equipped and then you can choose to go with either Warzechian Armguards or Goldwrap in the cube. We also drop Rechel's Ring of Larceny for Avarice Band.
At higher Paragon you can afford to drop some damage and toughness for more Movement Speed: swapping Taeguk for Wreath of Lightning or Goldwrap for Krelm's Buff Belt. Another option is to run with the Shatter Shot rune or switch to Bolas Imminent Doom with Leonine Bow of Hashir + Emimei's Duffel for better AoE coverage.
Gears of Dreadlands is among the top Bounty builds in the game and competitive with UE Multishot DH due to its insane mobility. Yang's Recurve is included for the massive amount of Resource Cost Reduction it provides.
Concept
This Bounty build tries to maximize Movement Speed more than anything. For that we have a whole host of skills and items: Displacement, Shadow Glide, Hot Pursuit, Warzechian Armguards, Rechel's Ring of Larceny and Wreath of Lightning. Elusive Ring adds valuable toughness to be able to channel objectives or town portal while ignoring nearby enemies.
Gameplay
Keep up Momentum at 17 or more, spam your mobility skill (Smoke Screen Displacement & Shadow Power Shadow Glide) and Strafe away! When you are teleporting to the next quest with mobs around, try to do it fast because the defensive buff from Gears of Dreadlands (4) Bonus only lasts 5 seconds.
Setups
If your damage is too low, drop Wreath of Lightning for Zei's Stone of Vengeance and/or Rechel's Ring of Larceny for Stone of Jordan. Arriving at your destination quickly is great but useless if you can't kill anything.
Concept
We aim to go fast and complete Greater Rifts at a comfortable level in around 90-150 seconds. Choose a difficulty where regular monsters die instantly and elites only take a few seconds. For the most damage output, we combine Bastions of Will, Squirt's Necklace & Fortress Ballista.
Gameplay
The gameplay rotation is the same as always: Keep your Momentum stacks high and Strafe away. Go fast and make sure you don't lose your Squirt's Necklace when you can avoid it. Depending on which tier you are farming, consider skipping bad elite packs (such as Waller Elites and Juggernauts) if they slow you down too much.
Setups
If you are too squishy, make sure to run with Awareness or your follower's cheat death ability.
At higher Paragon (2500+) you should switch from Guardian's Jeopardy to Aughild's Authority (quite squishy) or Wraps of Clarity + Convention of Elements (by dropping Ring of Royal Grandeur).
Select Build Version
Concept
The most basic and care-free variant revolves around Valla's Bequest. Very similar to this is the Fortress Ballista version that you generally want to transition into once you acquire enough toughness and familiarity with the build to keep up your Squirt's Necklace most of the time. Lastly, Odyssey's End presents an alternative with a very high skill ceiling that rewards you with massive DPS and pushes slightly higher if executed properly.
To have enough damage for the highest Tiers, we use the Bastions of Will set and Convention of Elements. For defense we have Wraps of Clarity and Numbing Traps.
Gameplay
Pull enemies together between your Convention of Elements rotations and mow them down during the Cold cycle. Jump into Oculus Rings when you see them to boost your damage. With Valla's Bequest equipped you can dive into the pack for extra Area Damage and slow value from Bane of the Trapped whenever it's safe enough to do so.
Setups
You have the option to add Elusive Ring in the cube if you're struggling to survive. At high Paragon, Valla's Bequest should be replaced with Fortress Ballista once you can keep up your Squirt's Necklace at least 50% of the time with it.
Concept
Odyssey's End presents an alternative with a very high skill ceiling that rewards you with massive DPS and pushes slightly higher if executed properly. You have to run with Entangling Shot Heavy Burden instead of one of your utility skills, so you will be a bit squishier.
When using a 2-handed bow, you need to make sure that you don't have more than a total of 19% Attack Speed on all of your gear combined (meaning your quiver, you must not have any other rolls) and none from Paragons to stay at the 9 Frames breakpoint for Strafe (<1.67 APS in character details). Going above will heavily drop your DPS and you should avoid this at all costs. The most optimal way to play is to hug the mobs in melee range 100% of the time to maximize your DPS, as this guarantees a perfect use of this breakpoint and Hungering Arrow spawn rate. Unless Oculus Ring zone spawns away from all the mobs, you should always be surrounded by enemies as long as you can survive. However, on small pulls you can instead try to keep up your Squirt's Necklace for more DPS.
Gameplay
Pull enemies together between your Convention of Elements rotations and mow them down during the Cold cycle. Jump into Oculus Rings when you see them to boost your damage.
When you make a new pull and are getting ready to DPS, you need to use Entangling Shot and then Strafe with it for a few seconds, making sure that all enemies are entangled (you will entangle roughly 10 enemies per second using Strafe). After that the only thing you have to do is change the way you keep up your Momentum stacks: instead of shooting a Hungering Arrow when the counter hits 17, you first shoot Entangling Shot and then Hungering Arrow (use Smoke Screen to stay alive) and only after that you continue with Strafe. Normally this would be a DPS loss because you have to spend extra time not Strafing, but because of the Momentum bug (see Mechanics below) you have to shoot twice more often than not anyway.
Setups
If anything in this version is too difficult, you should just play one of the easier ones because almost any possible adjustment will reduce the push potential by too much.
Concept
This setup is very similar to solo speeds, but since we get a lot of toughness from supports, we more easily maintain Squirt's Necklace and can even add more greedy choices such as Caltrops Bait the Trap and Steady Aim to reach most DPS. Taeguk is replaced with Zei's Stone of Vengeance because the benefit of the former is heavily reduced when supporters are present.
Gameplay
You should be focused almost entirely on your positioning, which can be tougher than expected due to all the Movement Speed you have. You should (in order of importance):
- Stay out of dangerous ground effects
- Stay inside Oculus Ring zone
- Stay inside Bait The Trap AoE
- Stay 10 yards away from all monsters for Steady Aim
Other than that you just need to keep up your Momentum stacks, spam Smoke Screen and cast Preparation and Vengeance when they come off cooldown.
Note: if you are running double DPS and both of them have Convention of Elements, you should desync them. One DH removes their CoE from the cube, waits until the other is on the start of Lightning in their cycle and puts it in again. This way you never have to wait longer than 4s for your window of increased DPS.
Setups
This setup is intended for 3 min runs, where average elite fight takes 5-10 seconds. If you are going for faster runs you should switch Special Recipe for Displacement and Caltrops for Fan of Knives Bladed Armor.
At higher Paragon (2500+) you should switch from Wraps of Clarity and Convention of Elements to Ring of Royal Grandeur + Aughild's Authority, which will provide you with more consistent DPS at the cost of toughness. This is especially great for very fast runs (75-100 seconds) where playing around Convention of Elements is barely possible.
Concept
For Echoing Nightmares we are using an exact copy of the Fortress Ballista Push Build. For more information check out our full Echoing Nightmare Guide and take a look at our Echoing Nightmare Build Tier List and META post for the best builds and strategies!
Gameplay
Click Speed Pylon as soon as the challenge starts and all the other Pylons at around wave 90. At wave 122 you can stop attacking and run to the corner to let the timer run out.
Keep up your buffs and spin to win! Make sure to dodge incoming attacks, explosions and the green meteors by spamming Smoke Screen as much as possible.
Video Guide
Mechanics
- Due to The Ninth Cirri Satchel this skill will pierce up to 4 times, but is not guaranteed to do so when no enemies are in its path.
- The maximum travel distance is 120 yards total or 90 yards distance from the starting point.
- The arrow will periodically turn around and seek out a new nearby target.
- The Devouring Arrow rune adds a 70% damage increase stacking additively with itself that is multiplicative to the base damage (First hit = 100%, second hit = 170%, third hit = 240%, fourth hit = 310%, fifth hit = 380%).
- Devouring Arrow momentarily Chills the enemy hit with no duration, applying the Numbing Traps debuff. This Chill happens after the damage and does not activate Cull the Weak or Bane of the Trapped.
- Using Hungering Arrow will provide a Momentum buff lasting 4 seconds.
- There' a 5 second delay after the last application before the buff timer starts counting down.
- 5 successive casts will provide the maximum bonus (20 + 5 seconds).
- Each stack/second left adds 8% Movement Speed and 10% multiplicative damage for your Primary skills.
- There are some bugs that sometimes prevent you from getting a Momentum stack— just cast it again.
“All hope abandon, ye who enter here.”
- Strafe will fire your last used Primary skill when it hits an enemy.
- This effect can occur once every 9 frames (game runs at 60 FPS, max. 6.67 procs/s).
- Rockets from Rocket Storm can proc it too when the Cooldown is ready (using that rune can increase your DPS by a small amount). The ground effect from Icy Trail can not.
- Projectiles generated from the set gain full effects of Hatred generation, Area Damage and proc coefficients.
Since Strafe only fires a Primary when it hits an enemy, rather when it spawns a projectile, its relationship with Attack Speed is complicated.
As a channeled skill, Strafe shoots projectiles at an accelerated rate. The main breakpoints important for GoD DH are:
- 10 FPA - Used for Crossbows without any Attack Speed rolls
- 9 FPA - Best for Crossbows with 1 Attack Speed roll or for Bows (you can have max. +19% Attack Speed including your Quiver, so you have to remove it from Paragon Points). When at this Breakpoint, you want to stay inside the pull for optimal Primary generation from the (4) Bonus
- 8 FPA - Avoid this breakpoint at all costs
- 7 FPA - Typical breakpoint for One-Handed/Dual-Wield setups
- 6 FPA - If you happen to get some Attack Speed on your gear with a One-Handed Weapon, you can consider this one, but it barely adds any DPS and can cause Hatred issues in speedruns
- 5 FPA - Don't try to reach this one, too much investment
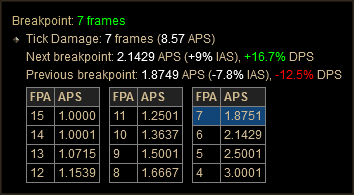
Here is the table. The values given are ranges between one breakpoint to the next. Here we have a typcial dual-wielding character with 2.00 APS at the 7 FPA breakpoint, which ranges from 1.8751 to 2.1428 APS:
First, we consider the situation where each Strafe projectile hits an enemy exactly when it spawns (this actually happens when you are inside the mob's hitbox). Then the result is pretty clear: for Breakpoints of 9 frames and slower, you get a Primary on every tick of Strafe, and for faster breakpoint you get a Primary on every other tick.
| Breakpoint | Primaries/sec |
| 10 frames | 6.00 |
| 9 frames | 6.67 |
| 8 frames | 3.75 |
| 7 frames | 4.29 |
| 6 frames | 5 |
You can see that at the 9 frames Breakpoint, you reach the theoretical maximum "Attack Speed" of 6.67 attacks per second. For that reason, you play this build in melee when you equip a Two-handed Weapon. With Hand Crossbows, there is no way reasonable way to lower your Attack Speed enough to do this and the waiting time between procs allows you to move around enemies more freely without losing much damage.
To calculate the amount of shots per second, everything gets a lot more complicated when you are not in melee range. Strafe still continues to spawn projectiles at a steady rate depending on your Breakpoint, but now each projectile hits an enemy after some delay. That delay is dependent on the distance between you and the closest enemy and that distance changes when you or the monsters move.
Because of that, instead of trying to spawn a Primary every X frames, you try to spawn it every X frames + small, essentially random, delay. Using Rocket Storm rune adds extra (quasi random) points in time where a Primary can potentially spawn, effectively increasing DPS by about 5% at all Breakpoints. All this randomness makes it impossible to predict how many Primaries per second will be actually spawned depending on your Attack Speed. The following results were obtained experimentally, by Strafing for a minute around 15-20 mobs and then counting all the Hungering Arrows fired.
| Breakpoint | Primaries/sec |
| 10 frames | 4.7 |
| 9 frames | 5.1 |
| 8 frames | 4.8 |
| 7 frames | 4.7 |
| 6 frames | 5.2 |
Note, that for 6-8 frames Breakpoints, these values are higher than what you get when sitting on top of mobs, so to maximize your DPS, while playing with Hand Crossbows, you should stay outside of the pull. To increase your DPS further, you should also weave in manual Hungering Arrow casts as much as possible, around 2 per second. When done with the right timing, you will barely lose automatically fired projectiles from your (4) Bonus and improve your overall rate of fire.
If you are using Valla's Bequest, each Strafe projectile produces many moments in time where a Primary can spawn. With enough (20+) mobs around, this essentially means that you attempt to spam a Primary on every single frame, and that puts your rate of fire at 6.67 shots per second with enough density regardless of your position. In comparison to that, Buriza-Do Kyanon's legendary effect is a lot weaker due to its ICD and limited number of pierces. It provides less than 0.5% DPS increase.
In cases where you run with Bane of the Stricken things are equally complicated. When you hit an enemy with a skill that has greater than zero proc coefficient you apply a stack of Bane of the Stricken to them, and the gem itself goes on Cooldown equal to 0.9 divided by that skill's Attack Speed. Now in typical GoD build you have a lot of skills all hitting the boss at the same time:
- Vengeance cannons: a normal skill
- Vengeance rockets: also normal skill
- Hungering Arrows: a normal skill with separate x1.3 Attack Speed multiplier from Hunter's Wrath
- Strafe: a channeling skill with 4.0 speed coefficient
- Rocket Storm's rockets: a channeling skill with 2.0 speed coefficient
All these attacks hit the boss with high frequency and in completely random and uncontrollable order. For that reason Stricken/second values were also obtained experimentally to compare 2h and 1h setups:
- 1.54 APS (9 frames Strafe breakpoint): 2.24 stacks/second
- 2.08 APS (7 frames Strafe breakpoint): 3.25 stacks/second
On high tiers this produces much faster boss fights with one-handed weapons as your damage done rises faster than with slower Weapons. Luckily, this is not an issue anymore as Bane of the Stricken is not required to kill the boss in a reasonable amount of time anymore.
- Valla's will make all Strafe projectiles pierce - it doesn't add anything to the Hungering Arrow itself.
- Piercing projectiles can proc the 4-piece bonus again as long as the Cooldown is up (9 frames).
- In big density, you almost guarantee a 4-piece proc immediately when the Cooldown is ready.
- The overall DPS gain over wearing another random weapon is between 0% (single target) to 25% (high density).
- Valla's comes with one extra primary stat and an item-specific Strafe damage roll that can be removed (Strafe damage does not affect Hungering Arrow damage).
- Entangling Shot Heavy Burden lasts for 4 seconds.
- Hitting any enemy in the pull will slowly spread the slow effect to more and more targets nearby.
- The visual effect is not always displayed properly, but you can be sure that enemies are slowed after a while or see it from the slow animation at their feet.
- Refreshing the debuff on one monster of the chain will refresh it on all of them.
- If you lose the debuff, you will have to re-apply it to every single monster again.
- Gives a shield that stacks up to 10 times for a maximum of 30% of your total life.
- The shield lasts permanently and snapshots your Maximum Health at the time of application.
- Each time you attack you get at least 1 stack of the shield, however you often get more (sometimes all 10 at once), making this item significantly stronger than it appears at first glance.
- Taking damage without breaking the shield will protect the buff given by Squirt's Necklace.
- Keep in mind that your shield takes more damage with this setup as long as you have the amulet's buff.
Summary
- Put together the core items and acquire the full Gears of Dreadlands set.
- Reach the necessary Cooldown Reduction for permanent Vengeance (37% with a perfect Dawn).
- Get the Momentum buff to 20 and keep it above 17 at all times by using your Hungering Arrow.
- Use Strafe the rest of the time to move and deal damage.
- Activate your defensive and utility skills when necessary.
We hope you enjoyed this guide! Gears of Dreadlands is a great build for all kinds of purposes and skill levels, and if you're not familiar with it yet you are missing out on this powerhouse of a farmer!
Credits
Written by Northwar & wudijo
Updates by wudijo