Area Damage Explained
Last Updated:August 21, 2024|Changelog
[latexpage]
Introduction

appropriate reroll? Intelligence into %Damage or AD
Area Damage (AD) is one of the most valuable primary affixes for increasing one's overall damage output, however, it is also one of the most complicated and confusing affixes within Diablo III. The guide at hand aims to explain the core mechanics to properly understand Area Damage, explains a few misconceptions within the community and showcases a general concept on how to evaluate Area Damage for your character.
As an example, the Aether Walker on the right hand is an item all of us will stumble on eventually. It raises the main question: How should the item be rolled? Intelligence into %Damage or Area Damage? Unfortunately, the question at hand is not answered simply; it's necessary to understand what abilities proc Area Damage, how Area Damage propagates and how monster's positioning can therefore be manipulated to maximize AD.
Situation
Let's take a closer look at LoD Hydra Wizard Build, which is a perfect instance to explain the internal workings of Area Damage, to look a bit deeper into the issue at hand. We'll be taking a closer look on two planners, which differ only on their Serpent's Sparker - elsewise both planners are exactly the same. The left hand planner, which we'll reference as the Area Damage planner, has an additional Area Damage roll on its weapon with a legendary affix of 275%. The right hand planner, referenced as the Damage planner, has %Damage rolled on its weapon with a legendary affix of 300%.
The question at hand now is: which one to pick?
Mechanics
For an ability to be eligible to proc Area Damage on an damage instance only one thing needs to be given: The skill must have a proc coefficient ≠ 0. Any ability with a proc coefficient of 0 is not eligible to create Area Damage instances; the proc coefficient value itself does not have any further effect on AD, as long as the value is greater than 0. Hydra itself has a proc coefficient > 0 on all its runes, which means that the skill itself is eligible to proc Area Damage. However, any Hydra that is casted by a Legacy Etched Sigil, also commonly referenced as non-selfcasted instances, will have a proc coefficient of 0.
This is a common pattern and rule of thumb within Diablo III ("procs can not proc procs), which is further explained in the guide Proc Coefficients Explained (coming soon!). This inherently means that any Hydra casted from Etched Sigil within a Greater Rift will ignore 174% Area Damage (respectively 150%), while the self-casted Hydra benefit from the aforementioned primary affix. This a massive issue, explicitly for newer players; simply "holding down Arcane Torrent" is massively gimping the overall damage output. The correct playstyle is to self-cast Hydra twice and afterwards channel for 15 consecutive seconds, since Etched Sigil does not override pre-existing Hydras.
Napkin Math
Let's take a step back from the two planners and first understand a more simplified scenario. The most common issue is deciding whether to roll 10% Damage or 24% Area Damage on a weapon; assume you were to hit 20 targets with those different weapon rolls. In the first setup you'll hit 20 targets for 110 damage with 150% Area Damage, whereas we denote its total damage as T'. For the second setup you'll hit 20 targets for 100 damage with 174% Area Damage denoting its total damage as T''. In both scenarios each hit on a target will have a 20% chance to proc Area Damage on the 19 nearby standing other targets.

Overall, this quickly showcases that additional 24% Area Damage is better than 10% Damage when hitting a dense pull of 20 targets at 150% Area Damage.
Monster Boxes
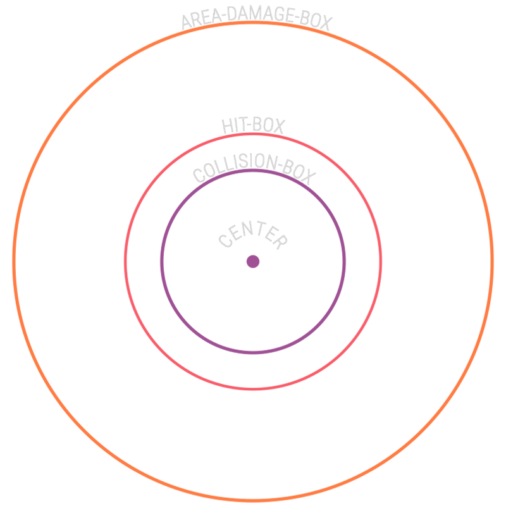
xy-planeTo properly understand how Area Damage propagate—for the sake of maximizing it with playstyle—one needs to understand the four different boxes that define a monster and how to manipulate them.
Center
All of the "within X yards" calculations in Diablo III are defined as a sphere around a center. While Diablo III actually defines any actor's position with three-dimensional coordinates Pmonster = (x,y,z) all "within X yards" calculations internally refer to distances in xy-plane entirely omitting z. One exception to this is the sphere created by Slow Time which, at least for its visual render, constructs an actual three-dimensional sphere; to be clear, there might be more exceptions to this, but this is the most obvious one for most players. Any other "within X yards" -mechanic is therefore simplified in a two-dimensional circle in xy-plane, which thankfully reduces the amount of time I need to put into making the following figures :D We define the center of a monster m as its xy-Position Pxym, which at all times is also the center of its Hit Box.
Hit Box
The Hit Box of a monster m (see Figure 1) always has Pxym as its center; it's always defined as a perfect circle with a set radius rH in yards. The radius rH is a hand-picked value based on the visual size of the monster's model; these values can be data-mined for each model, however, there isn't a publicly available repository providing this type of information. There isn't any mechanic within the game that allows for rH to be scaled; it's a static per monster-model value.
Per definition a monster takes damage if and only if its Hit Box is clipped by the area of a damage instance. This also inherently means that all damage instances are internally nothing but "a space of area of arbitrary shape"; the most common shapes are:
xy-rectangle such as Blizzard, Hydra Mammoth Hydra, Disintegratexy-triangle such as Multishot, Firebatsxy-circle such as Grasp of the Dead, Explosive Blast, Whirlwind
This is by no means a complete list, just a quick overview of different shapes the game utilizes to calculate hits efficiently. Some skills have alternating shapes, such as Crippling Wave, which, however, exceeds to scope of this guide.
For us at this point it's only necessary to understand that Area Damage is internally a xy-circle around the primary target it procs on. This means the Hit Box of the primary target is irrelevant for Area Damage and its damage range and output.
Collision Box
The Collision Box of a monster m (see Figure 1) is for ease of understanding depicted as a circle, however, can be of any arbitrary shape. It does not exactly match the monster's model for a simple reason: computational efficiency to calculate whether or not a collision is apparent or not. For that reason game engines very commonly reduce the Collision Box to a rectangular or spherical bounding box around an actor; since for these shapes a potential collision can be computed efficiently.
The Collision Box of an actor is, unlike its Hit Box, not static and can change dynamically. A simple and relatable example here would be Spirit Walk or Illusory Boots; when active both completely disable the Collision Box of your character, which is commonly coined in the gaming genre with the term "Phase Walking". As for monsters, a few of them have no Collision Box at all, such as Vile Swarms, Enraged Phantom or Shade Stalker, which means they can be "stacked" as densely as one wishes up the point where their centers Pxy have exactly the same values. A few monsters have the capability to disable their Collision Box temporarily, mostly for the sake of a moving ability (Winged Assassins, Executioners, etc.) such that they won't need to push away other actors in their target location.
All Collision Boxes, no matter of what actual shape they are, are three-dimensional xyz-meshes. They key factor to understand in this section is: once two actors, let's say monster m1 and m2 have colliding Collision Boxes, their centers Pxym1 and Pxym2 can not be manipulated to be closer to each other anymore.
| Box | Static/Dynamic | Shape | Size |
| Center | dynamic | xyz-point | - |
| Collision | dynamic | xyz-mesh | variable |
| Hit | static | xy-circle | fixed value per model |
| Area Damage | static | xy-circle | 10 yards |
The above standing table summarizes what we've learned so far. In a perfect world, with an infinite amount of computational power, every Hit Box would exactly be the parallel projection of the Collision Box into the xy-plane. As stated, this is not feasible, which is one of the reasons why some models, Collision Boxes and Hit Boxes are not really aligned for certain monsters.
Death Maiden is a great example on this end; if you've ever played zMonk you'll know the pain of consistently being teleported, even though you could swear you never actually "targeted" her. Death Maiden is a representation of a case where the Collision Box is significantly larger than the model and the Hit Box. Voracity, on the other hand, showcases the except opposite: an over the top large Hit Box with a Collision Box so small that your character can visually stand within the model of Voracity even without wearing Illusory Boots.
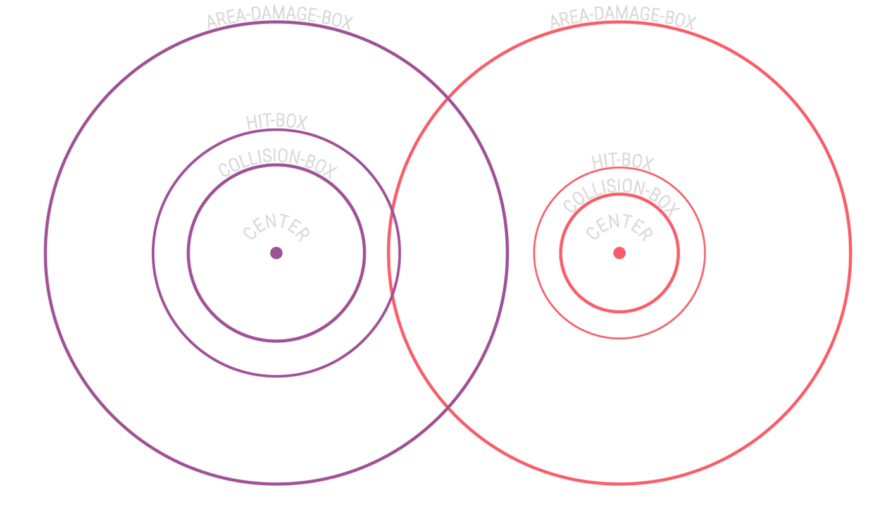
Figure 2 showcases one of the surprising results that emerge from Area Damage being a damage instance as a xy-circle around the center of the primary target. Assume a large monster m1 is our primary target that we proc Area Damage on; the resulting Area Damage Instance does not clip m1's (a small monster) Hit Box. In this case there is no secondary target taking extra damage from Area Damage. If we flip the situation however, and we define m2 as our primary target, the resulting Area Damage Instance will clip m1's Hit Box and will damage it as a secondary target.
The Pixelpull
It's abundantly clear at this point that the density is the most important factor, when it comes to scaling Area Damage. You want for a any primary target, if Area Damage procs on it, to hit as many secondary targets as possible. We learned in the previous section that the size of a Hit Box of a primary target is inconsequential, however, large Hit Boxes on secondary targets will help with the overall damage output, since those secondary targets will provide "more space to be hit with". Unfortunately, we also realized in the previous section, that radius rH of each Hit Box remains a static value and is not scalable with any interaction in the game.
This means the only thing left for us to manipulate is the positioning of monster in relation to each other; the denser the centers of all targets are, the higher our Area Damage output will be. This inherently means that our limiting factor is the Collision Box of each target. We already know that a few monsters have the capability to disable their Collision Box temporarily, mostly for the sake of a moving ability (Winged Assassins, Executioners, Punishers, etc.). Fortunately, we have a few abilities in the game that allow us to disable a monster's Collision Box at our own will, allowing us to reposition them as densely as we want:
The picture above (use the slider) showcases a—so called—Pixelpull. In this example Energy Twister with Ranslors Folly are utilized to pull nearly the entirety of the screen into a single pull. With these spicy pulls Area Damage simply skyrockets 8-) Not all displacement abilities are, however, capable of creating pixel density; as an example Cyclone Strike does displace multiple monsters, however, the Collision Box of each displaced target is not temporarily disabled. Overall the following skills and item combinations are capable of pixelpulling:
- Energy Twister with Ranslors Folly
- Ground Stomp Wrenching Smash
- Ancient Spear
- Piranhas Piranhado
- Wall of Death Wall of Zombies
- Condemn Vacuum
- Sweep Attack Gathering Sweep
- Frailty, Decrepify or Leech with Briggs Wrath
- Grim Scythe Cursed Scythe with Briggs Wrath
- Grim Scythe Dual Scythes
Press F for our fellow dexterity classes; Monk and Demon Hunter do not have any pixelpulls in their repertoire. Properly executed pixelpulls carry most of the 4-Man Push METAs; they are quintessential for the highest of Greater Rifts, especially from a competitive perspective. Keep in mind that displacing monsters increases their Crowd Control Resistance, meaning at some point they'll eventually become immune to displacement; you can not indefinitely re-pixel a pixelpull.
Area Damage Mechanics
In this section we'll quickly summarize the internal workings of Area Damage. We denote the primary target as the target that procs Area Damage, whereas the secondary target is a target hit by the resulting Area Damage Instance. These are the rules that define Area Damage:
- Only a skill with a proc coefficient
≠ 0is eligible to proc Area Damage. - If a skill is eligible to proc Area Damage, it has a flat chance of 20% to do so on each hit.
- Area Damage hits a secondary target, if and only if the Hit Box of the secondary target overlaps with a 10 yard circle originating from the center of the primary target. The size of the Hit Box of the primary target is irrelevant.
- Area Damage is always a non-critical-strike number meaning it's always rendered as a white number in the UI.
- Area Damage has a proc coefficient of 0. You can't return ressources (Lifer per Hit, Life Leech, etc.), gain stacks (Gogok of Swiftness, Bane of the Stricken, etc.) or proc item effects (The Tormentor, Maximus, etc.) with it.
- Area Damage can only be scaled by the primary damage dealt on the primary target. Additionally debuffing secondary targets (e.g. with Threatening Shout Falter) has no effect. Only the primary target needs to be debuffed for an Area Damage Instance to be scaled.
Damage Calculation
If we want to check out how Area Damage scales, we'll need to take a closer look at the the total damage calculation. Let's assume you'd hit t-many targets in a pull with an Area of Effect (AoE) ability, such as Energy Twister. We have y Area Damage equipped and our Energy Twister ticks exactly for s damage. All targets are within 10 yards of each other, meaning we are damaging a perfect pixelpull. Per hit we'll have a 20% chance per target to receive an Area Damage proc resulting in t ⋅ 0.2 = t ÷ 5 many AD procs. Each AD proc will hit t-1 many targets for its damage value y ⋅ s. Overall this yields:

The interesting part is now to look at certain trade-offs, as described in the Introduction with LoD Hydra. We are comparing two Serpent's Sparker with each other in the exact same build. In the first setup, the increased damage one, we'll equipp a 300% Sparker with 10% Damage while sitting at 150% Area Damage. The second setup will use a 275% Sparker with additional 24% Area Damage. The most common misconception within the community at this point is that there is a number of targets at which the AD Sparker always outperforms the Damage Sparker at all times. This is incorrect. The breakpoint of target, at which the second Sparker outperforms the first one, does not always exist. We have two look at two different cases:
- Is the DPS-Item always better than the AD-Item? If so, then we are done.
- Else there is a number of targets
tat which the AD-Item starts to beat the DPS-Item.
In this very example, let's denote our currently equipped Area Damage as d with 150% and our additional Area Damage granted as y with 24%. Lastly, we must estimate how much better the first Sparker is with its primary target hits than the second one x = (4 ÷ 3.75) ⋅ 1.1 ≈ 1.1733. All we need to do to figure out whether we are in the above standing case (1) or (2), is to check whether (x ⋅ d) ÷ (d + y) is larger or smaller than 1. If you are further interested in why this is the case, you are welcome to read through the generic derivation and proof in the Appendix (Limit Proof).

The takeaway here is that the first Sparker, with 10% Damage and a 300% affix, will always outperform the second one with at least 1.1% more damage, regardless of the amount of targets hit. But what if we end up in the (2) case? If and only if (x ⋅ d) ÷ (d + y) ≨ 1, then there is a t0 ∈ ℕ such that the AD-item starts outperforming the DPS-item, when you start hitting more than t0 targets in a pixelpull. Let's take a look at our Hydra scenario once again and alternate it slightly. Let's assume the second Serpent's Sparker for the Area Damage setup has an Affix of 295% with 24% Area Damage, which yields x = (4 ÷ 3.95) ⋅ 1.1 ≈ 1.1139. Let's plug it in and see if we end up in (2).

Indeed we do; this means there is a number of targets t0 ∈ ℕ at which the AD-item starts outperforming the DPS-item. We can calculate said t0 with a simple formula; feel free to look up its derivation in Appendix (Target Proof):
This simply means that starting from 10 targets the Area Damage Sparker beats out the %Damage one. One a single target, however, for instance on certain Rift Guardians the %Damage Sparker will deal x ≈ 1.1139 more damage; whether or not you want to make that specific trade-off is entirely up to you. Usually, if your build scales well with Area Damage, you are comfortable making this specific trade-off, since the Rift itself is the hard part, while the extra time on the Rift Guard helps out immensely due to Bane of the Stricken.
Appendix
Assume you want to compare two items on the same slot; one grants you additional Area Damage, however, decreases your overall damage instance against a single target. We are assuming the following premises, which constitute the best-case scenario for Area Damage:
- Your sheet damage value is
swhile wearing the AD-item. - You have
s ⋅ xsheet damage anddamount of Area Damage while wearing the DPS-item. - The AD-item gives
yadditional Area Damage compared to wearing the DPS-item. - Your chance to proc Area Damage on an attack is
c. - Each of your attacks always hits
ttargets. - Every target is within 10 yards of any other target meaning each target will damage
(t - 1)targets with its Area Damage proc.

Let fDPS : ℕ → ℝ denote all damage done when wearing the DPS-Item and fAD : ℕ → ℝ denote all damage done when wearing the AD-Item.
What is the relative damage increase r : ℕ → ℝ, r(t) ↦ fDPS(t) ÷ fAD(t) for equipping the DPS-item over the AD-item? Or in other words, is there always a t0 ∈ ℕ (a number of targets to be hit) for which afterwards the AD-Item outperforms the DPS-item?

With that being said, let's see what happens if we were to hit an infinite amount of targets.

Let's quickly take a look at the restrictions we have to deal with based on the above standing equivalencies. Firstly, s ≠ 0 imposes the restriction that our sheet damage is not allowed to be zero; we can ensure that this can never happen since even a naked character in Diablo III will have a sheet damage value.
Secondly, t ≠ 0 imposes the restriction that we always "must hit at least one target" for a damage instance to appear; while this seems rather obsolete to think about, from a mathematical point of view it's still a necessity to think about these edge cases to be able to assert that the above standing equivalencies are indeed correct in all possible cases. We can assure that there is no way to create damage instances without hitting a single target, hence, the equivalencies still hold to be true.
Lastly, c ≠ 0 imposes the restriction that the chance to proc Area Damage must not be 0. The tooltip in-game confirms that we have a consistent 20% chance to proc Area Damage. Since all restrictions are satisfied and can never be "broken", the above standing equivalencies hold to be true at all times.
This means for t → ∞ our relative multiplier will converge against (x ⋅ d) ÷ (d + y). If (x ⋅ d) ÷ (d + y) > 1, then the DPS-item is always a better choice than the AD-item regardless how many targets you were to hit. If and only if (x ⋅ d) ÷ (d + y) ≨ 1, then there is a t0 ∈ ℕ such that the AD-item starts outperforming the DPS-item when you start hitting more than t0 targets in a pixelpull.
Assume you want to compare two items on the same slot; one grants you additional Area Damage, however, decreases your overall damage instance against a single target. We are assuming the following premises, which constitute the best-case scenario for Area Damage:
- Your sheet damage value is
swhile wearing the AD-item. - You have
s ⋅ xsheet damage anddamount of Area Damage while wearing the DPS-item. - The AD-item gives
yadditional Area Damage compared to wearing the DPS-item. - Your chance to proc Area Damage on an attack is
c. - Each of your attacks always hits
ttargets. - Every target is within 10 yards of any other target meaning each target will damage
(t - 1)targets with its Area Damage proc.

Let fDPS : ℕ → ℝ denote all damage done when wearing the DPS-Item and fAD : ℕ → ℝ denote all damage done when wearing the AD-Item. We denote the relative damage increase as r : ℕ → ℝ, r(t) ↦ fDPS(t) ÷ fAD(t). We assume there exists a t0 ∈ ℕ (a number of targets to be hit) for which afterwards the AD-Item outperforms the DPS-item. This means, due to the previous proof, that (x ⋅ d) ÷ (d + y) ≨ 1 is given, which we denote as (i).

Let's find said breakpoint of targets t0 at which the AD-item is always the better choice.

Let's quickly take a look at the restrictions we have to deal with based on the above standing equivalencies. Firstly, s > 0 imposes the restriction that our sheet damage must always be positive greater than 0; we can ensure that this is always the case since even a naked Level 1 character in Diablo III will have a positive sheet damage value.
Secondly, t > 0 imposes the restriction that we always "must hit at least one target" for a damage instance to appear; while this seems rather obsolete to think about, from a mathematical point of view it's still a necessity to think about these edge cases to be able to assert that the above standing equivalencies are indeed correct in all possible cases. We can assure that there is no way to create damage instances without hitting a single target, hence, the equivalencies still hold to be true.
Lastly, c > 0 imposes the restriction that the chance to proc Area Damage must a positive value. The tooltip in-game confirms that we have a consistent 20% chance to proc Area Damage. Since all restrictions are satisfied and can never be "broken", the above standing equivalencies hold to be true at all times.
There is one last step that we need to do to calculate t0. From the last inequation we had, all we need to do is round upwards to the next integer and set c = 0.2 as depicted in the ingame client:

Credits
Thanks to Iria#1342 for noticing a flipped sign in the target proof, a small notation error (both proofs) and a missed cancellation in the limit proof.
Written by sVr. Updated by Chewingnom.