Soul Shards Explained
Last Updated:April 20, 2024|Changelog
Introduction
Sliver of Terror
With the upcoming 25th Anniversary of the Diablo Franchise, Diablo III is allowing players to fully embrace evil by infusing themselves with the essences of the Lords of Hell, iconic figures of the franchise.
In Season 25, Soul Shards are a new type of gem that can be socketed into Helmets and Weapons which grant incredibly powerful effects. This article will cover everything there is to know about Soul Shards, from a global presentation to a detailed explanation of their specificities. Come unleash your inner evil!
With the game going into maintenance mode with Season 30 and Patch 2.7.7, older Season Themes are now returning, starting with Soul Shards in Season 30. Now is your chance to experience them if you were not around in Season 25!
General Overview
Though the Black Soulstone has been destroyed, lingering fragments of The Lords of Hell once contained therein still persist in Sanctuary. These Soul Shards hold immense power—power that once belonged to the Prime and Lesser Evils. Cunning Nephalem who find and wield these Soul Stones must exercise caution. Power can be alluring, and the road to the Burning Hells is paved with good intentions...
Season 25 introduced Soul Shards. There are 7 unique Soul Shards, based on the Lords of Hell, which give players demonic new powers. One of the 3 Prime Evil Soul Shards can be socketed into Helms while one of the 4 Lesser Evil Soul Shards can be socketed into Weapons. Each Soul Shard can be upgraded 3 times using a new seasonal-exclusive consumable, the Hellforge Ember.
Lesser Evil Soul Shards
Socketed into Weapons
Dregs of Lies
Essence of Anguish
Remnant of Pain
Stain of Sin
Prime Evil Soul Shards
Socketed into Helms
Fragment of Destruction
Shard of Hatred
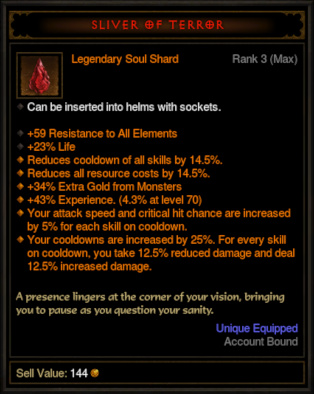
Sliver of Terror
Soul Shards can drop everywhere but are more likely to drop from Act Bosses and Rift Guardians. They do not require you to be level 70 to drop meaning you can find them while leveling. They cannot be acquired through Kanai's Cube or from Kadala however they are not so rare, so you should not have trouble finding a proper one for your build. Salvaging them grant you some Imperial Gems and more rarely a Flawless Royal Gem.
Soul Shards drops at Rank 0 and can be upgraded up to 3 times to unlock new powers using a new consumable, the Hellforge Ember. These can be found anywhere with a higher droprate than Ramaladni's Gift so you shouldn't be starved of them in the long run.
Additionally, Soul Shards can be used as Caldesann's Despair (Augments) on your gear. A Rank 0 Soul Shard will create a Rank 50 Augment and every additional Rank increases the power of the Augment by 25 levels, meaning Soul Shards are a great way to fuel you with Rank 125 Augments!
Some builds obviously benefit more than others from Soul Shards. Regardless, Soul Shards completely blow Ethereals out of the water in terms of power creep and all builds will gain a great power boost from them. Check out our Season 30 Tier Lists to discover which builds get the most out of Soul Shards!
Finally, as they are a seasonal theme, Soul Shards will disappear when the Season ends, with no chance for non-seasonal players to get their hands on them as Soul Shards can only drop in Seasonal play.
How to Obtain Shards
As stated above, Soul Shards can drop everywhere but are more likely to drop from Act Bosses and Rift Guardians. They do not require you to be level 70 to drop meaning you can find them while leveling. You can force drop specific Soul Shards since every Act Boss drops a guaranteed specific Soul Shard. However, Bosses from Acts with 2 Soul Shards have a 50% chance to drop either both or none.
- Act I - Essence of Anguish
- Act II - Dregs of Lies (Vidian is not included)
- Act III - Stain of Sin + Fragment of Destruction
- Act IV - Remnant of Pain + Sliver of Terror
- Act V - Shard of Hatred
During the Darkening of Tristram event, you can also get Soul Shards by killing the Bosses (Butcher, King Leoric and Diablo himself). Any of these Bosses drop all 7 Soul Shards upon death which is a great way to farm them, especially to salvage them in order to get normal Imperial Gems to be able to augment your gear.
Soul Shards & Followers
for Enforcer Builds
While Soul Shards Rank 0 and Rank 3 special powers do not work on Followers, the normal offensive and defensive stats accessible with Rank 1 and Rank 2 upgrades are working just fine. This means you can use a Prime Soul Shard in your follower Helmet to get the +946-1125 to any Main Stat in order to have an easier time reaching their 25,000 Main Stat cap scaling their skills. Eventually you can also use the +15-20% Melee/Ranged Damage Reduction for follower setups not using the Immortality Token (for T16 content or simply builds using Enforcer) to help them survive.
Additionally, you can get a Lesser Soul Shard with +12-15% Attack Speed for their Weapon. While this is not gamebreaking, it helps them to proc special item effects such as Thunderfury, Blessed Blade of the Windseeker more efficiently.
Moreover, there is one Soul Shard special power that kind of works on followers, the Essence of Anguish stacking effect granting you up to 25% Cooldown Reduction, 25% Movement Speed and 50% extra damage taken at 10 stacks. If you have it equipped in your own Weapon and your follower has a Poison Damage Range on its Weapon, then your follower attacks can proc the stacks for you!
Soul Shard Ranks
As explained above, Soul Shards are found at Rank 0 and can be upgraded up to 3 times to unlock new powers using Hellforge Embers. Here is what to expect from unlocking the additional Soul Shards ranks:
Rank 0
Soul Shards begin with a unique static Legendary Power which comes with a beneficial bonus and a drawback. This is very interesting as it makes you think about your build mechanics and optimization. Is the beneficial effect worth the drawback for my build? Can my build offset the drawback of this Soul Shard easily? Each Soul Shard also has more or less a specific theme, with Dregs of Lies being the Pet-oriented Soul Shard for instance.
Rank 1
The Rank 1 provides you with all the affixes you can usually get from normal gems:
Weapons
- +270-300 Damage
- +130-150% Critical Hit Damage
- +20-25% Elite Damage
- +28,000-30,000 Life per Hit
- +38,000-40,000 Thorns Damage
Helmets
- +23-25% Life %
- +12-15% Cooldown Reduction
- +12-15% Resource Cost Reduction
- +32-35% Gold Find
- +41-50% Experience
This is a good thing as it makes sure your build is not in trouble using a Soul Shard because it desperately needs Cooldown Reduction from a Flawless Royal Diamond socketed into your Helmet for instance. Even better, the range on those affixes is slightly higher than the normal ranges!
The Damage Range on the Lesser Soul Shards is local to your Weapon, meaning it is directly applied to your Weapon DPS and is affected by the Damage % affix on Weapons. Also, the 20-25% Elite Damage is additive with other sources of Elite Damage (Aughild's Authority, The Furnace) as you would expect.
Be aware that Leoric's Crown and Broken Crown do not work with Soul Shards in any way! Even if you have Broken Crown on your follower, you need to have a normal gem in your Helmet for this effect to work since it emanates to you. Also interestingly enough, the presence of Life per Hit on every Lesser Soul Shard (Weapon) is pretty much killing the possibility for any build to make a proper use from Shi Mizu's Haori.
Rank 2
The Rank 2 power grants one additional bonus affix between these:
Weapons
- 12-15% Attack Speed
- +10-15% Damage
- +7-10% Critical Hit Chance
- 20-25% Elemental Damage
Helmets
- +946-1125 to any Main Stat
- +55-62 to All Resistances
- +375-390 to Armor
- 15-20% Melee Damage Reduction
- 15-20% Ranged Damage Reduction
On Weapons, Damage % and Elemental Damage are the most interesting affixes, with Elemental Damage slightly pulling ahead in most scenarios. A perfectly rolled 15% Damage is almost equivalent to a perfect 25% Elemental Damage roll for most builds. Critical Hit Chance is a pretty good choice as well in most cases.
Note that the Damage % affix is local to your Weapon DPS, meaning it is not a straight 15% separate damage multiplier. As a result, builds dual-wielding Weapons will see the benefit of this affix halved (at the exception of few skills not alternating Weapons). Similarly, the Attack Speed affix applies to your Weapon and not as an additive Attack Speed roll. Some Legacy of Dreams builds stacking a lot of Elemental Damage or Mask of Jeram builds are going to prefer 15% Damage, 15% Attack Speed or 10% Critical Hit Chance over 25% Elemental Damage because they already have so much of it.
On Helmets, Main Stat is always good to have to maximize damage but 15-20% Melee/Ranged Damage Reduction is a huge toughness buff for most builds that can struggle to survive way before they have trouble to kill monsters. If you feel too squishy, absolutely go for the Damage Reduction and focus on getting Main Stat instead only when you can comfortably survive without the Damage Reduction affix.
On a sidenote, it is optimal to stop upgrading at Rank 2 when you are fishing for a perfect Soul Shard for your build and have enough Hellforge Embers to do so. Upgrading to Rank 3 only makes sense early on to get a specific power or when you want to create Level 125 Augments, just like the Whisper of Atonement you can get from Echoing Nightmare.
Rank 3
The final Rank unlocks 1 additional random Legendary Power between 3 availables unique to that Soul Shard. This exponentially raises the possibilities of every Soul Shard, allowing every one of them to specialize even further with different meaningful options. For some builds or activities, you actually only care about this Rank 3 power and not so much about the initial static power. Check the sections below for a full overview of every Soul Shard unique effect!
Prime Evil Soul Shards
Base Effect
Your cooldowns are increased by 25%. For every skill on cooldown, you take 12.5% reduced damage and deal 12.5% increased damage.
- Damage boost is a separate multiplier that stacks additively with itself for a maximum of 75% damage increase with 6 skills on cooldown.
- Damage reduction also stacks additively with itself, meaning that each skill on cooldown gives you more toughness than the last:
- 1 skill: 12.5% damage reduction - 14.3% extra toughness
- 2 skills: 25% damage reduction - 33.3% extra toughness
- 3 skills: 37.5% damage reduction - 60% extra toughness
- 4 skills: 50% damage reduction - 100% extra toughness
- 5 skills: 62.5% damage reduction - 166% extra toughness
- 6 skills: 75% damage reduction - 300% extra toughness
- Skills using charges are considered to be on cooldown if at least one charge is missing.
- Invincibility skills are not considered to be on cooldown wile they are active.
This is the most commonly used Prime Evil Shard. It provides both damage and toughness and unlike Shard of Hatred it works both in the rift and during the Rift Guardian fight.
Ring of Fire
You cast a devastating Ring of Fire after killing 100 enemies.
- You only gain stacks when you kill the monster, kills from party members are not shared.
- All stacks are lost upon death.
- Kills scored by the Ring of Fire itself, contribute to the stacks towards the next one.
- The ring spawns centered on you, has an 18 yard radius, and lasts for 20 seconds.
- It deals damage 4 times per second to all enemies caught within.
- Ring of Fire damage only scales with the Tier in Greater Rifts and is independent of your character stats. In Greater Rift 150, each tick deals approximately 1,300T damage. In practice, it will kill small monsters such as zombies in 2-3 seconds, and deal about 60% of a Rare Elite's HP over its entire duration.
- The damage does not scale with the number of players in the party, making it significantly weaker in group play.
This upgrade is incredibly powerful and is almost a must-have for solo push builds that cannot demolish Greater Rift 150. When playing with Ring of Fire you just need to kill 100 smallest enemies such as Boggits, Spiderlings or Shade Stalkers and then the Ring of Fire will do the rest. If you pull almost 100 enemies into that Ring of Fire, then your next Ring will be almost ready, and at this point you're just making pulls and burning them to ashes, while barely doing any killing yourself.
Attack Speed and Critical Hit Chance
Your attack speed and critical hit chance are increased by 5% for each skill on cooldown.
- Attack Speed and Critical Hit Chance increase are additive and show up in your sheet.
This upgrade simply gives you a bunch of DPS stats and is used in most speedfarming builds and also in push builds that can do time attack on Greater Rift 150.
Lightning and Fire Damage
If three or more skills are on cooldown, your Lightning and Fire skill damage are increased by 50%.
- The buff is a 50% Elemental damage bonus which stacks additively with other sources of Elemental Damage (Bracers and Amulet rolls mainly).
This upgrade is similar in function to Attack Speed and Critical Hit Chance one but it has an extra condition and, in general, gives you less damage. The only time it's better is if your build does not scale with Critical Hit Chance.
Base Effect
You deal 15% reduced damage while you have 3 or fewer enemies within 25 yards. If more than 3 enemies are within the same distance, you deal 5% increased damage per enemy (to a maximum of 50%).
- Damage boost and penalty are separate multipliers.
This is the second DPS-oriented Prime Evil Shard, but it has a significant flaw that it massively boosts your damage in the rift but reduces your damage against the Rift Guardian. As a result, your bossfight can become extremely long when you push with this shard. This shard is only used by a handful of builds, that absolutely cannot fit in any skills with cooldown.
Increased Damage
You now deal 10% increased damage for every enemy instead of 5% (to a maximum of 100%).
This upgrade just gives you damage and it's what you use in every pushing or Trash Killer build.
The pull
Killing an Elite enemy pulls all enemies within 40 yards to where the elite died.
- Pulls a maximum of 16 targets
This upgrade is quite bad. It could be useful in speedfarming for some builds that struggle in the AoE department, but the shard itself is bad for speedfarming, so this doesn't happen too often.
Movement Speed
Your Movement Speed is increased by 50%. Each enemy within 25 yards reduces your movement speed by 10% up to 70%.
This upgrade is very useful for Nephalem Rifts and Bounties.
Base Effect
You move unhindered through enemies. Each enemy you pass through receives the Mark of Destruction for 7 seconds. Each marked enemy that dies removes 1 second from one of your skills on cooldown. If the Mark of Destruction expires before the enemy dies, you lose 2% of your maximum health as damage. Marks are not applied if you are below 35% health.
- Warning: 2% HP loss when a Mark of Destruction expires can bypass cheat death effects.
This is a shard gives you Illusory Boots and Messerschmidt's Reaver with extra steps, both are very useful items for support characters. Apart from that, it can also be good for some cooldown-hungry Nephalem Rift farming builds.
Heal on Kill
You have a 25% chance to restore 5% health when an enemy dies with Mark of Destruction active.
Assuming that you have Mark of Destruction applied to every single enemy, you will restore about 1.25% Life on each kill, which is equivalent to 1-2 Life per Kill secondary rolls on your armor. This is completely useless for supports and for speedfarming.
Movement Speed
When you apply Mark of Destruction to an enemy, you increase your movement speed by 5% for 7 seconds. Max 10 Stacks.
This upgrade is very welcome for any speedfarming build and also helpful for support characters.
Execution
You now leave a trail of fire in your wake that slays enemies with the Mark of Destruction that are below 10% health.
This upgrade also gives you The Executioner and Fire Walkers for free, resulting in the ultimate support Soul Shard.
Lesser Evil Soul Shards
Base Effect
Every time you deal poison damage to an enemy you increase your Cooldown Reduction and Movement Speed by 2.5% while your damage received is increased by 5% for 10 seconds. Max 10 stacks.
- All effects stack additively with themselves, resulting in 25% Cooldown Reduction, 25% Movement Speed and 50% extra damage taken at 10 stacks.
- You gain a stack for each enemy hit.
- If your active Weapon has a Poison damage range, your attacks give you stacks, even if you use a skill that converts it to another damage type.
- Similarly, attacks of your Follower also count as "your" damage, and grant you stacks as long as your follower has a Poison damage Weapon.
- Witch Doctors and Necromancers can gain stacks regardless of their Weapon's damage type by using a Poison skill.
This Lesser Shard is quite commonly used by DPS builds that lack better options. While it doesn't provide any huge benefits, the downside is also very mild and the requirements are easy to meet.
15 Stacks
Your Movement Speed and Cooldown Reduction can be increased up to 15 times by dealing poison damage to an enemy.
- Increases the maximum Cooldown Reduction and Movement Speed bonuses to 37.5%.
This upgrade is used mostly in Bounty builds where Cooldown Reduction and Movement Speed are among the most desirable stats.
Poison Debuff
When you deal Poison damage to an enemy, they receive 50% increased Poison damage from all sources for 10 seconds.
- Poison damage requirement to apply the debuff works the same way as the requirement to get the stack, meaning you can do it with a Poison Damage Range on Weapon or with a Poison skill.
- Debuffed enemies will have all their damage taken increased by 50%. This effect is in the additive damage category. This extra damage has Poison type.
- The debuff affects all party members but doesn't stack.
This upgrade gives 50% additive damage to your entire party, it is used by many DPS builds in solo, but in group play more powerful options exist.
Explosion on Kill
When you kill an enemy, you deal the damage done by the death blow to all enemies within 25 yards. Pets and Followers cannot trigger this effect.
- The explosion deals Poison damage and can stack the primary effect of this shard.
- When you kill multiple enemies at the same time only one explosion is triggered.
- The explosion can proc Area Damage but cannot be triggered by Area Damage procs.
This upgrade is used in many speedfarming or pushing builds. Its effectiveness compared to 50% debuff depends on how often your builds deals damage and how hard it hits. Builds such as Tempest Rush Monk and Fan of Knives DH, that deliver one big hit after a long preparation period, benefit a lot from this upgrade.
Base Effect
Your Critical Hit Chance is reduced by 15%. Attacks against Incapacitated enemies are automatically critical hits.
- Enemies are considered Incapacitated when they are affected by one of these hard Crowd Control effects: Stun, Freeze, Fear, Blind, Charm.
- Automatic Critical Hits apply even to attacks that normally ignore Critical Hit Chance, such as Thorns and Thorn-based skills.
- The skill that applies the first Incapacitating effect to an enemy is not guaranteed to be a critical hit.
This Lesser Shard is used by some DPS builds that can include some form of hard CC. It's fits especially well into builds that already have to use CC to get damage due to effects like Krysbin's Sentence, Horde of the Ninety Savages (2) Bonus or Bracer of Fury.
Cold Damage
Hitting enemies with Cold damage has a 50% chance to freeze them. Cold skill damage is increased to frozen targets by 20%.
- The freeze duration is 3 seconds.
- The damage bonus is a separate 1.2x multiplier that applies to all Cold skills.
- The skill that applies the freeze is not affected by this bonus.
This upgrade is used in some Cold builds that don't have a good way to apply CC on demand.
Speed Pylon
Gain passability while your Movement Speed bonus is over 50%. When you move through enemies you knock them back and stun them for 2 seconds.
This upgrade gives you the bad part of Speed Pylon. Constant and uncontrollable knockback will render enemies immune to Crowd Control in no time at all, which is terrible news for any build that rely on Crowd Controls to deal damage (coincidentally, these builds are also the ones most likely to use this Shard).
Attack Speed
When you critically hit an enemy, you increase the Attack Speed of all players by 5% for 5 seconds. Max 10 stacks.
- The Attack Speed bonus is additive, just like any normal roll on your gear besides Weapon one.
- Does not stack from multiple of the same Shard.
This upgrade is used by any DPS builds that scale with Attack Speed and also by supports.
Base Effect
You deal 25% less damage. Your Pets deal 25% increased damage.
- Both damage bonus and damage penalty are separate multipliers.
- Despite the fact that your pets damage scales with your own damage, this 25% penalty does not affect Pets in any way, making the "downside" completely meaningless for all pet-based builds.
This Lesser Shard is used by most pet-based DPS builds.
Stacking Damage
Each time your Pets hit an enemy, your damage is increased by 0.5% for 5 seconds. This stacks up to 100 times. When you reach 100 stacks, the stacks quickly reset to 0.
- Each time your Pets hit an enemy you receive 1 stack of buff.
- The buff has 5 seconds duration, which is refreshed each time you gain a stack.
- When you reach 100 stacks, you lose the ability to gain new stacks for the next 6 seconds and you lose 20 stacks per second.
- This damage bonus is multiplicative.
This upgrade gives you another 25%-35% damage boost and is used by all DPS builds using Pets.
Cheat Death
On receiving fatal damage, spawn a shadow that prevents your death, restores your health to 35%, and grants +225 All Resist to all party members while it is active. The shadow only lasts 15 seconds.
- This effect has a 60 second cooldown.
- The shadow makes you invincible for 5 seconds after spawning. Sometimes this duration is increased to full 15 seconds.
- The shadow sometimes attacks enemies using an unruned Primary skill of your class.
This upgrade doesn't give you damage and thus never used.
CDR on Elite Kill
Killing an Elite enemy reduces all your active cooldowns by 5 seconds.
- Your cooldowns are reduced for each individual enemy killed, including Rare Minions and Treasure Goblins.
- Elite enemies killed by your party members do not proc this effect.
This upgrade is used for speedfarming on some Pet builds.
Base Effect
You deal 25% less damage. When you kill 50 enemies, you spawn a pool of blood that increases the damage done to Elite enemies by 150% and lasts 15 seconds.
- The damage penalty is multiplicative.
- You gain stacks when anyone in the party kills enemies. Stacks last 20 seconds and refresh with each kill.
- When you reach 50 stacks, the pool of blood spawns under your feet and slowly expands outward until it reaches the maximum radius of 45 yards.
- Elite enemies inside the pool take 50% increased damage from all sources. This damage buff is additive.
This Lesser Shard is used by support and Nephalem Rift farming builds.
Negate Affixes
The pool of blood now negates Elite affixes within its area.
This upgrade is never used.
Extra Progress Orb
You gain an additional Rift Progress Orb when you kill an Elite pack.
- An extra Progress Orb spawns under your feet.
- You also get the Orb when your party members kill a pack.
- Rare Elite packs only give an extra Progress Orb when you fully kill them, including all minions.
This upgrade is used by nearly all Nephalem Rift builds and by supports (especially in speedfarming).
Autopick Orbs
The pool of blood now collects Rift Progress Orbs.
This upgrade is never used.
Video Guide
Conclusion
While Season 24 and Ethereals brought some fresh air into Diablo III itemization, Season 25 goes one step further and offers to the game one of its craziest season theme ever! Soul Shards are indeed an insane power creep for every single build in the game while also offering numerous options to go for depending on what you're doing or your preferences. If clearing a Greater Rift 150 has been one of your long-term Diablo III goals, now is the time to go for it!
Credits
Thanks to Northwar for help and insights!
Written by Chewingnom.