Skill Gems & Passive Tree
Learn more about the Skill Gems and Passive Tree of the Static Strike Shockwave Slayer.
Skill Gems
Ensure your skill gems are of the right quality (normal, anomalous, divergent or phantasmal).
Some gems need to be a certain level to function. This is especially important for some auras and certain defensive setups.
Follow the guides instructions to get the specifics on what levels and qualities are needed. Not every gem needs to be at maximum level.
Skill Breakdown
Static Strike + Shockwave
- Divergent Static Strike grants you static energy on hit, which periodically hits enemies around you with beams.
- Divergent Shockwave Support is a cooldown-based Support that unleashes a massive Shockwave whenever triggered.
- Divergent Pulverise Support is a major boost to your Melee Damage and Area of Effect, at the cost of reducing your Attack Speed.
- Awakened Void Manipulation Support is a major damage boost to your Chaos Damage, at the Cost of dealing no Elemental Damage.
- Increased Critical Strikes Support significantly increases your chance for a Critical Strike.
- Increased Critical Damage Support significantly increases the damage dealt by Critical Strikes.
Frozen Legion
- Divergent Frozen Legion is a cooldown-based Skill that spawns statues that hit enemies in a radius upon activation. These statues can all hit the same target, making it a potent single-target damage skill.
- Divergent Pulverise Support is a major boost to your Melee Damage and Area of Effect, at the cost of reducing your Attack Speed.
- Awakened Void Manipulation Support is a major damage boost to your Chaos Damage, at the Cost of dealing no Elemental Damage.
- Increased Critical Strikes Support significantly increases your chance for a Critical Strike.
Auras
- Determination scales your physical damage reduction and Molten Shell shield value.
- Blood and Sand gives you the ability to swap between Blood and Sand Stance. While in Sand Stance, you get more Area of Effect and less Area Damage and while in Blood Stance you get more Area Damage and less Area of Effect. Quickly swap between stances depending on your needs (Mapping/Bossing).
- Anomalous Purity of Elements increases your Elemental Resistances while also granting Immunity to all Elemental Ailments.
- Enlighten Support reduced the necessary Mana Reservation for supported Aura Skills.
War Cry + Berserk
- Battlemage's Cry allows attacks to benefit from increases and reductions to Spell Damage while also granting a decent Critical Strike Chance Buff.
- Anomalous Urgent Orders Support is only used in this case for the Anomalous quality, which scales the Battlemage's Cry Effect. If you can't get an Anomalous version, this Skill Gem is useless.
- Anomalous Berserk grants multipliers to Damage Reduction, Attack Damage, Attack Speed and Movement Speed while up. This comes at the cost of consuming Rage and if your Rage Stacks reach 0, the buff is disabled.
Utility
Mobility
- Shield Charge is a movement skill that charges you towards a targeted location. Both Attack and Movement Speed make this skill faster.
- Anomalous Withering Step grants the Elusive Buff, temporarily increasing our Movement Speed and Damage Avoidance. It also applies the Wither Debuff to nearby enemies, increasing the damage they take from Chaos Damage.
- Faster Attacks Support significantly increases the Attack Speed of supported Skills.
- Enhance Support increases the Quality of supported Skills, therefore granting them extra bonuses.
Defence
- Cast when Damage Taken Support automatically triggers the supported skill gem when taking a hit. Lower levels of Cast When Damage Taken require less damage to trigger (Use Level 20 for this build).
- Anomalous Molten Shell provides an immense absorption shield based on your Armour for a short duration. Molten Shell triggers when taking damage to grant you mitigation when you need it most (Use level 20 for this build).
Vaal Skill
- Vaal Haste drastically increases your Attack, Cast and Movement Speed while activated. You only use the Vaal Version of this skill, as the normal Haste uses a Mana Reservation cost you can't afford. Due to Dexterity issues, only level this Skill Gem within reason (in my case Level 11, this can change depending on your gear).
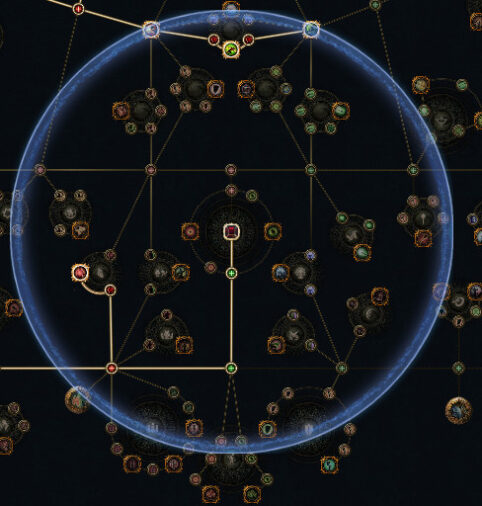
Passive Tree Progression
Jewel Locations
Certain Jewels require specific placement on the Passive Tree, you can find these locations below.
For more information on these Jewels, check out the Gearing-Section!
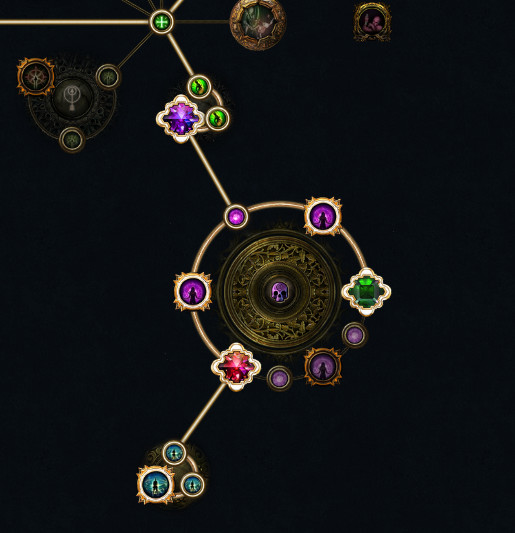
Cluster Jewel 1
Items: Luminous Ornament + Pandemonium Solace
This Large + Medium Cluster Jewel Combo is allocated under the Duelist Starting Area, near Call to Arms. Inside these Clusters is also where your 2 Split Personalitys are placed!
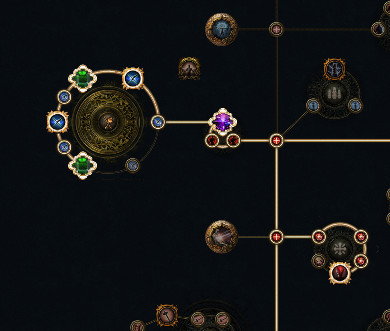
Cluster Jewel 2
Item: Dusk Glisten
This Jewel Socket is on the outer left of the Passive Tree, inbetween Divine Shield and Resolute Technique. Make sure that you allocate the Overload Node on your Cluster Jewel as soon as possible, as it grants you Fortify!
Lethal Pride
Item: Lethal Pride
This Jewel Socket is directly under the Scion start, near Magebane. This area gives you a ton of options for a solid Lethal Pride, making it easier to find one on trade that fits the build!
For a guide on Timeless Jewels and how to find the right ones for you, check out this article.

Inertia
Item: Inertia
This Jewel Socket is directly under the Duelist starting area, next to Iron Reflexes.
Tattoos
Passive Skill Tree Tattoos redefine character building in Path of Exile! They excel at covering for a build's weaknesses by converting unneeded Attributes into Resistances, damage, and quality of life. Choosing the ideal Tattoos for your build often comes down to your specific gearing choices, to learn more about optimizing Passive Skill Tree Tattoos check out our full guide here.
In this build however, Strength is very valuable, so don't overdo it on tattoos!