Spectral Helix Lightning Strike Champion
Last Updated:July 26, 2024|Changelog
Introduction
The Vaal Lightning Strike Champion is a league start viable all around build, capable of going from the Twilight Strand all the way to beating the pinnacle endgame bosses and taking on the most difficult maps in the game. The build excels at clearing fast but also deals good single target damage. It rewards the player for investing in defence as much as offence thanks to the scaling granted by Perseverance. The Champion ascendancy provides speed, damage, and defence, making this build currently one of the most well rounded builds in the game.
Strengths and Weaknesses
Skills Breakdown
Vaal Lightning Strike does incredible damage in bursts, which is fantastic for clearing maps and defence, thanks to the life on hit it offers during the duration. It is much less useful on bosses, and takes some time to charge up. It can attach to enemies or be positioned on the ground to shoot out auto targeting lightning beams, that scale with our attack speed and damage.
Ascendancy Breakdown
The Champion is an outstanding choice as it provides the some of the best defensive layers currently in the game, complimented by a modest amount of additional damage and aura enhancing bonuses.
- Fortitude & Unstoppable Hero grant the Champion 20 Fortification stacks, effectively reducing all incoming hit damage by 20% as well as providing Stun immunity, Attack Speed and flat Armour and Evasion.
- First to Strike, Last to Fall intimidates targets permanently, increasing the attack damage they receive by 10%. It also grants the Champion Adrenaline for 20 seconds on reaching low life and heals for 25%. This is a massive buff that grants 100% increased Damage, 25% increased Attack, Cast and Movement Speed and 10% additional Physical Damage reduction.
- Inspirational allows for a banner aura to be reserved for free and increases the effect of all non-curse auras granting us a substantial boost to the Champion's Defensive and Offensive Auras.
To learn how the Labyrinth works, feel free to consult our Labyrinth Guide!
Playstyle
Lightning Strike is a skill with two damage elements: a ground strike and a following burst of lightning projectiles emanating from the impact. We move around maps swiftly, unafraid of hit damage as it is greatly mitigated by Fortify, in addition to the core defences we build. We must maintain maximum effect of Elusive by binding Withering Step to left click; this ensures we get the most value out of Nightblade Support. Vaal Lightning Strike is the main damage cooldown available in our kit. When used in combination with Ancestral Protector and Ancestral Warchief we are be able to effectively burst down bosses with ease.
Positioning on single target encounters is crucial to maximize DPS with Lightning Strike. Standing at the right distance from your target doubles your damage from Strike Skills target 1-2 additional nearby Enemy which is critical for your endgame setup. This modifier has a range reaching further than the primary strike, allowing us to hit a target with both our projectiles and the melee hit.
Mapping
While mapping we must be wary that damage over time is not mitigated by our defence. We are practically near-immortal as long as we are attacking thanks to the immense recovery provided by claws' life gained on hit implicit, as well as the ability to spec into leech nodes on the passive skill tree. Whirling Blades and Elusive give the Champion massive movement speed and packs are cut down rapidly thanks to the projectiles piercing from Lightning Strike.
Bossing
The double-hit mechanic of the impact + projectiles plays the biggest role when fighting Bosses. Before engaging place both Ancestral Protector and Ancestral Warchief to gain their buffs. Make sure to keep pressing left click to ensure Withering Step resets the Elusive buff granted by Nightblade Support. Every 20 seconds, as long as we aren't in danger, use Corrupting Fever. This grants the First to Strike, Last to Fall buff, greatly boosting our damage. Keep an eye on the buff time and press it again after it has expired. When the souls are filled for Vaal Lightning Strike, drop it directly on the boss for a big damage burst.
Key Build Information
Transitioning to Lightning Strike
As powerful as Lightning Strike is in endgame, it is mechanically outmatched in the early game by Spectral Helix. Luckily, Spectral Helix is a highly capable skill which can carry us from level 12 all the way to endgame which incidentally shares the same scaling and skill tree as Lightning Strike, making the transition seemless. In order to transistion at endgame to Lightning Strike we need an item with the Strike Skills target 1-2 additional nearby Enemy modifier. We can obtain this modifier from a few different mechanics:
- Hunter/Searing Exarch Influence or Lesser Eldritch Embers on gloves.
- Tribal Fury anointed on a Talisman.
- Ancestral Call Support.
Getting Strike Skills target 1-2 additional nearby Enemy on gloves is the ideal route because it sets us up to use Crystallised Omniscience to bring the build to even greater heights.
Obtaining Strike Skills Target Additional Nearby Enemy on Gloves
You can spam Orb of Alteration crafting on a pair of Hunter-influenced Gloves on an item level of 80+ (appears on average 1 in 180 times) to obtain Strike Skills target 1-2 additional nearby Enemy. Alternatively you can also roll it as an implicit on any pair of non-conqueror influenced gloves, thanks to the Lesser Eldritch Embers dropped in tier 14+ maps or purchased on trade. Be wary it may take anywhere between 30-50 of these embers on average to roll. Using a higher tier ember is only useful if you are planning to invest multiple Divine Orbs to reach tier 5 of this affix which grants +2 Additional Strike Targets instead of +1.
Improving Critical Strike Chance
Scaling our Critical Strike Multiplier is useless if we don't actually deal Crits, so we need to stack as much Critical Strike Chance as we can. To ensure that your Critical Strike Chance is as high as possible do the following:
- Only equip a claw with a tier 3+ Critical Strike Chance roll.
- Roll a flask with the #% Increased Critical Strike Chance During Flask Effect suffix.
- Equip a Diamond Flask.
- If you are still struggling to get to 80%+ Critical Strike Chance you can swap out Elemental Damage with Attacks Support with Increased Critical Strikes Support in your main links.
Build Scaling
Lightning Strike is a hit-based critical strike scaling elemental skill. Most of our critical strike multiplier comes from Nightblade Support, allowing us to focus on other stats to further scale our damage output.
In general, we prioritize the following stats, which are abundantly found on the Passive Skill Tree. However we must mainly rely on gear for our critical strike chance.
- Added flat Fire, Lightning, Cold damage
- Critical Strike Chance/Multiplier
- Elemental penetration
- Generic Damage Increases (Elemental/Attack)
- Frenzy Charges
- Attack speed
- Elusive Effect
- Auras scaling
Champions have easy access to many layers of defences granting an absurd amount of mitigation for all incoming hit damage. Perseverance allows the Champion to scale Attack Damage by stacking Armour and Evasion. The bulk of our base defences come from Armour/Evasion hybrid item bases as well as both Jade Flask and Granite Flask flasks. In addition Grace and Determination grant additional flat Armour/Evasion and a massive more multiplier. Due to the unique effects of Perseverance, it is important to strive for balance between our Armour and Evasion as we gain extra value from both the closer they are together. Fortify reduces all hit damage received by an additional 20% and Elusive also grants avoidance up to 40% depending on how much Elusive effect we are stacking. In addition the build also greatly benefits from both leech and life gained on hit provided by our weapon of choice, the Imperial Claw.
The most important stats we must focus on to make sure our defences are scaled effectively are:
- Armour and Evasion from Gear, Flasks, Skill Tree and Determination + Grace
- Capped Elemental Resistances at 75%
- Fortify
- 100% Spell Suppression
- 100% Ailment Avoidance
- Stun Immunity
- Corrupted Blood Immunity
- Elusive effect
- Aura Effect
- Mana & Life leech
With all these defensive layers against Hit-damage our main weakness remains Damage over Time. As a result we always try to maintain a high uptime on a target if we are degenerating, as leech and life gained on hit will effectively mitigate them.
Leveling Section by tytykiller
Key Leveling Notes
This build is easy to level, provided that the player understands how to create a good leveling Weapon. Pasting this line, called a regex, into the Search Bar of Vendors selling Armors and Weapons when you go back to town, substantially speeds up leveling.
-[rgb]-.-|g-g-r|g-r-g|r-g-g|nne
Your Weapon is your most important upgrade! Always keep your Two-Handed Weapon up to date within ~7 levels of yourself. Make sure your Weapon either has % Physical Damage or Flat Damage. Here is an example of a good Weapon at Level 23: Double Axe
Besides picking up an Axe and identifying it, our primary way of getting a weapon is from using an Essence that adds Flat Damage on Two-Handed Weapons, whether its Physical, Fire, Cold or Lightning Damage. This method has the highest probability to create a good Weapon, especially early on.
When this method does NOT work, we use the Rustic Sash Vendor Recipe. When you sell a Rare Rustic Sash with a Blacksmith's Whetstone and a Weapon, the Recipe produces a % Physical Damage Weapon back! You may then use an Orb of Augmentation and pray that you land Attack Speed, a Resistance or a different (hopefully useful) stat.
This build chooses Ascendancy points from the Labryinth differently in Softcore and Hardcore. In Softcore, choose First to Strike, Last to Fall first, Inspirational second, Unstoppable Hero third, and Fortitude fourth. The third lab should be done at the same time as the Uber Lab, as there is no other way of getting Fortify. In Hardcore however, Fortify is an insane defensive layer, so choose Unstoppable Hero first, Fortitude second, Inspirational third, and First to Strike, Last to Fall fourth. This will end up being a bit slower early on, but will even out by the third lab.
Beginner players should follow Enki's Campaign Progression guide.
The levels listed below are based on speedrunning. Always be greater or equal to the levels listed.
Step 1: Level 2
- Kill Hillock. Talk to Tarkleigh and choose Splitting Steel as your reward.
- Splitting Steel gives a new skill called Call of Steel, which grants steel shards. Use Call of Steel to generate shards, cast Splitting Steel a handful of times to spend shards (if available), and then cast Call of Steel to finish enemies.
- Talk to Tarkleigh, click Purchase Items, and copy the following line: -[rgb]-.-|g-g-r|g-r-g|r-g-g|nne.
- Paste it in the vendor window in-game and it will highlight four links, movement speed boots, and items with Green-Green-Red (GGR) sockets. This is a regex filter, and is imperative to finding important items quickly!
- After this, complete the quests Mercy Mission and Breaking some Eggs.
- Upon killing Hailrake, hit escape and press EXIT TO CHARACTER SELECT (or type /exit in chat). This saves you a Portal Scroll. Selecting a different log out option puts you in a queue on a league start. This "return to town" method is used many times in this guide.
Step 2: Level 4
- Talk to Nessa and grab: Quicksilver Flask and Onslaught Support.
- Talk to Nessa and Purchase War Banner.
- War Banner is our first aura. Activating it causes monster deaths to store 50 charges. When released, it gives us the Adrenaline buff for a huge damage boost. This is best used on magic packs, rare monsters, or large packs of regular monsters.
- Talk to Tarkleigh and grab: Ancestral Protector and Dash.
- Click Purchase Items from Tarkleigh and paste in the regex: -[rgb]-.-|g-g-r|g-r-g|r-g-g|nne
- Complete the quests Dweller of the Deep and The Caged Brute.
- Note: you only have to reach the Waypoint in Lower Prison to acquire a gem from the quest.
- Ideally you will have a Green-Green-Red (GGR) item for Splitting Steel - Onslaught Support - Chance to Bleed Support.
- If you only have a Green-Red then just link Splitting Steel to Chance to Bleed Support.
- Our rotation on packs is Call of Steel for 12 stacks of Steel Shards, Dash forward constantly, place Ancestral Protector on packs of monsters, and use Splitting Steel until the pack is low.
Step 3: Level 8
- Reach Lower Prison and use the Waypoint back to town.
- Talk to Nessa and grab: Maim Support.
- Linked Maim to Ancestral Protector if you have a Red-Red item.
- Talk to Tarkleigh to grab your Passive Skillpoint.
- Click Purchase Items from Tarkleigh and paste in the regex: -[rgb]-.-|g-g-r|g-r-g|r-g-g|nne
- Go back to Lower Prison, complete the Trial of Ascendancy, and slay Brutus.
- Two handed weapons are a substantial DPS increase and help tremendously on Brutus. The recommended weapons here are either a Longsword at 8, or a Jade Chopper at 9.
Step 4: Level 10
- After killing Brutus, return to town.
- Talk to Tarkleigh and grab Leap Slam. This replaces Dash.
- Click Purchase Items from Tarkleigh, then paste in the regex: -[rgb]-.-|g-g-r|g-r-g|r-g-g|nne
- Complete the quests The Marooned Mariner and The Siren's Cadence.
- Note: you do not need to kill Merveil to acquire a gem from The Siren's Cadence.
Step 5: Level 12
- After killing Fairgraves and reaching the Waypoint in Merveil's Caverns, purchase Spectral Helix from Nessa for 1 Orb of Transmutation, OR grab Shattering Steel for free.
- Spectral Helix is better, but many people dislike the playstyle of attacking twice and moving on. It is very comparable to the Hammerdin from Diablo II. A decent alternative to Spectral Helix is Shattering Steel, as it is better than Splitting Steel in almost every way.
- Talk to Bestel and grab the Passive Skillpoint, then complete The Siren's Cadence.
- Look for a Bastard Sword to use at level 12, or a Woodsplitter at level 13.
- Equip a Sapphire Ring for Merveil to nullify her Cold Damage. Kill Merveil and move onto Act 2!
Step 1: Level 12
- After killing Merveil, walk north into The Forest Encampment (Town).
- Talk to Greust, click Sell Items, and sell all items you acquired from Merveil.
- You CAN try to purchase a Green-Green-Red (GGR) item if you have not found one yet, but it will likely cost an Orb of Transmutation.
- If you sell rare items identified they will give you Alteration Shards, while selling them unidentified gives you Transmutation Shards.
- Go to the right of town into The Old Fields and complete The Great White Beast.
- Your ideal weapon at this point is a Woodsplitter at level 13.
Step 2: Level 13
- After completing The Great White Beast, go to the Waypoint at The Crossroads to go back to town.
- Talk to Yeena and select the magic Quicksilver Flask reward.
- At this point, use two Life flasks, one Mana flask, and two Quicksilver Flasks.
- Waypoint back to The Crossroads, and finish the quest Intruders in Black in the Chambers of Sin 2.
- Make sure to complete the Trial of Ascendancy in the Chambers of Sin 2.
Step 3: Level 16
- After killing Fidelitas and getting the Baleful Gem, return to town.
- Talk to Greust and select the gem Blood Rage.
- Blood Rage is a buff that gives attack speed, leech, and has a chance to generate frenzy charges on kill - which give MORE attack/cast speed and damage.
- Talk to Yeena and purchase the gems Herald of Purity and Herald of Ash.
- Herald of Ash is an Aura that gives 15% of Physical Damage as extra Fire Damage, and also helps smooth out clearing packs. This gem takes priority over all other auras at this point.
- Herald of Purity gives us MORE Physical damage, and also summons some minions to help out while clearing or fighting a boss.
- Equip all three auras. In the case that you can only equip 1 or 2 auras, the priority is: Herald of Ash > Herald of Purity > War Banner. Remember that War Banner's primary usefulness comes from using the stacks, so use it at 50 stacks and/or when fighting a difficult monster!
- Go left from the Town to complete the quest Sharp and Cruel in The Weaver's Chambers.
- Your ideal weapon at this point is a Poleaxe at 18
Step 4: Level 18
- Kill Fidelitas, pick up Maligaro's Spike, and return to town.
- Talk to Silk and get the gem Faster Attacks Support.
- It is critically important to link this to Leap Slam as soon as you can at 18.
- Complete the quest Deal with the Bandits.
- Waypoint to the Crossroads, go right to the Broken Bridge, kill Kraityn, and return to town.
- Waypoint to the Riverways, go north to The Wetlands, and kill Oak.
- While in the Western Forest, kill Alira and complete the quest The Way Forward.
- Note that The Way Forward is an Act 1 quest that is only completable in Act 2.
Step 5: Level 18
- Talk to Eramir for two Passive Skillpoints.
- Take the Waypoint back to the Act 1 town Lioneye's Watch. Talk to Bestel for an additional Passive Skillpoint for completing The Way Forward.
- Use the Waypoint to travel to The Wetlands in Act 2. Click the Vaal Ruins to open it if you have not already done so.
- Use a Ruby Ring for this zone, as the monsters casting Explosive Arrow are scary.
- Complete the quest Shadow of the Vaal by killing the Act 2 boss, Vaal Oversoul. After this, return to town and complete the Trial of Ascendancy in The Crypt. Once these are done, move onto Act 3!
Step 1: Level 21
- Waypoint to the City of Sarn, kill the Guard Captain, and talk to Clarissa. Complete the quest Lost in Love.
- After completing the Trial of Ascendancy and obtaining Tolman's Bracelet, return to town.
- Talk to Clarissa to obtain the Sewer Keys.
- Talk to Maramoa and choose the gem Poacher's Mark. Use it on bosses to gain Life and Mana back on hit.
- The Ideal weapon at this point is a Double Axe at level 23.
Step 2: Level 24
- Talk to Hargan and select Purchase Items. Paste in the regex -[rgb]-.-|g-g-r|g-r-g|r-g-g|nne
- After level 24, you may find a four-link item. Ideally, it will already be G-G-G-R or G-G-R-R.
- If it is not already these colors, use Chromatic Orbs on either a Dexterity or Strength-Dexterity base. If you find a four link that requires Intelligence in any way, using Chromatic Orbs is not a good idea since they are very likely to roll Blue sockets.
- G-G-G-R links: Spectral Helix - Onslaught Support - Faster Attacks Support - Chance to Bleed Support
- G-G-R-R links: Spectral Helix - Onslaught Support - Cruelty Support - Chance to Bleed Support
- Complete the quests Victario's Secrets, The Ribbon Spool and The Gemling Queen. Choose the rare Lapis Amulet as a reward.
- Ensure that you complete the Trial of Ascendancy from The Catacombs at some point during this cycle.
Step 3: Level 26
- Complete the quest Piety's Pets.
- Ignore the quest Sever the Right Hand. We do not need to kill Gravicius for this build.
- Aim for at LEAST level 27 before killing Piety.
- Farm in The Docks if you are behind in XP. You can reset a zone by holding down Ctrl and left clicking on either a zone entrance or Waypoint.
- Getting two-stone rings and using essences that give rings flat damage to attacks (like an Wailing Essence of Torment) is amazing here.
Step 4: Level 27
- The Ideal weapon basetype starting at level 28 is a Gilded Axe.
- Try to get your resists close to 75% Fire, Cold, and Lightning.
- The best craft you can make is with the Crafting Bench in your hideout. Use the 16-20% of a single resist craft, which only costs an Orb of Transmutation.
- Talk to Hargan for a Passive Skillpoint (from the quest Victario's Secrets). Then talk to him again and shop for a four-link by pasting in the regex -[rgb]-.-|g-g-r|g-r-g|r-g-g|nne
- Talk to Grigor to get a Passive Skillpoint.
- Complete the Trial of Ascendancy in The Imperial Gardens.
- While fighting Dominus, avoid getting slammed when he says "The Touch of God!" Kill Dominus and move on to Act 4.
Step 1: Level 28
- Complete the quest Breaking the Seal.
- Farm Dried Lake until at least level 30.
- Act 4 is when the game strains your resistances. Playing with below 75% elemental resists is extremely dangerous. Start to over-cap resists in this Act, as we are aiming for at least 105% by the time we kill Act 5 Kitava.
- Keep identifying rare items and keep chugging along with high Life and resists gear.
Step 2: Level 30
- Complete the quest An Indomitable Spirit
- Reach the Waypoint in the Crystal Veins and complete the normal Labryinth.
- Ascend as a Champion, and choose First to Strike, Last to Fall.
- When your Life falls below 50%, you will heal 25% of your Life back, remove all ailments on you, and gain Adrenaline. You may recognize that you have been gaining a small Adrenaline buff from using War Banner, but our first ascendancy gives it to us for twenty seconds! The best way to proc it is from using the Act 2 gem Corrupting Fever and linking it to Lifetap Support.
- Since we no longer need the Adrenaline buff from War Banner, remove this aura from the build.
Step 3: Level 32
- Do not progress past Crystal Veins without being at least level 32, farm Dried Lake if you need to catch up.
- Complete the quest The Eternal Nightmare by killing Daresso and Kaom.
Step 4: Level 34
- Kill Piety, then complete the quest Corpus Malachus.
- Talk to Piety again, go kill Malachai, and move on to Act five!
Step 1: Level 35
- Get at least 75% resists in Fire, Cold, and Lightning - but aim for 105%, as you lose 30% from killing Kitava.
- Put every armor and jewelry piece you have into the crafting bench in your hideout to see if it has space for a Fire, Cold, or Lightning resist craft. This is only usable if the item has an Open Suffix (hold Alt on an item to see).
- Complete the quest Return to Oriath and talk to Lani for a ring matching the resists you need the most. Get any of the Two-Stones over the single-resist rings, as they are easier to replace later.
- Complete the quests In Service to Science, The Key to Freedom, and reach the Chamber of Innocence
Step 2: Level 38
- Once you enter the Chamber of Innocence, farm this zone until at least level 40. You can reset a campaign zone by holding down CTRL and clicking on the zone or Waypoint.
- If you are clearing the Chamber of Innocence and are still under level 40, use a Portal Scroll and talk to Lani for a Granite Flask
- Talk to Vilenta for a Passive Skillpoint.
- Complete the quest Death to Purity.
Step 3: Level 40
- Complete the quests The Ravenous God and Kitava's Torments.
- When Kitava closes his fist, he will spawn orbs that close in on your location in an X formation, closing in on the center. Avoid any slams and abilities from the large unique monsters that spawn. Kill Kitava, and move onto Act six.
- After killing Kitava, your resists drop by 30%. This should be easy to overcome, and in softcore your resists should be at least 50% each. Every point of resistance gear from here on out drastically increases your survivability!
Step 1: Level 42
- If you are 42, you don't need to farm any XP past this point until Act 9, just be within 6 levels of the zone.
- Entering this Act without 75% all resists is perfectly fine (in softcore!). The elemental damage you take here depends on which part of the Act you are in. The Mud Flats and the Tukohama fight requires Fire res, the Shavronne fight Lightning res, and the Brine King Cold and Lightning res. Using this, it’s okay if your resists initially look like 75% Fire, 50% Cold, and 50% Lightning (again, in softcore). In hardcore, ensure that all resists equal 75% or more.
- Go to your hideout and throw each piece individually at the crafting bench to see if you can craft a Fire, Cold, or Lightning resist on them for 1 Orb of Transmutation each. Obviously only craft the types of resists you need!
- Go out to The Coast and get the Waypoint, then go to the Mud Flats and complete the quest The Father of War.
- Once at the Ridge Waypoint, take it back to The Coast and complete Bestel's Epic.
- Use a Portal Scroll, complete Fallen From Grace, and return to town.
Step 2
- Talk to Lily Roth for 2x Passive Respec Points. Click Purchase Items and select the following: Added Cold Damage Support, Trinity Support, Nightblade Support, and Elemental Damage with Attacks Support. Level these in your off-hand weapons.
- You will also notice that your Corrupting Fever - Lifetap Support setup might not proc your Adrenaline buff anymore from your ascendancy. As you gain more life, this flat amount will no longer be enough. Once this starts occurring, use the gem setup Corrupting Fever - Lifetap Support - Increased Duration Support.
- Talk to Bestel for either a rare Leather Belt or Agate Amulet, depending on which slot needs a bigger upgrade.
- Talk to Tarkleigh for a Passive Skillpoint.
- Travel to The Lower Prison and complete the Trial of Ascendancy there.
- Finish the Essence of Umbra by killing Brutus and Shavronne. Grab the Spell Damage craft after the fight.
Step 3
- Kill Abberath in Prisoner's Gate for The Cloven One.
- Grab the Waypoint in The Riverways, then go north to The Wetlands and kill Ryslatha for The Puppet Mistress.
- You may skip Abberath and Ryslatha until late Act 7 if your character is too weak at this point.
- Return to town, then talk to Bestel for a Passive Skillpoint.
- Talk to Tarkleigh for a Fencer Helm and a Passive Skillpoint.
- Complete the remaining questline to defeat The Brine King, then move onto Act 7.
Step 1
- Start identifying any rare claw that gives "Life gained for each enemy hit by attacks." Notably, the basetype Twin Claw starts to appear in this act.
- Stats to look for are flat fire, cold, or lightning damage, critical strike chance, and attack speed. A near-perfect claw at this point looks like: Noble Claw
- Select the Brine King Pantheon (the Keybind is Y by default)
- Complete the quest The Silver Locket
- Travel to The Crypt for the Trial of Ascendancy and the map for Essence of the Artist.
- Waypoint back to The Crossroads, travel north to the Chamber of Sins, and complete Web of Secrets.
- Do the Trial of Ascendancy while in the Chambers of Sin 2, and complete The Master of a Million Faces.
Step 2
- Optionally, you may travel back to town at this point and talk to Helena for an amulet reward.
- Gather the seven fireflies for the quest Lighting the Way, and kill Greust for the quest The Master of a Million Faces while in The Dread Thicket.
- Exit The Dread Thicket and travel to The Causeway for Kishara's Star.
- Get to the Waypoint in the Vaal City and talk to Yeena there, then return to town.
- This also frees your inventory of the fireflies!
Step 3
- Select the Pantheon Ralakesh, Master of a Million Faces.
- Talk to Eramir for two Passive Skillpoints.
- Talk to Weylam Roth to select the Quartz Flask and a Passive Skillpoint.
- Talk to Helena and select the Wyrmscale Boots.
- After this, complete the Cruel Labyrinth.
Completing Cruel Lab awards you with Unstoppable Hero.
Step 4
- Finally, Waypoint back to The Vaal City, travel to Temple of Decay 2, and kill Arakaali. Avoid the cone of poisonous bolts, as well as the purple orbs that spawn far away and travel towards the boss. After this, move onto Act 8!
Step 1
- Continue identifying any rare Noble Claw you find, as well as any rare Twin Claw for the swap over to claws.
- Kill Doedre for the quest Essence of the Hag, then go to the right towards The Quay.
- Complete the quest Love is Dead, then travel to the Grain Gate to complete The Gemling Legion.
- Continue to the Solaris Temple and get the waypoint in Solaris Temple 1.
- Complete the quest Solar Eclipse and return to town.
Step 2
- Talk to Clarissa for a Passive Skillpoint.
- Talk to Hargan for whichever Two-Stone ring reward you need the most.
- Talk to Maramoa for a Passive Skillpoint.
Step 3: Level 54
- Go back to Solaris Temple 1, travel to the Solaris Concourse, the Harbour Bridge, then Lunaris Concourse.
- Go to the Lunaris Temple 2 and complete Lunar Eclipse.
- Travel to the Lunaris Concourse and kill the Twins Solaris the Eternal Sun and Lunaris the Eternal Moon. Stand behind Solaris when she throws her Fire Spear, and get move away when Lunaris fires Cold Rain from the sky. After this, continue onwards to Act 9 and the best zone in the campaign for farming - the Blood Aqueducts!
Step 1: Level 54
- Your goal is to farm Blood Aqueducts until character level 62 for both gem levels and currency. While farming Blood Aqueduct you might find Humility cards, which sell for approximately 2 Chaos Orb at the start of a league. Sell these to other players, as there are far better options for chest pieces in the current state of the game.
- Continue identifying any rare claw you find for the swap over to crit elemental helix.
- The final goal we have of Blood Aqueduct is to farm gear that has good resistances. We want our resists to be close to 105% when killing Act 10 Kitava, as we get another penalty to our resistances. Mapping with ~60% resists is fine for softcore, but is a definite no-go in hardcore. Continue farming gear, currency, and xp in Blood Aqueducts until 64, then move on to act 10.
Step 2: Level 62
- Go back to the Lunaris Concourse in Act 8 to get the Trial of Ascendancy in The Bath House and complete Reflection of Terror in the High Gardens.
- Return to town and talk to Hargan for a Passive Skillpoint.
Step 3: Level 62
- Complete the quest The Storm Blade. Return to town, talk to Petarus and Vanja for a Teak Round Shield, Sin for the next quest item, then Petarus and Vanja again. Return back to the Vastiri Desert waypoint and complete the quest Queen of the Sands.
- Return to town and talk to Irasha for a Passive Skillpoint.
Step 4
- Kill The Basilisk in the Boiling Lake
- Complete the quest Fastis Fortuna
- Complete the Trial of Ascendancy in The Tunnel
- Complete the Ruler of Highgate, then return to town and talk to Irasha for a Passive Skillpoint.
Step 5
- Finish the quest Recurring Nightmare by killing Act 9 boss The Depraved Trinity. Avoid the boss' slam, and avoid getting hit by the scorpion ads that spawn. Next, move onto Act 10!
Step 1
- Continue identifying any rare claw you find for the swap over to crit elemental helix.
- Kill Plaguewing and complete the quest Safe Passage.
- Place a portal in the middle of the Ruined Square, and go to the waypoint in the Control Blocks (left).
- Take the waypoint back to town and talk to Lani in town for a Silver Flask.
- This flask gives us a buff called Onslaught, which substantially increases our speed.
Step 2
- Don't complete the quest Vilenta's Vengeance in the Control Blocks at this time if your character feels weak. Instead, go through your portal that you placed earlier and go to the right this time towards the Ossuary.
- Complete the quest No Love for Old Ghosts and the Trial of Ascendancy in the Ossuary.
Step 3
- Kill Avarius to complete the quest Death and Rebirth, then return to town.
- Talk to Bannon with the The Staff of Purity in your inventory.
- Talk to Lani for a General's Brigandine.
- Talk to Weylam Roth for 2x Passive Respec Points.
Step 4
- Complete Merciless Labyrinth to obtain the Fortitude Ascendancy.
Step 5
- Travel back to the Ravaged Square, talk to Innocence, and complete the quest An End to Hunger.
- Kill Kitava, and move onto the mapping section below - congratulations on completing the campaign!
- Note that killing Kitava reduces your overall resistances by 30%. We prepare for this by obtaining gear with as high resists as possible. Aim for 75% Fire, Cold, and Lightning Resists.
Act 1
- Whenever you are back in town, click Purchase Items on a vendor and paste in
-[rgb]-.-|g-g-r|g-r-g|r-g-g|nne- This highlights four links, movement speed boots, and items with Green-Green-Red (GGR) sockets. This is a regex filter, and is imperative to finding important items quickly!
- Use Longsword at Level 8 or Jade Chopper at Level 9.
- Use Bastard Sword at Level 12 or Woodsplitter at Level 13.
- Swap Splitting Steel for Spectral Helix at 12, can opt for Shattering Steel if helix playstyle is not enjoyable.
Act 2
- For Bandits, kill all for 2 Passive Skillpoints.
- Weapon Base Type: Woodsplitter at Level 13, Poleaxe at Level 18, or highest tooltip DPS.
Act 3
- Ideal Weapons: Poleaxe at Level 18, Double Axe at 23, Gilded Axe at Level 28, or highest tooltip DPS.
- At Level 24, get Poacher's Mark quest reward and skip Gravicius quest.
- Paste
-[rgb]-.-|g-g-r|g-r-g|r-g-g|nneinto vendors starting at level 24 to look for a four-link. - G-G-G-R Spectral Helix - Onslaught Support - Faster Attacks Support - Chance to Bleed Support
- Or G-G-R-R Spectral Helix - Onslaught Support - Chance to Bleed Support - Maim Support
Act 4
- Ideal Weapons: Whatever Two-Handed Axe that provides the highest tooltip DPS.
- Complete the Normal Labyrinth.
- Ascend as a Champion and choose "First to Strike, Last to Fall."
- Ensure that you have Corrupting Fever linked to Lifetap, and use this every 20 seconds.
Act 5
- Ideal Weapons: Jasper Chopper at Level 37, Timber Axe at Level 41.
- Get resists close to 105% pre-Kitava.
- Farm Chamber of Innocence until at least Level 40.
Act 6
- Ideal Weapon: Headsman Axe at Level 45 or highest tooltip DPS.
- Get resistances up to 75%.
- Take Brine King as your Major Pantheon.
Act 7
- Ideal Weapon: Labrys at Level 49 or highest tooltip DPS.
- Take Ralakesh as your Minor Pantheon.
- Complete your Cruel Labyrinth after collecting all Act 6 & 7 Passive Skillpoints. Choose the node "Inspirational."
- Start identifying any rare claws you find, ideally you find one that gives life gain on hit.
- Stats to look for are flat fire, cold, or lightning damage, critical strike chance, and attack speed. A near-perfect claw at this point looks like: Noble Claw
Act 8
- Ideal Weapon: Highest tooltip DPS, Labrys at Level 49, or good elemental claw.
- Ensure that you are at least level 54 before entering Blood Aqueducts
Act 9
- Take Garukhan as your Minor Pantheon.
- Farm Blood Aqueducts until level 62.
Act 10
- Continue gearing for 105% to All Resistances (75% post Kitava).
Mapping Preparation
You're done with the Campaign and are ready to take on the Path of Exile Endgame. Priority 1 is to ensure your Elemental Resistances are capped (75%) and have sufficient Attributes to continue leveling your Skill Gems. Use Essences you have gathered on any item that is not Magic or Rare already. Items with an open modifier slot can be crafted on. Head to the Crafting Bench and craft Resistances wherever possible according to what you need and Life wherever else possible.
Map Modifiers
The following modifiers are impossible to run on the build:
- Monsters reflect #% of Elemental Damage
- Cannot Leech from monsters
The following modifiers are to be avoided if possible:
- Players have #% reduced effect of Non-Curse Auras from Skills
- Players have #% less Armour
- Players have #% less Accuracy Rating
Recommended Farming Content
First step is to progress through the Atlas following our Atlas Progression Guide. As a mapping focused character you should focus on the mechanics listed below depending on what level of content your character is currently capable of completing. If you're struggling in higher tier content it is always recommended you go a step back and farm up more Currency and Gear. Clicking the League Mechanics below takes you to either a full Explanation Guide or a detailed Currency Farming Guide based around maximizing your profits from that mechanic or content.
Early Game
- Essence
- Harbinger
- Strongboxes
- Shrines
Mid Game
- Essence
- Harbinger
- Strongboxes
- Shrines
- Expedition
- Harvest
Endgame
- Legion
- Delirium
- Blight
- Shrines
- Expedition
- Harvest
- Endgame Bosses
- Eldritch Altars
Pantheon
To learn how the Pantheon works, feel free to consult our Pantheon Guide!
For Major Pantheon, select Brine King to gain Immunity to Freeze and Reduction of Chill Effect. This bonus is not baseline and needs to be acquired with a Divine Vessel.
For Minor Pantheon, select Abberath and upgrade it. This grants you defences but most importantly Immunity to Burning Ground. Alternatively you may want to select Ralakesh until you gain Corrupted Blood from a flask suffix or jewel corruption.
Skill Gems
Gems are a fundamental part of your build, getting the correct link setups before entering Maps and leveling those Gems as you progress through the Atlas is one of your main goals. This is how your Gem setup should look like before entering Maps:
Lightning Strike
Vaal Lightning Strike is our main damaging ability. Trinity Support simply explained rewards the player for investing in a combination of 2 or more added elemental damage rolls, for example Lightning + Fire or Cold. With Trinity Support in your build, an icon appears in the top left corner of the screen indicating the current state of the buff. If you see all three bars filled after attacking an enemy, you are on the right track. If one remains empty, you need to rebalance two of your three elemental damage types so that their average damage done is roughly equal. Check your skill's offense details in the character tab for that!
Inspiration Support grants us a considerable boost to both our elemental damage and critical strike chance, but most importantly, greatly reduces the mana cost of Vaal Lightning Strike. Added Cold Damage Support is our preferred added damage link. It helps balance our resonance for Trinity Support and provides additional defensive utility such as chills, freezes and shatters. Nightblade Support grants Elusive on Critical Strike, 1% to base Critical Strike Chance while Elusive and also grants Critical Strike Multiplier scalable with Elusive Effect. Elemental Damage with Attacks Support is a more multiplier for elemental attack skills.
Adrenaline
Corrupting Fever linked to Lifetap Support and Increased Duration Support allows us to consistently proc our First to Strike, Last to Fall Ascendancy. This grants us a considerable damage and speed boost. If at any given point this gem setup fails to proc Adrenaline you can replace Lifetap Support with it's Anomalous variant, but if that's still not enough Increased Duration Support can be replaced by Second Wind Support.
Guard Skills
Molten Shell linked to Cast when Damage Taken Support provides us with a massive defensive boost. It is best to keep Cast when Damage Taken Support at level 6 and Molten Shell at level 13, it ensures the buff procs more often with little to no downside. When you take 897 damage the gem automatically triggers, granting the player a huge absorb shield which scales with Armor. The more Armor, the larger the absorb shield up to a maximum of 10,000. Keep in mind that Molten Shell only works against Hit damage, not Damage over Time.
Defensive Auras
Determination, Grace and Defiance Banner are our main active defensive auras. They provide a bonus flat as well as a % more multiplier to both Armor and Evasion to scale up our base defences. Precision is a gem which reserves more mana and grants more flat accuracy as it is leveled up; therefore it is important to balance out its level to ensure we still have enough mana to play comfortably. If there is ever a point where your accuracy rating is not capped but you cannot afford to level up precision any higher, you should invest more into passive skills that grant accuracy or find equipment with either % increased or flat accuracy.
Ancestral Totem Buffs
Ancestral Protector & Ancestral Warchief linked to Multiple Totems Support can be used as a temporary buff to damage and Attack Speed. Place these down on hard boss fights and re-summonthem as they expire for maximal damage output.
Single Target Debuff
Assassin's Mark linked to Mark On Hit Support triggers when a rare or unique enemy is hit, marking him. This grants lots of additional Critical Strike Chance and Critical Strike Multiplier. It's important to keep track of the skill's high mana cost, which can easily overwhelm your entire unreserved Mana pool. In that case, keep Assassin's Mark at a lower level until you can solve it. Hydrosphere can be used when facing tougher enemies, granting exposure (-10% to an elemental resistance).
Mobility
Whirling Blades is your primary way of moving around, it is an ability which scales with attack speed allowing for very quick movement. Flame Dash allows you to get over ledges untraversable by Whirling Blades. Withering Step should be placed on left-click to ensure that you are refreshing the Elusive buff on cooldown granting the highest potential effectiveness of Nightblade Support.
Skill Tree Progression
Helix leveling to Helix Early-Mid Game Tree Swap should be performed as soon as you have been able to transition from the levelling setup supplied in the campaign walkthrough to Elemental Damage Critical Strike Claws. Removing the extra points on your tree used allows you to re-allocate the points toward completing the endgame tree.
Character Progression
Early Game Goal
Our goal in the early game is to establish our defenses by crafting on the appropriate Armor/Evasion hybrid bases and flasks. Work towards capping your Critical Strike Chance, upgrade your weapon at every opportunity and level your skill/support gems. Keep in mind that maintaining our chance to hit at 100% is essential throughout the entire gearing process.
Milestone 1 - Weapon
Next we upgrade our damage by acquiring an Imperial Claw or Gemini Claw. Use the Harvest mechanic to spam for high elemental damage rolls or the following essences: Deafening Essence of Anger, Deafening Essence of Wrath & Deafening Essence of Hatred. We are looking for a claw with at least:
- 400+ elemental DPS
- 25%+ increased Critical Strike Chance
If you can get a Claw with the above pre-requisites and also try to get one or multiple of the mods below:
- % increased Attack Speed
- % to Global Critical Strike Multiplier
- % chance to deal Double Damage (crafted)
You can find a claw with these specifications using this trade link.
Milestone 2 - Perseverance
The best in slot belt for the build is Perseverance. Which can be acquired by following this trade link.
On top of its great synergy with the Champion ascendancy we also get rewarded with permanent Onslaught (grants 20% attack, cast & movement speed). This makes this item the single most important unique in the build which carries on through to the endgame.
Until we can afford Perseverance we can use a rare belt to satisfy our Attribute & Resistance requirements while gaining some HP and damage. To make up for the loss of Onslaught a Silver Flask can be used.
Milestone 3 - The Gull
The Gull can be one of the most powerful upgrades we can make early in conjunction with a set of Atlas Passive Skills. It grants Lesser Shrines but most importantly 75% increased effect of shrine buffs and 50% increased duration of shrine effects. These effects can buff the shrines found in maps greatly helping with our early atlas progression.
The Atlas Passive Skills you should aim to get as soon as possible are:
- Supplication
- Drawn to Power
- Syncretism
Milestone 4 - Flasks
Flasks are significant defensive upgrade and are our next pickup. The flask bases to run with this build are:
- Eternal Life Flask
- Diamond Flask
- Quicksilver Flask
- Granite Flask
- Jade Flask
Craft your Flasks using basic crafting methods by first using an Orb of Transmutation on Normal Rarity Flasks and then alternating between using Orb of Alteration and Orb of Augmentation until hitting the following mods on your Diamond Flask, Granite Flask and Jade Flask. Any of the below mods can be on any of the flasks you're rolling:
- Increased Evasion during Flask effect.
- Increased Armour during Flask effect.
- Reduced Effect of Shock on you during Flask effect.
Roll your Quicksilver Flask using the same method as above for the following modifier: Increased Movement Speed during Flask effect.
When rolling your Eternal Life Flask look for the following modifier making sure that it's not rolled with any negative modifiers: Grants Immunity to Bleeding if used while Bleeding.
Flasks have modifier tiers just like items so be sure to upgrade these as you gain access to higher level flask bases.
As you pick up Glassblower's Bauble, use them on your flasks until they hit 20% quality. After picking up enough Instilling Orbs check the Crafting Bench and craft the following enchant on each of your Utility Flasks: Used when charges reach full.
Milestone 5 - High Life, Attribute and Resistance Gear
We want to invest heavily in making sure we gain more Resistances and Attributes than we need here as we require it later on in progression.
For your Helmet, Chest, Gloves and Boots prioritise Armour/Evasion Hybrid Bases for crafting: (Pig-Faced Bascinet, Nightmare Bascinet), Triumphant Lamellar, Dragonscale Gauntlets, Dragonscale Boots & Two-Toned Boots. These hybrid bases allow you to stack exactly the right defences for the build as well as Spell Suppression, a very important defensive layer. It is recommended that you have these bases on your filter or purchase them from other players to craft on. Once you have your bases ready you can begin crafting.
To craft your Gloves and Chest spam any combination of the following Essences on the item until you hit satisfactory life and total elemental resistances:
- Screaming Essence of Greed
- Screaming Essence of Hatred
- Screaming Essence of Anger
- Screaming Essence of Wrath
- Finish the item by crafting Life or Hybrid Elemental Resistances with the Crafting Bench.
To craft your Boots spam the following essence and then finish with a bench craft:
- Shrieking Essence of Zeal
- Bench craft Life or Hybrid Elemental Resistances.
To craft your Rings spam one of the following essences depending on which attribute you require on the base you require the Elemental Resistances for and finish with a bench craft:
- Screaming Essence of Spite
- Screaming Essence of Rage
- Bench craft Life, Hybrid Elemental Resistances or Intelligence/Dexterity.
Milestone 6 - Jewels
This build has very limited Jewel sockets, prioritize slotting in one Mantra of Flames as it grants us with a ton of added flat fire damage to attacks, greatly boosting our damage.
Jewels with life on them are expensive but offer greater defences, early on in your character's progression it is recommended to pick up double or triple mod damage Jewels to keep things affordable and effective.
For rare Jewels you can use the following trade link to find high damage jewels with life.
Another stat we might want to grab on an Abyssal Jewel is:
- % chance to gain Phasing for 4 seconds on Kill
This build has great synergy with Inspired Learning. If you are lucky enough to find one or afford one you should use it. It greatly aids your mapping experience and provides a lot of fun when stealing certain types of buffs.
Milestone 7 - Anointed Talisman Amulet
Look for Talismans with usable stats as well as the Tribal Fury Anoint. This allows us to swap to Lightning Strike as early as possible as the anoint grants us an additional strike. You can find talismans with the following trade link.
Mid Game Goal
Our goal is to upgrade into powerful rare and unique items which greatly boost both our defense and offense. At the end of these milestones we arrive at a full build which is able to take on all endgame challenges.
Milestone 1 - Claw Upgrades
In order to challenge the endgame of Path of Exile content you're going to need to upgrade your claw.
Really good claws are unfortunately not easy to craft. There are multiple ways to craft a fantastic claw however all of them require severalDivine Orbs to finish. It's wise to just buy a decent claw that gets you to endgame then save up for crafting or buying a better endgame claw later.
Just as before we are looking for similar stats but with higher rolls.
- 650+ Elemental Damage
- 30%+ increased Critical Strike Chance
If your claw has an open suffix you can craft an end game craft that can be acquired from unveiling veiled weapons;
- % chance to deal Double Damage
Alternatively craft Attack Speed, or Critical Strike Chance.
This step should net you a claw of at least 4 damage mods, hopefully 5 mods after bench crafting.
Milestone 2 - 6-Link Rare Eldrich Chest
A 6-link rare armour is going to provide us with a huge power spike in the mid game.
Make sure to only craft on a General's Brigandine, Triumphant Lamellar or Full Dragonscale as they provide the highest amount of flat Armor + Evasion
The ideal Body Armour has the following stats:
- + to Maximum Life
- % chance to Suppress Spell Damage
- % chance to Avoid Elemental Ailments (crafted)
- % increased Armour and Evasion
- +% to Resistances
Lesser Eldritch Ember implicits in order of priority:
- % increased effect of Non-Curse Auras from your Skills
- % to all maximum Resistances
- Flasks gain a Charge every # seconds
Lesser Eldritch Ichor implicits in order of priority:
- Grace has % increased Aura Effect
- Determination has % increased Aura Effect
- % increased Evasion Rating
- % increased Armour
- % to all Elemental Resistances
A unique body armour that you could use before transitioning to a crafted rare chest is the Daresso's Defiance. This chest provides a lot of armor and evasion as well as some life and Onslaught effect.
Milestone 3 - Eldrich Implicit Gloves
Once we have acquired a good pair of high item level Dragonscale Gauntlets, we can begin to roll them for Strike Skills target 1 additional nearby Enemy with Lesser Eldritch Embers.
the Orb of Conflict can allow us to further upgrade this implicit all the way to it's tier 5 "Exquisite" granting us the Strike Skills target 2 additional nearby Enemy instead of 1. Be wary this can cost multiple Divine Orbs so make sure the gloves you are rolling on are worthy of this investment.
Milestone 4 - Amulet Upgrade
Once we have acquired our Additional strike gloves implicit gloves, we can upgrade our amulet to: Yoke of Suffering.
This amulet provides us with a ton of damage by allowing us to shock with all of our elemental damage, increasing the damage taken by the enemy substantially. Additionally we also deal more damage to the enemy for every ailment we inflict, which with a tri-ele build is a minimum of 15% as we Shock, Chill, and Ignite.
For anoints we can enchant:
Sepia Oil + Teal Oil + Black Oil for Divine Judgment (Great Budget Anoint).
A better but more expensive anoint is:
Opalescent Oil + Silver Oil + Golden Oil for Tribal Fury, granting us Strike Skills target 1 additional nearby Enemy.
Milestone 5 - Rings
At this point you should work on upgrading your ring to a Mark of the Elder. In order to fully unlock the power of this ring you must have a shaper influenced ring equipped as your 2nd, thus enabling the %increased Attack Damage if your other ring is a Shaper Item stat.
For our secondary ring we can look for one of the following bases:
- Amethyst Ring
- Vermillion Ring
- Opal Ring
- Two-Stone Ring
Our Preferred stats are:
- + to Maximum Life
- % increased Elemental Damage with Attack Skills
- + to Accuracy Rating (if needed)
- % to Resistances
- % increased Attack Speed
If you have a free suffix on the item and you are not in need of additional resistances, the best craftable modifier is: % increased Global Critical Strike Chance, +% to Critical Strike Multiplier if you've Shattered an Enemy Recently.
Because the Mark of the Elder is such a powerful unique, it is important to look to upgrade into it. Typically this ring is very expensive at League start but then drops dramatically in price as supply outgrows demand.
Milestone 6 - Suppression & Ailment Avoidance Gear
The suppression and ailment avoidance stats are two of the most important defensive stats found on items, they greatly help our build feel more defensive in maps and boss fights.
Ailment avoidance can primarily be found as a body armor prefix, as a boot suffix + implicit, on shields and on the passive skill tree (the thick skin life cluster grants this build 20% avoidance). The easiest way to cap our ailment avoidance is to get a total of 80% avoidance split amongst these items, while keeping in mind we can craft 25% as a prefix on Body Armor and 25% as a suffix on Boots.Therefore we need at least a t1 % chance to Avoid Elemental Ailments on our shield, or a lower tier with an implicit on our boots rolled with Lesser Eldritch Ichor.
Spell suppression is less mandatory in endgame than ailment avoidance but regardless greatly contributes to our survival. Suppression grants a % chance to reduce incoming spell damage of hits and their ailments by 50%. This can be stacked up to 100% to effectively half our Spell Damage taken. The primary sources of suppression are: Body Armor, Boots, Gloves, Helmet, and Shield Suffixes. This stat can only roll on Evasion or hybrid Evasion bases which isn't a problem for this build since we only craft on hybrid Armour and Evasion bases. Try your best to get as much suppression as possible on these pieces, and potentially invest some Passive Points on the tree to reach 100% until you can upgrade your gear further. Even a few missing % make a huge difference between sometimes getting oneshot, or not.
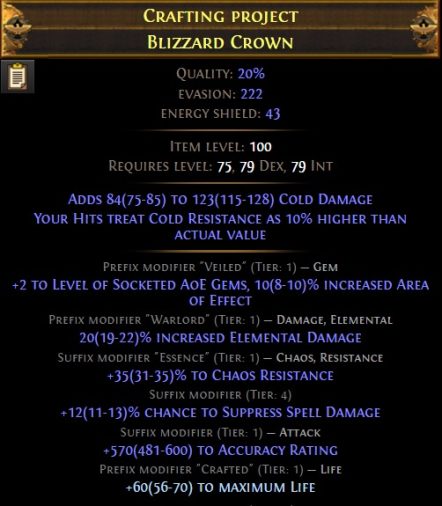
Milestone 7 - Blizzard Crown
The Blizzard Crown base is acquired through the Ritual league mechanic. It is a rare base which can be found occasionally when claiming rewards from the Ritual inventory. This base provides us with a large amount of added flat cold damage, granting us a big damage increase. Crafting one of these however might be tricky, it is advisable to either use the Harvest mechanic to re-forge for life or resistances, or use Deafening Essence of Greed until you have other desirable mods such as resistances and Spell Suppression.
Milestone 8 - Better Jewels and Gems
Better rare jewels can be found with this trade link.
Once you have more currency you can also look to upgrade your gems to their Awakened or alternative quality variants:
- Awakened Elemental Damage with Attacks Support
- Awakened Added Cold Damage Support or Awakened Added Lightning Damage Support
- Divergent Inspiration Support
- Anomalous Nightblade Support
End Game Goal
At this point, we have established all our defenses and we are looking to further upgrade our gear. Upgrades can become extremely expensive but min/maxing is satisfying as the build scales well with investment.
Milestone 1 - Upgrading Eldrich Implicits
The Orb of Conflict is a powerful currency which allows us to upgrade our Eldrich Implicits all the way up the tier progression: Lesser (t1), Grand (t2), Greater (t3), Exceptional (t4), Exquisite (t5) and finally Perfect (t6). The Orb of Conflict always has a higher chance at upgrading the lower tier modifier present.
We use this orb to upgrade our implicits on all of our items to their highest tier, further increasing the power of our character.
Upgrade implicits following this order of importance:
- Additional Strike gloves (upgrade to exquisite for +2 strikes)
- Ailment Avoidance boots (upgrade to perfect for 32% avoidance)
- Effect of non-curse aura chest (upgrade to perfect for 20%)
Milestone 2 - Perfecting Rares
At this point our rares should be min/maxed, refer to the character planner in the gear overview tab for examples of what you're looking for. If you want to try out how to craft your final items, Craft of Exile is an amazing tool to plan them without wasting in-game currency.
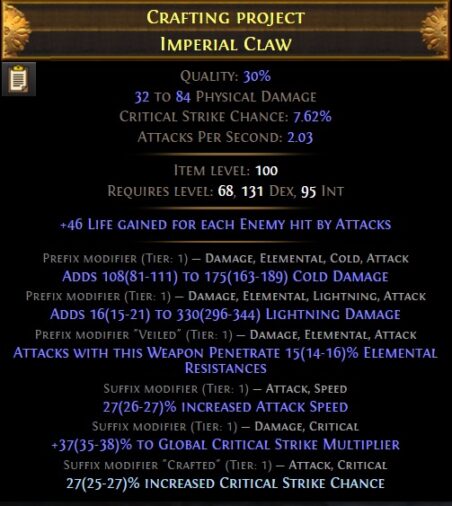
Endgame Claw
As we are an Elemental Attack, Critical Strike build the weapon is an the most important slot in the build. It is going to provide us with most of our flat damage and Critical Strike Chance necessary to deal with the most challenging content in the game. A great Claw will have very high Elemental Damage and Critical Strike chance rolls on a favourable base such as the Imperial Claw and Gemini Claw. Follow the crating guide below to complete your Claw.
Step 1
Use Deafening Essence of Anger or Deafening Essence of Wrath. Seek out any of the following secondary local damage rolls:
Adds (89–121) to (180–210) Fire Damage
Adds (81–111) to (163–189) Cold Damage
Adds (15–21) to (296–344) Lightning Damage
Step 2
Make sure only the two local damage mods are present as prefixes. If you roll a third undesired prefix, use an Orb of Annulment. If the third prefix does not have an attack tag, craft Cannot Roll Attack Modifiers to ensure you do not Annul off your elemental damage mods.
Step 3
Craft Prefixes Cannot Be Changed and use T4 Aisling in hopes of getting the veiled prefix Attacks with this Weapon Penetrate (14–16)% Elemental Resistances.
Step 4
If you get a veiled suffix instead of a prefix, craft Prefixes Cannot Be Changed and Orb of Scouring your claw. If you Get do not get the Attacks with this Weapon Penetrate (14–16)% Elemental Resistances make absolutely sure to select a veiled modifier which does not have an attack tag.
Step 5
Repeat steps 2-4 until you you have 2 T1 elemental damage rolls and the Attacks with this Weapon Penetrate (14–16)% Elemental Resistances
Step 6
Craft Prefixes Cannot be Changed and Use the following harvest craft: Reforge a Normal or Magic item as a Rare item with random modifiers, including a Speed modifier. Repeat this step until you have (26–27)% increased Attack Speed.
Step 7
Craft (25–27)% increased Critical Strike Chance with the Crafting Bench
Step 8
Use a Redeemer's Exalted Orb in hopes of hitting one of the following modifiers:
- (23–25)% chance to Blind Enemies on Hit with Attacks
- Auras from your Skills grant 2% increased Damage to you and Allies
Step 9
Apply the following Harvest Enchant: Enchant a Weapon. Quality does not increase its Physical Damage, has 1% increased Attack Speed per 8% Quality
Step 10
Apply Hillock Quality for 30% Quality.
Your final claw should look something like this:
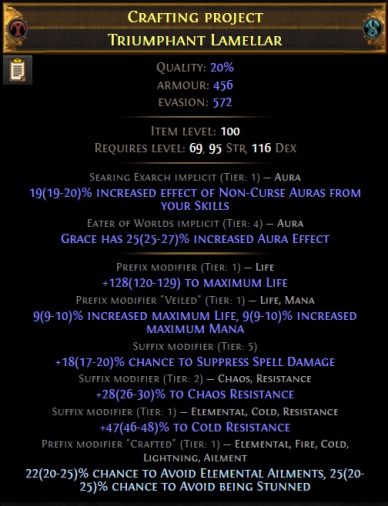
Endgame Body Armour
Body Armours grant the highest amount of Spell Suppression out of any other item slot. it is advisable to try to get a high roll here so that less stress is put on other gear slots to reach Spell Suppression Cap. Luckily we can get Spell Suppression on our Gloves, Shield and Helmet as well, but make sure that you are keeping track of how much you need so that you do not fall short on reaching 100%. Acquire a Triumphant Lamellar item level 86+ ensuring it is not Fractured, Influenced or Corrupted. Follow the Body Armour Crafting Guide below to complete your Body Armour.
Step 1
Orb of Scouring your chest piece and use an orb of Orb of Transmutation on it.
Now that you have your base spam roll Lesser Eldritch Embers until you hit the following modifier:
- Increased effect of non-curse auras from your skills.
Step 2
Ensure the item has a tier 4 (Grand) or better eater of worlds implicit, apply using Grand Eldritch Ichor if needed:
- Use an Orb of Conflict.
- If your Exarch Mod is removed go back to step 1.
- If your Exarch Mod is upgraded, move to step 3.
Step 3
Ensure the item has a tier 4 (Grand) or better eater of worlds implicit, apply using Grand Eldritch Ichor if needed:
- Use an Orb of Conflict.
- If your Exarch Mod is removed go back to step 2.
- If your Exarch Mod is upgraded, move to step 4.
Step 4
Ensure the item has a tier 4 (Grand) or better eater of worlds implicit, apply using Grand Eldritch Ichor if needed:
- Use an Orb of Conflict.
- If your Exarch Mod is removed go back to step 3.
- If your Exarch Mod is upgraded, move to step 5.
Step 5
Use an Exceptional Eldritch Ichor on your chest.
Step 6
Take your chest to the menagerie and use the beast craft "Create an Imprint of a magic item":
- Use an Orb of Conflict on your Chest.
- If your Exarch mod is downgraded use your Imprint and repeat step 6.
- If your Exarch mod is upgraded move, to step 7.
Step 7
- Use an Exceptional Eldritch Ichor on your chest.
Step 8
Take your chest to the menagerie and use the beast craft "Create an Imprint of a magic item":
- Use an Orb of Conflict on your Chest.
- If your Exarch mod is downgraded use your Imprint and repeat step 8
- If your Exarch mod is upgraded, move to step 9
Step 9
Spam your chest with Grand Eldritch Ichors until you hit either of the following mods:
- Grace or Determination has 25-27% increased aura effect
Step 10
Spam your chest with Shrieking Essence of Wrath/Shrieking Essence of Hatred/Shrieking Essence of Anger until you hit the following or better at the same time as your essence modifier:
- 17-22% Spell Suppression
- 36-41% Fire/Cold/Lightning/Chaos Resistance
Hitting higher suppression here makes crafting and gearing later easier.
If you hit a good roll of spell suppression, but did not hit a resist, try the following to get lucky
- If there is an open suffix and you have prefixes available use a "prefix to suffix" bestiary craft (Farric Lynx Alpha)
Step 11
Here you have two options based on what you believe to be cheaper;
If Eldritch Chaos Orbs appear cheap spam Eldritch Chaos Orbs on the item until you hit a life roll you're happy with then, use Eldritch Orb of Annulments until the life roll is the only prefix on the item. If you remove the life go back to spamming Eldritch Chaos Orbs.
OR
If Eldritch Exalted Orbs and Eldritch Orb of Annulments seem cheap, use Eldritch Orb of Annulments until there are no prefixes on the item then alternate between Eldritch Exalted Orbs and Eldritch Orb of Annulments until you hit a life roll you're happy with.
Step 12
Craft suffixes cannot be changed and use the crafting bench from Aisling level 4 from betrayal (You could purchase this off other players using community trade discords).
If the crafted mod you applied (Suffixes cannot be changed) is consumed and turned into a veiled mod go to step 13.
If your life mod is removed go back to step 11 and roll another life mod you're happy with.
Step 13
Before unveiling your chest piece craft % Chance to Block Attack Damage using the crafting bench (this is essential). Then unveil your chest, prioritizing the option below if it appears:
- 30-35% chance to avoid ailments
If you do not get offered ailments take the following mod:
- 9-10% increased maximum life
If you aren't offered either of these you can settle for:
- Hybrid life + armor/evasion
Step 14
Depending on what modifier you ended up with you should craft either:
- Chance to avoid ailments
OR
- % increased maximum life
Step 15
Use the harvest Swap resist craft to manipulate the resistances of the item to what you need
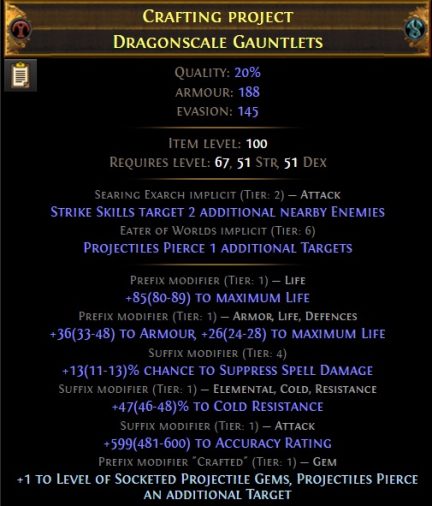
Endgame Gloves
Gloves are a great slot to fill out our Accuracy and the rest of the Spell Suppression needed to reach 100% chance. Acquire a Dragonscale Gauntlets item level 85+ ensuring it is not Fractured, Influenced or Corrupted. Follow the Glove Crafting Guide below to complete your Gloves.
Step 1
Orb of Scouring your gloves and then use an Orb of Transmutation on them. Now that you have your base spam roll Lesser Eldritch Embers until you hit the following modifier:
- Skills Target 1 Additional Nearby Enemy.
Step 2
Ensure the item has a tier 4 (Grand) or better eater of worlds implicit, apply using Grand Eldritch Ichor if needed:
- Use Orb of Conflict
- If your Exarch Mod is removed go back to step 1.
- If your Exarch Mod is upgraded, move to step 3.
Step 3
Ensure the item has a tier 4 (Grand) or better eater of worlds implicit, apply using Grand Eldritch Ichor if needed:
- Use Orb of Conflict.
- If your Exarch Mod is downgraded go back to step 2.
- If your Exarch Mod is upgraded, move to step 4.
Step 4
Ensure the item has a tier 4 (Grand) or better eater of worlds implicit, apply using Grand Eldritch Ichor if needed:
- Use Orb of Conflict.
- If your Exarch Mod is downgraded go back to step 3.
- If your Exarch Mod is upgraded, move to step 5.
Step 5
Use an Exceptional Eldritch Ichor on your Gloves.
Step 6
Take your Gloves to the menagerie and use the beast craft "Create an Imprint of a magic item":
- Use an Orb of Conflict on your Gloves.
- If your Exarch Mod is downgraded use your Imprint and repeat step 6.
- If your Exarch Mod is upgraded to Skills Target 2 Additional Nearby Enemy, move to step 7.
Step 7
Spam your Gloves with Grand Eldritch Ichors until you hit one of the following mod:
- 9% chance to suppress spell damage.
- Projectiles Pierce an additional Target.
- % increased Global Accuracy Rating.
Step 8
Spam your Gloves withDeafening Essence of Anger, Deafening Essence of Hatred, Deafening Essence of Wrath or Deafening Essence of Zeal until you hit the following with 1 suffix open or a stat that you want (Strength, Resistances, Accuracy):
- 8 - 14% chance to suppress spell damage.
Step 9
Craft Attack Speed, Resistances, Attributes or Accuracy you need using the bench if you have an open suffix.
Step 10
Spam Eldritch Chaos Orbs until you get a life roll you're happy with or if you haven't used a crafted mod you can craft it.
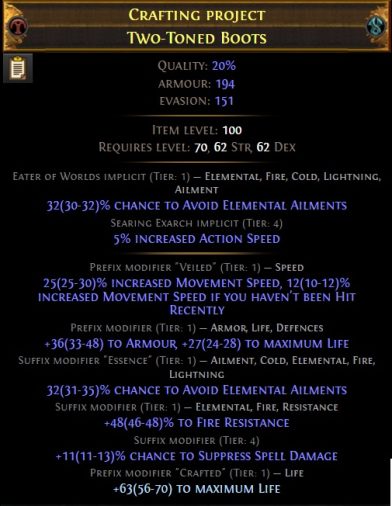
Endgame Boots
Purchase one of the following bases at Item Level 85+ with the enchantment Adds 1 to 160 Lightning Damage if you haven't Killed Recently and ensuring they are not Fractured, Influenced or Corrupted. If you are unable to find a pair of Boots with the enchant already on it, lab and enchant it yourself (or hire a lab runner):
- Two-Toned Boots
- Dragonscale Boots
Step 1
Use a Lesser Eldritch Ichor to apply Eater of World Dominance to the Boots.
Step 2
Spam Deafening Essence of Loathing until you hit one or more of the following suffixes:
- +40-48% to Fire/Lightning/Cold Resistance
- +25-35% to Chaos Resistance
- +% chance to Suppress Spell Damage
Step 3
If you have an open suffix in addition to the two desirable mods use an Eldritch Exalted Orb to augment one of the following modifiers:
- +40-48% to Fire/Lightning/Cold Resistance
- +25-35% to Chaos Resistance
- +% chance to Suppress Spell Damage
If you augment an undesirable modifier, go back to step 2
If you augment a desirable mod, move to step 4
Step 4
Now that you have your base spam roll Lesser Eldritch Ichors until you hit the following modifier:
- % Chance to Avoid Elemental Ailments
Step 5
Ensure the item has a tier 4 (Grand) or better exarch implicit, apply using Grand Eldritch Ember if needed:
- Use Orb of Conflict
- If your Eater Mod is removed go back to step 4
- If your Eater Mod is upgraded, move to step 6
Step 6
Ensure the item has a tier 4 (Grand) or better exarch implicit, apply using Grand Eldritch Ember if needed:
- Use Orb of Conflict
- If your Eater Mod is downgraded go back to step 5
- If your Eater Mod is upgraded, move to step 7
Step 7
Ensure the item has a tier 4 (Grand) or better exarch implicit, apply using Grand Eldritch Ember if needed:
- Use Orb of Conflict
- If your Eater Mod is downgraded go back to step 6
- If your Eater Mod is upgraded, move to step 8
Step 8
Use an Exceptional Eldritch Ember to your boots:
- Use Orb of Conflict
- If your Eater Mod is downgraded go back to step 6
- If your Eater Mod is upgraded, move to step 8
Step 9
Use an Exceptional Eldritch Ember to your boots:
- Use Orb of Conflict
- If your Eater Mod is downgraded go back to step 8
- If your Eater Mod is upgraded, move to step 10
Step 10
Spam your Boots with Grand Eldritch Embers until you hit one of the following mods
- 7% increased Movement Speed
- 4% increasd Action Speed
Step 11
Craft Suffixes Can't be Changed
Once you've done so use a Veiled Chaos Orb.
Step 12
Before unveiling craft # to maximum Mana with the crafting bench
Step 13
Unveil your boots with Aisling in your hideout in hopes of getting one of the Movement Speed mods.
The best movement speed unveil is the following:
- (25–30)% increased Movement Speed, (10–12)% increased Movement Speed if you haven't been Hit Recently
If you wish to repeat steps 11-13 to get this modifier you may. Although since we are constantly being hit the mod has very little value therefore you must decide whether it is worth the investment.
Step 14
Use the harvest swap resist craft to manipulate any resistances you may have on your boots to what you need
Endgame Helmet
Purchase a Blizzard Crown at Item Level 84+ (if possible) with one of the following enchantments ensuring they are not Fractured, Influenced or Corrupted. If you are unable to find a Helmet with the enchant already on it, lab and enchant it yourself (or hire a lab runner):
- Determination has 30% increased Mana Reservation Efficiency
- Grace has 30% increased Mana Reservation Efficiency
- Lightning Strike pierces 3 additional Targets
- 40% increased Lightning Strike Damage
Follow the Helmet Crafting Guide below to complete your Helmet.
Step 1
Ensure your base is correct and use a Orb of Scouring on it to begin.
Step 2
Spam your helmet with Deafening Essence of Envy until you hit the following or better at the same time:
- 10-14% Spell Suppression.
- +351-600 to Accuracy Rating.
AND
- 36-41% Fire/Cold/Lightning Resistance.
OR
- Two high tier Resistance rolls, as long as your Spell Suppression chance and Accuracy are capped.
If you hit a good roll of Spell Suppression or Accuracy, but did not hit a resist or an open suffix, try the following to get lucky and free up the suffix for a craft:
- Use the suffix to prefix beast in the menagerie (Farric Wolf Alpha).
If your item has 6 mods you can try using an Orb of Annulment.
Step 3
Craft Suffixes Cannot Be Changed
Once you've done so proceed to using a Veiled Chaos Orb
Step 4
Before Unveiling craft +1 to maximum number of Skeletons +1 to maximum number of Raised Zombies with the crafting bench
Step 5
Unveil your helmet in hopes of getting one of the following mods:
- +2 to Level of Socketed Projectile Gems, Projectiles Pierce an additional Target
- +2 to Level of Socketed AoE Gems, (8–10)% increased Area of Effect
- (24–28)% increased Evasion and Energy Shield, +(19–22) to maximum Life
- +(55–60) to maximum Life, Regenerate 5.3 Mana per second
Step 6
Craft (5–6)% of Physical Damage from Hits taken as Fire Damage
Once you've done so augment a mod with a Warlord's Exalted Orb in hopes of getting any tier of % increased Elemental Damage
Step 7
Finish your helmet by crafting one of the following mods depending on what you unveiled in the previous step:
- +(56–70) to maximum Life
- +1 to Level of Socketed Projectile Gems, Projectiles Pierce an additional Target
Step 8
Use the Harvest Swap Resistances craft to manipulate the resistances to what you need.
Endgame Ring
Due to our Mark of the Elder, the second Ring equipped must be Shaper Influenced. Crafting Shaper Influenced Rings can be very difficult. It is recommended to make a search for rings with Shaper influence with a combination of the following prefixes and suffixes:
The most important prefixes on Rings are:
- 70-79 to maximum Life
- 37-42% increased Elemental Damage with Attack Skills
- adds # to # Cold/Fire/Lightning Damage to Attacks
- Adds (4–8) to (82–86) Lightning Damage against Shocked Enemies
- Adds (20–26) to (41–48) Cold Damage against Chilled or Frozen Enemies
The most important suffixes on Rings are:
- +40-48% to Fire/Cold/Lightning Resistance
- +31-35% to Chaos Resistance
- +351–480 to Accuracy Rating
- +15–16% to all Elemental Resistances
- 5–7% increased Attack Speed
- (14–16)% increased Global Critical Strike Chance, +(21–23)% to Critical Strike Multiplier if you've Shattered an Enemy Recently (craft)
Milestone 3 - Endgame Jewels
The Watcher's Eye can grant a boost to both your defenses and offenses. Since this build utilises two defensive, and one offensive aura there is a wide range of stats we can look for on it. It is recommended to look for at least 1 damage stat and 1 defensive/utility stat listed below:
- % chance to Suppress Spell Damage while affected by Grace
- % chance to Evade Attack Hits while affected by Grace
- % increased Movement Speed while affected by Grace
- % additional Physical Damage Reduction while affected by Determination
- to Armour while affected by Determination
- % increased Attack Speed while affected by Precision
- % to Critical Strike Multiplier while affected by Precision
- % increased Attack Damage while affected by Precision
The Brutal Restraint is slotted at the Ranger jewel socket next to the Frenzy Charge. Near this socket there is a great concentration of passives the build already paths to for it's damage and utility making it the favourable location for it to be slotted. The jewel will grant additional powerful bonuses to passives allocated within the radius of it's ring. The bonuses we are looking for on these passives are any combination of the following:
- 5% increased Dexterity
- 8% increased effect of Non-Curse Auras from your Skills
- 25% chance to gain Alchemist's Genius when you use a Flask
- +20 to Dexterity
- 5% increased Attack and Cast Speed
- 4% increased maximum Life
- 5% chance to Blind Enemies on Hit
- 20% increased Projectile Damage
The best Forbidden Flame + Forbidden Flesh combination allocates Fatal Flourish. This notable causes the player's non-travel Attack Skills to Repeat an additional time similar to Multistrike Support and causes the final Repeat to do 60% more Damage. It Grants 30% More Damage overall if the player can attack consecutively, but locks the player down for two attack animations. When the Vaal version of Vaal Lightning Strike is used, Fatal Flourish doubles the amount of beams it shoots out.Vaal Lightning Strike is granted a repeat, at no additional attack time throughout it's duration granting the Vaal version of the skill a 130% more multiplier.
Alternatively the 2nd best Forbidden Flame + Forbidden Flesh allocates Arena Challenger. To enable this passive we must socket and use Blood and Sand to grant us the buffs provided by Arena Challenger.
Milestone 5 - What's Next?
Now that your build is done, what's next?
Well you're actually not done, it's time to save up for a Crystallised Omniscience, one of the most powerful endgame amulets in the game.
Crystallised Omniscience amulet converts all of our attributes into the Omniscience (omni) Stat. This means dexterity won't grant evasion and accuracy, strength won't grant life and melee damage, and intelligence won't grant energy shield. Instead, your attributes are converted into a unique stat: Omniscience which grants 1% elemental penetration and 1% to elemental resistances per 10 Omniscience.
Crystallised Omniscience can be used to almost cap our Resistances, and provide a massive amount of generic Elemental Penetration. This allows builds to not have to focus on one specific elemental damage type to be efficient. This synergizes extremely well with Trinity Support as well as other conditional damage notables found on the passive tree. The sweet spot for Omniscience is approximately 1500. This almost caps our Resistances exclusively from Attributes. Beyond that, it is still a nice stat to stack, however diminishing returns are incurred. The damage increase granted by Penetration damage does not scale linearly, so after a certain amount, other stats become favorable.
Refer to the endgame Omniscience Lightning Strike Champion Build guide for further more information.
Video Guide
Path of Building
Leveling: https://pobb.in/_aRxXJV3tMvk
Endgame: https://pobb.in/G4ZMoh1nn9aP
Summary
- The Spectral Helix/Lightning Strike Champion is a great all-round build with strong defences. In its final form it can take on the toughest challenges in the game with ease.
- The build rewards frequent upgrades from the early to the late game with satisfying power jumps along the way. Balance out your elemental damage types for Trinity support and other various benefits such as Shocks, Chills, and Ignites that buff damage and defence, as well as fully unlocking the potential of the Yoke of Suffering.
- Perseverance is a core item that scales both offenses and defences for very little cost, making investing into defences very rewarding.
- The build can fit an Inspired Learning at no passive skill cost granting a boost in mapping efficiency.
- Once itemized properly this Champion is able to take on Simulacrum wave 30, 100% Delirium as well as all the Uber bosses with ease.
If you're looking for an endgame build beyond this Champion, much of the gear can be used as a stepping stone to the endgame titan: Omniscience Lightning Strike or Tornado shot builds as much of the same gear can be interchanged between the two builds. Additionally as the build can take on all content in the game, it can be used as a stepping stone to farm up currency for whatever project you may have in mind for the future.
Credits
Written by Crouching_Tuna.