Labyrinth Guide
Last Updated:December 7, 2023|Changelog
The Lord’s Labyrinth was introduced on March 4, 2016, as part of the Ascendancy expansion to Path of Exile which added new content and features such as Ascendancy Classes & Transfigured Gems. Unlike most areas in the game, the Labyrinth's layout is randomised every 24 hours and will otherwise remain the exact same for all players during that period of time. The Labyrinth is a very iconic part of the game due to its unconventional gameplay and Hardcore-like nature; the penalty for dying in the Labyrinth is having to start it over from the beginning!
There are four different versions of Izaro's Labyrinth and they must all be completed in order to gain the eight Ascendancy points for your Class. The first three versions can be unlocked by completing the Trials of Ascendancy that are located throughout the Campaign.
- The Labyrinth is level 33 and requires Trials of Ascendancy from Acts 1-3.
- The Cruel Labyrinth is level 55 and requires Trials of Ascendancy from Acts 6&7.
- The Merciless Labyrinth is level 68 and requires Trials of Ascendancy from Acts 8-10.
The fourth version, known as the Eternal Labyrinth is level 75, can be entered at any time after completing the campaign by paying the entry cost of 1x Offering to the Goddess.
Warning; Lab Farming changed a lot in 3.23 due to the addition of Transfigured Gems. Once the League goes live our Maxroll Team will get to work testing it and provide more information on the new Divine Font.
The Eternal Labyrinth can be attempted on higher difficulties by using one of three improved offerings from Trial of Glory:
- Tribute to the Goddess
- Enhanced Rewards.
- Gift to the Goddess
- 6 Additional uses of the Divine Font.
- Dedication to the Goddess
- This was changed in 3.23, more information coming soon.
These higher difficulties yield better rewards however they are significantly more dangerous as the area is raised from 75 to 83 and each improved offering gives bonuses to Izaro and his traps.
The Trials of Ascendancy
Seeking a worthy successor, Emperor Izaro constructed deadly trials throughout Wraeclast to find candidates.
Throughout the first three acts, there are six Trials that need to be completed in order to gain access to the Aspirants' Plaza. Once these trials have been completed, you can access the Aspirants' Plaza via the large plaque located within the Act 3 Sarn Encampment. Completing the Labyrinth for the first time will grant you the ability to Ascend!
Each class has three ‘Ascendancies’. These are specialized versions of your base class. Each time you complete a labyrinth difficulty for the first time on a character, you are granted 2x Ascendancy points which can be used to further improve and specialize your character.
Once you have opened the passage to the Aspirants' Plaza, it can be accessed again in future directly via a waypoint within the plaza itself.
The campaign contains six more Trials; prerequisites for the Cruel and Merciless Labyrinths which will grant 2x additional Ascendancy points each. Information on all twelve trials can be found below:
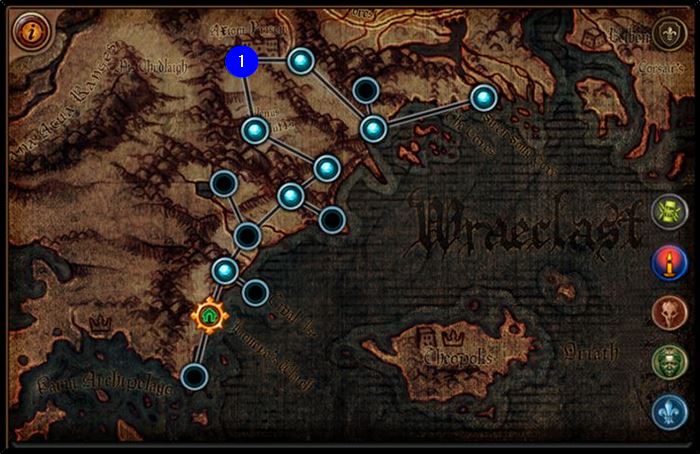
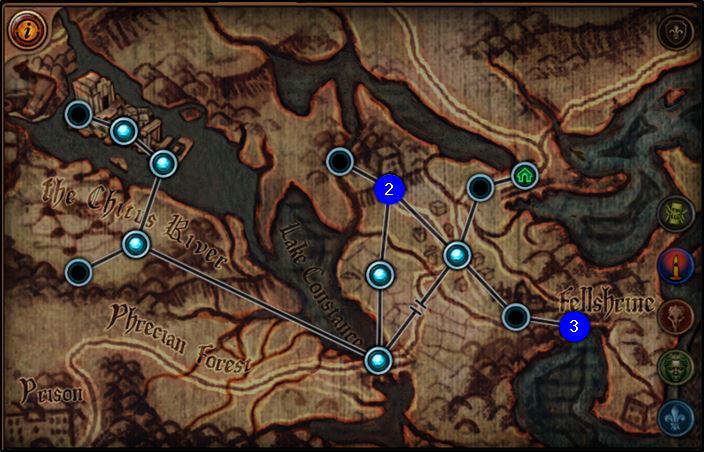
In Act 1 when you enter the Lower Prison (1) you encounter the first Trial of Piercing Truth, which includes Spike Traps.
The next two Trials of Ascendancy are located in Act 2.
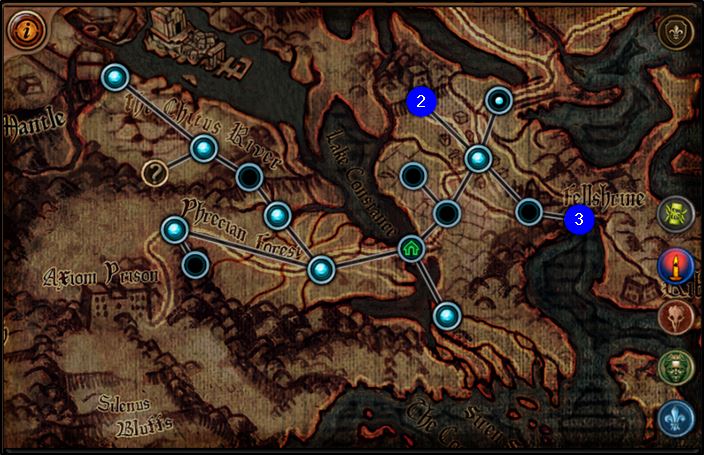
The Trial of Crippling Grief is found in The Chamber of Sins Level 2 (2), which contains Sawblade Traps.
The Trial of Swirling Fear is located in The Crypt Level 1 (3), which contains Spinning Blades.
The final three trials required to access the Aspirants’ Plaza for the first time can all be found in Act 3.

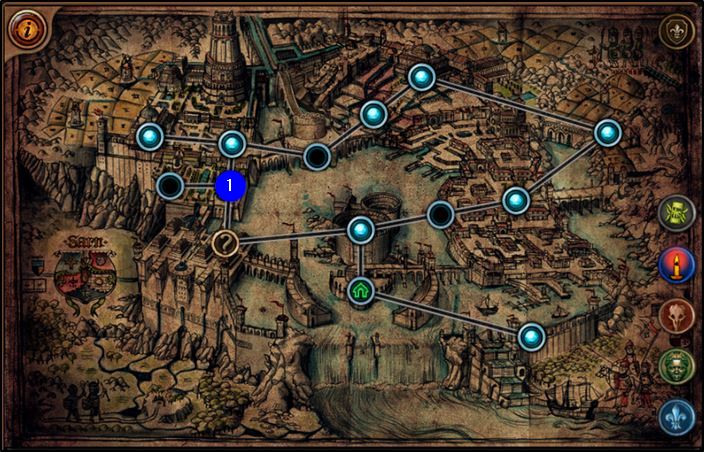
Trial of Burning Rage is located in The Crematorium (4), which showcases Furnace Traps.
The Trial of Lingering Pain demonstrates the Blade Sentry mechanic and is located in The Catacombs (5).
The Trial of Stinging Doubt is full of poisonous Dart Traps and is located in The Imperial Gardens (6).
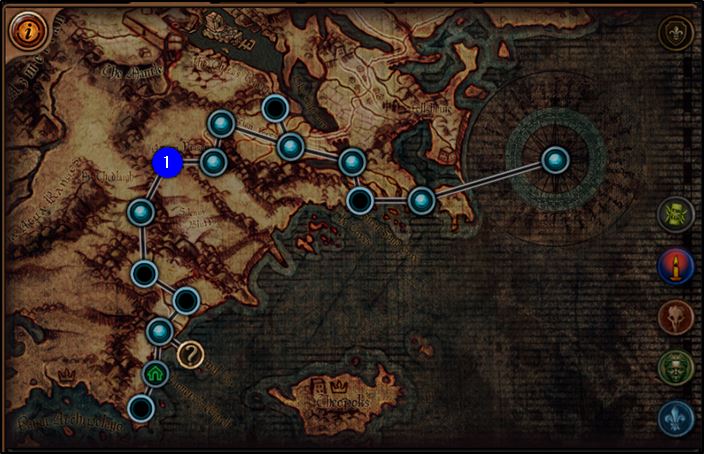
In Act 6 when you enter the Lower Prison (1) you can encounter the Trial of Piercing Truth, which includes Spike Traps.
The last two Trials of Ascendancy required to access the Cruel Labyrinth can be found in Act 7. The Trial of Crippling Grief is located in The Chamber of Sins Level 2 (2), which contains Sawblade Traps.
The last Cruel Trial of Swirling Fear (3) is located in The Crypt Level 1 (3) again with Spinning Blades.
The Trial of Burning Rage is located within The Bath House (1), which showcases Furnace Traps.
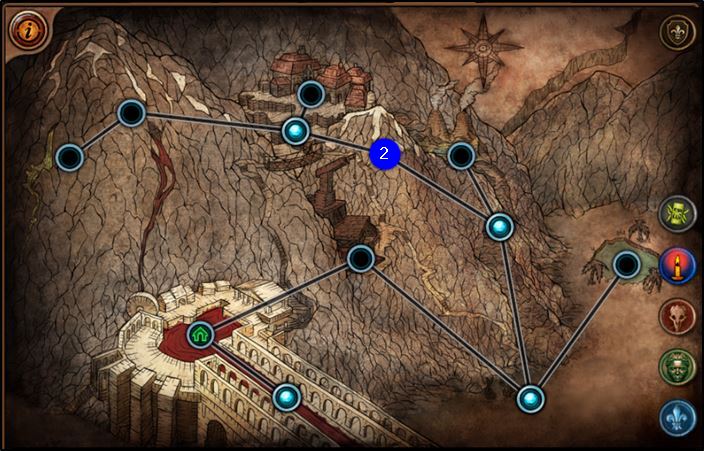
The Trial of Lingering Pain (2) demonstrates the Blade Sentries and is located in The Tunnels (2) in Act 9.
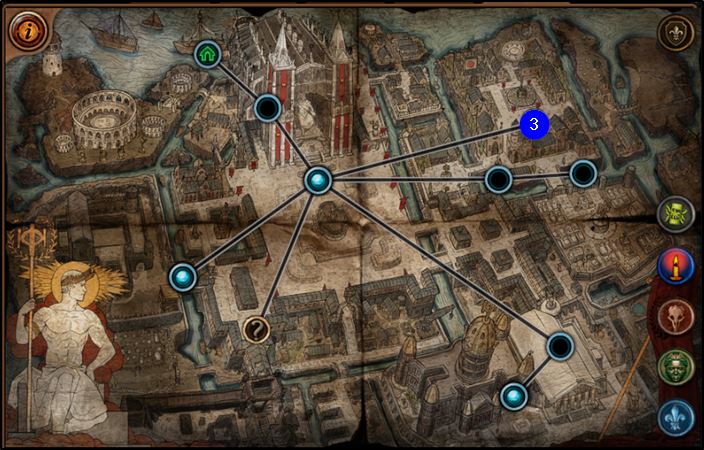
The Trial of Stinging Doubt (3) is located in Act 10 The Ossuary. It is full of poisonous Dart Traps.
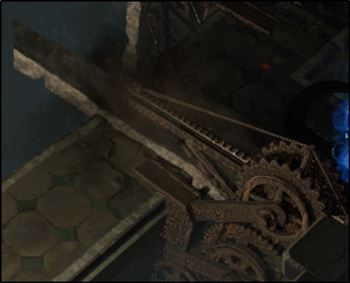
Traps
Many traps deal a percentage of your life as Physical, Fire or Chaos damage over time. Damage over time is NOT reduced or evaded by defensive types like Armour/Evasion/Dodge/Spell Suppression. To mitigate damage over time, you need to use some of the following tools:
- Fixed value #% Additional Physical Damage Reduction (not Armour) or Endurance Charges to reduce the amount of incoming Physical damage over time.
- While rare, #% less Physical damage over time on your items is very effective.
- #% Life Regeneration or flat # Life Regeneration is a good source of permanent Life sustain.
- The Vitality Aura is a great way to get Life Regeneration during the Campaign.
- Enduring Cry, or a Summon Stone Golem are good additional sources for #Life Regeneration on most builds.
- Taking two or three extra Life Flasks is by far the easiest way to have a good time. For example, this Saturated Divine Life Flask of Perenniality (high amount of Life + extra recovery) is "best in slot" in order to sustain your Life.
- Movement Skills like Flame Dash that teleports your character to a location allowing you to skip through certain traps without taking damage.
- Fire and Chaos Resistance help to mitigate non-Physical trap damage.
- Pantheon Souls
- Soul of Arakaali (Major God, Act 7) - 10% reduced Damage taken from Damage over Time.
- Soul of Ryslatha (Minor God, Act 6) - Life Flasks gain 3 Charges every 3 seconds if you haven't used a Life Flask Recently.
60% increased Life Recovery from Flasks used when on Low Life. - Check out our Pantheon Guide for more information.
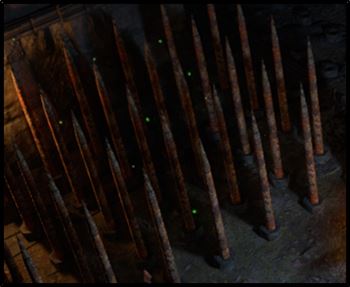
Spikes
Spike Traps deal 1/4 of your Life and Energy Shield as Bleed Damage and lock your character in place by shooting out of the ground in a square-shaped area either at a preset frequency or when their pressure plate is stepped on. You can check whether a Spike Trap is frequency or pressure based by waiting to see if the spikes shoot out on their own.
A Spike Trap blocks movement while it is open, and it is impossible to pass through it, so walk step by step like in the video showcase!
Counter Spike Traps by watching the pattern, and moving when they're inactive.
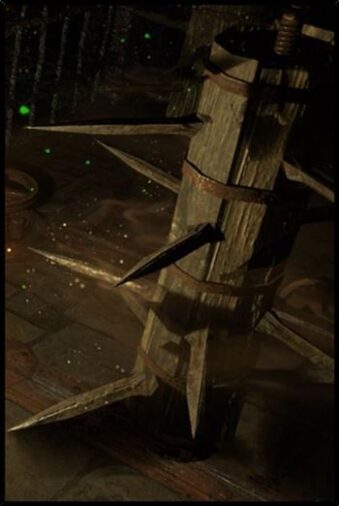
Sawblades
Sawblades deal Physical damage over time when you get in contact with them. They deal enough damage to kill you with one full second of contact if you don't have adequate mitigation.
Sawblades move back and forth along a straight line independently of whatever your character is doing. As you may notice in the video, sometimes you can use a lever to prevent them from moving at all.
Counter Sawblades by avoiding them, or running through them so you spend a minimal amount of time in contact with the blade. NEVER run in the same direction as the blade!
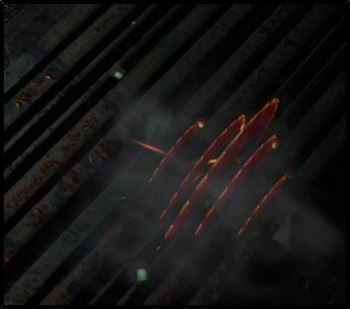
Spinning Blades
Upon full contact, Spinning Blades cause a large enough amount of Physical damage over time to kill you within one full second of contact!
They follow a predetermined route on the ground back and forth. Activating levers on the ground can shift these traps between their set tracks. In comparison to Sawblades, Spinning Blades have more complex pathing.
Counter Spinning Blades using Flame Dash and walk alongside a wall or the edge to avoid getting hit by two or more of them simultaneously! Most importantly, if you can't avoid them entirely, don't run along their path and instead rush right through them as they approach you to minimize the damage you take.
Furnace
When standing over activated Furnace Traps you receive Burning damage over time which can be fatal even if the player has 75% Fire resistance. Furnace Traps function according to a timer which causes them to deal damage only for a period of time.
Counter these traps by waiting until they cool down and are no longer actively dealing damage, then move over them. If you must run over an active Furnace Trap make sure to have Life Flask charges to heal through the Burning damage.
Bladed Sentries
Blade Sentries are wide, circular Traps that deal Physical damage over time that follow a set route. Their damage increases as you get closer to their centre.
Counter Blade Sentries using Flame Dash or any other Movement Skill and walk alongside a wall or the centre between them to avoid getting hit by them while you walk. Similar to the other mobile Trap types described above, it's best to rush straight through them in the opposite direction if you can't avoid them.

Dart Traps
Like Spike Traps, Dart Traps are either frequency or pressure based. They deal Physical damage and inflict Poisons which deal Chaos damage over time. They also apply Hinder (slow) when they hit you.
Counter Dart Traps by watching the pattern, and moving when they're inactive. If you trigger a Pressure Plate move quickly to avoid taking consecutive hits. Movement skills like Flame Dash are important for countering the slowing effect applied by the trap.
Cleaver
Cleaver Traps deal a high amount of Physical damage on hit and apply Bleeds. Cleaver Traps are frequency based and deal damage once every few seconds to a small area. They only appear in narrow walkways.
These Traps only appear in the Eternal Trials and the Eternal Labyrinth.
Counter Cleaver Traps by waiting for the blade to slam down, then moving through as it begins to rise and reset.
Sentinels
An area can be affected by a Sentinel Trap in many ways. These Traps only start appearing in the Eternal Trials and the Eternal Labyrinth.
Counter Sentinel Traps by dealing damage to them. This temporarily deactivates the Traps and you can pass by safely.

There are several types of Sentinel Traps:
- Endless Drought - Removes Flask Charges.
- Endless Hazard - Covers the area with several green circles on the ground with the effect: % of Life/Energy Shield to take as damage on using a movement skill taken Physical Damage whenever you use a Movement Skill.
- Endless Pain - Has an aura that applies 50% increased damage taken.
- Endless Sting - Causes Bleeding.
- Unending Fire - Casts Fire Nova.
- Unending Frost - Casts Ice Nova.
- Unending Storm - Casts Shock Nova.
- Unending Lethargy - Has a Temporal Chains aura.
The Lord's Labyrinth
When you die in the Labyrinth, your run comes to an end, It is therefore mandatory to survive the entire run in order to achieve completion. If you leave the area for any reason, your current attempt is ended and you will have to start from the beginning upon your return. While navigating the Labyrinth, you will fight "Izaro" three times in a boss arena, removing one third of his health each time until the final fight which culminates in his death.
Upon killing Izaro, you will gain access to the Ascendancy Chamber which contains:
- Treasure chests which can be opened with Treasure Keys collected during the run.
- The Altar of Ascendancy which rewards you with Ascendancy points if it is your first time clearing that version of the Labyrinth on that character.
- Alternatively allows you to respecialize your character into a different Ascendancy if you have refunded all your Ascendancy Points first.
- The Divine Font, a single use crafting bench that is used to modify your Gems.
- In the Eternal Labyrinth the Divine Font grants 2 uses.
We will discuss these rewards in more depth later.
Layout & Mechanics
The layout of the Labyrinth changes each day (midnight 00:00 UTC), so if you fail a Labyrinth run, you can use your knowledge of its current layout to re-progress through it faster. Every run on a given day has the same hidden passageways and secret rooms.
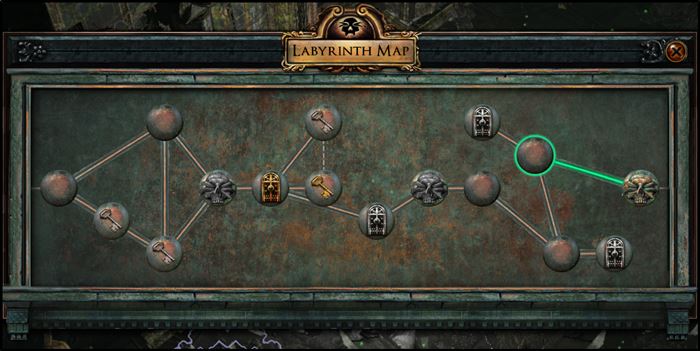
On your way through the Labyrinth, you may find secret passages to take a shortcut or various buffs to speed up your run or make the fight against Izaro a bit easier.
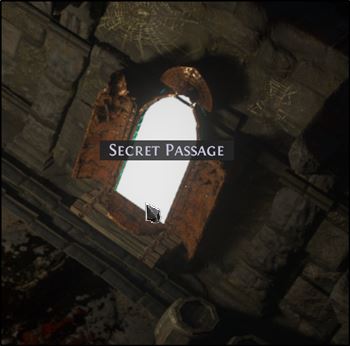
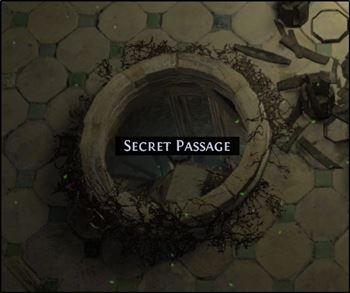
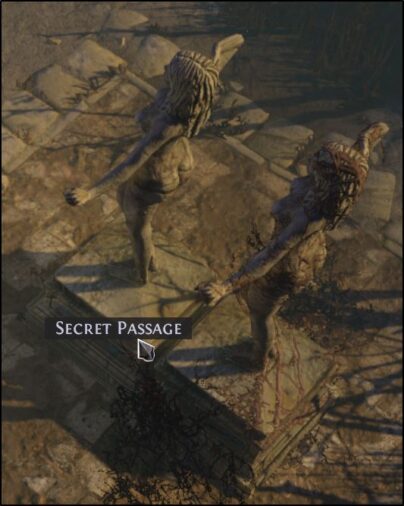
Secret Passages and Rooms
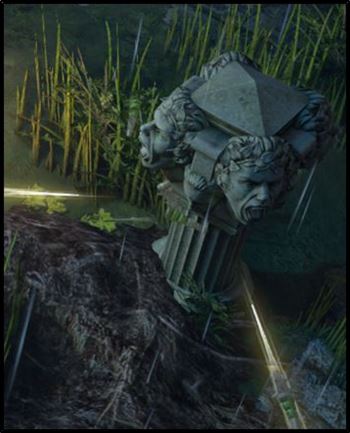
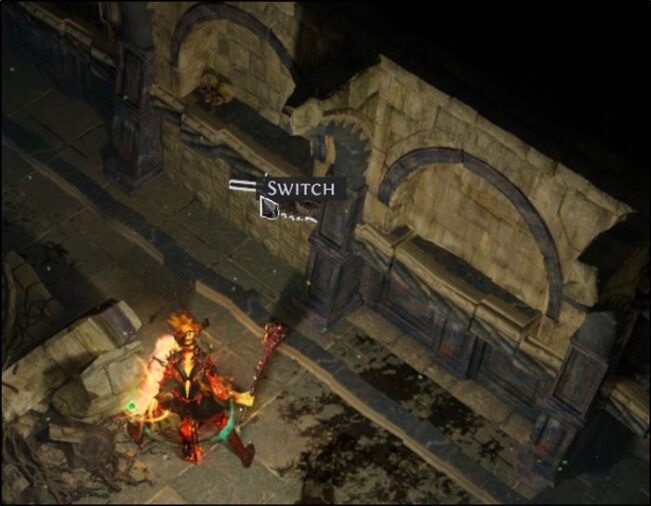
Secret Passages are shortcuts to a later room without having to run through the complete layout. If there is a Statue, Coffin or Well that becomes highlighted by hovering over them, this indicates that a secret passage will open upon being clicked.
Mysterious Darkshrine
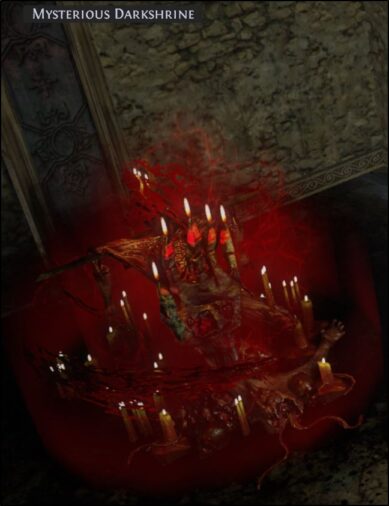
Each day, the Labyrinth includes a handful of Mysterious Darkshrines which are hidden shrines that impart beneficial effects to you for the remainder of the run, however they are often hard to find and can in many cases not be worth the time it takes to obtain these buffs. In some cases, these Mysterious Darkshrines grant an extra treasure key or an additional use of the Divine Font.
Your character and any party members in the Labyrinth are affected by a Shrine effect until leaving the Labyrinth:
Death doesn't wait.
- Acceleration Shrine - You have increased Action Speed and Projectile Speed
- 50% increased Action Speed
- 80% increased Projectile Speed
Deliver pain exquisite.
- Diamond Shrine - You always deal Critical Strikes
Hit hard. Hit once.
- Brutal Shrine - Your hits have Knockback, and increased Damage and Stun Duration
- Knocks Enemies Back on Hit
- Extra gore
- 30% increased Stun Duration on enemies
- 50% increased Damage
Restore that which was lost.
- Replenishing Shrine - You are regenerating Life and Mana
- Regenerate 10% of Mana per second
- Regenerate 6.67% of Life per second
Courage stands tall.
- Massive Shrine - You have increased Life, Area of Effect, and Size
- 40% increased maximum Life
- 30% increased Character Size
- 40% increased Area of Effect
- Resistance Shrine - You have additional Resistance to Elemental Damage
- +10% to all maximum Resistances
- +50% to all Elemental Resistances
None shall stop you.
- Impenetrable Shrine - Resistance Shrine - You have additional Defenses.
- 100% increased Armour
- 100% increased Evasion Rating
- 100% increased maximum Energy Shield
The heart quickens, the blood thickens.
- All Areas within the Labyrinth gain the following modifiers:
- 50% reduced Damage Taken from Hits from Labyrinth Traps
- 50% reduced effectiveness of Damage over Time Debuffs from Labyrinth Traps on Players
Movement ceases, tension mounts.
- Labyrinth Traps are disabled in the final encounter with Izaro. This Shrine effect can be gained in the Normal Labyrinth despite it having no effect; Traps are always disabled in the Aspirant's Trial in the Normal Labyrinth.
Be twice blessed.
- Receive an additional use of the Divine Font. This effect can be gained more than once per Labyrinth, but multiple effects will not stack. - This is by far the strongest Darkshrine bonus!
Discover what lies within.
- Izaro will drop one additional Treasure Key when defeated in the final encounter.
To the worthy go the spoils.
- Izaro will drop one additional unique item when defeated in the final encounter.
Argus
Argus is Izaro's loyal little dog companion and awaits you within the Merciless and Eternal Labyrinths. He drops a Treasure Key upon being defeated. Argus spawns in a random room behind a closed door depending on the Labyrinth's daily layout, however if you do find him, it is best to move on and avoid him.
This cute guy hits very hard, dealing Physical Damage with all of his attacks:
- Melee "Default Attack" - 1525–2288 Physical damage
- Minotaur Sunder 1525–2288 Physical damage
- Minotaur Enrage enables at 33% Life threshold
- Cooldown Time is 15 seconds
- Base duration is 8 seconds
- 100% increased Movement Speed
- 59% increased Damage
- 100% increased Attack and Cast Speed
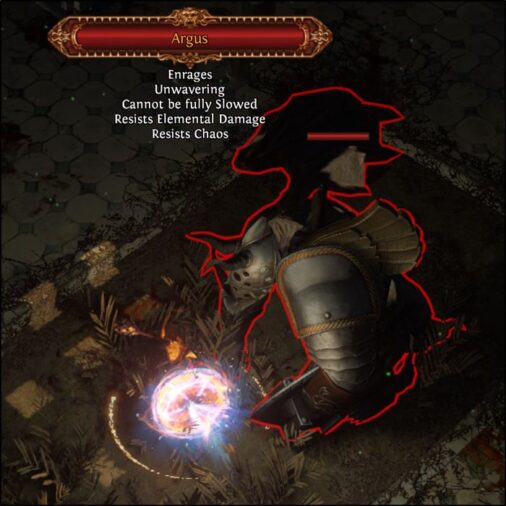
When Argus enrages, he shimmers red and gets slightly bigger. You need to be very careful, maybe even kite him while enraged.
Rewards
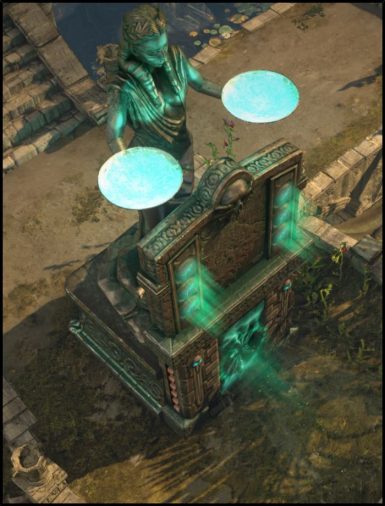
The Labyrinth ends with the Ascendancy Chamber, the final room after defeating Izaro. There are ten Treasure Chests in this room, along with the Altar of Ascendancy and a Divine Font.
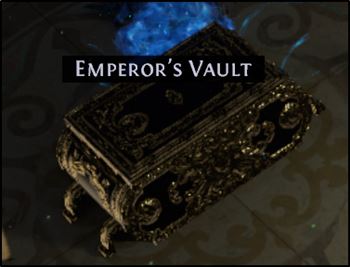
While you can find extra Treasure Chests, Puzzles and Secrets for extra rewards along the way, by far the most valuable reward for farming the Labyrinth are the Transfigured Gems granted by the Divine Font. The most Valuable reward to find along the way is a Grand Spectrum. These drop extremely rarely from Labyrinth Troves and Emperor's Vaults in the Merciless and Eternal Labyrinths.
- Grand Spectrum, there are 9 different Grand Spectrum Jewels with the following effects:
- +1 to Minimum Power Charges per Grand Spectrum
- +1 to Minimum Endurance Charges per Grand Spectrum
- +1 to Minimum Frenzy Charges per Grand Spectrum
- Minions have +10% to Critical Strike Multiplier per Grand Spectrum
- 25% increased Critical Strike Chance per Grand Spectrum
- +7% to all Elemental Resistances per Grand Spectrum
- 15% increased Elemental Damage per Grand Spectrum
- 5% increased Maximum Life per Grand Spectrum
- 12% chance to Avoid Elemental Ailments per Grand Spectrum
- Minions have +10% to Critical Strike Multiplier per Grand Spectrum
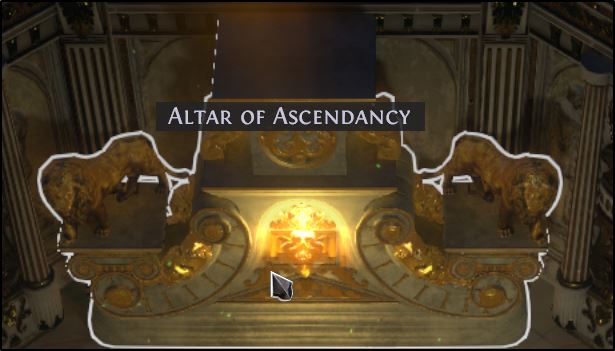
Altar of Ascendancy
Nineteen souls survived the Trials of Ascendancy. Nineteen men and women stood at the gates of the Lord's Labyrinth. Nineteen challengers whose exceptional martial and mystical talents still linger long after their death.
When completing the Normal Labyrinth for the first time, you get the choice of an Ascendancy class. The Altar of Ascendancy is located in the upper left corner of the final room and make your decision. You receive two additional Ascendancy points for the first time you complete the Cruel, Merciless, and Eternal Labyrinth.
Emperor's Vault
You earn one Treasure Key is earned by killing Izaro final encounter and two more by keeping some of this extra boss mechanics active without destroying them. Other Treasure Keys can be earned by completing certain challenges (Dark Shrines, Chests and Argus) through the Labyrinth. You can use these keys to open Izaro's treasure chests in the reward room. Related items like Treasure Keys, Silver Keys and Trinkets cannot be carried over from the Labyrinth, they are deleted from your inventory upon exiting.
Izaro's Treasure may contain one of the following:
- An Offering to the Goddess
- Two additional Treasure Keys
- Maps in Merciless Labyrinth and beyond.
- Sacrifice at Dawn, Sacrifice at Dusk, Sacrifice at Midnight and Sacrifice at Noon
- Divination cards
- Currency items
- Skill Gems with quality
- Jewellery: Amulets, Rings, Belts, Jewels
- Body Armours, Gloves, Boots, Helmets. They can also drop corrupted.
- Weapons of all types. They can also drop corrupted.
Unique Rewards
- Unique items:
- Chitus' Needle
- Death's Door
- Glitterdisc
- Izaro's Dilemma
- Izaro's Turmoil
- The Scales of Justice
- Spine of the First Claimant
- Steelworm
- Unyielding Flame
- Viper's Scales
- Winds of Change
- Xirgil's Crank
- Emperor's Might (Eternal/Upgraded only)
- Emperor's Wit (Eternal/Upgraded only)
- Emperor's Cunning (Eternal/Upgraded only)
- Emperor's Mastery (Eternal/Upgraded only)
Divine Font
Modifies a gem in a variety of ways.
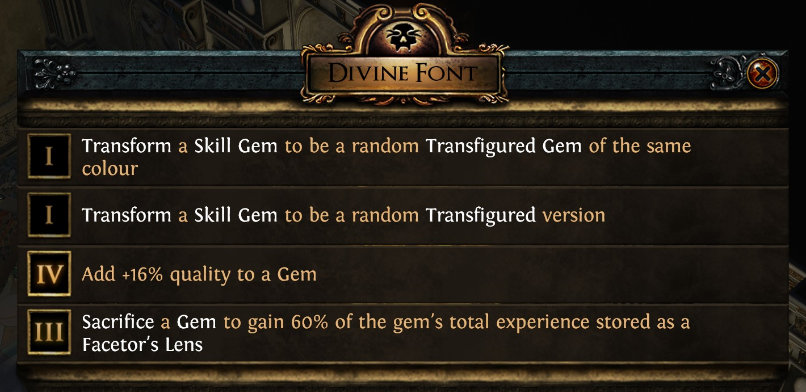
These are just a few of the options available. In addition to the above you can add Experience to a Gem or transform your Gem into a non-awakened Exceptional Support. Selecting Quality during your Normal or Cruel Labyrinth is a great way to get access to extra power and quality of life on your main skill.
When you Transform a Skill Gem in the Divine Font you are offered a choice from 3 Transfigured Gems. If you don't like the choices offered you can reclaim your gem. Transfigured Gems retain the experience, level, and quality of the original.
Izaro the Emperor
Izaro is the creator and protector of the Labyrinth. His main types of damage are Physical and Fire. Three different combinations of weapons are available to him: a Two-Handed Mace, Dual Swords, and a Sword and Shield. In order to obtain enough defense for the fight take a look at our Defenses Guide and follow these tips:
- Since Izaro uses Physical Attacks, Armor and Evasion are great defensive layers. Determination, Grace or Defiance Banner are the best auras for dealing with this.
- #% Physical Damage Reduction or Endurance Charges are also effective ways to reduce the amount of incoming Physical Attack damage
- If you don't use any Darkshrines, there are Traps in the final Izaro encounter, so having sources of #%leech, #%Life Regeneration, or #Life Regeneration in addition to high tier Life Flasks is very important.
- Enduring Cry & Vitality are good sources of #Life Regeneration that can help keep you alive when you don't have any Flask charges left.

Skill Breakdown
Izaro's Mechanics
In each Labyrinth you encounter Izaro a total of three times in the Aspirant's Trial, each ending at 66%, 33% and finally 0% HP. Before the fight, you have access to your stash to store items and can see which buffs are currently affecting Izaro. There are mechanics that buff Izaro's damage, defenses, or speed; and they can be seen in the right (second Izaro encounter) and left (third Izaro encounter) corner in the Aspirant’s Trial.
Similar to how the Labyrinth's layout is randomised each day, so are the extra mechanics affecting him. Each additional mechanic that affects Izaro can be removed for the remainder of that run by defeating a corresponding enemy or by interacting with the mechanic in some way that deactivates it during the Izaro fight. Doing so causes Izaro to drop one less key for each removed mechanic.
For a better understanding of how these mechanics work, you can read the information below:
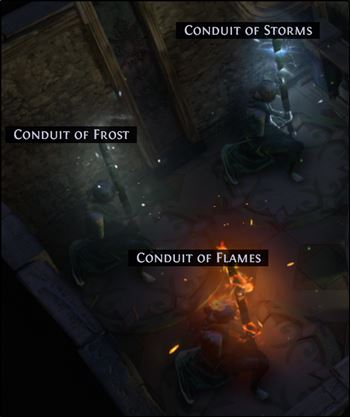
In each corner of the room, there is a statue representing each element. A statue's active state increases Izaro's damage and resistance to the related element. You can deactivate the statues for a short period of time by clicking them.
When this mechanic is active, Izaro will gain charges throughout the fight. Each charge grants him bonuses for speed, defense, or damage up to a maximum of 10 charges. There are three Charge Disruptors that can be activated to remove charges, and each Disrupter can only be used once.
The Elemental Essences take the form of elemental Golems:
- Summon Ice Golem
- Summon Flame Golem
- Summon Lightning Golem
The Golems enter the fight one after another and slowly walk towards Izaro. When they touch him, they are absorbed and grant related buffs. They also grant additional damage, resistance, and the chance to apply a Status Ailment that corresponds to their element - Ignite, Shock and Chill/Freeze.
Izaro summons three Gargoyles to assist him and as they stay inactive, they have extremely high amounts of damage reduction, making killing them very difficult. The Goddess of Justice channels a beam at a Gargoyle which activates it and causes the loss of its damage reduction - this is the time to attack it in order to destroy the Gargoyle!
- Granite-infused Gargoyle grants damage reduction.
- Steel-imbued Gargoyle grants extra Physical damage.
- Basalt-infused Gargoyle grants increased damage dealt.
- Quicksilver-infused Gargoyle grants increased movement speed and attack speed.
Three Idols spawn in each corner, one for each element (Fire, Cold and Lightning). The Idols cannot die and slowly regenerate Life over time. Idols use life as a resource, unleash a series of elemental damage explosions when their life reaches full.
If an Idol’s life reaches full and it unleashes this spell at least once, it will return in subsequent fights within the same Labyrinth run. If all three Idols cast their spell at least once, Izaro will drop an additional key.
Three skeletal Lieutenants successively spawn in each corner, one at a time. Each Lieutenant is related to one of the three elements and has different skills and passives:
- Fire Lieutenant of the Mace
- Cold Lieutenant of Rage
- Lightning Lieutenant of the Bow
If a Lieutenant is not slain, it will return in subsequent fights within the same Labyrinth run. All three skeletal Lieutenants must be alive when Izaro is slain in order for Izaro to drop an additional key.
Three Portals successively spawn in each corner. Each portal steadily summons Skeletal Mages until destroyed. If a portal is not destroyed it will return in subsequent fights within the same Labyrinth run.
All three Portals must be active when Izaro is slain in order for Izaro to drop an additional key.
Three Fonts successively spawn in each corner and will begin casting curses at the player. These fonts can be destroyed, however any portals that are not destroyed will return in subsequent fights within the same Labyrinth run. All three Fonts must be active when Izaro is slain in order for Izaro to drop an additional key.
Upon killing a font, it will cast an empowered version of its corresponding curse on you that lasts 10 seconds:
- Font of Fragility casts Vulnerability.
- The Font of Lethargy casts Temporal Chains.
- Font of Elements casts Elemental Weakness.
Summary
- The Trials of Ascendancy must be completed before you are allowed to enter the Lord's Labyrinth.
- You can pick your Ascendancy Class after completing the first Labyrinth. The first time you complete each Labyrinth on a character, you receive 2 Ascendancy Points, up to a total of 8.
- When you enter the Labyrinth , you must navigate through it without dying, otherwise you have to start over again.
- Life sustain and Physical damage reduction are the most important stats for improving your survivability within the Labyrinth - Take extra Life Flasks and Life Recovery for better survivability.
- Running endgame Labyrinths for Transfigured Gems is a very lucrative farming strategy in Trade Leagues.
Credits
Written by terence_
Reviewed by Fyregrass & Wudijo