Unholy Death Knight Raid Guide
Welcome to the Unholy Death Knight Raid guide for the World of Warcraft patch 11.1.5! This guide covers everything you need to know to understand your character! Are you starting out and leveling up from 70? Check out the leveling guide!
Overview
Hero Talents
- On pure Single-Target Rider of the Apocalypse is currently slightly ahead but in this raid there is only 1 pure single-target fight meaning that on the majority of fights you are playing San'layn as it is the best on anything with more than 1 target with your new tier bonus.
Offensive Nodes
- Rider's Champion - Each Rune spent gives you a 10% chance to summon one of the following Four Horsemen:
- Mograine
- Puts up a Death and Decay that follows him.
- You gain the benefit of Mograine's Might and Unholy Ground if you are standing in this.
- Puts up a Death and Decay that follows him.
- Whitemane
- Undeath is a disease with a 24 second duration that spreads and gains 1 stack every time you use Scourge Strike on the infected target.
- Trollbane
- Repeatedly casts Chains of Ice over his duration that gets shattered by Scourge Strike with Trollbane's Icy Fury.
- Nazgrim
- Grants you 5% Strength, increasing by 1% for every Rune spent while Nazgrim is active.
- Mograine
- Apocalypse Now
- Summons all 4 Horsemen for 20 seconds after casting Raise Abomination. This lines up with every other use of Dark Transformation and Apocalypse making for extremely large burst windows especially when combined with on-use trinkets.
- If a Horsemen is already out, it extends the current duration by 20 seconds instead.
- Mograine does not recast his Death and Decay but all other Horsemen recast their abilities.
- If a Horsemen is already out, it extends the current duration by 20 seconds instead.
- Summons all 4 Horsemen for 20 seconds after casting Raise Abomination. This lines up with every other use of Dark Transformation and Apocalypse making for extremely large burst windows especially when combined with on-use trinkets.
- Fury of the Horsemen or A Feast of Souls
- Fury of the Horsemen increases the duration of your Horsemen when spending Runic Power which has incredible value for Unholy due to Mastery interactions with the Horsemen's abilities. A Feast of Souls enables larger Death Coils and Epidemics but is not strong enough on single target to make it worth it.
- Hungering Thirst
- Passively increases the damage of your diseases, Virulent Plague as well as Frost Fever and Blood Plague while playing Superstrain, and Death Coil damage.
- Mawsworn Menace
- Increases Scourge Strike and Clawing Shadows damage by 10% as well as reducing the cooldown of Death and Decay by 10 seconds allowing you to use 2 charges of Death and Decay during Dark Transformation in AoE without being punished.
- This reduces the cooldown of Defile by 5 seconds if you are playing it instead.
- Increases Scourge Strike and Clawing Shadows damage by 10% as well as reducing the cooldown of Death and Decay by 10 seconds allowing you to use 2 charges of Death and Decay during Dark Transformation in AoE without being punished.
Defensive Choice Nodes
- Death Charge or On a Paler Horse
- On a Paler Horse does not work at all in this raid so you always choose Death Charge which is not a bad thing as this greatly increases your mobility and allows you to break roots and slows.
- Horsemen's Aid or Pact of the Apocalypse
- Horsemen's Aid depends on the value of Anti-Magic Shell during the fight as this can be incredibly potent allowing you to pre-immune debuffs or randomly absorb high amounts of magic damage. On the other hand, Pact of the Apocalypse grants you a 5% damage reduction per Horsemen out or a 20% damage reduction during your cooldowns with Apocalypse Now. Due to the situational value of both of these, there is no auto pick for this as it just depends on the fight.
Offensive Nodes
- Vampiric Strike
- Death Coil, Epidemic, and Death Strike have a 10% chance to transform your next Scourge Strike in to Vampiric Strike.
- Vampiric Strike heals you for 1% of your max HP, triggers Infliction of Sorrow, and grants you 1 stack of Essence of the Blood Queen.
- Infliction of Sorrow
- Causes Vampiric Strike to add 3 seconds to the duration of Virulent Plague and deal 10% of its' remaining damage on the target.
- After Gift of the San'layn expires you get a buff causing the next Scourge Strike to consume Virulent Plague and deal its' remaining damage immediately.
- This damage is affected by Plaguebringer, Ebon Fever, Foul Infections, and other damage modifiers making them incredibly important talents while playing San'layn as this becomes a massive amount of burst every 1m30s.
- Gift of the San'layn
- Dark Transformation now grants you Gift of the San'layn which replaces Scourge Strike with Vampiric Strike for its' duration.
- Essence of the Blood Queen effectiveness is also increased by 100% during Dark Transformation.
- Blood-Soaked Ground
- While standing in your Death and Decay the proc chance of Vampiric Strike is increased to 15%.
- Frenzied Bloodthirst
- Allows Essence of the Blood Queen to stack up to 7 and increases your Death Coil damage by 3% per stack.
- Visceral Strength
- Consuming Sudden Doom procs grants you 6% strength for 8 seconds.
- Pact of the San'layn or Sanguine Scent
- Pact of the San'layn simply deals more damage overall as Sanguine Scent only increases the chance to gain Vampiric Strike in execute which you can already get the majority of the time.
Your damage is maximized by using Dark Transformation to gain Gift of the San'layn on cooldown to stack and maintain Essence of the Blood Queen as well as increasing the duration of Virulent Plague and taking advantage of Infliction of Sorrow during your cooldowns. This happens every 45 seconds, but is especially powerful every 90 seconds as this lines up with Raise Abomination, Unholy Assault, and your on-use trinkets.
Defensive Choice Nodes
- Vampiric Speed or Newly Turned
- Newly Turned has the potential to be nice but overall you are not normally the person combat rezzing while Vampiric Speed increases your movement speed and that of nearby allies slightly which is always good.
- Bloody Fortitude or Vampiric Aura
- In Raids, Bloody Fortitude increasing the potency of Icebound Fortitude is simply too good to give up as 2% Leech sometimes increasing to 4% even for 4 allies is just not good enough.
Talents
Pure Single-Target
When to Use This Spec
This is the default loadout going into most bosses in Liberation of Undermine as all but one of the bosses have priority adds. This build is extremely strong in 2 target cleave and has the best damage profile this spec can offer.
Gameplay Altering Talents
Discover all talents that significantly alter your gameplay within the Spec and Class Talent trees. This section gives a concise overview of these talents and their applications but for a more detailed look check out the Rotation and Deep Dive sections below.
Spec Tree
- Plaguebringer
- Makes your diseases tick faster, dealing more damage.
- Infected Claws
- A factor in why you don't constantly have to press Festering Strike as this gives roughly 8 Festering Wounds per minute.
- Every hit in multi-target situations from Sweeping Claws has a separate chance of applying a Festering Wound, meaning you don't have to constantly Festering Strike multiple targets.
- Apocalypse
- Bursts up to 4 Festering Wounds on the target, summoning 4 ghouls that deal damage for 15 seconds.
- Raise Abomination
- Replaces Army of the Dead, instead summoning an abomination that applies all diseases when it spawns in a small radius around it and applies a Festering Wound on each of its' auto attacks for 30 seconds.
- Unholy Assault
- Puts 4 Festering Wounds on your target and Increases your damage by 20% for 20 seconds.
- Morbidity and Superstrain
- Morbidity Increases the damage taken by targets with your diseases and Superstrain puts up 2 extra diseases.
Class Tree
- Soul Reaper
- Used rotationally when hitting enemies under 35% health.
- Cleaving Strikes
- Allows Clawing Shadows to hit up to 7 additional enemies while you are standing in Death and Decay or when you have the buff from recently standing in your Death and Decay.
- Abomination Limb
- Grips enemies to you for 12 seconds with a minimum range of 8 yards and a max range of 20 yards as well as dealing a decent amount of damage over the duration.
- Runic Attenuation
- A very nice source of passive Runic Power generation to help smooth your rotation out.
- Anti-Magic Zone and Assimilation
- Your raid cooldown that lasts for either 8 seconds or until 150% of your maximum health has been absorbed in total by everyone standing in the zone.
- Talenting into Assimilation makes this absorb 10% stronger, 165% of your maximum health, and have a 30 second reduced cooldown.
- Null Magic
- Reduces your magic damage taken by 5% and reduces the duration of harmful magic effects by 35%. While the reduced magic damage portion of Null Magic works against all magic damage, the reduced duration of harmful magic effects does not work on the vast majority of debuffs in the raid as that could simply break too many things.
- Death's Echo
- Gives you 1 extra charge of Death and Decay, Death's Advance, and Death Grip.
- Gives you 2 charges of Defile if talented instead of Death and Decay.
- Gives you 1 extra charge of Death and Decay, Death's Advance, and Death Grip.
- Will of the Necropolis
- Reduces all damage taken by 35% when below 30% health, including the portion of the hit that takes you below 30%. For example, if you take a hit that takes you from 60% to 10%, the portion of the hit below 30% of your health is reduced by 35%
- Unholy Endurance
- Transforms Lichborne into a defensive cooldown and increases its' duration.
- Gloom Ward
- Increases all absorbs on you by 15%, this is incredibly powerful as it increases the absorb of spells like Anti-Magic Shell and Power Word: Shield and other similar abilities.
When to Use This Spec
This is the default loadout going into any pure Single-Target boss
Talent Adjustments
Listing all the changes within the Class and Spec tree compared to the default build.
- Added
- Clawing Shadows
- Magus of the Dead
- Unholy Aura
- Commander of the Dead
- Removed
- Plaguebringer
- Morbidity
- Superstrain
- Ebon Fever
Rotation
Tier Set
- 2-Set: Your spells and abilities have a chance to activate a Winning Streak! increasing the damage of your Death Coil and Epidemic by 3% stacking up to 10 times. Death Coil and Epidemic have a 15% chance to remove Winning Streak!
- 4-Set: Casting Dark Transformation grants up to 10 stacks of Winning Streak! and while Dark Transformation is active the effectiveness of Winning Streak! is increased by 100% and no longer has a chance to reset.
Single-Target
Opener
- Your goal in the opener is get in to Dark Transformation and stack up Gift of the San'layn quickly to begin your actual burst phase. You don't start dealing much damage until Gift is stacked up and you begin spamming Death Coil and Vampiric Strike.
- Sometimes you are running in and Raise Abomination does not reach your target by the time you get there as it is very slow. When that happens use Festering Strike to apply a Festering Wound instead of waiting for Raise Abomination to apply it.
During Dark Transformation Priority List
While this is very simple, getting the most out of your Season 2 Set Bonus during Dark Transformation is the most important part of you dealing the most possible damage. Do not cast Festering Strike during this time as it is not worth it.
- Cast Death Coil if you have Sudden Doom and at least 3 stacks of Gift.
- Cast Vampiric Strike if Gift of the San'layn is not at 7 stacks.
- Cast Death Coil
- Cast Vampiric Strike
Base Priority List
- Cast Apocalypse and Dark Transformation on 45 second cooldown windows, they should always be paired together, but always Apocalypse before Dark Transformation. Raise Abomination and Unholy Assault should be used in combination with the others on 1m30s windows.
- Cast Scourge Strike when the final Infliction of Sorrow buff can be used
- Cast Vampiric Strike when you get a proc.
- Cast Death and Decay when the remaining duration of Gift of the San'layn will not last until your next Dark Transformation cast.
- Cast Death Coil when you have more than 80 Runic Power or a Sudden Doom proc.
- Cast Outbreak if any diseases are missing.
- Cast Death Coil when the remaining duration of Gift of the San'layn will not last until your next Dark Transformation cast.
- Cast Soul Reaper if the enemy is below 35% health or will be by the time this expires.
- Cast Scourge Strike if Plaguebringer is missing.
- Cast Festering Strike when you have 2 or less Festering Wounds.
- Cast Death Coil
- Cast Scourge Strike when you have 3 or more Festering Wounds.
Opener
- Your goal in the opener is to get your high value casts out of the way so you can get your cooldowns started immediately as you want to get into your normal rotation and begin taking advantage of your cooldowns. Below, you see an example of how your opener looks like using the recommended Rider of the Apocalypse Single-Target build.
- After this opener, there is a lot of Clawing Shadows and Death Coil spamming with some Festering Strikes sprinkled in.
Priority List
- Cast Dark Transformation and Apocalypse on 45 second cooldown windows, they should always be paired together. Raise Abomination and Unholy Assault should be used in combination with the others on 1m30s windows.
- Cast Soul Reaper if the enemy is below 35% health or will be when this expires.
- Cast Death and Decay if you are not standing in Mograine's Death and Decay and your cooldowns are active.
- Cast Death Coil when you have more than 80 Runic Power or when Sudden Doom is active.
- Cast Clawing Shadows when you have 1 or more Festering Wounds and Rotten Touch is on the target.
- Cast Festering Strike when you have 2 or less Festering Wounds.
- While Raise Abomination is active, you only cast Festering Strike when you are at 0 Festering Wounds
- Cast Death Coil if Death Rot is about to fall off.
- Cast Clawing Shadows when you have 4 or more Festering Wounds.
- Cast Death Coil.
- Cast Abomination Limb if you have nothing else.
Notes
- On Single-Target, you do not refresh Virulent Plague unless it is with Dark Transformation or Raise Abomination as there are only a couple seconds of downtime between Virulent Plague falling and casting Raise Abomination. If there is considerable downtime between your cooldowns, you end up needing to refresh as it is worth the cast at that point.
- Rotten Touch has >95% uptime on the target when you are able to consistently hit the boss so normally you spend down to 1 Festering Wound.
Multi-Target
In this Raid, but especially on Heroic and likely Mythic as well, there are no scenarios where you would realistically play a full AoE build so that will not be focused on in this guide.
Opener
- Your goal in the opener is get in to Dark Transformation and stack up Gift of the San'layn quickly to begin your actual burst phase. You don't start dealing much damage until Gift is stacked up and you begin spamming Death Coil and Vampiric Strike.
- Sometimes you are running in and Raise Abomination does not reach your target by the time you get there as it is very slow. When that happens use Festering Strike to apply a Festering Wound instead of waiting for Raise Abomination to apply it.
When looking at this raid, there are no opportunities to execute a true 'burst' and 'building' phase. Therefore, this guide doesn't follow the same approach as you would in Mythic+, and while the priority is similar, it is far more condensed.
Burst Phase
If priority damage matters more than adds dying, press Death Coil instead of Epidemic.
- Cast Death and Decay if it is not already down.
- Cast Dark Transformation to begin your burst.
- Cast Epidemic if you have Sudden Doom or less than 2 Runes and there are 5 or more targets, otherwise cast Death Coil.
- Cast Vampiric Strike.
- Cast Epidemic if there are 5 or more targets, otherwise cast Death Coil.
Normal Phase
When adds are not up and it is single-target, return to this priority list.
- Cast Apocalypse and Dark Transformation on 45 second cooldown windows, they should always be paired together, but always Apocalypse before Dark Transformation. Raise Abomination and Unholy Assault should be used in combination with the others on 1m30s windows.
- Cast Scourge Strike when the final Infliction of Sorrow buff can be used
- Cast Vampiric Strike when you get a proc.
- Cast Death and Decay when the remaining duration of Gift of the San'layn will not last until your next Dark Transformation cast.
- Cast Death Coil when you have more than 80 Runic Power or a Sudden Doom proc.
- Cast Outbreak if any diseases are missing.
- Cast Death Coil when the remaining duration of Gift of the San'layn will not last until your next Dark Transformation cast.
- Cast Soul Reaper if the enemy is below 35% health or will be by the time this expires.
- Cast Scourge Strike if Plaguebringer is missing.
- Cast Festering Strike when you have 2 or less Festering Wounds.
- Cast Death Coil
- Cast Scourge Strike when you have 3 or more Festering Wounds.
In this Raid, but especially on Heroic and likely Mythic as well, there are no scenarios where you would realistically play a full AoE build so that will not be focused on in this guide. With that being the case, there are only a few fights you would press Epidemic for a short amount of time due to fight design. On these fights, you play a slightly different talent build that focuses more on diseases rather than Clawing Shadows so that is what this section will focus on.
Opener
- Your goal in the opener is to get your high value casts out of the way so you can get your cooldowns started immediately as you want to get into your normal rotation and begin taking advantage of your cooldowns. Below, you see an example of how your opener looks like using the recommended Rider of the Apocalypse Multi-Target build.
- While this is a Single-Target opener, there are no fights in Nerub-ar Palace with immediate AoE on pull.
Single-Target Priority List
- Cast Dark Transformation and Apocalypse on 45 second cooldown windows, they should always be paired together. Raise Abomination and Unholy Assault should be used in combination with the others on 1m30s windows.
- Cooldowns can be held for AoE scenarios if they are up within a reasonable amount of time.
- Cast Outbreak to refresh your diseases if you are not about to cast Dark Transformation or Raise Abomination.
- Cast Soul Reaper if the enemy is below 35% health or will be when this expires.
- Cast Death Coil when you have more than 80 Runic Power or when Sudden Doom is active.
- Cast Scourge Strike when you have 1 or more Festering Wounds and Rotten Touch is on the target.
- Cast Festering Strike when you have 2 or less Festering Wounds.
- While Raise Abomination is active, you only cast Festering Strike when you are at 0 Festering Wounds.
- Cast Death Coil if Death Rot is about to fall off.
- Cast Scourge Strike when you have 4 or more Festering Wounds.
- Cast Death Coil.
Multi-Target Priority (When Adds are up)
- Cast Death and Decay if it is not already down.
- Cast Outbreak if any targets are missing diseases.
- Cast Epidemic when Sudden Doom is active.
- Cast Scourge Strike if any targets have Festering Wounds.
- Cast Epidemic if there are no no remaining Festering Wounds.
- Cast Scourge Strike.
Deep Dive
How to Use Your Cooldowns in Raid
As an Unholy Death Knight, your main strength is using your cooldowns together to extract the maximum potential from your most potent abilities. This section shows you how to properly use them together for both Hero Talents.
Pull
- On pull, follow the opener in the rotation section. If Essence of the Blood Queen falls at any point in the fight, you can follow that priority when you get in to your next Dark Transformation window.
45s Window
- When in the 45 second window all you want to use is Death Coil and Vampiric Strike as casting Festering Strike is simply not worth it. You want to set up for this window by having as many Festering Wounds as possible on your target so your Festermight stacks gained from Apocalypse last for the entirety of your burst window.
90s Window
- In the 90 second window, due to your opener, your cooldowns are likely to be slightly offset because you might not have been able to immediately cast them on cooldown on your previous window(s). The only thing you need to make sure of is that you cast Apocalypse before Dark Transformation and that your Raise Abomination lasts the entirety of your burst window, otherwise these will be slightly fluid based on timings. Make sure you have as much Runic Power as possible for your Unholy Assault and House of Cards window.
45s Window
1m30s Window
- Your objective here is to not waste a global cooldown overcapping on Festering Wounds as Apocalypse summons 4 ghouls as long as there is at least 1 Festering Wound on your target, but popping more at once is always better.
Casting Death Coil vs Epidemic
- When you are in an AoE situation, you should switch to using Epidemic over Death Coil at 4 stacked targets. However, when you are talented into Improved Death Coil this changes to 5 stacked targets. This is not a common issue as you are not regularly talented into Improved Death Coil while being in situations where you want to press Epidemic constantly.
Pet Positioning
- When you empower your ghoul with Dark Transformation, it is essential to see and manage where your pet is at all times due to the interaction between Sweeping Claws and Infected Claws as this can put Festering Wounds on all targets hit by Sweeping Claws. This increases your power dramatically in any multi-target situation as you gain a ton of additional Festermight stacks from this interaction when you start bursting them with Death and Decay and Scourge Strike.
- Managing your pet positioning is also necessary while you are talented into Commander of the Dead as it only has a 100 yard application range to your summoned minions. While this is not ordinarily an issue, occasionally bosses like Volcoross existed in the past and pets like to move to the back of the boss, putting them far out of the 100 yard application range.
Anti-Magic Shell Runic Power
- Anti-Magic Shell has the ability to grant you up to 40 Runic Power based on the amount it absorbs. This is incredibly powerful as these single target builds can get starved of Runic Power so you want to use this to your advantage as often as possible on bosses where Anti-Magic Shell isn't needed for purely defensive purposes.
Understanding Mechanics
Rotational min-maxing is just one aspect of mastering a specialization, but there are numerous other key mechanics that influence your performance. Use the following guides to improve them.
Liberation of Undermine
← Scroll for more Bosses →
Boss Tips
- Use Anti-Magic Shell when targeted by Spew Oil.
- Spew Oil spawns a Oil Slick puddle, position it in a way so the Geargrinder Bikers get stunned.
- During the second phase wait for the Pit Mechanics to spawn before popping your cooldowns and hit 5 of them with Frostwhelp's Aid.
- Interrupt Repair.
Boss Tips
- Use Anti-Magic Shell when you soak the Scrapbomb.
- If you pop Icebound Fortitude or Lichborne with Anti-Magic Shell, you can avoid getting the following Molten Phlegm.
- Cleave both bosses during Colossal Clash, but be wary and dodge the Zapbolt and the Fiery Wave.
- Cleaving Strikes does not cleave in this phase as they are too far apart.
- You can crowd control the Voltaic Image withChains of Ice if they get too close and Death Grip to help your group.
- Make sure to not Death Grip the one fixated on you, it will instantly kill you. This is purely to help others out.
Boss Tips
- On this fight you use your Anti-Magic Shell, Icebound Fortitude, or Lichborne whenever you soak an Amplifier to decrease the damage intake from Lingering Voltage.
- The boss has a deadly frontal on the tank always position yourself behind the boss.
- Make sure to have both stacks of Death's Advance for Phase 2, this is a very high mobility phase and you need everything you can get here.
- If you are in the circle when the Amplifier explodes and knocks your entire group up but you do not get knocked, you are still safe. It not knocking you is just a bug.
Boss Tips
- Use Anti-Magic Shell on every other use of Incinerator, this prevents you from getting the debuff.
- Avoid the Garbage Piles on the ground at all costs before the boss casts Incinerator in case you get targeted, even if Anti-Magic Shell is up, it still explodes Garbage Piles if you are standing on them.
- If you get targeted by Rolling Rubbish pre position yourself so that you can get as many Garbage Piles as fast as you can, and destroy the Discarded Doomsplosive once you reach maximum Energy.
- Death Grip in the Territorial Bombshells once they hit 75% health
- Make sure to do this before Short Fuse triggers.
- Interupt the Scrapmasters Scrap Rockets.
Death Grip
- Death Grip does not work on all adds on this boss, it only works on
- Territorial Bombshells
- Junkyard Hyena
Boss Tips
- Rotate between Anti-Magic Shell, Icebound Fortitude, and Lichborne when Sonic Ba-Boom is up and you trigger Foot-Blasters.
- Pyro Party Pack is fall off damage based on your distance from you and the tank with it, if for some reason the boss is debuffed tank is tanking the boss move away from the boss.
- Drop the Screw Up away from melee if you get targeted.
- Death's Advance prevents you from being moved on the conveyor belts in the room.
- Make sure you have a charge for Beta Launch so you can quickly run back to the boss over the conveyor belts.
Boss Tips
- Always watch out for the Pay-Line, they will come from the boss and from another person that is rolling the chips back.
- You get High Roller! if you are close to the path of the coin.
- If you get stunned, you can Icebound Fortitude out of it (if you live)
- Dodge the Traveling Flames that come out of the Superheated Coils.
- You can help stack the Dynamite Booty and the Fiery Dynamite Booty with Death Grip.
- Do not Death Grip them in to other players as they can fixate melee.
- The Premium Dynamite Booty is not affected by any crowd control.
- Interrupt the Reel Assistants Overload!.
- Use Anti-Magic Shell, Icebound Fortitude, and Lichborne on Flame and Coin.
- Anti-Magic Shell prevents you from getting stacks while it is up, so maximize the amount you can absorb by stacking DR's.
Boss Tips
- While you are on Zee's side use Anti-Magic Shell for Goblin-guided Rocket.
- On the Mug side Soak the Earthshaker Gaol and kill the Gallagio Goon.
- If you get targeted by Frostshatter Boots go behind a wall spawned from Earthshaker Gaol to avoid the Frostshatter Spear.
- You can Anti-Magic Shell through the Radiant Electricity to avoid having to deal with the "dance" during the intermission.
Stat Priority
Understand your secondary stat priority and the tertiary stats needed for optimal performance during Raid boss fights as an Unholy Death Knight. For more detailed information, visit the Stats and Attributes guide.
For an accurate representation of what item to equip you should use Simcraft!
A static "Stat Priority" is just a starting point and can easily shift depending on your current gear.
- All secondary stats are affected by diminishing returns. Click here to learn more!
Tertiary
- Avoidance - Great stat to reduce the damage intake of "Area of Effect" abilities.
- Leech - Provides additional healing through damage dealing. The damage of your pets does not heal you thus Leech is a great tertiary for you since most of your damage is coming from your own spells.
- Speed - Niche tertiary that can be very useful and has been proven useful in the past. Makes playing certain mechanics a lot easier.
Gear
While these are the items that you should be aiming to acquire for your absolute Best in Slot, these items will not always be the best until you achieve this exact combination of items.
For an accurate representation of what item to equip you should use Simcraft whenever you get what can be an upgrade!
| Slot | Item | Location |
|---|---|---|
| Head | Cauldron Champion's Crown | Tier / Catalyst |
| Neck | Strapped Rescue-Keg | The Great Vault |
| Shoulder | Cauldron Champion's Screamplate | Tier / Catalyst |
| Cloak | Consecrated Cloak | Crafted |
| Chest | Cauldron Champion's Ribcage | Tier / Catalyst |
| Wrist | Everforged Vambraces | Crafted |
| Gloves | Cauldron Champion's Fistguards | Tier / Catalyst |
| Belt | Coin-Operated Girdle | One-Armed Bandit |
| Legs | Galvanized Oxxein Legguards | The Great Vault |
| Boots | Cauldron Champion's Greatboots | Catalyst |
| Ring 1 | The Jastor Diamond | Gallywix |
| Ring 2 | Miniature Roulette Wheel | One-Armed Bandit |
| Trinket 1 | Eye of Kezan | Gallywix |
| Trinket 2 | House of Cards | One-Armed Bandit |
| Weapon | Best-in-Slots | One-Armed Bandit |
Below you are presented with a good list of farmable alternatives that are obtainable outside of WoW’s weekly lockout system. While replaced in time as you progress, these offer immediate character power.
| Slot | Item | Location |
|---|---|---|
| Head | Apogee Inventor's Goggles | Operation: Mechagon |
| Neck | Strapped Rescue-Keg | Cinderbrew Meadery |
| Shoulder | Unyielding Combatant's Pauldrons | Theater of Pain |
| Cloak | Electrician's Siphoning Filter | Operation: Floodgate |
| Chest | Muckdiver's Wading Plate | Operation: Floodgate |
| Wrist | Stonefury Vambraces | The MOTHERLODE!!! |
| Gloves | Power-Assisted Vicegrips | The MOTHERLODE!!! |
| Belt | Lightning-Conductor's Bands | The Rookery |
| Legs | Galvanized Oxxein Legguards | Theater of Pain |
| Boots | Cauldron Champion's Greatboots | Catalyst |
| Ring 1 | Footbomb Championship Ring | The MOTHERLODE!!! |
| Ring 2 | Radiant Necromancer's Band | Priory of the Sacred Flame |
| Trinket 1 | Improvised Seaforium Pacemaker | Operation: Floodgate |
| Trinket 2 | Signet of the Priory | Priory of the Sacred Flame |
| Weapon | Electro-Arm Bludgeoner | The MOTHERLODE!!! |
Trinkets
Below you can find active and passive alternatives to our recommended trinkets. Do note that some trinkets are better than others depending on the raid boss.
Active Trinket Alternative
- Funhouse Lens
- Unfortunately with the cooldown timings Unholy has, there are only 2 options for active trinkets this tier. Between Funhouse Lens and House of Cards, House of Cards is better but use what you can as they are the only options.
Passive Trinket Alternatives
- Suspicious Energy Drink
- Mechano-Core Amplifier
- Improvised Seaforium Pacemaker
In The War Within Season 2, Unholy has very few truly viable trinkets with the best coming from Delves. Unfortunately, this means it is quite simply impossible to truly farm your best non-raid trinkets as you only get 4 attempts per week.
Embellishments
- Duskthread Lining
- Elemental Focusing Lens is technically better on single-target but due to the amount of multi-target scenarios in this raid and the amount of uptime you are able to have on this embellishment, this is recommended.
Remaining Sparks
- Crafted items are 681 item level and regular items are 684 on max item level therefore it is not normally beneficial to equip crafted items outside of your 2x Embellishments.
- While you are gearing up and do not yet have 684 pieces of gear in all slots, especially with your best stats, use your Gilded Undermine Crest to craft 681 pieces with Haste and Mastery on slots that do not have them.
Simcraft
To find the best combination of gear available to you or identify the best possible upgrades, visit our Simcraft guide to learn how to utilize Simcraft easily and effectively.
Consumables
- Phials
- Flask of Alchemical Chaos -- Maximum DPS.
- Food
- Chippy Tea -- Maximum DPS
- Feast of the Divine Day -- Small loss
- Combat Potion
- Tempered Potion
- Health Potion
- Algari Healing Potion -- A big burst of healing
- Weapon Oil
- Algari Mana Oil
- Augment Rune
- Crystallized Augment Rune
- Sockets
- Culminating Blasphemite -- Unique
- Rider of the Apocalypse
- Quick Onyx
- San'layn
- Masterful Emerald
Enchantments
| Head | Greater Rune of the Void Ritual S.A.D. |
| Neck | Magnificent Jeweler's Setting 2x |
| Cloak | Enchant Cloak - Chant of Winged Grace |
| Chest | Enchant Chest - Crystalline Radiance |
| Wrist | Enchant Bracer - Chant of Armored Avoidance S.A.D. |
| Waist | S.A.D. |
| Legs | Stormbound Armor Kit |
| Boots | Enchant Boots - Scout's March |
| Ring 1 | Enchant Ring - Radiant Haste Magnificent Jeweler's Setting 2x |
| Ring 2 | Enchant Ring - Radiant Mastery Magnificent Jeweler's Setting 2x |
| Weapon | Rune of the Fallen Crusader |
You buy S.A.D. from the Great Vault Vendor to add sockets to your Helm, Wrists & Waist.
Races
For min-maxing an Unholy Death Knight in raiding, different racial traits can provide a tremendous benefit to your character. If this is not your top goal, picking a race that fits your style works just as well.
- Berserking -- Troll
- The best racial for an Unholy Death Knight in The War Within as this lines up perfectly with your highest points of burst during Army of the Dead or every other use of Raise Abomination.
- Reduce the duration of movement-impairing effects by 20%. This was only useful once in the recent history of progression raiding but is still worth noting.
- Combat Analysis -- Mechagnome
- Currently an extremely strong racial due to the high value of Strength. This ramps up over the course of a minute and stays at the max value for the rest of the fight.
- Ancestral Call -- Mag'har Orc
- While this does not line up with your cooldowns perfectly, it is an extremely strong burst racial granting you 6.5k of one of your two highest stats.
- Stoneform -- Dwarf
- Dispels Magic and Bleed debuffs. Has been useful in the past on some bosses with Bleeds.
Recommendation
If you only play Unholy, I recommend that you play Troll as it is the highest DPS racial for Unholy. However, if you also play Frost, I recommend that you play Mag'har Orc as it is the best racial for Frost and only slightly behind for Unholy.
Macros
Discover recommended macros for an Unholy Death Knight during Raid encounters and watch a quick video guide on creating simple macros for your character.
Anti-Magic Zone - Casts Anti-Magic Zone at your Cursor position.
/cast [@cursor] Anti-Magic ZoneDeath and Decay - Casts Death and Decay at your cursor position.
/cast [@cursor] Death and DecayIf you do not like Death and Decay on your cursor you can replace [@cursor] with [@player] and it will instead put it at your feet. Having either of these is important as it removes the targeting reticle and allows you to get it out faster.
/cast [@player] Death and DecayOutbreak - Casts Outbreak at your mouseover if it exists or your target.
/cast [@mouseover,exists,harm][@target,exists,harm] OutbreakChains of Ice - Casts Chains of Ice at your mouseover if it exists or your target.
/cast [@mouseover,exists,harm][@target,exists,harm] Chains of IceMind Freeze - Casts Mind Freeze at your mouseover if it exists or your target.
/cast [@mouseover,exists,harm][@target,exists,harm] Mind FreezeDeath Grip - Casts Death Grip at your mouseover target if it exists or your target.
/cast [@mouseover,exists,harm][@target,exists,harm] Death GripRaise Ally - Casts Raise Ally on your mouseover so you can use this on your frames.
/cast [@mouseover,help,dead][]Raise AllySet Focus Mouseover - This will set your focus to your mouseover.
/focus [@mouseover]Focus Death Grip - Casts Death Grip at your focus.
/cast [@focus] Death GripFocus Mind Freeze - Casts Mind Freeze at your focus.
/cast [@focus] Mind FreezeWhile rare, you need some pet spells bound as pets can be very stupid even on assist. This can happen especially on bosses with large hitboxes as they like to follow the bosses back and they can end up being over 100 yards away.
Pet Attack - Sometimes you will want your pet to target specific things and not follow you around.
/petattackPet Follow - Rarely needed, but sometimes you want your ghoul to stop hitting its target.
/petfollowPet Move - For the fights you just can not get your ghoul in the right position.
/petmovetoGnaw - As you do not want this on auto-cast, this enables you to have a stun which is incredibly powerful on some fights. This also works while your pet is in Dark Transformation.
/cast GnawLeap / Shambling Rush - While this is almost always on auto-cast, you will want this bound for the extremely rare situations that pet kick can be useful.
/cast LeapAddons
Below, you see a screenshot of the author's User Interface for their Unholy Death Knight, outlining which addons are used and how they are utilized in Raids to make your life easier.
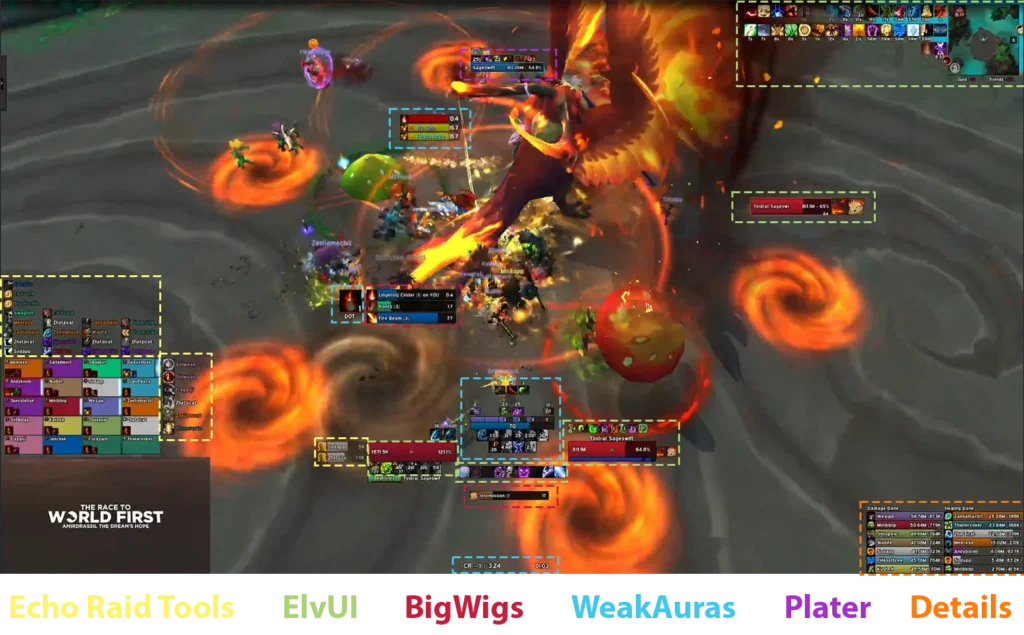
- Echo Raid Tools -- Raid cooldowns and more
- Helpful addon for Raiders, especially for Raid leaders and officers.
- ElvUI -- Full User Interface replacement
- A user interface designed around user-friendliness with extra features that are not included in the standard UI.
- Alternatively, you can also use Shadowed Unit Frames (SUF) and an action bar addon of your choice or of course the stock UI.
- BigWigs -- Generic Boss Mod
- BigWigs is a boss encounter add-on. It consists of many individual encounter scripts, or boss modules; mini add-ons that are designed to trigger alert messages, timer bars, sounds, and so forth, for one specific Raid encounter.
- WeakAuras -- Jack of all trades
- WeakAuras is a powerful and flexible framework that allows the display of highly customizable graphics on World of Warcraft's user interface to indicate buffs, debuffs, and other relevant information. This addon was created to be a lightweight replacement for Power Auras but has since introduced more functionalities while remaining efficient and easy to use.
- Plater -- Advanced Nameplates
- Plater is a nameplate addon with an extraordinary amount of settings, out of the box debuff tracking, threat coloring, and support for scripting similar to WeakAuras and wago.io + the WeakAuras-Companion for Mod/Script/Profile updates.
- Details -- In-depth Damage Meter
- Most powerful, reliable, handsome, damage meter.
Runes and Runic Power
Shows your current Runes progress and your Runic Power

Defensive Tracker
Shows you when your defensives are up and when externals have been put on you

Changes this Patch
Hotfixes
- San'layn: The Blood is Life Blood Beast now explodes for 20% of the damage (was 25%).
Unholy
- All ability and pet damage increased by 5%.
- Soul Reaper damage increased by 35%.
- Clawing Shadows damage increased by 15%. Does not affect Vampiric Strike.
- Scourge Strike damage increased by 15%. Does not affect Vampiric Strike.
- Gargoyle Strike damage increased by 50%.
- Apocalypse ghoul damage increased by 25%.
- Magus of the Dead damage increased by 55%.
- Doomed Bidding now summons a Magus of the Dead for 6 seconds (was 8 seconds).
- Commander of the Dead now increases the damage of Gargoyle and Army of the Dead by 45% (was 35%).
- Apocalypse and Raise Dead now summon ghouls instantly and visuals have been updated.
- Veteran of the Third War now increases Stamina by 12% (was 20%), and 6% in PvP combat (was 10%).
- Null Magic now reduces the magical damage you take by 5% (was 8%), and 3% in PvP combat (was 4%).
- Permafrost now generates an absorb shield at 30% of your auto attack damage (was 40%).
- Rider of the Apocalypse
- All Horsemen damage increased by 10%. Does not include Undeath and Trollbane's Icy Fury.
Unholy
- Apocalypse ghoul damage increased by 30%.
- Rotten Touch now increases the damage of your Scourge Strike against the target by 60% (was 50%).
- Death Coil damage increased by 8%.
- Scourge Strike, Clawing Shadows and Vampiric Strike damage increased by 10%.
Death Knight
- Death Strike can now only heal the Death Knight for a percentage of damage taken from a given damage event once. Death Strikes that heal the minimum health amount do not count as using damage events in this way.
- Unholy Strength (Rune of the Fallen Crusader) now heals for 4% maximum health (was 6%).
- Enfeeble reduces damage dealt to you by 12% (was 15%).
- Null Magic reduces Magic damage taken by 8% (was 10%).
- An issue causing Raise Abomination to deal less damage than it should has been fixed.
Unholy
- All ability damage reduced by 10%.
- Clawing Shadows damage increased by 25%.
- Ebon Fever now increases damage diseases deal by 12% (was 15%).
- Bursting Sores now increases Festering Wound damage by 16% (was 20%).
- Bursting Sores damage reduced by 8%.
- Superstrain now applies Blood Plague and Frost Fever at 75% (was 80%).
- Raise Abomination now costs 1 Rune to summon.
- An issue with Unholy Blight applying Virulent Plague to the player's current target instead of enemies in proximity has been resolved.
Death Knight
- Lichborne now grants 6% Leech (was 10%).
- Blood Scent now grants 3% Leech (was 5%).
- New Talent: Subduing Grasp
- When you pull an enemy the damage they deal to you is reduced by 6% for 6 seconds.
- New Talent: Osmosis
- Anti-Magic Shell increases healing received by 15%.
- New Talent: Null Magic
- Magic Damage taken is reduced by 10% and the duration of harmful Magic effects against you are reduced by 35%.
- New Talent: Vestigial Shell
- Casting Anti-Magic Shell grants 2 nearby allies a Lesser Anti-Magic Shell that absorbs magic damage and reduces the duration of harmful Magic effects against them by 50%.
- New Talent: Ice Prison
- Chains of Ice now also roots enemies for 4 seconds but its cooldown is increased to 12 seconds.
- New Talent: Runic Protection
- Your chance to be critically struck is reduced by 3% and your Armor is increased by 6%.
- New Talent: Unyielding Will
- Anti-Magic Shell's cooldown is increased by 20 seconds and it now also removes all harmful magic effects when activated.
- Chains of Ice is now learned at level 13 (was a talent).
- Anti-Magic Shell is now learned at level 14 (was a talent).
- Rune of the Stoneskin Gargoyle can now be Runeforged on 1-handed weapons.
- Abomination Limb no longer grants Bone Shield, Runic Corruption, or Rime based on specialization.
- Rune of the Apocalypse has been updated:
- War – Damage taken increased to 4% (was 1%) and duration increased to 10 seconds (was 6 seconds).
- Pestilence – Damage increased by 500%.
- Famine – Damage dealt to the caster reduced to 5% (was 2%).
- Death – Healing reduction increased to 5% (was 1%).
- Icebound Fortitude cooldown reduced by 60 seconds.
- Cleaving Strikes now also retains bonus effects for being within your Death and Decay for 4 seconds when leaving its area.
- Veteran of the Third War now grants 20% Stamina (was 10%). Now a 1-point talent (was 2).
- Icy Talons now increases attack speed per stack by 6% (was 3%). Now a 1-point talent (was 2).
- Unholy Bond now increases effectiveness of Runeforge effects by 20% (was 10%). Now a 1-point talent (was 2).
- Assimilation now reduces the cooldown of Anti-Magic Zone by 30 seconds. No longer increase Runic Power when absorbing damage.
- Suppression now grants an additional 6% damage reduction to area of effects when you suffer a loss of control effect. Moved to gate 3.
- Blood Draw now also grants a buff reducing damage taken by 10% and reducing Death Strike cost by 10 for 8 seconds when falling below 30% health. Now a 1-point talent.
- Blood Draw cooldown reduced to 2 minutes (was 3 minutes).
- The following talents have been removed:
- Might of Thassarian
- Merciless Strikes
- Clenching Grasp
- Empower Rune Weapon
- Rune of Hysteria
Unholy
- New Talent: Doomed Bidding
- Consuming Sudden Doom calls upon a Magus of the Dead to assist you for 8 seconds.
- New Talent: Raise Abomination
- Summons an Abomination to attack nearby enemies applying a Festering Wound with its melee attacks and infecting all nearby enemies with Virulent Plague. 90 second cooldown. Replaces Army of the Dead.
- New Talent: Foul Infections
- Your diseases deal 10% more damage and have a 5% increased chance to critically strike.
- New Talent: Menacing Magus
- Your Magus of the Dead Shadow Bolt now fires a volley of Shadow Bolts at up to 4 nearby enemies.
- New Talent: Festering Scythe
- Every 20 Festering Wound you burst empowers Festering Striketo become Festering Scythe for 12 seconds.
- Festering Scythe: Sweep through all enemies within 14 yards in front of you, dealing Shadow damage and infecting them with 2-3 Festering Wounds.
- Every 20 Festering Wound you burst empowers Festering Striketo become Festering Scythe for 12 seconds.
- New Talent: Decomposition
- Virulent Plague has a chance to abruptly flare up, dealing 50/100% of the damage it dealt to the target over the last 4 seconds. When this effect triggers, the duration of your active minions are increased by 1 second, up to 3 seconds. 2-point talent.
- Epidemic is now learned at level 18 (was a talent).
- Outbreak is now learned at level 13 (was a talent).
- Sudden Doom has been redesigned:
- Your auto attacks have a 25% chance to make your next Death Coil or Epidemic cost 10 less Runic Power and critically strike. Additionally, your next Death Coilwill burst 1 Festering Wound.
- When talented into Harbinger of Doom, Sudden Doom now displays the activation overlay images separately, left and right, for each stack.
- Unholy Blight has been updated:
- Passive ability. Dark Transformation surrounds your ghoul with a vile swarm of insects for 6 seconds, stinging all nearby enemies and infecting them with Virulent Plague and an unholy disease that deals damage over 14 seconds, stacking up to 4 times.
- Dark Transformation cooldown reduced to 45 seconds (was 60 seconds).
- Army of the Dead cooldown reduced to 3 minutes (was 8 minutes).
- Apocalypse cooldown reduced to 45 seconds (was 90 seconds).
- Apocalypse now always summons 4 ghouls regardless of Festering Wounds burst.
- Apocalypse ghoul damage reduced by 15%.
- Vile Contagion cooldown reduced to 45 seconds (was 90 seconds).
- Clawing Shadows damage reduced by 15%.
- Raise Dead ghoul damage reduced by 10%.
- Scourge Strike damage reduced by 15%.
- Death Coil damage reduced by 15%.
- Magus of the Dead damage reduced by 15%.
- Epidemic damage reduced by 15%.
- Festering Wound damage reduced by 15%.
- Defile damage increased by 200% and no longer increases Mastery when dealing damage to enemies.
- Festermight now functions like Druid's Ironfur, allowing multiple instances to overlap.
- Ebon Fever now also affects Frost Fever and Blood Plague if Superstrain is talented.
- Dragonflight Season 4 class set bonuses have been updated to the Dragonflight Season 1 class set bonuses:
- 2 Set Bonus
- Bursting a Festering Wound grants your ghoul Vile Infusion, increasing their damage by 25% and Haste by 10% for 5 seconds.
- 4 Set Bonus
- Your primary ghoul's attacks have a 8% chance to increase your damage and Haste by 8% for 8 seconds. This chance is increased to 15% during Vile Infusion.
- Developer's note: In The War Within pre-patch we had several season 4 class sets that were made into spec talents. In order to prevent any oddities we are updating those select few class sets with earlier tier sets from Dragonflight to prevent any overlap or potential bugs.
- 2 Set Bonus
- The following talents are now 1 point:
- Ghoulish Frenzy
- Improved Death Coil
- The following talents have been removed:
- Replenishing Wounds
- Army of the Damned
- Unholy Command
- Feasting Strikes
FAQ
A: When you are auto attacking, you have a ramping chance to proc Sudden Doom, averaging out to 4 auto attacks between procs with an absolute worst case scenario of 11 auto attacks that you are unlikely to ever see.
While you are talented into Harbinger of Doom this chance averages out to just about 3.1 auto attacks between procs with a worst case of 8 auto attacks between procs. Skyfury reduces this to approximately 2.5 auto attacks between Sudden Doom procs with the extra auto attack chance. This chance is not guaranteed whatsoever as it is just an average based on proc chance.
Two stacks of Sudden Doom cannot be procced at once with Skyfury as Sudden Doom has a very small internal cooldown to specifically combat this interaction.
Credits
Written By: Miniaug
Reviewed By: Revvez