Unholy Death Knight Mythic+ Guide
Welcome to the Unholy Death Knight Mythic+ guide for the World of Warcraft patch 11.1.7! This guide covers everything you need to know to understand your character! Are you starting out and leveling up from 70? Check out the leveling guide!
Overview
Hero Talents
- For Mythic+ in The War Within Season 2, San'layn is the best build with your new tier bonus
Offensive Nodes
- Vampiric Strike
- Death Coil, Epidemic, and Death Strike have a 10% chance to transform your next Scourge Strike in to Vampiric Strike.
- Vampiric Strike heals you for 1% of your max HP, triggers Infliction of Sorrow, and grants you 1 stack of Essence of the Blood Queen.
- Infliction of Sorrow
- Causes Vampiric Strike to add 3 seconds to the duration of Virulent Plague and deal 10% of its' remaining damage on the target.
- After Gift of the San'layn expires you get a buff causing the next Scourge Strike to consume Virulent Plague and deal its' remaining damage immediately.
- This damage is affected by Plaguebringer, Ebon Fever, Foul Infections, and other damage modifiers making them incredibly important talents while playing San'layn as this becomes a massive amount of burst every 1m30s.
- Gift of the San'layn
- Dark Transformation now grants you Gift of the San'layn which replaces Scourge Strike with Vampiric Strike for its' duration.
- Essence of the Blood Queen effectiveness is also increased by 100% during Dark Transformation.
- The Blood is Life
- Vampiric Strike has a chance to summon a Blood Beast that, when combined with Pact of the San'layn, stores shadow damage you deal in to its' explosion, dealing massive amounts of aoe damage.
- This proc chance is based off of hasted random procs per minute, meaning that you can not control when or have a higher chance of proccing it at any point.
- Vampiric Strike has a chance to summon a Blood Beast that, when combined with Pact of the San'layn, stores shadow damage you deal in to its' explosion, dealing massive amounts of aoe damage.
- Pact of the San'layn or Sanguine Scent
- Pact of the San'layn simply deals more damage overall as Sanguine Scent only increases the chance to gain Vampiric Strike in execute.
- Blood-Soaked Ground
- While standing in your Death and Decay the proc chance of Vampiric Strike is increased to 15%.
- Frenzied Bloodthirst
- Allows Essence of the Blood Queen to stack up to 7 and increases your Death Coil damage by 3% per stack.
- Visceral Strength
- Consuming Sudden Doom procs grants you 6% strength for 8 seconds.
Your damage is maximized by using Dark Transformation to gain Gift of the San'layn on cooldown to stack and maintain Essence of the Blood Queen as well as increasing the duration of Virulent Plague and taking advantage of Infliction of Sorrow during your cooldowns. This happens every 45 seconds, but is especially powerful every 90 seconds as this lines up with Raise Abomination, Unholy Assault, and your on-use trinkets.
Defensive Choice Nodes
- Vampiric Speed or Newly Turned
- Newly Turned has the potential to be nice but overall you are not normally the person combat rezzing while Vampiric Speed increases your movement speed and that of nearby allies slightly which is always good.
- Bloody Fortitude or Vampiric Aura
- In Raids, Bloody Fortitude increasing the potency of Icebound Fortitude is simply too good to give up as 2% Leech sometimes increasing to 4% even for 4 allies is just not good enough.
Offensive Nodes
- Rider's Champion - Each Rune spent gives you a 10% chance to summon one of the following Four Horsemen:
- Mograine
- Puts up a Death and Decay that follows him.
- You gain the benefit of Mograine's Might and Unholy Ground if you are standing in this.
- Puts up a Death and Decay that follows him.
- Whitemane
- Undeath is a disease with a 24 second duration that spreads and gains 1 stack every time you use Scourge Strike on the infected target.
- Trollbane
- Repeatedly casts Chains of Ice over his duration that gets shattered by Scourge Strike with Trollbane's Icy Fury.
- Nazgrim
- Grants you 5% Strength, increasing by 1% for every Rune spent while Nazgrim is active.
- Mograine
- Apocalypse Now
- Summons all 4 Horsemen for 20 seconds after casting Raise Abomination. This lines up with every other use of Dark Transformation and Apocalypse making for extremely large burst windows especially when combined with on-use trinkets.
- If a Horsemen is already out, it extends the current duration by 20 seconds instead.
- Mograine does not recast his Death and Decay but all other Horsemen recast their abilities.
- If a Horsemen is already out, it extends the current duration by 20 seconds instead.
- Summons all 4 Horsemen for 20 seconds after casting Raise Abomination. This lines up with every other use of Dark Transformation and Apocalypse making for extremely large burst windows especially when combined with on-use trinkets.
- Fury of the Horsemen or A Feast of Souls
- Fury of the Horsemen increases the duration of your Horsemen when spending Runic Power which has incredible value for Unholy due to Mastery interactions with the Horsemen's abilities. A Feast of Souls enables larger Death Coils and Epidemics but is not strong enough on single target to make it worth it.
- Hungering Thirst
- Passively increases the damage of your diseases, Virulent Plague as well as Frost Fever and Blood Plague while playing Superstrain, and Death Coil damage.
- Mawsworn Menace
- Increases Scourge Strike and Clawing Shadows damage by 10% as well as reducing the cooldown of Death and Decay by 10 seconds allowing you to use 2 charges of Death and Decay during Dark Transformation in AoE without being punished.
- This reduces the cooldown of Defile by 5 seconds if you are playing it instead.
- Increases Scourge Strike and Clawing Shadows damage by 10% as well as reducing the cooldown of Death and Decay by 10 seconds allowing you to use 2 charges of Death and Decay during Dark Transformation in AoE without being punished.
Defensive Choice Nodes
- Death Charge or On a Paler Horse
- On a Paler Horse does not work at all in this raid so you always choose Death Charge which is not a bad thing as this greatly increases your mobility and allows you to break roots and slows.
- Horsemen's Aid or Pact of the Apocalypse
- Horsemen's Aid depends on the value of Anti-Magic Shell during the fight as this can be incredibly potent allowing you to pre-immune debuffs or randomly absorb high amounts of magic damage. On the other hand, Pact of the Apocalypse grants you a 5% damage reduction per Horsemen out or a 20% damage reduction during your cooldowns with Apocalypse Now. Due to the situational value of both of these, there is no auto pick for this as it just depends on the fight.
Talents
When to Use This Spec
This is the "standard" spec to use when you get your Season 2 tier bonus.
Gameplay Altering Talents
Discover all talents that significantly alter your gameplay within the Spec and Class Talent trees. This section gives a concise overview of these talents and their applications but for a more detailed look check out the Rotation and Deep Dive sections below.
Spec Tree
- Plaguebringer
- Makes your diseases tick faster, dealing more damage.
- Infected Claws
- A factor in why you don't constantly have to press Festering Strike as this gives roughly 8 Festering Wounds per minute.
- Every hit in multi-target situations from Sweeping Claws has a separate chance of applying a Festering Wound, meaning you don't have to constantly Festering Strike multiple targets.
- Bursting Sores
- Allows your Festering Wounds to "cleave" when popped.
- Festering Scythe
- Converts Festering Strike in to a cleave that applies aoe Festering Wounds, paired with Bursting Sores this is incredibly powerful.
- Raise Abomination
- Replaces Army of the Dead, instead summoning an abomination that applies all diseases when it spawns in a small radius around it and applies a Festering Wound on each of its' auto attacks for 30 seconds.
- Unholy Assault
- Puts 4 Festering Wounds on your target and Increases your damage by 20% for 20 seconds.
- Morbidity and Superstrain
- Morbidity Increases the damage taken by targets with your diseases and Superstrain puts up 2 extra diseases.
Class Tree
- Soul Reaper
- Used rotationally when hitting single-target enemies under 35% health.
- Cleaving Strikes
- Allows Scourge Strike to hit up to 7 additional enemies while you are standing in Death and Decay or when you have the buff from recently standing in your Death and Decay.
- Abomination Limb
- Grips enemies to you for 12 seconds with a minimum range of 8 yards and a max range of 20 yards as well as dealing a decent amount of damage over the duration.
- Runic Attenuation
- A very nice source of passive Runic Power generation to help smooth your rotation out.
- Anti-Magic Zone and Assimilation
- Your raid cooldown that lasts for either 8 seconds or until 150% of your maximum health has been absorbed in total by everyone standing in the zone.
- Talenting into Assimilation makes this absorb 10% stronger, 165% of your maximum health, and have a 30 second reduced cooldown.
- Null Magic
- Reduces your magic damage taken by 5% and reduces the duration of harmful magic effects by 35%. While the reduced magic damage portion of Null Magic works against all magic damage, the reduced duration of harmful magic effects does not work on the vast majority of debuffs in the raid as that could simply break too many things.
- Death's Echo
- Gives you 1 extra charge of Death and Decay, Death's Advance, and Death Grip.
- Gives you 2 charges of Defile if talented instead of Death and Decay.
- Gives you 1 extra charge of Death and Decay, Death's Advance, and Death Grip.
- Will of the Necropolis
- Reduces all damage taken by 35% when below 30% health, including the portion of the hit that takes you below 30%. For example, if you take a hit that takes you from 60% to 10%, the portion of the hit below 30% of your health is reduced by 35%
- Unholy Endurance
- Transforms Lichborne into a defensive cooldown and increases its' duration.
- Gloom Ward
- Increases all absorbs on you by 15%, this is incredibly powerful as it increases the absorb of spells like Anti-Magic Shell and Power Word: Shield and other similar abilities.
Rotation
Tier Set
- 2-Set: Your spells and abilities have a chance to activate a Winning Streak! increasing the damage of your Death Coil and Epidemic by 3% stacking up to 10 times. Death Coil and Epidemic have a 15% chance to remove Winning Streak!
- 4-Set: Casting Dark Transformation grants up to 10 stacks of Winning Streak! and while Dark Transformation is active the effectiveness of Winning Streak! is increased by 100% and no longer has a chance to reset.
Single-Target
Opener
- Your goal in the opener is get in to Dark Transformation and stack up Gift of the San'layn as quick as possible. You don't start dealing much damage until Gift is stacked up and you begin spamming Death Coil and Vampiric Strike.
- During the process of stacking Gift, when you get a Sudden Doom you want to use it at latest when you get 2 stacks, but the earlier the better as to try and not waste procs.
During Dark Transformation Priority List
While this is very simple, getting the most out of your Season 2 Set Bonus during Dark Transformation is the most important part of you dealing the most possible damage. Do not cast Festering Strike during this time as it is not worth it unless it is a Festering Scythe.
- Cast Death Coil if you have Sudden Doom and at least 3 stacks of Gift.
- Cast Vampiric Strike if Gift of the San'layn is not at 7 stacks.
- Cast Festering Scythe.
- Cast Death Coil
- Cast Vampiric Strike
Base Priority List
- Cast Scourge Strike when the final Infliction of Sorrow buff can be used
- Cast Vampiric Strike when you get a proc.
- Cast Death and Decay when the remaining duration of Gift of the San'layn will not last until your next Dark Transformation cast.
- Cast Death Coil when you have more than 80 Runic Power or a Sudden Doom proc.
- Cast Outbreak if any diseases are missing.
- Cast Death Coil when the remaining duration of Gift of the San'layn will not last until your next Dark Transformation cast.
- Cast Scourge Strike if Plaguebringer is missing.
- Cast Festering Strike when you have 2 or less Festering Wounds.
- Cast Death Coil
- Cast Scourge Strike when you have 3 or more Festering Wounds.
AoE
Opener
- Your goal in the opener isget in to Dark Transformation and stack up Gift of the San'layn quickly to begin your actual burst phase. You don't start dealing much damage until Gift is stacked up and you begin spamming Epidemic, Vampiric Strike, and Festering Scythe.
Burst Phase
If priority damage matters more than random adds dying, press Death Coil instead of Epidemic.
- Cast Defile if it is not already down.
- Cast Dark Transformation to begin your burst.
- Cast Outbreak if your diseases are missing.
- Make sure to watch that you are not spamming Epidemic after Infliction of Sorrow and your diseases are missing on up to 8 targets!
- Cast Epidemic if you have Sudden Doom or less than 2 Runes and there are 5 or more targets, otherwise cast Death Coil.
- Cast Vampiric Strike.
- Cast Epidemic if there are 5 or more targets, otherwise cast Death Coil.
Building Phase
- Cast Scourge Strike if Plaguebringer will soon expire or is not up.
- Cast Festering Scythe if it is up.
- Cast Outbreak if your diseases are missing and Dark Transformation is not within 7 seconds of being ready.
- Cast Abomination Limb.
- Cast Epidemic if you have Sudden Doom or less than 2 Runes and there are 5 or more targets, otherwise cast Death Coil and you are not about to enter Dark Transformation.
- Cast Unholy Assault.
- Cast Epidemic if you have less than 2 Runes.
- Cast Defile.
- Go to the Burst Phase rotation once Defile is placed.
Deep Dive
Casting Death Coil vs Epidemic
- When you are in an AoE situation, you should switch to using Epidemic over Death Coil at 7 stacked targets.
Build and Burst Phases
- In the Mythic+ talent build, you have 2 distinct damage phases that you play in and they are dictated by when you use Death and Decay or Defile charges. The burst phase is where you are focused on bursting as many Festering Wounds as possible. Secondly, you have a different building phase when you have neither Death and Decay or Defile available that focuses on maintaining your important buffs and dealing damage with Epidemic while preparing to spread as many Festering Wounds as you can to all targets for the burst phase.
- Wasting Runic Power is regular in this build, specifically during Burst Phases, so do not worry about it unless you are about to be running low on Festering Wounds. As long as you are bursting all of your Festering Wounds during the Defile window it never hurts to throw in an Epidemic to try and get Runic Corruption procs for more casts of Scourge Strike.
- Dealing a lot of damage when you are not bursting is not a thing you do in the Mythic+ Build but you still want to spread diseases with Outbreak, maintain Plaguebringer with Scourge Strike, spread Festering Wounds with Festering Scythe if you proc it, and not overcap Runic Power with Epidemic.
Pet Positioning
- When you empower your ghoul with Dark Transformation, it is essential to manage where your pet is at all times due to the interaction between Sweeping Claws and Infected Claws as this can put Festering Wounds on all targets hit by Sweeping Claws. This increases your power dramatically in any multi-target situation as you gain a ton of additional Festermight stacks from this interaction when you start bursting them with Death and Decay and Scourge Strike.
Anti-Magic Shell Runic Power
- Anti-Magic Shell grants you up to 40 Runic Power based on the amount it absorbs. This is incredibly powerful as this build can get starved of Runic Power on single target so you want to use this to your advantage as often as possible on bosses where Anti-Magic Shell isn't needed for purely defensive purposes.
Understanding Mechanics
Rotational min-maxing is just one aspect of mastering a specialization, but there are numerous other key mechanics that influence your performance. Use the following guides to improve them.
Dungeons
← Scroll for more Dungeons →
Boss Tips
Brew Master Aldryr
- Use Anti-Magic Shell on Throw Cinderbrew.
- Watch out for your health during this intermission, use Icebound Fortitude or Lichborne when you outrange your healer during this.
I'pa
- Pop Anti-Magic Shell on Burning Fermentation.
- It is important to never let the Brew Drops reach I'pa.
- Crowd control the Brew Drops with Death Grip and Chains of Ice if absolutely necessary.
Benk Buzzbee
- Keep your Icebound Fortitude or Lichborne incase you get a lot of Shredding Sting stacks.
- It is a good idea to use Anti-Magic Shell on Fluttering Wing as it is the only magic damage event in the fight.
- Once you kill a Ravenous Cinderbee you can mount up on them Tamed, and kill the Snack Time.
Goldie Baronbottom
- Avoid the front of the boss at all costs to dodge the Cash Cannon.
- Keep the room clean from Cinder-BOOM! and burn the barrels with Burning Ricochet.
- Be aware that clearing up multiple of the barrels does apply a deadly dot on all players Cindering Wounds.
- The boss casts Let It Hail! upon reaching 100 Energy, use Anti-Magic Shell, Icebound Fortitude, or Lichborne on it.
- Keep in mind that all the Cinderbrew Bombs explode and if you have Cinder-BOOM! on the ground you want to press even more personals and a healthpotion or healthstone.
Trash Tips
- Single targeting the Yes Man is important, as they full heal themselves as one of them dies with Field Promotion.
- Important abilities to interrupt in this dungeon are:
- Boiling Flames from Venture Co. Pyromaniac.
- Free Samples? from Taste Tester.
- Rejuvenating Honey from Flavor Scientist.
- Bee-stial Wrath from Bee Wrangler.
- Honey Volley from Royal Jelly Purveyor.
- Pay extra attention to these casts:
- Throw Chair from Hired Muscle.
- Inflicts physical damage to a random player. Make sure you are always full health whenever getting targeted by this spell. Always be ready to press a strong defensive like Icebound Fortitude or Lichborne.
- Reckless Delivery from Careless Hopgoblin
- Targets a player and the Careless Hopgoblin charges towards the direction of the player, make sure to bait it close to the trash pack that you are fighting so he does not move very far away.
- Failed Batch from Flavor Scientist.
- Summons a Failed Batch that starts a 10 second cast which will inflict AoE fire damage to all players upon succeeding. Swap to it as soon as it spawns to kill it as quickly as possible.
- Swarming Surprise from Venture Co. Honey Harvester.
- An AoE cast that ramps in damage done per cast.
- Throw Chair from Hired Muscle.
- Dangerous debuffs to be wary of:
- Erupting Inferno from Venture Co. Pyromaniac.
- Shredding Sting from Worker Bee.
- A stacking Bleed that is applied to random players. Use Icebound Fortitude or Lichborne if you get multiple of those stacks.
Boss Tips
Ol' Waxbeard
- Be aware of the Menial Laborers when targeted by Luring Candleflame.
- It is your highest priority to kill the Dynamite Mine Card as it spawns.
- Bait Reckless Charge close to a wall so the boss does not move too far away.
Blazikon
- Your goal is to ignite as many candles as possible with Wicklighter Barrage, to decrease the damage from Enkindling Inferno.
- Hit atleast 1 candle with Extinguishing Gust to gurantee a safe spot for Incite Flames.
- Extinguishing Gust is a very fast projectile from the boss make sure to not get hit by it.
The Candle King
- Interrupt Paranoid Mind.
- You can rotate interrupts with two melee interrupts.
- Hide behind a Wax Statue after targeted the The Candle King by Darkflame Pickaxe.
- Rotate Anti-Magic Shell, Icebound Fortitude, and Lichborne on Throw Darkflame.
- You want to melt down the Wax Statues with it.
The Darkness
- The Darkness casts Call Darkspawn, interrupt it.
- Keep the Candlelight safe from the Umbral Slash.
Trash Tips
- Important abilities to interrupt in this dungeon are:
- Wicklighter Bolt from Royal Wicklighter.
- Mole Frenzy from Lowly Moleherd.
- Explosive Flame from Blazing Fiend.
- Flaming Tether from Sootsnout.
- Drain Light from Shuffling Horror.
- Pay extra attention to these casts:
- Throw Rock from Lowly Moleherd.
- Pay attention to your health whenever you are spam targeted by this spell, especially if Lowly Moleherd is Panicked!.
- One-Hand Headlock from Torchsnarl.
- You can Icebound Fortitude out of this stun.
- Ceaseless Flame is cast by Sootsnout on the person targeted by One-Hand Headlock, use Anti-Magic Shell on it.
- Wild Wallop from Rank Overseer.
- This ability knocks every target not differentiating from enemies or allies.
- Dangerous debuffs to be wary of:
- Flashpoint from Royal Wicklighter.
- Applies a Magic debuff to a random player, inflicting heavy fire damage. Be careful if you are not dispelled and use Anti-Magic Shell.
- Explosive Flame from Blazing Fiend.
- Be careful if you get too many stacks of this debuff and press a defensive if the cast goes through multiple times.
- Flashpoint from Royal Wicklighter.
Boss Tips
Tussle Tonks
- Use Death's Advance when you get targeted by Foe Flipper to maximize uptime on the bosses.
- Use Icebound Fortitude or Lichborne during Ground Pound.
- To maximize cleave damage on both bosses, use cooldowns when the boss is not buffed by Platinum Plating.
- Kill the Platinum Pummeler and Gnomercy 4.U. at the same time to avoid Electrical Storm.
K.U-J.O
- During Explosive Leap avoid hitting the Junk Bomb.
- Rotate Anti-Magic Shell and Icebound Fortitude or Lichborne on Explosive Leap.
- While K.U-J.O casts Venting Flames you can keep hitting the boss as long as you are affected byHiding Behind Junk.
Machinist's Garden
- Always watch your surroundings to easily dodge Self-Trimming Hedge.
- Rotate between Anti-Magic Shell, Icebound Fortitude, and Lichborne when targeted by Blossom Blast.
- During "Hidden" Flame Cannon look at the middle of the room and you see the direction which the "Hidden" Flame Cannon turn.
King Mechagon
- Throughout the fight the Plasma Orb adjust their positioning around different players on Recalibrate.
- Watch the arrows closely to avoid getting clipped by it.
- Anti-Magic Shell prevents the debuff when targeted by Mega-Zap. Use Icebound Fortitude or Lichborne when it is not up and you are targeted.
- During Take Off! the Cutting Beam does not hit you as long as you stay on max melee range.
Trash Tips
- Important abilities to interrupt in this dungeon are:
- Detonate from Bomb Tonk.
- Giga-Wallop from Mechagon Tinkerer.
- Tune Up from Mechagon Mechanic.
- Pay extra attention to these casts:
- Mega Drill from Waste Processing Unit.
- Inflicts nature damage to all players. Stack up with the group and use defensives.
- Short Out from Defense Bot Mk III.
- Short channeled cast that inflicts nature damage to all players. Use a defensive whenever it happens.
- Shield Generator from Workshop Defender.
- The Shield Generator decreases the damage everyone takes whether its friend or foe, ensure you are standing in it to decrease your damage intake.
- You can Death Grip mobs stuck casting in the shield out of it.
- The Shield Generator decreases the damage everyone takes whether its friend or foe, ensure you are standing in it to decrease your damage intake.
- Mega Drill from Waste Processing Unit.
- Dangerous debuffs to be wary of:
- Fiery Jaws from Junkyard D.0.G.
- Applies a Magic debuff to a random player, inflicting heavy fire damage. Be careful if you are not dispelled and use a defensive.
- Arcing Zap from Defense Bot Mk I and Defense Bot Mk III.
- Applies a Magic debuff to a random player, inflicting nature damage. Be careful if you are not dispelled and use a defensive.
- If you track the cooldown of this ability, you can use Anti-Magic Shell before it happens. While it is rng if it prevents a debuff or not, it can be extremely helpful when it does.
- Applies a Magic debuff to a random player, inflicting nature damage. Be careful if you are not dispelled and use a defensive.
- Fiery Jaws from Junkyard D.0.G.
Boss Tips
Big M.O.M.M.A
- One of the Darkfuse Mechadrone casts Maximum Distortion always interrupt it.
- Move away from the boss after beeing targeted by Sonic Boom to avoid getting hit by it.
- During the first phase always hit the Darkfuse Mechadrones as it triggers the second phase after all of them are dead.
- If you take too long to kill the Darkfuse Mechadrones Big M.O.M.M.A casts Kill-o-Block Barrier .
- Phase 2 is a burn phase, make sure your cooldowns are up for Jumpstart as it is a 200% damage increase.
Demolition Duo
- Kill both bosses in a similar time to avoid Divided Duo.
- Diffuse Big Bada BOOM! with Barreling Charge and Kinetic Explosive Gel.
- In general it is a good idea to use Anti-Magic Shell on on Kinetic Explosive Gel if it is up, if not use Icebound Fortitude or Lichborne instead.
Swampface
- Razorchoke Vines links you together with another player(it cannot be the tank unless people are dead), and you have to move together.
- Usually there is a set rule to always dodge mechanics left or right depending on agreement with the group.
- It is a good idea to use Anti-Magic Shell on Awaken the Swamp incase you get hit by Rushing Tide.
Geezle Gigazap
- During Turbo Charge you should use a strong personal like Icebound Fortitude or Lichborne.
- Use Anti-Magic Shell when targeted by Gigazap.
- Kite the Leaping Sparks towards Dam Water on the ground.
- You can touch the water as long as a spark did not reach it yet.
Trash Tips
- Important abilities to interrupt in this dungeon are:
- Trickshot from Mechadrone Sniper.
- Surveying Beam from Venture Co. Surveyor.
- Bloodthirsty Cackle from Darkfuse Hyena.
- Blood Blast from Darkfuse Bloodwarper.
- Restorative Algae from Disturbed Kelp.
- You can stun these as well but they will recast untill interrupted.
- Harpoon from Venture Co. Diver.
- Lightning Bolt from Venture Co. Electrician.
- Pay extra attention to these casts:
- Wind Up from Loaderbot.
- Fixates a random player, inflicting physical damage to players within 3.5 yards for 6 seconds. Don't be in melee or close to the mob whenever it happens.
- Shreddation from Shreddinator 3000.
- Summons several spinning sawblades at the location of every player, inflicting physical damage every 0.3 seconds to players within the effect. This damage increases with consecutive hits. Damage can be fully avoided by prerunning out of it before the cast finishes.
- Flamethrower from Shreddinator 3000.
- It can be very spicy to dodge the Shreddation and the Flamethrower at the same time, in the worst case scenario get out of melee.
- Rapid Construction from Venture Co. Architect.
- While the Scaffolding is up, the Venture Co. Architect is buffed by High Ground.
- Focus the Scaffolding to remove High Ground as fast as possible.
- While the Scaffolding is up, the Venture Co. Architect is buffed by High Ground.
- Wind Up from Loaderbot.
- Dangerous debuffs to be wary of:
- Overcharge from Venture Co. Electrician.
- Applies a Magic debuff to a random player, inflicting nature damage and stuns if the effect persists without being dispelled.
- Overcharge from Venture Co. Electrician.
Boss Tips
Captain Dailcry
- Depending on your route the either Elaena Emberlanz, Sergeant Shaynemail or Taener Duelmal is up.
- Interrupt Repentance from Elaena Emberlanz.
- Sergeant Shaynemail puts a nasty bleed Lunging Strike.
- Use Icebound Fortitude or Lichborne on it.
- Taener Duelmal casts Cinderblast and Fireball.
- One person in the group should always hold their interrupt for Cinderblast.
- Always focus Captain Dailcry as the fight finishes after he is dead.
- Interrupt Battle Cry.
Baron Braunpyke
- Interrupt Burning Light.
- It is a faster cast while empowered by Vindictive Wrath.
- Soak Sacrificial Pyre with Anti-Magic Shell. You do not receive if debuff while Anti-Magic Shell is still up.
- While empowered by It is a faster cast while empowered by Vindictive Wrath it has 5charges instead of 3.
Prioress Murrpray
- Turn around at the end of Blinding Light.
- Interrupt Holy Smite.
- Kite The Sacred Flame towards the edge of the room to maximize space.
- There is a nasty overlap with The Sacred Flame while the boss casts Blinding Light, keep your Anti-Magic Shell for it as it does a massive amount of damage
- After reaching 50% health, Prioress Murrpray teleports upstairs and begins casting Barrier of Light.
- Interrupt Embrace the Light whenever your healer is out of healing cooldowns.
Trash Tips
- Important abilities to interrupt in this dungeon are:
- Boiling Flames from Venture Co. Pyromaniac.
- Holy Smite from High Priest Aemya.
- Cinderblast from Taener Duelmal.
- Fireball from Taener Duelmal.
- Holy Smite from Devout Priest.
- Greater Heal from Devout Priest.
- Fireball from Fanatical Conjuror.
- Flamestrike from Fanatical Conjuror.
- Fireball Volley from Risen Mage.
- Fireball from Risen Mage.
- Pay extra attention to these casts:
- Defend from Arathi Footman.
- A channeled cast that reduces damage taken by any ally around the caster by 50% for up to 5 seconds. Stop it with Blinding Sleet immediately.
- Pot Shot from Fervent Sharpshooter.
- Inflicts physical damage to a random player. Use a defensive if you are targeted by multiple of them.
- Disrupting Shout from Arathi Knight.
- Inflicts physical damage to all players within 40 yards and interrupts spell casting for 4 seconds.
- Holy Radiance from Elaena Emberlanz.
- Inflicts holy damage to all players for 8 seconds.
- Lunging Strike from Sergeant Shaynemail.
- Leaps at a random player, inflicting physical damage and applying a Bleed.
- Sacred Toll from Ardent Paladin.
- Inflicts a hefty amount of holy damage use Anti-Magic Shell on it to mitigate damage or instead use Icebound Fortitude or Lichborne if there are multiple in the pack and they are casting back to back.
- Purification from Lightspawn.
- Channeled cast that fixates on a random player and inflicts holy damage every second for 6 seconds.
- Burst of Light Lightspawn.
- Use Death Grip to keep any mob out of the Burst of Light as this heals them to full.
- Defend from Arathi Footman.
- Dangerous debuffs to be wary of:
- Pounce from War Lynx.
- A Bleed effect inflicting physical damage for 14 seconds or until fully healed.
- Impale from Arathi Knight.
- A Bleed that is applied to a random player.
- Heat Wave from Forge Master Damian.
- A Magic slow debuff for 4 seconds. In combination with Molten Pools can be very deadly.
- Pounce from War Lynx.
Boss Tips
Kyrioss
- Use Anti-Magic Shell during Lightning Torrent if your healer is struggling.
- After Kyrioss reaches 100 Energy he casts Lightning Torrent.
- It always rotates clockwise.
Stormguard Gorren
- Rotate Anti-Magic Shell and Icebound Fortitude or Lichborne when afflicted by Chaotic Corruption.
- Chaotic Corruption always travels to the closest person even if they are not in the targeted indicated circle.
- You can always juggle it to the tank, but keep your distance when debuffed by Chaotic Vulnerability to avoid getting Chaotic Corruption on accident.
- Crush Reality spawns Reality Tear from his impact, be aware and dodge it.
Voidstone Monstrosity
- Make sure your cooldowns are up for Storm's Vengeance as it increases your damage throughput.
- This happens after breaking the absorb shield every time.
- It is your highest priority to hit Voidstone Fragments with Seeping Corruption to avoid Voidstone Awakened from spawning.
- Rotate between Anti-Magic Shell and Icebound Fortitude or Lichborne when afflicted by Unleash Corruption.
Trash Tips
- Important abilities to interrupt in this dungeon are:
- Lightning Bolt from Cursed Thunderer.
- Lightning Surge from Cursed Rooktender.
- Void Bolt from Corrupted Oracle.
- You can stun or grip this if you see the person this ability is cast on is low to save their life.
- Void Bolt from Void Ascendant.
- Pay extra attention to these casts:
- Bounding Void from Quartermaster Koratite.
- Targets a random player and launches void infused orbs towards him that travels out and returns back to the caster.
- Attracting Shadows from Coalescing Void Diffuser.
- Pulls in all players inflicting shadow damage every second and additionally inflicts even more damage to players within 7 yards of the center of the pull in effect at the end of the cast.
- Use a defensive for this.
- Arcing Void from Coalescing Void Diffuser.
- Does a heavy chunk of magic damage, use Anti-Magic Shell, Icebound Fortitude, or Lichborne for it.
- Bounding Void from Quartermaster Koratite.
Boss Tips
Coin-Operated Crowd Pummeler
- Line up your cooldowns for when the boss is afflicted by Timed Detonation to maximize your boss damage.
- Keep the last bomb on Footbomb Launcher to maximize the uptime of Timed Detonation to maximize your boss damage.
- Rotate Anti-Magic Shell and Icebound Fortitude or Lichborne on Static Pulse.
- Static Pulse knocks you back as well, so be sure to use Death's Advance for it.
Azerokk
- The Earthragers fixate a random player with Raging Gaze you can help the fixated people out with Death Grip and Chains of Ice if they get too close.
- Azerokk drops a puddle on Resonant Quake, stay max melee to avoid taking a tick from it.
- Rotate Anti-Magic Shell and Icebound Fortitude or Lichborne on Resonant Quake.
- Focus the Earthrager that gets empowered by Azerite Infusion, it takes extra damage.
Rixxa Fluxflame
- Bait the Azerite Catalyst towards the outside of the room to maximize space.
- Propellant Blast pushes the puddles from Azerite Catalyst away from the boss, so make sure you bait it towards puddles.
- Rotate Anti-Magic Shell and Icebound Fortitude or Lichborne on Propellant Blast.
Mogul Razdunk
- Always watch the directions of the B.O.O.M.B.A to find the safe spot.
- Do not hit anyone when targeted by Homing Missile.
- Use Anti-Magic Shell to reduce damage intake.
- Stay very close to the boss and behind him to avoid getting hit by Gatling Gun.
- Rotate Anti-Magic Shell and Icebound Fortitude or Lichbornewhen targeted by Buster Shot.
Trash Tips
- Important abilities to interrupt in this dungeon are:
- Toxic Blades from Hired Assassin.
- Iced Spritzer from Refreshment Vendor.
- Rock Lance from Venture Co. Earthshaper.
- Furious Quake from Stonefury.
- Tectonic Barrier from Stonefury.
- Transmute: Enemy to Goo from Venture Co. Alchemist.
- Pay extra attention to these casts:
- Uppercut from Addled Thug.
- Charges to a random player, inflicting physical damage and knocking all players within 4 yards of impact into the air.
- Activate Mech from Mech Jockey.
- Activates a nearby Mechanized Peacekeeper.
- Stop it using Blinding Sleet and Death Grip.
- Activates a nearby Mechanized Peacekeeper.
- Fan of Knives from Hired Assassin.
- Channeled cast that inflicts physical damage to anyone within 45 yards. Extremely dangerous if Toxic Blades cast went through.
- Stop it using Blinding Sleet or Death Grip if it starts casting.
- Channeled cast that inflicts physical damage to anyone within 45 yards. Extremely dangerous if Toxic Blades cast went through.
- Rapid Extraction from Azerite Extractor.
- Inflicts physical damage to all players and spawns ground effects at nearby location.
- Mind Lash from Venture Co. Mastermind.
- Targets a random player and channels at him, inflicting arcane damage every second over 4 seconds.
- Uppercut from Addled Thug.
- Dangerous debuffs to be wary of:
- Seek and Destroy from Crawler Mine.
- Crawler Mine crawls towards a player and detonates when nearby, inflicting fire damage on impact and every 2 seconds for 6 seconds.
- Caustic Compound from Venture Co. Alchemist.
- A Poison effect, inflicting nature damage for 6 seconds.
- Seek and Destroy from Crawler Mine.
Boss Tips
An Affront of Challengers
- At 100 Energy Sathel the Accursed casts Searing Death, be spread before it to avoid cleaving each other.
- Anti-Magic Shell should be used to maximize your dps when you are afflicted by Searing Death.
- Interrupt Necromantic Bolt from Sathel the Accursed.
- Equalize each boss health pool so they all die within a short timeframe of each other.
Gorechop
- The Oozing Leftovers cleave with Leaping Thrash, prioritize not stacking with other people.
- Upon death the Oozing Leftovers drops a puddle Coagulating Ooze, a well timed Death Grip in the right spot can maximize the space in the boss area.
- Tenderizing Smash pulls you towards Gorechop if you are away from melee.
- You can Death's Advance this if wanted.
Xav the Unfallen
- Oppressive Banner's slow is mostly mitigated by the passive portion of Death's Advance.
- Use the active of Death's Advance to get in and out when Deafening Crash is cast.
- During Blood and Glory the person that gets his offensive cooldowns ready should win the duel as they gain Glorified.
- Use Icebound Fortitude or Lichborne on Might of Maldraxxus.
Kul'Tharok
- Interrupt Necrotic Bolt.
- Spread around the boss to avoid cleaving each other with Well of Darkness.
- Use Death Grip to keep the Lost Souls away from Kul'Tharok or stack them up if someone in your group stands out with it.
- Make sure to not grip it directly through the boss.
- Rotate Anti-Magic Shell and Icebound Fortitude or Lichborne on Well of Darkness if Anti-Magic Shell isn't up.
Mordretha, the Endless Empress
- Interrupt Deathwalkers Death Bolt.
- Use Death Grip or Abomination Limb to help stack Deathwalkers.
- Dark Devastation targets a random player and it can overlap with Ghostly Charge, bait it towards a good direction so you can easily dodge both mechanics.
- Use Anti-Magic Shell when afflicted by Manifest Death.
- After Mordretha, the Endless Empress reaches 50% hp casts Echoes of Carnage use your Diffuse Magic to mitigate damage.
Trash Tips
- Important abilities to interrupt in this dungeon are:
- Necrotic Bolt from Battlefield Ritualist.
- Unholy Fervor from Battlefield Ritualist.
- Necrotic Bolt from Maniacal Soulbinder.
- Necrotic Bolt Volley from Maniacal Soulbinder.
- Bone Spear from Bone Magus.
- Sear Mind from Twilight Beguiler.
- Withering Discharge from Blighted Sludge-Spewer.
- Pay extra attention to these casts:
- Heavin the Breaker - Interrupting Roar
- You can LoS this cast.
- Harugia the Bloodthirsty - Bloodthirsty Charge
- You can LoS this cast.
- Portal Guardian - Soulstorm
- Rotate Anti-Magic Shell and Icebound Fortitude or Lichborne to mitigate damage especially when afllicted by Shadow Vulnerability.
- Raging Bloodhorn - Raging Tantrum
- Heavin the Breaker - Interrupting Roar
Affixes
The Affix system got revamped going into The War Within Season 1 retiring most Affixes as well as introducing new kiss-curse ones while also changing on which key level these appear.
- +4 Affixes -- Rotates on a weekly basis
- Xal'atath's Bargain: Ascendant
- Xal'atath's Bargain: Voidbound
- Xal'atath's Bargain: Oblivion
- Xal'atath's Bargain: Devour
- Xal'atath's Bargain: Pulsar
- +7 Affixes -- Alternates between each other on a weekly basis
- Tyrannical
- Fortified
- +10 Affixes -- Alternates between each other on a weekly basis, is always the opposite of the +7 Affix
- Tyrannical
- Fortified
- +12 Affix
- Xal'atath's Guile -- Replaces the +4 Affix
Following you get some useful tips for handling different Mythic+ Affixes as an Unholy Death Knight
- Xal'atath's Bargain: Ascendant
- Hit as many orbs as possible with Blinding Sleet
- Death Grip the far orbs if they are by themselves.
- Xal'atath's Bargain: Voidbound
- Focus and cleave off of this target as mobs take reduced damage while it is alive.
- Xal'atath's Bargain: Oblivion
- Soak any orbs that are close in melee.
- Xal'atath's Bargain: Devour
- Dispel this with Unyielding Will if you are playing it.
- If you have taken a considerable amount of damage in the last few seconds, you can use 1 Death Strike to help out your healer.
Stat Priority
Understand your secondary stat priority and the tertiary stats needed for optimal performance during Mythic+ dungeons as an Unholy Death Knight. For more detailed information, visit the Stats and Attributes guide.
For an accurate representation of what item to equip you should use Simcraft!
A static "Stat Priority" is just a starting point and can easily shift depending on your current gear.
All secondary stats are affected by diminishing returns. Click here to learn more!
Tertiary
- Avoidance - Great stat to reduce the damage intake of "Area of Effect" abilities.
- Leech - Provides additional healing through damage dealing. The damage of your pets does not heal you thus Leech is an okay tertiary for you since you have a mix of damage from yourself and pets but in AoE is mostly your damage.
- Speed - Niche tertiary that can be very useful and has been proven useful in the past. Makes playing certain mechanics a lot easier.
Gear
While these are the items that you should be aiming to acquire for your absolute Best in Slot, these items will not always be the best until you achieve this exact combination of items.
For an accurate representation of what item to equip you should use Simcraft whenever you get what can be an upgrade!
| Slot | Item | Location |
|---|---|---|
| Head | Cauldron Champion's Crown | Tier / Catalyst |
| Neck | Strapped Rescue-Keg | The Great Vault |
| Shoulder | Cauldron Champion's Screamplate | Tier / Catalyst |
| Cloak | Consecrated Cloak | Crafted |
| Chest | Cauldron Champion's Ribcage | Tier / Catalyst |
| Wrist | Everforged Vambraces | Crafted |
| Gloves | Cauldron Champion's Fistguards | Tier / Catalyst |
| Belt | Durable Information Securing Container | Overcharged Delves |
| Legs | Galvanized Oxxein Legguards | The Great Vault |
| Boots | Cauldron Champion's Greatboots | Catalyst |
| Ring 1 | The Jastor Diamond | Gallywix |
| Ring 2 | Miniature Roulette Wheel | One-Armed Bandit |
| Trinket 1 | Mechano-Core Amplifier | The Great Vault |
| Trinket 2 | House of Cards | One-Armed Bandit |
| Weapon | Best-in-Slots | One-Armed Bandit |
Durable Information Securing Container
- For Mythic+, Charged Bolts is a good consistent option, but if you are get full value out of Spark Burst via long pulls it is also a very good option.
Below you are presented with a good list of farmable alternatives that are obtainable outside of WoW’s weekly lockout system. While replaced in time as you progress, these offer immediate character power.
| Slot | Item | Location |
|---|---|---|
| Head | Apogee Inventor's Goggles | Operation: Mechagon |
| Neck | Strapped Rescue-Keg | Cinderbrew Meadery |
| Shoulder | Unyielding Combatant's Pauldrons | Theater of Pain |
| Cloak | Electrician's Siphoning Filter | Operation: Floodgate |
| Chest | Muckdiver's Wading Plate | Operation: Floodgate |
| Wrist | Stonefury Vambraces | The MOTHERLODE!!! |
| Gloves | Power-Assisted Vicegrips | The MOTHERLODE!!! |
| Belt | Lightning-Conductor's Bands | The Rookery |
| Legs | Galvanized Oxxein Legguards | Theater of Pain |
| Boots | Cauldron Champion's Greatboots | Catalyst |
| Ring 1 | Footbomb Championship Ring | The MOTHERLODE!!! |
| Ring 2 | Radiant Necromancer's Band | Priory of the Sacred Flame |
| Trinket 1 | Improvised Seaforium Pacemaker | Operation: Floodgate |
| Trinket 2 | Signet of the Priory | Priory of the Sacred Flame |
| Weapon | Electro-Arm Bludgeoner | The MOTHERLODE!!! |
Trinkets
Below you can find active and passive alternatives to our recommended trinkets. Do note that some trinkets are better than others depending on the raid boss.
Active Trinket Alternative
- Funhouse Lens
- Unfortunately with the cooldown timings Unholy has, there are only 2 options for active trinkets this tier. Between Funhouse Lens and House of Cards, House of Cards is better but use what you can as they are the only options.
Passive Trinket Alternatives
- Eye of Kezan
- Best in the raid, but not in Mythic+ due to constantly dropping combat. If you are able to stay in combat the vast majority of the dungeon, even between pulls, this trinket is quite good.
- Suspicious Energy Drink
- Improvised Seaforium Pacemaker
In The War Within Season 2, Unholy has very few truly viable trinkets with the best coming from Delves. Unfortunately, this means it is quite simply impossible to truly farm your best non-raid trinkets as you only get 4 attempts per week.
Embellishments
- Duskthread Lining
Remaining Sparks
- Crafted items are 681 item level and regular items are 684 on max item level therefore it is not normally beneficial to equip crafted items outside of your 2x Embellishments.
- While you are gearing up and do not yet have 684 pieces of gear in all slots, especially with your best stats, use your Gilded Undermine Crest to craft 681 pieces with Haste and Mastery on slots that do not have them.
Simcraft
To find the best combination of gear available to you or identify the best possible upgrades, visit our Simcraft guide to learn how to utilize Simcraft easily and effectively.
Consumables
- Phials
- Flask of Alchemical Chaos -- Maximum DPS.
- Food
- Chippy Tea -- Maximum DPS
- Feast of the Divine Day -- Small loss
- Combat Potion
- Tempered Potion
- Health Potion
- Algari Healing Potion -- A big burst of healing
- Weapon Oil
- Algari Mana Oil
- Augment Rune
- Crystallized Augment Rune
- Sockets
- Culminating Blasphemite -- Unique
- Rider of the Apocalypse
- Quick Onyx
- San'layn
- Masterful Emerald
Enchantments
| Head | Greater Rune of the Void Ritual S.A.D. |
| Neck | Magnificent Jeweler's Setting 2x |
| Cloak | Enchant Cloak - Chant of Winged Grace |
| Chest | Enchant Chest - Crystalline Radiance |
| Wrist | Enchant Bracer - Chant of Armored Avoidance S.A.D. |
| Waist | S.A.D. |
| Legs | Stormbound Armor Kit |
| Boots | Enchant Boots - Scout's March |
| Ring 1 | Enchant Ring - Radiant Haste Magnificent Jeweler's Setting 2x |
| Ring 2 | Enchant Ring - Radiant Mastery Magnificent Jeweler's Setting 2x |
| Weapon | Rune of the Fallen Crusader |
You buy S.A.D. from the Great Vault Vendor to add sockets to your Helm, Wrists & Waist.
Races
For min-maxing an Unholy Death Knight in Mythic+, different racial traits can provide a tremendous benefit to your character. If this is not your top goal, picking a race that fits your style works just as well.
- Stoneform -- Dwarf
- One of the most potent racials in Mythic+ currently and historically.
- Dispels Magic and Bleed debuffs.
- Shadowmeld -- Night Elf
- Also one of the most potent racials in Mythic+ historically.
- Use-cases
- Run past basically any mob and then cast Shadowmeld to make them reset. Even works on mobs that have stealth detection if you get enough distance before you Shadowmeld.
- Berserking -- Troll
- The best DPS racial for an Unholy Death Knight in The War Within as this lines up perfectly with your highest points of burst during Army of the Dead or every other use of Raise Abomination.
- Reduce the duration of movement impairing effects by 20%.
- Ancestral Call -- Mag'har Orc
- While this does not line up with your cooldowns perfectly, it is an extremely strong burst racial granting you 6.5k of one your two highest stats.
Recommendation
If you are serious about pushing Mythic+ as an Unholy Death Knight, you need to play Night Elf due to the threat situation this season and being able to remove important mechanics. If you also raid, Troll or Mag'har Orc are by no means bad decisions as they best racials for raiding.
Macros
Discover recommended macros for Unholy Death Knight during Mythic+ dungeons and watch a quick video guide on creating simple macros for your character.
Anti-Magic Zone - Casts Anti-Magic Zone at your Cursor position.
/cast [@cursor] Anti-Magic ZoneDeath and Decay - Casts Death and Decay at your cursor position.
/cast [@cursor] Death and DecayIf you do not like Death and Decay on your cursor you can replace [@cursor] with [@player] and it will instead put it at your feet. Having either of these is important as it removes the targeting reticle and allows you to get it out faster.
/cast [@player] Death and DecayOutbreak - Casts Outbreak at your mouseover if it exists or your target.
/cast [@mouseover,exists,harm][@target,exists,harm] OutbreakChains of Ice - Casts Chains of Ice at your mouseover if it exists or your target.
/cast [@mouseover,exists,harm][@target,exists,harm] Chains of IceMind Freeze - Casts Mind Freeze at your mouseover if it exists or your target.
/cast [@mouseover,exists,harm][@target,exists,harm] Mind FreezeDeath Grip - Casts Death Grip at your mouseover target if it exists or your target.
/cast [@mouseover,exists,harm][@target,exists,harm] Death GripRaise Ally - Casts Raise Ally on your mouseover so you can use this on your frames.
/cast [@mouseover,help,dead][]Raise AllySet Focus Mouseover - This will set your focus to your mouseover.
/focus [@mouseover]Focus Death Grip - Casts Death Grip at your focus.
/cast [@focus] Death GripFocus Mind Freeze - Casts Mind Freeze at your focus.
/cast [@focus] Mind FreezeWhile rare, you need some pet spells bound as pets can be very stupid even on assist. This can happen especially on bosses with large hitboxes as they like to follow the bosses back and they can end up being over 100 yards away.
Pet Attack - Sometimes you will want your pet to target specific things and not follow you around.
/petattackPet Follow - Rarely needed, but sometimes you want your ghoul to stop hitting its target.
/petfollowPet Move - For the fights you just can not get your ghoul in the right position.
/petmovetoGnaw - As you do not want this on auto-cast, this enables you to have a stun which is incredibly powerful on some fights. This also works while your pet is in Dark Transformation.
/cast GnawLeap / Shambling Rush - While this is almost always on auto-cast, you will want this bound for the extremely rare situations that pet kick can be useful.
/cast LeapAddons
Below, you see a screenshot of the author's User Interface for their Unholy Death Knight, outlining which addons are used and how they are utilized in Mythic+ dungeons to make your life easier.
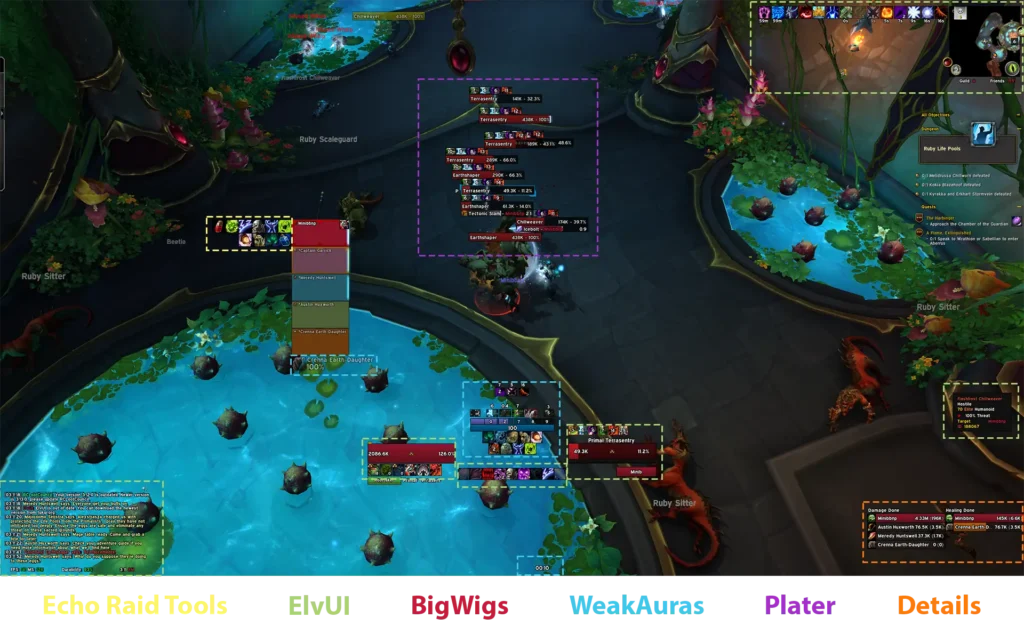
- Echo Raid Tools -- Raid cooldowns and more
- Helpful addon for Raiders, especially for Raid leaders and officers.
- ElvUI -- Full User Interface replacement
- A user interface designed around user-friendliness with extra features that are not included in the standard UI.
- Alternatively, you can also use Shadowed Unit Frames (SUF) and an action bar addon of your choice or of course the stock UI.
- BigWigs -- Generic Boss Mod
- BigWigs is a boss encounter add-on. It consists of many individual encounter scripts, or boss modules; mini add-ons that are designed to trigger alert messages, timer bars, sounds, and so forth, for one specific Raid encounter.
- WeakAuras -- Jack of all trades
- WeakAuras is a powerful and flexible framework that allows the display of highly customizable graphics on World of Warcraft's user interface to indicate buffs, debuffs, and other relevant information. This addon was created to be a lightweight replacement for Power Auras but has since introduced more functionalities while remaining efficient and easy to use.
- Plater -- Advanced Nameplates
- Plater is a nameplate addon with an extraordinary amount of settings, out of the box debuff tracking, threat coloring, and support for scripting similar to WeakAuras and wago.io + the WeakAuras-Companion for Mod/Script/Profile updates.
- Details -- In-depth Damage Meter
- Most powerful, reliable, handsome, damage meter.
Runes and Runic Power
Shows your current Runes progress and your Runic Power

Defensive Tracker
Shows you when your defensives are up and when externals have been put on you

Changes this Patch
Hotfixes
- San'layn: The Blood is Life Blood Beast now explodes for 20% of the damage (was 25%).
Unholy
- All ability and pet damage increased by 5%.
- Soul Reaper damage increased by 35%.
- Clawing Shadows damage increased by 15%. Does not affect Vampiric Strike.
- Scourge Strike damage increased by 15%. Does not affect Vampiric Strike.
- Gargoyle Strike damage increased by 50%.
- Apocalypse ghoul damage increased by 25%.
- Magus of the Dead damage increased by 55%.
- Doomed Bidding now summons a Magus of the Dead for 6 seconds (was 8 seconds).
- Commander of the Dead now increases the damage of Gargoyle and Army of the Dead by 45% (was 35%).
- Apocalypse and Raise Dead now summon ghouls instantly and visuals have been updated.
- Veteran of the Third War now increases Stamina by 12% (was 20%), and 6% in PvP combat (was 10%).
- Null Magic now reduces the magical damage you take by 5% (was 8%), and 3% in PvP combat (was 4%).
- Permafrost now generates an absorb shield at 30% of your auto attack damage (was 40%).
- Rider of the Apocalypse
- All Horsemen damage increased by 10%. Does not include Undeath and Trollbane's Icy Fury.
Unholy
- Apocalypse ghoul damage increased by 30%.
- Rotten Touch now increases the damage of your Scourge Strike against the target by 60% (was 50%).
- Death Coil damage increased by 8%.
- Scourge Strike, Clawing Shadows and Vampiric Strike damage increased by 10%.
Death Knight
- Death Strike can now only heal the Death Knight for a percentage of damage taken from a given damage event once. Death Strikes that heal the minimum health amount do not count as using damage events in this way.
- Unholy Strength (Rune of the Fallen Crusader) now heals for 4% maximum health (was 6%).
- Enfeeble reduces damage dealt to you by 12% (was 15%).
- Null Magic reduces Magic damage taken by 8% (was 10%).
- An issue causing Raise Abomination to deal less damage than it should has been fixed.
Unholy
- All ability damage reduced by 10%.
- Clawing Shadows damage increased by 25%.
- Ebon Fever now increases damage diseases deal by 12% (was 15%).
- Bursting Sores now increases Festering Wound damage by 16% (was 20%).
- Bursting Sores damage reduced by 8%.
- Superstrain now applies Blood Plague and Frost Fever at 75% (was 80%).
- Raise Abomination now costs 1 Rune to summon.
- An issue with Unholy Blight applying Virulent Plague to the player's current target instead of enemies in proximity has been resolved.
Death Knight
- Lichborne now grants 6% Leech (was 10%).
- Blood Scent now grants 3% Leech (was 5%).
- New Talent: Subduing Grasp
- When you pull an enemy the damage they deal to you is reduced by 6% for 6 seconds.
- New Talent: Osmosis
- Anti-Magic Shell increases healing received by 15%.
- New Talent: Null Magic
- Magic Damage taken is reduced by 10% and the duration of harmful Magic effects against you are reduced by 35%.
- New Talent: Vestigial Shell
- Casting Anti-Magic Shell grants 2 nearby allies a Lesser Anti-Magic Shell that absorbs magic damage and reduces the duration of harmful Magic effects against them by 50%.
- New Talent: Ice Prison
- Chains of Ice now also roots enemies for 4 seconds but its cooldown is increased to 12 seconds.
- New Talent: Runic Protection
- Your chance to be critically struck is reduced by 3% and your Armor is increased by 6%.
- New Talent: Unyielding Will
- Anti-Magic Shell's cooldown is increased by 20 seconds and it now also removes all harmful magic effects when activated.
- Chains of Ice is now learned at level 13 (was a talent).
- Anti-Magic Shell is now learned at level 14 (was a talent).
- Rune of the Stoneskin Gargoyle can now be Runeforged on 1-handed weapons.
- Abomination Limb no longer grants Bone Shield, Runic Corruption, or Rime based on specialization.
- Rune of the Apocalypse has been updated:
- War – Damage taken increased to 4% (was 1%) and duration increased to 10 seconds (was 6 seconds).
- Pestilence – Damage increased by 500%.
- Famine – Damage dealt to the caster reduced to 5% (was 2%).
- Death – Healing reduction increased to 5% (was 1%).
- Icebound Fortitude cooldown reduced by 60 seconds.
- Cleaving Strikes now also retains bonus effects for being within your Death and Decay for 4 seconds when leaving its area.
- Veteran of the Third War now grants 20% Stamina (was 10%). Now a 1-point talent (was 2).
- Icy Talons now increases attack speed per stack by 6% (was 3%). Now a 1-point talent (was 2).
- Unholy Bond now increases effectiveness of Runeforge effects by 20% (was 10%). Now a 1-point talent (was 2).
- Assimilation now reduces the cooldown of Anti-Magic Zone by 30 seconds. No longer increase Runic Power when absorbing damage.
- Suppression now grants an additional 6% damage reduction to area of effects when you suffer a loss of control effect. Moved to gate 3.
- Blood Draw now also grants a buff reducing damage taken by 10% and reducing Death Strike cost by 10 for 8 seconds when falling below 30% health. Now a 1-point talent.
- Blood Draw cooldown reduced to 2 minutes (was 3 minutes).
- The following talents have been removed:
- Might of Thassarian
- Merciless Strikes
- Clenching Grasp
- Empower Rune Weapon
- Rune of Hysteria
Unholy
- New Talent: Doomed Bidding
- Consuming Sudden Doom calls upon a Magus of the Dead to assist you for 8 seconds.
- New Talent: Raise Abomination
- Summons an Abomination to attack nearby enemies applying a Festering Wound with its melee attacks and infecting all nearby enemies with Virulent Plague. 90 second cooldown. Replaces Army of the Dead.
- New Talent: Foul Infections
- Your diseases deal 10% more damage and have a 5% increased chance to critically strike.
- New Talent: Menacing Magus
- Your Magus of the Dead Shadow Bolt now fires a volley of Shadow Bolts at up to 4 nearby enemies.
- New Talent: Festering Scythe
- Every 20 Festering Wound you burst empowers Festering Striketo become Festering Scythe for 12 seconds.
- Festering Scythe: Sweep through all enemies within 14 yards in front of you, dealing Shadow damage and infecting them with 2-3 Festering Wounds.
- Every 20 Festering Wound you burst empowers Festering Striketo become Festering Scythe for 12 seconds.
- New Talent: Decomposition
- Virulent Plague has a chance to abruptly flare up, dealing 50/100% of the damage it dealt to the target over the last 4 seconds. When this effect triggers, the duration of your active minions are increased by 1 second, up to 3 seconds. 2-point talent.
- Epidemic is now learned at level 18 (was a talent).
- Outbreak is now learned at level 13 (was a talent).
- Sudden Doom has been redesigned:
- Your auto attacks have a 25% chance to make your next Death Coil or Epidemic cost 10 less Runic Power and critically strike. Additionally, your next Death Coilwill burst 1 Festering Wound.
- When talented into Harbinger of Doom, Sudden Doom now displays the activation overlay images separately, left and right, for each stack.
- Unholy Blight has been updated:
- Passive ability. Dark Transformation surrounds your ghoul with a vile swarm of insects for 6 seconds, stinging all nearby enemies and infecting them with Virulent Plague and an unholy disease that deals damage over 14 seconds, stacking up to 4 times.
- Dark Transformation cooldown reduced to 45 seconds (was 60 seconds).
- Army of the Dead cooldown reduced to 3 minutes (was 8 minutes).
- Apocalypse cooldown reduced to 45 seconds (was 90 seconds).
- Apocalypse now always summons 4 ghouls regardless of Festering Wounds burst.
- Apocalypse ghoul damage reduced by 15%.
- Vile Contagion cooldown reduced to 45 seconds (was 90 seconds).
- Clawing Shadows damage reduced by 15%.
- Raise Dead ghoul damage reduced by 10%.
- Scourge Strike damage reduced by 15%.
- Death Coil damage reduced by 15%.
- Magus of the Dead damage reduced by 15%.
- Epidemic damage reduced by 15%.
- Festering Wound damage reduced by 15%.
- Defile damage increased by 200% and no longer increases Mastery when dealing damage to enemies.
- Festermight now functions like Druid's Ironfur, allowing multiple instances to overlap.
- Ebon Fever now also affects Frost Fever and Blood Plague if Superstrain is talented.
- Dragonflight Season 4 class set bonuses have been updated to the Dragonflight Season 1 class set bonuses:
- 2 Set Bonus
- Bursting a Festering Wound grants your ghoul Vile Infusion, increasing their damage by 25% and Haste by 10% for 5 seconds.
- 4 Set Bonus
- Your primary ghoul's attacks have a 8% chance to increase your damage and Haste by 8% for 8 seconds. This chance is increased to 15% during Vile Infusion.
- Developer's note: In The War Within pre-patch we had several season 4 class sets that were made into spec talents. In order to prevent any oddities we are updating those select few class sets with earlier tier sets from Dragonflight to prevent any overlap or potential bugs.
- 2 Set Bonus
- The following talents are now 1 point:
- Ghoulish Frenzy
- Improved Death Coil
- The following talents have been removed:
- Replenishing Wounds
- Army of the Damned
- Unholy Command
- Feasting Strikes
FAQ
A: When you are auto attacking, you have a ramping chance to proc Sudden Doom, averaging out to 4 auto attacks between procs with an absolute worst case scenario of 11 auto attacks that you are unlikely to ever see.
While you are talented into Harbinger of Doom this chance averages out to just about 3.1 auto attacks between procs with a worst case of 8 auto attacks between procs. Skyfury reduces this to approximately 2.5 auto attacks between Sudden Doom procs with the extra auto attack chance. This chance is not guaranteed whatsoever as it is just an average based on proc chance.
Two stacks of Sudden Doom cannot be procced at once with Skyfury as Sudden Doom has a very small internal cooldown to specifically combat this interaction.
Credits
Written By: Miniaug
Reviewed By: Revvez