Survival Hunter Mythic+ Guide
Welcome to the Survival Hunter Mythic+ guide for the World of Warcraft patch 11.1! This guide covers everything you need to know to understand your character! Are you starting out and leveling up from 70? Check out the leveling guide!
Overview
Hero Talents
- It is recommended to run the Sentinel hero talent in mythic+ environment. The latest changes to Pack Leader made it significantly weaker.
The Sentinel hero talent tree does not introduce any major changes in your rotation.
- Its benefits come mostly from Sentinel which makes your attacks have a chance to apply stacks to your target, up to a maximum of 10. Various hero tree talents give a chance to activate or remove these stacks to deal damage to the targets and generate Focus.
- Symphonic Arsenal provides an increased damage in stacked AoE situations every time you use Butchery on targets affected by Sentinel.
- Lunar Storm is your hero talent capstone that makes your Wildfire Bomb spawn a circle at your main target's location that damages the target and enemies around it every 15 seconds.
- Defensively, Sentinel offers Don't Look Back giving you an absorb shield up to 10% max HP.
The Pack Leader hero talent tree mostly empowers Kill Command, Raptor Strike and your pet's Basic Attack.
Various hero tree talents complement and synergize with each other to make your:
- Kill Command spawn one of three beasts every 25 seconds that all have passive benefits and generating an extra stack of Tip of the Spear.
- Wildfire Bomb get its cooldown reduced by 10 seconds when spawning a beast.
- Raptor Strike cleave up to 4 extra targets and refresh the duration of Mongoose Fury if talented.
- Coordinated Assault grant an extra beast spawn and increase the damage of your beasts and pet.
Defensively, Pack Leader offers Shell Cover which is a small 10% DR for 6 seconds.
Talents
Gameplay Altering Talents
Discover all talents that significantly alter your gameplay within the Spec and Class Talent trees. This section gives a concise overview of these talents and their applications but for a more detailed look check out the Rotation and Deep Dive sections below.
Spec Tree
- Tip of the Spear
- One of your major talents to play around and buff the correct spells.
- Grenade Juggler + Wildfire Infusion + Lunge
- This talent combo provides many sources of Wildfire Bomb cooldown reduction.
- Butchery
- Heavy hitting ability that applies a powerful bleed with Merciless Blow and reduces the cooldown of Wildfire Bomb with Frenzy Strikes.
- Fury of the Eagle
- Your short cooldown AoE channeled spell that has an increased critical strike chance against targets below 20% health.
- Ruthless Marauder
- Improves Fury of the Eagle damage by 10%, gives a haste buff at the end of the channel and has a 20% chance to give Tip of the Spear stack.
- Coordinated Assault
- Your main burst cooldown, combined with Symbiotic Adrenaline immediately gives 3 stacks of Tip of the Spear and becomes a 1 minute cooldown.
- Bombardier
- Changes how you play your Coordinated Assault window. It incentivizes you to dump your stacks of Wildfire Bomb before entering Coordinated Assault and weaving in Explosive Shot when the effect ends.
Class Tree
- Padded Armor
- Combine with Lone Survivor to give Survival of the Fittest an additional charge and reduce its cooldown, significantly increasing your survivability.
- Natural Mending
- Provides cooldown reduction to Exhilaration, improving your self-healing.
- Posthaste
- With this talent, Disengage can now remove all movement impairing effects and give a burst of movement speed for 4 seconds.
- Implosive Trap
- A trap that will knock-up enemies within a short radius around where you place it.
Hero Talents
- Sideline
- Your default pick since Catch Out can cause some issues with its root.
- Sentinel Watch
- Reduces even more the cooldown of Coordinated Assault.
- Overwatch
- Outperforms Crescent Steel.
Rotation
Tier Set
- 2-Set: Your spells and abilities have a chance to activate a Winning Streak! increasing the damage of your Wildfire Bomb by 3% stacking up to 6 times. Wildfire Bomb has a 15% chance to end your Winning Streak!
- 4-Set: When your Winning Streak! ends, your next Raptor Strike deals 400% increased damage and reduces the cooldown of Wildfire Bomb by 10 sec.
Single-Target
Opener
- The general goal of the Survival Hunter rotation is to avoid overcapping your Focus, not waste valuable cooldown on abilities such as Wildfire Bomb and Kill Command and maximizing the value of Tip of the Spear to buff your most powerful abilities detailed in the Priority List.
- Use Hunter's Mark before the fight.
- Use your active trinkets, Tempered Potion and racials like Blood Fury or Berserking after using Coordinated Assault.
Priority List
This is a general priority you aim to maintain throughout the fight.
- Avoid capping Wildfire Bomb charges.
- Cast Butchery if talented and won't cap your Wildfire Bomb charges.
- Cast Coordinated Assault with 0 Wildfire Bomb charges when playing with Bombardier.
- When playing Symbiotic Adrenaline use any remaining Tip of the Spear stacks before entering Coordinated Assault.
- Cast Kill Command in Coordinated Assault with Relentless Primal Ferocity when you have 0 Tip of the Spear stacks.
- Spend Tip of the Spear stacks with the following priority:
- Wildfire Bomb if you're about to reach 2 stacks
- Fury of the Eagle if talented
- Flanking Strike if talented
- Kill Shot
- Explosive Shot
- Raptor Strike with the Strike it Rich buff and if it won't cap your Wildfire Bomb charges
- Cast Kill Command while below 70 Focus and
- Inside of Coordinated Assault with Relentless Primal Ferocity not above 1 stack of Tip of the Spear.
- Outside of Coordinated Assault not above 2 stacks of Tip of the Spear.
- Cast Wildfire Bomb to spend Tip of the Spear.
- Cast Raptor Strike.
AoE
Opener
- Similar to Single-Target, your goal stays the same but with an emphasis on resetting more Wildfire Bomb with Butchery. Below, you can see an example of how your opener looks like in AoE situations.
- Buff heavy-hitting AoE abilities like Wildfire Bomb and Explosive Shot with Tip of the Spear.
- Spread Bloodseeker by always using Kill Command on a new enemy that doesn't have the debuff.
- Use your active trinkets, Tempered Potion and racials like Blood Fury or Berserking after using Coordinated Assault.
Priority List
- Avoid capping Wildfire Bomb charges.
- Cast Butchery if it won't cap your Wildfire Bomb charges.
- Cast Coordinated Assault with 0 Wildfire Bomb charges when playing with Bombardier.
- When playing Symbiotic Adrenaline use any remaining Tip of the Spear stacks before entering Coordinated Assault.
- Cast Kill Command in Coordinated Assault with Relentless Primal Ferocity when you have 0 Tip of the Spear stacks.
- Spend Tip of the Spear stacks with the following priority:
- Wildfire Bomb if you're about to reach 2 stacks
- Fury of the Eagle if talented
- Flanking Strike if talented
- Kill Shot
- Explosive Shot
- Raptor Strike with the Strike it Rich buff and if it won't cap your Wildfire Bomb charges
- Cast Kill Command while below 70 Focus and
- Inside of Coordinated Assault with Relentless Primal Ferocity not above 1 stack of Tip of the Spear.
- Outside of Coordinated Assault not above 2 stacks of Tip of the Spear.
- Cast Wildfire Bomb to spend Tip of the Spear.
- Cast Kill Shot on a target below 20% HP.
- Cast Raptor Strike preferably on a target with Serpent Sting.
Deep dive
Tip of the Spear
- Your main goal in single target and AoE is to buff as many Wildfire Bombs, Flanking Strikes and Explosive Shots (+Kill Shot in Single-Target) with the Tip of the Spear buff.
- You may sometimes find yourself getting an excess of Tip of the Spear stacks, especially during Coordinated Assault with Relentless Primal Ferocity talented. Make sure you use these on:
- Raptor Strike on Single-Target.
- Raptor Strike with Merciless Blows and Butchery on AoE.
- Currently, there is an unintended interaction with you being able to consume only one stack of Tip of the Spear to buff two spells. The two main applications are:
- Wildfire Bombs and Raptor Strike/Butchery
- With enough haste (~20%) you have to throw your Wildfire Bombs outside of melee range but close enough to run to your target and Raptor Strike when your global cooldown is ready again. It can also be done with a max range Harpoon.
- Fury of the Eagle and Wildfire Bomb/Raptor Strike
- Since Fury of the Eagle consumes its Tip of the Spear stack at the end of the channel, you can clip it with Wildfire Bomb or Raptor Strike and get the benefit of both abilities being buffed by one stack of Tip of the Spear.
- Wildfire Bombs and Raptor Strike/Butchery
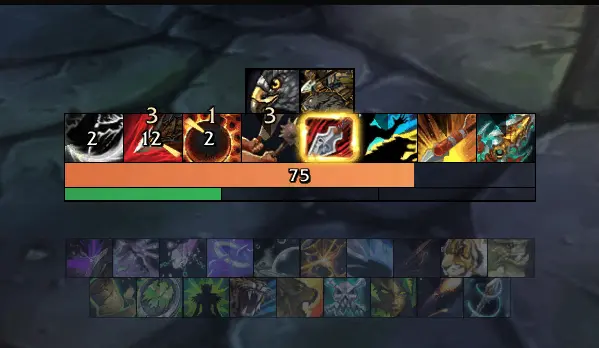
Min-maxing Bombardier
- With the above information about Tip of the Spear, you want to use every free Explosive Shot that you get at the end of Coordinated Assault with the buff.
- Your aim is to weave some big Focus spenders between your Kill Command + Explosive Shot combos to not cap the resource resulting in a damage loss.
Below, you find an example of how to play your ability sequence after exiting Coordinated Assault. The example is assuming you exit your cooldown without any stacks of Tip of the Spear. Ideally you try to exit your cooldown with at least two stacks of Tip of the Spear.
Harpoon with Terms of Engagement
- Harpoon becomes a new source of Focus generation but comes with a drawback. Harpoon can only be casted starting at 8 yards away from the target.
- The spell is not affected by global cooldown so your main goal is to use it between two rotational spells.
- The two best moments for you to move away from the target and use Harpoon are when you're about to use either Wildfire Bomb or Kill Command next since they both don't require you to be in melee range.
Understanding Mechanics
Rotational min-maxing is just one aspect of mastering a specialization, but there are numerous other key mechanics that influence your performance. Use the following guides to improve them.
Dungeons
← Scroll for more Dungeons →
Boss Tips
Brew Master Aldyr
- Stand either in melee range of the boss or max range to easily dodge Blazing Belch.
- Save Disengage and Aspect of the Cheetah for the intermissions and try to always pick the furthest patron to deliver the Cinderbrew to.
- Use a defensive if you are either of the people targeted by Throw Cinderbrew.
I'pa
- Rotate between your defensives when the boss casts Spouting Stout.
- This ability will also spawn Brew Drops in a triangle around the boss that will cause Fill 'Er Up if they touch the boss. Use your utility like Binding Shot and Implosive Trap to help control these and kill them in time.
Benk Buzbee
- Look to use a defensive if you gain multiple stacks of Shredding Sting.
- Once the Ravenous Cinderbees are dead, look to clear multiple Snack Time barrels with a single charge if possible.
Goldie Baronbottom
- Look to use a defensive if you have multiple stacks of Cindering Wounds.
Trash Tips
- Important abilities to interrupt in this dungeon are:
- Boiling Flames from Venture Co. Pyromaniac.
- Rejuvenating Honey from Flavor Scientist.
- Bee-stial Wrath from Bee Wrangler.
- Honey Volley from Royal Jelly Purveyor.
- Free Samples? from Taste Tester.
- Pay extra attention to these casts:
- Thirsty from Venture Co. Pyromaniac
- An enrage affect that buffs the mob.
- Failed Batch from Flavor Scientist
- An extra spawned mob that will deal massive damage if not killed within 10 seconds.
- Thirsty from Venture Co. Pyromaniac
Boss Tips
Ol' Waxbeard
- If you are targeted for Reckless Charge and you run it behind a pillar the boss will cancel the cast.
- Use a defensive if you have a large amount of Crude Weapons stacks.
- If the boss targets you for Luring Candleflame all of the Menial Labors will fixate you and apply this dot.
Blazikon
- Save Disengage and Aspect of the Cheetah for when the boss casts Wicklighter Barrage and run near 1-2 candles.
- Use Extinguishing Gust to blow out only 1 candle.
- Use a defensive on Enkindling Inferno if you gain 3-4 stacks.
- Based on your HP, also consider using a defensive before Dousing Breath.
The Candle King
- Stack with others for Eerie Molds to keep them stacked.
- Coming into contact with any of these Molds will afflict you with Cursed Wax which will stun you for 5 seconds.
- Use Darkflame Pickaxe and Throw Darkflame to break these Molds and lessen the AoE damage the group is taking.
- Also make sure to interrupt Paranoid Mind.
The Darkness
- Stay within the Candlelight unless you are targeted with Shadowblast or you are going to grab a Wax Lump to increase the candles energy.
- Save Disengage and Aspect of the Cheetah for when you inevitably need to collect a Wax Lump.
- Interrupt the adds spawned by Call Darkspawn when they start casting.
Trash Tips
- Important abilities to interrupt in this dungeon are:
- Wicklighter Bolt from Royal Wicklighter.
- Mole Frenzy from Lowly Moleherd.
- Explosive Flame from Blazing Fiend.
- Flame Bolt from Kobold Flametender.
- Candleflame Bolt and Flaming Tether from Sootsnout.
- Drain Light from Shuffling Horror.
Boss Tips
Tussle Tonks
- Use a defensive during Ground Pound.
- Be careful where you are positioned in the room as Gnomercy 4.U. could target you with Foe Flipper and send you into B.4.T.T.L.3. Mines spread around the room.
K.U.-J.O.
- Watch your HP if you are targeted with Explosive Leap since soon after the healer will dispell Blazing Chomp from the tank which does a large partywide AoE.
Machinists Garden
- Staying near the middle of the room might prove helpful in dodging the Self-Trimming Hedges the boss spawns.
King Mechagon
- Always use a defensive if your targeted with Mega-Zap.
- During Phase 2 try and play on the outer edges or in the middle of the room and try to limit your movement as much as possible.
Trash Tips
- Important abilities to interrupt in this dungeon are:
- Detonate from Bomb Tonk.
- Giga-Wallop from Mechagon Tinkerer.
- Tune Up from Mechagon Mechanic.
Boss Tips
Big M.O.M.M.A
- You can dodge the projectile from the bosses Sonic Boom cast if you stand far enough away and Disengage after it's been cast.
- The boss will cast Kill-o-Block Barrier at 100 energy if the Darkfuse Mechadrones are still alive. If this happens use a defensive to cover the damage taken until the adds are dead.
- Use a defensive during Jumpstart.
Demolition Duo
- Kinetic Explosive Gel is an important part of this fight but it can also be immuned with Aspect of the Turtle. Be careful to not accidently immune this if you still need it to blow up the Ticking Time Bombs.
- You should also use a defensive if you are targeted with Kinetic Explosive Gel since this is the only damage of this fight that is predictable.
Swampface
- Communicate which way your group will be moving for this boss since moving as a group essentially negates Razorchoke Vines.
- Use a defensive whenever you start to drop low as this boss is fully rot damage.
Geezle Gigazap
- You can immune the damage from Gigazap using Aspect of the Turtle. If the boss picks you first out of the 2 people to zap he will instead cast Gigazap on you twice so don't cancel your Aspect of the Turtle to early.
- Always use a defensive during Turbo Charge.
Trash Tips
- Important abilities to interrupt in this dungeon are:
- Trickshot from Mechadrone Sniper.
- Surveying Beam from Venture Co. Surveyor.
- Bloodthirsty Cackle from Darkfuse Hyena.
Boss Tips
Captain Dailcry
- Depending on which side of the dungeon you kill you will have either of 2 minibosses to deal with in addition to Captain Dailcry
- If you kill the left side you will get Elaena Emberlanz
- She will cast Holy Radiance throughout the fight and you should generally use a defensive everytime this happens.
- If you kill the right side you will get Taener Duelmal
- He will require you to either interrupt Cinderblast or Fireball.
- If you kill the left side you will get Elaena Emberlanz
- If you get targeted with Savage Mauling you can use Feign Death to instantly have the boss cancel it.
Baron Braunpyke
- Try to stack with others for Hammer of Purity so that everything you need to dodge is coming from the same direction.
- Whenever you soak a stack from the Sacrificial Pyre use a defensive as this will leave a DoT and do party wide AoE.
- Interrupt Burning Light.
Prioress Murrpray
- Whenever The Sacred Flame is cast on you try to put it near other ground denial areas or as far away from the boss as possible.
- There are also times this will overlap with Blinding Light so if you are also kiting The Sacred Flame be sure to pay attention if you need to turn away from the boss as well.
- Always use a defensive whenever the boss casts Inner Fire since this will cause the boss to pulse AoE.
Trash Tips
- Important abilities to interrupt in this dungeon are:
- Holy Smite from High Priest Aemya.
- Cinderblast from Taener Duelmal.
- Greater Heal from Devout Priest.
Boss Tips
Kyrioss
- Rotate between your defensives when the boss casts Crashing Thunder.
Stormguard Gorren
- Bounce Chaotic Corruption between the other members of your group. If you get this twice in a sort time frame consider using a defensive since you will also have Chaotic Vulnerability from the first time you had it.
- Depending on your HP also consider using a defensive for Crush Reality.
Voidstone Monstrosity
- Since we are more mobile than others pre-stand on either the left or side side of the boss so it's easier to deal with the Voidstone Fragments spawned from Null Upheaval.
- Use a defensive whenever the boss targets you with Unleash Corruption.
Trash Tips
- Important abilities to interrupt in this dungeon are:
- Lightning Bolt from Cursed Thunderer.
- Void Bolt from Corrupted Oracle.
Boss Tips
Coin-Operated Crowd Pummeler
- When the boss casts Footbomb Launcher pick the Footbombs furthest away from the boss to Punt since we are very mobile.
- Use a defensive for Static Pulse.
Azerokk
- Focus and kill whichever add is being buffed by Azerite Infusion.
- When Call Earthrager is cast you can use Binding Shot and Intimidation to help keep your distance.
- Earthragers will put a Jagged Cut on you whenever they melee you.
- Use a defensive for Resonant Quake.
Rixxa Fluxflame
- Always point Propellant Blast towards the Azerite zones on the ground.
- Whenever you are targeted by Azerite Catalyst always drop it by other Azerite on the ground if possible to take up the least amount of room.
Mogul Razdunk
- Play close to the boss so its easier to dodge Gatling Gun.
- Move out of melee range before Homing Missile is about to be cast. If this is on you run it out of the group.
- If you and your group are fast with this mechanic and you are far enough away you can use Feign Death to blow it up instantly.
- You can tell where the Micro Missiles from the B.O.O.M.B.A's are being cast by looking at where they are in the room. They generally shoot in front of them and a small area around them.
Trash Tips
- Important abilities to interrupt in this dungeon are:
- Brackish Bolt from Irontide Waveshaper.
- Watertight Shell from Irontide Waveshaper.
- Water Bolt from Bilge Rat Tempest.
- Choking Waters from Bilge Rat Tempest.
- Bolstering Shout from Ashvane Commander.
Boss Tips
An Affront of Challengers
- Always use a defensive when Dessia casts Mighty Smash.
- Interrupt Necromantic Bolt from Sathel.
- If you pull the Raging Bloodhorn into this boss be ready to use Tranquilizing Shot on him when he casts Raging Tantrum.
Gorechop
- Oozing Leftovers are the only incoming source in this fight. You can use Binding Shot or Intimidation on them to delay their Leaping Thrash.
- If Binding Shot and Intimidation are on cooldown consider using a defensive if you are low instead.
Xav the Unfallen
- Cleave down the Oppressive Banners that get spawned throughout the fight so that it's easier to escape the deadly combos from Might of Maldraxxus.
- If an Oppressive Banner is still alive while Might of Maldraxxus is happening you can use Disengage to clear the slow affect.
Kul'thorak
- Stack with others when the boss is casting Draw Soul and use CC utility on them to prevent them from reaching the boss.
- If your HP is dropping low use a defensive when the boss targets you with Well of Darkness.
Mordretha
- Use a defensive when the boss casts Manifest Death and also interrupt the Deathwalkers Death Bolt cast that spawns on top of you.
Trash Tips
- Important abilities to interrupt in this dungeon are:
- Necrotic Bolt and Unholy Fervor from Battlefield Ritualist.
- Demoralizing Shout from Ancient Captain.
- Bind Soul from Shackled Soul.
- Necrotic Bolt Volley from Maniacal Soulbinder.
- Bone Spear from Bone Magus.
- Withering Discharge and Decaying Filth from Blighted Sludge-Spewer.
Affixes
The Affix system got revamped going into The War Within Season 1 retiring most Affixes as well as introducing new kiss-curse ones while also changing on which key level these appear.
- +2 Affixes -- Rotates on a weekly basis
- Xal'atath's Bargain: Ascendant
- Xal'atath's Bargain: Voidbound
- Xal'atath's Bargain: Oblivion
- Xal'atath's Bargain: Devour
- Xal'atath's Bargain: Pulsar
- +4 Affixes -- Alternates between each other on a weekly basis
- Tyrannical
- Fortified
- +7 Affix
- Challenger's Peril
- +10 Affixes -- Alternates between each other on a weekly basis, is always the opposite of the +4 Affix
- Tyrannical
- Fortified
- +12 Affix
- Xal'atath's Guile -- Replaces the +2 Affix
Following you get some useful tips for handling different Mythic+ Affixes as a Survival Hunter.
- Xal'atath's Bargain: Ascendant
- Implosive Trap and Tranquilizing Shot with Kodo Tranquilizer are your best tools to deal with the orbs.
- Xal'atath's Bargain: Voidbound
- Switch to the affix mob and kill it as soon as it spawns as it gives damage reduction to the rest of mobs around it
- Kill Shot is immediately usable on it.
- Xal'atath's Bargain: Oblivion
- Collect the orbs moving towards the enemies.
- Xal'atath's Bargain: Devour
- Feign Death with Emergency Salve allows you to get rid of the debuff on yourself.
- Aspect of the Turtle is also an option but should be held as a defensive.
- Feign Death with Emergency Salve allows you to get rid of the debuff on yourself.
Stat Priority
Understand your secondary stat priority and the tertiary stats needed for optimal performance during Mythic+ dungeons as a Survival Hunter. For more detailed information, visit the Stats and Attributes guide.
Higher Item level items are better in most scenarios. For an accurate representation of what item to equip you should use Simcraft! A static "Stat Priority" is just a starting point and can easily shift depending on your individual gear.
All secondary stats are affected by diminishing returns. Click here to learn more!
Tertiary
- Avoidance - Great stat to reduce the damage intake of "Area of Effect" abilities.
- Leech - Provides additional healing through damage dealing. The damage of your pets does not heal you thus Leech is a great tertiary for you since most of your damage is coming from your own spells.
- Speed - Niche tertiary that can be very useful and has been proven useful in the past. Makes playing certain mechanics a lot easier.
Gear
| Slot | Item | Location |
|---|---|---|
| Head | Tireless Collector's Chained Cowl | One-Armed Bandit / Catalyst |
| Neck | Gobfather's Gifted Bling | Mug'Zee |
| Shoulder | Epaulettes of Failed Enforcers | Mug'Zee |
| Cloak | Consecrated Cloak | Crafted |
| Chest | Tireless Collector's Battlegear | Sprocketmonger / Catalyst |
| Wrist | Glyph-Etched Vambraces | Crafted |
| Gloves | Tireless Collector's Gauntlets | Cauldron of Carnage / Catalyst |
| Belt | Dealer's Covetous Chain | Chrome King Gallywix |
| Legs | Tireless Collector's Armored Breeches | Stix Bunkjunker / Catalyst |
| Boots | Dubious Table-Runners | One-Armed Bandit |
| Ring 1 | The Jastor Diamond | Chrome King Gallywix |
| Ring 2 | 85-Year Tenure Ring | Cinderbrew Meadery |
| Trinket 1 | House of Cards | One-Armed Bandit |
| Trinket 2 | Reverb Radio | Rik Reverb |
| Weapon | Giga Bank-Breaker | One-Armed Bandit |
Below you are presented with a good list of farmable alternatives that are obtainable outside of WoW’s weekly lockout system. While replaced in time as you progress, these offer immediate character power.
| Slot | Item | Location |
|---|---|---|
| Head | Psychogenic Prognosticator's Lenses | Operation: Mechagon |
| Neck | Strapped Rescue-Keg | Cinderbrew Meadery |
| Shoulder | Crashguard Spaulders | The MOTHERLODE! |
| Cloak | Chef Chewie's Towel | Cinderbrew Meadery |
| Chest | Triumphant Combatant's Chainmail | Theater of Pain |
| Wrist | Consecrated Baron's Bindings | Priory of the Sacred Flame |
| Gloves | Linked Pummeler Grips | The MOTHERLODE! |
| Belt | Shalebiter Interlinked Chain | The MOTHERLODE! |
| Legs | Pollen-Lugger Treads | Cinderbrew Meadery |
| Boots | Gloomstomper's Sabatons | Darkflame Cleft |
| Ring 1 | Hoop of the Blighted | The Rookery |
| Ring 2 | 85-Year Tenure Ring | Cinderbrew Meadery |
| Trinket 1 | Signet of the Priory | Priory of the Sacred Flame |
| Trinket 2 | Azerokk's Resonating Heart | The MOTHERLODE! |
| Weapon | Gallytech Turbo-Tiller | Operation: Floodgate |
Trinkets
Below you can find active and passive alternatives to our recommended trinkets. Do note that some trinkets are better than others depending on the mythic+ dungeon.
Active Trinket alternatives
- Signet of the Priory
Passive Trinket alternatives
- Improvised Seaforium Pacemaker
- Azerokk's Resonating Heart
- Eye of Kezan
- Suspicious Energy Drink
Embellishments
- 2x Dawnthread Lining / Duskthread Lining
- The preferred crafting slots are Cloak and Bracers. Less desired slots are Boots and Waist because of stat budget.
- In some scenarios Duskthread Lining pulls ahead if you already have enough Critical Strike.
Remaining Sparks
- Crafted items are 675 item level and regular items are 678 on max item level therefore it's not beneficial to equip crafted items outside of your 2x embellishments unless you don't have access to other high item level gear on that slot.
Simcraft
To find the best combination of gear available to you or identify the best possible upgrades, visit our Simcraft guide to learn how to utilize Simcraft easily and effectively.
Consumables
- Phials
- Flask of Alchemical Chaos -- maximum DPS.
- Flask of Tempered Versatility -- less DPS but more survivability.
- Food
- Feast of the Divine Day
- Combat Potion
- Tempered Potion
- Health Potion
- Algari Healing Potion -- a big burst of healing
- Weapon Oil
- Ironclaw Whetstone
- Ironclaw Weightstone
- Augment Rune
- Crystallized Augment Rune
- Sockets
- Deadly Onyx
- Culminating Blasphemite -- Unique, use one of each gem color to enhance your Culminating Blasphemite.
- Masterful Ruby
- Masterful Sapphire
- Masterful Emerald
Enchantments
| Head | Greater Rune of the Void Ritual S.A.D. |
| Neck | Magnificent Jeweler's Setting 2x |
| Cloak | Enchant Cloak - Chant of Winged Grace |
| Chest | Enchant Chest - Crystalline Radiance |
| Wrist | Enchant Bracer - Chant of Armored Avoidance S.A.D. |
| Waist | S.A.D. |
| Legs | Stormbound Armor Kit |
| Boots | Enchant Boots - Scout's March |
| Ring 1 | Enchant Ring - Radiant Mastery Magnificent Jeweler's Setting 2x |
| Ring 2 | Enchant Ring - Radiant Mastery Magnificent Jeweler's Setting 2x |
| Weapon | Enchant Weapon - Authority of Radiant Power |
You buy S.A.D. from the Great Vault Vendor to add sockets to your Helm, Wrists & Waist.
Races
For min-maxing a Survival Hunter in Mythic+, different racial traits can provide a tremendous benefit to your character. If this is not your top goal, picking a race that fits your style works just as well.
- Stoneform -- Dwarf
- One of the most potent racials in Mythic+ currently and historically.
- Dispels Magic and Bleed debuffs.
- Shadowmeld -- Night Elf
- Also one of the most potent racials in Mythic+ historically.
- Use-cases
- Run past basically any mob and then cast Shadowmeld to make them reset. Even works on mobs that have stealth detection if you get enough distance before you Shadowmeld.
- Blood Fury -- Orc
- Strong racial for damage both because of Command and Blood Fury which lines up with Coordinated Assault.
- 20% reduced Stun duration on you which can be useful in some Mythic+ dungeons.
- Escape Artist -- Gnome
- Free yourself from roots.
- Rocket Jump -- Goblin
- Do a small jump in the direction your character is facing.
- Berserking -- Troll
- Strong DPS racial but lines up poorly with Coordinated Assault.
- Reduce the duration of movement imparing effects by 20%.
Recommendation
Dwarf and Night Elf abilities have such a big impact on your Mythic+ experience that you need to use either of them if you're serious about pushing keys with your Survival Hunter.
Macros
Discover recommended macros for Survival Hunters during Mythic+ dungeons and watch a quick video guide on creating simple macros for your character.
Freezing Trap -- Casts Freezing Trap on your cursor without confirmation.
#showtooltip Freezing Trap
/cast [@cursor] Freezing Trap
Tar Trap -- Casts Tar Trap on your cursor without confirmation.
#showtooltip Tar Trap
/cast [@cursor] Tar Trap
Binding Shot -- Casts Binding Shot on your cursor without confirmation.
#showtooltip Binding Shot
/cast [@cursor] Binding Shot
High Explosive Trap -- Casts Freezing Trap on your cursor without confirmation.
#showtooltip High Explosive Trap
/cast [@cursor] High Explosive Trap
Implosive Trap -- Casts Implosive Trap on your cursor without confirmation.
#showtooltip Implosive Trap
/cast [@cursor] Implosive TrapWildfire Bomb -- A macro that can see uses in niche situations where you don't want to change your main target but throwing a bomb from it would result in the bomb not hitting as many targets as throwing the bomb from another target. A prime example of this type of situation is last boss from Plaguefall or more recently Rasha'nan.
#showtooltip Wildfire Bomb
/use [@mouseover,exists,harm,nodead][]Wildfire Bomb
Kill Shot -- Casts Kill Shot on your mouseover or target.
#showtooltip Kill Shot
/use [@mouseover,exists,harm,nodead][]Kill Shot
Tranquilizing Shot -- Casts Tranquilizing Shot on your mouseover or target.
#showtooltip Tranquilizing Shot
/use [@mouseover,exists,harm,nodead][]Tranquilizing ShotRaptor Strike pet attack -- Casts Raptor Strike and your pet's basic attack at your current target.
#showtooltip Raptor Strike
/petattack
/cast Raptor Strike
/cast [@pettarget]Claw
/cast [@pettarget]Bite
/cast [@pettarget]Smack
Kill Command pet attack/pet call -- Casts Kill Command and your pet's basic attack at your current target. If you don't have a pet, it will Call Pet the first pet on your list. If you want it to call another pet, simply change the number or your pet order.
#showtooltip Kill Command
/petattack
/cast [pet] Kill Command; Call Pet 1
/cast Claw
/cast Bite
/cast SmackAspect of the Turtle Macro -- Allows you to immediately cancel Aspect of the Turtle when pressing the macro again, useful in situations where you need to only immune a damage instance or to dispel a debuff with Emergency Salve.
#showtooltip Aspect of the Turtle
/cancelaura Aspect of the Turtle
/stopcasting
/stopcasting
/cast Aspect of the Turtle
Misdirection Macro -- An all in one macro to misdirect to in order your mouseover, your party's leader, or your pet. If you use it in dungeons make sure the tank is your party leader.
#showtooltip Misdirection
/cast [@mouseover,exists,noharm,nodead][@party1,exists,noharm,nodead][@pet] Misdirection
Fury of the Eagle/Spearhead Macro -- Simply combines both spells into a single button.
#showtooltip
/cast [known:Spearhead] Spearhead
/cast [known: Fury of the Eagle] Fury of the Eagle
Addons
Below, you see a screenshot of the author's User Interface for their Survival Hunter, outlining which addons are used and how they are utilized in Mythic+ dungeons to make your life easier.
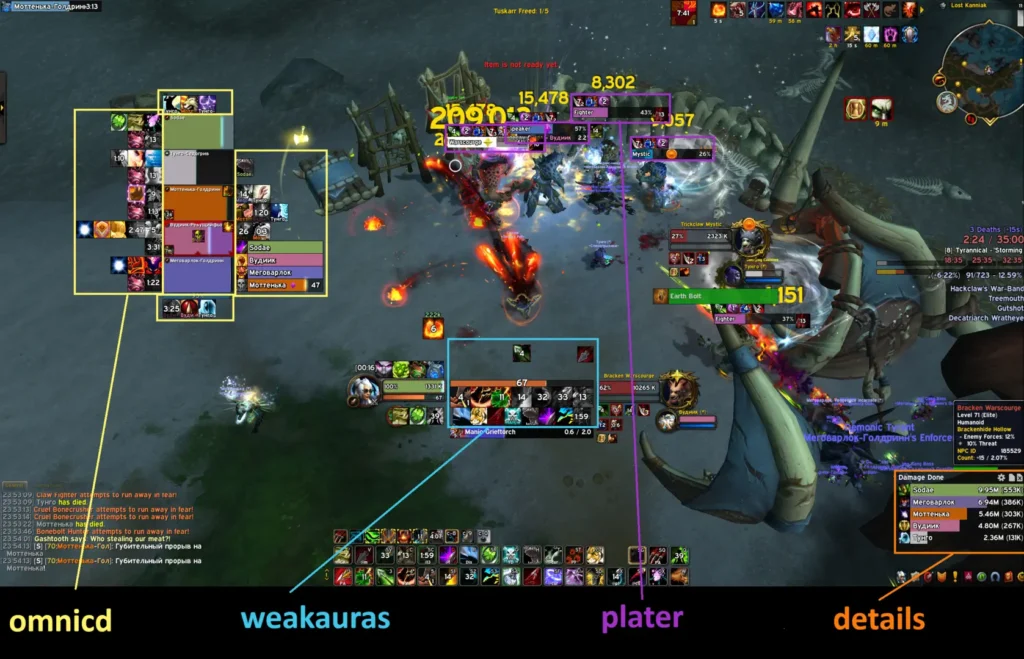
- ElvUI -- Full User Interface replacement
- A user interface designed around user-friendliness with extra features that are not included in the standard UI.
- Alternatively, you can also use Shadowed Unit Frames (SUF) and an action bar addon of your choice or of course the stock UI.
- LittleWigs -- Generic Boss Mod
- BigWigs is a boss encounter add-on. It consists of many individual encounter scripts, or boss modules; mini add-ons that are designed to trigger alert messages, timer bars, sounds, and so forth, for one specific Raid encounter.
- WeakAuras -- Jack of all trades
- WeakAuras is a powerful and flexible framework that allows the display of highly customizable graphics on World of Warcraft's user interface to indicate buffs, debuffs, and other relevant information. This addon was created to be a lightweight replacement for Power Auras but has since introduced more functionalities while remaining efficient and easy to use.
- Plater -- Advanced Nameplates
- Plater is a nameplate addon with an extraordinary amount of settings, out of the box debuff tracking, threat coloring, and support for scripting similar to WeakAuras and wago.io + the WeakAuras-Companion for Mod/Script/Profile updates.
- Details -- In-depth Damage Meter
- Most powerful, reliable, handsome, damage meter.
- OmniCD -- Party track addon
- Helpful addon for Mythic+ to check the available cooldowns of your party.
Luxthos Hunter Pack
Displays all of the things you want to have tracked in a simple WeakAura package.
Changes this Patch
Survival
- Developers’ notes: Survival has found a lot of success with its 11.0.5 update to Merciless Blow in concert with Pack Leader’s bleed synergies. We’re adjusting it slightly to ensure the build is still competitive, but not quite as dominant.
- Merciless Blow damage reduced by 15%. Does not apply to PvP combat.
- Vicious Hunt damage reduced by 20%. Does not apply to PvP combat.
Hunter
- New Talent:Deathblow – Kill Command has a 10% chance to grant Deathblow. Deathblow: The cooldown of Kill Shot is reset. Your next Kill Shot can be used on any target, regardless of their current health.
- Developer's note: Each Hunter specialization has a way to generate Deathblow, but only Marksmanship referred to it as Deathblow. These changes are meant to unify the Deathblow design while still allowing each specialization to interface with it in a unique way.
- Steady Shot now generates 10 Focus baseline for all specs.
- Tranquilizing Shot empowered by Kodo Tranquilizer will now prioritize players.
- Improved Kill Shot has been removed.
Survival
- Ruthless Marauder has been redesigned – Fury of the Eagle's damage is increased by 10% and damage from Fury of the Eagle has a 20% chance to generate a stack of Tip of the Spear. When Fury of the Eagle ends, your Haste is increased by 8% for 10 seconds. Now a 1-point talent.
- Merciless Blow has been redesigned – Butchery causes affected targets to bleed for heavy damage over 8 seconds.
- Sic 'Em has been updated – Kill Command’s chance to grant Deathblow is increased to 15% and Deathblow now makes Kill Shot strike up to 2 additional targets. Your chance to gain Deathblow is doubled during Coordinated Assault.
- Exposed Flank has been updated – Now empowers your next Kill Command to deal 50% increased damage, strike 3 targets, and generate a Tip of the Spear stack for each target it hit.
- Grenade Juggler has been updated – Now resets the cooldown of Explosive Shot instead of automatically firing it.
- Developer's note: By allowing you to manually fire Explosive Shot, we can open up this talent’s ability to synergize with existing effects (like Grenade Juggler’s own cooldown reduction) while also eliminating some frustrating edge-cases.
- Butchery damage increased by 50%.
- Butchery no longer has charges and its cooldown has been increased to 15 seconds.
- Fury of the Eagle damage increased by 25%.
- Fury of the Eagle channel time reduced to 3 seconds (was 4 seconds).
- Fury of the Eagle now consumes a stack of Tip of the Spear when the channel begins, and the damage bonus will persist for the duration of the channel.
- Kill Command resets no longer reduce the cooldown of Fury of the Eagle.
- Tip of the Spear’s consumption grace period has been reduced to 0.3 seconds (was 0.7 seconds).
- Relentless Primal Ferocity now grants 2 additional stacks of Tip of the Spear (was 1).
- Frenzy Strikes Wildfire Bomb cooldown reduction per target hit increased to 3 seconds (was 1 second).
- Killer Companion now increases Kill Command’s damage by 10/20% (was 5/10%).
- Bombardier’s aura is now removed at more reasonable times.
- Spearhead’s cast animation now blends with other animations.
- Spearhead will no longer go on cooldown if the pet is out of range.
- Ranger and Terms of Engagement have swapped positions in the talent tree.
- Harpoon will now find an appropriate destination during the Rasha'nan fight in The Dawnbreaker dungeon.
- Pack Leader
- Howl of the Pack now also increases Wildfire Bomb damage by 20%.
- Wild Attacks now also increases the damage of Raptor Strike/Mongoose Bite by 20%.
- Sentinel
- Symphonic Arsenal damage increased by 200%.
Hunter
- Rejuvenating Wind now heals 12% maximum health over its duration (was 20%).
- An issue with Ghillie Suit not activating when uncovered by Flare effect has been resolved.
Survival
- Grenade Juggler has been updated – Casting Explosive Shot reduces the cooldown of Wildfire Bomb by 2 seconds.
- Grenade Juggler and Sulfur-Lined Pockets procs will no longer grant the cooldown reduction effect.
- Bombardier is no longer consumed by Sulfur-Lined Pockets or Grenade Juggler procs.
- Wildfire Bomb damage reduced by 5%.
- Flanking Strike damage reduced by 40%.
- Flanking Strike and Harpoon now pull you to the edge of your target’s hitbox, rather than the center.
- Wildfire Bomb initial damage dealt to primary target increased to 80% (was 40%).
- Wildfire Bomb damage reduced by 25%.
- Raptor Strike damage increased by 5%.
- Mongoose Bite damage increased by 5%.
- Flanking Strike damage increased by 10%.
- Explosive Shot damage reduced by 5%.
- Fixed an issue preventing Flanking Strike’s pet damage from scaling with the Hunter’s attack power.
- Fixed an issue preventing Flanking Strike and Kill Command from scaling with Hunter’s Mastery.
Hunter
- All talent trees have had many talents move locations or have had their pathing updated.
- New Talent: Padded Armor – Survival of the Fittest gains an additional charge.
- New Talent: Kodo Tranquilizer – Tranquilizing Shot removes up to 1 additional Magic effect from its target.
- New Talent: Devilsaur Tranquilizer – If Tranquilizing Shot removes only an Enrage effect, its cooldown is reduced by 5 seconds.
- New Talent: Scout's Instincts – You cannot be slowed below 80% of your normal movement speed while Aspect of the Cheetah is active.
- New Talent: Scrappy – Casting Aimed Shot reduces the cooldown of Intimidation and Binding Shot by 0.5 seconds.
- New Talent: Kindling Flare – Stealthed enemies revealed by Flare remain revealed for 3 seconds after exiting the flare.
- New Talent: Unnatural Causes – Your damage over time effects deal 10% increased damage. This effect is increased by 50% on targets below 20% health.
- New Talent: Moment of Opportunity – When a trap triggers, you gain Aspect of the Cheetah for 3 seconds. Can only occur every 1 minute.
- New Talent: No Hard Feelings – When Misdirection targets your pet, it reduces the damage they take by 50% for 5 seconds.
- New Talent: Territorial Instincts – Casting Intimidation without an active pet summons one from your stable. Intimidation's cooldown is reduced by 5 sec.
- New Talent: Tar-Coated Bindings – Binding Shot root duration is increased by 1 second.
- New Talent: Serrated Tips – You gain 5% more critical strike from critical strike sources.
- New Talent: Ghillie Suit – You take 20% reduced damage while in Camouflage. This bonus persists 3 seconds after leaving Camouflage.
- New Talent: Specialized Arsenal – Aimed Shot damage increased by 10%.
- New Talent: Blackrock Munitions – The damage of Explosive Shot is increased by 8%.
- New Talent: Implosive Trap – Hurls a fire trap to the target location that explodes when an enemy approaches, causing Fire damage and knocking all enemies up. Limit 1. Choice node with High Explosive Trap.
- Lone Survivor now also reduces Counter Shot and Muzzle cooldown by 2 seconds.
- Survival of the Fittest now reduces all damage you and your pet take by 30% (was 20%).
- Disruptive Rounds now also grants 10 Focus when you interrupt an effect with Counter Shot or Muzzle.
- Quick Load now resets the cooldown of Scatter Shot and Bursting Shot.
- Born To Be Wild now reduces Aspect of the Cheetah, Survival of the Fittest, and Aspect of the Turtle by 30 seconds (was 7/15%).
- Steady Shot cast time reduced to 1.65 seconds (was 1.75 seconds).
- Explosive Shot now explodes early when applied to a target that already is affected by Explosive Shot.
- Explosive Shot projectile and explosion visual effects have been updated.
- Barrage, Master Marksman, and Hydra's Bite have moved to the Marksmanship talent tree.
- Bursting Shot is now a choice node with Scatter Shot (was in Marksmanship tree).
- The following talents are now 1 point:
- Improved Traps
- Pathfinding
- Trailblazer
- Wilderness Medicine
- Natural Mending
- Rejuvenating Wind
- The following talents have been removed:
- Sentinel Owl
- Sentinel's Perception
- Sentinel's Protection
- Serpent Sting
- Poison Injection
- Stampede
- Beast Master
- Arctic Bola
- Nature's Endurance
- Serrated Shots
- Steel Trap
- Death Chakram
Survival
- New Talent: Sulfur-Lined Pockets �– Every third Quick Shot is replaced with an Explosive Shot at 100% effectiveness.
- New Talent: Grenade Juggler – Wildfire Bomb deals 5% increased damage and has a 25% chance to also cast an Explosive Shot at your target at 100% effectiveness. Explosive Shot reduces the cooldown of Wildfire Bomb by 2 seconds.
- New Talent: Exposed Flank – Flanking Strike exposes a weakness in your enemy's defenses, causing it to strike 2 additional targets at 100% effectiveness and causing Kill Command to hit 2 additional nearby enemies for 10 seconds.
- New Talent: Contagious Reagents – Reapplying Serpent Sting spreads it to up to 2 nearby enemies.
- New Talent: Outland Venom – Each damage over time effect you have on a target increases the critical strike damage they receive from you by 2%.
- New Talent: Merciless Blows – Casting Butchery makes your next Raptor Strike or Mongoose Bite to hit up to three nearby targets.
- New Talent: Sic 'Em – Kill Command has a 15% chance to reset the cooldown of Kill Shot, make it usable on targets regardless of Health, and strike up to 2 additional targets. This chance is doubled during Coordinated Assault.
- New Talent: Symbiotic Adrenaline – The cooldown of Coordinated Assault is reduced by 60 seconds and Coordinated Assault now grants 3 stacks of Tip of the Spear.
- New Talent: Relentless Primal Ferocity – While Coordinated Assault is active, Kill Command generates 2 stacks of Tip of the Spear, you gain 10% Haste, and Tip of the Spear's damage bonus is increased by 50%.
- Mastery: Spirit Bond has been redesigned – You and your pet deal increased damage and take 3% reduced damage, increased by 100% when within 25 yards of each other.
- Tip of the Spear has been redesigned – Kill Command increases the damage of your next non-pet spell by 15%, stacking up to 3 times.
- You now consume one stack of Tip of the Spear at a time and multiple stacks of Tip of the Spear no longer increase its damage bonus.
- Flanker's Advantage has been redesigned – Kill Command has a 10% increased chance to immediately reset its cooldown. Tip of the Spear's damage bonus is increased by up to 30%, based on your critical strike chance.
- Spearhead has been redesigned – Your pet charges your enemy target, applying a heavy bleed that increases your chance to critically strike them by 30% for 10 seconds. Spearhead visuals and sound effects updated.
- Deadly Duo has been redesigned – The cooldown of Spearhead is reduced by 30 seconds and increases your critical strike damage against the target by 30% for 10 seconds.
- Viper's Venom has been redesigned – Raptor Strike and Mongoose Bite apply Serpent Sting.
- Aspect of the Eagle has been redesigned – Increases the range of your Raptor Strike and Mastery: Spirit Bond to 40 yards for 15 seconds.
- Bombardier has been redesigned – Casting Coordinated Assault grants 2 charges of Wildfire Bomb. When Coordinated Assault ends, your next 2 Explosive Shot are free and have no cooldown.
- Ruthless Marauder has been redesigned – Wildfire Bomb cooldown reduction effect is now 1 second by default and no longer is increased by the second talent point.
- Coordinated Assault has been redesigned – You and your pet charge your enemy, striking them for combined Physical damage. You and your pet’s bond is then strengthened for 20 seconds, causing you and your pet to deal 20% increased damage. While Coordinated Assault is active, Kill Command’s chance to reset its cooldown is increased by 15%.
- Wildfire Infusion has been redesigned – Mongoose Bite and Raptor Strike have a 10% chance to reset Kill Command's cooldown. Kill Command reduces the cooldown of Wildfire Bomb by 0.5 seconds.
- Quick Shot has been updated – Now has a 30% chance to fire an Arcane Shot when you cast Kill Command (was when Kill Command reset).
- Bloody Claws has been updated – Now also causes Kill Command to extend the duration of Mongoose Fury by 1.5 seconds.
- Mongoose Fury and Alpha Predator are now Survival talents (was Class).
- Harpoon is now learned at level 14 (was a talent).
- Aspect of the Eagle is now learned at level 23 (was a talent).
- Coordinated Assault initial damage increased by 60%.
- Butchery damage increased by 100%.
- Lunge no longer increases attack range by 3 yards.
- Wildfire Bomb now costs 10 Focus and its damage over time effect is now a rolling periodic.
- Explosives Expert now reduces Wildfire Bomb cooldown by 1/2 seconds (was 2/4 seconds).
- Explosive Shot now benefits from and consumes Tip of the Spear.
- Flanking Strike damage increased by 40%, generates 15 Focus and generates 2 stacks of Tip of the Spear.
- Bombardier now uses an activation overlay.
- Many 2-point talents are now 1 point.
- The following talents have been removed:
- Carve
- Coordinated Kill
- Birds of Prey
- Intense Focus
- Sharp Edges
FAQ
A: All pets do the same damage, the only big difference is their family with each giving a different spell:
- The Cunning family provides Master's Call and Pathfinding.
- The Ferocity family provides Primal Rage and Predator's Thirst.
- The Tenacity family provides Fortitude of the Bear and Endurance Training.
Each family of pet has uses that's why its suggested to have at least a pet of each family and swap them according to your needs.
Credits
Written By: Soda
Reviewed By: Solwinas