Mistweaver Monk Mythic+ Guide
Welcome to the Mistweaver Monk Mythic+ guide for the World of Warcraft patch 11.1.5! This guide covers everything you need to know to understand your character! Are you starting out and leveling up from 70? Check out the leveling guide!
Overview
Hero Talents
- Conduit of the Celestials gives you another cooldown Celestial Conduit, which offers very strong healing and damage for a 1.5 min cooldown. It also offers you great talent nodes such as Heart of the Jade Serpent that lowers the cooldown of some of your abilities, after a total of 10 stacks of Sheilun's Gift has been used. Conduit of the Celestials also enhances your other spells and gives you some utility as well.
- Master of Harmony focuses more on increasing your DPS output and has chances of being a strong choice if you wanna do high DPS.
- But overall Master of Harmony is the stronger choice for Mythic+ due to it's high dps throughput it provides at the cost of a on-demand cooldown, so this guide will be based on playing this hero talent.
- Aspect of Harmony stores "vitality", up to a certain amount, from 10% of your damage, and 20% of your healing, with overhealing at a reduced amount. Casting Thunder Focus Tea activates Aspect of Harmony for 10 seconds, making your spells draw out the amount of vitality stored, to deal 40% additional damage or healing over 8 seconds on the targets.
- Through Coalescence which makes Aspect of Harmony have a chance of spreading to a nearby target, by dealing damage or healing. You also deal 10% more damage and healing to targets you healed with Aspect of Harmony.
- Path of Resurgence makes your Chi Burst increases all vitality store by 25% for 10 seconds.
- Harmonic Gambit enables Aspect of Harmony through your single target abilities to draw vitality to deal damage.
- Endless Draught gives your Thunder Focus Tea another charge.
- Overwhelming Force makes your single target abilities deal 15% more damage in a line in front of you.
- You gain the ability Celestial Conduit on a 1.5 min cooldown, this is a very strong cooldown for healing, you may move while channeling, and its healing and damage are increased up to 30%, for 6% per target. You can recast this ability during its duration, to have all the August Celestials assist at 200% increased effectiveness, it will do it automatically if not used before the end of the cast.
- Heart of the Jade Serpent gives you 75% reduced cooldown time on Renewing Mist, Rising Sun Kick, Life Cocoon and Thunder Focus Tea whenever you consume a total of 10 stacks of Sheilun's Gift.
- Jade Sanctuary gives 15% damage reduction whenever you cast Celestial Conduit and it lingers for 8 seconds after.
Talents
When to use this Spec
This is the default loadout going into any dungeon. You have to adjust the class talent tree based on the utility needed for the affix and dungeon combo. To make your life easier, Dungeon specific talent loadouts are available in the Dungeons section.
Gameplay Altering Talents
Discover all talents that significantly alter your gameplay within the Spec and Class Talent trees. This section gives a concise overview of these talents and their applications but for a more detailed look check out the Rotation and Deep Dive sections below.
Spec Tree
- Rising Mist
- This is the core talent for your build, it makes your Rising Sun Kick heal all allies with your Renewing Mist and Enveloping Mist and extends those effects by 4 sec, up to 100% of their original duration.
- Ancient Teachings
- The buff from casting Jadefire Stomp or Thunder Focus Tea which makes your Crackling Jade Lightning, Tiger Palm, Blackout Kick and Rising Sun Kick heal up to 5 injured allies for an additional 160% of the damage done for 15 seconds, split evenly. You also gain 5% stamina while this buff is up.
- Jade Empowerment
- Casting Thunder Focus Tea makes your next Crackling Jade Lightning deal 2500% more damage and cleave onto 4 more targets for 15% effectiveness. This synergizes very well with Jadefire Teachings to do a lot of healing.
- Awakened Jadefire
- Provides a higher chance of a reset on Jadefire Stomp, and it makes your Tiger Palm strike 2 times and give 2x stacks of Teachings of the Monastery. It also makes your Blackout Kick hit 2 additional enemies for 20% effectiveness. Additionally, it makes your Spinning Crane Kick heal 3 nearby allies for 110% of the damage done.
- Chi Harmony
- Gives your target that you cast Renewing Mist on 8 seconds of 50% healing taken increase from you, also preventing Renewing Mist from bouncing to a new target.
- Rapid Diffusion
- Rising Sun Kick and Enveloping Mist applies Renewing Mist with a 6 second duration to random ally. Giving you extra Renewing Mist for free basically, and you get a lot of them with this spec due to casting Rising Sun Kick on cooldown.
- Sheilun's Gift
- Very strong direct heal, that heals up to 5 targets, for a amount depending on how many stacks you have, with the talent Veil of Pride you will gain a stack every 4 seconds.
Class Tree
- Improved Detox
- Your Detox also dispels all Poison and Disease effects.
- Vivacious Vivification
- Making your Vivify sometimes an instant and does more healing, very good for healing when you have to dodge mechanics.
- Save Them All
- When you heal an ally lower than 35% hp, you gain a nice 10% healing increase for the next 4 seconds.
- Diffuse Magic
- A very strong 60% reduced magic damage taken defensive cooldown for 6 sec, also transfers all harmful effects on you back to the caster if possible.
Hero Talents
- Harmonic Gambit enables your vitality to be used for damage to enemies.
- Endless Draught gives you another charge of Thunder Focus Tea
Rotation
Tier Set
- 2-Set: Your healing spells have a chance to apply Insurance! to their targets that heals them over 15 sec. Insurance! is consumed if an ally drops below 40% health to heal them.
- 4-Set: Casting Renewing Mist applies Insurance! for 6 sec on the target, and is increased by up to 50% in proportion to the coverage of Renewing Mist has on you and up to 10 allies.
This set increases the value that the talent Chi Harmony brings by guaranteeing the healing increase from the talent will apply to the 4-set bonus. Making casting Renewing Mist by itself a actual decent spot heal.
Priority List
General rotation
- Apply Mystic Touch to all enemies by doing any damage to them.
- Cast Jadefire Stomp and maintain the buff.
- Cast Thunder Focus Tea and use Expel Harm or Rising Sun Kick for the Versatility buff, then cast Crackling Jade Lightning.
- Spin to win with Spinning Crane Kick if there are 4+ enemies and you can heal the damage intake with it.
- Cast Renewing Mist so you never reach 3 stacks.
- Cast Sheilun's Gift whenever there's a large amount of healing needed.
- Cast Thunder Focus Tea and use it on either Rising Sun Kick or Expel Harm for damage, or Enveloping Mist for instant cast spot heal.
- Cast Rising Sun Kick on cooldown.
- Cast Blackout Kick when you have any stacks of Teachings of the Monastery.
- Cast Tiger Palm to gain Teachings of the Monastery stacks.
- Cast Expel Harm for strong self-healing and damage.
- Cast Vivify to heal an ally and the party.
- Cast Soothing Mist if someone is in need of serious spot heal for a longer duration.
For Damage
- Cast Jadefire Stomp and maintain the buff.
- Cast Thunder Focus Tea.
- Cast Rising Sun Kick
- Cast Crackling Jade Lightning.
- Cast Blackout Kick on cooldown.
- Cast Tiger Palm.
- Cast Spinning Crane Kick if there are 4 or more enemies and Thunder Focus Tea is on cooldown.
Cooldowns
Invoke Chi-Ji, the Red Crane
- Your main healing cooldown as a Mistweaver Monk summons an effigy of Chi-Ji, that shields allies with Celestial Harmony, and your damage abilities reduce the cost and cast time of Enveloping Mist by 33% (up to 3 stacks) making it 100% free and instant cast.
- Celestial Harmony gives a shield to 5 allies, and also makes your Enveloping Mist apply an extra HoT and 10% heal increase with Enveloping Breath.
- Gift of the Celestials reduces the cooldown down to 1 min , but decreases duration to 12 sec.
- Before summoning Invoke Chi-Ji, the Red Crane you should get 4x stacks of Teachings of the Monastery. This makes your next Blackout Kick hit 5 total times for a super strong heal through Ancient Teachings and Gust of Mists.
Sheilun's Gift
- Sheilun's Gift is a powerful cooldown due to its super strong heal, you can treat this as a cooldown by itself when it's at 10 stacks, but at lower stacks it can still be powerful, especially on targets with Chi Harmony on them. If used well, this can be a lifesaver for your party in many situations.
Thunder Focus Tea
- Use Thunder Focus Tea on Rising Sun Kick for a cooldown reset, or you can also use it on Expel Harm for a heal absorb from Chi Cocoon for survivability. You can also use it on Enveloping Mist for an instant cast spot heal if necessary.
- With the talent Jade Empowerment, your Crackling Jade Lightning will do a lot of healing, especially if there are up to 5 enemies you can hit, this will deal a very high amount of healing, making it a very strong cooldown in terms of healing.
Life Cocoon
- A high absorb external, Life Cocoon, can be a lifesaver for both allies and yourself. You can use it before a high-damage event to save some personal cooldowns on your allies, or so you can entirely focus on healing the rest of the group.
Deep Dive
Spin to win or Ancient Teachings for healing?
- If you have Thunder Focus Tea ready, then cast it and right after you should cast Crackling Jade Lightning before anything, this is for both dps and healing, especially when there are multiple targets you can hit.
- If there are 7+ enemies, then spin to win with Spinning Crane Kick and Awakened Jadefire for the most healing.
- On 4-6 enemies then keep casting Spinning Crane Kick for damage, but only if you can heal through the damage intake.
- If there are 1-3 Jadefire Stomp and Ancient Concordance with Ancient Teachings is by far more healing and damage. Even with 4-6 enemies, this is generally better than Spinning Crane Kick for healing, it can depend on how much damage the tank is taking, and the pattern of damage intake.
If you can't do either of the above to sustain enough healing for your group, then you need to start using cooldowns. Activate Sheilun's Gift to top the group when health bars are going low, Invoke Chi-Ji, the Red Crane is a huge boost to your healing especially with Blackout Kick during Jadefire Stomp with the talent Ancient Concordance.
Understanding Mechanics
Rotational min-maxing is just one aspect of mastering a specialization, but there are numerous other key mechanics that influence your performance. Use the following guides to improve them.
Dungeons
← Scroll for more Dungeons →
Boss Tips
Brewmaster Aldyr
- Personal/External
- Always have a defensive active when targeted with Throw Cinderbrew.
I'pa
- General Tips
- Always dispel Burning Fermentation from players who do not have a defensive ability active first.
- Personal/External
- Always have a defensive active when targeted with Burning Fermentation.
Benk Buzzbee
- General Tips
- Focus on playing the Bee-Haw! mechanic first, if played well there is no group damage.
- Personal/External
- Always have a defensive active when Fluttering Wing happens.
Goldie Baronbottom
- Personal/External
- Ensure you have a defensive active when Let It Hail! happens.
Trash Tips
- Important abilities to interrupt in this dungeon are:
- Boiling Flames from Venture Co. Pyromaniac.
- Free Samples? from Taste Tester.
- Rejuvenating Honey from Flavor Scientist.
- Bee-stial Wrath from Bee Wrangler.
- Honey Volley from Royal Jelly Purveyor.
- Pay extra attention to these casts:
- Throw Chair from Hired Muscle.
- Reckless Delivery from Careless Hopgoblin
- Failed Batch from Flavor Scientist.
- Swarming Surprise from Venture Co. Honey Harvester.
Boss Tips
Ol' Waxbeard
- General Tips
- Position yourself close to a pillar to hide behind when the boss targets you with Reckless Charge.
- Personal/External
- Always use a defensive cooldown when targeted with Luring Candleflame.
Blazikon
- General Tips
- Make sure that you hit a candle with Wicklighter Barrage.
- Personal/External
- Always have a defensive active when Dousing Breath breath happens.
The Candle King
- General Tips
- This boss does a lot of damage, make sure your group is stacked!
- Always hit a Wax Statue with Darkflame Pickaxe, otherwise you will be overwhelmed by raw damage.
- Always instantly dispel Paranoid Mind!
- Personal/External
- Ensure to have a personal defensive active when targeted with Throw Darkflame.
The Darkness
- General Tips
- Since this boss doesn’t deal constant damage, use your mobility spells to collect candles.
- Stay stacked with your group, do not bait Shifting Anomalies ahead.
- Personal/External
- Always have a defensive active when targeted with Shadowblast.
Trash Tips
- Important abilities to interrupt in this dungeon are:
- Blazing Fiends - Explosive Flame
- Shuffling Horror - Drain Light
- Royal Wicklighter - Flashpoint
- Sootsnout - Flaming Tether
Boss Tips
Captain Dailcry
- General Tips
- Depending on your route the either Elaena Emberlanz, Sergeant Shaynemail or Taener Duelmal is up
- Interrupt Repentance from Elaena Emberlanz.
- Sergeant Shaynemail puts a strong bleed Lunging Strike.
- Taener Duelmal casts Cinderblast.
- Depending on your route the either Elaena Emberlanz, Sergeant Shaynemail or Taener Duelmal is up
- Personal/External
- Ensure you have a defensive active when targeted with Savage Mauling.
Baron Braunpyke
- General Tips
- The boss casts empowered versions of his spell when empowered by Vindictive Wrath.
- Interrupt Burning Light, it is a faster cast while empowered by Vindictive Wrath.
- Personal/External
- Use your personal defensives when soaking Sacrificial Pyre.
Prioress Murrpray
- General Tips
- Turn around at the end of Blinding Light.
- Personal/External
- Use a defensive when Blinding Light happens.
Trash Tips
- Important abilities to interrupt in this dungeon are:
- Cinderblast from Taener Duelmal.
- Fireball Volley from Risen Mage.
- Pay extra attention to these casts:
- Ardent Paladin - Sacred Toll
- Arathi Footman - Defend
Boss Tips
Kyrioss
- General Tips
- Dispel Lightning Torrent as fast as possible, if people get hit.
- Personal/External
- Rotate through your defensives while Lightning Torrent is happening.
Stormguard Gorren
- Personal/External
- Rotate your personals to mitigate damage from Chaotic Corruption.
Voidstone Monstrosity
- General Tips
- Take a central position so you can heal your entire party!
- Dispel Unleash Corruption as fast as possible.
- Personal/External
- Ensure you have a defensive active when Null Upheaval happens.
Trash Tips
- Important abilities to interrupt in this dungeon are:
- Cursed Thunderer - Lightning Bolt
- Unruly Stormrook - Energized Barrage
- Cursed Rooktender - Lightning Surge
- Void Ascendant - Feasting Void
Boss Tips
Big M.O.M.M.A.
- General Tips
- Disengage from the boss after being targeted by Sonic Boom to avoid getting hit by it.
- During the first phase always hit the Darkfuse Mechadrones as it triggers the second phase after all of them are dead.
- If you take too long to kill the Darkfuse Mechadrones Big M.O.M.M.A casts Kill-o-Block Barrier.
- Phase 2 is a burn phase, hold your cooldowns for Jumpstart it is a 200% damage increase.
Demolition Duo
- General Tips
- Kill both bosses in a similar time to avoid Divided Duo.
- Diffuse Big Bada BOOM! with Barreling Charge and Kinetic Explosive Gel.
- Personal/External
- Ensure to always have a defensive active when affected by Kinetic Explosive Gel.
Swampface
- General Tips
- Make sure there is a rule in place that determines the direction in which you and your party should always move!
- Personal/External
- Always have a defensive active when Awaken the Swamp happens.
Geezle Gigazap
- General Tips
- Preposition well to avoid kiting Leaping Sparks for a long time.
- Output Cds
- Save your healing cds for Turbo Charge as this is the time your party takes heavy damage.
- Personal/External
- Ensure to always have a defensive active when targeted with Gigazap.
Trash Tips
- Important abilities to interrupt in this dungeon are:
- Mechadrone Sniper - Trickshot
- Venture Co. Diver - Harpoon
- Disturbed Kelp - Restorative Algae
- Darkfuse Bloodwarper - Blood Blast
- Pay extra attention to these casts:
- Shreddinator 3000 - Shreddation
- Move towards the end of the cast to avoid any damage.
- Disturbed Kelp - Jettison Kelp
- Coordinate AoE stops to prevent this from happening.
- Shreddinator 3000 - Shreddation
Boss Tips
An Affront of Challengers
- General Tips
- At 100 Energy Sathel the Accursed casts Searing Death, be spread before it to avoid cleaving each other.
- Output Cds
- Use everything to maximize damage as there is low AoE damage on this boss.
- Personal/External
- Use a defensive cooldown whenever Mighty Smash happens.
Gorechop
- Output Cds
- Use everything to maximize damage as there is low AoE damage on this boss.
- Personal/External
- The Oozing Leftovers cleave with Leaping Thrash, prioritize not stacking with other people.
Xav the Unfallen
- Personal/External
- Ensure to have a defensive active whenever Might of Maldraxxus happens.
Kul'tharok
- General Tips
- Spread around the boss to avoid cleaving each other with Well of Darkness.
- Personal/External
- Rotate through your defensive arsenal whenever targeted with Well of Darkness.
Mordretha, the Endless Empress
- General Tips
- Dark Devastation targets a random player and it can overlap with Ghostly Charge, bait it towards a good direction so you can easily dodge both mechanics.
- Personal/External
- Rotate through your defensive arsenal whenever targeted with Manifest Death.
Trash Tips
- Important abilities to interrupt in this dungeon are:
- Necrotic Bolt from Battlefield Ritualist.
- Unholy Fervor from Battlefield Ritualist.
- Necrotic Bolt from Maniacal Soulbinder.
- Necrotic Bolt Volley from Maniacal Soulbinder.
- Bone Spear from Bone Magus.
- Sear Mind from Twilight Beguiler.
- Withering Discharge from Blighted Sludge-Spewer.
- Pay extra attention to these casts:
- Heavin the Breaker - Interrupting Roar
- You can LoS this cast.
- Harugia the Bloodthirsty - Bloodthirsty Charge
- You can LoS this cast.
- Portal Guardian - Soulstorm
- Make sure to dispel Shadow Vulnerability.
- Raging Bloodhorn - Raging Tantrum
- You can remove Raging Tantrum with Soothe.
- Heavin the Breaker - Interrupting Roar
Boss Tips
Tussle Tonks
- General Tips
- Kill the Platinum Pummeler and Gnomercy 4.U. at the same time to avoid Electrical Storm.
- Personal/External
- Use defensives during Ground Pound.
K.U.-J.O.
- Output Cds
- During Explosive Leap avoid hitting the Junk Bomb.
- Personal/External
- Rotate Defensives on Explosive Leap.
Machinist's Garden
- General Tips
- Fully focus on dodging Self-Trimming Hedge.
- Use Stampeding Roar during "Hidden" Flame Cannon.
- Personal/External
- Rotate through your defensive arsenal whenever targeted with Blossom Blast.
King Mechagon
- General Tips
- Throughout the fight the Plasma Orb adjust their positioning around different players on Recalibrate. Watch the arrows closely to avoid getting clipped by it.
- Personal/External
- Ensure to have a defensive active when targeted with Mega-Zap.
Trash Tips
- Important abilities to interrupt in this dungeon are:
- Bomb Tonk - Detonate
- Mechagon Tinkerer - Giga-Wallop
- Mechagon Mechanic - Tune Up
Boss Tips
Coin-Operated Crowd Pummeler
- General Tips
- Spread before Footbomb Launcher to help your team kick the Footbombs.
- Instantly dispel yourself if a Timed Detonation happens.
- Personal/External
- Always have a defensive active when the Boss casts Static Pulse.
Azerokk
- Personal/External
- Rotate through your defensive arsenal whenever the boss uses Resonant Quake.
Rixxa Fluxflame
- Personal/External
- Ensure to have a defensive active when targeted with Propellant Blast.
Morgul Razdunk
- General Tips
- Preposition in melee whenever Gatling Gun happens.
- Personal/External
- Use a defensive whenever targeted with Homing Missile.
Trash Tips
- Important abilities to interrupt in this dungeon are:
- Refreshment Vendor - Iced Spritzer
- Hired Assassin - Toxic Blades
- Venture Co. Earthshaper - Rock Lance
- Stonefury - Furious Quake
- Venture Co. Alchemist - Transmute: Enemy to Goo
- Pay extra attention to these casts:
- Hired Assassin - Fan of Knives
- Use AoE stops to prevent this.
- Mechanized Peacekeeper - Charged Shield
- Venture Co. War Machine - Charged Shot
- Hired Assassin - Fan of Knives
Affixes
The Affix system got revamped going into The War Within Season 1 retiring most Affixes as well as introducing new kiss-curse ones while also changing on which key level these appear.
- +4 Affixes -- Rotates on a weekly basis
- Xal'atath's Bargain: Ascendant
- Xal'atath's Bargain: Voidbound
- Xal'atath's Bargain: Oblivion
- Xal'atath's Bargain: Devour
- Xal'atath's Bargain: Pulsar
- +7 Affixes -- Alternates between each other on a weekly basis
- Tyrannical
- Fortified
- +10 Affixes -- Alternates between each other on a weekly basis, is always the opposite of the +7 Affix
- Tyrannical
- Fortified
- +12 Affix
- Xal'atath's Guile -- Replaces the +4 Affix
Following you get some useful tips for handling different Mythic+ Affixes as a Mistweaver Monk.
- Xal'atath's Bargain: Ascendant
- UseRing of Peace and Leg Sweep on any big stack of orbs.
- Xal'atath's Bargain: Voidbound
- You can cleave off the Void Emissary with your Blackout Kick through Jadefire Stomp and Ancient Concordance for more healing while helping to kill it.
- Xal'atath's Bargain: Oblivion
- Use Roll and soak as many orbs as possible.
- Xal'atath's Bargain: Devour
- Use Detox on cooldown whenever this is active.
Stat Priority
Understand your secondary stat priority and the tertiary stats needed for optimal performance during Mythic+ dungeons as a Mistweaver Monk. For more detailed information, visit the Stats and Attributes guide.
The conclusion here is that you want to equip the highest item level generally.
Blizzard introduced Stat DRs that you need to be aware of. To get to know what those are and why you have to care about them click here to get to our detailed stat DR resource post!
Tertiary
- Avoidance - Reduces damage taken from AoE effects.
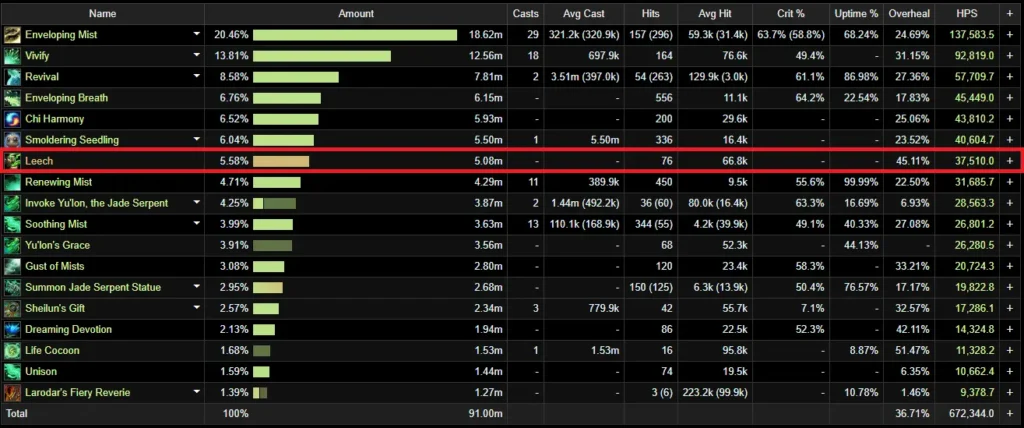
- Leech - Returns a portion of your damage and healing done as healing to you. (Excludes self healing)
- Speed - increases movement speed. (Does stack with other movement speed abilities)
The only time you should think about picking a lower item level is if it has Leech or Avoidance. Speed is nice to have, but you should generally ignore that stat.
Here is a showcase of how powerful Leech is for a Healer:
Gear
Due to the way stat weights work for Mistweaver Monks, there isn't a strict best-in-slot list. Although it is theoretically possible to obtain items with all the correct Tertiaries, doing so requires extraordinary luck or several human lifespans because of the weekly reset system in World of Warcraft.
| Slot | Item | Location |
|---|---|---|
| Head | Waterworks Filtration Mask | Operation: Floodgate |
| Neck | Semi-Charmed Amulet | Rik Reverb |
| Shoulder | Ageless Serpent's Shoulderpads | Tier/Catalyst |
| Cloak | Cloak of Questionable Intent | The MOTHERLODE!! |
| Chest | Ageless Serpent's Inked Coils | Tier/Catalyst |
| Wrist | Rune-Branded Armbands | Crafted |
| Gloves | Ageless Serpent's Handguards | Tier/Catalyst |
| Belt | Hitman's Holster | Mug´zee, Heads of Security |
| Legs | Ageless Serpent's Leggings | Tier/Catalyst |
| Boots | Dragster's Last Stride | Vexie and Geargrinders |
| Ring 1 | Bloodoath Signet | Theater of Pain |
| Ring 2 | Wick's Golden Loop | Darkflame Cleft |
| Trinket 1 | Bursting Lightshard | Priory of the Sacred Flame |
| Trinket 2 | Signet of the Priory | Priory of the Sacred Flame |
| One-Hand Weapon | Big Earner's Bludgeon | Mug´zee, Heads of Security |
| Off-Hand | Vagabond's Torch | Crafted |
Authors Note:
This list shows the best items for healing in Raids from all sources. Keep in mind that getting different tier pieces with Leech / Avoidance changes which off-piece is best for you. Likewise, any other non-trinket item with Leech / Avoidance replaces the one suggested here.
Below you are presented with a good list of farmable alternatives that are obtainable outside of WoW’s weekly lockout system. While replaced in time as you progress, these offer immediate character power.
| Slot | Item | Location |
|---|---|---|
| Head | Waterworks Filtration Mask | Operation: Floodgate |
| Neck | Strapped Rescue-Keg | Cinderbrew Meadery |
| Shoulder | Fireproof Cinderbee Perch | Cinderbrew Meadery |
| Cloak | Cloak of Questionable Intent | The MOTHERLODE!! |
| Chest | Seraphic Wraps of the Ordained | Priory of the Sacred Flame |
| Wrist | Disturbed Kelp Wraps | Operation: Floodgate |
| Gloves | Shimmering Glimclaws | Darkflame Cleft |
| Belt | Brewery Toiler's Waistband | Cinderbrew Meadery |
| Legs | Flame-Seared Leggings | Operation: Mechagon |
| Boots | Stalwart Guardian's Boots | Priory of the Sacred Flame |
| Ring 1 | Bloodoath Signet | Theater of Pain |
| Ring 2 | Wick's Golden Loop | Darkflame Cleft |
| Trinket 1 | Carved Blazikon Wax | Darkflame Cleft |
| Trinket 2 | Signet of the Priory | Priory of the Sacred Flame |
| One-Hand Weapon | Electrifying Cognitive Amplifier | Operation: Mechagon |
| Off-Hand | Deathwalker's Promise | Theater of Pain |
Trinkets
Below you can find active and passive alternatives to our recommended trinkets. Do note that some trinkets are better than others depending on the dungeon.
Active Trinket alternatives
- Gallagio Bottle Service
- On-use that heals injured allies over 4 sec and after gives you increased haste.
Passive Trinket alternatives
- Mister Pick-Me-Up
- Does a decent amount of healing, this will be better when you are still uncomfortable with the spec.
- Mug's Moxie Jug
- Strong stat stick as well, gives your spells a chance to grant you some Crit that stacks up but doesn't refresh the duration.
- Reverb Radio
- Strong stat stick, that gives you a high average of your preferred secondary stat.
Embellishments
- Darkmoon Sigil: Ascension 1x
- Gives you a random secondary stat every 8 seconds when in combat, that stacks up to 10 times.
- Writhing Armor Banding 1x
- Doubles the effect of your Darkmoon Sigil: Ascension embellishment.
Remaining Sparks
- Crafted items are 681 item level and regular items are 684 on max item level, therefore, it's not beneficial to equip crafted items outside of your 2x embellishments unless you don't have access to other high item level gear on that slot.
Consumables
- Phials
- Flask of Tempered Swiftness
- Food
- Feast of the Divine Day
- Combat Potion
- Algari Mana Potion -- Recommended
- Potion Bomb of Recovery
- Health Potion
- Algari Healing Potion
- Weapon Oil
- Algari Mana Oil
- Augment Rune
- Crystallized Augment Rune
- Sockets
- Versatile Emerald
- Elusive Blasphemite -- Unique, use one of each gem colour to enhance your Blasphemite.
- Versatile Ruby
- Versatile Onyx
- Quick Sapphire
Enchantments
| Helm | Greater Rune of the Void Ritual |
| Neck | Magnificent Jeweler's Setting 2x |
| Cloak | Enchant Cloak - Chant of Winged Grace |
| Chest | Enchant Chest - Crystalline Radiance |
| Wrist | Enchant Bracer - Chant of Armored Avoidance S.A.D. |
| Belt | S.A.D. |
| Legs | Daybreak Spellthread |
| Boots | Enchant Boots - Scout's March |
| Ring 1 | Enchant Ring - Radiant Haste Magnificent Jeweler's Setting 2x |
| Ring 2 | Enchant Ring - Radiant Haste Magnificent Jeweler's Setting 2x |
| Weapon | Enchant Weapon - Authority of Radiant Power |
You buy Nerubian Gemweaver from the Great Vault Vendor to add sockets to your Helm, Wrists and Belt.
Races
For min-maxing a Mistweaver Monk in Mythic+ Dungeons, different racial traits can provide a tremendous benefit to your characters. If this is not your top goal, picking a race that fits your style works just as well.
- Shadowmeld -- Night Elf
- Turns you invisible, any action, movement, or suffering any damage breaks this effect.
- Turns you invisible, any action, movement, or suffering any damage breaks this effect.
- Stoneform -- Dwarf
- Removes all magic, bleed, poison, and disease effects and reduces physical damage taken.
- Removes all magic, bleed, poison, and disease effects and reduces physical damage taken.
- Ancestral Call -- Mag'har Orc
- 2 minute cooldown that gives you a high amount of secondary stats.
Recommendation:
For this coming patch, Mag'har Orc is going to be a very good choice due to their racial Ancestral Call, on a 2 min cooldown, which grants you a massive amount of one secondary stat for 15 sec, now choosing one of your 2 highest secondary stats, you can treat this as a smaller cooldown by itself to enhance your output even outside of your cooldowns.
Macros
Discover recommended macros for Mistweaver Monk during Mythic+ dungeons and watch a quick video guide on creating simple macros for your character.
All spells in this Mistweaver Monk Mythic+ Guide are available as mouseover macros for your convenience!
Vivify
/cast [@mouseover, help] Vivify; VivifyEnveloping Mist
/cast [@mouseover, help] Enveloping Mist; Enveloping MistRenewing Mist
/cast [@mouseover, help] Renewing Mist; Renewing MistSoothing Mist
/cast [@mouseover, help] Soothing Mist; Soothing MistSheilun's Gift
/cast [@mouseover, help] Sheilun's Gift; Sheilun's GiftLife Cocoon
/cast [@mouseover, help] Life Cocoon; Life CocoonDetox
/cast [@mouseover, help] Detox; DetoxMakes you spinn faster with Spinning Crane Kick
#showtooltip
/cast !Spinning Crane Kick
Your Ring of Peace instantly goes off when you press the button without having to confirm click, use with caution.
#showtooltip
/cast [@cursor] Ring of Peace
Addons
Below, you see a screenshot of the author's User Interface for their Mistweaver Monk, outlining which addons are used and how they are utilized in Mythic+ Dungeons to make your life easier.
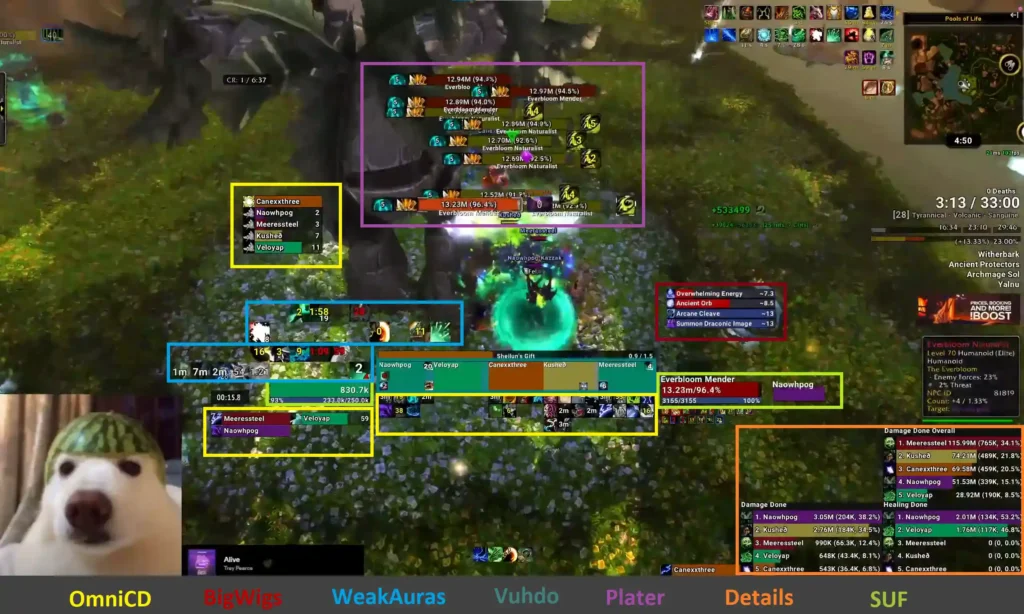
- OmniCD --- Party CD Tracker
- Addon to track your party members' Cooldowns, mandatory for Mythic+.
- Shadowed Unit Frames --- Party/Raidframe Addon
- Simplistic addon to replace your Unitframes and other UI Elements with a more clean look.
- Vuhdo --- Party/Raidframe Addon
- Addon to replace your Unitframes.
- WeakAuras --- Jack of all trades
- WeakAura allows players to create and customize graphical displays of game information. These displays, known as "auras" can show various aspects such as buffs, debuffs, cooldowns, health, and other important events.
- Plater --- Nameplate Addon
- Plater is a nameplate addon with an extraordinary amount of settings out of the box. Debuff tracking, threat coloring, support for scripting similar to WeakAuras + the WeakAuras-Companion for Mod/Script/Profile updates.
- BigWigs -- BossMods Addon
- BigWigs is a boss encounter add-on. It consists of many individual encounter scripts, or boss modules; mini add-ons that are designed to trigger alert messages, timer bars, sounds, and so forth, for one specific raid encounter.
- Details --- Damage Meter
- Shows you Damage/Healing throughout the encounter.
These WeakAuras are recommended for optimal performance in raids as a Mistweaver Monk.
Sheilun's Gift
Shows how many stacks you have and if you play Shaohao's Lessons, what buff is next.

Shaohao's Lessons
Displays the current Lessons buff you have up and the duration.

Changes this Patch
Mistweaver
- Developers’ notes: We’re making several updates to Mistweaver focused on smoothing out their healing output on varying target sizes and shifting rotational damage priority to a more intuitive space (when players should optimally use each offensive spell should be more obvious).
- New Talent: Emperor’s Favor – Sheilun’s Gift’s healing is increased by 150% and its cast time is reduced by 100%, but it now only heals a single ally.
- Dance of the Wind has been redesigned – Now reduces physical damage taken by 10% and an additional 10% every 4 seconds until you receive a physical attack.
- Jade Empowerment has been redesigned – Increases Crackling Jade Lightning’s damage by 2000% to its primary target and cleaves 4 additional enemies at 25% effectiveness.
- Yu’lon’s Whisper healing increased by 100%.
- Blackout Kick damage increased by 75%.
- Spinning Crane Kick damage increased by 30%.
- Jadefire Awakening now causes Blackout Kick to cleave 2 additional enemies at 20% effectiveness (was 70%).
- Invoke Chi-Ji, the Red Crane now causes 3 Gust of Mists per target (was 1), but only activates once per Blackout Kick and Rushing Wind Kick cast.Developers’ notes: Teachings of the Monastery Blackout Kicks will continue to function to activate additional gusts but not from their cleave damage.
- Sheilun’s Gift’s talent location has been moved up to above the final talent gate and now connects with Focused Thunder.
- Jade Bond has been redesigned – Chi Cocoons now apply Enveloping Mist for 4 seconds when they expire or are consumed, and Chi-Ji’s Gusts of Mists healing is increased by 40% (was 20%) and Yu’lon’s Soothing Breath healing is increased by 500%.Developers’ notes: These changes to Jade Bond are intended to refocus Chi-Ji into a powerful cooldown that encourages more intentional uses. We’re reducing the baseline cooldown of both Celestials to account for the loss of dynamic cooldown reduction and increasing the effectiveness of Chi Cocoons cast by longer cooldown Celestials to make intentional uses of this longer cooldown feel more immediately impactful.
- The cooldowns of Invoke Chi-Ji, the Red Crane and Invoke Yu’lon, the Jade Serpent have been reduced to base 2 minutes (was 3 minutes).
- Chi Cocoon’s absorb amount now scales with the cooldown of your celestial (now 100% more effective when not using Gift of the Celestials).
- Jade Empowerment now increases Crackling Jade Lightning’s damage by 3000% (was 2000%) and cleaves at 10% effectiveness (was 25%).
- Lotus Infusion increases healing taken by 10% (was 8%).Developers’ notes: We’re making a small adjustment to Lotus Infusion given that we’re expecting the upcoming class set to influence talent decisions around this talent node and we’d like Lotus Infusion to remain a viable, more passive option for those who prefer it.
- Yu’lon’s Whisper healing increased by 30%.
- Spinning Crane Kick damage increased by 40% (was 30%).
- Fixed an issue that caused Enveloping Mists caused by Misty Peaks or Jade Bond to cancel Celestial Conduit.
- Fixed an issue that sometimes allowed spells to be cast during Mana Tea’s channel.
- Jade Empowerment now deals 2500% (was 3000%) additional damage to its primary target and cleaves at 15% effectiveness (was 10%).
- Liberation of Undermine set bonus – Insurance! healing increased by 15%.
- Fixed an issue that caused the Liberation of Undermine 4-set bonus to sometimes increase the healing of Insurance! by more than intended.
- Mending Proliferation now prefers players.
- Conduit of the CelestialsCelestial Conduit damage increased by 225%.
- Heart of the Jade Serpent now triggers on every cast of Sheilun’s Gift and scales its duration with the number of clouds consumed.Developers’ notes: The goal for this change is to reduce the amount of tracking required to optimally use Heart of the Jade Serpent.
- Celestial Conduit damage increased by 30%.
- August Dynasty no longer has a proc cooldown (was 8 seconds).
- Master of HarmonyOverwhelming Force damage decreased to 5% (was 15%).
FAQ
A: Start using Life Cocoon as your own defensive cooldown.
A: You need to make good use of Mana Tea, and you may be casting too many Enveloping Mist.
Credits
Written By: Velo
Reviewed By: Rycn