Holy Paladin Raid Guide
Welcome to the Holy Paladin Raid guide for the World of Warcraft patch 11.1.7! This guide covers everything you need to know to understand your character! Are you starting out and leveling up from 70? Check out the leveling guide!
Overview
Hero Talents
- Herald of the Sun focuses on healing and Cooldown strength, while Lightsmith focuses on survivability and damage done.
- In a Raid environment Herald of the Sun outperforms Lightsmith in any scenario. Therefore this Guide focuses solely on the better option.
- Casting Avenging Wrath, Avenging Crusader or activating Awakening applies Dawnlight to nearby allies. While Avenging Wrath or Avenging Crusader is active you are linked with beam lines to all targets with Dawnlight healing/damaging anything crossing them.
- After using Holy Prism you can apply 2 more Dawnlight with your Holy Power spenders.
- While Dawnlight is active your Holy Power spenders are 5% stronger thanks to Gleaming Rays.
- With Solar Grace your haste is increased while Dawnlight is active. This effect stacks.
- Your core spec abilities are enhanced by the following nodes:
- Word of Glory is replaced by Eternal Flame making it even stronger with extra HoT effect on top.
- Holy Shock and Light of Dawn are empowered with:
- Luminosity that increases critical strike chance by 5%.
- Sun Sear which procs on critical strikes.
- Second Sunrise giving 15% chance to cast again at 30% effectiveness.
- Casting Holy Prism procs Divine Purpose.
- Holy Armaments rotates between Sacred Weapon and Holy Bulwark allowing you to buff both yourself and your target with current Armament.
- While wielding Sacred Weapon your spells and abilities have a chance to deal extra damage or healing.
- With Holy Bulwark up you get 15% max health absorb and an extra 2% absorb every 2 seconds.
- Divine Inspiration, Forewarning, Laying Down Arms and Valiance allow you to have higher uptime on Armaments.
- Activating Avenging Wrath summons another Sacred Weapon. While Avenging Wrath is active Sacred Weapon echoes your Holy Power spenders.
- Your active aura is 33% stronger on allies with Armaments thanks to Shared Resolve.
- While wielding an Armament the duration of Fear effects is reduced due to Fear No Evil talent.
- Few abilities are enhanced by the following nodes:
- Divine Guidance makes Consecration stronger with each Holy Power spender.
- Hammer and Anvil triggers a small burst of damage/healing around your target when Judgment critically strikes.
- Rite of Sanctification increases your armor by 5% and primary stat by extra 1% while imbued on your weapon.
Talents
When to use this Spec
This is the default loadout going into any boss unless specified otherwise. You have to adjust the class talent tree based on the utility needed for the encounter. To make your life easier, boss-specific talent loadouts are available in the Liberation of Undermine section.
Gameplay Altering Talents
Discover all talents that significantly alter your gameplay within the Spec and Class Talent trees. This section gives a concise overview of these talents and their applications but for a more detailed look check out the Rotation and Deep Dive sections below.
Spec Tree
- Beacon of Virtue or Beacon of Faith
- Beacon of Faith is the default choice as it is easier on mana and does not interfere with your rotation. Beacon of Virtue is still a very strong option and has massive throughput potential on heavy healing fights but might not be playable if the fight is too long
- Holy Prism
- On its own it is not as strong as it used to be in the last 2 seasons of Dragonflight but as Herald of the Sun it gives access to Dawnlight which makes it very important. On top of that it procs Divine Favor and Divine Purpose on use. Ideally you want to use it with Avenging Wrath or Awakening proc in order to get 2 more Sun's Avatar beams.
- Divine Favor
- Divine Favor provides big chunky Holy Lights which helps with spot healing. It procs passively now on Holy Prism cast which is a nice quality of life change.
- Awakening
- Helps a lot with Avenging Wrath uptime. Pair this with Divine Toll and Holy Prism.
- Blessing of Summer
- Going into the new expansion Blessing of Summer got reworked so that it can be used either for extra healing or damage. You use it on the strongest healer in the raid during their cooldowns to maximize its damage.
- Rising Sunlight
- Very strong talent that makes your cooldown windows even better. Watch out to not overcap your Holy Power with Holy Shock!
Class Tree
- Sanctified Plates
- A talent that makes Paladins super tanky even without a defensive cooldown up.
- Divine Toll
- The main cooldown that you want to use inside Avenging Wrath. Provides a good chunk of burst healing on short cooldown and procs Rising Sunlight.
- Divine Resonance
- This talent makes your Divine Toll windows even stronger. Watch out to not overcap Holy Power during this buff !
- Of Dusk and Dawn
- Insanely strong talent overall that makes your already strong spenders even stronger thanks to the Blessing of Dawn buff. On top of that, it makes you tankier with Blessing of Dusk up.
When to use this Spec
This Spec is mostly used to bring more passive damage to your raid group. The Spec brings weaker cooldowns that can be used more frequently while also losing some spot healing power.
Talent Adjustments
Spec Tree
- Added
- Avenging Crusader
- During Avenging Crusader your Crusader Strike and Judgment heal nearby allies.
- Crusader's Might
- With Crusader's Might talented Crusader Strike reduces cooldown of Judgment and Holy Shock by 2 seconds.
- Avenging Crusader
- Removed
- Avenging Wrath
- Inflorescence of the Sunwell
Class Tree
- Added
- Justification
- Increases damage of Judgment by 10%.
- Quickened Invocation
- Reduces cooldown of Divine Toll by 15 seconds.
- Justification
- Removed
- Touch of Light
- Quickened Invocation
Rotation
Tier Set
- 2-Set: Your healing spells have a chance to apply Insurance! to their targets that heals them over 15 seconds. Insurance! is consumed if an ally drops below 40% health to heal them.
- 4-Set: Divine Toll applies Insurance! to allies it for 8 seconds. cooldown is reduced by 1 second each time you spend Holy Power.
This set further empowers your core gameplay of building and spending Holy Power while also buffing your Divine Toll windows.
Priority List
- DO NOT overcap Holy Power. Your spenders are really strong, even if there isn't much to heal you can always use Shield of the Righteous.
- Cast Holy Shock as much as possible. It is the bread and butter of Holy Paladin.
- Spend Holy Power if at 5 Holy Power.
- Cast 1st charge of Holy Shock.
- If Divine Favor is still up spend it on Holy Light with Infusion of Light.
- Cast Holy Prism on an enemy for Aoe healing.
- Spend Infusion of Light on Flash of Light or Judgment. If mana allows and more spot healing needed on demand cast Holy Light.
- Cast 2nd charge of Holy Shock.
- Spend Holy Power.
- Cast Flash of Light if you need an immediate heal.
- Cast Judgment.
- Cast Hammer of Wrath if usable.
- Cast Crusader Strike.
- Cast Flash of Light.
- Spend Holy Power if at 5 Holy Power.
- If Divine Favor is still up spend it on Holy Light with Infusion of Light.
- Cast Holy Prism on an enemy for Aoe healing.
- During Avenging Crusader cast Judgment.
- During Avenging Crusader cast Crusader Strike.
- Cast Holy Shock.
- Cast Crusader Strike
- Spend Infusion of Light on Flash of Light or Judgment. If mana allows and more spot healing needed on demand cast Holy Light.
- Spend Holy Power.
- Cast Flash of Light if you need an immediate heal.
- Cast Judgment.
- Cast Hammer of Wrath if usable.
- Cast Flash of Light.
Cooldowns
Avenging Wrath
- An iconic paladin cooldown which now is very strong on its own thanks toHerald of the Sun. You want to pair it up with other smaller cooldowns like Divine Toll and Holy Prism to increase their power.
Divine Toll
- Your main cooldown that should be used every minute with Awakening proc and every 2 minutes with Avenging Wrath. It also procs Rising Sunlight, which makes it even burstier.
Tyr's Deliverance
- Going into TWW, Tyr's Deliverance has been nerfed significantly, making it a very weak cooldown that you only use to gain access to Relentless Inquisitor. Use it on cooldown whenever you anticipate incoming damage and then forget about it.
Aura Mastery
- Mostly used with Devotion Aura to provide one of the raid-wide damage reduction cooldowns. It's not as strong as it used to be but can still be a game changer against some mechanics. Make sure to use it proactively before damage events happen; otherwise, it might be a waste of a global cooldown.
Deep Dive
Cooldown Management
- Maximizing your Holy Paladin's potential involves properly combining your cooldowns. Thanks to Awakening talent, you should aim to never use a Divine Toll alone. When your Avenging Wrath is on cooldown, combine Divine Toll and Holy Prism with a Awakening proc. This results in very strong 2 minutes windows where you combine all cooldowns and weaker but still good 1 minute pops.
Managing Dawnlight and Sun's Avatar
- Dawnlight HoT gets applied to nearby allies preferring injured ones on activation of Avenging Wrath ( 4 HoTs ) and Awakening (1 HoT). On top of that you spread 2 extra Dawnlight HoTs with your Holy Power spenders after Holy Prism cast. During Avenging Wrath all targets with Dawnlight are linked to you creating Sun's Avatar beams that heal you, all linked allies and the ones passing through them.
- This means that you can only fully control 2 Dawnlight HoTs every time. In order to do it use Eternal Flame on allies without the HoT already, preferring players stacked with others.
- This way you can maximize the amount of Sun's Avatar beams and Dawnlight healing from radiation.
- The amount of Dawnlight targets depends on your pop:
- 2min pop + Awakening - 7 targets
- 2min pop - 6 targets
- 1min pop - 3 targets
- 30 pop - 2 targets
- You need to properly track Dawnlight on raid frames in order to not overlap it !!
- Disclaimer! Avenging Crusader applies only 2 Dawnlight HoTs.
Optimizing spenders
- Do not overthink it. Eternal Flame is almost always the best choice unless you would overheal with it. It is much easier to cover AoE healing in a raid, but a strong spot heal on someone who is low or close to dying is always going to be more valuable than Light of Dawn on random injured targets. You are in the raid to keep players alive, not to pad the meters!
Optimizing Blessing of Summer
- To get the most out of Blessing of Summer in a raid, you want to use it offensively on yourself or another healer right before cooldowns pop. This way, you get a very good amount of passive damage even while healing the raid.
- Blessing of Autumn is best used on a DPS that relies on short cooldowns to use them more often. You might also consider throwing it on yourself during a hard healing check fight to make your cooldowns cycle quicker.
- Blessing of Winter should always be used on yourself to help with mana.
- You mostly use Blessing of Spring on yourself to buff your healing, but at times it's better to buff another healer during their cooldowns as it might allow them to solo heal a certain boss mechanic.
Understanding Mechanics
Rotational min-maxing is just one aspect of mastering a specialization, but there are numerous other key mechanics that influence your performance. Use the following guides to improve them.
Liberation of Undermine
The following tips are mainly applicable to Heroic Bosses. Mythic tips will be released after our progression finishes.
← Scroll for more Bosses →
How To Use Your Healing Cooldowns
- These cooldowns were assigned with the primary goal of defeating the boss, rather than maximizing raw HPS.
Boss Tips
- Defensives
- Use Divine Protection when targeted by Incendiary Fire.
- Externals
- Use Blessing of Sacrifice if someone drops low.
- Paradox
- Other healers make better use of Spatial Paradox.
- General
- Only go into bikes at the start of phases as Exhaust Fumes becomes stronger each time.
How To Use Your Healing Cooldowns
- These cooldowns were assigned with the primary goal of defeating the boss, rather than maximizing raw HPS.
Boss Tips
- Defensives
- Use Divine Protection during Colossal Clash to survive being hit by waves.
- Externals
- Use Blessing of Sacrifice if someone drops low.
- Paradox
- Other healers make better use of it this encounter.
- General
- Use Divine Steed during Colossal Clash to make dodging waves easier.
How To Use Your Healing Cooldowns
- These cooldowns were assigned with the primary goal of defeating the boss, rather than maximizing raw HPS.
Boss Tips
- Defensives
- Use Divine Protection when targeted by Sound Cannon or during intermission.
- Externals
- Use Blessing of Sacrifice if someone drops low.
- Paradox
- Other healers make better use of it on this boss encounter.
- General
- Cast Divine Steed in intermission to reach overloaded amplifiers easier.
How To Use Your Healing Cooldowns
These cooldowns were assigned with the primary goal of defeating the boss, rather than maximizing raw HPS.
Boss Tips
- Defensives
- Rotate your defensives when Sonic Ba-Boom overlaps with Foot-Blasters at the start and at the end of each phase.
- Externals
- Use Blessing of Sacrifice on people targeted by multiple Infested Spawn without their own defensive cooldown.
- Paradox
- Other healers make better use of it on this boss encounter.
- General
- Use Divine Steed during the intermission to reach the boss quicker.
How To Use Your Healing Cooldowns
These cooldowns were assigned with the primary goal of defeating the boss, rather than maximizing raw HPS.
Boss Tips
- Defensives
- Ensure you have Divine Protection active when targeted with Incinerator.
- Externals
- Use Blessing of Sacrifice on people targeted with Incinerator.
- Paradox
- Other healers make better use of it on this boss encounter.
- General
- Make sure to use Divine Steed when targeted by Incinerator to spread quicker.
How To Use Your Healing Cooldowns
These cooldowns were assigned with the primary goal of defeating the boss, rather than maximizing raw HPS.
Boss Tips
- Defensives
- Rotate through your defensive arsenal when Foul Exhaust overlaps with another mechanic.
- Externals
- If an ally does not have any defensive cooldown of their own left use Blessing of Sacrifice on them.
- Paradox
- Other healers make better use of it on this boss encounter.
Stat Priority
Understand your secondary stat priority and the tertiary stats needed for optimal performance during Raid boss fights as a Holy Paladins. For more detailed information, visit the Stats and Attributes guide.
The Conclusion here is that you want to equip the highest item level generally.
- Blizzard introduced Stat drs, which you should be aware of. To get to know what those are and why you have to care about them click here to get to our detailed stat DR resource post!
Tertiary
- Avoidance - Reduces damage taken from AoE effects.
- Leech - Returns a portion of your damage and healing done as healing to you. (Excludes self healing)
- Speed - increases movement speed. (Does stack with other movement speed abilities)
The only time you should think about picking a lower item level is if it has Leech or Avoidance. Speed is nice to have, but you shouldn't consider this stat when choosing between two items.
- Here is a showcase of how powerful Leech is for a Healer: Breakdown of Mythic Fyrakk

Gear
Due to the way stat weights work for Holy Paladin, there isn't a strict best-in-slot list. Although it is theoretically possible to obtain items with all the correct Tertiaries, doing so requires extraordinary luck or several human lifespans because of the weekly reset system in World of Warcraft.
| Slot | Item | Location |
|---|---|---|
| Head | Aureate Sentry's Pledge | Tier/Catalyst |
| Neck | Strapped Rescue-Keg | Cinderbrew Meadery |
| Shoulder | Aureate Sentry's Roaring Will | Tier/Catalyst |
| Cloak | Consecrated Cloak | Crafting |
| Chest | Aureate Sentry's Encasement | Tier/Catalyst |
| Wrist | Everforged Vambraces | Crafting |
| Gloves | Jumpstarter's Scaffold-Scrapers | Floodgate |
| Belt | Durable Information Securing Container | Delves |
| Legs | Aureate Sentry's Legguards | Tier/Catalyst |
| Boots | Rik's Walkin' Boots | Rik |
| Ring 1 | The Jastor Diamond | Gallywix |
| Ring 2 | Miniature Roulette Wheel | One-Armed Bandit |
| Trinket 1 | Eye of Kezan | Gallywix |
| Trinket 2 | Mister Pick-Me-Up | Lockenstock Sprocket |
| 1h Weapon | Big Earner's Bludgeon | Mugzee |
| Off hand | Titan of Industry | Gallywix |
Authors Note:
This list shows the best items for healing in Raids from all sources. Keep in mind that getting different tier pieces with Leech / Avoidance changes which off-piece is best for you. Likewise, any other non-trinket item with Leech / Avoidance replaces the one suggested here.
Below you are presented with a good list of farmable alternatives that are obtainable outside of WoW’s weekly lockout system. While replaced in time as you progress, these offer immediate character power.
| Slot | Item | Location |
|---|---|---|
| Head | Apogee Inventor's Goggles | Workshop |
| Neck | Strapped Rescue-Keg | Cinderbrew Meadery |
| Shoulder | Unyielding Combatant's Pauldrons | Theater of Pain |
| Cloak | Electrician's Siphoning Filter | Floodgate |
| Chest | Muckdiver's Wading Plate | Floodgate |
| Wrist | Stonefury Vambraces | Motherlode |
| Gloves | Jumpstarter's Scaffold-Scrapers | Floodgate |
| Belt | Durable Information Securing Container | Delves |
| Legs | Galvanized Oxxein Legguards | Theater of Pain |
| Boots | Hops-Laden Greatboots | Cinderbrew Meadery |
| Ring 1 | Fleshfused Circle | Theater of Pain |
| Ring 2 | Footbomb Championship Ring | Motherlode |
| Trinket 1 | Signet of the Priory | Priory of the Sacred Flame |
| Trinket 2 | Carved Blazikon Wax | Darkflame Cleft |
| One-Hand Weapon | G3T-00t | Motherloade |
| Off-Hand | G0-4W4Y Crowd Repeller | Motherloade |
Trinkets
Below you can find active and passive alternatives to our recommended trinkets. Do note that some trinkets are better than others depending on the scenario.
Active Trinket alternatives
- House of Cards
- A strong On-Use Trinket that empowers your cooldown window.
Passive Trinket alternatives
- Reverb Radio
- Strong stat stick, that gives you high average of haste.
- Mug's Moxie Jug
- Strong stat stick that grants Crit which stacks up but does not refresh the duration.
Embellishments
- Darkmoon Sigil: Ascension
- Grants stacking secondary stats increasing with time.
- Writhing Armor Banding
- Doubles all nerubian embelishment affects.
- Dawnthread Lining
- Gives crit as long as you stay above 80% health.
Early into the season its recommended to craft a weapon with Darkmoon Sigil: Ascension as it is the biggest immediate boost to your character which will help with progress by alot. If your focus is only on raid then 2h weapon instead of 1h weapon is the most efficient crest save but it comes at a cost of not being able to use Shield of the Righteous.
Later into season you will swap to Dawnthread Lining as there are more interesting weapon choices from raid.
Remaining Sparks
- Crafted items are 675 item level and regular items are 678 on max item level, therefore, it's not beneficial to equip crafted items outside of your 2x embellishments unless you don't have access to other high item level gear on that slot.
Consumables
- Phials
- Flask of Tempered Swiftness or Flask of Tempered Mastery -- Depends on your current stats
- Food
- Feast of the Divine Day
- Combat Potion
- Algari Mana Potion -- Recommended
- Potion Bomb of Recovery
- Health Potion
- Algari Healing Potion
- Weapon Oil
- Algari Mana Oil
- Augment Rune
- Crystallized Augment Rune
- Sockets
- Deadly Onyx
- Culminating Blasphemite -- Unique, use one of each gem colour to enhance your Blasphemite.
- Masterful Ruby
- Masterful Sapphire
- Masterful Emerald
Enchantments
| Helm | S.A.D. - Greater Rune of the Void Ritual |
| Neck | Magnificent Jeweler's Setting 2x |
| Cloak | Enchant Cloak - Chant of Leeching Fangs |
| Chest | Enchant Chest - Council's Intellect |
| Wrist | Enchant Bracer - Whisper of Armored Leech S.A.D. |
| Belt | S.A.D. |
| Legs | Daybreak Spellthread |
| Boots | Enchant Boots - Scout's March |
| Ring 1 | Enchant Ring - Radiant Mastery Magnificent Jeweler's Setting 2x |
| Ring 2 | Enchant Ring - Radiant Mastery Magnificent Jeweler's Setting 2x |
| Weapon | Enchant Weapon - Authority of Fiery Resolve |
You buy Nerubian Gemweaver from the Great Vault Vendor to add sockets to your Helm, Wrists and Belt.
Races
For min-maxing a Holy Paladin in Mythic Raiding, different racial traits can provide a tremendous benefit to your characters. If this is not your top goal, picking a race that fits your style works just as well.
- Stoneform -- Dwarf
- Extra Bleed/Magic dispel comes clutch on some fights
- Arcane Torrent -- Blood Elf
- Historically aoe purge from Arcane Torrent was very strong at times
Recommendation:
It is recommended to play a Dwarf! The combination of Might of the Mountain and Stoneform makes it a very strong race overall. Extra personal dispel from Stoneform makes fights like The Silken Court way easier.
Macros
Discover recommended macros for Holy Paladin during Raid encounters and watch a quick video guide on creating simple macros for your character.
All spells in this Holy Paladin Raid guide are available as mouseover macros for your convenience!
Holy Shock
#showtooltip
/cast [@mouseover,help,nodead] Holy Shock; [harm] Holy Shock ; Holy shock
Flash of Light
/cast [@mouseover,help,nodead] Flash of Light ; Flash of LightHoly Light
/cast [@mouseover,help,nodead] Holy Light ; Holy LightWord of Glory
/cast [@mouseover,help,nodead] Word of Glory ; Word of GloryBlessing of Protection
/cast [@mouseover,help,nodead] Blessing of Protection ; Blessing of ProtectionBlessing of Freedom
/cast [@mouseover,help,nodead] Blessing of Freedom ; Blessing of FreedomBlessing of Sacrifice
/cast [@mouseover,help,nodead] Blessing of Sacrifice ; Blessing of SacrificeLay on Hands
/cast [@mouseover,help,nodead] Lay on Hands ; Lay on HandsCleanse
/cast [@mouseover,help,nodead] Cleanse ; CleanseHoly Prism
/cast [@mouseover,help,nodead] Holy Prism; [harm] Holy Prism ; Holy PrismDivine Toll
/cast [@mouseover,help,nodead] Divine Toll; [harm] Divine Toll ; Divine TollIntercession
/cast [@mouseover,help] Intercession Redemption
/cast [@mouseover,help] RedemptionBeacon of Light + Beacon of Virtue
/cast [@mouseover,help,nodead] Beacon of Light ; Beacon of Light
/cast [@mouseover,help,nodead] Beacon of Virtue ; Beacon of Virtue
Beacon of Faith
/cast [@mouseover,help,nodead] Beacon of Faith ; Beacon of FaithIf you don't want to mouseover every buff you can assign who buffs will go to before combat. Simply put the character name instead of the word person# in the macro.
#showtooltip
/use [@person4] Blessing of Autumn
/use [@person2] Blessing of Winter
/use [@person3] Blessing of Spring
/use [@person1] Blessing of Summer
With this macro, you never die when trying to use your immunity mid cast.
#showtooltip
/stopcasting
/cast Divine Shield
Sometimes you might have to cancel your immunity early.
/cancelaura Divine Shield
/cancelaura Blessing of Protection
Addons
Below, you see a screenshot of the author's User Interface for their Holy Paladin, outlining which addons are used and how they are utilized in Raids to make your life easier.
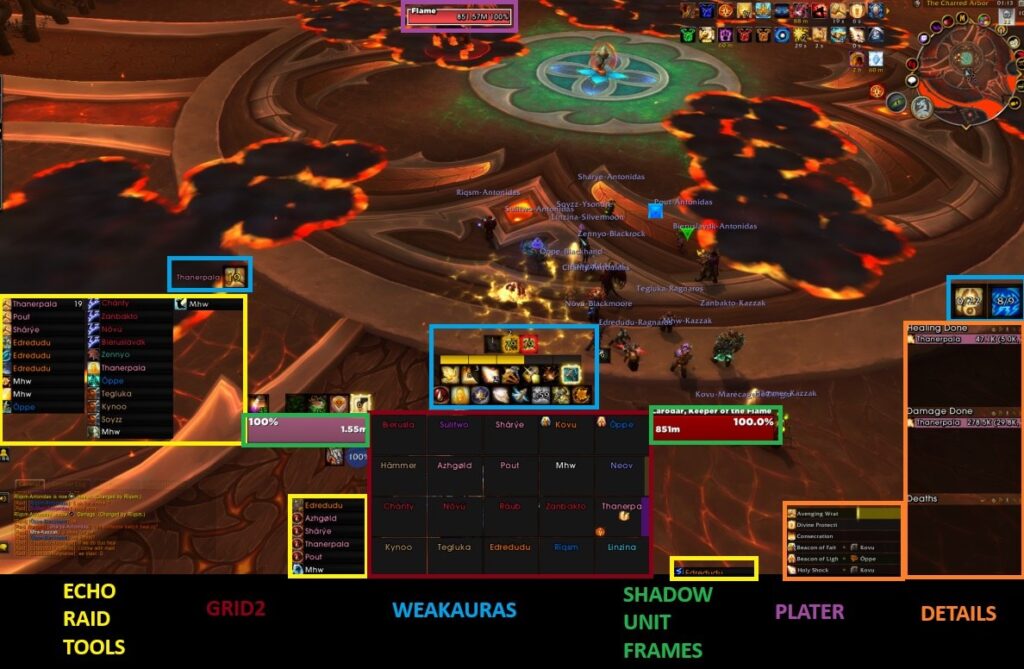
- Echo Raid Tools -- Raid CD Tracker
- Addon to track your raid members' Cooldowns
- Grid2 --- Party/Raidframe Addon
- WeakAuras -- Jack of all trades
- WeakAura allows players to create and customize graphical displays of game information. These displays, known as "auras" can show various aspects such as buffs, debuffs, cooldowns, health, and other important events.
- Shadow Unit Frames --- Player/Target/Boss frames
- Addon to replace your unit frames with a bunch of options to customize it.
- Plater -- Nameplate Addon
- Plater is a nameplate addon with an extraordinary amount of settings, out of the box debuff tracking, threat coloring, and support for scripting similar to WeakAuras + the WeakAuras-Companion for Mod/Script/Profile updates.
- Details -- Damage Meter
- Shows you Damage/Healing throughout the dungeon
These WeakAuras are recommended for optimal performance in raids as a Holy Paladin.
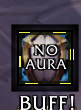
Raid buffs tracker
Shows an icon when you don't have Devotion Aura up
Changes this Patch
Paladin
- Seal of the Crusader healing reduced by 50%.
- Lightforged Blessing now heals 1% of health (was 2%).
- A Just Reward now has a more just reward, its healing increased by 140%.
- Blinding Light and Repentance now break on a damage threshold instead of breaking on any damage.
Holy
- Developers’ notes: Holy Paladin’s throughput has been below our targets so we are combining an overall buff with targeted increases to a few spells we would like to feel particularly more impactful.
- All healing increased by 3%.
- Word of Glory and Eternal Flame healing increased by an additional 20%.
- Light of Dawn healing increased by an additional 20%.
- Holy Prism AoE healing and damage increased by an additional 30%.
- Holy Prism single target healing and damage increased by an additional 50%.
- Shield of the Righteous damage increased by 30%.
- Retribution
- Final Verdict damage increased by 20%.
FAQ
A: Watch for your health when Blessing of Sacrifice is up or combine it with Divine Shield.
A: You are using Holy Light too often.
Credits
Written By: Thaner
Reviewed By: Zhatzi