Havoc Demon Hunter Mythic+ Guide
Welcome to the Havoc Demon Hunter Mythic+ guide for the World of Warcraft patch 11.1.5! This guide covers everything you need to know to understand your character! Are you starting out and leveling up from 70? Check out the leveling guide!
Overview
Hero Talents
- Aldrachi Reaver and Fel-Scarred are the new Hero Talent tree options.Aldrachi Reaver is currently significantly ahead of Fel-Scarred in both AoE and Single-Target scenarios.
- Art of the Glaive makes your Throw Glaive ability become Reaver's Glaive, an ability that is off global cooldown that allows you to to cast either one of two combinations of abilities to trigger a debuff on your current target and do additional damage
- Casting Blade Dance or Death Sweep after Reaver's Glaive into Chaos Strike or Annihilation makes you current target take 14% more damage by you for the next 20 seconds.
- Casting Chaos Strike or Annihilation first after throwing your Reaver's Glaive will make your target take 4% more damage by you for the next 20 seconds and make your next Blade Dance or Death Sweep do additional damage.
- Additional to that after casting one of these two combinations you will get the Thrill of the Fight buff, which increases your attack speed and overall damage done by 20% for the next 10 seconds
- The Fel-Scarred talent tree is generally more passive than the Aldrachi Reaver talent tree, Monster Rising it is a bit counter intuitive as on one hand, it enhances your abilities during Metamorphosis turning Eye Beam into Abyssal Gaze, Sigil of Flame into Sigil of Doom and Immolation Aura into Consuming Fire making them look fancy on your bar.
- On the other hand however the tree has talents like Monster Rising, Burning Blades and Enduring Torment that significantly increase your output out of Metamorphosis.
- Generally I would highly recommend to play this talent tree as it almost does the same damage as Aldrachi Reaver with way less effort, which allows you to focus on more important stuff than dealing damage.
- Make sure to use your Sigil of Flame, Immolation Aura and Eye Beam before using Metamorphosis as Violent Transformation resets those abilities.
Talents
Gameplay Altering Talents
Discover all talents that significantly alter your gameplay within the Spec and Class Talent trees. This section gives a concise overview of these talents and their applications but for a more detailed look check out the Rotation and Deep Dive sections below.
Spec Tree
- Essence Break
- Does massive damage in a frontal cone and amplifies the damage done by your Chaos Strike and Blade Dance on all targets hit.
- Cycle of Hatred
- Every time you cast Eye Beam the ccooldown is reduced by 5 seconds, up to 20 seconds max.
- Initiative
- Hitting a target before it hits you increases your critical strike chance by 10%, this is reset on every hostile target by casting Vengeful Retreat.
- A Fire Inside
- Grants an additional charge of Immolation Aura and gives a 30% chance of not consuming a charge when casting Immolation Aura.
- Ragefire
- Stores critical damage of your Immolation Aura and explodes them at the end of the each differentImmolation Aura duration.
Class Tree
- Darkness
- This group-wide defensive cooldown creates a zone of Darkness at the Havoc Demon Hunter's location, granting all allies within it a 15% chance to avoid all damage from incoming attacks.
- The Hunt
- This strong offensive Cooldown puts a major DoT on your target and every other target you charge through (capped at 5).
- Soul Sigils
- all your sigils spawn an additional Soul.
Hero Talents
- Art of the Glaive
- After casting Reaver's Glaive your next Chaos Strike and Blade Dance are empowered.
- Reaver's Mark
- Your next Chaos Strike applies a debuff on your current target, putting a Reaver's Mark on it which increases your damage to it by 7% or 14% if it was cast after Blade Dance.
Rotation
Tier Set
- 2-Set: Your spells and abilities have a chance to activate a Winning Strea! increasing the damage of your Blade Dance and Chaos Strike by 3% stacking up to 10 times. Blade Dance and Chaos Strike have a 15% chance to remove Winning Streak!
- 4-Set: Winning Streak! persists for 8 sec after being removed by Blade Dance or Chaos Strike.
Single-Target
Opener
- The Havoc Demon Hunter's opener is very complex and it is important that you do it in this exact order to maximize your damage output.
- The goal of this opener is to maximize your damage output in the first 30 seconds of the fight and maximizing the uptime of all your buffs.
- If there are relevant targets next to your main target this opener changes slightly, as you want to always cast Annihilation before Death Sweep in that case.
Priority List
This is a general priority you aim to maintain throughout the fight.
NOTE: ALWAYS CAST CHAOS STRIKE FIRST AFTER CASTING REAVER'S GLAIVE IN AoE SCENARIOS, UNLESS OFF TARGETS ARE NOT IMPORTANT.
!!!! MAKE SURE TO APPLY Reaver's Mark TO THE MOST IMPORTANT TARGET OF THE PACK. !!!!
- Cast Immolation Aura
- Cast Reaver's Glaive and activate Reaver's Mark on the most important target.
- Cast Eye Beam on cooldown
- Cast Vengeful Retreat on cooldown
- Cast Essence Break on cooldown
- Cast Sigil of Spite on cooldown
- Cast The Hunt on cooldown
- Cast Death Sweep
- Cast Annihilation
- Cast Blade Dance
- Cast Chaos Strike
- Cast Sigil of Flame
- Cast Felblade
- Cast Fel Rush if everything else is on cooldown and you have no fury
AoE
Opener
- Below, you see an example of how your opener looks like using the recommended AoE talent spec.
Priority List
NOTE: ALWAYS CAST CHAOS STRIKE FIRST AFTER CASTING REAVER'S GLAIVE IN AoE SCENARIOS, UNLESS OFF TARGETS ARE NOT IMPORTANT.
!!!! MAKE SURE TO APPLY Reaver's Mark TO THE MOST IMPORTANT TARGET OF THE PACK. !!!!
- Cast Immolation Aura
- Cast Reaver's Glaive and activate Reaver's Mark on the most important target.
- Cast Eye Beam on cooldown
- Cast Vengeful Retreat on cooldown
- Cast Essence Break on cooldown
- Cast Sigil of Spite on cooldown
- Cast The Hunt on cooldown
- Cast Death Sweep
- Cast Annihilation
- Cast Blade Dance
- Cast Chaos Strike
- Cast Sigil of Flame
- Cast Felblade
- Cast Fel Rush if everything else is on cooldown and you have no fury
Deep dive
Dead or Alive
The most important part of doing damage and being a useful part of your group is staying alive. With movement being a core part of your damage rotation you NEED to always be aware of your surroundings. Do not Fel Rush or Vengeful Retreat into frontal abilities or area of effect zones.
You cannot do damage while you are dead and neither can you stop abilities from going through.
Being able to execute the perfect rotation isn't going to help you if you are lying dead on the floor or if you need externals/healing that your tank would need otherwise.
Immolation Aura
Manage your Immolation Aura charges properly as it is the biggest portion of your damage breakdown in AoE scenarios. When you are about to overcap on charges but you don't have Fel Rush charges ready to spend on Inertia uptime just use your Immolation Aura charges and ignore Inertia.
Never overcap on Immolation Aura charges, no matter what!
Initiative Windows
Another important part of your damage is managing your Initiative windows properly. Remember that every single hostile enemy procs Initiative and Vengeful Retreat also resets it on EVERY hostile enemy.
You can optimize this by staying out of range of some enemies to procInitiative again later.
Haste ?!
Even though Haste Sims pretty poorly on paper, it is a great stat for multi target scenarios as it smooths your gameplay out by a lot.
Haste increases the amount of Immolation Aura charges you have as it decreases the recharge time and helps with Fury generation as well as helping you fit more abilities into your Demonic windows.
Understanding Mechanics
Rotational min-maxing is just one aspect of mastering a specialization, but there are numerous other key mechanics that influence your performance. Use the following guides to improve them.
Dungeons
← Scroll for more Dungeons →
Boss Tips
Brew Master Aldryr
- Use Blur on Throw Cinderbrew.
- Make sure to dodge out of Blazing Belch, a frontal cone of the boss.
- Use your mobility to help your group deliver the beers quickly during the intermission at 66% and 33%.
I'pa
- Use Blur on Spouting Stout.
- Use Chaos Nova to stop the Brew Drops.
Goldie Baronbottom
- Use Blur on Let It Hail! cast from the boss.
Trash Tips
- Important abilities to interrupt in this dungeon are:
- Free Samples? from Taste Tester.
- Boiling Flames from Venture Co. Pyromaniac.
- Rejuvenating Honey from Flavor Scientist.
- Failed Batch from Flavor Scientist
- Bee-stial Wrath from Bee Wrangler
- Honey Volley from Royal Jelly Purveyor.
- Pay extra attention to these casts:
- Volatile Keg from Hired Muscle
- Reckless Delivery from Careless Hopgoblin
Pre Dungeon Start
- Always use Metamorphosis and Tempered Potion before the key starts.
Boss Tips
Ol' Waxbeard
- Make sure not to stand on the rails.
- Instantly swap onto the cart when it spawns.
- If you get targeted by Reckless Charge, try to run the adds over and hit a nearby wall.
Blazikon
- Always make sure to hit a candle with Enkindling Inferno.
- If you get targeted by Wicklighter Barrage, you have to move very quickly if you are close to the boss, as the travel time is decided by the distance to the boss.
The Candle King
- If you get targeted by Darkflame Pickaxe, hide behind one of the statues.
- Use Interrupt on Paranoid Mind.
The Darkness
- Use your Interrupt on Call Darkspawn cast that spawns adds.
Trash Tips
- Important abilities to interrupt in this dungeon are:
- Mole Frenzy from Lowly Moleherd.
- Explosive Flame from Blazing Fiend.
- Flaming Tether from Sootsnout.
- Drain Light from Shuffling Horror.
Pre Dungeon Start
- Always use Metamorphosis and Tempered Potion before the key starts.
Boss Tips
Tussle Tonks
- A lot to dodge on this platform, watch out and try to keep uptime on the boss.
- If you get targetted by Maximum Thrust, try to hit the closest wall without hitting any party members.
- Make sure not to pop cooldowns when Platinum Plating is on.
K.U.-J.0.
- Spread when you get targetted by Air Drop.
- Use Blur on Explosive Leap
- During the Venting Flames cast, hide behind one of the boxes, and try to keep hitting the boss. As long as you have Hiding Behind Junk you are safe.
Machinist's Garden
- Interrupt Giga-Wallop.
- The Inconspicuous Plant shoots on the nearest target so be ready with defensives if you are taking too much damage.
King Mechagon
- Use Blur on Mega-Zap and try to stand still.
Trash Tips
- Important abilities to interrupt in this dungeon are:
- Giga-Wallop from Mechagon Tinkerer.
- Tune Up from Mechagon Mechanic.
Pre Dungeon Start
- Always use Metamorphosis and Tempered Potion before the key starts.
Boss Tips
Big M.O.M.M.A.
- Interrupt Maximum Distortion from the adds.
- Try to line up your cooldowns with Jumpstart as the boss takes 200% increased damage.
Demolition Duo
- If you get targetted by Barreling Charge, make sure to hit as many barrels at possible.
- Use your Blur to minimize the damage taken from Kinetic Explosive Gel when you are getting dispelled.
Swampface
- Make sure to coordinate with your group as to which side you are dodging towards since you will be linked with Razorchoke Vines.
- Use your Blur during Awaken the Swamp cast from the boss and dodge the Rushing Tide.
Geezle Gigazap
- When you get targetted by Leaping Sparks, make sure to guide your Spark towards the water on the floor.
- Use Blur on Giga Zap.
Trash Tips
- Important abilities to interrupt in this dungeon are:
- Trickshot from Mechadrone Sniper.
- Surveying Beam from Venture Co. Surveyor.
- Bloodthirsty Cackle from Darkfuse Hyena.
- Blood Blast from Darkfuse Bloodwarper.
- Restorative Algae from Disturbed Kelp.
- Lightning Bolt fromVenture Co. Electrician.
Pre Dungeon Start
- Always use Metamorphosis and Tempered Potion before the key starts.
Boss Tips
Captain Dailcry
- Break the shield of the add and use your interrupt the boss.
- Use your interrupt on Battle Cry.
- Make sure to dodge Hurl Spear.
Baron Braunpyke
- Use your interrupt on Burning Light.
- Use Blur on Sacrificial Pyre.
Prioress Murrpray
- Break Barrier of Light as fast as possible and interrupt the boss.
- Make sure to look away when the boss casts Blinding Light.
Trash Tips
- Important abilities to interrupt in this dungeon are:
- Cinderblast from Taener Duelmal.
- Fireball Volley from Risen Mage.
Pre Dungeon Start
- Always use Metamorphosis and Tempered Potion before the key starts.
Boss Tips
Kyrioss
- Generally you always want to be spread out during this boss.
- When the boss casts Crashing Thunder, stay away from melee to help your group spreading
Stormguard Gorren
- Make sure to dodge Crush Reality.
- During Chaotic Corruption, make sure to be close to other people to pass the debuff on, do not tacke more than one stack of it.
Voidstone Monstrosity
- Try to hit as many Voidstone Fragments as possible with Null Upheaval.
- Try to line up with cooldowns with Void Shell after you break the shield.
Trash Tips
- Important abilities to interrupt in this dungeon are:
- Lightning Bolt from Cursed Thunderer.
- Void Bolt from Void Ascendant.
Pre Dungeon Start
- Always use Metamorphosis and Tempered Potion before the key starts.
Boss Tips
Coin-Operated Crowd Pummeler
- Make sure to pop cooldowns when there is at least 2-3 stacks of Blazing Azerite on the boss.
- Spread out and kick the Footbombs into the boss as quickly as possible, you can delay the last kick a little bit to extend the buff for as long as possible.
Azerokk
- Kite the Earthragers close to the boss and be ready to swap to the one that gets Azerite Infusion.
- Use Blur on Resonant Quake.
Rixxa Fluxflame
- Make sure to clear the room with Propellant Blast.
Mogul Razdunk
- Avoid spreading Homing Missile if you are targeted.
- Avoid the rockets at all costs as they one shot. The tank should be pre-placing the boss in a safe spot.
- If you get targetted by Drill Smash, make sure you hit a Big Red Rocket.
Trash Tips
- Important abilities to interrupt in this dungeon are:
- Toxic Blades from Hired Assassin.
- Iced Spritzer from Refreshment Vendor.
- Rock Lance from Venture Co. Earthshaper.
- Furious Quake from Stonefury.
- Transmute: Enemy to Goo Venture Co. Alchemist.
Pre Dungeon Start
- Always use Metamorphosis and Tempered Potion before the key starts.
Boss Tips
An Affront of Challengers
- Make sure to dodge Decaying Breath.
- Spread out with Searing Death.
- Interrupt Necromantic Bolt.
- Use your Blur on Mighty Smash.
Xav the Unfallen
- Make sure to save all your cooldowns to never lose a duell downstairs.
Kul'tharok
- Use your Blur on Draw Soul
- Spread out with Well of Darkness.
- Interrupt Necrotic Bolt.
Gorechop
- Use your Blur on Tenderizing Smash initial hit and then move out of the circle.
- You can bait the Oozing Leftovers outside when they are close to dead so they spawn the pool outside when they die.
Mordretha, the Endless Empress
- Use your Blur on Manifest Death and spread out.
Trash Tips
- Important abilities to interrupt in this dungeon are:
- Necrotic Bolt from Battlefield Ritualist.
- Demoralizing Shout from Ancient Captain.
- Bind Soul from Shackled Soul.
- Necrotic Bolt Volley from Maniacal Soulbinder.
- Bone Spear from Bone Magus.
- Spirit Frost from Nefarious Darkspeaker.
- Withering Discharge from Blighted Sludge-Spewer.
Pre Dungeon Start
- Always use Metamorphosis and Tempered Potion before the key starts.
Affixes
The Affix system got revamped going into The War Within Season 1 retiring most Affixes as well as introducing new kiss-curse ones while also changing on which key level these appear.
- +4 Affixes -- Rotates on a weekly basis
- Xal'atath's Bargain: Ascendant
- Xal'atath's Bargain: Voidbound
- Xal'atath's Bargain: Oblivion
- Xal'atath's Bargain: Devour
- Xal'atath's Bargain: Pulsar
- +7 Affixes -- Alternates between each other on a weekly basis
- Tyrannical
- Fortified
- +10 Affixes -- Alternates between each other on a weekly basis, is always the opposite of the +7 Affix
- Tyrannical
- Fortified
- +12 Affix
- Xal'atath's Guile -- Replaces the +4 Affix
Following you get some useful tips for handling different Mythic+ Affixes as a Havoc Demon Hunter.
- Xal'atath's Bargain: Ascendant
- Chaos Nova as many orbs as possible.
- Xal'atath's Bargain: Voidbound
- The Void Emissary usually is on the tank, make sure to cleave it down or main target it if it doesnt die fast enough.
- Xal'atath's Bargain: Oblivion
- Collect all orbs that are flying into melee.
- Xal'atath's Bargain: Devour
Stat Priority
Understand your secondary stat priority and the tertiary stats needed for optimal performance during Mythic+ dungeons as a Havoc Demon Hunter. For more detailed information, visit the Stats and Attributes guide.
Higher Item level items are better in most scenarios. For an accurate representation of what item to equip you should use Simcraft! A static "Stat Priority" is just a starting point and can easily shift depending on your individual gear.
All secondary stats are affected by diminishing returns. Click here to learn more!
Tertiary
- Avoidance - Great stat to reduce the damage intake of "Area of Effect" abilities.
- Leech - Provides additional healing through damage dealing.
- Speed - Niche tertiary that can be very useful and has been proven useful in the past. Makes playing certain mechanics a lot easier.
Gear
| Slot | Item | Location |
|---|---|---|
| Head | Fel-Dealer's Visor | The One-Armed Bandit |
| Neck | Undermine Merc's Dog Tags | BoE |
| Shoulder | Fel-Dealer's Recycled Reavers | Rik Reverb |
| Cloak | Chef Chewie's Towel | Cinderbrew Meadery |
| Chest | Fel-Dealer's Soul Engine | Sprocketmonger Lockenstock |
| Wrist | Rune-Branded Armbands | Crafting |
| Gloves | Tempestwind Handlers | The Rookery |
| Belt | Hitman's Holster | Mug'Zee |
| Legs | Fel-Dealer's Fur Kilt | Stix Bunkjumper |
| Boots | Rushed Beta Launchers | Sprocketmonger Lockenstock |
| Ring 1 | The Jastor Diamond | Chrome King Gallywix |
| Ring 2 | Cyrce's Circlet | Siren Isle |
| Trinket 1 | Improvised Seaforium Pacemaker | Floodgate |
| Trinket 2 | House of Cards | One-Armed Bandit |
| Weapon | Capo's Molten Knuckles & Everforged Warglaive | Mug'Zee & Crafting |
Below you are presented with a good list of farmable alternatives that are obtainable outside of WoW’s weekly lockout system. While replaced in time as you progress, these offer immediate character power.
| Slot | Item | Location |
|---|---|---|
| Head | Helm of the Righteous Crusade | Priory of the Sacred Flame |
| Neck | Undermine Merc's Dog Tags | BoE |
| Shoulder | Extravagant Epaulets | Mechagon |
| Cloak | Chef Chewie's Towel | Cinderbrew Meadery |
| Chest | Venture Co. Plenipotentiary Vest | Motherlode |
| Wrist | Rune-Branded Armbands | Crafting |
| Gloves | Tempestwind Handlers | The Rookery |
| Belt | Gleamkeeper's Buckle | Darkflame Cleft |
| Legs | Fearless Challenger's Leggings | Theater of Pain |
| Boots | Machinist's Treasured Treads | Mechagon |
| Ring 1 | Ring of Perpetual Conflict | Theater of Pain |
| Ring 2 | Cyrce's Circlet | Siren Isle |
| Trinket 1 | Improvised Seaforium Pacemaker | Floodgate |
| Trinket 2 | Azerokk's Resonating Heart | Motherlode |
| Weapon | Everforged Warglaive & Sonic Ka-BOOM!-erang | Crafting & Floodgate |
Trinkets
Below you can find active and passive alternatives to our recommended trinkets. Do note that some trinkets are better than others depending on the mythic+ dungeon.
Active Trinket alternatives
- House of Cards
- On use mastery trinket with baseline mainstat, synergizes very well with the Havoc Demon Hunter bursty profile
- Signet of the Priory
- On use trinket with a 2minute cooldown, not quite as strong as House of Cards but easier to use as you can use it with your 2 minute cooldown every time
- Noggenfogger Ultimate Deluxe
- Very good 2 minute on use trinket for single target, however hard to get on a high item level as this is delve loot
Passive Trinket alternatives
- Improvised Seaforium Pacemaker
- Strongest passive trinket choice, gives you baseline agility and a high amount of crit with very high uptime during ur damage windows
- Eye of Kezan
- Strongest trinket for raid and / or prolonged fights, loses a high amount of value in M+ because the stacks drop rapidly when you are out of combat
- Suspicious Energy Drink
- passive trinket that procs mastery with a very high uptime
Embellishments
- 2x Dawnthread Lining
- It is a good choice if you have over 80% health most of the time and during your cooldowns.
- The optimal slots to craft on are Wrists, Boots, Waist, or Cloak depending on your available gear.
Honorable mention
- Darkmoon Sigil: Ascension
- Darkmoon Sigil: Vivacity
- Blessed Weapon Grip
Remaining Sparks
- Crafted items are 675 item level and regular items are 678 on max item level, therefore, it's not beneficial to equip crafted items outside of your 2x embellishments unless you don't have access to other high item level gear on that slot.
Simcraft
To find the best combination of gear available to you or identify the best possible upgrades, visit our Simcraft guide to learn how to utilize Simcraft easily and effectively.
Consumables
- Phials
- Flask of Alchemical Chaos -- maximum DPS.
- Flask of Tempered Versatility -- less DPS but more survivability.
- Food
- Feast of the Divine Day
- Combat Potion
- Tempered Potion
- Health Potion
- Algari Healing Potion -- a big burst of healing
- Weapon
- Algari Mana Oil
- Augment Rune
- Crystallized Augment Rune
- Sockets
- Masterful Ruby
- Culminating Blasphemite -- Unique, use one of each gem color to enhance your Culminating Blasphemite.
- Deadly Sapphire
- Deadly Emerald
- Deadly Onyx
Enchantments
| Head | S.A.D. |
| Neck | Magnificent Jeweler's Setting 2x |
| Cloak | Enchant Cloak - Chant of Winged Grace |
| Chest | Enchant Chest - Crystalline Radiance |
| Wrist | Enchant Bracer - Chant of Armored Avoidance S.A.D. |
| Waist | S.A.D. |
| Legs | Defender's Armor Kit |
| Boots | Enchant Boots - Defender's March |
| Ring 1 | Enchant Ring - Radiant Critical Strike Magnificent Jeweler's Setting 2x |
| Ring 2 | Enchant Ring - Radiant Critical Strike Magnificent Jeweler's Setting 2x |
| Weapon | 1x Enchant Weapon - Council's Guile & 1x Enchant Weapon - Stonebound Artistry |
You buy S.A.D. from the Great Vault Vendor to add sockets to your Helm, Wrists & Waist.
Races
For min-maxing a Havoc Demon Hunter in Mythic+, different racial traits can provide a tremendous benefit to your characters. If this is not your top goal, picking a race that fits your style works just as well.
- Shadowmeld -- Nightelf
- Provides nothing in Raid, but can be useful in Mythic+ in very niche situations.
- Arcane Torrent -- Bloodelf
- Removes 1 beneficial effect from hostile targets around you.
- Generates 15 Fury.
Recommendation
It does not really matter which Race you chose for Havoc Demon Hunter, as both provide about the same DPS benefits, it is however advised to go Bloodelf as Arcane Torrent might come in handy in some situations where you need a quick AoE purge and can be used to gain 15 Fury while you are out of range of any target in combat.
Macros
Discover recommended macros for Havoc Demon Hunter during Mythic+ dungeons and watch a quick video guide on creating simple macros for your character.
@Cursor Metamorphosis Macro - Uses your Metamorphosis at your cursor's location
/cast [@Cursor] Metamorphosis@Cursor Sigil of Flame Macro - Uses your Sigil of Flame at your cursor's location
/cast [@Cursor] Sigil of Flame@Cursor Sigil of Spite Macro - Uses your Sigil of Spite at your cursor's location
/cast [@Cursor] Sigil of Spite@Cursor Sigil of Misery Macro - Uses your Sigil of Misery at your cursor's location
/cast [@Cursor] Sigil of Misery@Mouseover Interrupt Macro - Interrupts your Mouseover target if you have one, Interrupts your current target if you don't have a Mouseover.
/cast [@mouseover,harm,nodead][] Disrupt@Mouseover Fel Eruption Macro - Stuns your Mouseover target if you have one, stuns your current target if you don't have a Mouseover.
/cast [@mouseover,harm,nodead][] Fel Eruption@Player Metamorphosis Macro - Uses your Metamorphosis at your current location
/cast [@Player] Metamorphosis@Player Sigil of Flame Macro - Uses your Sigil of Flame at your current location
/cast [@Player] Sigil of Flame@Player Sigil of Spite Macro - Uses your Sigil of Spite at your current location
/cast [@Player] Sigil of Spite@Player Sigil of Misery Macro - Uses your Sigil of Misery at your current location
/cast [@Player] Sigil of MiseryAddons
Below, you see a screenshot of the author's User Interface for their Havoc Demon Hunter, outlining which addons are used and how they are utilized in Mythic+ to make your life easier.
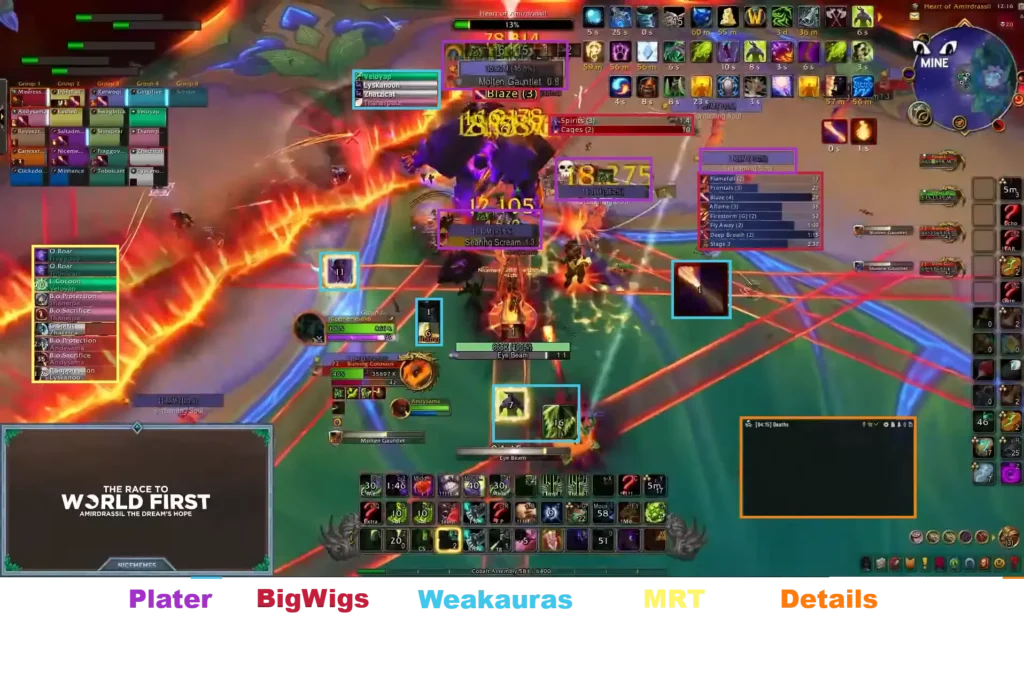
- MRT -- Notes, Raid cooldowns, and more
- Helpful addon for Raiders, especially for Raid leaders and officers.
- BigWigs -- Generic Boss Mod
- BigWigs is a boss encounter add-on. It consists of many individual encounter scripts, or boss modules; mini add-ons that are designed to trigger alert messages, timer bars, sounds, and so forth, for one specific Raid encounter.
- WeakAuras -- Jack of all trades
- WeakAuras is a powerful and flexible framework that allows the display of highly customizable graphics on World of Warcraft's user interface to indicate buffs, debuffs, and other relevant information. This addon was created to be a lightweight replacement for Power Auras but has since introduced more functionalities while remaining efficient and easy to use.
- Plater -- Advanced Nameplates
- Plater is a nameplate addon with an extraordinary amount of settings, out of the box debuff tracking, threat coloring, and support for scripting similar to WeakAuras and wago.io + the WeakAuras-Companion for Mod/Script/Profile updates.
- Details -- In-depth Damage Meter
- Most powerful, reliable, handsome, damage meter.
Immolation Aura + Ragefire tracker
Shows you your Immolation Aura uptime to position properly for the Ragefire pop.

Unbound Chaos tracker
Shows you the time you have to Fel Rush before your Unbound Chaos buff runs out.
Changes this Patch
DEMON HUNTER
- Lost in Darkness has been redesigned – Spectral Sight has 5 second reduced cooldown and no longer reduces movement speed.
- Spectral Sight has been reworked:
- No longer removed upon taking an action.
- No longer removed when taking damage.
- Now removed by loss-of-control effects.
- Now Magic-dispelled.
- Movement penalty reduced to 20% (was 30%).
- Immolation Aura damage increased by 6%.
- The Hunt damage increased by 8%.
- Sigil of Spite damage increased by 8%.
- Sigil of Flame damage increased by 6%.
- Imprison now breaks based on a small damage threshold instead of any damage.
- Activating Vengeful Retreat now enforces a brief cooldown for Felblade, similar to its behavior with Fel Rush.
- Activating Felblade shortly after activating Vengeful Retreat will now cancel Vengeful Retreat’s movement if Felblade’s target is too close to dash to it.
- Hero Talents
- Aldrachi Reaver
- Wounded Quarry has been updated – Expose weaknesses in the target of your Reaver's Mark, causing your Physical damage to any enemy to also deal 20% of the damage dealt to your marked target as Chaos, and sometimes shatter a Lesser Soul Fragment.
- Developers' notes: We are mostly happy with Wounded Quarry's new effect in Undermine(d), but the soul generation component of its previous effect was important to the pacing of Aldrachi Reaver's gameplay and mechanics. In order to match the overall intended gameplay we are updating the damage effect to have a chance to generate a Lesser Soul Fragment.
- Fixed an issue where Wounded Quarry damage was not scaling with some damage multipliers.
- Fixed an issue where several abilities were double-dipping on Thrill of the Fight’s ability damage bonus.
- Fixed an issue causing Wounded Quarry to double-dip with Thrill of the Fight's damage bonus and Mastery: Demonic Presence.
- Fixed an issue causing Reaver's Glaive to double-dip with Thrill of the Fight.
- Wounded Quarry has been updated – Expose weaknesses in the target of your Reaver's Mark, causing your Physical damage to any enemy to also deal 20% of the damage dealt to your marked target as Chaos, and sometimes shatter a Lesser Soul Fragment.
- Fel-Scarred
- Demonsurge damage increased by 65% and now deals reduced damage beyond 8 targets.
- Flamebound now increases Immolation Aura critical damage bonus by 50% (was 25%).
- Student of Suffering bonus Mastery value reduced by 33% and duration reduced to 6 seconds (was 8 seconds).
- Aldrachi Reaver
- Havoc
- New Talent: Screaming Brutality – Blade Dance automatically triggers Throw Glaive on your primary target for 100% damage and each slash has a 50% chance to Throw Glaive an enemy for 35% damage.
- Momentum renamed Exergy and has been updated – The Hunt and Vengeful Retreat increase your damage by 5% for 20 seconds.
- Inertia has been updated – The Hunt and Vengeful Retreat cause your next Fel Rush or Felblade to empower you, increasing damage by 18% for 5 seconds.
- Unbound Chaos has been updated – The Hunt and Vengeful Retreat cause your next Fel Rush or Felblade to deal 500% increased damage.
- Cycle of Hatred has been redesigned – Eye Beam reduces the cooldown of your next Eye Beam by 2.5/5 seconds, stacking up to 10/20 seconds.
- Cycle of Hatred additional aura stacks generated now persist until the Demon Hunter has been out of combat for 60 seconds without casting Eye Beam.
- Mastery: Demonic Presence effectiveness increased by 25%.
- All ability damage increased by 5%.
- Blade Dance damage increased by 33% (does not affect Death Sweep).
- Immolation Aura damage increased by 12%.
- Soulscar damage reduced to 80% of your Throw Glaive (was 100%).
- A Fire Inside now also causes your Immolation Aura to deal Chaos damage instead of Fire, in addition to its existing effects.
- Fixed an issue that caused Demon Hide to apply an inflated bonus for Immolation Aura, Sigil of Flame, The Hunt, Sigil of Spite, and Burning Wound.
- Exergy and Inertia choice node has swapped locations with Unbound Chaos.
- Cycle of Hatred is now a 1-point talent (was 2).
- Any Means Necessary has been removed.
- Fel-Scarred
- Enduring Torment now increases Blade Dance and Chaos Strike damage while not in Demon Form by 15% (was 10%).
- Burning Blades now deals 50% of listed ability damage over 6 seconds (was 35%).
- Demonsurge now causes Metamorphosis to increase Fury generated by Demon Blades by 3 (was 5).
- Flamebound radius bonus now also affects Ragefire.
FAQ
A: It is almost never worth holding your Eye Beam for specific points unless you hold it for less than 3-4 seconds. You are better off just using your Eye Beam, Essence Break and Vengeful Retreat on cooldown.
Credits
Written By: Nicememes
Reviewed By: Kush