Fury Warrior Raid Guide
Welcome to the Fury Warrior Raid guide for the World of Warcraft patch 11.1.5! This guide covers everything you need to know to understand your character! Are you starting out and leveling up from 70? Check out the leveling guide!
Overview
Hero Talents
- Slayer is significantly stronger on single target, and Mountain Thane is significantly stronger in AoE. Single target damage is generally more important in raids, and so it is more often played, although both Slayer and Mountain Thane are great options.
- Slayer's Dominance
- Your attacks have a chance to trigger Slayer's Strike which does damage and applies Marked for Execution.
- Unrelenting Onslaught
- Consuming Marked for Execution reduces the cooldown of Bladestorm.
- You can use Storm Bolt while channeling Bladestorm because of this talent, and since Storm Bolt does some damage it is a DPS increase.
- Overwhelming Blades
- Consuming Marked for Execution, getting a Reap the Storm proc or using Bladestorm applies Overwhelmed.
- Imminent Demise
- Increases the amount of Sudden Death you get.
- The effect to accelerate your Bladestorm is incredibly powerful;
- Normally as a Fury Warrior Bladestorm strikes 5 times, an increase to 8 strikes is a 60% increase in strikes and damage.
- Popular talent Unhinged would normally have 2 automatic Bloodthirsts, but with these additional Bladestorm strikes you instead do 4 automatic Bloodthirsts, a 100% increase.
- Fierce Followthrough
- With the Bloodcraze talent your Bloodthirsts and Bloodbaths are often critical strikes and benefit greatly from this hero talent.
- Reap the Storm
- Greatly increases the value of Bloodthirst in AoE situations.
- Lightning Strikes
- Your Lightning Strikes deal a significant part of your damage, and have a chance to proc Burst of Power.
- Burst of Power
- A low chance on Lightning Strikes to get a significant Bloodthirst buff, and temporarily remove the cooldown of the ability.
- Crashing Thunder
- Thunder Clap is with this trait a significantly stronger way to apply Improved Whirlwind and enable cleave, compared to Whirlwind.
- With Thunder Clap being so strong, you barely lose single-target damage while cleaving, which is something Slayer struggles with in comparison to Mountain Thane.
- Thunder Blast
- Transforms your Thunder Clap into Thunder Blast, dealing Stormstrike damage that ignores armor.
- Has a chance to proc from Bloodthirst.
- Avatar of the Storm
- A reliable way to get Thunder Blast.
Talents
When to use this Spec
Use this spec for single target damage. You can switch Anger Management and Reckless Abandon, they are very close in damage.
Gameplay Altering Talents
Discover all talents that significantly alter your gameplay within the Spec and Class Talent trees. This section gives a concise overview of these talents and their applications but for a more detailed look check out the Rotation and Deep Dive sections below.
Spec Tree
- Bladestorm
- When paired with Unhinged it is a strong cooldown for both single-target and AoE. These automatic Bloodthirst from Unhinged can proc hero talent Reap the Storm to further buff your burst.
- Bloodcraze
- Stacking critical strike chance for Bloodthirst that has great synergy with Cold Steel, Hot Blood.
Class Tree
- Thunderous Roar
- A significant cooldown for AoE.
- Avatar
- Your primary big DPS cooldown to plan around.
When to use this Spec
Use this spec if you need to do anything more than just single-target damage. This talent setup does not sacrifice much single-target damage, less than 3%, in order to get significant cleave damage. There are many variations of cleave builds that sacrifice slightly more single-target damage in order to get slightly more cleave, you can consider this a starting point and feel free to experiment.
Talent Adjustments
Listing all the changes within the Class and Spec tree compared to the default build.
Spec Tree
- Added
- Improved Whirlwind
- Meat Cleaver
- Removed
- Unbridled Ferocity
- Deft Experience
When to use this Spec
Use this spec if you need to do significant AoE or cleave damage, especially consistent damage and not just burst.
Talent Adjustments
Listing all the changes within the Class and Spec tree compared to the default build.
Spec Tree
- Added
- Improved Whirlwind
- Meat Cleaver
- Ravager
- Critical Thinking
- Powerful Enrage
- Removed
- Ashen Juggernaut
- Sudden Death
- Bladestorm
- Deft Experience
- Frenzied Enrage
Class Tree
- Added
- Barbaric Training
- Seismic Reverberation
- Thunder Clap
- Crackling Thunder
- Removed
- Sidearm
- Second Wind
- Pain and Gain
- Shockwave
Hero Tree
- Switched from Slayer to Mountain Thane.
Rotation
Tier Set
- The War Within Season 2 (2pc): Your abilities have a chance to start a Winning Streak! increasing the damage of Rampage by 2%, stacking up to 10 times.
- The War Within Season 2 (4pc): When you gain a stack of Winning Streak! you have an even chance to either cause your next Bloodthirst to deal 15% increased damage and have 25% increased chance to critically strike or cause your next Raging Blow to deal 15% increased damage and generate 2 additional Rage.
Single-Target
Opener Rotation
- The opener 3 abilities are best used in a macro like this:
/cast Recklessness
/cast Avatar
/cast Charge
Priority List
This is a general priority you aim to maintain throughout the fight.
- Use Rampage if Enrage is not up or is running out within a global cooldown.
- Use Execute if you have any of the following:
- 3x Marked for Execution.
- 2x Sudden Death.
- Sudden Death buff is running out.
- Any amount of Marked for Execution is up and Overwhelmed is running out or not at 10 stacks.
- The target is below 20%, Sudden Death is active and you do not have 3x Imminent Demise yet.
- Use Bloodthirst if it has at least an 85% chance to critical strike.
- Use Rampage if you have 5 stacks of Slaughtering Strikes.
- Use Raging Blow if you have Brutal Finish up.
- Use Rampage if you are playing Anger Management and are at risk of rage-capping. (Recklessness active or 90%+ on rage bar)
- Use Raging Blow if you have 2 charges ready.
- Use Bloodthirst if the target is below 35% health.
- Use Raging Blow.
- Use Rampage.
- Use Execute.
- Use Bloodthirst.
- Use Slam.
Opener Rotation
- You can open with a Ravager from range before you charge in, but be aware that it puts you in combat so you don't pre-place it, only put it when the boss has been pulled. You can also use Ravager in melee after getting Enrage.
- The opener 3 abilities are best used in a macro like this:
/cast Recklessness
/cast Avatar
/cast Charge
Priority List
This is a general priority you aim to maintain throughout the fight.
- Use Rampage if Enrage is not up or is running out within a global cooldown.
- Use Thunder Blast if you have 2 stacks available.
- Use Bloodthirst if it has at least an 85% chance to critical strike.
- Use Rampage if you are playing Anger Management and are at risk of rage-capping. (Recklessness active or 90%+ on rage bar)
- Use Raging Blow if you have 2 charges ready.
- Use Thunder Blast.
- Use Bloodthirst if the target is below 35% health.
- Use Raging Blow.
- Use Rampage.
- Use Execute.
- Use Bloodthirst.
- Use Thunder Clap.
- Use Whirlwind.
Multi Target
Opener Rotation
- The Multi Target opener can be done in the same way as the single target opener.
- The opener 3 abilities are best used in a macro like this:
/cast Recklessness
/cast Avatar
/cast Charge
Priority List
This is a general priority you aim to maintain throughout the fight.
- Use Whirlwind when needed to enable your cleave through Improved Whirlwind.
- Use Rampage if Enrage is not up or is running out within a global cooldown.
- Use Execute if you have any of the following:
- 3x Marked for Execution.
- 2x Sudden Death.
- Sudden Death buff is running out.
- Any amount of Marked for Execution is up and Overwhelmed is running out or not at 10 stacks.
- The target is below 20%, Sudden Death is active and you do not have 3x Imminent Demise yet.
- Use Bloodthirst on cooldown. --- Reap the Storm is very powerful in Cleave and AoE situations.
- Use Raging Blow if you have Brutal Finish up.
- Use Rampage if you are playing Anger Management and are at risk of rage-capping. (Recklessness active or 90%+ on rage bar)
- Use Raging Blow.
- Use Rampage.
- Use Execute.
- Use Whirlwind .
Opener Rotation
- The Multi Target opener can be done in the same way as the single target opener.
- You can open with a Ravager from range before you charge in, but be aware that it puts you in combat so you don't pre-place it, only put it when the boss has been pulled. You can also use Ravager in melee after getting Enrage.
- The opener 3 abilities are best used in a macro like this:
/cast Recklessness
/cast Avatar
/cast Charge
Priority List
This is a general priority you aim to maintain throughout the fight.
- Use Thunder Blast or Thunder Clap to enable Improved Whirlwind.
- Use Rampage if Enrage is not up or is running out within a global cooldown.
- Use Bloodthirst if it has at least an 85% chance to critical strike.
- Use Rampage if you are playing Anger Management and are at risk of rage-capping. (Recklessness active or 90%+ on rage bar)
- Use Raging Blow if you have 2 charges ready.
- Use Bloodthirst if the targets are below 35% health.
- Use Raging Blow.
- Use Rampage.
- Use Execute.
- Use Bloodthirst.
- Use Thunder Clap.
- Use Whirlwind.
Deep Dive
Cooldown Usage for Slayer Fury Warrior
- As a priority list:
- Use Thunderous Roar on cooldown.
- Use Recklessness on cooldown.
- Use Avatar on cooldown.
- Use Bladestorm if Avatar is active or has more than 10 seconds remaining cooldown.
Single-Target
- During your cooldowns you have access to the empowered versions of Bloodthirst and Raging Blow.
- These abilities are used in just the same way as the not empowered versions, with a couple of exceptions:
- You prefer Bloodbath over Rampage unless you need to get Enrage.
- Bloodbath is a higher priority than Crushing Blow if the target is below 35%.
Multi-Target
- As a priority list:
- Use Thunderous Roar on cooldown.
- Use Recklessness on cooldown.
- Use Avatar on cooldown.
- Use Bladestorm if any of these apply:
- Recklessness has more than 25 seconds remaining cooldown.
- and/or
- You have 3 Imminent Demise stacks.
- and/or
- You have Recklessness and Avatar active.
- Recklessness has more than 25 seconds remaining cooldown.
Single-Target
Multi-Target
Cooldown Usage for Mountain Thane Fury Warrior
- As a priority list:
- Use Thunderous Roar on cooldown.
- Use Ravager on cooldown.
- Use Recklessness on cooldown.
- Use Avatar on cooldown.
Single-Target
- During your cooldowns you have access to the empowered versions of Bloodthirst and Raging Blow.
- These abilities are used in just the same way as the not empowered versions, with a couple of exceptions:
- You prefer Bloodbath over Rampage unless you need to get Enrage.
- Bloodbath is a higher priority than Crushing Blow if the target is below 35%.
Multi-Target
- As a priority list:
- Use Thunderous Roar on cooldown.
- Use Ravager on cooldown.
- Use Recklessness on cooldown.
- Use Avatar on cooldown.
Single-Target
Multi-Target
Delay Rampage
- You delay Rampage in your rotation, it is only the highest priority when it is needed to enable Enrage.
- Several abilities deal higher damage than Rampage, and are a higher priority even if you are rage-capping.
- When you are not at risk of hitting the rage cap, it is beneficial to collect more rage and spend Raging Blow charges, since this should reduce the amount of Slams to cast over time.
- If you play Anger Management, there is a great value in spending rage itself, in order to get higher uptime of your cooldowns. You can still delay Rampage, but not if you risk hitting the rage-cap.
Understanding Mechanics
Rotational min-maxing is just one aspect of mastering a specialization, but there are numerous other key mechanics that influence your performance. Use the following guides to improve them.
Liberation of Undermine
← Scroll for more Bosses →
Offensive Cooldown Usage
- Use cooldowns on pull, and then hold future uses for Mechanical Breakdown, like shown on the timeline below.
Defensive Cooldown Usage
- Use Spell Reflection to reduce damage taken when affected by Bomb Voyage!.
Offensive Cooldown Usage
- The first Colossal Clash happens a bit too early to line up with your cooldowns well. If you use Avatar with 10 seconds left of the pull timer, you waste half of it but then have your Avatar for every Colossal Clash.
Defensive Cooldown Usage
- The timing between Scrapbomb can be a bit close to have Spell Reflection ready for all of them, but if you pre-use Spell Reflection so that the end of it covers the bomb you can have it ready for all.
Boss Tips
- The Colossal Clash can be very dangerous and it is also the best time to use DPS cooldowns since you can attack 2 targets. It might be best to save your defensive cooldown also to save yourself when you get hit by Fiery Wave.
Offensive Cooldown Usage
- You can use Avatar twice in the first and third phase, and once in the second phase.
Defensive Cooldown Usage
- Use defensives if targeted by Sound Cannon.
Offensive Cooldown Usage
- The timeline below shows a good way to use Avatar if you are trying to do damage to the Adds.
Defensive Cooldown Usage
- You can cover every single Incineration with Spell Reflection.
Boss Tips
- When targeted by Rolling Rubbish you can Heroic Leap out and get some distance to the boss, making it easier to find a good path of garbage to pick up.
Offensive Cooldown Usage
- Be careful to not use your cooldowns just before Beta Launch.
Defensive Cooldown Usage
- Use defensive cooldowns when there is an overlap of Sonic Ba-Boom and Foot-Blasters exploding.
Offensive Cooldown Usage
- Try to use your cooldowns either with Spin To Win! or with the bombs that spawn after, and not use cooldowns on a single target unless you can't delay without losing a use.
Defensive Cooldown Usage
- Foul Exhaust can be dangerous if overlapped with other damage such as Electric Blast. Be ready to use a defensive cooldown to cover it.
Boss Tips
- Stay close to the Pay-Line to get High Roller!.
Boss Tips
- While there is some 2-target cleave on this fight, most of the time those adds that you can cleave, Volunteer Rocketeer and Mk.II Electro Shocker, are trivial from a DPS perspective, since if the boss is next to them they will just die from mostly passive cleave from other classes, therefore we use the single-target build. This maximizes the actually useful damage that you deal in this fight.
Boss Tips
- Try to have Bladestorm ready for add spawns.
- It can be difficult to know when to save Bladestorm and when to use it on single-target, since there is unpredictable cooldown reduction.
- In general hold Bladestorm if adds are spawning in less than 25 seconds. Get used to looking at BigWigs timers, or practice the fight a lot so that you don't need to.
- It can be difficult to know when to save Bladestorm and when to use it on single-target, since there is unpredictable cooldown reduction.
- A lot of ground effects you can not Heroic Leap over, which is a bit unusual.
- The boss hitbox is huge, so you are often able to attack even when it feels like you shouldn't be able to.
- Interrupt Static Zap, and if it's targeting you and going through use Spell Reflection to deflect the stun.
Stat Priority
Understand your stat priority and the tertiary stats needed for optimal performance during Raid boss fights as a Fury Warrior. For more detailed information, visit the Stats and Attributes guide.
Higher Item level items are better in most scenarios. For an accurate representation of what item to equip you should use Simcraft! A static "Stat Priority" is just a starting point and can easily shift depending on your individual gear.
- All secondary stats are affected by diminishing returns. Click here to learn more!
Tertiary
- Avoidance - Great stat to reduce the damage intake of "Area of Effect" abilities.
- Leech - Provides additional healing through damage dealing. The damage of your pets does not heal you thus Leech is a great tertiary for you since most of your damage is coming from your own spells.
- Speed - Niche tertiary that can be very useful and has been proven useful in the past. Makes playing certain mechanics a lot easier.
Gear
| Slot | Item | Location |
|---|---|---|
| Head | Enforcer's Backalley Faceshield | The One-Armed Bandit / Catalyst |
| Neck | Strapped Rescue-Keg | Cinderbrew Meadery / The Great Vault |
| Shoulder | Enforcer's Backalley Shoulderplates | Rik Reverb / Catalyst |
| Cloak | Consecrated Cloak | Tailoring |
| Chest | Enforcer's Backalley Vestplate | Sprocketmonger Lockenstock / Catalyst |
| Wrist | Everforged Vambraces | Blacksmithing |
| Gloves | Enforcer's Backalley Crushers | Cauldron of Carnage / Catalyst |
| Belt | Automatic Waist Tightener | Operation: Mechagon / The Great Vault |
| Legs | Thunder-Clad Legguards | The Rookery / The Great Vault |
| Boots | Enforcer's Backalley Stompers | Catalyst |
| Ring 1 | The Jastor Diamond | Chrome King Gallywix |
| Ring 2 | Miniature Roulette Wheel | The One-Armed Bandit |
| Trinket 1 | Mister Lock-N-Stalk | Sprocketmonger Lockenstock |
| Trinket 2 | Eye of Kezan | Chrome King Gallywix |
| Weapon | Best-in-Slots | The One-Armed Bandit |
| Weapon Off-Hand | Capital Punisher | Chrome King Gallywix |
Below you are presented with a good list of farmable alternatives that are obtainable outside of WoW’s weekly lockout system. While replaced in time as you progress, these offer immediate character power.
| Slot | Item | Location |
|---|---|---|
| Head | Apogee Inventor's Goggles | Operation: Mechagon |
| Neck | Strapped Rescue-Keg | Cinderbrew Meadery |
| Shoulder | Foam-Ridden Pauldrons | Cinderbrew Meadery |
| Cloak | Electrician's Siphoning Filter | Operation: Floodgate |
| Chest | Muckdiver's Wading Plate | Operation: Floodgate |
| Wrist | Stonefury Vambraces | The MOTHERLODE!! |
| Gloves | Power-Assisted Vicegrips | The MOTHERLODE!! |
| Belt | Lightning-Conductor's Bands | The Rookery |
| Legs | Thunder-Clad Legguards | The Rookery |
| Boots | Devoted Plate Walkers | Priory of the Sacred Flame |
| Ring 1 | Footbomb Championship Ring | The MOTHERLODE!! |
| Ring 2 | Cyrce's Circlet | The Siren Isle |
| Trinket 1 | Signet of the Priory | Priory of the Sacred Flame |
| Trinket 2 | Improvised Seaforium Pacemaker | Operation: Floodgate |
| Weapon | Electro-Arm Bludgeoner | The MOTHERLODE!! |
| Weapon Off-Hand | Electro-Arm Bludgeoner | The MOTHERLODE!! |
Trinkets
Below you can find active and passive alternatives to our recommended trinkets. Do note that some trinkets are better than others depending on the raid boss.
Active Trinket alternatives
- House of Cards
- The best active trinket, which is BiS in many situations when you need burst damage.
- Funhouse Lens
- A good alternative from delves.
Passive Trinket alternatives
- Mechano-Core Amplifier
- Excellent trinket but can be hard to farm since delves have such a big loot pool.
- Mister Lock-N-Stalk
- Excells in single-target encounters.
- Eye of Kezan
- By far the best trinket for progress raiding. Loses a lot of value compared to other trinkets in quick farm kills.
Embellishments
- 2x Duskthread Lining
- BiS is crafted on Wrist and Cloak.
or
- 2x Dawnthread Lining
- BiS is crafted on Wrist and Cloak.
Which one is best depends on your stats, but generally Duskthread Lining is slightly better.
Remaining Sparks
- Crafted items are 681 item level and regular items are 684 on max item level, therefore, it's not beneficial to equip crafted items outside of your 2x embellishments unless you don't have access to other high item level gear on that slot.
Simcraft
To find the best combination of gear available to you or identify the best possible upgrades, visit our Simcraft guide to learn how to utilize Simcraft easily and effectively.
Consumables
- Phials
- Flask of Alchemical Chaos
- Food
- Feast of the Divine Day -- Primary stat food is the best option if you have low item level gear.
- Feast of the Midnight Masquerade -- Primary stat food is the best option if you have low item level gear.
- Beledar's Bounty -- With high item level gear secondaries start to become competitive with or superior to Strength.
- Combat Potion
- Tempered Potion
- Health Potion
- Algari Healing Potion
- Weapon Temporary Enchant
- Algari Mana Oil
- Augment Rune
- Crystallized Augment Rune
- Sockets
- Quick Onyx
- Culminating Blasphemite -- Unique, use one of each gem color to enhance your Culminating Blasphemite.
- Masterful Emerald
- Masterful Ruby
- Masterful Sapphire
Enchantments
| Head | S.A.D. Greater Rune of the Void Ritual |
| Neck | Magnificent Jeweler's Setting 2x |
| Cloak | Enchant Cloak - Chant of Winged Grace |
| Chest | Enchant Chest - Crystalline Radiance |
| Wrist | Enchant Bracer - Chant of Armored Avoidance S.A.D. |
| Waist | S.A.D. |
| Legs | Defender's Armor Kit |
| Boots | Enchant Boots - Scout's March |
| Ring 1 | Enchant Ring - Radiant Mastery Magnificent Jeweler's Setting 2x |
| Ring 2 | Enchant Ring - Radiant Mastery Magnificent Jeweler's Setting 2x |
| Weapon | Enchant Weapon - Authority of the Depths |
| Weapon Off-Hand | Enchant Weapon - Authority of the Depths |
You buy S.A.D. from the Great Vault Vendor to add sockets to your Helm, Wrists & Waist.
Races
For min-maxing a Fury Warrior in raiding, different racial traits can provide a tremendous benefit to your character. If this is not your top goal, picking a race that fits your style works just as well.
- Escape Artist -- Gnome
- Root and Snare dispel.
- Shadowmeld -- Night Elf
- Drop combat in order to avoid spells being targeted at you.
- Stoneform -- Dwarf
- Removes all Poison, Disease, Curse, Magic, and Bleed simultaneously.
- Arcane Torrent -- Blood Elf
- Dispels 1 beneficial effect from all nearby enemies at the same time.
- Spatial Rift -- Void Elf
- Activate to spawn a shadow traveling in the direction you are facing. Activate again to teleport to it.
- Maximum range of 100 yards.
Recommendation
If you prioritize the highest DPS then you should go with the best simming racial, but if your priority is in progression raiding then you should consider the the utility of different racials. For example: The Stoneform racial made Dwarf the best pick for Fyrakk the Blazing in the Race to World First Amirdrassil, the Dream's Hope.
Macros
Discover recommended macros for Fury Warriors during Raid encounters and watch a quick video guide on creating simple macros for your character.
Bladestorm and Ravager Macro --- If you have Ravager talented then you use Ravager on your cursor, if not then you Bladestorm.
/cast [known:228920,@cursor] Ravager; BladestormThunderous Roar and Champion's Spear Macro --- If you have both abilities talented then Champion's Spear is prioritized, and if you have Champion's Spear talented it is cast on your cursor.
/cast [known:376079,@cursor] Champion's Spear; Thunderous RoarHeroic Leap Macro --- Leap on your cursor without the extra mouse click.
/cast [@cursor] Heroic LeapExecute Macro --- If your mouse is over an enemy then Execute it, otherwise Execute your target. This macro is useful to Execute a nearby low HP mob while still targeting the boss.
/cast [@mouseover, harm, nodead][harm,nodead] ExecuteCharge Macro --- Charge your target, unless your mouse is over another enemy, then it targets that enemy and uses Charge.
/target [@mouseover, harm, nodead]
/cast ChargeDefensive Stance and Berserker Stance Macro --- With this you can swap stances while using only 1 keybind.
/cast [stance:2] Defensive Stance; stance[:3] Berserker StanceAddons
Below, you see a screenshot of the author's User Interface for their Fury Warrior, outlining which addons are used and how they are utilized in Raids to make your life easier.
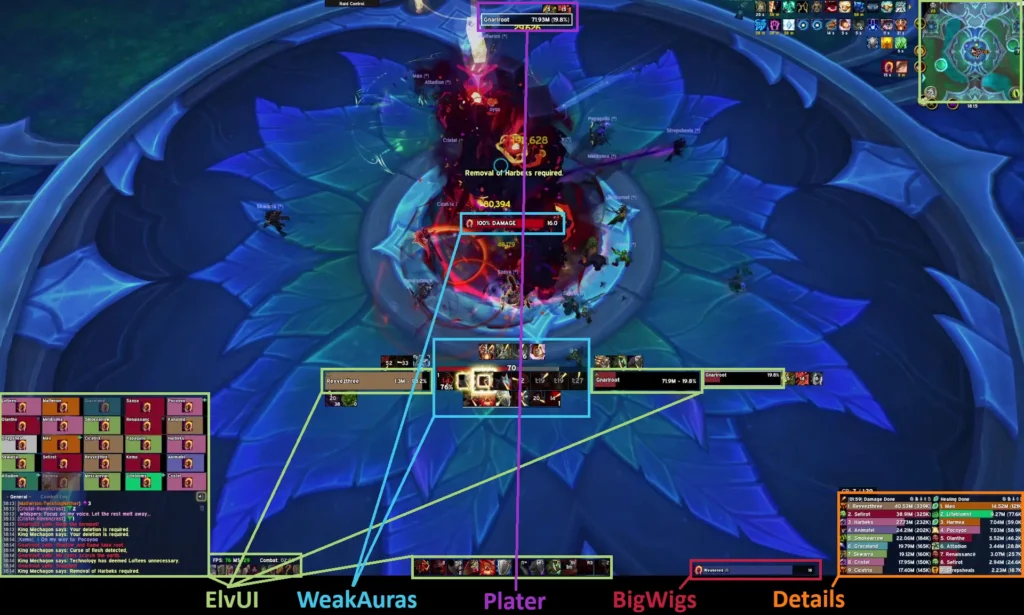
- MRT -- Notes, Raid cooldowns, and more
- Helpful addon for Raiders, especially for Raid leaders and officers.
- ElvUI -- Full User Interface replacement
- A user interface designed around user-friendliness with extra features that are not included in the standard UI.
- Alternatively, you can also use Shadowed Unit Frames (SUF) and an action bar addon of your choice or of course the stock UI.
- BigWigs -- Generic Boss Mod
- BigWigs is a boss encounter add-on. It consists of many individual encounter scripts, or boss modules; mini add-ons that are designed to trigger alert messages, timer bars, sounds, and so forth, for one specific Raid encounter.
- WeakAuras -- Jack of all trades
- WeakAuras is a powerful and flexible framework that allows the display of highly customizable graphics on World of Warcraft's user interface to indicate buffs, debuffs, and other relevant information. This addon was created to be a lightweight replacement for Power Auras but has since introduced more functionalities while remaining efficient and easy to use.
- Plater -- Advanced Nameplates
- Plater is a nameplate addon with an extraordinary amount of settings, out of the box debuff tracking, threat coloring, and support for scripting similar to WeakAuras and wago.io + the WeakAuras-Companion for Mod/Script/Profile updates.
- Details -- In-depth Damage Meter
- Most powerful, reliable, handsome, damage meter.
You can find a lot of WeakAuras made for raiding and Fury Warriors at wago.io.
Bloodthirst Crit Chance
Shows your current critical strike chance with Bloodthirst. Useful when playing with Bloodcraze.

Changes this Patch
Warrior
There were no Fury Warrior changes in the 11.1.5 patch.
Warrior
- Developers' notes: We feel that Warriors are in a good place overall, however, there are a few places we'd like to make improvements to each spec, and to the class as a whole. Warrior survivability in particular has been a weak point, and Endurance Training competing against powerful throughput nodes in the bottom of the Warrior tree makes it difficult to talent into. We’re combining Endurance Training and Reinforced Plates to put the choice in the second tier, which has more choice against other utility and survival nodes and thus be easier to spend points on. The Weapon Specialization nodes have been increased to 2 points to keep the tree structure and overall talent build costs similar, and the nodes have been rearranged slightly to make the choice about how to access Avatar more distinct for each spec.
- Reinforced Plates is now a 2-point talent that grants 5% Stamina and 5% Armor per point.
- Overwhelming Rage is now a 1-point talent that increases maximum Rage by 30.
- Two-Handed Weapon Specialization (Arms) is now a 2-point talent that grants 3% damage and 2% reduction of damage from area-of-effect attacks while wielding a 2-hand weapon per point.
- Dual Wield Specialization (Fury) is now a 2-point talent that grants 3% damage and 2% movement speed while dual-wielding per point.
- One-Handed Weapon Specialization (Protection) is now a 2-point talent that grants 3% damage and 2% Leech per point.
- Thunderous Words increases your Bleed damage by 20% on affected targets (was 30%).
- Cruel Strikes, Wild Strikes, and the Weapon Specialization nodes have changed positions in the tree.
- Endurance Training has been removed.
Fury
- Developers' notes: Fury is overall in a place we are happy with, and we're taking this opportunity to redesign some talents to keep their effects unique and powerful.
- Titan’s Torment has been redesigned – While Avatar is active Rampage's Rage cost is reduced by 20 and Bloodthirst's cooldown is reduced by 1.5 seconds.
- Developers' notes: We want to provide a new option for Avatar to impact Fury's rotation, and let you make the best use of your Avatar duration with more Rampages and Bloodthirsts. This change will also allow us to maintain Odyn’s Fury as a powerful and signature Fury ability independent of Avatar.
- Reckless Abandon has been redesigned – Activating Recklessness generates 50 Rage and while Recklessness is active, Raging Blow and Bloodthirst are replaced by Crushing Blow and Bloodbath.Crushing Blow – A powerful dual-weapon strike that deals 20% increased Critical Strike damage.
- Bloodbath – A powerful attack that applies a Bleed to the target that is extended by its full duration when reapplied.
- Developers' notes: Reckless Abandon has been having an outsized impact on rotations and we’d like to bring the focus of the talent back to Recklessness as well as make Crushing Blow and Bloodbath abilities with unique additional effects.
- All ability damage reduced by 5%.
- Bloodthirst damage increased by 38%.
- Bloodbath instant damage increased by 38%.
- Raging Blow damage increased by 44%.
- Crushing Blow damage increased by 44%.
- Rampage damage increased by 44%.
- Odyn's Fury damage increased by 15%.
- Onslaught damage increased by 30%.
- Whirlwind damage increased by 30%.
Mountain Thane
- Thunder Blast damage increased by 25%.
- Strength of the Mountain increases Bloodthirst and Rampage damage by 25% (was 30%).
Slayer
- Imminent Demise and Death Drive now correctly require the Sudden Death talent to be taken to function.
- Developers' notes: This was an oversight during implementation. Slayers are expected to talent into Sudden Death.
Warrior
- Thunderous Roar now deals reduced damage beyond 5 targets (was 8).
- Champion's Spear icon has been updated.
Slayer
- Overwhelmed now stacks up to 10 times (was 12).
Fury
- Raging Blow damage increased by 25%
- Developer's note: This change does not affect Reckless Abandon's Crushing Blow.
- Bloodthirst damage increased by 30%.
- Developer's note: This change does not affect Reckless Abandon's Bloodbath.
- Developer’s note: Currently Reckless Abandon is outperforming Anger Management in all situations, so we’re bringing them closer in power by bringing up Raging Blow and Bloodthirst’s base damage, which will also improve Fury’s baseline single-target damage.
- Crushing Force now increases Bloodthirst critical strike damage by 5/10% (was critical strike chance by 2/4%).
- Odyn's Fury now deals reduced damage beyond 5 targets (was 8).
Warrior
- Shield Slam damage increased by 8%.
- Pain and Gain now heals for 2% of your max health (was 3.5%).
Fury
- Invigorating Fury now heals for 10% of maximum health (was 15%).
Warrior
- All talent trees have had many talents move locations or have had their pathing updated.
- Honed Reflexes has been redesigned – Cooldown of Die by the Sword, Enraged Regeneration, Shield Wall, Pummel, Intervene, Spell Reflection, and Storm Bolt reduced by 5%.
- Second Wind gains an additional effect – While you are below 35% health, restores 1.0% health every 1 second. The amount restored increases the closer you are to death (max 2%).
- Berserker Rage is now learned at level 12.
- Slam damage increased by 130%. Arms Slam damage bonus reduced to 50% (was 75%).
- Bladestorm damage increased by 70%.
- Ravager damage decreased by 10%.
- Sudden Death can now stack 2 times.
- Thunder Clap Rage cost reduced to 20 (was 30) and now applies Rend by default if it is known.
- Frothing Berserker now refunds 10% Rage for Arms and Fury, and 25% Rage for Protection.
- Shockwave no longer generates Rage on cast.
- Champion's Spear generates 10 Rage on cast (was 20).
- Thunderous Roar no longer generates Rage on cast.
- Thunderous Roar now deals reduced damage beyond 8 targets. The tooltip will reflect this change in a future update.
- Thunderous Words now causes Thunderous Roar’s Bleed effect to increase damage targets take from all the Warrior’s bleed effects, rather than passively increasing it all the time.
- Odyn's Fury now deals reduced damage beyond 8 targets. The tooltip will reflect this change in a future update.
- Uproar now reduces the cooldown of Thunderous Roar by 45 seconds (was 30 seconds).
- Champion's Might now causes you to deal 25% increased critical strike damage to targets chained to your Spear.
- Piercing Challenge now increases all damage dealt by Champion's Spear (was only initial damage).
- The visual for Shockwave will now properly match its radius, both with and without the Rumbling Earth talent. Impact visual has also been updated.
- The visual for Thunderous Roar has been adjusted.
- Fixed an issue that caused Rallying Cry to increase maximum health by 15% instead of the intended 10%.
- The following talents have been removed:
- Titanic Throw
- Sonic Boom
- Blood and Thunder
Fury
- New Talent: Powerful Enrage: Enrage increases the damage your abilities deal by an additional 15% and Enrage's duration is increased by 1 second. On a choice node with Frenzied Enrage.
- Hurricane replaced with Unhinged – Every other time Bladestorm or Ravager deal damage, you cast a Bloodthirst at your target or a nearby enemy.
- Fury Warriors now learn Defensive Stance by default.
- All ability damage increased by 49%.
- Rampage damage increased by 26%.
- Bloodthirst damage increased by 29%.
- Odyn's Fury damage increased by 33%.
- Raging Blow damage increased by 10%.
- Improved Raging Blow’s chance for Raging Blow to reset its own cooldown increased to 25% (was 20%).
- Reckless Abandon now buffs your next Bloodthirst and Raging Blow.
- Reckless Abandon's Bloodbath damage reduced by 26% and Crushing Blow damage reduced by 3%.
- Deft Experience now causes Bloodthirst to extend your Enrage effect by 0.5/1.0 sec if you are Enraged.
- Swift Strikes now also increases Bloodthirst’s Rage generated by 1.0/2.0 Rage.
- Crushing Force now increases the damage of Bloodthirst by 10/20% and critical strike chance of Bloodthirst by 2/4%.
- Slam's Rage cost removed.
- Wrath and Fury now increases the chance for Improved Raging Blow to reset Raging Blow's cooldown by 10% while Enraged.
- Deft Experience no longer reduces Bloodthirst's cooldown, instead it now increases Bloodthirst's chance to trigger Enrage by 2% per point.
- Tenderize no longer increases the duration of Enrage.
- Bloodcraze now triggers from Raging Blow instead of Bloodthirst.
- Bladestorm now generates 10 Rage per damage event for Fury (20 with Storm of Steel).
- Bladestorm is now a choice node with Ravager. All existing Ravager sub-talents have been updated to work with both Ravager and Bladestorm.
- Unbridled Ferocity no longer triggers from Onslaught and its chance to trigger is reduced to 6% (was 20%).
- Berserker's Torment tooltip updated with detailed information. No functional changes.
- Titan's Torment tooltip updated with detailed information. No functional changes.
- The following talents have been removed:
- Frenzied Flurry has been removed, its effects have been added to Single-Minded Fury.
- Raging Armaments
- Annihilator
- Storm of Swords
FAQ
A: There is luck involved in having high uptime of Recklessness, but it is also likely you are not using Recklessness, Avatar or Rampage aggressively enough. Do not generally hold on to cooldowns, and keep spending rage for Anger Management.
Credits
Written By: Revvez
Reviewed By: Clickz